warning light AUDI A4 2016 Service Manual
[x] Cancel search | Manufacturer: AUDI, Model Year: 2016, Model line: A4, Model: AUDI A4 2016Pages: 278, PDF Size: 70.26 MB
Page 87 of 278
.... N
0
""' CX)
engine can only be star ted with the se lector in
these positions .
!I Is the key in the v ehicle?
This message appears if the master key is re
moved from the vehicle with the engine run ning .
If the maste r key is no longer in the veh icle, you
cannot swi tch on the ignition after stopping the
engine and yo u also cannot start the engine
again. Moreover, you cannot lock the vehicle
from the outside with the key .
Shift to P otherwise vehicle can roll away . Door s
do not lo ck if l ever i s not in
P.
This message appears fo r safety reasons a long
with a warning signal. It appears if the selec to r
l eve r fo r th e automatic transmission is not in the
P posit ion when switching off the ignition . M ove
the selector leve r to the P position, otherwise the
ve hicle is not secured against rolling away. You
also cannot lock the vehicle using the locking button* on the door handle or using the remote
key.
Con venien ce key d efectiv e! Use ignition lo ck
This message appea rs if the engine mus t be
s t arted or stopped us ing t he igni tion key and no t
the
! START ENGINE STOPI button .
Electromechanical
parking brake
Operation
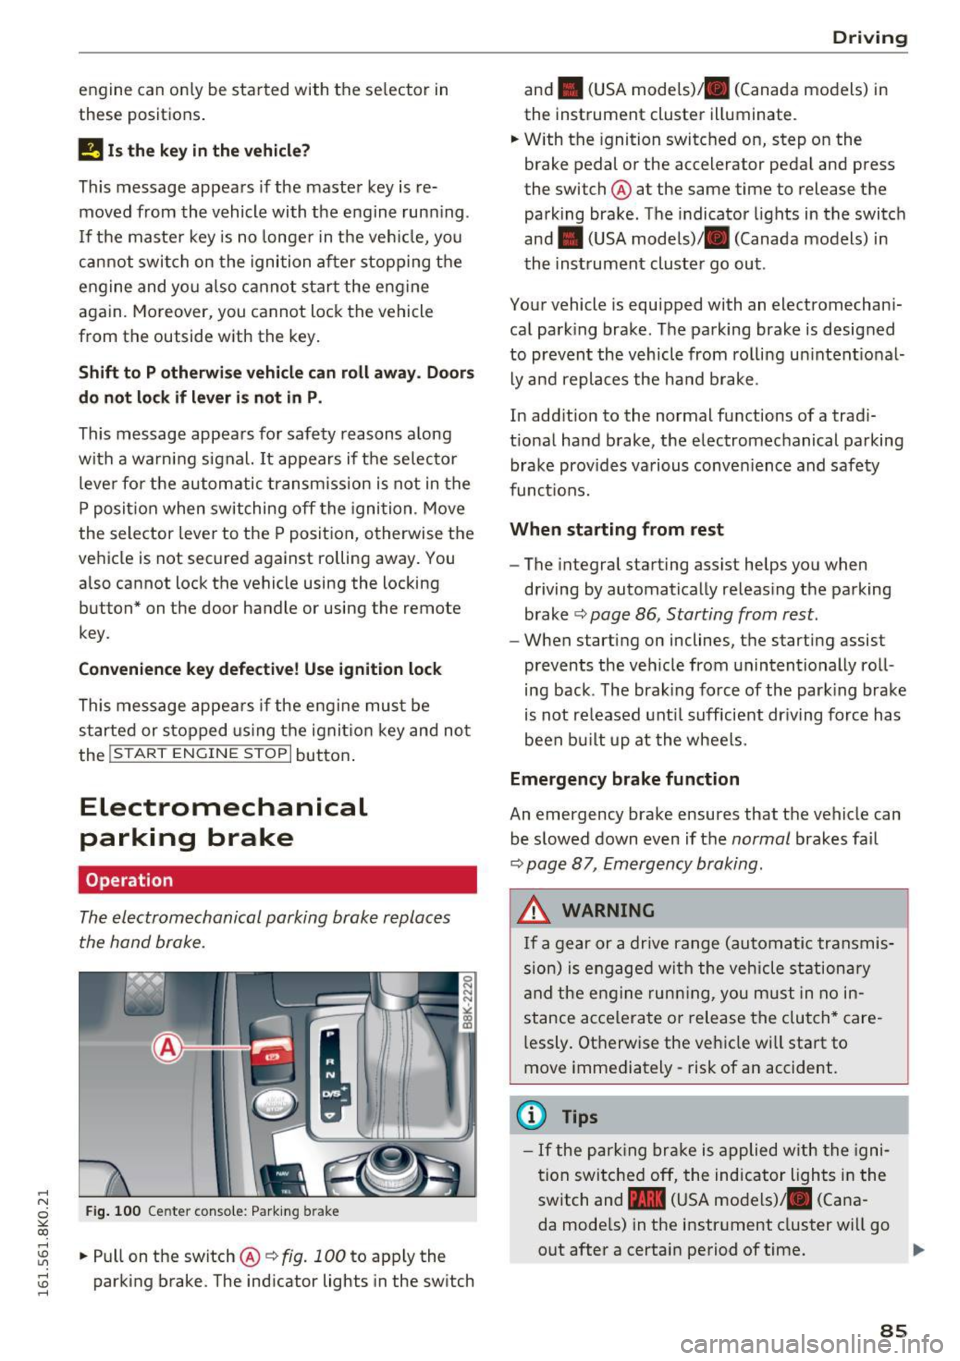
The electromechanical parking brake replaces
the hand brake.
Fig . 100 Ce nter conso le: Park ing b rake
....
~ .. Pull on the switch@~ fig. 100 to apply the
~ parking brake. The ind icator lights in the sw itch ....
D rivi ng
and . (USA mode ls)/ . (Canada models) in
the instrument cluster illuminate.
.. W ith the ignition switc hed on, step on the
brake pedal or the accelerator pedal and press
the switch @ at the same time to release the
parking brake . The indicator lights in the switch
and . (USA models)/ . (Canada models) in
the instrument cluster go out .
Your vehicle is equipped with an electromechani
cal park ing brake. The parking brake is designed
to prevent the vehicle from rolling un intent ional
ly and replaces the ha nd b rake .
In add ition to the normal functions of a trad i
t ional ha nd brake, the electromechanical parking
brake prov ides va rious conven ience and safety
funct ions.
When starting from rest
- The integral starting assist helps you when
driving by automatically releas ing the parking
brake ~
page 86 , Starting from rest.
- When start ing on inclines, the starting assist
prevents the veh icle from unintentionally roll
ing back . T he brak ing force of the park ing brake
is not re leased unt il sufficient dr iving force has
been bu ilt up at the whee ls.
Emergency brake function
An emergency brake ensures that the veh icle can
be slowed down even if the
normal brakes fa il
~ page 8 7, Emergency braking .
A WARNING
If a gear or a drive range (automatic transmis
s ion) is engaged wi th the vehicle stationa ry
a nd the engine runn ing, you must in no in
stance acce lera te or release the clutch* care
l essly. Otherwise the vehicle wi ll sta rt to
move immediately- risk of an accident.
(1) Tips
- If the pa rk ing br ake is a pplied with the igni
tion swi tche d off, the indicator lights i n the
switch and -(USA models) . (Cana
da mode ls) in the instr ument cluster wi ll go
out after a certain period of time .
85
Page 91 of 278
-For reasons of safety, cruise control should
not be used in the city, in stop-and-go traf
fic, on twisting roads and when road condi
t ions are poor (such as ice, fog, gravel,
heavy ra in and hydroplan ing) -risk of acci
dent .
- Turn
off the cruise control temporar ily when
enter ing turn lanes, h ighway exit lanes o r in
construction zones.
- Please note that inadvertently "rest ing"
your foot on the accelerator pedal causes
the cruise control not to brake. This is be
cause the cruise cont rol is overridden by the
dr iver's acceleration.
- If a brake system ma lf u nction such as over
heating occu rs when the c ruise contro l sys
tem is switched on, the braking function in
the system may be switched
off . The other
cruise contro l functions remain active as
long as the indicator light
[lj;(i )~i~ (US mod
els)/ .. (Canadian models) is on .
(D Tips
-Vehicles with manual transmission: You can
attain the set speed only if the gear that is
currently engaged will allow it, or if it does
not tax the engine and allows it to run
smooth ly. Therefore sh ift into a higher or
lower gear in a timely ma nner.
- The brake lights illuminate as soon as the
brakes apply automatically .
Changing speed
.,. To inc rease/decrease the speed in increments,
tap the lever in the
0 10 direction r:!> page 88,
fig. 102.
.,. To inc rease/decrease the speed qu ickly , ho ld
the leve r in the
0 10 direction until the de
si red speed is displayed .
You can a lso press the accelerator pedal down to
increase yo ur speed, e.g. if you want to pass
someone . The speed you saved earlier wi ll re -
,.... sume as soon as you let
off of the acce lerator N
~ pedal.
co
I f, however, you exceed your saved speed by
6 mph
( 1 0 km/h) for longer than 5 minutes, the
D riv ing
cruise contro l wi ll be turned off temporarily. The
green symbol in the display turns white. The
saved speed remains t he same.
Presetting your speed
You can preset your desired speed while the vehi
cle is not moving.
.,. Switch on the ign ition.
.,. Pull lever into position
(D r:!> page 88, fig . 102.
.,. Press the lever in the 0 or 0 direction to in-
crease or decrease your speed.
.,. Release the lever to save that speed.
This function makes it possible, for example, to save the speed you want before driving on the
highway . Once on the highway, activate the
cruise contro l by pull ing the lever toward
(D .
Switching off
Temporar y de acti vation
.,. Press the brake pedal, or
.,. Manual transmission: Keep the clutch pedal
pressed down
longer, or
.,. Press the lever into position @ (not clicked into
place)
~ page 88, fig. 102, or
.,. Dr ive fo r longer than 5 m inutes a t more than
6 mph (1 0 km/h) above the s to red speed.
Switching off completely
.,. Press lever into posit ion @ (clicked into p lace),
or
.,. Switch the ignit ion
off .
T he speed you saved will be retained if the cruise
control has been switched off temporarily . To re
s u me the saved speed , let up on the bra ke or
cl utch pedal and pull the lever to position
(D .
Switch ing the ignition off erases the saved speed .
A WARNING
--
You should only return to the saved speed if it
i s not too fast for the current t raffic condi
tions -ris k of an accident!
89
Page 93 of 278
,....,
N
0
""' CX) ,....,
I.Cl U"I ,....,
I.Cl ,....,
tiptronic transmission
In the tiptron ic tr ansmission, power is transfer
red by a torque converter.
Selector lever positions
Applies to vehicles: with multitronic/S tronic/tiptronic
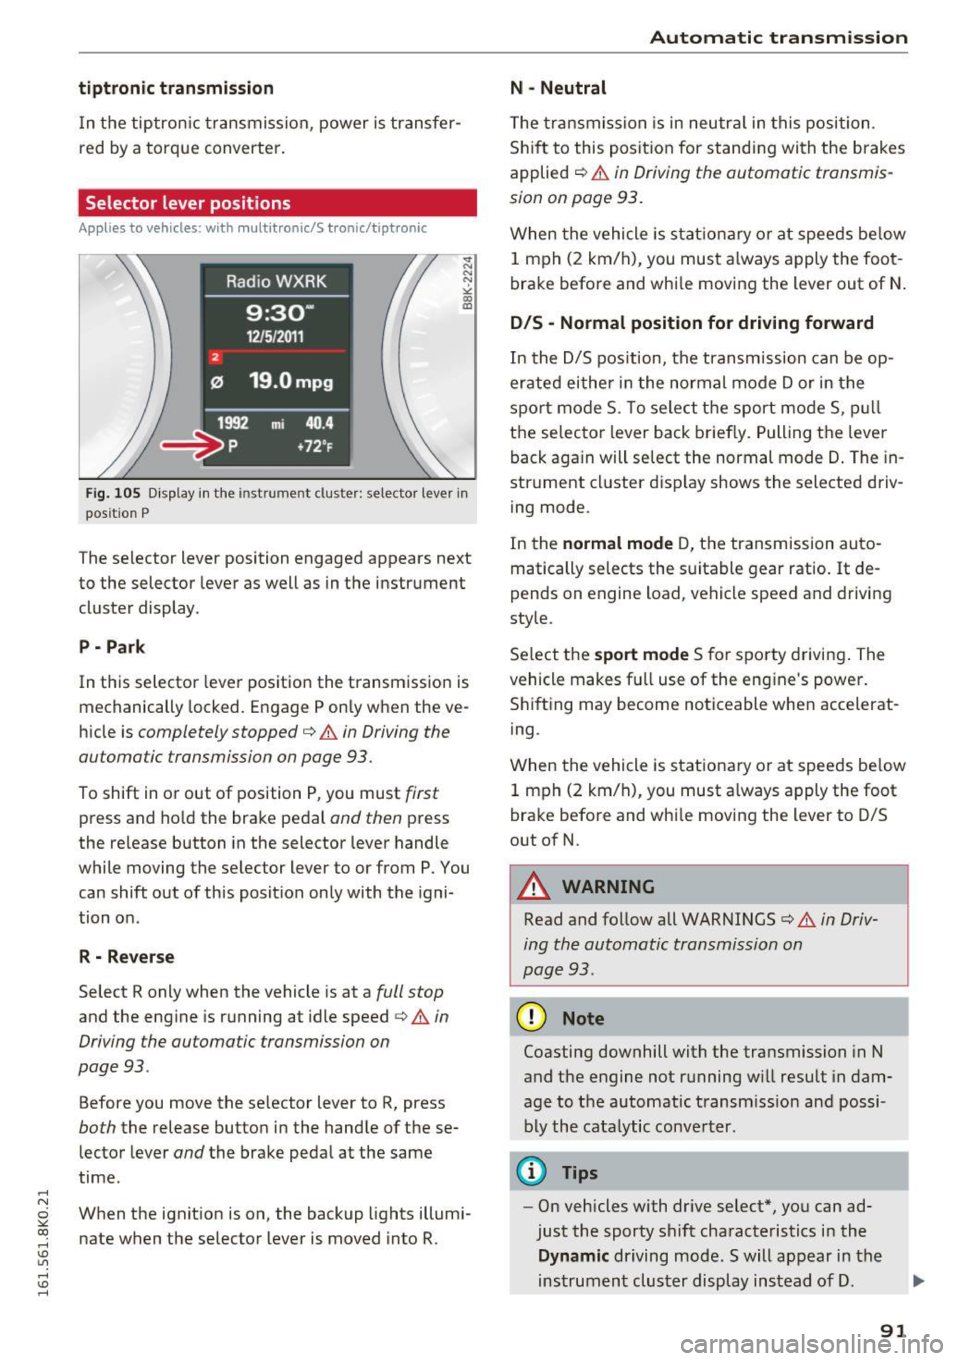
Fig. 105 Display in the instrume nt clus ter: selector lever in
pos it io n P
The selector lever position engaged appears next
to the selector lever as well as in the instrument
cluster display .
P • Pa rk
In this selector lever pos ition the transmission is
mechanically locked. Engage P only when the ve
hicle is
completely stopped¢ A in Driving the
automatic transmission on page 93.
To shift in or out of position P, you must first
press and ho ld the brake pedal and then press
the re lease button in the selector lever handle
while moving the selector lever to or from P. You can shift out of this position only with the igni
tion on .
R - Reverse
Select R only when the vehicle is at a full stop
and the engine is running at idle speed ¢&. in
Driving the automatic transmission on
page 93 .
Before you move the se lector lever to R, press
both the release button in the handle of these
lector lever
and the brake pedal at the same
time.
When the ignition is on, the backup lights illumi
nate when the selector lever is moved into R.
Automatic transmission
N -Neutral
The transmission is in neutra l in this position.
Shift to this position for stand ing with the brakes
applied
c:> A in Driving the automatic transmis
sion on page 93.
When the vehicle is stationary or at speeds below
1 mph (2 km/h), you must always apply the foot
brake before and whi le moving the lever out of N.
DIS -Normal position for driving forward
In the D/S position, the transmission can be op
erated either in the normal mode Dor in the
spo rt mode S. To select the sport mode S, pull
the selector lever back briefly. Pulling the lever
back aga in will select the normal mode D. The in
strument cluster display shows the selected driv
ing mode.
In the
normal mode D, the transmission auto
matically selects the suitable gear ratio.
It de
pends on engine load , vehicle speed and driving
style.
Se lect the
sport mode S for sporty driving. The
vehicle makes fu ll use of the engine 's power.
Shifting may become noticeable when accelerat
ing.
When the vehicle is stationary or at speeds be low
1 mph (2 km/h), you must always apply the foot
brake before and whi le moving the lever to D/S
out of N.
A WARNING
-Read and follow all WARNINGS¢ & in Driv-
ing the automatic transmission on
page 93 .
(D Note
Coasting downhill with the transmission in N
and the engine not running w ill result in dam
age to the automatic transmiss ion and possi
bly the catalytic converter.
@ Tips
-On vehicles with dr ive select*, you can ad
just the sporty shift characteristics in the
Dynamic driving mode.Swill appear in the
instrument cluster display instead of D.
91
Page 94 of 278
Automatic transmission
-If you accidenta lly select N while driving,
take your foot off the accelerator pedal im
mediately and wa it for the engine to slow
down to idle before select ing 0/5 .
- If there is a power fa ilure, the selecto r lever
will not
move out of the P pos it ion. T he
emergency release can be used if this hap
pens
c:;, page 97.
Automatic Shift Lock (ASL)
App lies to veh icles: w ith multitronic/S tronic/tiptronic
The Automatic Shift Lock safeguards you against
accidentally shi~ing into a forward or the re
verse gear and causing the vehicle to move unin
tentionally.
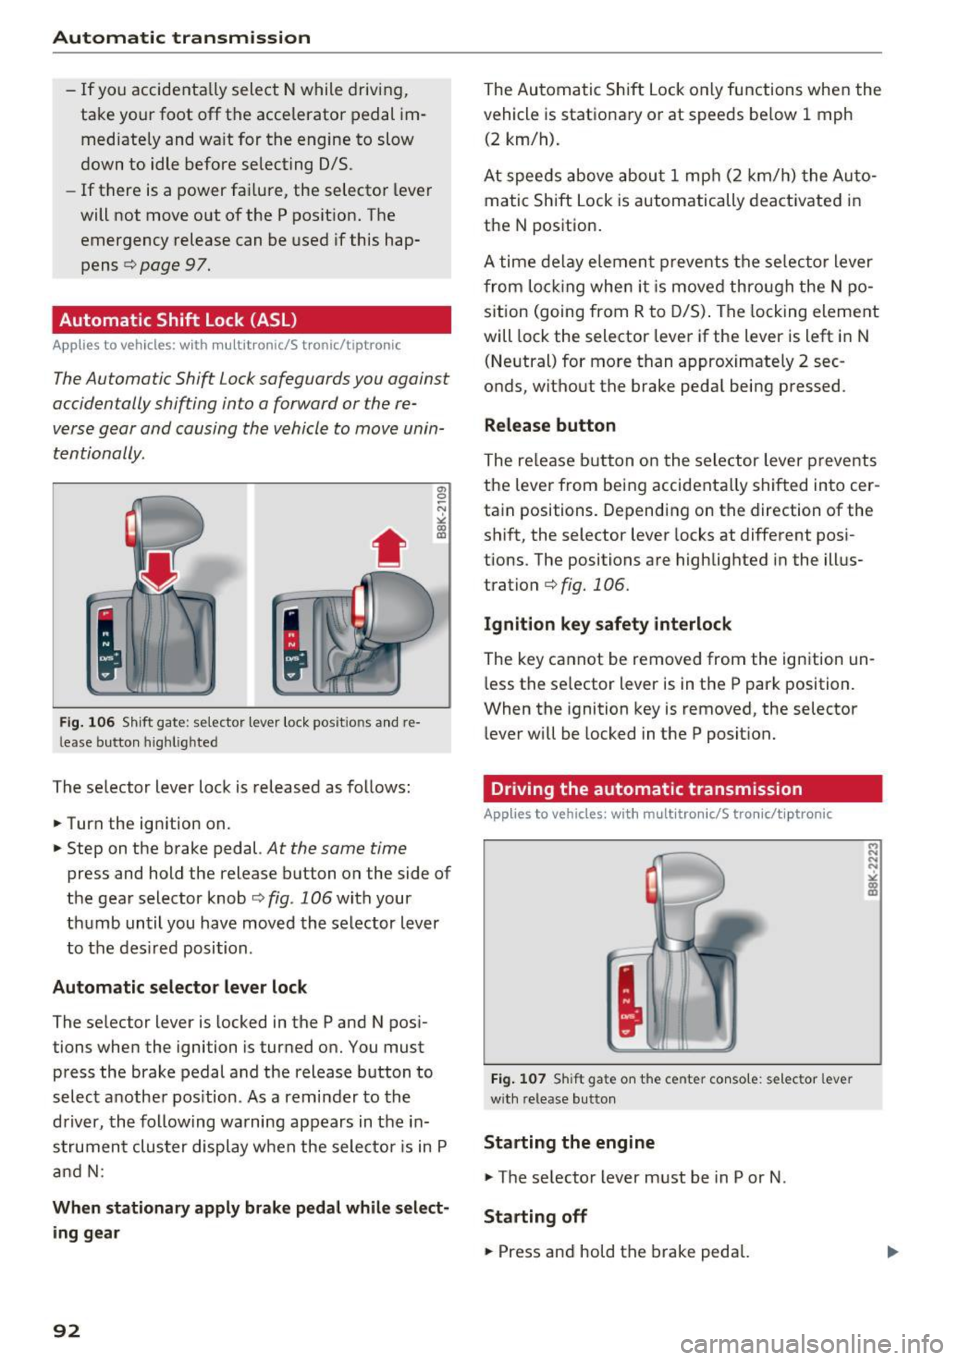
F ig. 106 S hi ft gate : selector leve r loc k pos it io ns and re
l ease butto n high lig hte d
The selector lever lock is released as follows :
.. Turn the ign it ion on .
a, 0 ~ N ~ OJ ID
.,. Step on the b rake pedal. At the same time
press and hold the release button on the side of
the gear selector knob
c:;, fig . 106 with your
th umb until you have
moved the selector lever
to the des ired posi tion .
Automatic selecto r lever lock
The se lector lever is locked in the P and N pos i
tions when the ignition is tur ned on. You must
press the brake pedal and the release b utton to
selec t anothe r pos ition. As a reminder to the
d river, the following warning appears in t he in
s tru men t clus ter display when the sele ctor is in P
a nd N :
When stationary apply brake pedal while select
ing gear
92
The Au tomatic Shift Lock o nly functions whe n the
veh icle is stationa ry o r at speeds be low 1 mph
(2 km/h).
A t spee ds above abou t 1 mp h (2 km/ h) the A uto
m at ic Shift Lock is automatically deact ivated in
the N pos ition .
A time de lay ele men t pr event s the se lec tor lever
fr om lo cking whe n it i s
move d through the N po
s ition (going from R to 0/5) . T he locking eleme nt
will lock the selector leve r if the lever is left i n N
(Ne utral) for mo re than approximate ly 2 sec
onds, witho ut the brake peda l being pressed .
Release button
The release butto n on the sele ctor lever p reve nts
the leve r from being accidenta lly shifted into cer
tain positions. Depend ing on the direction of the
shi ft, the selector lever locks at different pos i
tions. The positions are highlighted i n the ill us
tration
c:;, fig. 106.
Ignition key safety interlock
The key cannot be removed from the ignition un
l ess the se lector lever is in the P park position.
When the ignition key is removed, the selector
l ever wi ll be locked in the P posit ion.
Driving the automatic transmission
Applies to vehicles: with mult itro nic/S tro nic/ti ptronic
Fig. 107 Sh ift ga te o n th e ce nter co nso le : se lec tor leve r
w it h re lease b utton
Starting the engine
.,. The se lector lever must be in P or N.
Starting off
.. Press an d hold the brake peda l.
Page 95 of 278
..... N
0 ::..:: co .....
tor lever handle, select the desired selector lev
er position such as D/5 and release the button.
~ Wait briefly until the transmission has shifted
(you w ill fee l a slight movement) .
~ Remove your foot from the brake pedal and ac
celerate .
Stopp ing tem pora ril y
~ Keep the vehicle stationary using the braking
pedal, for example at traffic lights.
~ Do not press the accelerator pedal when doing
th is .
~ To prevent the vehicle from rolling when you
start driving, set the park ing brake when stop
ping on steep inclines ¢
,&.
~ The pa rking brake w ill release automatically
and the vehicle will start moving once you press
the accelerator pedal.
Stopping /park ing
If the se lecto r lever is not in the P position when
you open the d river 's door, the vehicle could roll.
The message
Tr an smi ssion: Car ma y roll! Shift
t o pa rk!
appears .
~ Press and hold the brake pedal unt il the vehicle
has come to a comp lete stop.
~ Apply the pa rking brake ¢ page 86, Parking .
~ Select the P selector leve r position ¢ .&,.
Stopp ing on an incline
~ Always press the brake peda l to hold the vehi
cl e in place and prevent it from "rolling back"
¢
,& . Do not try to prevent the vehicle from
"ro lling back" when a gear is engaged by in
c reasing the eng ine speed ¢(!).
Starting on an incline
~ Activate the parki ng b rake .
~ With the driving gea r se lected, press the acce l
erator pedal caref ully. The parking b rake will
r e lease automatically if your seat belt is fas
tened .
Unde r ce rtain c ircumstances, suc h as dr iv ing in
the mountai ns, it may be usef ul to switch tempo
rari ly to the manua l shift program in order to ad-
Autom atic tran sm iss ion
just the gears to the driv ing conditions by hand
¢ page 94.
On slopes, act ivate the park ing brake first and
then move the selec to r l ever to the P posi tion .
T his prevents too m uch stress from being placed
on the locking mechanism .
Vehicles with mult itro nic tr ansmission : Your ve
hicle is equipped wi th
hill hold assist allowing
you to start whi le on an incl ine. The system is ac
tivated when the brake peda l is pressed down
and held
for a few second s. The brake pressure
will ho ld for
a momen t after the brake peda l
loosens to prevent the veh icle from rolling back
wards while starting up .
A WARNING
--The vehicle can also ro ll when the eng ine is
stopped .
- Unintended vehicle movement can cause se rious injury .
- Never leave your veh icle with the engine
running while in gear .
If you must leave
your ve hicle when the eng ine is running, ac
tivate t he pa rking brake and move the selec
tor lever to P.
- Power is still transmi tted to the wheels
when the engine is runn ing at idle. To pre
vent the vehicle from "creepi ng", yo u m ust
keep your foot on the brake when the en
gine is running and the selector lever is in D/
Sor R or "tiptronic" mode is se lected .
- Do not press the acce le ra t or peda l when
changing the se lector lever position while
the vehicle is stationary and the engine is
running.
- Never sh ift into R or P whi le driving.
- Before driving down a steep slope, reduce your speed and sh ift into a lower gear w ith
"t i ptronic".
- Do not ride the brakes or press the brake
pedal too often or too long when driving
down a hi ll. Constant brak ing causes the
brakes to overheat and substant ially re
duces brak ing performance, increases brak
ing d istance or causes comp lete failure of
the brake system.
~
93
Page 97 of 278
..... N
0 ::..:: co .....
An M appears in the instrument cluster display as soon as the transmiss ion has shifted.
~ To upshift, push the selector lever forward to
the p lus position
0 ¢ fig. 108.
~ To downshift, push the lever to the minus posi -
t ion
0 .
Gear selection with shift paddles*
The shift paddles are act ivated when the se lector
lever is in D/S or the tiptronic manual shift pro
gram.
~ To upshift, touch the shift padd le on the right
G) ¢fig.109 .
~ To downshift, touch the shift paddle on the left
0.
~ If you do not press a shift paddle within a short
t ime while in the D/S position, the transmission
will return to automatic mode. To keep shift ing
using the sh ift paddles, move the selector lever
to the right out of the D/S position.
The transm ission automatically shifts up or down
before critical engine speed is reached.
The transm ission only allows manual shifting
when the engine speed is within the permitted
range.
{O) Tips
- When you sh ift into the next lower gear, the
transmission will downsh ift only when there
i s no poss ibility of over-rew ing the engine.
- When the kick-down comes on, the trans
mission will shift down to a lower gear, de
pending on vehicle and engine speeds.
- Tiptron ic is inoperative when the transmis
s ion is in the fail-safe mode.
Kick-down
Appl ies to vehicles: with multitronic/S t ronic/tiptronic
Kick-down enables maximum acceleration .
Applies to vehicles with a multitronic
transmission
When you depress the accelerator pedal beyond
the res istance point, the transmission downshifts
in to a lower gear rat io depending on the vehicle
Automatic transm ission
speed and engine speed. As long as the accelera
tor pedal is depressed, the engine speed is auto
matically regulated for maximum accelerat ion .
Applies to vehicles with a S tronic-/ tiptronic
transmission
When you depress the accelerator pedal beyond
the resistance point, the automat ic transmission
downsh ifts into a lower gear, depending on vehi
cle speed and engine speed. The upsh ift into the
next higher gear takes place once the maximum
specified engine speed is reached .
A WARNING
Please note that the drive wheels can spin if
kick-down is used on a smooth slippery road -
there is a risk of skidding.
Launch Control Program
Applies to vehicles: wi th S tronic
The Launch Control Program provides the best
acceleration possible when starting from a stop .
Requirement: The engine must be at operating
temperature and the steering wheel must not be
turned .
~ Sedan: Press the I~ OF FI button¢ page 178
while the eng ine is running. The II indicator
light illuminates in the instrument cluster and
Stabilization control (ESC): Sport. Warning!
Restricted stability
appears in the driver infor
mation system display.
~ allroad: Press the I~ OFFI button¢ page 178
while the engine is ru nning . The II indicator
light illuminates in the instrument cluster and
Stabilization control (ESC): Offroad . Warning!
Restricted stability
appears in the driver infor
mation system display .
~ Move the selector lever to the D/S posit ion to
select sport mode (S) or select the
dynamic
driving mode in drive select*¢ page 112.
~ Press the brake pedal strongly w ith your left
foot and hold i t down for at least 1 second.
~ At the same time, press the accelerator pedal
down comp lete ly with your right foot unti l the
engine reaches and maintains a h igh RPM.
~ Remove your foot from the brake peda l within
S seconds¢ ,&. ..,.
95
Page 105 of 278
,....,
N
0
""' CX) ,....,
I.Cl U"I ,....,
I.Cl ,....,
Audi adaptive cruise control and braking guard
~--- ~-Di stance 3: This setting corresponds
to a distance of 164 feet/SO meters when travel
ing at 62 mph (100 km/h), or a time interval of
1.8 seconds.
~ ---- ~ Distance 4: This setting corresponds
to a distance of 210 feet/64 meters when travel
ing at 62 mph (100 km/h), or a time interval of
2 .3 seconds.
A WARNING
Following other vehicles too closely increases
the risk of collisions and ser ious personal in
jury.
- Setting short distances to the traffic ahead
reduces the time and distance available to
br ing your vehicle to a safe stop and makes
it even more necessary to pay close atten
tion to traffic.
- Always obey applicable traffic laws, use
good judgment, and select a safe following
distance for the traffic, road and weather
conditions.
¢j) Tips
- Distance 3
is set automatically each time
you switch the ignition on.
- Your standard sett ings are automat ically
stored and assigned to the remot e control
k ey be ing used.
Setting the driving program
Applies to vehicles: with Audi adaptive cruise control
Depending on the selected dr iv in g program and
d istance, driving behav ior when accelerating w ill
vary from dynamic to comfortable.
Setting the driving program for vehicles
without Audi drive select*
~ In the radio/MM!*, select: !CARI function but
ton >
Adaptive cruise control > Driving prog. >
comfort, standard or dynamic . Or
~ Select: ICARI function button> Car systems*
contro l button > Driver ass ist > Adaptive cruise
control > Driving program* > Comfort, Stand
ard or Dynamic . Setting the driving mode for vehicles with
Audi drive select*
Refer to c!:>poge 112 .
(D Tips
Your settings are automatically stored and as
s ig ned to the remote control key being used.
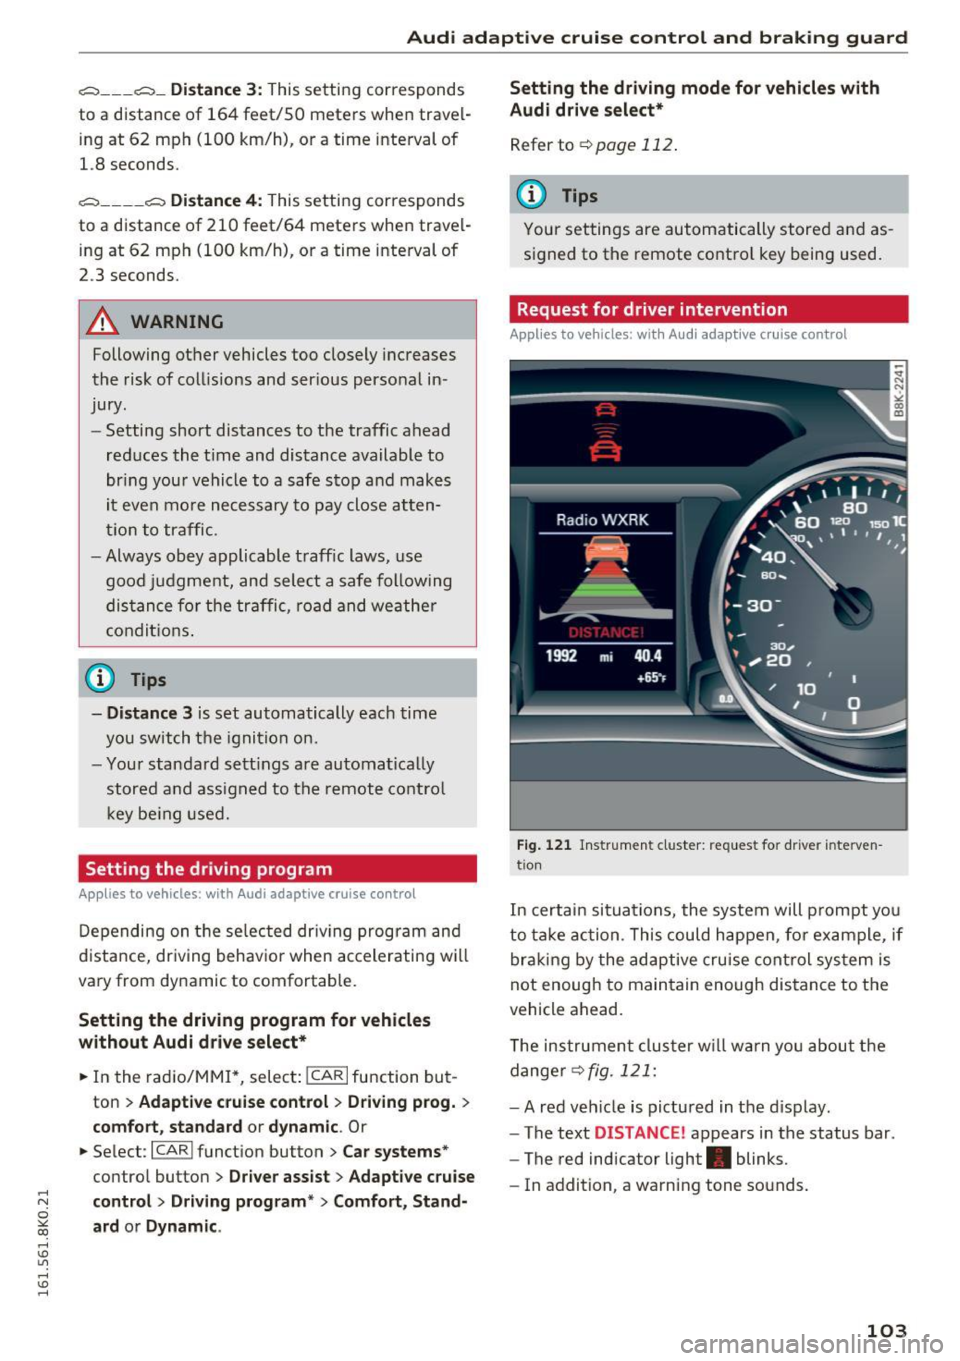
Request for driver intervention
Applies to vehicles: with Audi adapt ive cruise control
Fig. 121 Ins trumen t cluster: request for driver interve n
tio n
In certain situa tions, the system will prompt yo u
to take action . This could happen, for example, if
braking by the adaptive cruise control system is
not enoug h to maintain enough dis tance to the
vehicle ahead.
T he instrument cluster will warn you about the
danger
c!:> fig. 121:
-A red vehicle is pictured in the display.
- The text
DISTANCE ! appears in the status bar.
- The red indicator light. blinks.
- In addition, a warning tone sounds.
103
Page 106 of 278

Audi adaptive cruise control and braking guard
Audi braking guard
Description
Applies to vehicles: with Audi adaptive cruise contro l
Fig. 122 In strument cluste r: appro ach warning
Braking guard uses a radar sensor. It also func
tions within the limits of the system when adap
tive cruise control is switched off .
What can Audi braking guard do?
When detected in time, the system can assess
si tuation s when a veh icle ahead brakes suddenly
or if your own vehicle is traveling at a high speed
and approaching a vehicle up ahead that is mov
ing more slowly . Braking guard does not react if
it cannot detect the situat ion.
The system advises you of variou s situations:
- The
distance warning is given if you are too
close to the vehicle ahead for a long time. If the
vehicle ahead brakes sharply, you will not be
able to avoid a collision. The indicator light .
in the display comes on.
- The
approach warning is given when a detected
vehicle up ahead in your lane is moving much
more slowly than you are or if it brakes sharply .
When this warning is given, it may only be pos
s ib le to avo id a collision by swerving or braking
sharply. The indicator light . and indicator in
the d isplay will warn you about the danger
¢fig. 122. You will also hear an acoustic signal.
If you do not react fast enough or do not react at
a ll to the situation, Braking guard will intervene
by braking and the message
braking guard inter
vention
will appear.
l) This is no t a vail able in som e coun trie s.
104
- If a collision is imminent , the system will first
provid e an
acute warning by briefly and sharply
app lying the b rakes.
- If you do not react to the acute warning, brak
ing guard can brake within the limits of the sys
tem . This reduces the vehicle speed in the event
of a collision.
- At speeds under 20 mph (30 km/h), the system
can initiate a complete deceleration shortly be
fore a collision ll.
- If the braking gua rd senses that you are not
braking hard enough when a collision is immi
nent, it can increase the braking force.
Which functions can be controlled?
You can switch braking guard and the distance/
approach warning on or off in the radio or MMI
¢page 105, Settings in the radio/MM!.
A WARNING
Lack of attent ion can cause collisions, other
accidents and ser ious personal injuries . The
braking guard is an assist system and cannot
prevent a collision by itself . The driver must
always inte rvene. The driver is always respon
sible for braking at the correct time .
- Always pay close attention to traffic, even
when the braking guard is switched on. Be
ready to intervene and be ready to take
complete control whenever necessary. Al
ways keep the safe and legal distance be
tween your vehicle and vehicles up ahead .
- Braking guard works within limits and will
not respond outside the system limits, for
example when approach ing a stopped vehi
cle or stationary obstacle (end of a traffic
jam or vehicle that has broken down in traf
fic) .
- Always remember that the radar sensor for
the braking guard works only within defined
detection and range limits that may prevent
the proper detection of other vehicles.
- The radar sensor's function and range can
be reduced by rain, snow and heavy spray.
Moving vehicles up ahead may not be
-
Page 118 of 278

Parking System
The rear acoustic park assist system is integrated
in the rear of the vehicle and the rear view cam
era is integrated in the rear lid
~ page 117.
A WARNING
-
-The rear view camera has blind spots, in
wh ich objects cannot be detected. Be espe
c ially careful to check fo r small children and
animals before back ing up. Small children
and animals w ill not always be detected by
the se nsor s.
General Information
Applies to vehicles: with park ing system (rear, wit h rear view
camera)
F ig . 1 32 Covered area(!) and uncovered area@of th e rear
v iew camera
• 0
F ig . 133 Trunk lid: Locat ion of the rear view came ra
Sensors in the bumper
Sensors are located in the rear bumpers . If these
detect an obstacle, audible s ignals warn you . The
range a t which t he sensors beg in to measu re is
approx ima tely:
To the side 2 ft (0.60
m)
Center rear 5.
2 ft (1.60 m)
Distance warning when reversing starts when an
obstacle is detected in the range of the pa rking
116
assist system. As the distan ce decreases, t he
time interval between the audib le tones becomes
sho rter.
When the distance is less than 1ft (0.30 m), the
tone becomes cont inuo us. At th is point you
shou ld stop backing up .
If the distance to an obstacle stays t he sa me, the
vo lume of the dis tan ce signal chime is g radua lly
reduced after a bout
4 seconds (does not a ffect
the continuous signal tone). Approaching anoth
er obstacle will cause the distance s ignal to
sound again at the normal volume.
Rear view camera coverage area
The MMI display shows t he area cove red by the
rear view camera
¢fig . 132 (!). Objects that are
not in the a rea covered @are not shown on the
MMI display.
We recommend tha t you prac tic e parking wit h
the rear view camera in a traffic -free location or
parking lot to become familiar with the system,
the orientat ion lines, and their function. When
do ing this, there should be good light and weath
er condit ions.
In the MMI display, objects or vehicles appear closer or further away if:
- you a re dr iv ing in reve rse gear from a level s ur
face onto an incline, or a downward slope,
- you a re dr iving in reve rse gear tow ard prot rud
ing objects,
- t he vehicle is car rying too much load in the
rear.
The acc uracy of the or ie ntation lines and blue
s ur faces dim inishes if:
- the rear v iew camera does not provide a reliab le
image, fo r example, in poor visib ility co ndi tions
or if the le ns is dirty,
- the image on the screen is not v isible due to
sun glare and reflectio n.
Caring fo r the rear v iew camera lens
The rear view camera is located above the rear li
cense plate bracket. For the parking assist to op-
erate, the lens¢
fig. 133 must be kept clea n: .,..
Page 123 of 278
..... N
0 ::..:: co ,....,
Basics
Safe driving habits
Please remember -safety first!
This chapter contains important information,
tips, instructions and warnings that you need to
read and observe for your own safety, the safety
of your passengers and others . We have summar
ized here what you need to know about safety
belts, airbags, child restraints as well as child
safety. Your safety is for us
priority number 1. Al
ways observe the information and warnings in
this section - for your own safety as well as that
of your passengers.
The information in this section applies to all
model versions of your vehicle. Some of the fea
tures descr ibed in this sections may be standard
equipment on some models, or may be optional
equipment on others. If you are not sure, ask
your authorized Audi dealer.
A WARNING
- Always make sure that you follow the in
structions and heed the WARNINGS in this
Manual. It is in your interest and in the in
terest of your passengers .
-
-Always keep the complete Owner's Litera
ture in your Audi when you lend or sell your
vehicle so that this important information
will always be available to the driver and
passengers.
- Always keep the Owner's literature handy so
that you can find it easily if you have ques
tions.
Safety equipment
The safety features are part of the occupant re
straint system and work together to help reduce
the risk of injury in a wide variety of accident sit
uations.
Your safety and the safety of your passengers
should not be left to chance. Advances in tech
nology have made a var iety of features available
to help reduce the risk of injury in an accident.
Driving safety
The following is a list of just a few of the safety
features in your Audi:
- sophisticated safety belts for driver and all pas-
senger seat ing pos itions,
- be lt force limiters for the front seats,
- belt pretensioners for the seats,
- head restraints for each seating position,
- front airbags,
- side airbags in the front seats,
- side curtain airbags,
- specia l LATCH anchorages for child restraints,
- adjustable steering column.
These individual safety features, can work to gether as a system to help protect you and your
passengers in a w ide range of accidents. These
features cannot work as a system if they are not
always correctly adjusted and correctly used.
Safety is everybody's responsibility!
Important things to do before driving
Safety is everybody's job! Vehicle and occupant
safety always depends on the informed and care
ful driver.
For your safety and the safety of your passen
gers,
before driving always:
.. Make sure that all lights and signals are operat
ing correctly.
.. Make sure that the tire pressure is correct.
.. Make sure that all windows are clean and afford
good visibility to the outside .
.. Secure all luggage and other items carefully
c:::>page 65.
.. Make sure that nothing can interfere with the
pedals .
.. Adjust front seat, head restraint and mirrors
correctly for your height.
.. Instruct rear seat passengers to adjust the
head restraints according to their height.
.. Make sure to use the right child restraint cor
rectly to protect children
c:::> page 158, Child
safety .
.. Sit properly in your seat and make sure that
your passengers do the same
c:::> page 59, Seats
and storage.
121