technical data AUDI A5 2008 8T / 1.G Owners Manual
[x] Cancel search | Manufacturer: AUDI, Model Year: 2008, Model line: A5, Model: AUDI A5 2008 8T / 1.GPages: 313, PDF Size: 12.13 MB
Page 230 of 313
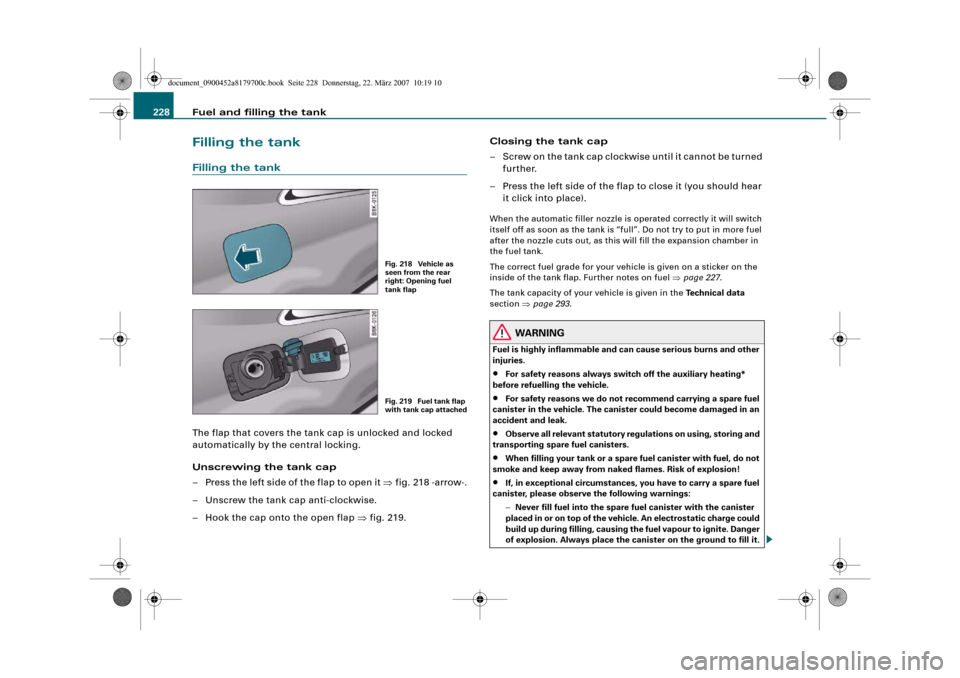
Fuel and filling the tank 228Filling the tankFilling the tankThe flap that covers the tank cap is unlocked and locked
automatically by the central locking.
Unscrewing the tank cap
– Press the left side of the flap to open it ⇒fig. 218 -arrow-.
– Unscrew the tank cap anti-clockwise.
– Hook the cap onto the open flap ⇒fig. 219.Closing the tank cap
– Screw on the tank cap clockwise until it cannot be turned
further.
– Press the left side of the flap to close it (you should hear
it click into place).
When the automatic filler nozzle is operated correctly it will switch
itself off as soon as the tank is “full”. Do not try to put in more fuel
after the nozzle cuts out, as this will fill the expansion chamber in
the fuel tank.
The correct fuel grade for your vehicle is given on a sticker on the
inside of the tank flap. Further notes on fuel ⇒page 227.
The tank capacity of your vehicle is given in the Technical data
section ⇒page 293.
WARNING
Fuel is highly inflammable and can cause serious burns and other
injuries.•
For safety reasons always switch off the auxiliary heating*
before refuelling the vehicle.
•
For safety reasons we do not recommend carrying a spare fuel
canister in the vehicle. The canister could become damaged in an
accident and leak.
•
Observe all relevant statutory regulations on using, storing and
transporting spare fuel canisters.
•
When filling your tank or a spare fuel canister with fuel, do not
smoke and keep away from naked flames. Risk of explosion!
•
If, in exceptional circumstances, you have to carry a spare fuel
canister, please observe the following warnings:
−Never fill fuel into the spare fuel canister with the canister
placed in or on top of the vehicle. An electrostatic charge could
build up during filling, causing the fuel vapour to ignite. Danger
of explosion. Always place the canister on the ground to fill it.
Fig. 218 Vehicle as
seen from the rear
right: Opening fuel
tank flapFig. 219 Fuel tank flap
with tank cap attached
document_0900452a8179700c.book Seite 228 Donnerstag, 22. März 2007 10:19 10
Page 231 of 313
Fuel and filling the tank229
Controls
Safety
Driving tips
General maintenance
Self-help
Technical data −Insert the filler nozzle as far as possible into the spare fuel
canister.
−If the spare fuel canister is made of metal, the filler nozzle
must be in contact with the canister during filling. This helps
prevent an electrostatic charge building up.
−Make sure you never spill fuel in the vehicle or in the luggage
compartment. Fuel vapour is explosive. Risk of fatal accident!
Caution
•
If any fuel is spilt onto the vehicle, it should be removed immedi-
ately, as it could otherwise damage the paintwork.
•
Never run the tank completely dry. If there is an irregular fuel
supply, misfiring can occur. As a result unburnt fuel can enter the
exhaust system and cause damage to the catalytic converter(s).
•
When filling the fuel tank after having run it completely dry on a
vehicle with a diesel engine the ignition must be switched on for at
least 30 seconds without starting the engine. When you then start
the engine it may take longer than normal (up to one minute) for the
engine to start firing. This is because air needs to be bled from the
fuel system while starting.For the sake of the environment
Do not try to put in more fuel after the automatic filler nozzle has
switched off; this may cause the fuel to overflow if it becomes warm.
Note
The tank flap is not locked when you lock the vehicle from the
inside.
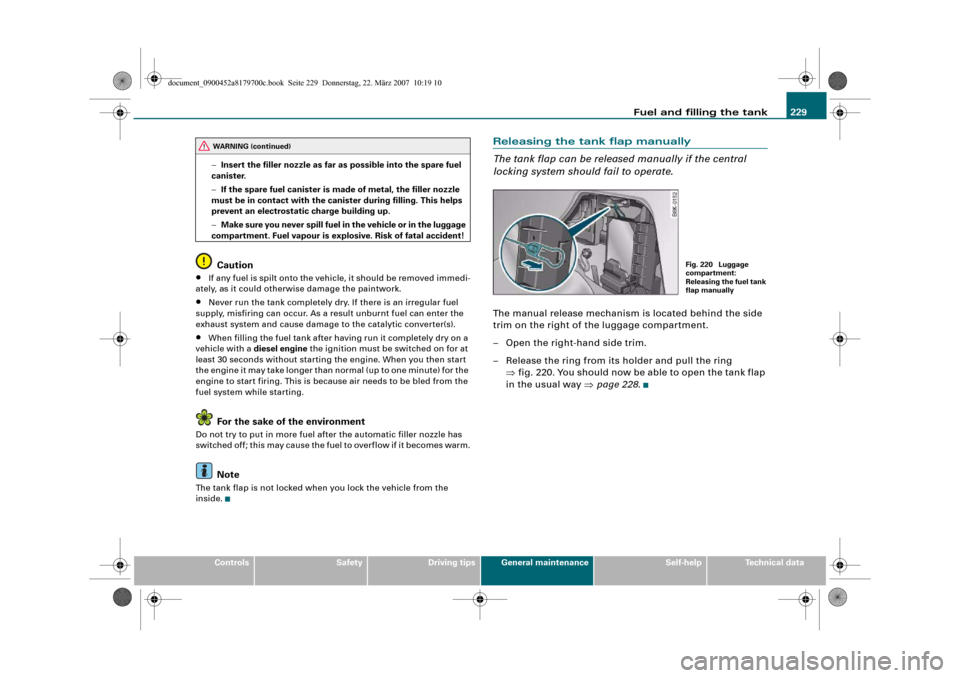
Releasing the tank flap manually
The tank flap can be released manually if the central
locking system should fail to operate.The manual release mechanism is located behind the side
trim on the right of the luggage compartment.
– Open the right-hand side trim.
– Release the ring from its holder and pull the ring
⇒fig. 220. You should now be able to open the tank flap
in the usual way ⇒page 228.
WARNING (continued)
Fig. 220 Luggage
compartment:
Releasing the fuel tank
flap manually
document_0900452a8179700c.book Seite 229 Donnerstag, 22. März 2007 10:19 10
Page 233 of 313
Checking and topping up fluids231
Controls
Safety
Driving tips
General maintenance
Self-help
Technical data
Working on components in the engine compartment
Extra caution is necessary when working on components
in the engine compartment.Always be aware of the danger of injury and scalding as well as the
risk of accident or fire when working in the engine compartment
(e.g. when checking and refilling fluids). Always observe the warn-
ings listed below and follow all normal safety precautions. The
engine compartment of any motor vehicle is a potentially
hazardous area. ⇒.
WARNING
•
Switch off the engine.
•
Remove the ignition key.
•
Apply the parking brake.
•
Put the gear lever in neutral or selector in P.
•
Wait for the engine to cool down.
•
Keep children away from engine compartment.
•
Never spill fluids on hot engine components. These fluids can
cause a fire (e.g. radiator anti-freeze).
•
Take care not to cause short circuits in the electrical system,
especially when working on the battery.
•
Do not touch the radiator fan when the engine is hot. The fan
may start running suddenly.
•
Do not unscrew the cap on the expansion tank when the engine
is hot. The cooling system is under pressure.
•
Protect face, hands and arms by covering the cap with a large,
thick rag to protect against escaping coolant and steam.
•
If any tests have to be performed with the engine running,
there is an extra safety risk from the rotating parts, such as the
drive belts, alternator and radiator fan, etc., and from the high-
voltage ignition system.
•
Vehicles with automatic gearbox: Never open the throttle inad-
vertently (for instance by hand from the engine compartment) if a
gear is engaged while the vehicle is stationary with the engine
running. The vehicle could otherwise start moving immediately
and possibly cause an accident.
•
Observe the following additional warnings if work on the fuel
system or the electrical system is necessary:
−Always disconnect the battery.
−Do not smoke.
−Never work near naked flames.
−Always keep an approved fire extinguisher immediately
available.Caution
When topping up fluids make sure the correct fluid is put into the
correct filler opening. This can otherwise cause serious malfunc-
tions or engine damage.
For the sake of the environment
Inspect the ground underneath your vehicle regularly so that any
leaks are detected at an early stage. If you find oil spots or other
fluids, have your vehicle inspected by a qualified workshop.
Note
On right-hand drive vehicles* some of the containers/ reservoirs
mentioned below are located on the other side of the engine
compartment.
WARNING (continued)
document_0900452a8179700c.book Seite 231 Donnerstag, 22. März 2007 10:19 10
Page 235 of 313
Checking and topping up fluids233
Controls
Safety
Driving tips
General maintenance
Self-help
Technical data The positions of the engine oil filler cap and the engine oil dipstick
⇒page 232, fig. 223 (items and ) may be different on some
engine versions.
Engine oilGeneral notesWe recommend that you have the oil change carried out by an Audi
dealership/qualified workshop according to the intervals stated in
the Service Schedule or according to the service interval display in
the instrument cluster.
Whether your vehicle is serviced at flexible service intervals or fixed
service intervals is shown in the Service Schedule.
The correct oil specifications for your engine are listed in the Te c h -
nical data section ⇒page 295, “Performance, weights and dimen-
sions”.
Check that the specifications quoted (VW standards) appear on the
container either singly or in combination with other specifications.
Flexible service intervals (Audi LongLife Service*)
Special engine oils ⇒page 295, “Performance, weights and dimen-
sions” have been developed as part of the Audi LongLife Service
(⇒“Service Schedule”).
This type of oil must be used if you intend to take advantage of the
extended maintenance intervals allowed by the Audi LongLife
Service.•
Do not mix the LongLife oil with oil intended for fixed service
intervals, as the requirements for the extended service intervals are
then no longer guaranteed.
•
In exceptional circumstances, if the engine oil level is too low
⇒page 234 and you cannot obtain the specified LongLife oil, you
can put in a small quantity of oil for fixed service intervals -
⇒page 295, “Performance, weights and dimensions”. This should not be done more than once and no more than 0.5 litres should be
used.
Fixed service intervals (Inspection Service)*
If you do not take advantage of the LongLife service for your car, you
can use the oils for fixed service intervals - ⇒page 295, “Perform-
ance, weights and dimensions”. In this case, your car must be serv-
iced after a fixed interval of 1 year / 15,000 km (10,000 miles) – see
Service Schedule.
•
In exceptional circumstances, if the engine oil level is too low
⇒page 234 and you cannot obtain the oil specified for your vehicle,
you can put in a small quantity of oil conforming to the specification
ACEA A2 or ACEA A3 (petrol engines) or ACEA B3 or ACEA B4 (diesel
engines). This should not be done more than once and no more than
0.5 litres should be used.
Vehicles with diesel particulate filter*
The Service Schedule states whether your vehicle is fitted with a
diesel particulate filter.
•
Vehicles with diesel particulate filter must only be filled with
engine oil VW 507 00. This oil can be used regardless of whether the
vehicle is serviced at flexible service intervals (Audi LongLife
Service) or fixed service intervals.
•
Avoid mixing this oil with other engine oils.
•
In exceptional circumstances, if the engine oil level is too low
⇒page 234 and you cannot obtain the oil specified for your vehicle,
you can put in a small quantity of oil conforming to the specification
VW 506 00 / VW 506 01 or VW 505 00 / VW 505 01 or ACEA B3 /
ACEA B4. This should not be done more than once and no more than
0.5 litres should be used.
A3
A4
document_0900452a8179700c.book Seite 233 Donnerstag, 22. März 2007 10:19 10
Page 237 of 313
Checking and topping up fluids235
Controls
Safety
Driving tips
General maintenance
Self-help
Technical data
–Unscrew cap
from oil filler opening ⇒page 234,
fig. 226.
– Carefully put in the specified grade of oil ⇒page 295
0.5 litres at a time.
– After two minutes check the oil level once again
⇒page 234.
– If the oil level is too low, add more engine oil.
– Replace the oil filler cap carefully and push the dipstick
all the way in.
WARNING
•
Ensure that no oil comes into contact with hot engine compo-
nents when topping up: this could cause a fire.
•
Wash your skin thoroughly if it comes into contact with engine
oil.Caution
•
The oil level must never be above area , as this may result in
damage to the catalytic converter or to the engine. Contact a quali-
fied workshop to extract the engine oil if necessary.
•
No additives should be used with engine oil. Any damage caused
by the use of such additives would not be covered by the factory
warranty.For the sake of the environment
•
Never pour oil down drains or into the ground.
•
Always observe statutory requirements when disposing of
empty oil canisters.
Cooling systemCoolant
The purpose of the coolant is to carry heat away from the
engine. The correct amount of anti-freeze is important to
prevent the cooling system from freezing in winter.The cooling system is filled for life at the factory, so the coolant does
not need to be changed. The coolant consists of a mixture of water
and anti-freeze additive G12+. This is a glycol-based anti-freeze with
anti-corrosion additives.
Anti-freeze additive
The amount of anti-freeze additive required depends on the temper-
atures to be expected in the winter season. If the anti-freeze concen-
tration is too low the coolant can freeze, resulting in failure of the
cooling system and heater.
The cooling system is filled at the factory with the correct amount of
anti-freeze for the country concerned.
In most cases the mixture consists of 60% water and 40% additive.
This mixture gives the necessary antifreeze protection down to –
25 °C and protects the alloy parts of the cooling system against
corrosion. It also prevents scaling and raises the boiling point of the
coolant.
Countries with warm climate
The coolant concentration must not be reduced by adding plain
water, even in the summer or in warm climates. The concentration
of the anti-freeze additive must always be at least 40%.
Countries with cold climate
If greater anti-freeze protection is required in very cold climates, the
proportion of the anti-freeze additive G12+ can be increased. A
concentration of 60% offers protection down to about -40 °C. The
concentration of the antifreeze additive must not be more than 60%,
Aa
document_0900452a8179700c.book Seite 235 Donnerstag, 22. März 2007 10:19 10
Page 239 of 313
Checking and topping up fluids237
Controls
Safety
Driving tips
General maintenance
Self-help
Technical data
– Add coolant.
– Screw the cap on again tightly.Make sure that the coolant meets the required specifications
⇒page 235, “Coolant”. Do not use a different type of additive if anti-
freeze additive G12+, G12 or G11 is not available. In this case use
only water and bring the coolant concentration back up to the
correct level as soon as possible by putting in the specified additive.
Always top up with fresh, unused coolant.
Do not fill above the “MAX” mark. Excess coolant is forced out of the
system through the valve in the filler cap when the engine gets hot.
If a lot of coolant has been lost, wait for the engine to cool down
before putting in cold coolant. Failure to do so could result in
serious engine damage.
WARNING
•
The cooling system is under pressure. Do not unscrew the cap
on the expansion tank when the engine is hot: you could be
scalded by escaping steam
•
The coolant and coolant additive can be a health hazard. Store
the coolant additive in the original container in a safe place out of
reach of children – risk of poisoning.For the sake of the environment
Drained off coolant should not be used again. Drain off the used
coolant into a suitable container and dispose of it in the proper
manner (observe environmental regulations).
Radiator fan
The radiator fan can start running spontaneously.The radiator fan is driven by the engine via a poly V-belt. The speed
of the fan is varied by a viscous clutch according to the temperature.
There is also an auxiliary electric fan, which cuts in automatically
whenever the temperature of the coolant and the engine compart-
ment rises above a certain level.
The auxiliary fan can continue to run for as long as 10 minutes after
stopping the engine – even after the ignition is switched off. It may
also start running suddenly ⇒ after a while if•
residual heat raises the coolant temperature, or
•
the hot engine compartment is additionally heated up by the
sun.
WARNING
When working in the engine compartment be aware that the radi-
ator fan may start running suddenly – risk of injury.
document_0900452a8179700c.book Seite 237 Donnerstag, 22. März 2007 10:19 10
Page 241 of 313
Checking and topping up fluids239
Controls
Safety
Driving tips
General maintenance
Self-help
Technical data
For the sake of the environment
If the fluid has to be drained out of the brake system, use an appro-
priate container to catch the used brake fluid and dispose of it in the
proper manner.BatteryGeneral notes
All work on batteries requires specialist knowledge.The battery is virtually maintenance-free. It is checked as part of the
Inspection Service.
We recommend that you replace a battery once it is older than 5
years.
When an airbag is triggered, the battery will, under certain circum-
stances, be disconnected from the on-board power supply for
safety reasons ⇒ in “General notes on airbag system” on
page 176.
Disconnecting the battery
If the battery is disconnected, some of the vehicle's functions will
become inoperative (e.g. electric windows). These functions will
require resetting after the battery is reconnected. For this reason,
the battery should only be disconnected from the vehicle's electrical
system when absolutely necessary.
If the vehicle is not used for long periods
If you do not drive your vehicle for a period of several days or weeks,
the power management will gradually shut off the on-board
systems one by one, or reduce the amount of current they are using.
This limits the amount of power consumed and helps to ensure reli-
able starting even after a long period ⇒page 202.Please note that certain convenience features, such as the Audi
advanced key*, the remote control key or the electrical seat adjust-
ment may not be available when you unlock the vehicle. These func-
tions will be restored when you switch on the ignition and start the
engine.
Winter conditions
At low temperatures the battery has to work very hard. It also
provides only a fraction of the starting power it has at normal
temperatures.
For this reason, we recommend having the battery checked and
charged if necessary before the start of winter ⇒page 241.
WARNING
•
All work on batteries requires specialist knowledge. For queries
regarding the vehicle battery please contact an Audi dealership or
other qualified workshop (risk of chemical burns / risk of explo-
sion).
•
The battery must not be opened. Do not attempt to make any
changes to the electrolyte level of the battery. Otherwise, there is
a risk that a mixture of oxygen and hydrogen gas can accumulate
and cause an explosion.Note
If the vehicle is to be left standing for a period of several weeks at
extremely low temperatures, the battery should be removed from
the vehicle. This ensures that it cannot “freeze up” and be
damaged.
document_0900452a8179700c.book Seite 239 Donnerstag, 22. März 2007 10:19 10
Page 243 of 313
Checking and topping up fluids241
Controls
Safety
Driving tips
General maintenance
Self-help
Technical data
•
Do not expose the battery to direct sunlight over a long period of
time, as the intense ultraviolet radiation can affect the battery
housing.
•
If the car is left standing for long periods, protect the battery
from extreme cold temperature so that it does not “freeze up” and
become damaged.
Charging the battery
Terminals for charging the battery are fitted in the engine
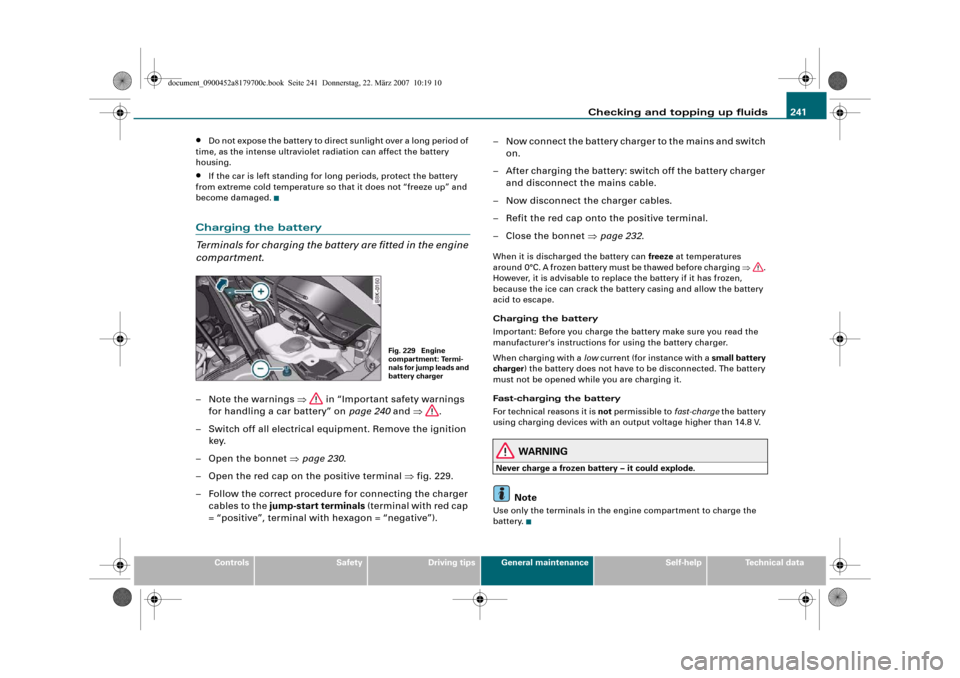
compartment.– Note the warnings ⇒ in “Important safety warnings
for handling a car battery” on page 240 and ⇒.
– Switch off all electrical equipment. Remove the ignition
key.
– Open the bonnet ⇒page 230.
– Open the red cap on the positive terminal ⇒fig. 229.
– Follow the correct procedure for connecting the charger
cables to the jump-start terminals (terminal with red cap
= “positive”, terminal with hexagon = “negative”).– Now connect the battery charger to the mains and switch
on.
– After charging the battery: switch off the battery charger
and disconnect the mains cable.
– Now disconnect the charger cables.
– Refit the red cap onto the positive terminal.
– Close the bonnet ⇒page 232.
When it is discharged the battery can freeze at temperatures
around 0°C. A frozen battery must be thawed before charging ⇒.
However, it is advisable to replace the battery if it has frozen,
because the ice can crack the battery casing and allow the battery
acid to escape.
Charging the battery
Important: Before you charge the battery make sure you read the
manufacturer's instructions for using the battery charger.
When charging with a low current (for instance with a small battery
charger) the battery does not have to be disconnected. The battery
must not be opened while you are charging it.
Fast-charging the battery
For technical reasons it is not permissible to fast-charge the battery
using charging devices with an output voltage higher than 14.8 V.
WARNING
Never charge a frozen battery – it could explode.
Note
Use only the terminals in the engine compartment to charge the
battery.
Fig. 229 Engine
compartment: Termi-
nals for jump leads and
battery charger
document_0900452a8179700c.book Seite 241 Donnerstag, 22. März 2007 10:19 10
Page 245 of 313
Wheels and tyres243
Controls
Safety
Driving tips
General maintenance
Self-help
Technical data
Wheels and tyresWheelsGeneral notes–When driving with new tyres, be especially careful during
the first 500 km.
– If you have to drive over a kerb or similar obstacle, drive
very slowly and as near as possible at a right angle to the
kerb.
– Inspect the tyres regularly for damage (cuts, cracks or
blisters, etc.). Remove any foreign bodies embedded in
the treads.
– Damaged wheels and tyres must be replaced immedi-
ately.
– Keep grease, oil and fuel off the tyres.
– Replace any missing valve caps as soon as possible.
– Mark the wheels before taking them off so that they
rotate in the same direction when put back.
– When removed, the wheels or tyres should be stored in a
cool, dry and preferably dark place.New tyres
New tyres do not give maximum grip straight away and should
therefore be “run in” by driving carefully and at moderate speeds for
about the first 500 km. This will also help to make the tyres last
longer.
The tread depth of new tyres may vary, according to the type and
make of tyre and the tread pattern.Concealed damage
Damage to tyres and rims is often not readily visible. If you notice
unusual vibration or the car pulling to one side, this may indicate
that one of the tyres is damaged. Reduce speed immediately if there
is any reason to suspect that damage may have occurred. Inspect
the tyres for damage. If no external damage is visible, drive slowly
and carefully to the nearest qualified workshop and have the car
inspected.
Tyres with directional tread pattern
An arrow on the tyre sidewall indicates the direction of rotation on
tyres with directional tread. Always note the direction of rotation
indicated when mounting the wheel. This guarantees optimum grip
and helps to avoid aquaplaning, excessive noise and wear.
Tyre service life
Correct inflation pressures and sensible driving habits
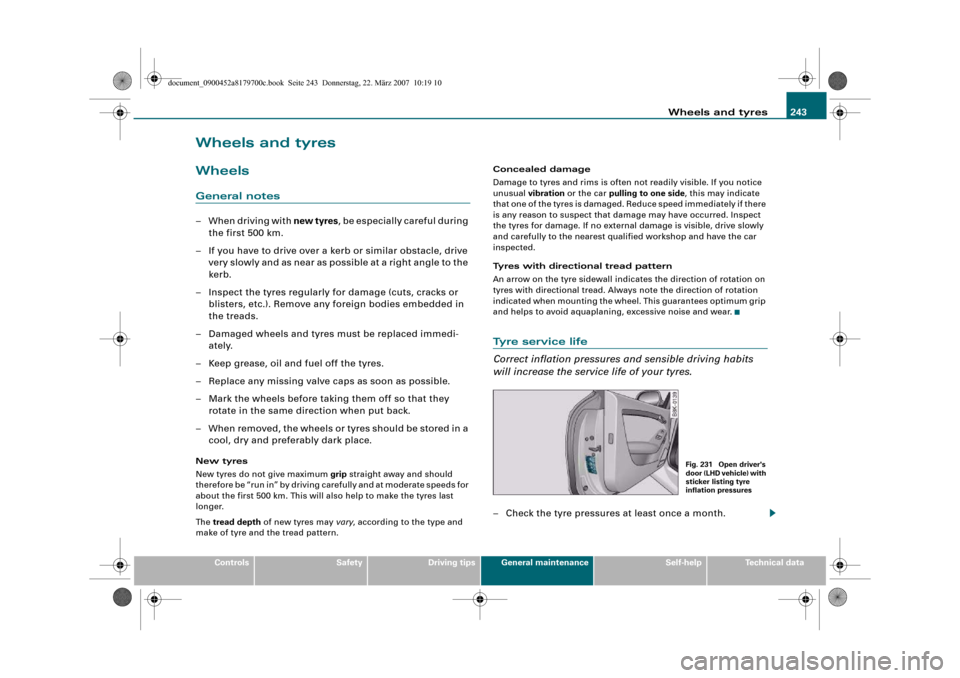
will increase the service life of your tyres.– Check the tyre pressures at least once a month.
Fig. 231 Open driver's
door (LHD vehicle) with
sticker listing tyre
inflation pressures
document_0900452a8179700c.book Seite 243 Donnerstag, 22. März 2007 10:19 10
Page 247 of 313
Wheels and tyres245
Controls
Safety
Driving tips
General maintenance
Self-help
Technical data
Tread wear indicators
The tread wear indicators show the condition of the tyre
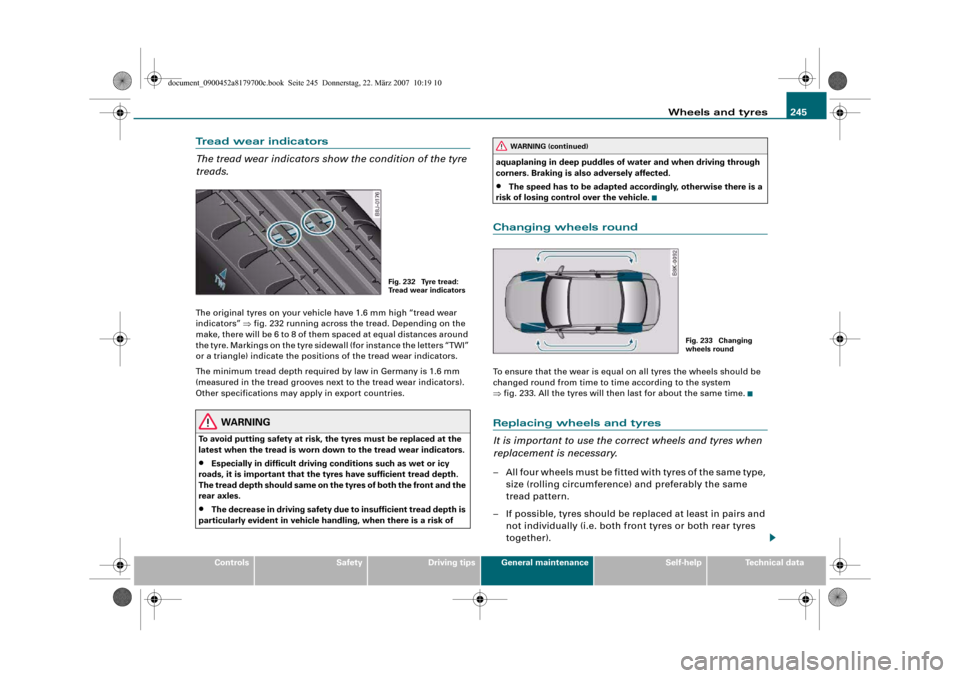
treads.The original tyres on your vehicle have 1.6 mm high “tread wear
indicators” ⇒fig. 232 running across the tread. Depending on the
make, there will be 6 to 8 of them spaced at equal distances around
the tyre. Markings on the tyre sidewall (for instance the letters “TWI”
or a triangle) indicate the positions of the tread wear indicators.
The minimum tread depth required by law in Germany is 1.6 mm
(measured in the tread grooves next to the tread wear indicators).
Other specifications may apply in export countries.
WARNING
To avoid putting safety at risk, the tyres must be replaced at the
latest when the tread is worn down to the tread wear indicators.•
Especially in difficult driving conditions such as wet or icy
roads, it is important that the tyres have sufficient tread depth.
The tread depth should same on the tyres of both the front and the
rear axles.
•
The decrease in driving safety due to insufficient tread depth is
particularly evident in vehicle handling, when there is a risk of aquaplaning in deep puddles of water and when driving through
corners. Braking is also adversely affected.
•
The speed has to be adapted accordingly, otherwise there is a
risk of losing control over the vehicle.
Changing wheels roundTo ensure that the wear is equal on all tyres the wheels should be
changed round from time to time according to the system
⇒fig. 233. All the tyres will then last for about the same time.Replacing wheels and tyres
It is important to use the correct wheels and tyres when
replacement is necessary.– All four wheels must be fitted with tyres of the same type,
size (rolling circumference) and preferably the same
tread pattern.
– If possible, tyres should be replaced at least in pairs and
not individually (i.e. both front tyres or both rear tyres
together).
Fig. 232 Tyre tread:
Tr e a d w e a r i n d i c a t o r s
WARNING (continued)
Fig. 233 Changing
wheels round
document_0900452a8179700c.book Seite 245 Donnerstag, 22. März 2007 10:19 10