technical data AUDI A5 2008 8T / 1.G Owners Manual
[x] Cancel search | Manufacturer: AUDI, Model Year: 2008, Model line: A5, Model: AUDI A5 2008 8T / 1.GPages: 313, PDF Size: 12.13 MB
Page 249 of 313
Wheels and tyres247
Controls
Safety
Driving tips
General maintenance
Self-help
Technical data replacement parts, trained personnel and facilities for disposing of
the old tyres.
WARNING
•
It is very important to ensure that the tyres you have chosen
have adequate clearance. When selecting replacement tyres, do
not rely entirely on the nominal tyre size marked on the tyre; with
some makes of tyre the effective tyre size can differ significantly
from the nominal dimensions, even though the tyres have the
same size designation. Inadequate tyre clearance can result in
damage to the tyres or the vehicle, causing a serious safety risk. It
may also invalidate the vehicle's type approval for use on public
roads.
•
Please ask your Audi dealer or qualified workshop whether run
flat tyres can be used on your vehicle. Unauthorised use of these
tyres can invalidate the vehicle's type approval for use on public
roads. Furthermore, this could cause damage to your vehicle and
possibly also result in an accident.
•
Avoid running the car on tyres that are more than 6 years old.
If you have no alternative, you should drive slowly and with extra
care at all times.For the sake of the environment
Old tyres must be disposed of according to the laws in the country
concerned.
Note
•
Never mount used tyres if you are not sure of their previous
history.
•
For technical reasons it is not normally possible to use wheel
rims from other vehicles. In some cases this also applies to rims
from other vehicles of the same model.
Wheel bolts
The wheel bolts are designed to suit the rims on your car.The wheel bolts are matched to the rims. When installing different
wheels (for instance wheels with winter tyres) it is important to use
the correct wheel bolts with the right length and correctly shaped
bolt heads. This is essential for the secure fit of the wheels and for
the proper function of the brake system.
Audi dealers have full information on the technical requirements
when installing or changing tyres, rims or wheel trims.
The wheel bolts should be clean and turn easily.
A special adapter is required to turn the anti-theft wheel bolts*
⇒page 264.Winter tyres
Winter tyres will significantly improve the car's handling
in winter road conditions.–Use only radial ply winter tyres.
– Winter tyres must be fitted on all four wheels.
– Only use winter tyres of the correct type approved for
your vehicle.
– Please note that the maximum permissible speed for
winter tyres may be lower than for summer tyres.
– Also note that winter tyres are no longer effective when
the tread is worn down.
– After fitting the wheels you must always check the tyre
pressures. The correct tyre pressures are listed on the
sticker on the end face of the driver's door.
document_0900452a8179700c.book Seite 247 Donnerstag, 22. März 2007 10:19 10
Page 251 of 313
Wheels and tyres249
Controls
Safety
Driving tips
General maintenance
Self-help
Technical data For technical reasons snow chains may only be used on tyres with
certain wheel rim/tyre combinations.
Only use snow chains with fine-pitch links. The links must not
protrude more than 13.5 mm from the tyres (including tensioner).
Remove the chains when roads are free of snow. Otherwise they will
impair handling, damage the tyres and wear out very quickly.
Four-wheel drive: where snow chains are compulsory on certain
roads, this normally also applies to cars with four-wheel drive. Snow
chains may only be fitted to the front wheels (also on vehicles with
four-wheel drive).
Rim size
Rim offset
Ty r e s i z e
7.5Jx17
28 mm
225/50
document_0900452a8179700c.book Seite 249 Donnerstag, 22. März 2007 10:19 10
Page 253 of 313
Accessories and modifications to the vehicle251
Controls
Safety
Driving tips
General maintenance
Self-help
Technical data
Radio transmitters and business equipmentRadio transmitters (fixed installation)
Retrofit installations of radio transmitters in the vehicle are subject
to official approval. Audi generally authorises in-vehicle installa-
tions of approved types of radio transmitters provided that:•
the aerial is installed correctly,
•
the aerial is not installed in the interior of the vehicle (and
screened cables are used together with non-reflective aerial trim-
ming),
•
the effective transmitting power does not exceed 10 Watts at the
aerial base.
Audi dealers and specialist retailers will be able to inform you about
options for installing and operating radio transmitters with a higher
transmitting power.
Mobile radio transmitters
When using commercial mobile telephones or radio equipment it is
possible that they might interfere with the electronics of your
vehicle and cause malfunctions. The reasons could be:
•
no external aerial
•
external aerial incorrectly installed
•
transmitting power more than 10 W.
Therefore you must not operate portable mobile telephones or radio
equipment inside the vehicle without a correctly installed external
aerial ⇒.
Please note also that the maximum range of the equipment can only
be achieved with an external aerial.
Business equipment
Retrofit installation of business or other equipment in the vehicle is
permitted, provided the equipment cannot interfere with the driver's immediate control of the vehicle. Any such equipment must
carry the CE mark. Any retrofit equipment that could influence the
driver's control of the vehicle must have a type approval for your
vehicle and must carry the e mark.
WARNING
Mobile telephones or radio equipment which are operated inside
the vehicle without a correctly installed external aerial can create
excessive magnetic fields that could cause a health hazard.
Note
•
Any retrofit installation of electrical or electronic equipment in
the vehicle will affect its type approval. In extreme cases this could
mean that you might lose the type approval for your vehicle.
•
Please refer to the mobile telephone/radio operating
instructions.
document_0900452a8179700c.book Seite 251 Donnerstag, 22. März 2007 10:19 10
Page 257 of 313
Self-help255
Controls
Safety
Driving tips
General maintenance
Self-help
Technical data
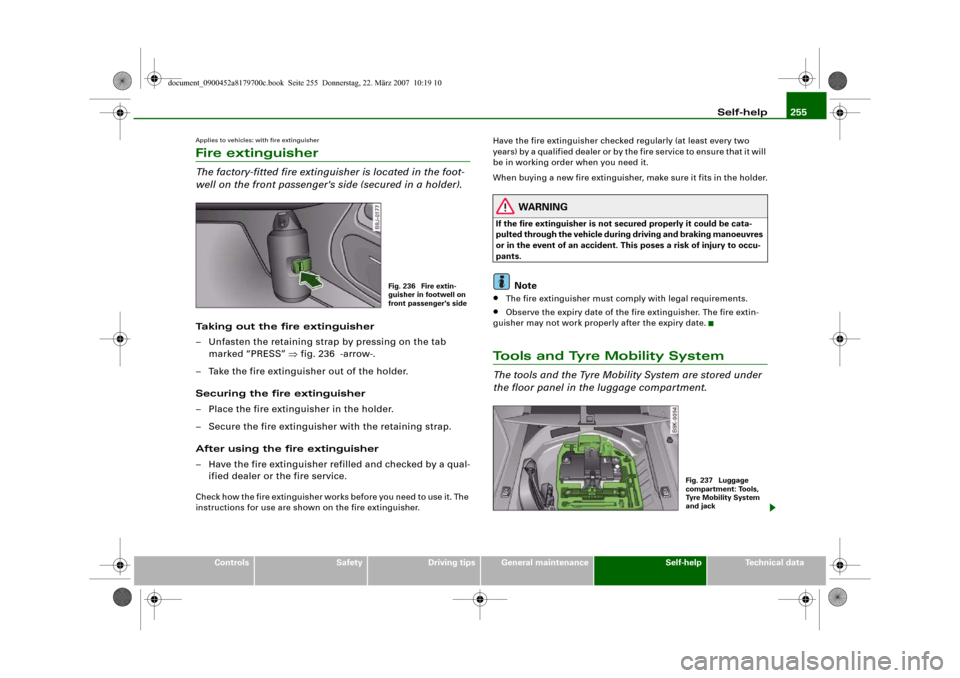
Applies to vehicles: with fire extinguisherFire extinguisherThe factory-fitted fire extinguisher is located in the foot-
well on the front passenger's side (secured in a holder).Taking out the fire extinguisher
– Unfasten the retaining strap by pressing on the tab
marked “PRESS” ⇒fig. 236 -arrow-.
– Take the fire extinguisher out of the holder.
Securing the fire extinguisher
– Place the fire extinguisher in the holder.
– Secure the fire extinguisher with the retaining strap.
After using the fire extinguisher
– Have the fire extinguisher refilled and checked by a qual-
ified dealer or the fire service.Check how the fire extinguisher works before you need to use it. The
instructions for use are shown on the fire extinguisher.Have the fire extinguisher checked regularly (at least every two
years) by a qualified dealer or by the fire service to ensure that it will
be in working order when you need it.
When buying a new fire extinguisher, make sure it fits in the holder.
WARNING
If the fire extinguisher is not secured properly it could be cata-
pulted through the vehicle during driving and braking manoeuvres
or in the event of an accident. This poses a risk of injury to occu-
pants.
Note
•
The fire extinguisher must comply with legal requirements.
•
Observe the expiry date of the fire extinguisher. The fire extin-
guisher may not work properly after the expiry date.
Tools and Tyre Mobility SystemThe tools and the Tyre Mobility System are stored under
the floor panel in the luggage compartment.
Fig. 236 Fire extin-
guisher in footwell on
front passenger's side
Fig. 237 Luggage
compartment: Tools,
Tyre Mobility System
and jack
document_0900452a8179700c.book Seite 255 Donnerstag, 22. März 2007 10:19 10
Page 259 of 313
Self-help257
Controls
Safety
Driving tips
General maintenance
Self-help
Technical data How to use the compact temporary spare wheel
Should you ever have a punctured tyre, the compact temporary
spare wheel is only intended for temporary use until you can reach
a workshop. The standard-size road wheel should be refitted as
soon as possible.
Please note the following restrictions when using the compact
temporary spare wheel. The compact temporary spare wheel is
designed specifically for this model. For this reason, do not use a
temporary spare from a different type of vehicle.
Snow chains
For technical reasons, snow chains must not be used on the
compact temporary spare wheel.
If you should have a puncture on one of the front wheels when using
snow chains, fit the compact temporary spare in place of one of the
rear wheels. You can then attach the snow chains to the wheel taken
from the rear and use this wheel to replace the punctured front
wheel.
WARNING
•
The tyre pressures must be checked and corrected as soon as
possible. The tyre pressure of the compact temporary spare wheel
must be 4.2 bar – an incorrectly inflated tyre can cause an acci-
dent.
•
Do not drive faster than 80 km/h - higher speeds can cause an
accident.
•
Avoid heavy acceleration, hard braking and fast cornering – risk
of accident.
•
Never use two or more compact spare tyres at the same time –
risk of accident.
•
No other type of tyre (normal summer or winter tyres) may be
fitted on the compact temporary spare wheel.
Ty r e r e p a i r sGeneral information and safety notes
Repaired tyres are only suitable for temporary use.Your vehicle is equipped with a tyre repair kit: the Tyre Mobility
System (TMS).
In the event of a puncture you will find the TMS, which consists of a
sealing compound and an electric compressor, located under the
floor panel in the luggage compartment.
The TMS will reliably seal tyres damaged by foreign bodies,
provided that the cuts or punctures are no larger than approx. 4 mm
in diameter.
It is not necessary to remove the foreign body from the tyre.
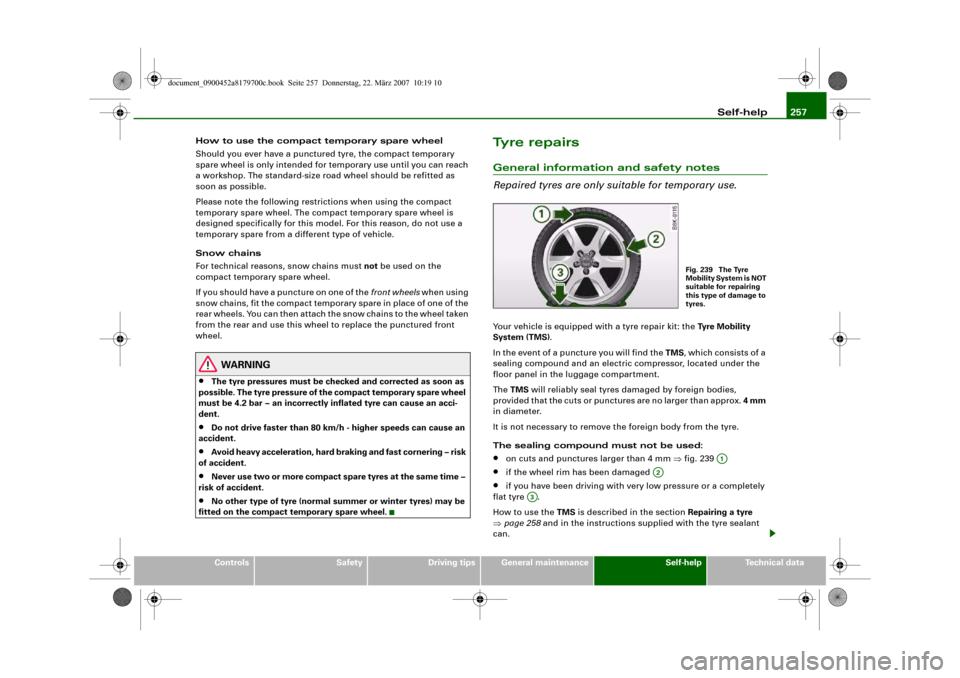
The sealing compound must not be used:•
on cuts and punctures larger than 4 mm ⇒fig. 239
•
if the wheel rim has been damaged
•
if you have been driving with very low pressure or a completely
flat tyre .
How to use the TMS is described in the section Repairing a tyre
⇒page 258 and in the instructions supplied with the tyre sealant
can.
Fig. 239 The Tyre
Mobility System is NOT
suitable for repairing
this type of damage to
tyres.
A1
A2
A3
document_0900452a8179700c.book Seite 257 Donnerstag, 22. März 2007 10:19 10
Page 261 of 313
Self-help259
Controls
Safety
Driving tips
General maintenance
Self-help
Technical data
– Check whether a repair is possible using the Tyre
Mobility System ⇒page 257.
– Ensure that all passengers leave the vehicle and move
away from the danger area ⇒.
– Take the tyre sealant can and the electric compressor out
of the luggage compartment ⇒page 255.
– Fix the sticker “max. 80 km/h”, which is included with the
tyre sealant can, onto the instrument cluster where the
driver will see it.
Filling the tyre
– Shake the tyre sealant can well.
– Screw the enclosed filling hose onto the sealant can as
far as it will go. This will automatically pierce the foil
sealing the can.
– Take the valve cap off the tyre valve and use the enclosed
valve insert tool to unscrew the valve insert ⇒page 258,
fig. 240.
– Place the valve insert onto a clean surface.
– Remove the sealing plug from the filling hose and insert
the hose into the tyre valve.
– Hold the tyre sealant can upside down and fill the
complete contents of the can into the tyre.
– Then disconnect the hose and screw the valve insert
firmly back into the tyre valve.Inflating the tyre
– Screw the filling hose of the electric compressor onto the
tyre valve and plug the connector into the cigarette
lighter.
– Pump the tyre up to 2.0 to 2.5 bar and monitor the pres-
sure shown on the pressure gauge.
– If the tyre pressure remains lower than the value speci-
fied above drive the vehicle approx. 10 metres forwards
or backwards, so that the sealant can spread evenly in
the tyre. If the pressure is still lower than the specifica-
tion the tyre is too badly damaged and cannot be
repaired using the tyre sealant.
Final checks
– After about 10 minutes stop to check the tyre pressure.
– If tyre pressure is less than 1.3 bar, the tyre is too badly
damaged. Do not drive on. You should obtain profes-
sional assistance.
WARNING
•
If you have a puncture in moving traffic, switch on the hazard
warning lights and place the warning triangle in a visible location.
This is for your own safety and also warns other road users.
•
Make sure your passengers wait in a safe place (for instance
behind the roadside crash barrier).
•
Please observe the manufacturers' safety notes on the
compressor and the instructions supplied with the tyre sealant
can.
•
If it was not possible to build up a tyre pressure of 2.0 bar
within 6 minutes this means that the tyre is too badly damaged.
Do not drive on.
document_0900452a8179700c.book Seite 259 Donnerstag, 22. März 2007 10:19 10
Page 263 of 313
Self-help261
Controls
Safety
Driving tips
General maintenance
Self-help
Technical data
–Loosen the wheel bolts ⇒page 261.
–Raise the car with the jack* ⇒page 262.
–Ta k e o f f the wheel with the flat tyre and then put on the
spare wheel* ⇒page 263.
–Lower the vehicle to the ground.
– Tighten the wheel bolts firmly i n d i a g o n a l s e qu e n c e w i t h
the box spanner ⇒page 261.
–Fit the hub cap back on.After changing a wheel
What you must do after changing a wheel.– Place the wheel with the defective tyre in the spare wheel
well and secure it.
– Put the tools and the jack* back in the luggage compart-
ment.
–The inflation pressure of the newly fitted spare tyre must
be checked as soon as possible.
–Have the tightening torque of the wheel bolts checked as
soon as possible with a torque wrench. The correct tight-
ening torque is 120 Nm.
– Have the flat tyre replaced as quickly as possible.
Note•
If you notice that the wheel bolts are corroded and difficult to
turn when changing a wheel, they must be replaced before having
the tightening torque checked.
•
In the interest of safety, drive at moderate speeds until the tight-
ening torque of the wheel bolts has been checked.
Hub caps
The hub caps must be removed for access to the wheel
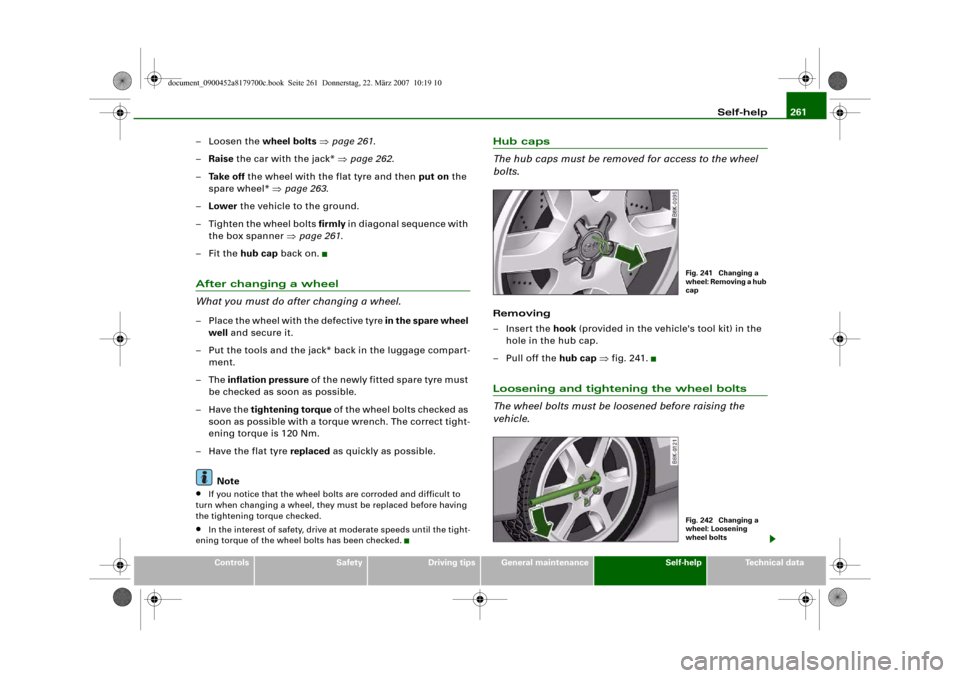
bolts.Removing
– Insert the hook (provided in the vehicle's tool kit) in the
hole in the hub cap.
–Pull off the hub cap ⇒fig. 241.Loosening and tightening the wheel bolts
The wheel bolts must be loosened before raising the
vehicle.
Fig. 241 Changing a
wheel: Removing a hub
capFig. 242 Changing a
wheel: Loosening
wheel bolts
document_0900452a8179700c.book Seite 261 Donnerstag, 22. März 2007 10:19 10
Page 265 of 313
Self-help263
Controls
Safety
Driving tips
General maintenance
Self-help
Technical data
– Now fit the crank handle onto the jack by inserting it
in the opening on the knob ⇒page 262, fig. 244. Turn the
crank handle clockwise or anti-clockwise to secure it in
place.
– Raise the vehicle by winding the crank handle until the
defective wheel is clear of the ground.Recesses at the front and rear of the door sills mark the jacking
points ⇒page 262, fig. 243. There is one jacking point for each
wheel. The distance from the jacking points to the wheel arches is
approximately 20 cm at the front and 40 cm at the rear. The jack may
only be applied at the seam of the jacking points shown.
An unstable surface under the jack may cause the vehicle to slip off
the jack. Always provide a firm base for the jack on the ground. If
necessary use a large, strong board or similar support. On a hard,
slippery surface (such as tiles) use a rubber mat or similar to prevent
the jack from slipping.
WARNING
•
Prevent the base of the jack from slipping – risk of injury.
•
The car can be damaged if the jack is not applied at the correct
jacking points. There is also a risk of injury since the jack can slip
off suddenly if it is not properly engaged.
Taking off the wheel and putting on the spare wheel
Step-by-step instructions for taking off the wheel and
putting on the spare wheel.Change the wheel as described below after loosening the
wheel bolts and raising the vehicle with the jack*.
Taking off the wheel
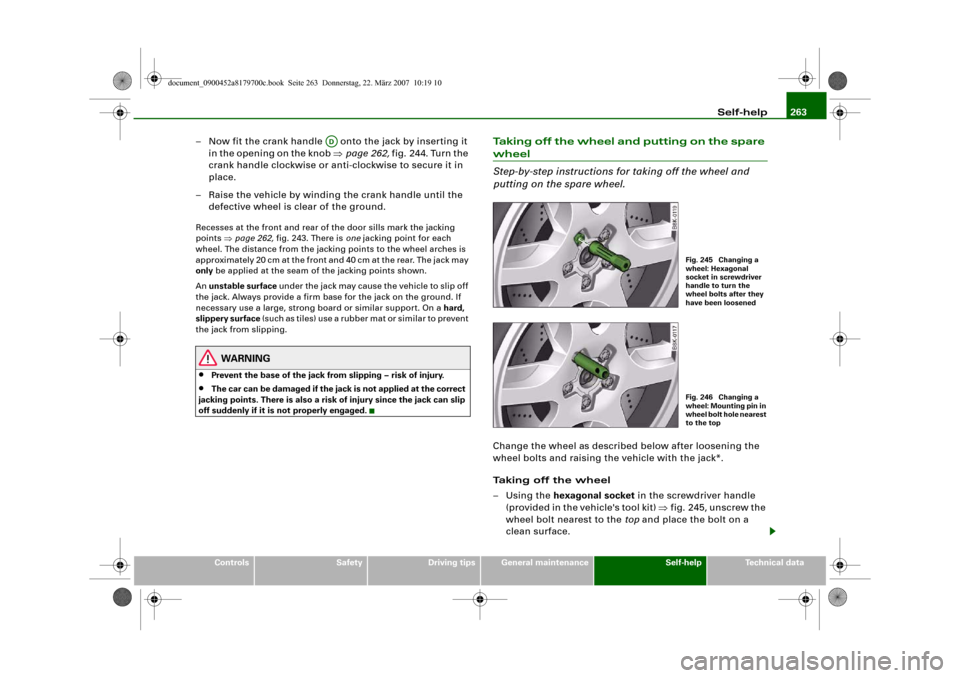
–Using the hexagonal socket in the screwdriver handle
(provided in the vehicle's tool kit) ⇒fig. 245, unscrew the
wheel bolt nearest to the top and place the bolt on a
clean surface.
AD
Fig. 245 Changing a
wheel: Hexagonal
socket in screwdriver
handle to turn the
wheel bolts after they
have been loosenedFig. 246 Changing a
wheel: Mounting pin in
wheel bolt hole nearest
to the top
document_0900452a8179700c.book Seite 263 Donnerstag, 22. März 2007 10:19 10
Page 267 of 313
Self-help265
Controls
Safety
Driving tips
General maintenance
Self-help
Technical data
– Insert the hook (provided in the vehicle's tool kit) in the
hole in the hub cap.
–Pull off the hub cap ⇒page 261, fig. 241.
– Insert the adapter completely into the wheel bolt .
– F i t t h e b o x s p a n n e r as f a r as i t w i l l g o o v e r t h e a d a p t e r .
– Loosen or tighten the wheel bolt ⇒page 261.It is advisable to carry the wheel bolt adapter in the vehicle. The
adapter is normally stored in the vehicle tool kit, underneath the
towline anchorage. It should be put back there after use.
The code number of the anti-theft wheel bolt is stamped on the front
o f t h e a d a p t e r. Yo u r A u d i d e a l e r w i l l n e e d t h i s n u m b e r t o r e p l a c e t h e
adapter if lost.
Note
Note the code number of the anti-theft wheel bolt and keep it in a
safe place – not in your vehicle.Jump-startingBefore starting the engine
If necessary, the engine can be started by connecting it to
the battery of another vehicle.If the engine should ever fail to start because of a discharged
battery, the battery can be connected to the battery of another
vehicle to start the engine. Suitable jump leads are required.
Both batteries must be rated at 12 Volts. The capacity (Ah) of the
booster battery should not be significantly lower than that of the
discharged battery.Jump leads
The jump leads must be heavy enough to carry the starter current.
Refer to the details given by the manufacturer.
Only use jump leads with insulated battery clamps.
Positive cable – usually red
Negative cable – usually black
WARNING
•
When it is discharged the battery can freeze at temperatures
around 0°C. A frozen battery must first be thawed out before
connecting the jump leads, as it could otherwise explode.
•
Please note the safety warnings referring to working in the
engine compartment ⇒page 231.Note
•
There must be no contact between the two vehicles as otherwise
current could flow as soon as the positive terminals are connected.
•
The discharged battery must be properly connected to the
vehicle's electrical system.
•
Switch off the car telephone if necessary. Details will be given in
the manufacturer's instructions for the car telephone.
A2
A1A2
document_0900452a8179700c.book Seite 265 Donnerstag, 22. März 2007 10:19 10
Page 269 of 313
Self-help267
Controls
Safety
Driving tips
General maintenance
Self-help
Technical data terminal must not touch metal parts of the vehicle: this can cause
short circuiting.
•
Do not bend over the batteries – risk of acid burns.
•
The screw plugs on the battery cells must be screwed in firmly.
•
Keep sparks, flame and lighted cigarettes away from batteries:
the gases given off can cause an explosion.
•
If jump-starting another vehicle, position the jump leads in
such a way that they cannot come into contact with any moving
parts in the engine compartment of the other vehicle.Caution
Please note that the above method of connecting the leads is meant
for jump-starting your vehicle. If jump-starting another vehicle, you
should not connect the negative lead (–) to the negative terminal of
the discharged battery, but directly to the engine block or a solid
metal part bolted to the engine block. If the battery of the other
vehicle does not have a gas vent, there is a risk that a mixture of
oxygen and hydrogen gas can accumulate and cause an
explosion.Tow-starting and towing awayGeneral notes
Points to observe when tow-starting or towing awayIf you use a towrope:
Notes for the driver of the towing vehicle
– The towrope must be taut before driving off.– Engage the clutch very gently when starting to move; on
vehicles with automatic gearbox press the accelerator
slowly.
Notes for the driver of the towed vehicle
– The ignition should be switched on so that the turn
signals, horn, windscreen wipers and washers can be
used. Please ensure that the steering wheel is unlocked
when you switch on the ignition, and that it moves freely.
–Put gear lever in neutral (manual gearbox) or move
selector lever to position N (automatic gearbox).
– The brake servo and power steering only work when the
engine is running. Considerably more effort is required
on the brake pedal and steering wheel when the engine
is switched off.
– Ensure that the towrope remains taut at all times when
towing.
Towrope or towbar
It is easier and safer to tow a vehicle with a towbar. You should only
use a towrope if you do not have a towbar.
A towrope should be slightly elastic to reduce the loading on both
vehicles. It is advisable to use a towrope made of synthetic fibre or
similar material.
Attach the tow-rope or tow-bar only to the towing anchorages
intended for this purpose ⇒page 268 or ⇒page 269.
Driving technique
Towing requires some experience – especially when using a
towrope. Both drivers should be familiar with the technique required
for towing. Inexperienced drivers should not attempt to tow-start or
tow away another vehicle.
WARNING (continued)
document_0900452a8179700c.book Seite 267 Donnerstag, 22. März 2007 10:19 10