light AUDI A5 COUPE 2010 Manual PDF
[x] Cancel search | Manufacturer: AUDI, Model Year: 2010, Model line: A5 COUPE, Model: AUDI A5 COUPE 2010Pages: 360, PDF Size: 84.39 MB
Page 147 of 360
__________________________________________________ A_ u_ d _ i_ d_ ri_v _ e_ s_ e_ le_ c_t _ __.9'
[ i J Tip s
• Sporty shifting characteristics can be set by selecting the
DYNAMIC mode . The S selector lever position is not available .
• The dynamic steering may make noise when sta rting or stopping
the engine. This does not indicate a problem. •
Applie s to v ehic les: wit h dr ive se le ct
Selecting the driving mode
You can choose between COMFORT, AUTO, DYNAMIC and
INDIVIDUAL* modes.
t
Con tro ls and eq uip
ment
i ;
-
~ ·
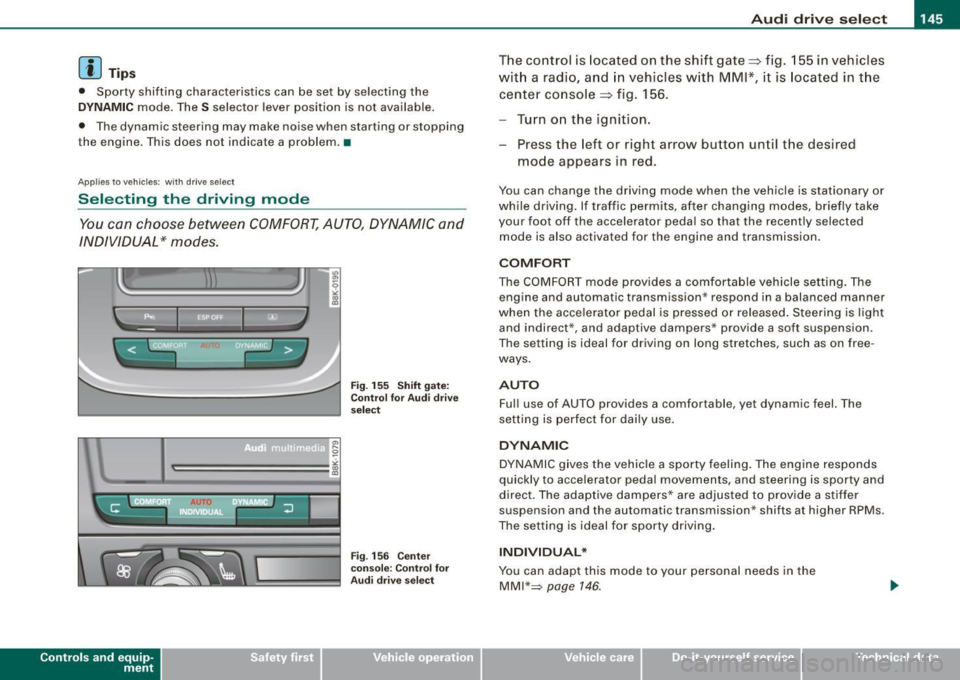
Fig. 15 5 Shift g ate:
Co ntr ol fo r Aud i d rive
s el ect
Fi g. 15 6 Center
co nso le: Co ntrol for
Aud i d rive s elect
The co ntrol is located on the shift gate=:> fig. 155 in vehicles
wit h a radi o, a nd in vehicles w ith
MMI *, it is located in t he
cente r co nsole =:> fig . 156.
Turn o n the ignit ion.
Press the left or right arrow button unt il the desired
mode appears in red .
You can change the driving mode when the vehicle is stationary or
while driving. If traffic permits, after changing modes, briefly take
your foot off the accelerator peda l so that the recently se lected
mode is also activated for the engine and transmission .
COMFORT
The COMFORT mode provides a comfortable vehicle setting. The
engine and automatic transmission * respond in a balanced manner
when the acce lerator pedal is pressed or released . Steering is light
and indirect* , and adaptive dampers* provide a soft suspension .
The sett ing is ideal for driving on long stretches, such as on free
ways .
AUTO
Ful l use of AUTO prov ides a comfo rtable , yet dynamic feel. The
setting is perfect for dai ly use .
DYNAMIC
DYNAMIC g ives the vehicle a sporty feeling . The engine responds
quickly to accelerator peda l movements, and steering is sporty and
direc t. The adaptive dampers * are adjusted to provide a stiffer
suspension and the automatic transmission * shifts at higher RPMs.
The setting is ideal fo r sporty driving .
INDIVIDUAL *
You can adapt this mode to your pe rsonal needs in the
MMI"~ page 146 .
Vehicle care I I irechnical data
Page 149 of 360

____________________________________________________ T_ r_ a _n _s_ m_ i_ s _ s_ i_ o _ n _ ___._
Transmission
Manual transmission
Applies to vehicles: with manual transmission
Gearshift lever
The clutch pedal must be depressed all the way before
you can start the engine.
The manual transmission in your Audi is equipped with an
interlock-feature.
- Depress the clutch pedal all the way.
- Start the engine with the gearshift
lever in Neutral and
the clutch pedal depressed .
0 Note
Always depress the clutch pedal fully when changing gears. Do not
hold the vehicle on a hill with the clutch pedal partially depressed .
This may cause premature clutch wear or damage .
[ i J Tips
• Resting your hand on the gearshift lever knob while driving will
cause premature wear in the transmission.
• The back-up lights go on when you shift into Reverse with the
ignition on .•
Con tro ls and eq uip
ment
App lies to vehicles: with manual transm ission
Gearshift pattern (6-speed manual
transmission )
Engaging reverse gear (R)
Fig. 158 Gearshift
pattern: 6-s peed
manual transmission
- Move the shift lever all the way to the left, press it down,
then push it forward.
Especially after driving forward, stop the vehicle completely, shift
into
Neutral and rest the shift lever briefly in Neutral before shifting
into
Reverse. •
Automatic transmission
Applies to vehicles: wi th au tomat ic transmission
Introduction
Your vehicle is equipped with an electronically controlled 6 -speed
automatic transmission. Upshifting and downshifting takes place
automatically. ~
Vehicle care I I irechnical data
Page 152 of 360
• ..__T_ r_a _n_ s_ m_ is_ s_i o _ n ______________________________________________________ _
Before you move the selector lever to R, press both the button in the
handle of the selector lever
and the brake pedal at the same time .
When the ignition is on , the backup lights illumina te when the
selector lever is moved into R.
N -N eutr al
The transmission is in neutral in this position. Shift to this position
for standing with the brakes applied=:>
page 150.
When the vehicle is stationary or at speeds below 3 mph (5 km/h) ,
you must always apply the footbrake before and while moving the lever out of
N .
D -N or mal pos itio n fo r d rivi ng forward
Posi tion Dis for normal city and highway driving . It ranges from zero
to top speed and all gears shift automatically, depending on engine load , driv ing spe ed and automa tically selected shift programs .
When the vehicle is s tationary or at speeds below 3 mph (5 km/h).
you must always apply the foot brake befo re and while moving the
lever to
D ou t of N.
In certain circumstances it may be advantageous to temporarily
switch to the manual shift program to manually select gear ratios to
match specific driving conditions=:>
page 152.
S -Sp o rt posit io n*
Select this pos ition for sportier performance. In this position, the
transmission will not upshift as soon , allowing the vehicle to use the
increased power available at higher engine speeds to achieve live
lier acceleration.
When the vehicle is stationary or at speeds below 3 mph (5 km/h) ,
you must always apply the foot brake befo re and while moving the
lever to
S out of N.
& WARNING
R ea d and foll ow all WARNIN GS =:> & in "Dri vin g th e a utom atic
tr an smi ssion " on
pag e 148.
0 Note
Coasting downhill with the transmission in N and the engine not
running will result in damage to the automa tic transmission and
possibly the catalytic converter. •
Applies t o ve hicl es: wit h automa tic trans mis si on
Automatic Shift Lock (ASL )
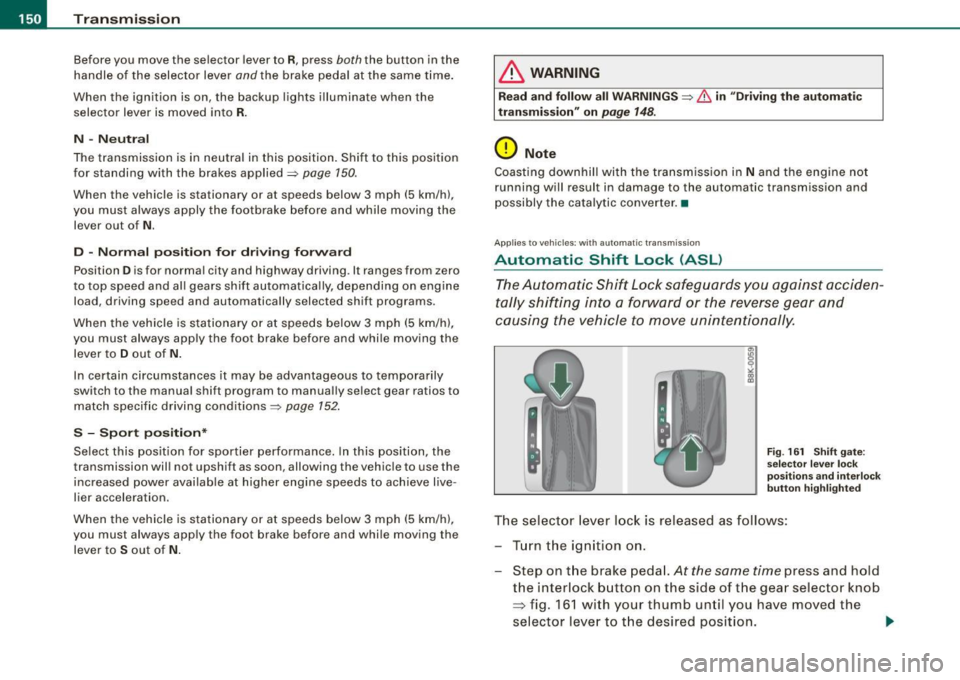
The Automatic Shift Lock safeguards you against acciden
tally shifting into a forward or the reverse gear and
causing the vehicle to move unintentionally.
F ig . 16 1 Shift gate:
se lector le ver loc k
posit ions a nd int erl ock
butt on hi gh ligh ted
The selector lever l ock is released as follows :
Turn the ignit ion on .
Step on the brake peda l.
At the same time press and hold
the interlock button on the s ide of the gear selector knob
=> fig. 161 w ith your thumb until you have moved the
selector lever to t he desired position.
~
Page 153 of 360
Tra ns mi ssio n -
----------------
Aut omat ic selec to r l ever lock
The se lector lever is locked in the P and N positions when the igni
tion is turned on. To move the lever from these positions the driver
must depress the brake pedal. As a reminder to the driver, the
follow ing warning appears in the instrument cluster display when
the selector is in
P and N:
W hen sta tio nary app ly footbrake while selecting g ear
A time delay e lement prevents the selector lever from locking when
it is moved through the
N position (going from R to Dl. The locking
e lement will lock the selector lever if the lever is left in N (Neutral)
for more than approximately 1 second, without the brake peda l
being pressed.
At speeds above about 3 mph (5 km/h) the Automatic Shift Lock is
automatically deactivated in the
N position .
Interlock butt on
The lock button on the selector lever prevents the lever from being
accidentally shifted into certain positions. Pressing this button
deactivates the selector lever lock. Depending on the direction of
the shift, the selector lever locks at different positions. The positions
are highlighted in the illustration =>
page 150, fig. 161.
Igniti on key sa fe ty in te rlo ck
The key cannot be removed from the ignition unless the selector
lever is in the
P park position. When the ignition key is removed, the
selector lever wil l be locked in the
P position. •
Applies to vehicles : with automatic transm iss ion
Kick-down
The kick-down feature allows the vehicle to generate
maximum acceleration .
When you press the acce lerator pedal beyond the resistance point
that is reached at ful l throttle, the transmission wi ll select a lower
gear ratio based on vehic le speed and engine RPM. The engine RPM
Controls and equip
ment
wi ll be controlled to produce maximum vehic le acceleration as long
as you continue to press the accelerator pedal beyond this resis
tance point .
& WARNING
Be care ful whe n usi ng the kick -dow n fe atur e on slipp ery ro ads .
R apid acc eleration may cau se th e v ehicle to skid . •
App lies to vehicles : with automat ic transm ission
Dynamic shift program (DSP)
The aut omatic transmission is electronically controlled.
The transmission is se lf adapting and will a ut oma tica lly se lect the
best shift program suited to the driving conditions and driving style.
The transmission will select one of the
eco nom y programs when
you drive at a steady speed or a g radually changing speed without
heavy acceleration. This achieves optimum fuel efficiency, with early
upshifting and delayed downshifting.
The transmission will automatically select the
s p ort y shift programs
when you drive at higher speeds, or with heavy acceleration and
frequent ly changing speeds . Upshifts are delayed to make full use
of engine power . Downshifting takes place at higher engine speeds
than in the economy programs .
The se lect ion of the most su itable shift program is a continuous,
automatic process. The driver can also make the transmission
sw itch to a sporty program by
quick ly pressing down the gas peda l.
This causes the transmission to shift down to a lower gear to
achieve rapid acceleration, e.g. for quickly passing another vehicle .
You do not need to press the gas pedal into the kick-down range.
After the transm ission has upshifted, the original program is
selected accord ing to your driving sty le.
An additiona l shift program allows the automatic transmission to
select the proper gear for uph ill and downhi ll gradients. ..,.
I • •
Page 154 of 360
-Tr
ansmi ssio n
..__ ______________ _
This keeps the transmission from shifting up and down unneces
sari ly on hills. The transmission will shift down to a lower gear when
the driver presses the brake pedal on a downhi ll gradient. This
makes use of the braking effect of the engine without the need to
shift down manually. •
Applies to vehi cles: with aut om ati c transmi ssio n
Manual shift program
Using the manual shift program you can manually select
gears.
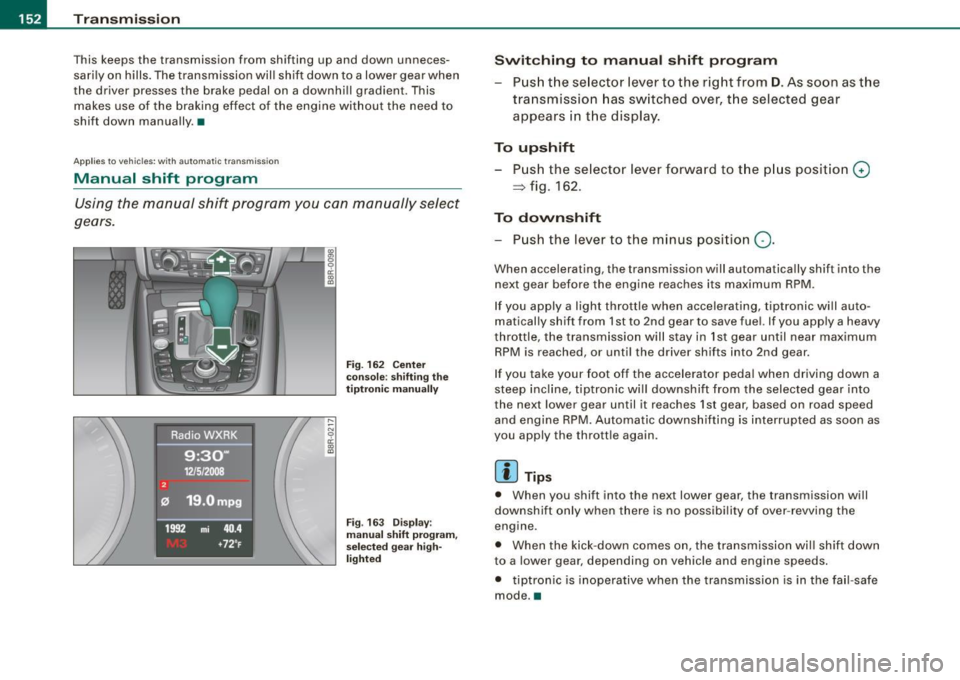
F ig . 162 Ce nter
conso le : sh if ting the
t iptr oni c man ually
Fig . 163 Disp lay:
m anua l shi ft p rogra m ,
selected gear hig h
li g ht ed
Swit chin g to m anu al s hift pr ogr am
Push the se lector lever to the right from D . As soon as the
transmission has switched over, the selected gear
appears in the display .
To upshift
Push the selector lever forward to the p lus position G)
~ fig . 162.
To dovvnshift
- Push the lever to the minus position Q.
When accelerating , the transmission will automatically shift into the
next gear before the engine reaches its maximum RPM .
If you apply a light throttle when accelerating, tiptronic wi ll au to
matically shift from 1st to 2nd gear to save fuel. If you apply a heavy
throttle, the transmission will s tay in 1st gear until near maximum
RPM is reached, or unti l the driver shif ts into 2nd gear.
If you take your foot off the accelerator peda l when driving down a
steep inc line, tiptronic wi ll downshift from the selected gear into
the neX1 lower gear until it reaches 1st gear, based on road speed
and engine RPM. Automatic downshifting is interrupted as soon as
you apply the thrott le again .
[ i ] Tips
• When you shift into the next lower gear, the transmission will
downshift only when there is no possibi lity of over -revving the
engine .
• When the kick-down comes on , the transmission wil l shift down
to a lower gear , depending on vehicle and engine speeds .
• tiptron ic is inoperative when the transmission is in the fa il-safe
mode. •
Page 167 of 360
___________________________________________________ H_ o_m _ e_ L_ i_ n _k_ @_R _ __.1111
Applies to vehicles: with Homelin k® un iversal remote contro l
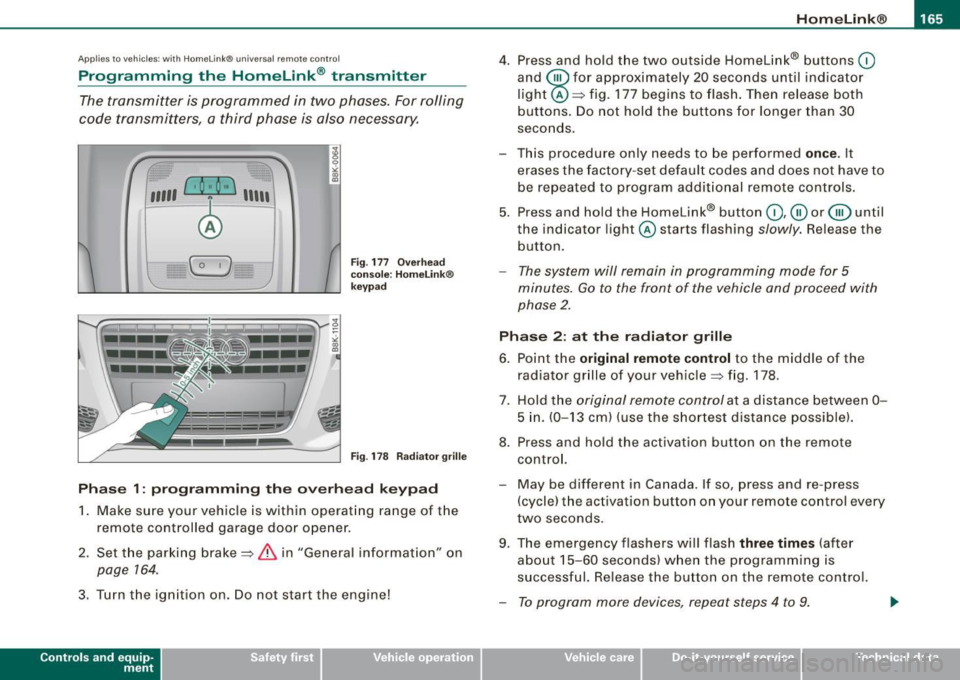
Programming the Homelink ® transmitter
The transmitter is programmed in two phases. For rolling
code transmitters, a third phase is also necessary.
,,,,, r, o: o "'' '''"
Fig . 177 Overhead
console: HomeLink ®
keypad
Fig . 178 Radiator grille
Phase 1: programming the overhead keypad
1. Make sure your vehicle is within operating range of the
remote controlled garage door opener.
2. Set the parking brake==>
& in "General information" on
page 764.
3. Turn the ignition on. Do not start the engine!
Contro ls and eq uip
ment
4. Press and hold the two outside Homelink® buttons 0
and @for approximately 20 seconds until indicator
light@==> fig. 177 begins to flash. Then release both
buttons. Do not hold the buttons for longer than
30
seconds.
- This procedure only needs to be performed
once . It
erases the factory-set default codes and does not have to
be repeated to program additional remote controls.
5. Press and hold the Homelink® button
0,@ or@ until
the indicator light @starts flashing slowly. Release the
button.
- The system will remain in programming mode for 5
minutes.
Go to the front of the vehicle and proceed with
phase 2.
Phase 2: at the radiator grille
6. Point the
original remote control to the middle of the
radiator grille of your vehicle==> fig. 178.
7. Hold the original remote control at a distance between
0-
5 in. (0-13 cm) (use the shortest distance possible).
8. Press and hold the activation button on the remote control.
- May be different in Canada . If so, press and re -press
(cycle) the activation button on your remote control every
two seconds.
9. The emergency flashers will flash
three times (after
about
15 -60 seconds) when the programming is
successful. Release the button on the remote control.
- To program more devices, repeat steps 4 to 9.
Vehicle care I I irechnical data
Page 168 of 360
• ..__H_ o_ m_ e_ L_in _ k_® ____________________________________________________ _
10. Press and ho ld the trained Homelink ® button and
observe t he indicator lig ht @ =>
page 165 , fig. 177 .
- If the indicator light is solid/continuous, programming is
complete and your device shou ld activate when you
press and release the tra ined Homelink ® button .
- If the indicator light b links rapidly for 2 seconds and is
then a solid/cont inuous light, proceed with phase 3 to
program a rolling code device .
Phase 3: rolling code prog rammin g
-A second person on a ladder who can safely reach the
garage door opener motor is recommended.
11 . Locate the "lea rn " button on the garage door opener
motor (refer to the operating instructions for t he opener ,
as the location of this button may vary by manufacturer).
12 . Press and release the lear n button on the garage door
opener motor .
-Not e: once the button is pressed, there are 30 se cond s in
which to in itiate t he next step.
1 3. On the Homeli nk® keypad inside the veh icle, f irmly
press and hold the Homelink ® button previously
programmed in phases 1 and 2 for two seconds and
release. Repeat th is sequence
twice .
-Some vehicles may require the press/hold/re lease
sequence up to three t imes to complete the tra ining
process.
- Homelink ® should now activate your rolling code
equipped device.
I f the 5 mi nute time limit is exceeded, the em erg ency flas hers w ill
fla sh one tim e to indicate that the process has been terminated. In
thi s case, repeat s teps 4 thro ugh 9 .
I f t he emergency flashers do not flash
three times (a fter about 15 -
60 seconds), prog ramming was not successful. In this case , repeat
steps
4 through 9 .
Remote control units for garage door openers in Canada are set to
stop transmi tting rad io frequency signals aft er two seconds . This
time may not be sufficient for the Homelink ® system to learn the
rad io freq uency signal. Perfo rm all o the r steps as described
above. a
Applies to veh icles: wit h Ho meli nk® unive rsal remote co ntro l
Operating the HomeLink ® transmitter
The Homelink® t ransmitter works in the some manner as
the original handheld remote control that came with the
system .
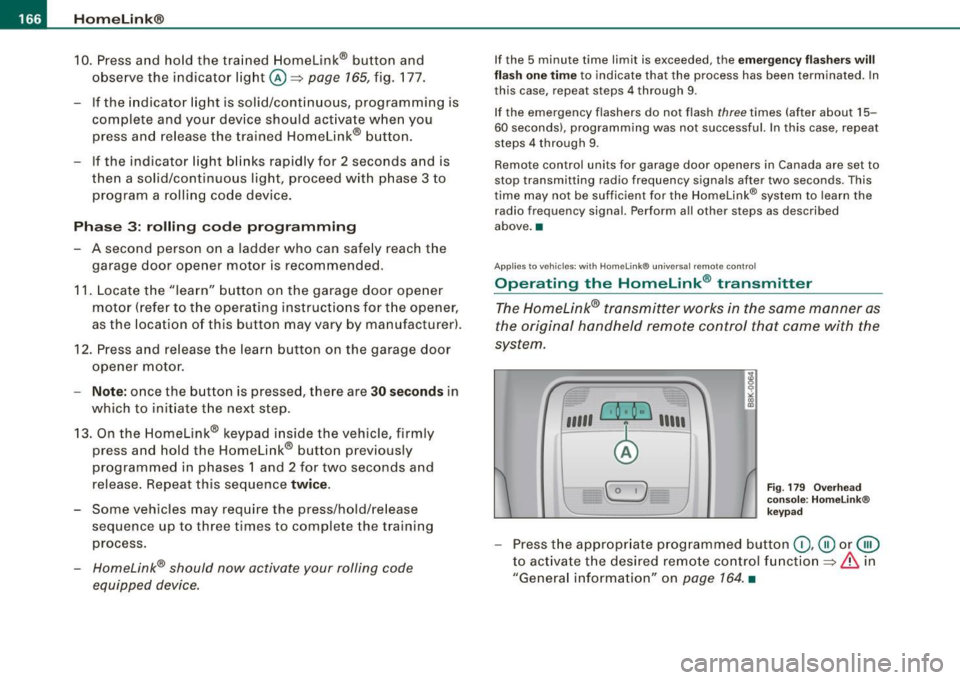
,,,,, r . o ~ o "', 1111 ,
@
B
Fig
. 17 9 Ove rhead
conso le: Hom eli nk®
key pad
- Press t he appropr iate programmed button 0 , ® or @
to activate the desired remo te co ntrol funct io n =>
& in
"General information" on
page 164. •
Page 169 of 360
___________________________________________________ H_ o_m_ e_ L_ i_ n _ k_ @_ R __ !II
Ap plies to vehi cles : w ith Hom elin k® un iversal re mote con tro l
Reprogramming a single button
A Homelink® button can be reprogrammed individually without affecting the other button allocations.
Programming the overhead keypad
Press the appropriate Homelink® button until the indi
cator light begins flashing slowly.
At the radiator grille
1. Point the original remote control to the middle of the
radiator grille of your vehicle~
page 165, fig. 178.
2. Hold the
original remote control at a distance between 0-
5 in. (0-13 cm) (use the shortest distance possible) .
3. Press and hold the activation button on the remote
control.
4. The emergency flashers will flash three times (after
about
15-60 seconds) when the programming is
successful. Now release the button on the remote
control.
- If the device utilizes a rolling code, please follow phase 3
of ~
page 165, "Programming the Homelink® trans
mitter" for rolling code programming.
This procedure will cause the existing programming on the
Homelink ® button to be erased!•
Controls and equip
ment
Ap plies to ve hicles: wit h Hom el ink ® universal re mote co ntro l
Erasing the programming of the Homelink ®
transmitter
When you erase the programming , the programming on
all three of the transmitter channels with be lost!
- Perform steps 1 to 4 as described on~ page 165, "Phase
1: programming the overhead keypad".
When completed, the Homelink ® system will be in the program
ming mode and is then ready to learn the codes for remo te
controlled devices.
[ i ] Tips
• Programmed buttons cannot be erased individual ly .
• For secu rity reasons you are advised to erase the programming
of the HomeLink ® system before you sell your vehicle. •
I • •
Page 171 of 360

________________________________________________ D_r_iv _ i _n_ g~ S_ a_ fe_ ly __ BI
Important things to do before driving
Safety is everybody's job! Vehicle and occupant safety
always depends on the informed and careful driver.
For your safety and the safety of your passengers, before
driving always:
-Make sure that all lights and signals are operat ing
correctly.
- Make sure that the tire pressure is correct.
- Make sure that all windows are clean and afford good
visibility to the outside.
- Secure all luggage and other items carefully =>
page 88.
-Make sure that noth ing can interfere w ith the pedals.
- Adjust front seat, head restraint and mirrors correctly for your height .
- Instruct passengers to adjust the head restraints
according to their height.
- Make sure to use the right ch ild restraint correctly to
protect children =>
page 213, "Child Safety ".
- Sit properly in your seat and make sure that your passen
gers do the same=>
page 69, "General recommenda
tions".
- Fasten your safety belt and wear it p roperly. Also instruct
your passengers to fasten the ir safety belts properly
=>
page 179. •
Controls and equip
ment Safety first
Vehicle operation
What impairs driving safety?
Safe driving is directly related to the condition of the
vehicle, the driver as well as the driver's ability to concen
trate on the road without being distracted.
The driver is responsible for the safety of the vehicle and all
of its occupants. If your ability to drive is impaired, safety
risks for everybody in the vehicle increase and you also
become a hazard to everyone else on the road =>& .There
fore:
Do not let yourself be distracted by passengers or by
using a cellular telephone .
NEVER drive when your driving ability is impaired (by
medications, alcohol, drugs, etc.).
- Observe all traffic laws, rules of the road and speed limits
and plain common sense .
- ALWAYS adjust your speed to road, traffic and weather
conditions.
- Take frequent breaks on long trips. Do not drive for more
than two hours at a stretch.
- Do NOT drive when you are tired, under pressure or when
you are stressed .
& WARNING
Impaired driving safety increases the risk of serious personal
injury and death whenever a vehicle is being used. •
Vehicle care Do-it-yourself service Technical data
Page 172 of 360

___ D_ ri_v _i_n -=g=--- S_ a_ f _e___, ly'---------------------------------------------------
Proper occupant seating positi ·ons
Proper seating position for the driver
The proper driver seating position is important for safe,
relaxed driving.
Fig. 180 The correct
distance between
driver and steering
wheel
Fig. 181 Correct head
restraint position for
driver
For your own safety and to reduce the risk of injury in the
event of an accident, we recommend that you adjust the
driver's seat to the following position:
- Adjust the driver's seat so that you can easily push the
pedals all the way to the floor while keeping your knee(s)
slightly bent=:>& . - Adjust the angle of the seatback so that it is in an upright
position so that your back comes in full contact with it
when you drive.
- Adjust the steering wheel so that there is a distance of at
least 10 inches (25 cm) between the steering wheel and
your breast bone=:> fig. 180. If not possible, see your
authorized Audi dealer about adaptive equipment.
- Adjust the steering wheel so that the steering wheel and
airbag cover points at your chest and not at your face.
- Grasp the top of the steering wheel with your elbow(s)
slightly bent.
- Adjust the head restraint so that the upper edge is as even with the top of your head as possible but no lower
than eye level and so that it is as close to the back of your
head as possible =:> fig. 181.
- Fasten and wear safety belts correctly=:>
page 183.
- Always keep both feet in the footwell so that you are in
control of the vehicle at all times.
For detailed information on how to adjust the driver's seat, see
=> page 72.
& WARNING
Drivers who are unbelted, out of position or too close to the airbag
can be seriously injured by an airbag as it unfolds. To help reduce
the risk of serious personal injury:
• Always adjust the driver's seat and the steering wheel so that
there are at least 10 inches
125 cm) between your breastbone and
the steering wheel.
• Always hold the steering wheel on the outside of the steering
wheel rim with your hands at the 9 o'clock and 3 o'clock positions ..