AUDI A5 COUPE 2018 Repair Manual
Manufacturer: AUDI, Model Year: 2018, Model line: A5 COUPE, Model: AUDI A5 COUPE 2018Pages: 409, PDF Size: 67.63 MB
Page 61 of 409
Step 2: Lift the power top storage
compartment lid out
Applies to: vehicles with power top
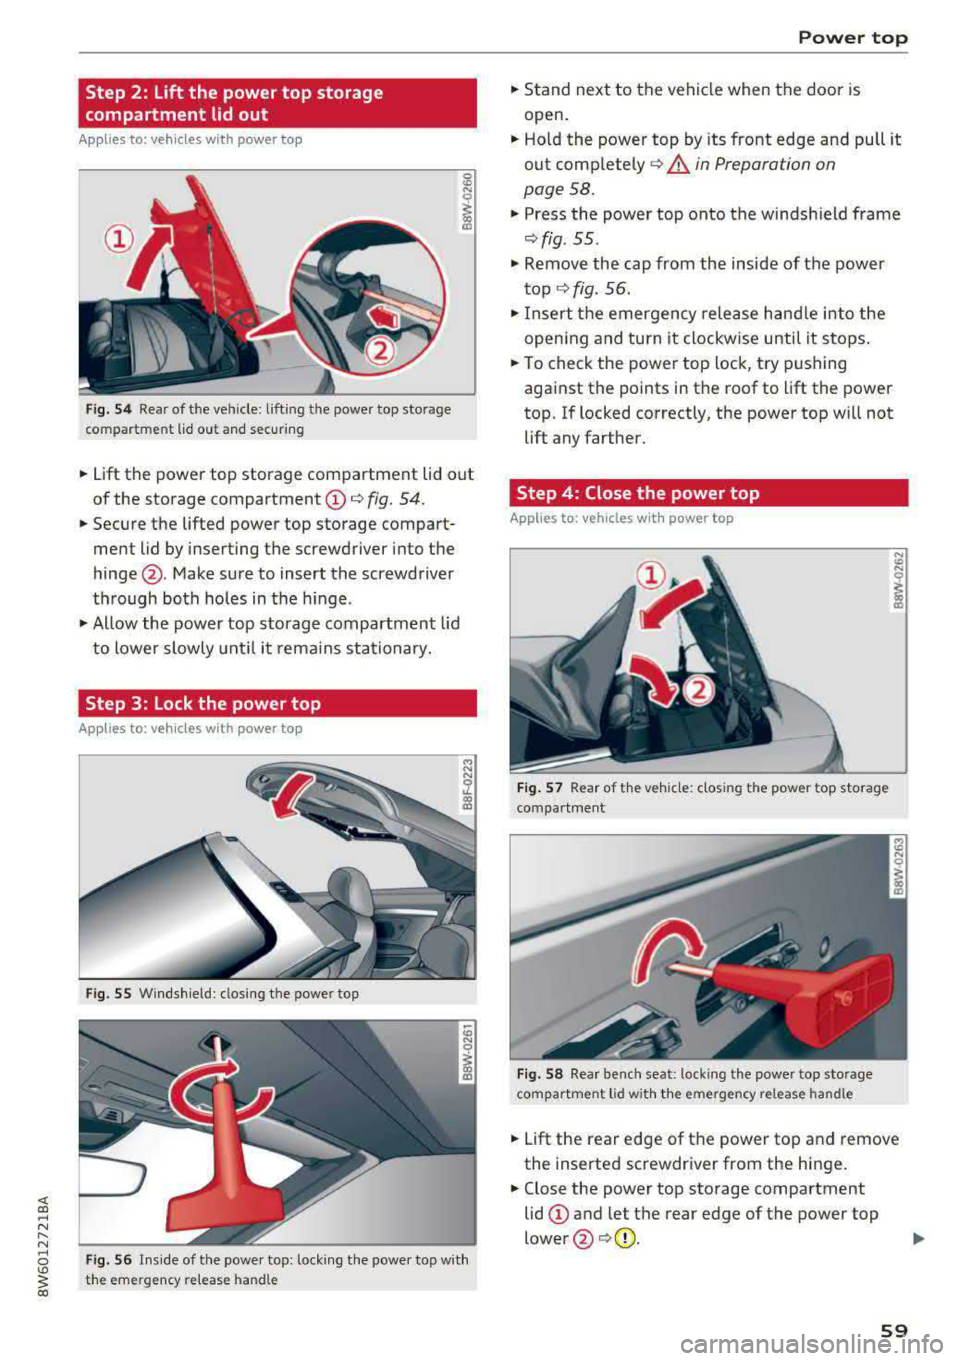
Fig. 54 Rear of the vehicle: lifting the power top storage
compartment lid out and secur ing
0
"' N 0
~ 00 CD
.. Lift the power top storage compartment lid out
of the storage compartment
(D q fig. 54.
.. Secure the lifted power top storage compart
ment lid by inserting the screwdriver into the
hinge @. Make sure to insert the screwdriver
through both holes in the hinge.
.. Allow the power top storage compartment lid
to lower slowly until it remains stationary.
Step 3: Lock the power top
Applies to: vehicles with power top
Fig. 55 Windsh ield: closi ng the power top
N N
5'. CX) Ill
Fig. 56 Inside of the powe r top: lock ing the powe r top wit h
the emergency relea se handle
Power top
.. Stand next to the vehicle when the door is
open .
.. Hold the power top by its front edge and pull it
out completely
q A in Preparation on
page 58.
.. Press the power top onto the windshield frame
qfig. 55 .
.. Remove the cap from the inside of the power
top
¢ fig. 56 .
.. Insert the emergency release handle into the
open ing and turn it clockw ise until it stops .
.. To check the power top lock, try pushing
against the points in the roof to lift the power
top. If locked correctly, the power top w ill not
lift any farther .
Step 4: Close the power top
Applies to: vehicles with power top
Fig. 57 Rear of t he vehicle: closing the power top storage
compartment
Fig . 58 Rear bench seat: locking the power top storage
compartment lid with the emergency release handle
N
"' N
~ 00 CD
.. Lift the rear edge of the power top and remove
the inserted screwdriver from the hinge .
.. Close the power top storage compartment
lid
(D and let the rear edge of the power top
lower @¢(D . ll>
59
Page 62 of 409
Power top
"'Insert the emergency release handle into the
opening in the rear panel and turn it in the
di
rection of the arrow until it locks into place
c>fig . 58.
"' Mount the cover again c> page 58, fig. 53.
"'Put the removed vehicle tool kit back in place .
A WARNING
-Drive a maximum of 44 mph (70 km/h) and
have the malfunction corrected immediately
by an authorized Audi dea ler or authorized
Audi Service Facility.
- Avoid touching the support rods and other
moving parts when opening or closing the
power top storage compartment lid. If do
you make contact, your hands could be
pinched .
- When positioning the power top, avoid con
tact with the supports or other moving
parts. Otherwise you could pinch your
hands.
- When pressing the power top down onto
the windshield frame, make sure that you
do not pinch yourself or anyone else ,
0 Note
After the power top has been lowered, it must
not be pressed down entirely on the molding
or it could result in damage. Drive to an
au
thorized Audi dealer or authorized Audi Serv
ice Facility immediately to have the malfunc
tion corrected .
(D Tips
Make sure the locking mechanisms are locked
securely.
60
Page 63 of 409
Lights and Vision
Exterior Lighting
Switching the lights on and off
--- ----~------'~
i
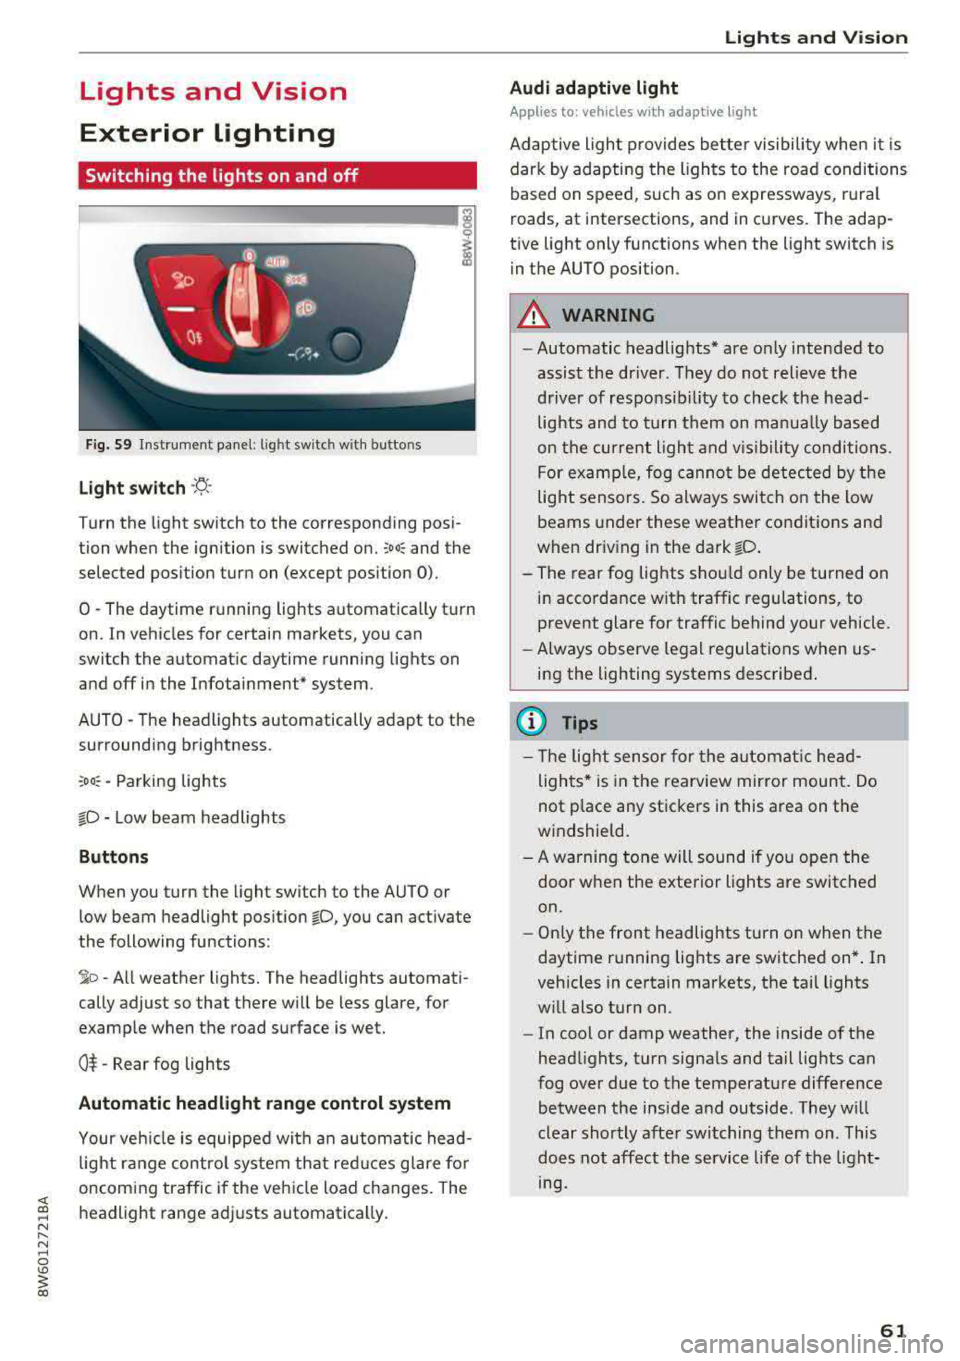
Fig . S9 Instrument panel: l ig ht sw itc h w ith buttons
Light switch ·'!;5- ·
Turn the light sw itch to the corresponding posi
tion when the ignition is switched on.
~oo: and the
selected pos ition turn on (except pos ition 0).
0 · The daytime r unning lights automat ica lly t urn
on. In veh icles for certain markets, you can
switch the automat ic daytime running lights on
and
off i n the Infotainment* system.
AUTO
-T he headlights automatically adapt to the
surrounding brightness.
~oo : -Parking lights
io -Low beam headlights
Buttons
When you turn the light switch to the AUTO or
l ow beam headlight pos it ion
io, you can activate
the following functions:
~ o -A ll weat her lights. The headlights automati
cally adjust so that there w ill be less glare, for
examp le when the road surface is wet.
0$ -Rear fog lights
Automatic headlight range control system
Your veh icle is equippe d with an autom atic head
l ight range contro l system that re duces glare fo r
oncoming traffic if the vehicle load c hanges. The
headlight range ad justs automatica lly.
Lights and V ision
Audi adaptive light
Appl ies to: vehicles wit h adaptive light
Ad aptive ligh t provides be tter visibili ty when i t is
dark by adapting the ligh ts to the road condi tions
based on speed, such as on e xpressways, rura l
roads, at intersections, and in c urves. The adap
t ive light only functions when the light switch is
i n the AUTO position .
A WARNING
--Automatic headlights* are on ly intended to
assist the driver. They do no t relieve the
driver of responsibil ity to check the head
lights and to turn t hem on manu ally b ased
on t he cur ren t ligh t and v is ibility conditi on s.
F o r e xamp le, fog canno t be de tec ted by t he
light sensors. So always swit ch o n the low
beams under these weather co nditions and
when dr iv ing in the dark
io .
- The rear fog lights s hou ld only be turned on
in acco rdance w ith traffic regulation s, to
prevent glare for traffic behind your vehicle.
- Always observe le g al regulations when
us
ing the lighting systems desc ribed .
(D Tips
- The lig ht sen sor for the automat ic he ad
ligh ts* is in the rearview mir ror mount. Do
not p lace any st ickers in this area on the
windshield.
- A warning tone will sound if yo u ope n the
door whe n the e xte rior lights a re switched
on .
- Only t he front headlights turn on when t he
daytime running lights are sw itche d on* . In
vehicles in certain markets, the tail lights
w ill also turn on.
- In cool or damp weather, the inside of the
head lights, turn signa ls and tail lights can
fog over due to the temperature diffe rence
b etween the insi de and outside . They wi ll
clear shortly afte r swi tching them on . This
does n ot aff ect the service life of the light
mg.
61
Page 64 of 409
Lights and Vi sion
Turn signal and high beam lever
The lever operates the turn signals, the high
beams and the headlight flasher.
®
,
I
@
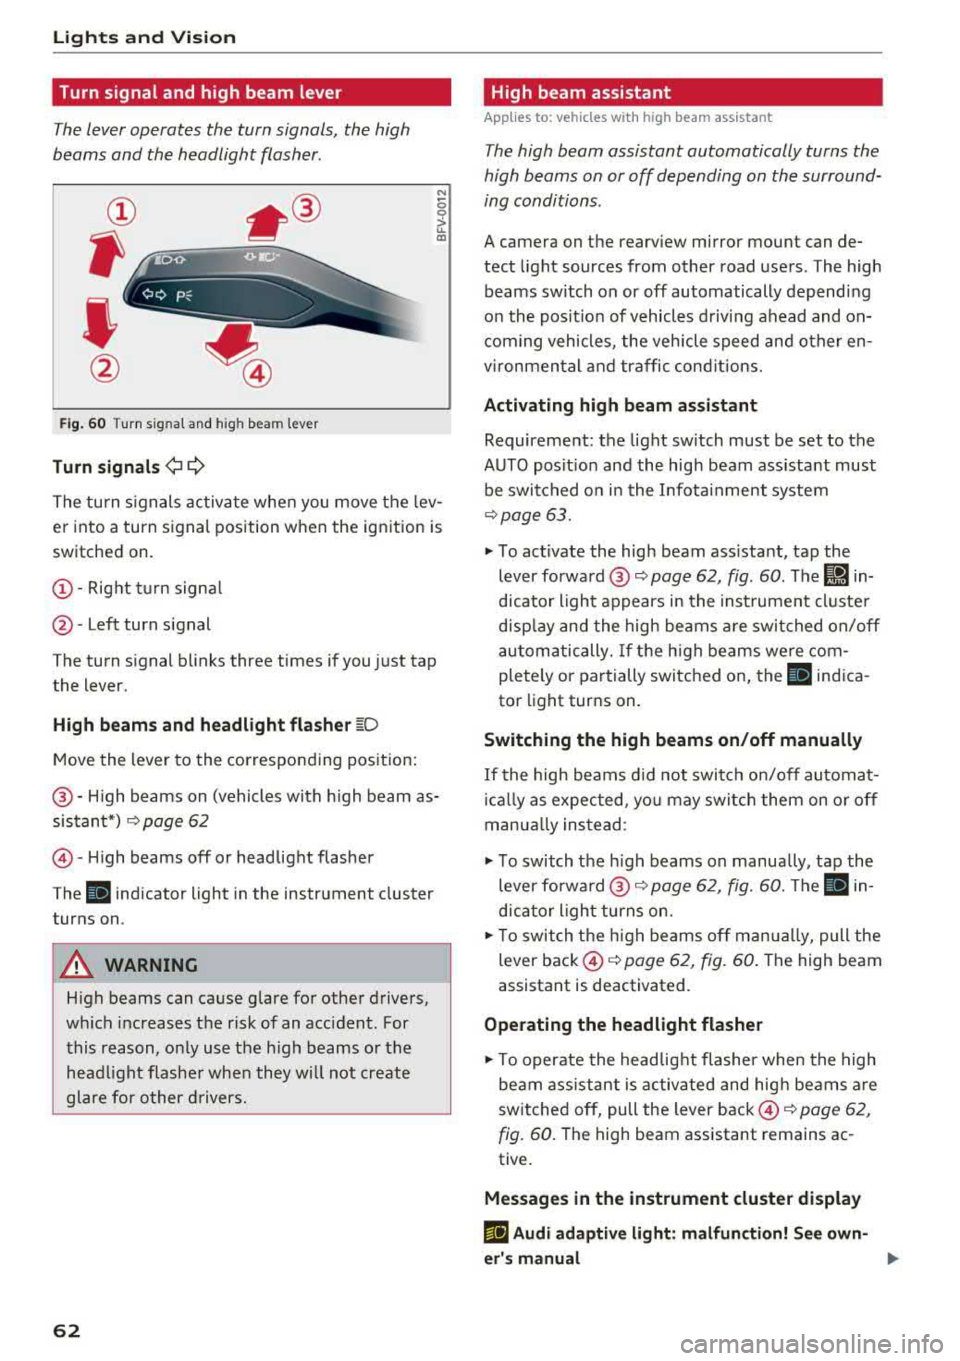
F ig . 60 Turn s ignal and high beam lever
Tu rn signals ¢ 9
N
0 0
> u. a,
The turn s ignals activate when you move the lev
er into a turn signal position when the ignition is
switched on.
@ -Right tu rn signa l
@-Left turn signal
The turn signal blinks three times if you just tap
the lever.
High b eams and h eadlight fl ash er ~D
Move the lever to the corresponding pos ition:
@ -High beams on (vehicles with h igh beam as
sistant*)
Q page 62
© -High beams off or headlight flasher
The
II indicator light in the instrument cluster
turns on.
A WARNING
High beams can cause glare for other drivers,
wh ich increases the risk of an accident. For
this reason, only use the h igh beams or the
head light f lasher when they will not create
glare for other d rivers.
62
· High beam assistant
Applies to: vehicles with high beam assistant
The high beam assistant automatically turns the
high beams on or off depending on the surround
ing conditions.
A camera on the rearview mirror mount can de
tect light sources from other road users. The high
beams switch on or off automatically depending
on the posit ion of vehicles d riving ahead and on
com ing vehicles, the veh icle speed and other en
vironmental and traffic cond itions.
Activ ating high b eam assistant
Requirement: the light sw itch must be set to the
AUTO posit ion and the high beam ass istant must
be switched o n in the Infota inment system
¢page 63.
~ To activate the high beam ass istant, tap the
lever forward @
c:> page 62, fig. 60 . The I!) in
dicator light appears in the inst rument cluste r
disp lay and the high beams a re swit ched on/off
automatically. If the h igh beams we re com
pletely or partially switched on, the II indica
tor light turns on.
Switching the high beams on /off manually
If the high beams d id not switch on/off automat
i ca lly as expected, yo u may switch them on or off
manua lly ins tead:
~ T o switch the h igh beams on manually, tap the
lever forward @
Q page 62, fig. 60. The Ill in
dicator light turns on.
~ T o switch the h igh beams off man ua lly, pull the
lever back ©
c:> page 62, fig. 60 . The high beam
assistant is deactivated.
Ope rating the headlight flasher
~ To operate the head lig ht flashe r when the high
beam ass istant is activated and hig h beams are
switched off, pull the lever back ©
c:> page 62,
fig. 60 .
The high beam assistant remains ac
tive.
Message s in the instrument cluster display
rlJ Audi adaptiv e light : malfun ction! See own
e r's manual
...
Page 65 of 409
• Headlight assista nt: m alfun cti on! See own
e r's manual
Drive to an autho rized Aud i deale r or a uthorized
Aud i Service Facility immedia tely to have the
malfunct ion corrected. You can still switch the
high beams on or off manually.
• Headlight a ssi stant : currently unavailabl e.
C amera view re stricted due to surrounding s.
See owne r's manual
The camera view is b locked, fo r example by a
sticker o r debris.
The sensor is located between the interior rear
view mirror and the windshield . Do not place any
stickers in th is area on the wi ndsh ield .
& WARNING
High beam assistan t is only i ntended to assist
the drive r. The dr iver is still responsible for
controlling the headlights and may need to
switch them on and off manually depend ing
on light and visibility conditions. It may be
necessary to ope rate them manually in s itua
tions such as:
- In adverse weather conditions such as fog, heavy ra in, b low ing snow or spraying water .
- On roads where oncoming traffic may be
partially obsc ured, such as expressways.
- When there are road users that do not have
su fficient lighting, s uch as bicyclers or
vehicles with dirty ta il lamps.
- In tight cu rves and on steep hills .
- In poorly lit areas.
- Wi th strong ref lec to rs , such as s igns.
- If the area of the windsh ield near the senso r
is f ogged ove r, dirty, icy or covere d wi th a
st icker.
Adjusting the exterior lighting
The functions ore adjust ed in the Infotainment
system.
• Select in the Info tainment system : IM ENUI but-
~ ton >Vehicle > left contro l button > Vehicle ~
~ setting s> Exterior lighting . N ~ 0
'° ~ co
Lights and Vision
Automatic headlights
You can adjust the following se ttings in the Au
t o matic headlights
menu :
Activation tim e -you can adjust if the headlights
switch on
Early , Medium or Late accord ing to the
sensit ivi ty of the light sensor .
Headlight assistant * -you can switch the high
beam assistant* on and off.
Entry /exit lighting
When it is dark, the Ent ry /e xit lighting ill umi
nates the area around the vehicle when unlocking
the vehicle and after switching off the ignit ion
and opening the dr iver's door .
The
Entry /exit lighting only works when it is
dark and the light sw itch is in the
AUTO position.
Daytime running l ight s
USA model s:
the daytime running lights can be
switched on/off . Sel ect
On or Off.
Canad a model s:
this f unction canno t be switched
off. They activate automatically eac h time the ig
nition is switched on .
Emergency flashers
-- ---
] -~ ~-
--------
Fig . 61 Ce nte r con so le: emergency flas her butto n
T he emergen cy flashe rs makes othe r d rivers
aware of your vehicle in dangerous situat ions.
• Press the 11 b utton to switch the emergency
flashe rs on or off .
You can ind icate a lane change or a turn when the
eme rgency flashers are switched on by using the
tu rn s ignal lever. The emergency flashe rs stop
tempora rily.
.,.
63
Page 66 of 409
Lights and Vision
The emergency flashers also work whe n the igni
tion is turned off.
@ Tips
You s hou ld sw itch the emergency flashers on
if:
- you are the last car in a traff ic jam so that
a ll other vehicles approaching from behind
can see you, or if
- your ve hicle has bro ke n down or you are
having an eme rgency, or i f
- you r vehicle i s being towed or if yo u are tow
ing another vehicle
Interior lighting
Front interior lighting
F ig. 62 Headliner: front inter ior l ight ing (example)
Press the corresponding button c::> fig . 62:
~-Door contac t switch on/off. The interior ligh t
ing is controlled automatically.
->;<-* -Inte rior l ighting on/off
Applies to: vehicles with touch-sensitive reading
lights: To turn the respect ive reading light on or
off, touch the surface @ briefly . To activate the
manual dimming function, touch the surface @
when the light is swi tched off and keep touching
it unt il t he desired brig htness is reached.
64
Rear interior lighting
Applies to: vehicles with rear interior lighting
Fig. 63 Headline r: rear reading lights
.,. To turn a reading light on or off, press the «~
button .
.,. To activate the ma nual dimming f unction*,
t o uch the s urface when the light is swi tc h ed off
'* and keep touching it unt il the desired
brightness is rea ched.
Interior lighting
Applies to: vehicles with interior lighting
.,. Select in the Infotainment system : IMENUj but
ton
> Vehicle > l eft control b utton > Vehicle
s etting s
> Interior lighting.
The inter io r l ight ing turns on when you sw itch
the headlights on w hile the ignition is on.
Version 1
To adjust the brightness of indiv idual zones, se
l ect
Front brightne ss*, Door brightnes s or Foot
well brightness .
Tur n the control kno b to the left
or to the right. Press the con trol knob to confirm
the b rightness.
Version 2
Se lect and confirm one of the d isplayed p rofiles
by pressing the con tro l knob.
Individual : you can custom ize the brightness and
color of individual zones. Press the right contro l
button. Press the control knob aga in to confirm
the set tings .
Audi driv e sel ect : the interio r and contour lig ht
i ng color changes depending on the d riving mode
selected in dr ive se lect*
c::> page 138 . ..,.
Page 67 of 409
@ Tips
The setting is automatica lly stored and as
signed to the remote control key that is be ing
used.
Instrument illumination
The brightness of the illumination for the instru
ments, display and head-up display* con be ad
justed.
Fig. 64 Instrument illum inatio n
~ Press the knob to release it.
~ Turn the knob toward "-" or"+" to reduce o r in
crease the brightness.
~ Press the knob again to return it to its original
position .
(D Tips
Depending on vehicle equ ipment, the instru
ment illumination (needles and gauges) may
turn on when the lights are off and the igni
tion is sw itched on. The illumination for the
gauges reduces automat ica lly and eventually
turns off as brightness outside increases. This
function reminds the driver to turn the low
beams on at the appropr iate time .
Lights and V ision
Vision
Adjusting exterior mirrors
Fig. 65 Driver's door: knob for the exterior mirrors
Turn the knob to the des ired position:
0
-a ll adjustment functions are deactivated.
q / P -adjusts the left/ right exter io r mirror.
Move the knob in the des ired direct ion.
Qiµ -Heats* the mirror glass depend ing on the
outside tempe rature.
8 -Folding exterior mirrors*. To fold the mirrors
out, turn the knob to one of the other positions.
In the Infotainment system, you can se lect if the
mir rors fold in a utomat ically when you lock the
vehicle
~ page 41.
Front passenger's exterior mirror tilt
function*
T o help you see the curb when backing into a
parking space, the surface of the mi rro r tilts
s lightl y. For this to happen, the knob must be in
the position for the front passenger 's exterio r
mirror .
You can adjust the tilted mirror s urfa ce by turn
i ng the knob in the desired direct ion. When you
move out of reverse and into another gear, the
new m irror pos ition is stored and assigned to the
key you are using .
The mirror goes back into i ts or iginal pos ition
once you drive forward faster than 9 mph
(15 km/h) or turn the ignition off .
.&_ WARNING
-C urved mirror surfaces (for example convex)
enlarge the field of vision. However, they
65
Page 68 of 409
Lights and Vision
make objects in the mirror appear smaller
and farther away. Your may estimate incor
rectly when you use these mirrors to gauge
your distance from the vehicles behind you
when changing lanes, which increases the risk of an accident.
{U) Note
- Applies to vehicles with power folding exte rior mirrors: if the mirror housing was
moved by outside forces (such as an impact
when maneuvering), you must use the pow
er folding function to fold the mirror all the
way out. The mirrors will make a loud noise
when they latch into place. The mirror hous
ing must not be moved back into place by
hand because this would impair the func
tion of the mirror mechanism.
- Applies to vehicles without power folding exterior mirrors: if the mirror housing was
moved by outside forces (such as an impact
when maneuvering), you must move it back
in place by hand.
- If you wash
th@ vehicle in an automatic car
wash, you must fold the exterior mirrors in
to reduce the risk of damage to the mirrors.
Never fold power folding exterior mirrors*
by hand . Only fold them in and out using
the power controls.
@ Tips
-If the power adjusting function malfunc
tions, the glass in both mirrors can be ad
justed by pressing on the edge of it by hand.
- The exterior mirror settings are stored with
the memory function*
9 page 74.
Dimming the mirrors
Your vehicle is equipped with a manual or auto
matic* dimming rearview mirror.
Manual dimming rearview mirror
.,. Pull the lever on the bottom of the mirror back.
66
Automatic dimming rearview mirror*
.,. The interior and exterior mirrors dim automati
cally when light shines on them, for example
from headlights on a vehicle behind you.
A WARNING
If the glass on an automatic dimming mirror
breaks, electrolyte can leak out. This liquid
can irritate the skin, eyes and respiratory sys
tem. If there is contact with the fluid, flush
immediately with plenty of water. Consult a
physician if necessary.
- Repeated or long-term exposure to electro lyte fluid can lead to irritation of the air
ways, especially in people with asthma or
other respiratory conditions. Take deep
breaths immediately after leaving the vehi
cle or, if this is not possible, open all of the
doors and windows as wide as possible.
- If electrolyte fluid enters the eyes, flush
them thoroughly with a large amount of
clean water for at least 15 minutes and then
seek medical attention.
- If electrolyte fluid comes into contact with
the skin, flush the affected area with clean
water for at least 15 minutes and then clean
with soap and water and seek medical at
tention. Clean affected clothing and shoes
thoroughly before wearing again.
- If the fluid was swallowed and the person is
conscious, flush the mouth with water for at least 15 minutes. Do not induce vomiting
unless this is recommended by medical pro
fessionals. Seek medical attention immedi
ately .
([) Note
If the glass on an automatic dimming mirror
breaks, electrolyte can leak out. This liquid
damages plastic surfaces and paint. Clean
this liquid as quickly as possible, for example
with a wet sponge.
(D Tips
- If the light reaching the rearview mirror is
obstructed, the automatic dimming mirror
will not function correctly,
Page 69 of 409

-The automatic dimming mirrors do not dim
when the interior lighting is turned on or
the reverse gear is selected.
Sun visors
9 :a
W- -- ----___._, dri~
Fig. 66 Su n visor
Sun visor
The sun visors for the driver and front passenger
can be re leased from their mounts and turned to
ward the doors
¢ fig. 66 @.
They can a lso be moved back and fo rth le ngth
wise in this posit ion.
Vanity mirror
The mirror lighting* switches on when the cover
over the vanity mirror @opens .
Windshield wipers
Switching the wipers on
Fig. 67 Windshield w iper lever
Move the windshield wiper lever to the corre
spond ing pos ition:
@ -Windshield wipers off
en 0 0
> u. III
@ -Rain sensor mode. The windshield wipers
switch on once the vehicle speed exceeds approx-
Lights and V ision
imately 2 mph (4 km/h) and it is raining. The
higher the sensitivity of the rain sensor that is set
(switch @to the right), the earlier the w ind
shield wipers react to moisture on the wind
shield. You can deactivate the rain sensor mode in the Infotainment system, wh ich sw itches the
intermittent mode on. To do this, select:
IMENUI
button > Vehicle > left control button > Driver
a ss istance > Rain sensor .
In inte rmittent mode,
you can adjust the interval time using the switch
@.
@ -Slow wiping
®-Fast wiping
@ -Single wipe. If you ho ld the lever in this posi
t ion longer, the wipers switch from slow wip ing
to fast wiping.
® -Clean the windshield . The wipers wipe one
time after several seconds of driving to remove
water droplets. You can sw itch this function off
by moving the lever to posit ion ® within
10 sec
onds of the afterwipe. The afterwipe function is
reactivated the next time you switch the ignit ion
on.
Clean the headlights*. The headlight washer sys
tem* operates only when the low beam head lights are on. If you move the lever into position
@, the headlights will be cleaned at fixed inter
vals .
_&. WARNING
-The rain sensor is on ly intended to ass ist the
d river. The driver may sti ll be responsible
for manually switching the wipers on based on visibility conditions.
-The windsh ield may not be treated w ith wa
ter-repelling windshield coating agents. Un
favorable conditions, such as wetness, dark
ness or low sun, can result in increased
g lare, which increases the risk of an acci
dent. Wiper blade chatter is also possible.
-Properly functioning windshield wiper
blades are required for a clear v iew and safe
driving
c;, page 68, Replacing wiper
blades .
~
67
Page 70 of 409
Lights and Vi sion
CJ) Note
- If there is frost, make sure the windshie ld
wiper blades are not frozen to the wind
sh ield. Switching on the windshield wipers
when the blades are frozen to the wind
shield can damage the wiper blades.
- The windshield wiper system must be
switched off (lever in position 0) before
us
i ng a car wash. This prevents the wipe rs
from sw itching on unintentionally and caus
i ng damage to the w indshield wiper system.
(D Tips
- The windshield wipers switch off when the
ignition is switched off. You can act ivate the
windsh ield wipers after the ign ition is
switched back on by moving the windsh ield
wiper lever to any pos it ion.
- Wo rn o r dirty windshield wipe r blades result
i n streak ing. This can affect the ra in sensor
fun ct ion . Check your windshield wiper
blades regularly .
- The washer fluid nozzles fo r the windshie ld
washer system are heated at low tempera
tures when the ignition is on.
- When stopp ing temporarily, such as at a
traffic light, the speed of the windshie ld
wipers automatically reduces by one leve l.
Cleaning the wiper blades
Clean the wiper blades when you see wiper
streaks. Use a soft cloth and a glass cleaner .
~ Place the windshield wiper arms in the service
position
c::> page 68.
~ Fo ld the windshield wiper arms away from the
windshield.
A WARNING
Dirty windshield wiper blades can impair vi
sion, which increases the risk of an accident.
68
-
· Replacing wiper blades
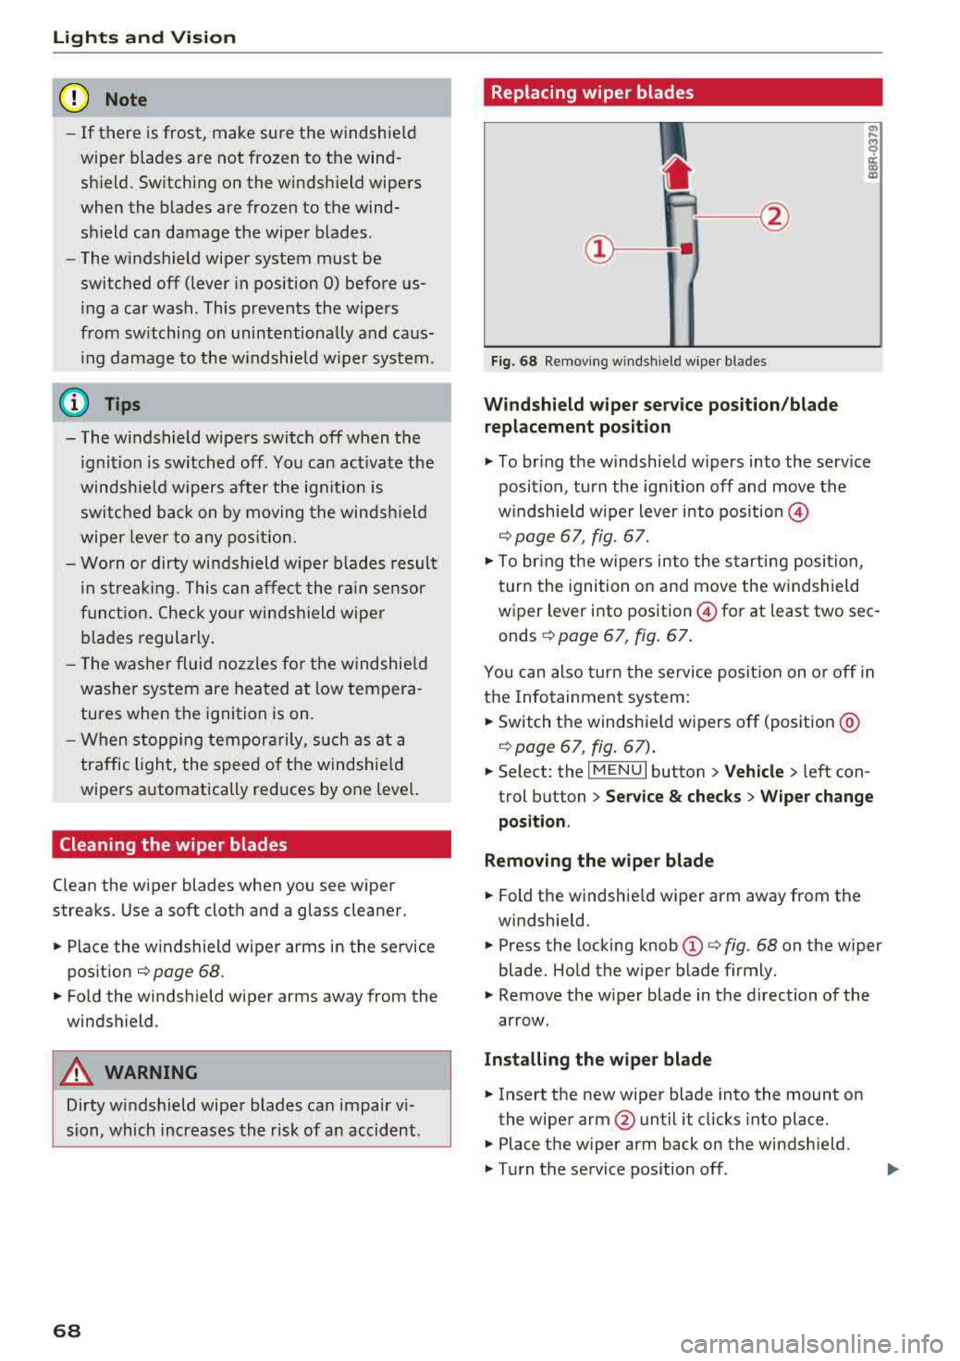
Fig. 68 Removing windshield wiper blades
Windshield wiper se rv ice po sition /blade
repl acement position
~ T o br ing the windshield w ipers into the serv ice
position, turn the ign ition off and move the
w indshie ld wiper lever into position @
c::> page 67, fig. 67.
~ To bring the w ipers into the starting posi tion,
turn the ignition on and move the windshield
wiper lever into position
@for at least two sec
onds
¢ page 67, fig. 67.
You can also turn the service posit ion on or off in
the Infotainment system:
~ Switch the windshie ld wipers off (position @
c::>page 67, fig . 67) .
~ Select: the IM ENU I button > Veh icle > left con
trol button
> Serv ice & chec ks > W ip er change
position .
Removing the wipe r blade
~ Fold the windshie ld wiper arm away from the
windshield.
~ Press the locking knob (D c::> fig. 68 on the wiper
blade. Hold the wiper blade firmly.
~ Remove the wiper blade in the direction of the
arrow.
Install ing the wiper blade
~ Insert the new wiper blade into the mount on
the wiper arm@until it clicks into place.
~ Place the wiper arm back on the windsh ield.
~ Turn the service pos ition off .