AUDI A6 1995 C5 / 2.G 01E Transmission Shift Control Mechanism Workshop Manual
Manufacturer: AUDI, Model Year: 1995,
Model line: A6,
Model: AUDI A6 1995 C5 / 2.G
Pages: 17, PDF Size: 0.38 MB
AUDI A6 1995 C5 / 2.G 01E Transmission Shift Control Mechanism Workshop Manual
A6 1995 C5 / 2.G
AUDI
AUDI
https://www.carmanualsonline.info/img/6/1318/w960_1318-0.png
AUDI A6 1995 C5 / 2.G 01E Transmission Shift Control Mechanism Workshop Manual
Trending: tow, engine, ECU, boot, center console, clutch, torque
Page 1 of 17
34-1
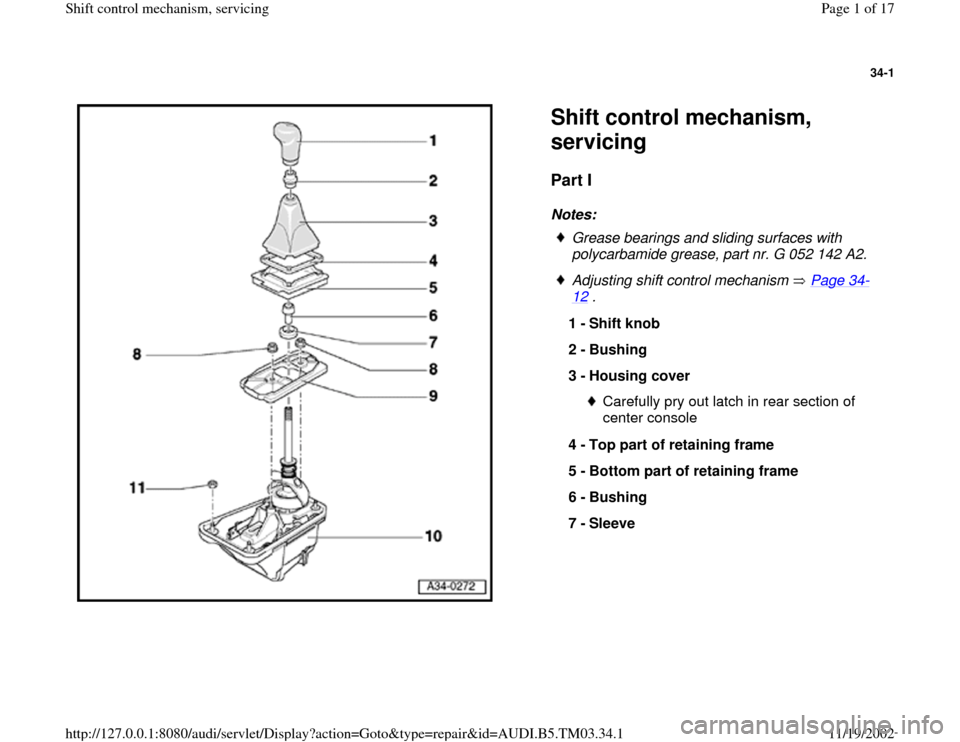
Shift control mechanism,
servicing Part I
Notes:
Grease bearings and sliding surfaces with
polycarbamide grease, part nr. G 052 142 A2.
Adjusting shift control mechanism Page 34
-
12
.
1 -
Shift knob
2 -
Bushing
3 -
Housing cover
Carefully pry out latch in rear section of
center console
4 -
Top part of retaining frame
5 -
Bottom part of retaining frame
6 -
Bushing
7 -
Sleeve
Pa
ge 1 of 17 Shift control mechanism, servicin
g
11/19/2002 htt
p://127.0.0.1:8080/audi/servlet/Dis
play?action=Goto&t
yp
e=re
pair&id=AUDI.B5.TM03.34.1
Page 2 of 17
34-2
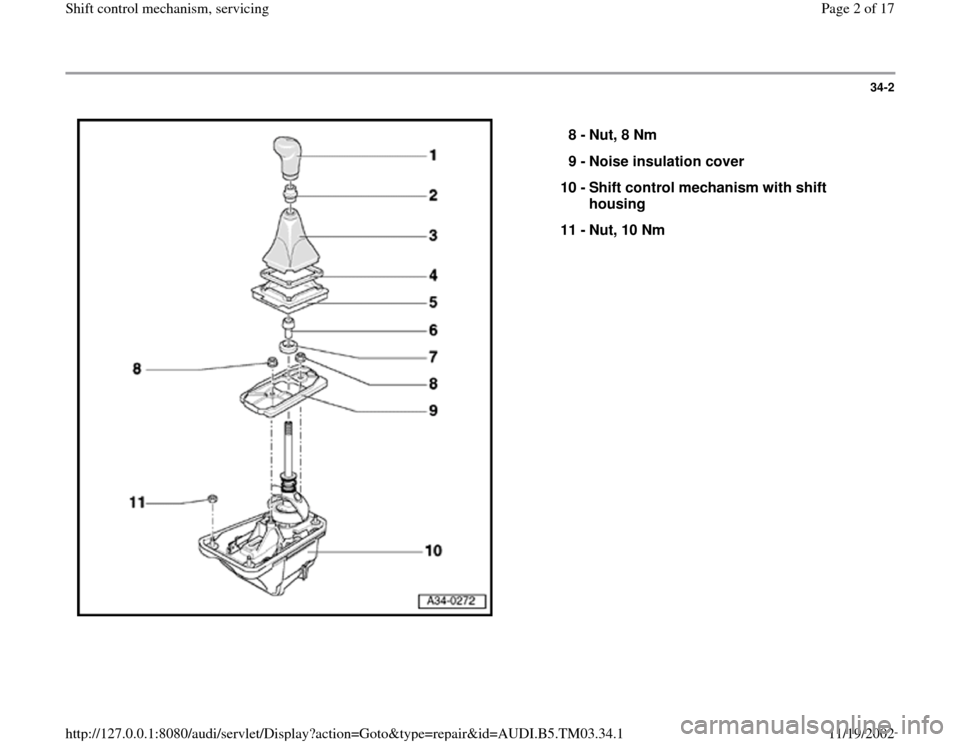
8 -
Nut, 8 Nm
9 -
Noise insulation cover
10 -
Shift control mechanism with shift
housing
11 -
Nut, 10 Nm
Pa
ge 2 of 17 Shift control mechanism, servicin
g
11/19/2002 htt
p://127.0.0.1:8080/audi/servlet/Dis
play?action=Goto&t
yp
e=re
pair&id=AUDI.B5.TM03.34.1
Page 3 of 17
34-3
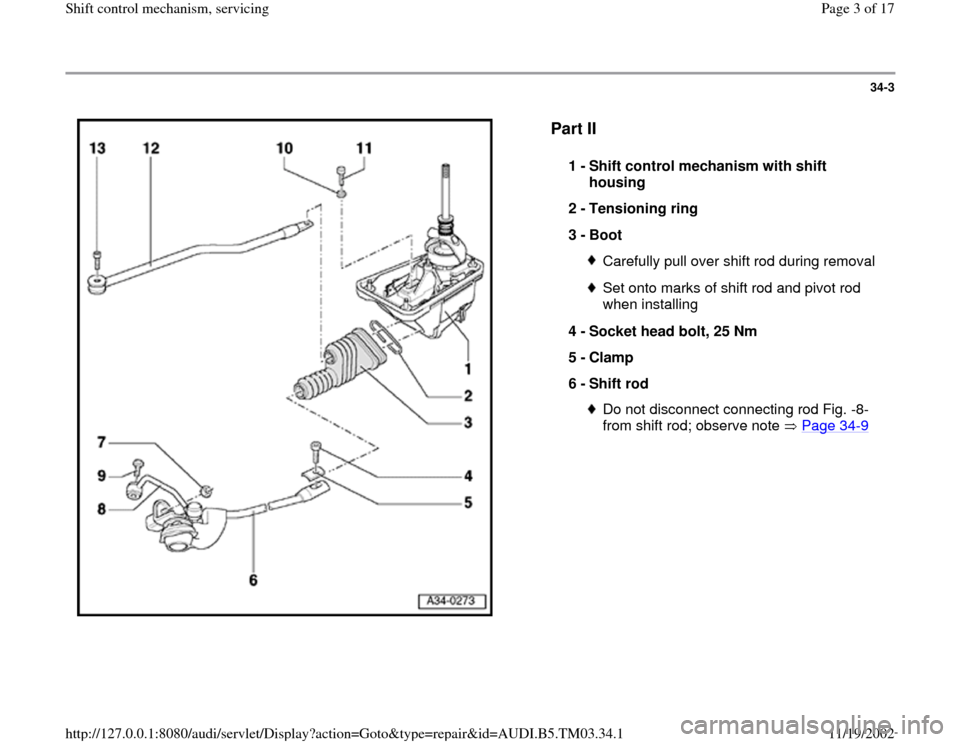
Part II
1 -
Shift control mechanism with shift
housing
2 -
Tensioning ring
3 -
Boot Carefully pull over shift rod during removalSet onto marks of shift rod and pivot rod
when installing
4 -
Socket head bolt, 25 Nm
5 -
Clamp
6 -
Shift rod Do not disconnect connecting rod Fig. -8-
from shift rod; observe note Page 34
-9
Pa
ge 3 of 17 Shift control mechanism, servicin
g
11/19/2002 htt
p://127.0.0.1:8080/audi/servlet/Dis
play?action=Goto&t
yp
e=re
pair&id=AUDI.B5.TM03.34.1
Page 4 of 17
34-4
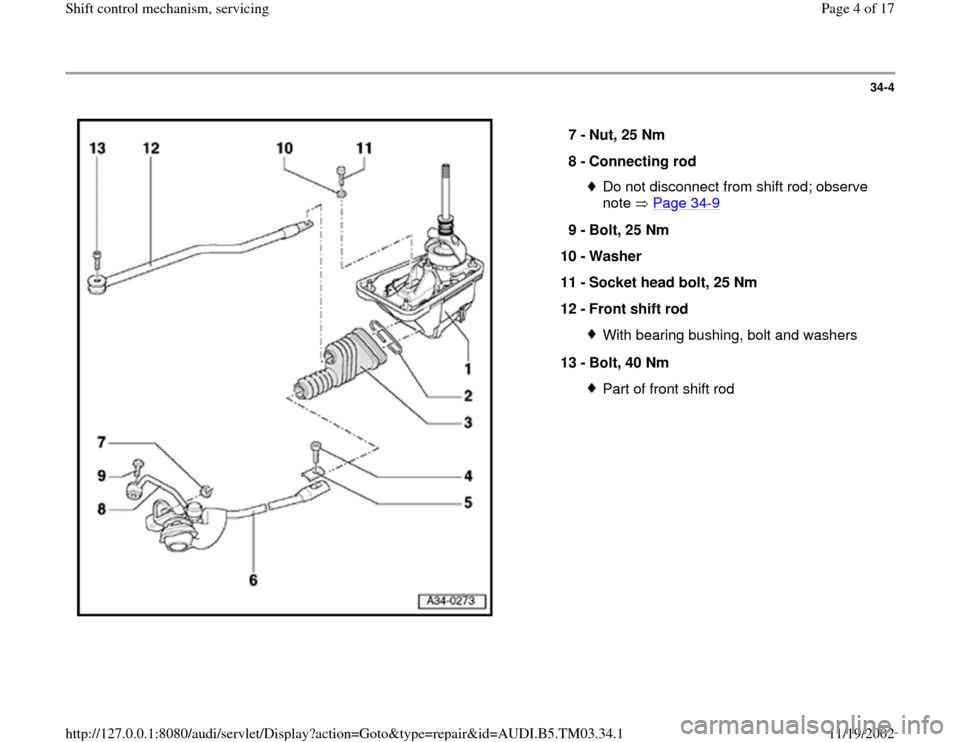
7 -
Nut, 25 Nm
8 -
Connecting rod
Do not disconnect from shift rod; observe
note Page 34
-9
9 -
Bolt, 25 Nm
10 -
Washer
11 -
Socket head bolt, 25 Nm
12 -
Front shift rod
With bearing bushing, bolt and washers
13 -
Bolt, 40 Nm Part of front shift rod
Pa
ge 4 of 17 Shift control mechanism, servicin
g
11/19/2002 htt
p://127.0.0.1:8080/audi/servlet/Dis
play?action=Goto&t
yp
e=re
pair&id=AUDI.B5.TM03.34.1
Page 5 of 17
34-5
Selector mechanism, removing and
installing
Removing
- Unscrew shift knob from shift lever.
Note:
Shift cover is removed together with the cover for
center console.
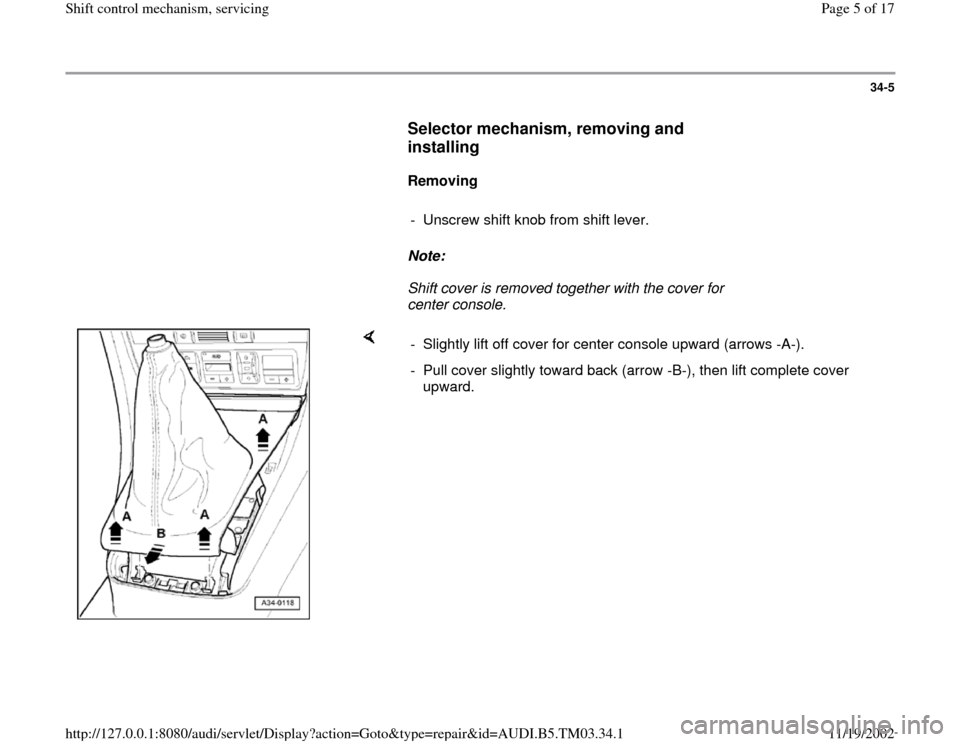
- Slightly lift off cover for center console upward (arrows -A-).
- Pull cover slightly toward back (arrow -B-), then lift complete cover
upward.
Pa
ge 5 of 17 Shift control mechanism, servicin
g
11/19/2002 htt
p://127.0.0.1:8080/audi/servlet/Dis
play?action=Goto&t
yp
e=re
pair&id=AUDI.B5.TM03.34.1
Page 6 of 17
34-6
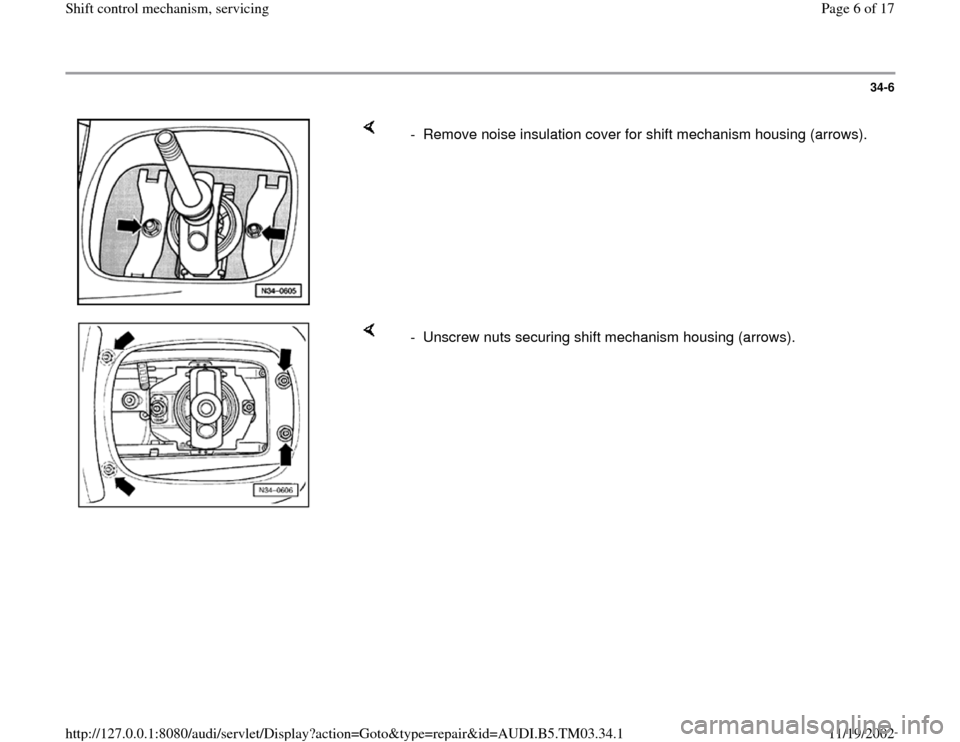
- Remove noise insulation cover for shift mechanism housing (arrows).
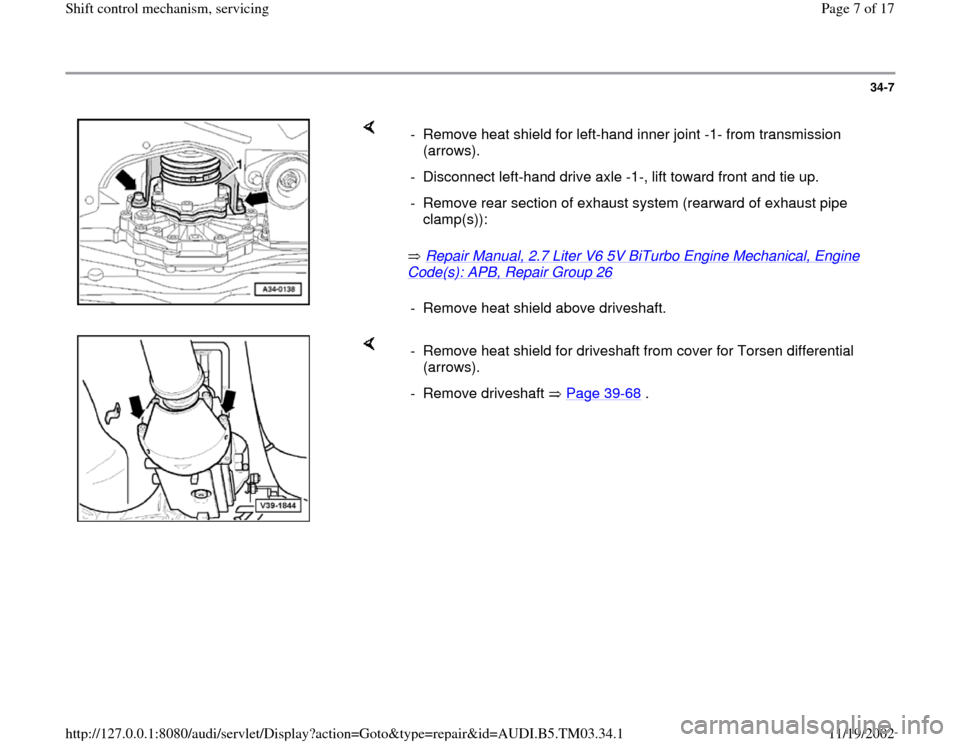
- Unscrew nuts securing shift mechanism housing (arrows).
Pa
ge 6 of 17 Shift control mechanism, servicin
g
11/19/2002 htt
p://127.0.0.1:8080/audi/servlet/Dis
play?action=Goto&t
yp
e=re
pair&id=AUDI.B5.TM03.34.1
Page 7 of 17
34-7
Repair Manual, 2.7 Liter V6 5V BiTurbo Engine Mechanical, Engine
Code(s): APB, Repair Group 26
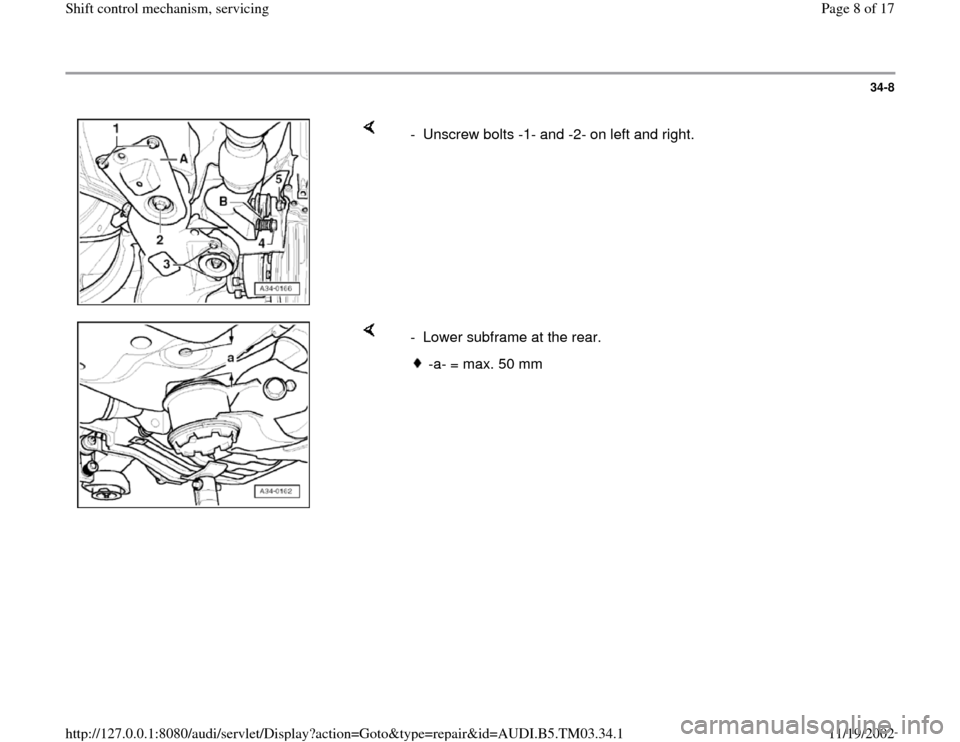
- Remove heat shield for left-hand inner joint -1- from transmission
(arrows).
- Disconnect left-hand drive axle -1-, lift toward front and tie up.
- Remove rear section of exhaust system (rearward of exhaust pipe
clamp(s)):
- Remove heat shield above driveshaft.
- Remove heat shield for driveshaft from cover for Torsen differential
(arrows).
- Remove driveshaft Page 39
-68
.
Pa
ge 7 of 17 Shift control mechanism, servicin
g
11/19/2002 htt
p://127.0.0.1:8080/audi/servlet/Dis
play?action=Goto&t
yp
e=re
pair&id=AUDI.B5.TM03.34.1
Page 8 of 17
34-8
- Unscrew bolts -1- and -2- on left and right.
- Lower subframe at the rear.
-a- = max. 50 mm
Pa
ge 8 of 17 Shift control mechanism, servicin
g
11/19/2002 htt
p://127.0.0.1:8080/audi/servlet/Dis
play?action=Goto&t
yp
e=re
pair&id=AUDI.B5.TM03.34.1
Page 9 of 17
34-9
Important notice for the following
procedures:
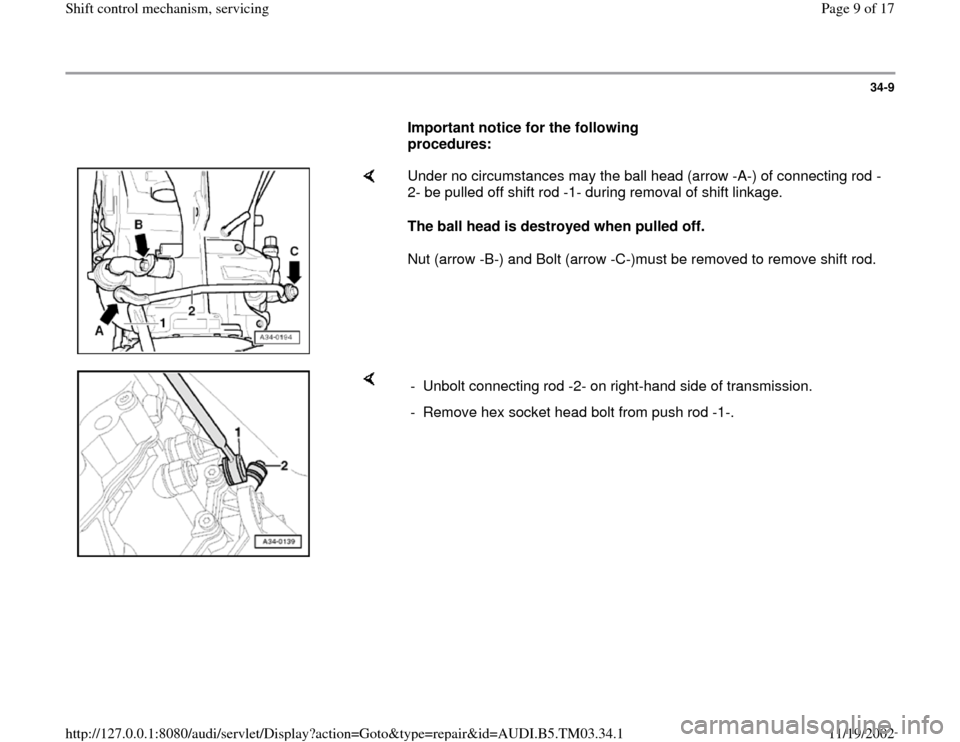
Under no circumstances may the ball head (arrow -A-) of connecting rod -
2- be pulled off shift rod -1- during removal of shift linkage.
The ball head is destroyed when pulled off.
Nut (arrow -B-) and Bolt (arrow -C-)must be removed to remove shift rod.
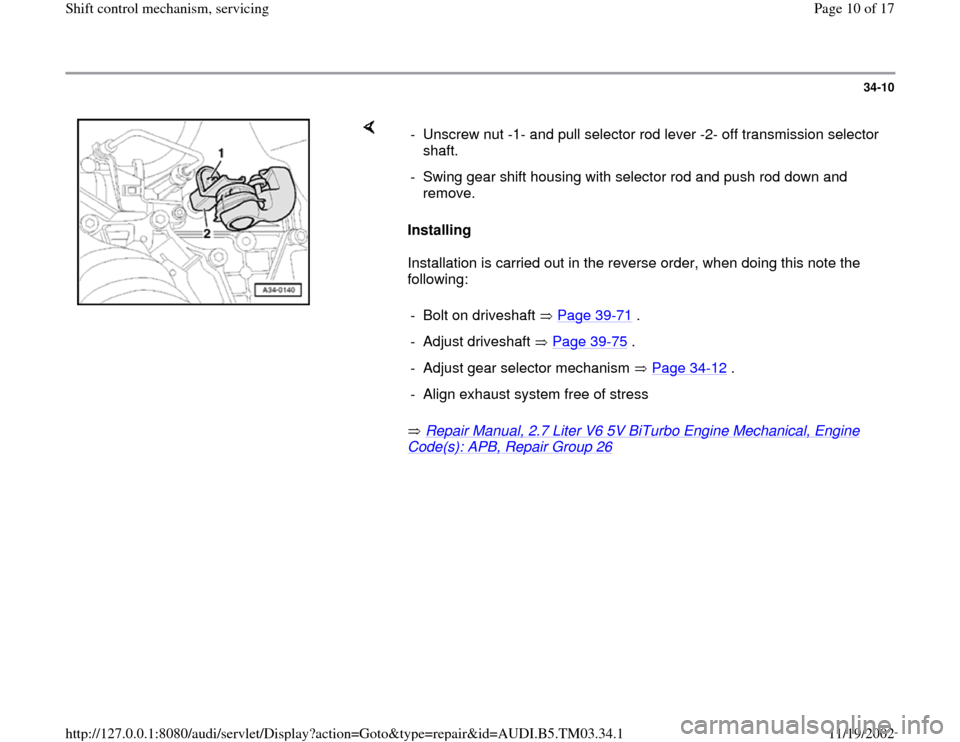
- Unbolt connecting rod -2- on right-hand side of transmission.
- Remove hex socket head bolt from push rod -1-.
Pa
ge 9 of 17 Shift control mechanism, servicin
g
11/19/2002 htt
p://127.0.0.1:8080/audi/servlet/Dis
play?action=Goto&t
yp
e=re
pair&id=AUDI.B5.TM03.34.1
Page 10 of 17
34-10
Installing
Installation is carried out in the reverse order, when doing this note the
following:
Repair Manual, 2.7 Liter V6 5V BiTurbo Engine Mechanical, Engine Code(s): APB, Repair Group 26
- Unscrew nut -1- and pull selector rod lever -2- off transmission selector
shaft.
- Swing gear shift housing with selector rod and push rod down and
remove.
- Bolt on driveshaft Page 39-71
.
- Adjust driveshaft Page 39
-75
.
- Adjust gear selector mechanism Page 34
-12
.
- Align exhaust system free of stress
Pa
ge 10 of 17 Shift control mechanism, servicin
g
11/19/2002 htt
p://127.0.0.1:8080/audi/servlet/Dis
play?action=Goto&t
yp
e=re
pair&id=AUDI.B5.TM03.34.1
Trending: light, torque, center console, engine, tow, differential, lock
