ESP AUDI A8 2016 User Guide
[x] Cancel search | Manufacturer: AUDI, Model Year: 2016, Model line: A8, Model: AUDI A8 2016Pages: 302, PDF Size: 75.68 MB
Page 48 of 302

Lights and Vision
Lights and Vision
Exterior lighting
Switching the headlights on and off
Fig. 42 Instrument panel : lig ht sw it c h with all -weather
l igh ts
The headlights only wo rk when the igni tion is
sw itched on. Whi le sta rting the engine or when
switching off the ignition, the headlights will go
off and only th e side marker lights will be on.
I f the sys tem i s not operating p roperly, a warning
symbo l in the drive r informat ion d isplay is dis
p layed
c::> page 21 .
Light switch -'t;f;
T urn the switch ~ fig. 42 to the corresponding
position . When the lights are sw itched on, the
:oo:
symbo l turns on .
0 - The l ights are off or the daytime runni ng
lights are on :
-USA mode ls: The daytime running lights will
come on automatically when the ignition is on
and the light sw itch
c::> fig . 42 is in the O posi
tion or the
AUTO position (only i n daylight con
di tions). The
Daytime running li ght s func tion
can be turned on and off in the MM I
c::> page 47, c::> &.
- Canada mo del s: T he daytime runn ing lights
will come on automa tically when the ignit io n is
o n and the light switch
c::> fig . 42 is in the O po
s ition, the
:oo : pos ition or the AUTO position
(on ly in daylight conditions)
c::> & .
AUTO -Automatic head light s switch on a nd off
depending on br igh tness , for example i n tw ilight,
du ring ra in or in tunne ls
c::> & .
46
:oo : -Side marker lights
gD -Low beam headlig hts
~ - All-weather lig hts
@il -Rear fog lights *. When the rear fog lights are
on, the symbol
0$ on the switch will illuminate .
All-weather lights
The front lights a re adjus ted au toma tica lly so
that you are less likely to see g la re from your own
headlights, for example whe n driving on a wet
road.
Automatic dynamic headlight range control*
Yo ur vehicle is equipped wi th a headlight range
contro l system so that the head lights do not
bl ind oncoming t raffic if the vehicle load
changes. The head light range also adjusts auto
matically when brak ing and acce lerating .
Light functions
The following ligh t fu nct ions are available de
pend ing on vehicle e quipment and o nly fu nction
whe n the light switc h is in the AUTO position.
You can deactivate these fu nctions in the M MI
unde r
Audi adapti ve light c::> page 47.
Static cornering light* -the corne ring ligh t
switches on automat ically when the steering
whee l is turned at a certain angle at speeds up to
app roximately 44 mph (70 km/h) and when the
turn s ignal is activated at speeds up to approxi
ma tely 25 mph (40 km/h) . The area to the side of
the ve hicle is illuminated better when turning .
Dynamic curve light* -the curve light adapts it
self to the curves in the road .
Highway light fun ction* -this funct ion adapts
the lighti ng for highway d riving based on vehicle
speed .
A WARNING
--Automatic headlig hts are only intended to
assist the driver . They do not relieve the
driver of his responsibi lity to check the
headlights and to turn them o n manually
according to the cur rent light and vis ib ility
co ndi tion s. For example, fog cannot be
Page 51 of 302

.... N
cluster illuminates when the high beams are
on.
- The
headlight flash er works only as long as you
hold the lever -even if there are no lights
turned on. The indicator light
& in the instru
ment cluster illum inates when you use the
headlight flasher.
A WARNING
Do not use the high beam or headlight flasher
if you know that these could bl ind oncoming
traffic.
High beam assist
App lies to: vehicles with high beam assist
The high beam assist automatically switches the
high beams on or off, depending on the sur
roundings and traffic conditions.
Fig. 45 Turn s ignal and h igh bea m lever : Turning on and
off the high beam assist
Activating high beam assist g
,.._ 0 ± .,. a,
Requirement:
The light switch must be in the AU
TO pos ition, the low beam headlights must be on
and the high beam assist must be switched on in
the Infota inment ~
page 47 .
.. Press the lever forwards (Din order to activate
the high beam assist. The indicator light
II
turns on in the instrument cluster display and
the high beams switch on or off automatically.
T he ind icator light
B turns on if the high
beams were switched on.
Switching the high beams on/off manually
a Requirement: High beam ass ist is activated . J:
'SI: ....
If the high beams did not switch on/off automat
ica lly when expected, you may instead switch
them on/off manually:
.. To switch the high beams on manually, press
the lever forwards (D. The indicator light
II
turns on.
.. To switch the high beams off manually, pull the
lever backwards @. The high beam assist is de
activated.
Operating the headlight flasher
.. To operate the flashers while the high beam as
sist is active and the high beams are switched
off, pull the lever into position@. The high
beam ass ist will remain active.
Messages in the instrument cluster display
Headlight assist: System fault
Drive to your authorized Audi dealer immediate ly
to have the malfunction corrected. You can still
switch the high beams on or off manually .
Headlight assist: Unavailable . No camera view
The camera view is blocked, for example by a
sticker or debris.
The sensor is located between the interior rear
view m irror and the windshield. Therefore, do not
place any stickers in this area on the windshield .
Service setting
There is a different sensitivity setting for servic
ing. This setting can be activated by pressing and
ho lding the button on the interior rearview mir
ror for more than 18 seconds. The LED next to
the button blinks three times. If you have acci dentally selected th is service function, the origi
nal sens itiv ity will be automat ically restored the
next t ime you sw itch the ignition on.
A WARNING
High beam assist is only intended to assist
the driver. The driver is still responsible for
controlling the headlights and switching the
high beams on and off manua lly depending
on traffic, lighting and visibility conditions.
Fail ure to intervene manually may lead to r isk
Ill>-
49
Page 54 of 302
Lights and Vision
and farther away. Your may estimate incor
rectly when you use these mirrors to gauge
your distance from the vehicles behind you
when changing lanes, which increases the risk of an accident .
CD Note
-If the mirror housing was moved by outside
forces (such as an impact when maneuver
ing), you must use the power folding func
tion to fold the mirror all the way out. The
mirror housing must not be moved back in
to place by hand because this would impair
the function of the mirror mechanism.
- If you wash the vehicle in an automatic car
wash, you must fold the exterior mirrors in
to reduce the risk of damage to the mirrors.
Never fold power folding exterior mirrors by
hand. Only fold them in and out using the
power controls.
@ Tips
- If the power adjusting function malfunc
tions, the glass in both mirrors can be ad
justed by pressing on the edge of it by hand.
- The exterior mirror settings are stored with
the memory function"~
page 65.
Dimming the mirrors
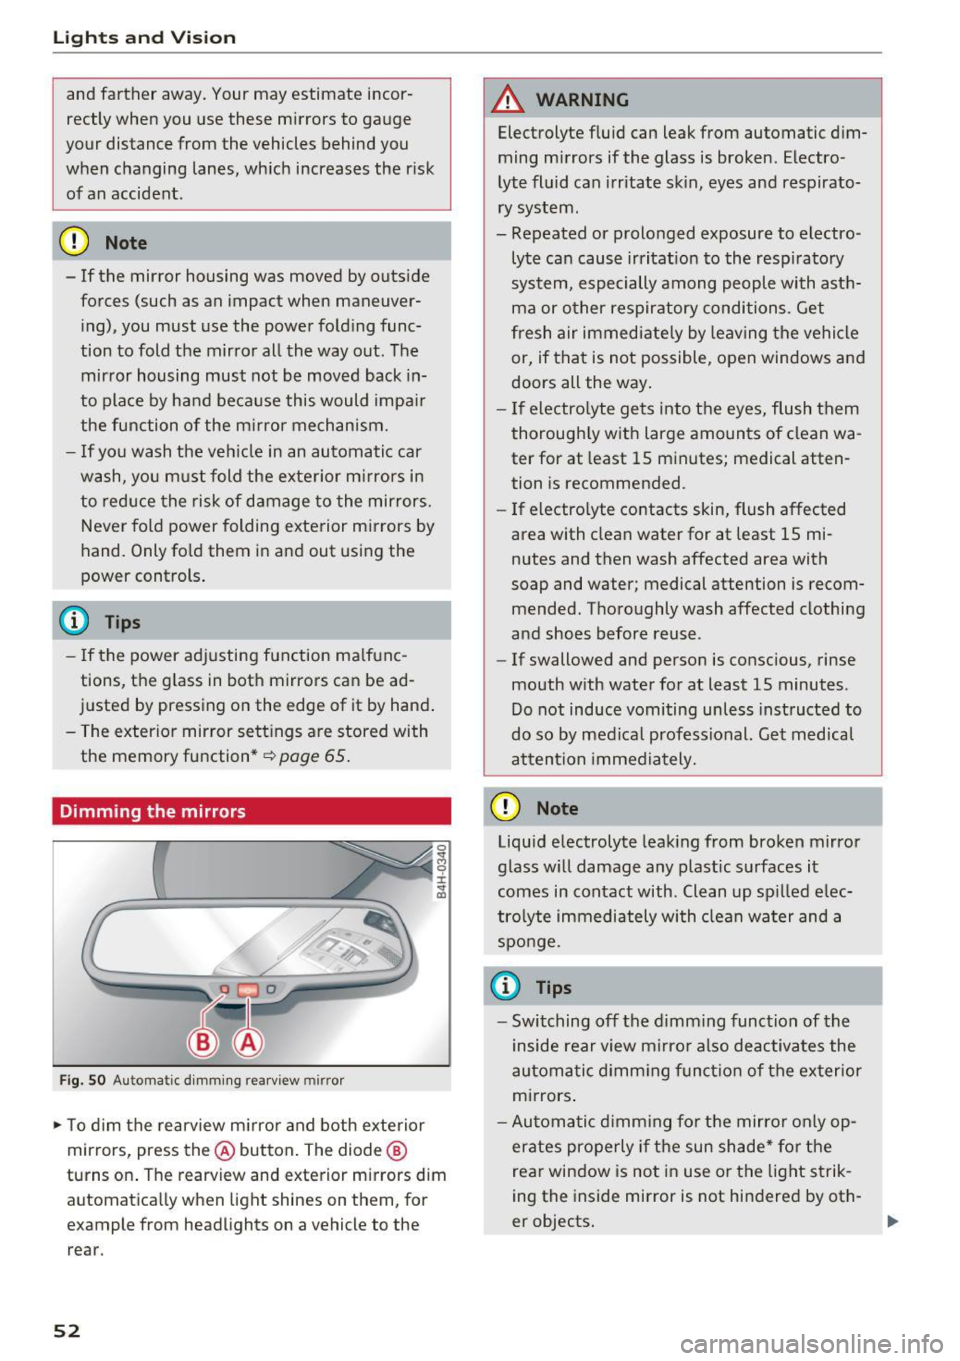
Fig. SO Automa tic dimming rearview mirror
0 ... M 9 :x:
~
~ To dim the rearview mirror and both exterior
m irrors, press th e@ button. The diode ®
turns on. The rearview and exterior mirrors dim
automatically when light shines on them, for
example from headlights on a vehicle to the rear .
52
A WARNING
Electrolyte fluid can leak from automatic dim
ming mirrors if the glass is broken. Electro
lyte fluid can irritate skin, eyes and respirato
ry system .
- Repeated or prolonged exposure to electro
lyte can cause irritation to the respiratory
system, especially among people with asth
ma or other respiratory conditions. Get
fresh air immediately by leaving the vehicle
or, if that is not possible, open windows and
doors all the way.
- If electrolyte gets into the eyes, flush them
thoroughly with large amounts of clean wa
ter for at least 15 minutes; medical atten
tion is recommended .
- If electrolyte contacts skin, flush affected
area with clean water for at least 15 mi
nutes and then wash affected area with
soap and water; medical attention is recom
mended. Thoroughly wash affected clothing
and shoes before reuse .
- If swallowed and person is conscious, rinse
mouth with water for at least 15 minutes .
Do not induce vomiting unless instructed to
do so by medical professional. Get medical
attention immediately.
CD Note
Liquid electrolyte leaking from broken mirror
glass will damage any plastic surfaces it
comes in contact with . Clean up spilled elec
trolyte immediately with clean water and a
sponge.
(0 Tips
- Switching off the dimming function of the
inside rear view mirror also deactivates the
automatic dimming function of the exterior
mirrors.
- Automatic dimming for the mirror only op
erates properly if the sun shade* for the
rear window is not in use or the light strik
ing the inside mirror is not hindered by oth-
er objects.
II>
Page 56 of 302
Lights and Vision
_&. WARNING
When lowering or raising the sunshade, make
sure there is nothing in its way and that it has
a free path to travel. This could cause person
al injury .
{!) Tips
-Pressing the button Ii.!.) several times con
secutively can trigger the overload protec
tion . The sun shade can only be extended/
retracted again after a brief wa iting period .
- The rear window sun shade only functions
when the vehicle interior is warmer than
14°F (-10°C).
Vanity mirror in the rear
Applies to: vehicles with vanity mirrors in the rear
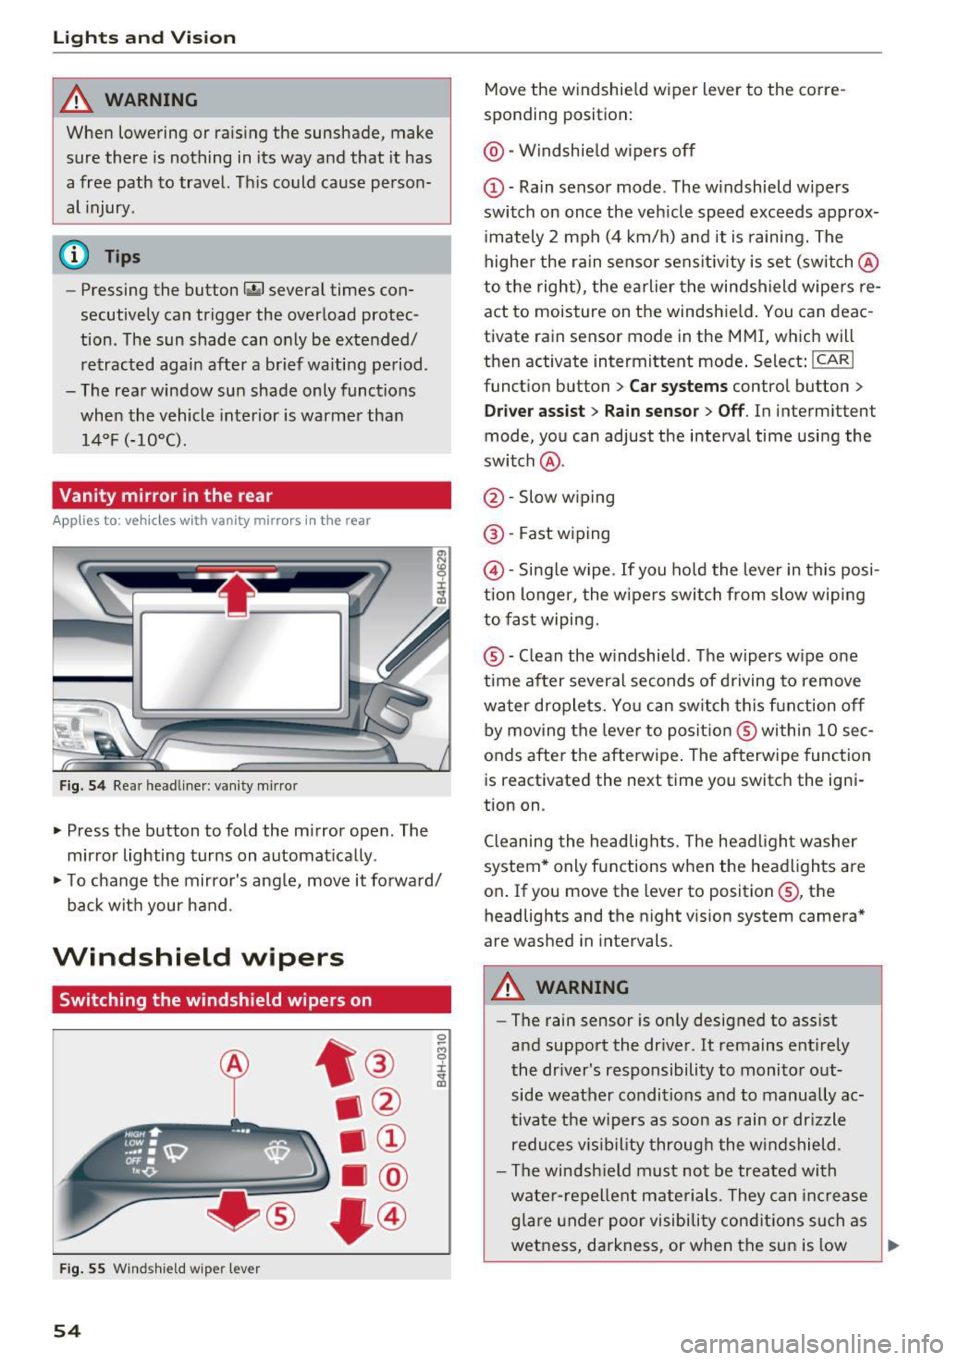
Fig. 54 Rear he ad lin er : vanity mirro r
• Press the button to fold the m irror open. The
mirror lighting turns on automat ically .
a, N
i
• To change the mirror's ang le, move it forward/
bac k with your hand .
Windshield wipers
Switching the windshield wipers on
Fig. 55 Windshield wip er le v er
54
Move the windshield wiper lever to the corre
sponding position:
@ -Windshield wipers off
(D -Rain sensor mode . The windshield w ipers
switch on once the vehicle speed exceeds approx
i mately 2 mph (4 km/h) and it is raining. The
higher the rain sensor sensit iv ity is set (switch @
to the right) , the earlier the windshield wipers re
act to moisture on the windshield . You can deac
t ivate rain sensor mode in the MMI, which will
then activate intermittent mode . Select:
!CAR I
function button > Car systems control button >
Driver assist> Rain sensor> Off. In intermitten t
mode, you can adjust the interval time using the
switch @.
@ -Slow wiping
@-Fast wiping
@-Single wipe. If you hold the lever in this posi
tion longer, the wipers switch from slow wiping
to fast wiping.
® -C lean the windshield . The wipers wipe one
time after several seconds of driving to remove
water droplets . Yo u can sw itch this function off
by moving the lever to position ® within 10 sec
onds after the afterwipe . The afterwipe function
is r eactivated the next time you switch the igni
tion on .
Cleaning the headlights. The headlight washer
system* only functions when the headlights are
on . If you move the lev er to position ®, the
headlights and the night v ision system camera*
are washed in intervals.
_&. WARNING
-The rain sensor is on ly designed to assist
and support the dr iver . It remains entirely
the driver's responsibility to monitor out
side weather conditions and to manually ac
tivate the wipers as soon as rain or drizzle
reduces vis ibility through the windshield.
- The windsh ield must not be treated with
water-repellent materials. They can increase
glare under poor visibility cond itions such as
wetness, darkness, or when the sun is low
Page 60 of 302
Seat s and sto rage
Seats and storage
General information
Why is your seat adjustment so important?
The safety belts and the airbag system can only
provide maximum protection if the front seats are correctly adjusted .
There are various ways of adjusting the front
seats to provide safe and comfortable support
for the dr iver and the front passenger . Adjust
your seat properly so that:
- you can easily and quickly reach all the switches
and controls in the instrument panel
- your body is properly supported thus reducing
physical stress and fatigue
- the safety belts and a irbag system can offer
maximum protection ¢
page 146.
In the following sections, you will see exact ly
how you can best adjust your seats.
There are spec ial regulat ions and instr uctions for
installing a c hild seat on the front passenger's
seat. Always follow the information regarding
child safety provided in
¢ page 168, Child safe
ty .
A WARNING
Incorrect seating position of the driver and all
other passengers can result in serious person
al injury.
- Always keep your feet on the floor when the
vehicle is in motion - never put your feet on
top o f the instr ument pane l, o ut of the win
dow o r on top of the sea t cushion. This ap
plies espe cially to the passenge rs.
If your
seat ing pos ition is inco rre ct, you increase
the risk of injury in the case of sudden brak
ing or an accident . If the airbag inf lates and
the seating position is incor rect, this could
result in personal injury or even death.
- It is important for both the driver and front
passenge r to keep a d istance o f at least
10 inches (25 cm) between themselves and
the steering wheel and/or instrument pan el. If you're s itting any closer than this, the
airbag system cannot pro tect you properly.
58
In addition, the front seats and head re
straints must be adjusted to your body
he ight so that they can give you maximum
protection .
- Always try to keep as much distance as pos
sible between yourself and the steer ing
wheel or instrument panel.
- Do not adjust the driver's or front passeng
er's seat while the veh icle is moving. Yo ur
seat may move unexpectedly, causing sud
den loss of vehicle contro l and personal in
jury. If you ad just yo ur seat while the veh icle
is moving, you a re o ut of po sition.
, Driver's seat
The correct seat position is important for safe
and relaxed driving .
We recommend that you adjust the dr iver's seat
i n the following manner:
.. Adjust the seat in fore and aft direction so that
you can easi ly push the pedals to the floor
while keep ing your knees slightly bent¢
A. in
Why is your seat adjustment so important? on
page 58 .
.. Adjust the bac krest so that whe n you s it w it h
your back agains t the backrest, yo u can s till
gras p the top of the steering wheel.
.. Adjust the head res traint so the uppe r edge is
as even as possib le w ith the top of you r head. If
that is not possible, try to adjust the head re
straint so that it is as close to this pos it ion as
possible ¢
page 64.
A WARNING
Neve r place any objects in the dr iver's foo t
well. An object could get into the pedal area and inte rfere with pedal function. In case of
sud den bra king or an ac cident, you w ould no t
be ab le to b rake o r accelerate.
-
Page 62 of 302
Sea ts and stor age
Multifunction button
Applies to: ve hicles w ith memory funct ion
You con adjust the massage function, upper sec
tion of the backrest, lumbar support, side bol
sters, seating surface and safety belt height us
ing the multifunction button.
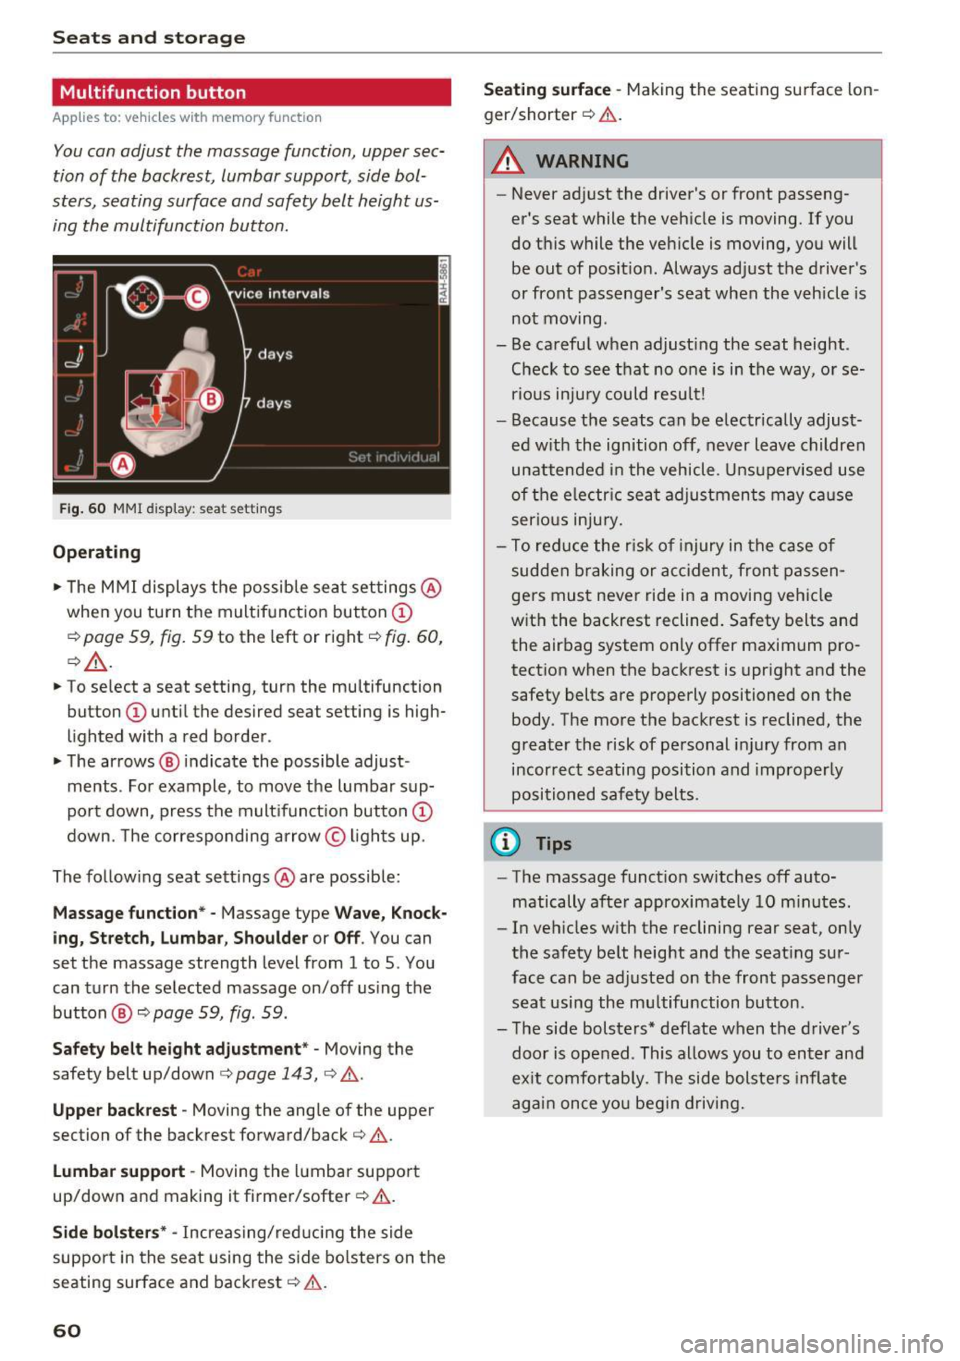
F ig . 60 MMI display: seat settings
Operat ing
,.. The M MI displays the possible sea t set tings @
when you tu rn the multifunct ion button @
c::> page 59, fig . 59 to the left or right c::> fig. 60,
c::> _&. .
,.. To select a seat setting, turn the multifunction
button
(I) until the desired seat setting is high
lighted with a red border .
• The arrows ® indicate the possible adjust
ments . Fo r example, to move the lumbar sup
po rt down, press the mult ifunct ion button @
down. The corresponding arrow © ligh ts up.
The follow ing seat sett ings @are possible:
Massage func tion * -Massage type Wave, Kno ck
ing , Stre tch, Lumbar , S houlder or Off .
You can
set the massage strength level from 1 to 5. You
can turn the selected massage on/off us ing the
button @
c::> page 59, fig . 59.
Safe ty belt height adju stm ent * -Moving the
safety belt up/down
c::> page 143, c::> &.
Uppe r back rest -Moving the angle of the upper
section of the backrest forward/back
c::> &.
Lumb ar support -Moving the l umbar support
up/down and making it firmer/softer
c::> & .
Side bolst ers* -Increas ing/red ucing the side
support in the seat using the s ide bo lsters on the
seating surface and backrest
c::> .&. .
60
Seating surface -Making the seating surface lon
ger/shorter
c::> & .
A WARNING
-Never ad just the driver's or front passeng
er 's seat while the vehicle is moving. If you
do this while the vehicle is moving, you will
be out of posit io n. Always adjust the driver's
or front passenger's seat when the vehicle is
not moving .
- Be careful when adjust ing the seat height .
Check to see that no o ne is in the way, or se
rious inju ry could result!
- Because the seats can be electr ically adjust
ed w ith the ignition off, never leave children
unattended i n the vehicle. Uns upervised use
of the e lectr ic sea t adjustments may ca use
serious in ju ry.
- To reduce the r is k of injury in the case of
sudden b raking or accident, front pa ssen
gers must never ride in a moving vehicle
w ith the backrest reclined . Safety belts and
the airbag system on ly offer maximum pro
tection when the backrest is upright and the
safety belts are properly positioned on the
body. The more the backrest is reclined, the
greater the risk of pe rsonal injury from an
incorrect seating position and improperly
positioned safety belts.
@ Tips
- The massage funct ion sw itches off auto
matically after approximately 10 m inutes.
- In vehicles w ith the reclining rear seat, on ly
the safety be lt height and the seat ing sur
face can be adjusted on the front passenger
seat using the mu ltifunction bu tton.
- The side bolsters* deflate when the driver's
door is ope ned . This allows you to enter and
ex it comfortab ly. The side bolste rs infla te
again once yo u begin driving.
-
Page 64 of 302
Seat s and sto rage
Adju st ing th e seat po sition
.,. To adjust the seat forwa rd/bac k, press the but
ton © forward/back .
.,. To move the seat up/down, press the button ©
upward/downward .
Adjusting th e massage function*
.,. To adjust the "p ulsating"/"wave" massage
funct ion, press the butto n© to the left/r ight.
The massage f unction is at its strongest level
when three LEDs in the button turn on .
.,. To reduce the massage level, press the © but
ton again .
.,. To switch the massage function off, press the
button repeatedly until the LED turns off.
Adju st ing th e re clining p osition
.,. To adjust the reclining position, press and hold
the button ® until the seat reaches its end po
s ition .
.,. Applies to vehicles with reclining seat*: If you
select the reclining position, the front passeng
er's seat moves forward and the backrest re
cl ines. Depending on the last setting, the leg
support may fold out at the same t ime. The
front passenger 's seat can no longer be used in
the recl ining position¢ _&.. You can adjust the
l eg support or fold the display fo rward in the
reclining position.
Selecting the standard seat position
.,. To adjust the standard seat pos ition, press and
hold the bu tton (D unt il the seat reaches its
end position .
.,. Applies to vehicles with reclining seat*: If you
select the standard seat position, the front pas
senger's seat is moved back into the starting
pos ition, the head restra int is moved to the up
rig ht posit ion a nd the leg support is folded in
ward ¢_& .
Adju st ing th e di splay*
.,. To tilt the disp lay forward/back, press and hold
the left/right button @ unt il the display reach
es the desired pos ition.
.,. Applies to vehicles with reclining seat*: To
maintain a clear view of the road when the seat
is in the reclining position, press and hold the
62
right button @ until the disp lay has folded for
ward. Make sure the driver has a clear view of the exter ior mirrors. If so, confirm the quest ion
in the Infotainment system with
Yes . If you an
swer
No or do not respond to the quest ion, the
disp lay w ill return to the upright pos ition.
Adju sting the leg support (vehicles with
reclining seat*)
Requirement: The reclining pos it ion must be se
lected ¢
page 62.
.,. To fold the leg support o ut/in, press and hold
the left/r ight button @ until the leg support
reaches the desired pos it ion.
.,. To angle the leg support so that it is more up
r ight/more reclined or to move it forward/back,
adjusting the front passenger's seat accord ing
ly.
Adjusting the front pa ssenger 's seat
.,. Make sure that the front passenger's seat ad
justment is switched on in the Infotainment
system
¢ page 64 .
.,. To act ivate the front passenger's seat adjust
ment, press the button ®·
.,. To adjust the front p assenger's se at forward/
back, press the button © forward/back .
.,. To move the front passenger's seat up/down,
press the button © upward/downward .
.,. To adjust the front passenger's seat backrest so
that is more upright/more recl ined, press the
button @ forward/back .
.,. Applies to veh icles with reclin ing seat*: To ad
just the reclin ing/standa rd seat position, press
and hold the button@/(D unt il the seat reach
es its end position.
~ WARNING
-
- The power ad justment for the ind iv idual
seats a lso works with the ignition. For this
reason, children sho uld never be left unat
tended in the vehicle -they could be injured!
- Exercise caution when adjust ing the seats.
Unsupervised or careless seat adjustment
can pinch fingers or hands ca us ing injur ies .
Page 66 of 302
Seats and storage
Comfort settings
Applies to: vehicles with comfort seats in the rear
You con adjust settings for the rear seat from
the cockpit using the MMI.
• Se lect I CAR I function button> Car systems con
trol button
> Vehicle settings > Seats > Rear
seats .
Factory settings position -
This function moves
the outer rear seats and the front passenger
seatback into the factory settings posit io n.
Entry assistance -Entry assistance makes it eas
ier to enter and ex it the rear seat more comforta
b ly. When the function is activated, the rear seat
moves all the way back automatically when t he
corresponding door opens.
Front passenger seat adjustment* -If the fu nc
tion is activated in the MMI, the front passenger
seat can be adjusted from the rear seat
c::> page 61, fig. 62.
Head restraints
Adjusting the head restraints
Head restraints that ore adjusted according to
body size, along with the safety belt, offer effec
tive protection .
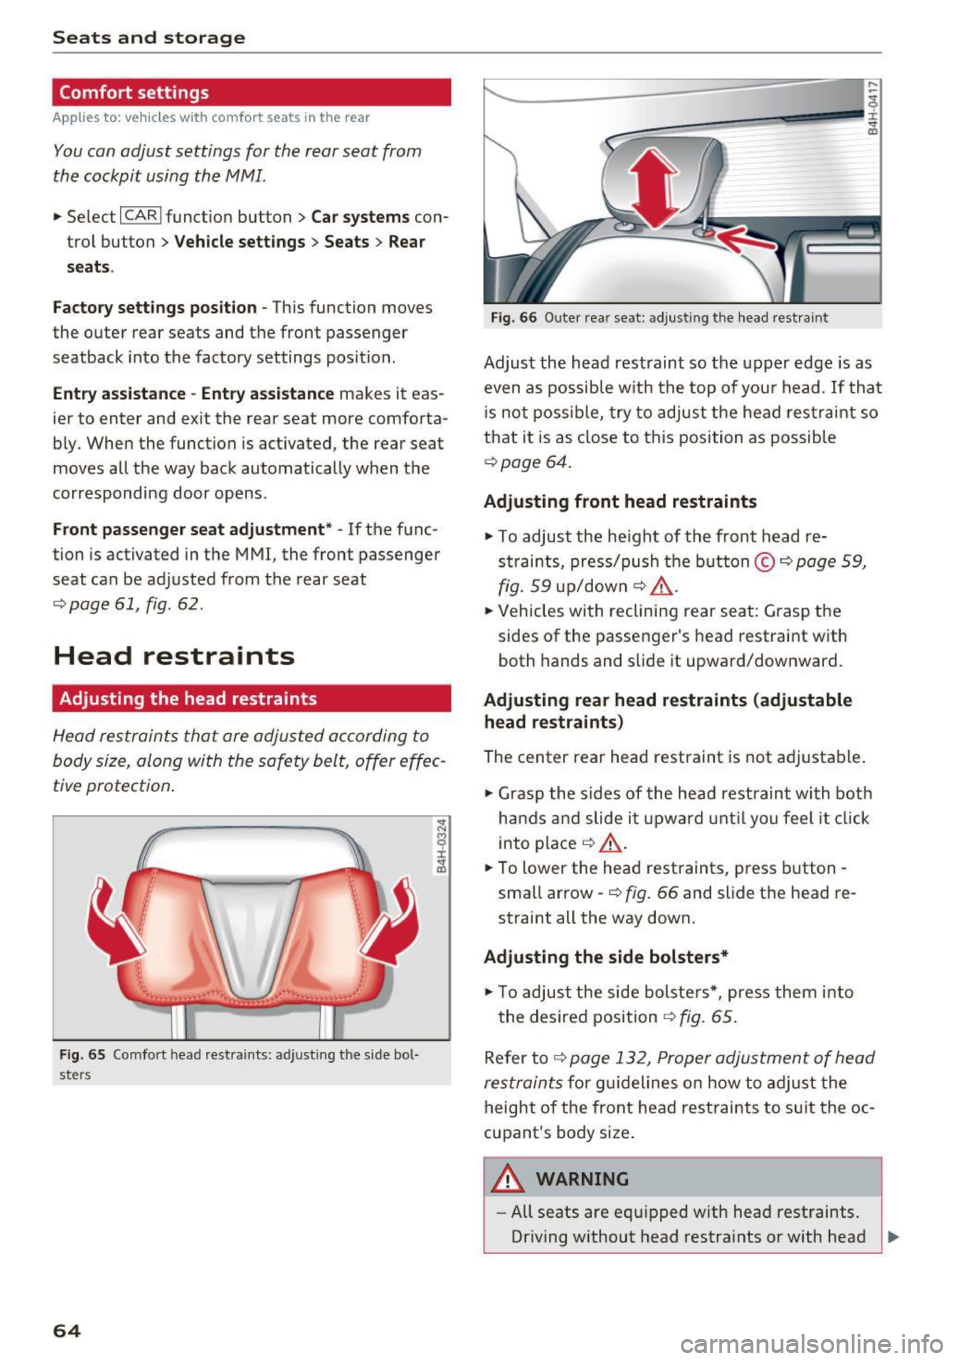
Fig. 65 Comfo rt hea d rest ra ints: a dju st ing t he s ide bol
sters
64
Fig. 66 Outer rea r seat: adjus ting the head restra in t
Adjust the head restraint so the upper edge is as
even as possible with the top of your head . If tha t
i s not possible, try to adjust the head res traint so
that it is as close to this position as possible
c::> poge 64.
Adjusting front head restraints
• To adjust the height of the front head re
straints, press/push the button©
c::> page 59,
fig. 59 up/down c::> ,&...
• Vehicles with reclining rear seat: Grasp the
sides of the passenger's head restraint with
both hands and slide it upward/downward.
Adjusting rear head restraints (adjustable
head restraints )
The center rear head restraint is not adjustable .
• Grasp the sides of the head restraint wi th both
hands and slide it up ward until you feel it click
into place
c::> ,&...
• To lower the head restraints, press button -
sma ll arrow -
c::> fig. 66 and slide the head re
straint all the way down.
Adjusting the side bolsters*
• To adjust the side bolsters*, press them int o
the desired position
c::> fig. 65.
Refer to
c::> page 132, Proper adjustment of head
restraints
for guidelines on how to adjust the
height of the front head restraints to suit the
oc
cupant's body size.
~ WARNING
-All seats are equ ipped with head restraints.
Driving without head restra ints or with head ..,.
Page 69 of 302

© -12 volt socket c:> page 72
@ -Folding table c:> page 68
©-center armrest and storage compartments:
to open the deep compartment, press the rig ht
button and fold the center armrest upward . To
open the compartment fo r the massage funct ion
r emo te contro l*
c:> page 63 and for the tele
phone*, press the left button and fo ld the center
armrest upward .
115-volt socket
Applies to: vehicles with 115-volt socket
The 115-vo lt socket can only be used when the
engine is running
c:> & . When you push the con
nector all the way into the socket, the ch ild safe
ty mechan ism releases and current flows through
the socket .
Equ ipment th at can be conn ect ed
Electrical devices can be connected to the 1 15
volt socket in the vehicle. Power consumption at
the 115-volt socket must not exceed 150 watts
(300 watts peak) . Check the power consumpt ion
of the equipment on the model plate .
LED on the socke t
-The socket is ready for use when the LED is
green.
- If the LED blinks red, there is a malfunction .
The socket will switch off automatically due to overcurrent or overheating. The socket will
switch on again automatically after a cool
down period . Any devices that are connected
and switched on will activate again automati ca lly
c:> ,& .
A WARNING
- T he so ckets and the electrical accesso ries
conne cted to them operate only when the
ignition is switched on . Incorrect usage can
lead to serious injuries or burns. To reduce
the risk of injuries, never leave children un
attended in the vehicle w ith the vehicle key.
- Heavy eq uipment or plugs with integrated
power supply units can damage the socket
and lead to injuries.
-
Seat s and sto rage
-Store all connected equipment securely
while the veh icle is moving so that they can
not be thrown through the vehicle in the
event of a braking maneuver or an accident.
- Never sp ill any liquids on the socket . If any
mo isture gets into the socket, make certain
that all the moisture has dried up before us
ing the socket again .
- Equipment that is connected to the vehicle
socket can heat up more than it does when
connected to the public grid .
- When us ing adapters and extens ion cords,
the child safety for the 115-volt socket is
disabled and the socket is live.
- Never insert anyth ing other than the plug of
an app ropr iate electrical accessory into the
soc ket, especially th ings that conduct ele c
tr icity, e.g. metal pens, knitting need les,
etc. into the contacts of the 115 -vol t sock
et .
- Turn the electrical equ ipment off if the
socket has switched off because of over
heating.
(D Note
- Always follow the manufacture r's i nstruc
tions for a ll electrical accessories yo u wan t
t o use with the e lectr ica l socket!
- Do not connect lamps tha t con tain a neon
t u be. Fo r tech nica l reasons the lamp may be
damaged.
- Do not connect any 230-volt equipment to
t he 115-vo lt socket . The equipment may be
damaged. If necessa ry , check the permiss i
ble vo ltage for the equipment on the mode l
label.
- In the case of some power packs, e.g. for a
laptop computer , the bui lt-in ove rcurrent
shutoff prevents it from being switched on
because of excessive start-up current. In
this case, disconnect the power pack from the consumer and reconnect it after abo ut
1 0 seconds .
(D Tips
-Unshielded equ ipment may cause interfer
ence in the radio and the vehicle electronics .
67
Page 76 of 302
Seats and storage
Additional storage
There are a variety of storage compartments and
fasteners in various places in the vehicle.
- Storage compartments in the doors
- Net in the front passenger footwell
- Eyeglasses compartment in the headliner (near the rearview mirror)
- Storage compartments under the center armr
ests
- Compartments* on the back of the front seat
backrests
- Garment hooks over the rear doors
- Compartment in the center console with pass-
through)* (rear)
- Compartment behind the rear center armrest
(in vehicles without the pass-through* or cool
er*)
- Cell phone holder* in the right rear door
- Bag hooks in the luggage compartment
_& WARNING
-When driving, do not leave any hard objects
on the rear window shelf or allow your pet
to sit on the shelf. They could become a haz ard for vehicle occupants in the event of
sudden braking or a crash.
- Always remove objects from the instrument
panel. Any items not stored could slide
around inside the vehicle while driving or
when accelerating or when applying the
brakes or when driving around a corner.
- When you are driving make sure that any
thing you may have placed in the center con
sole or other storage locations cannot fall
out into the footwells. In case of sudden
braking you would not be able to brake or
accelerate.
- Any articles of clothing that you have hung
up must not interfere with the driver's view.
The coat hooks are designed only for light
weight clothing. Never hang any clothing
with hard, pointed or heavy objects in the
pockets on the coat hooks. During sudden
braking or in an accident -especially if the
airbag is deployed -these objects could in
jure any passengers inside the vehicle.
74
- To reduce the risk of personal injury in an
accident or sudden stop, always keep the
glove compartment closed while driving.
- Read and follow all WARNINGS
¢ page 164, Important safety instructions
on the side airbag system.
- Hang clothes in such a way that they do not
impair the driver's vision.
- The coat hooks must only be used for light
weight clothing. Do not leave any heavy or
sharp edged objects in the pockets which
may interfere with the side curtain airbag
deployment and can cause personal injury in
a crash.
- Do not use coat hangers for hanging cloth
ing on the coat hooks as this can interfere
with proper deployment of the side curtain
airbags in an accident.
- Do not hang heavy objects on the coat
hooks, as they could cause personal injury in
a sudden stop.
(D Note
Objects located on the rear shelf that rub
against the rear window could damage the
heating wires for the rear window defogger .
(D Tips
-A vent slot is located between the shelf and
the rear window. Do not block the vent with
any items you may place on the rear window
shelf .
'
-Do not place bulky items on the rear window
shelf as they could restrict or block the driv
er's vision in the rear view mirror.
Refrigerator
Introduction
Applies to: vehicles wit h cooler
Please clean the cooler before using it for the
first time ¢
table on page 208 .
You can only switch on the cooler if
- the temperature in the luggage compartment
is below 131 °F (5 5 °C). The cooler switches off
automatically if the temperature in the luggage .,._