AUDI A8 2017 Repair Manual
Manufacturer: AUDI, Model Year: 2017, Model line: A8, Model: AUDI A8 2017Pages: 354, PDF Size: 88.68 MB
Page 61 of 354
C) C0 ....
"' " "' .... 0 0 :r
To prevent the head restraints from running into the headline, they are automat ically
Memory function
Description
Appl ies to: vehicles wit h memory function
Using the memo ry funct ion, you can q uickly and
eas ily store a pe rsonal seat profile for the driver
and front passenger as we ll as for the o uter rear
seats* and recall the settings. The memory func
tion is controlled using the remote contro l key
and the memory buttons in the driver's/front
passenger's door and in the rear doors*.
The driver's seat profi le is stored again and as
signed to the remote control key each time the
vehicle is locked. When you open the door, the
seat profile is automat ically recalled. If two peo-
Remote control
key
Dr iver
Seat X
Head rest raint X
Steering wheel * X
Safety belt* X
Both exterior mirrors* X
Remote control key
Applies to: vehicles with memory function
The function must be switched on so that the
driver's seat profile will be assigned to the re
mote control key when lock ing the vehicle .
.. Se lect : the
I CAR I function button > C ar sy stem s
control button > Veh icle setting s> Driver' s
s eat > Remote control ke y> On.
(D Tips
If you do not wish to have the seat p rofile for
another driver assigned to the remote control
key, switch the memory function off in the In
fotainment system or using the
IO FFI button
~page 59.
Seats and storag e
moved forward or upward when the seat is
adjusted.
ple use the vehicle, it is recommended that each
person always uses the ir "own" remote control
key .
Two seat profiles can be stored using the memo ry buttons in the d river 's/front passenger 's door
respectively, and one seat profile can be stored in
each of the rear doors *. Once they a re stored,
these seat profi les can be se lected at any time.
T he following sett ings a re stored :
Memory button
Driver Front passenger Outer
Rear seats*
X X X
X
X
X
X X
X
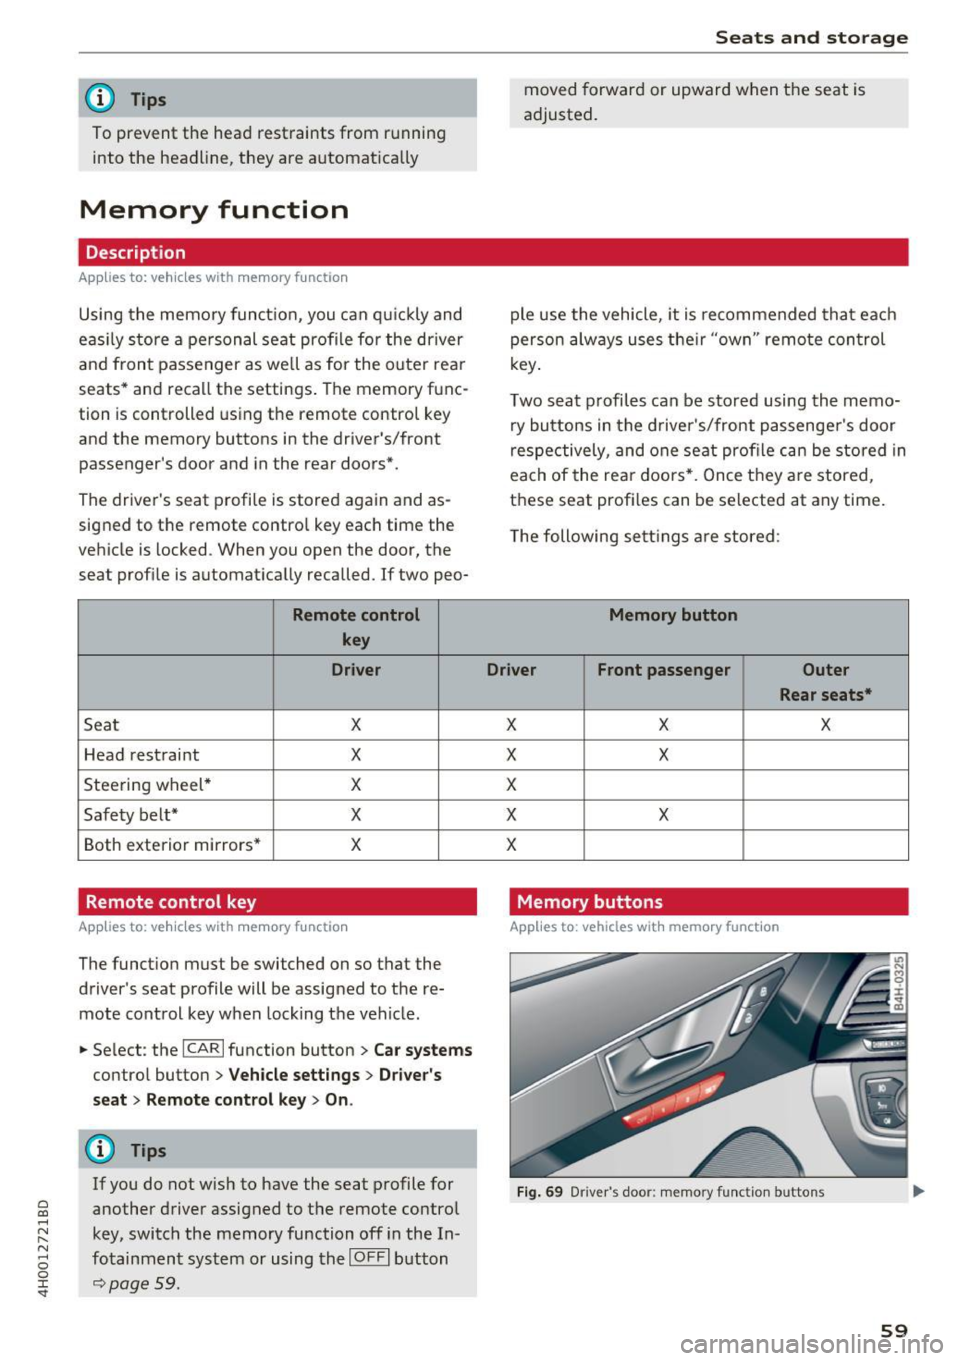
Memory buttons
Applies to: veh icles w ith memory function
F ig . 69 Dr iver 's door: memory function buttons
59
Page 62 of 354
Sea ts and stor age
The memo ry buttons are located in the driver's
door, front passenger's door and in the rear
doors*.
Sw itch ing the mem ory function on /off
• Press the IOFF I button to switch the memory
funct ion on/off. The LE D in the button tu rns on
when the memory function is
off. Seat profiles
are neither stored nor recalled.
Storing a seat pr ofi le
• Press the ISE TI button. When the wo rd S ET
ligh ts up, the memory is ready to store set
tings .
• Now press a memory button briefly . A tone
confirms that the settings were stored .
Accessing a seat profile
• If the drive r's door is open and the ig nit ion is
swi tched off, press the memory b utton .
• If the driver's door is closed or the ignition is
switched on , press and ho ld the memory but
ton until the seat adjustment is comp lete.
A WARNING
- For safety reasons, the seat setting can only
be recalled when the vehicle is stationary,
otherw ise there is a risk of an accide nt.
- If necessary, you can stop the recall process
by pressing the
I OFF! button or any memory
button.
Adjusting the front passenger 's seat in the
Infotainment system
Applies to: vehicles with memory function
The driver can move the front passenger's seat
into various positions .
Adjusting the front p assenge r's seat from
th e drive r's s eat
• Select : the ICARI function button> C ar s ystem s
contro l button > Veh icle sett ing s > Seats >
Pas senger's seat > Adju st seat po sition .
• You can now adjust the front passenger's seat
u sing the driver's seat but tons
c=;, page 54,
fig . 60.
60
Align with driver's seat
• To transfer the settings from the dr iver's seat
to the front passenge r's seat , se lect: the
!CAR I
function button > Car s ystems cont rol button >
Vehicle settings > Se ats > Pa ssenger 's sea t >
Align with dri ver 's s eat .
• Press and hold the control knob until the ad
justing process is comp lete.
@ Tips
The lumbar support and upper thigh support
settings are not transferred when aligning
the front passenger's seat with the driver's
seat.
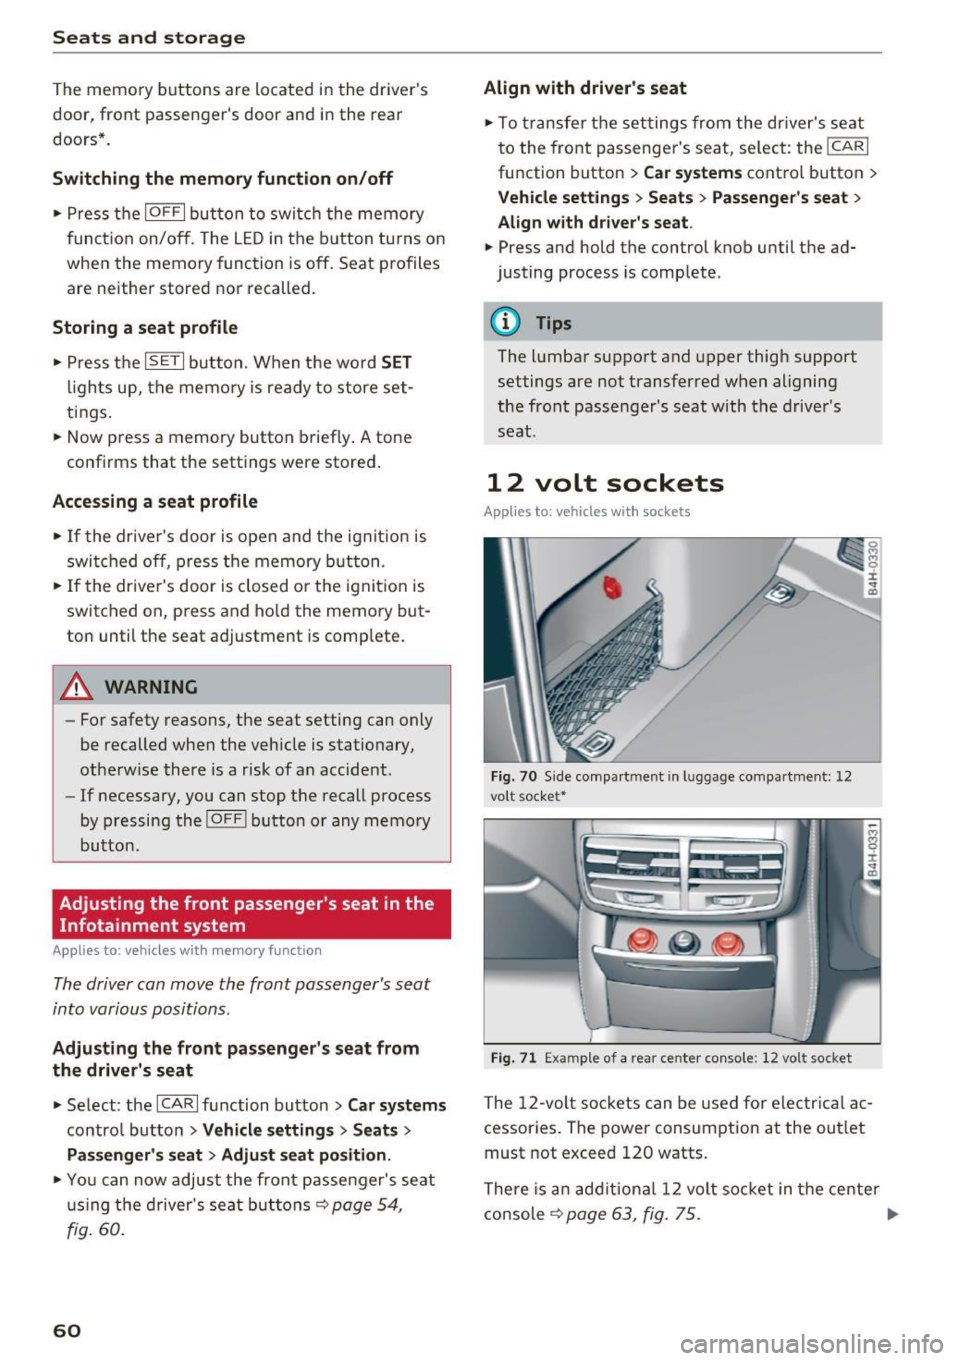
12 volt sockets
Applies to: vehicles with sockets
Fi g. 70 S ide compart ment in l ugg age compartment: 12
vo lt soc ket•
Fig . 71 Exa mple of a rear ce nter con so le: 12 vol t socket
The 12-vol t sockets can be used for e lectr ica l ac
cessories . The power consumption at the out let
must not exceed 120 watts.
There is an add itional 12 volt so cket in the center
console
c=;, page 63, fig. 75 . ..,.
Page 63 of 354

0 co .... N ,..... N .... 0 0 :c '
The sockets and the electrical accessories con
nected to them only function when the igni
tion is switched on . Incorrect usage can lead
to serious injuries or burns. To reduce the risk
of injur ies, never leave children unattended in
the vehicle with the vehicle key.
0 Note
- Never connect any accessories that provide
power (such as solar panels or battery
charger for the vehicle battery) to the ciga rette lighter. They can damage the vehicle
electrical system.
- To reduce the risk of damage to the sockets,
only use plugs that fit correctly.
115 volt socket
Appl ies to: vehicles with 115 volt socket
The 115 volt socket can be used when the igni
tion is switched on
c::> ,& . When you push the con
nector all the way into the socket, the child safe
ty mechanism releases and current flows through
the socket .
Connectable devices
Elect rical devices can be connected to the 115
volt socket in the vehicle. The device connected
to the socket must not use more than 150 watts
of power (300 watts peak power). Check the
power usage of the connected device on the type
label.
LED on the socket
- Th e socket is ready for use when the LED is
green.
- There is a malfunction if the LED is blinking red.
The socket will switch off automatically due to
overcurrent or overheating. The socket will
switch on again automatically after a cool
down period. Any devices that are connected
and switched on will activate again automati
cally
c::> .&. .
Seats and storage
A WARNING
-The sockets and the electrical accessories
connected to them only function when the
ignition is switched on. Incorrect usage can
lead to serious injuries or burns. To reduce
the risk of injuries, never leave children un
attended in the vehicle with the vehicle key.
- If devices or connectors that are heavy (for
example a power supply unit) are attached
directly to the socket, the holder can be
come damaged, which increases the risk of inj ury.
- To reduce the risk of fatal injury, store all
connected devices securely when driving so
that they do not move around inside the ve
hicle when braking or if involved a crash.
- To reduce the risk of fatal injury, do not spill
any fluids on the socket. Should any mois
ture enter the socket, make sure that it has
dried out completely before using the sock
et again.
- Devices connected to the vehicle behave dif
ferently than when they are connected to a
regular power supply. Therefore, connected
devices can become hot during operation,
which can increase the risk of injury.
- There is a risk of injury when using adapters and extension cords, because the child safe
ty on the socket is switched off and the
socket is powered with current.
- To reduce the risk of fatal injury, do not in
sert any conductive objects, such as knitting
needles, into the contacts on the socket.
- To reduce the risk of injury, switch off any
connected electrical devices if the socket has switched off due to overheating.
0 Note
-Also read the operating manuals for the
connected devices.
- Do not connect any lamps that contain neon
tubes. Due to technical reasons, this can
cause malfunctions in the lamp.
- Do not connect any 230 volt devices to the
115 volt socket . The device can be dam
aged. Check the permitted voltage of the
device according to the type label.
-
61
Page 64 of 354
Sea ts and stor age
- Wit h some power supply units, such as for
l aptops, switching them on disables the in
tegrated overcurrent shutdown . In this
case, disconnect the powe r supply unit from
the electrical equipment and reconnect af
ter approximately 10 seconds.
@ Tips
- Devices that are not shie lded or dev ices near
the rear w indow antenna can cause mal
functions in the radio, TV area or in the vehi
cle elect rical system.
- The functions on some devices may be limit
ed d ue to the low powe r output (wattage) .
Full-length center
console
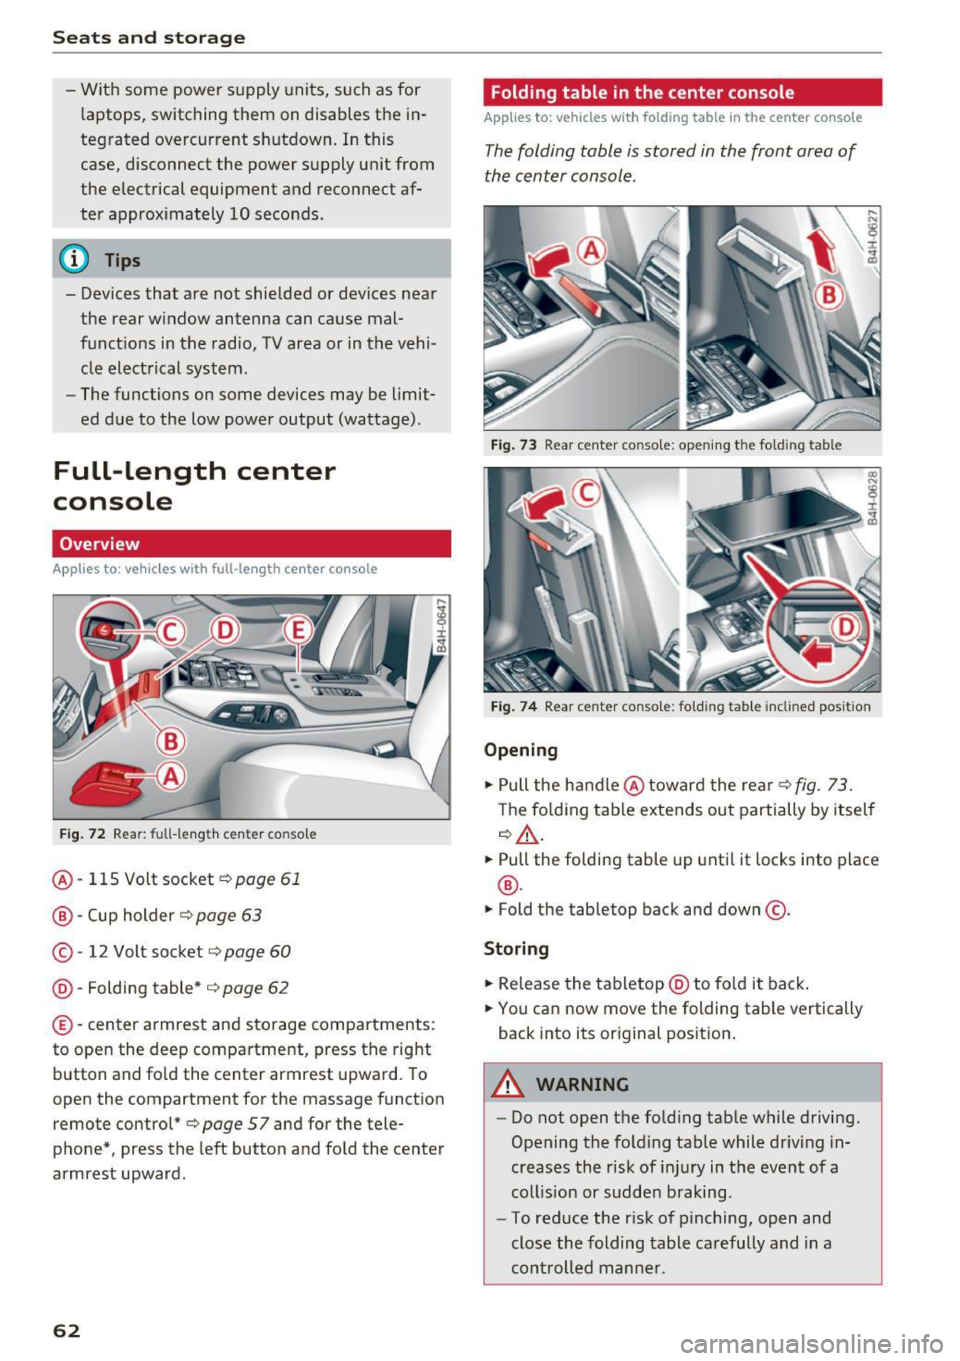
Overview
A ppl ies to: ve hicles w ith full-le ngth ce nter console
F ig . 72 Rear: fu ll-le ng th ce nte r co nso le
@ -115 Volt socket ¢page 61
@ -Cup holder ¢ page 63
©-12 Volt socket ¢ page 60
® -Fold ing table* ¢ page 62
©-center armrest and sto rage compartments :
to open the deep compa rtment, press the right
button and fo ld the c ent er armrest upward. To
open the compartment for the m assage function
remote control*¢
page 57 and for the tele
phone*, press the left button and fold the center
armrest upward .
62
Folding table in the center console
Applies to : vehicles wi th folding table in the center co nso le
The folding table is stored in the front area of
the center console.
Fig . 73 R ea r cent er co n so le: op ening th e fo ld ing t able
Fig . 74 Rear cent er co nso le: foldi ng tab le inclin ed po sition
Opening
.,. Pull the handle @toward the rear¢ fig . 73.
T he fo lding tab le extends out partially by itself
¢ &, .
.,. Pull the folding table up unti l it locks into p lace
® ·
.,. Fold the table top back and down@.
Storing
.,. Re lease the tabletop @ to fo ld it back .
.,. You can now move the folding table vertically
back into its original pos ition.
A WARNING
-- Do not open the fo ld ing tab le while d riving.
Opening the fo ld ing table while driving in
creases the risk of i njury in the event of a
coll ision or sudden braking .
- To reduce the r isk of pinching, open and
close the folding table carefully and in a
controlled manne r.
Page 65 of 354
C) C0 ....
"' " "' .... 0 0 :r
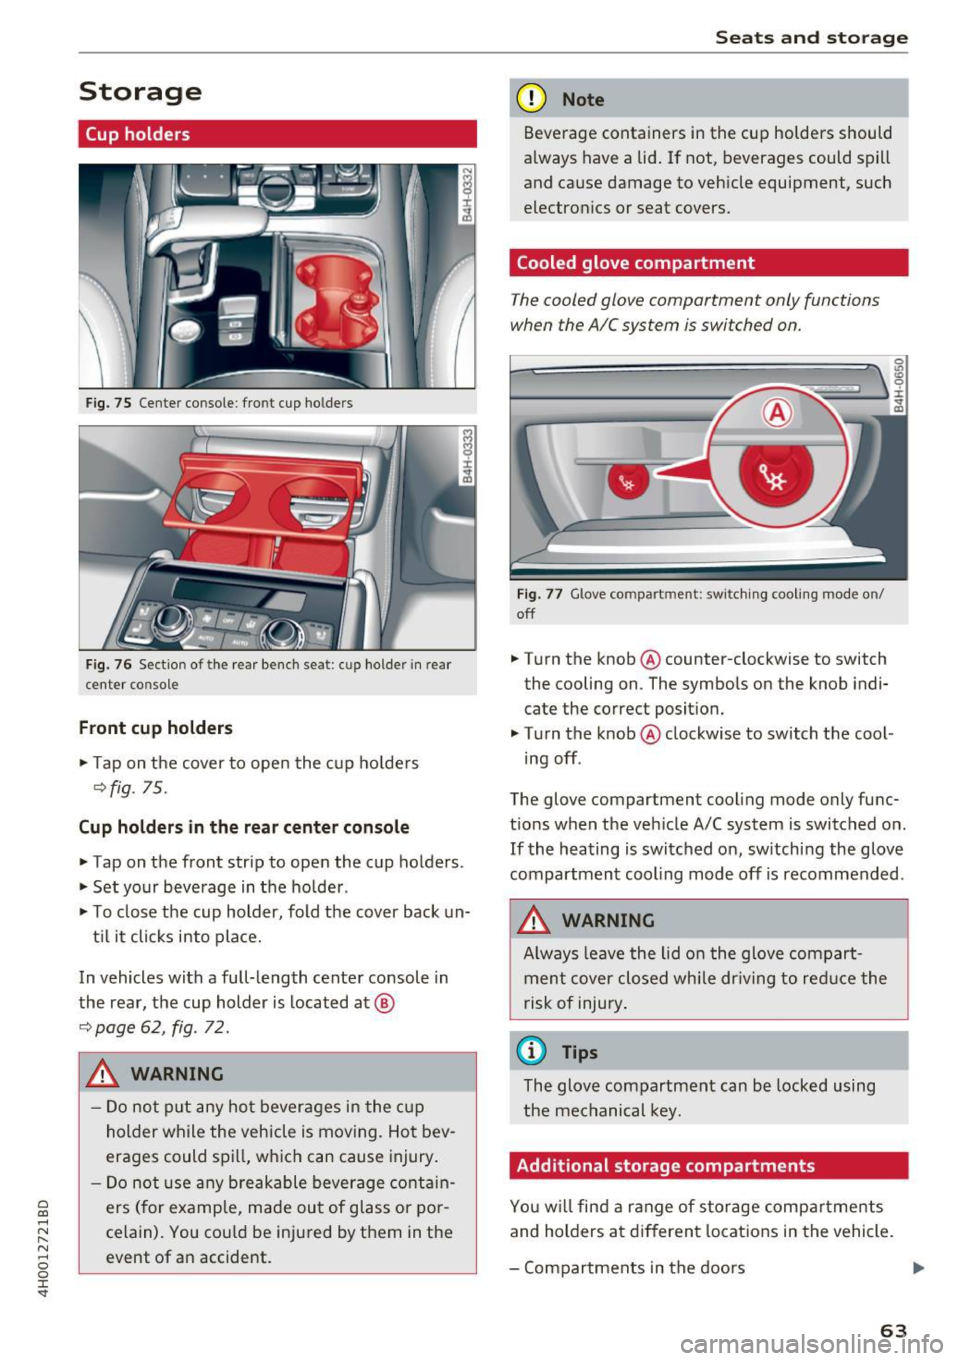
Cup holders
Fig. 75 Center co nsole : fro nt cup ho lders
F ig. 76 Sect io n of th e re ar bench se at: cu p ho lder in rear
center co nso le
Front cup holders
.. Tap on the cover to open the cup ho lde rs
Q fig. 75.
Cup holder s in the rear center console
.. Tap on the front strip to open the cup holders .
.. Set your beverage in the ho lder .
.. To close the cup holder , fold the cover back un-
t il it clicks into place.
In vehicles with a full-length center console in
the rear, the cup holder is located at @
9page 62, fig . 72.
A WARNING
-
- Do not p ut any hot beverages in the c up
holder while the vehicle is moving. Hot bev
erages could spill, wh ich can cause injury .
- Do not use any breakable beverage contain
ers (for example, made out of glass or po r
celain). You cou ld be injured by them in the
event of an accident .
Seats and storag e
(D Note
Beverage containers in the cup holders should
a lways have a lid . If not , beverages could spill
and cause damage to vehicle equipment, such
electron ics or seat covers.
Cooled glove compartment
T he cooled glove compartment only functions
when the AIC system is swi tched on.
Fig . 77 G love co mpart ment: swi tching cooling mode o n/
off
.. Turn the knob @counter-clockwise to switch
the cooling on . The symbols on the knob ind i·
cate the correct posit ion.
.. Turn the knob @clockwise to switch the cool ·
ing off .
The glove compartment cooling mode only func
t ions when the veh icle A/C system is switched on .
If the heating is switched on, switching the glove
compartmen t cooling mode off is recommended .
_& WARNING
Always leave the lid o n the glove compart
ment cover closed while dr iving to red uce the
risk of injury .
a) Tips
The glove compartment can be locked using
the mechanical key.
Additional storage compartments
Yo u w ill find a range of storage compa rtments
and holders at different locations in the vehicle.
- Compartments in the doors
IJ,,
63
Page 66 of 354
Seats and storage
-Net in the front passenger footwell
- Glasses holder in the headliner (near the rear-
view mirror)
- Storage compartments under the center arm
rest
- Compartments* on the backrests of the front
seats
- Garment hooks above the rear doors
- Compartment behind the rear center armrest
(on vehicles without a pass-through* or refrig
erator*)
- Cell phone holder* in the right rear door
- Bag hooks* in the luggage compartment
A WARNING
- When driving, do not leave any hard objects
on the rear window shelf or allow your pet
to sit on the shelf. They could become a haz
ard for vehicle occupants in the event of
sudden braking or a crash.
- Any articles of clothing that you have hung
up must not interfere with the driver's view.
The coat hooks are designed only for light
weight clothing . Never hang any clothing
with hard, pointed or heavy objects in the
pockets on the coat hooks. During sudden
braking or in an accident -especially if the
airbag is deployed -these objects could in
jure any passengers inside the vehicle.
- To reduce the risk of personal injury in an
accident or sudden stop, always keep the glove compartment closed while driving.
- Read and follow all WARNINGS
~ page 244, Important safety instructions
on the side airbag system.
- Hang clothes in such a way that they do not
impair the driver's vision.
- The coat hooks must only be used for light
weight clothing. Do not leave any heavy or
sharp edged objects in the pockets which
may interfere with the side curtain airbag
deployment and can cause personal injury in
a crash .
- Do not use coat hangers for hanging cloth
ing on the coat hooks as this can interfere
with proper deployment of the side curtain
airbags in an accident.
64
- Do not hang heavy objects on the coat
hooks, as they could cause personal injury in
a sudden stop.
(D Note
Objects on the rear shelf that rub against the
rear window can damage the rear window de
fogger wires .
(D Tips
-A vent slot is located between the shelf and
the rear window. Do not block the vent with
any items you may place on the rear window
shelf .
- Do not place bulky items on the rear window
shelf as they could restrict or block the driv
er's vision in the rear view mirror.
Roof rack
App lies to : vehicles wit h roof rack
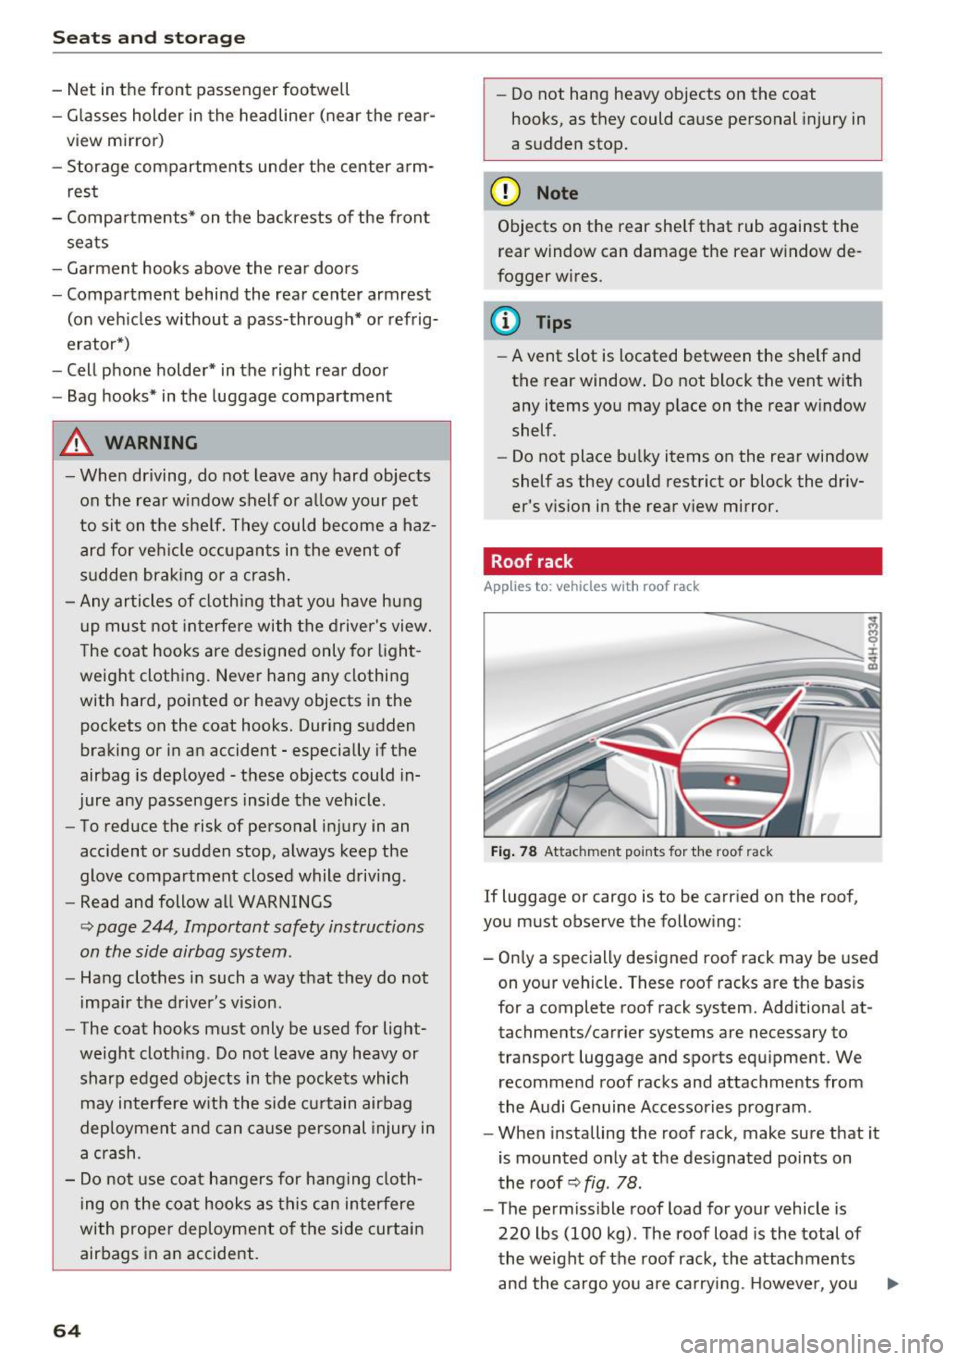
Fig. 78 Attachment po ints for the roof rack
If luggage or cargo is to be carried on the roof,
you must observe the following:
- Only a specially designed roof rack may be used
on your vehicle. These roof racks are the basis
for a complete roof rack system. Additional at
tachments/carrier systems are necessary to
transport luggage and sports equipment. We
recommend roof racks and attachments from
the Audi Genuine Accessories program .
- When installing the roof rack, make sure that it
is mounted only at the designated points on
the roof ~
fig. 78 .
-The permissible roof load for your vehicle is
220 lbs (100 kg) . The roof load is the total of
the weight of the roof rack, the attachments
and the cargo you are carrying . However, you ..,.
Page 67 of 354
C) C0 ....
"' ,-...
"' .... 0 0 :r
er system being used. For the permitted axle
l oad and the permitted total vehicle weight, re
fer to¢
page 333.
A WARNING
-Follow the installat ion instructions provided
with the roof rack system. If you do not se
c ur e the roof rack system and objects on the
roof correctly, they co uld come loose from
t he ve hicl e a nd cau se a n acci den t.
- Us ing a roof rac k system increases th e risk
of an accide nt, because it changes the dr iv
ing chara cteristics by s hift ing t he center of
grav ity an d /or the in cre asi ng the surface
area exposed to win d. Adapt your driving
and speed to the c urrent conditions.
@) Note
Ma ke sure th at the open lugg age compar t
ment lid an d the t ilting/sliding sunroof* do
no t come into contac t wi th objects on the
roof .
@) For the sake of the environment
Your veh icle w ill use mo re fuel d ue to the in
creased wind resistance . So
remove t h e roof
rack after using it.
Luggage compartment
General information
& WARNING
Read and follow the important safety precau
tions in~
page 213, Storing cargo correctly.
Seats and storag e
Tie-downs and luggage compartment net
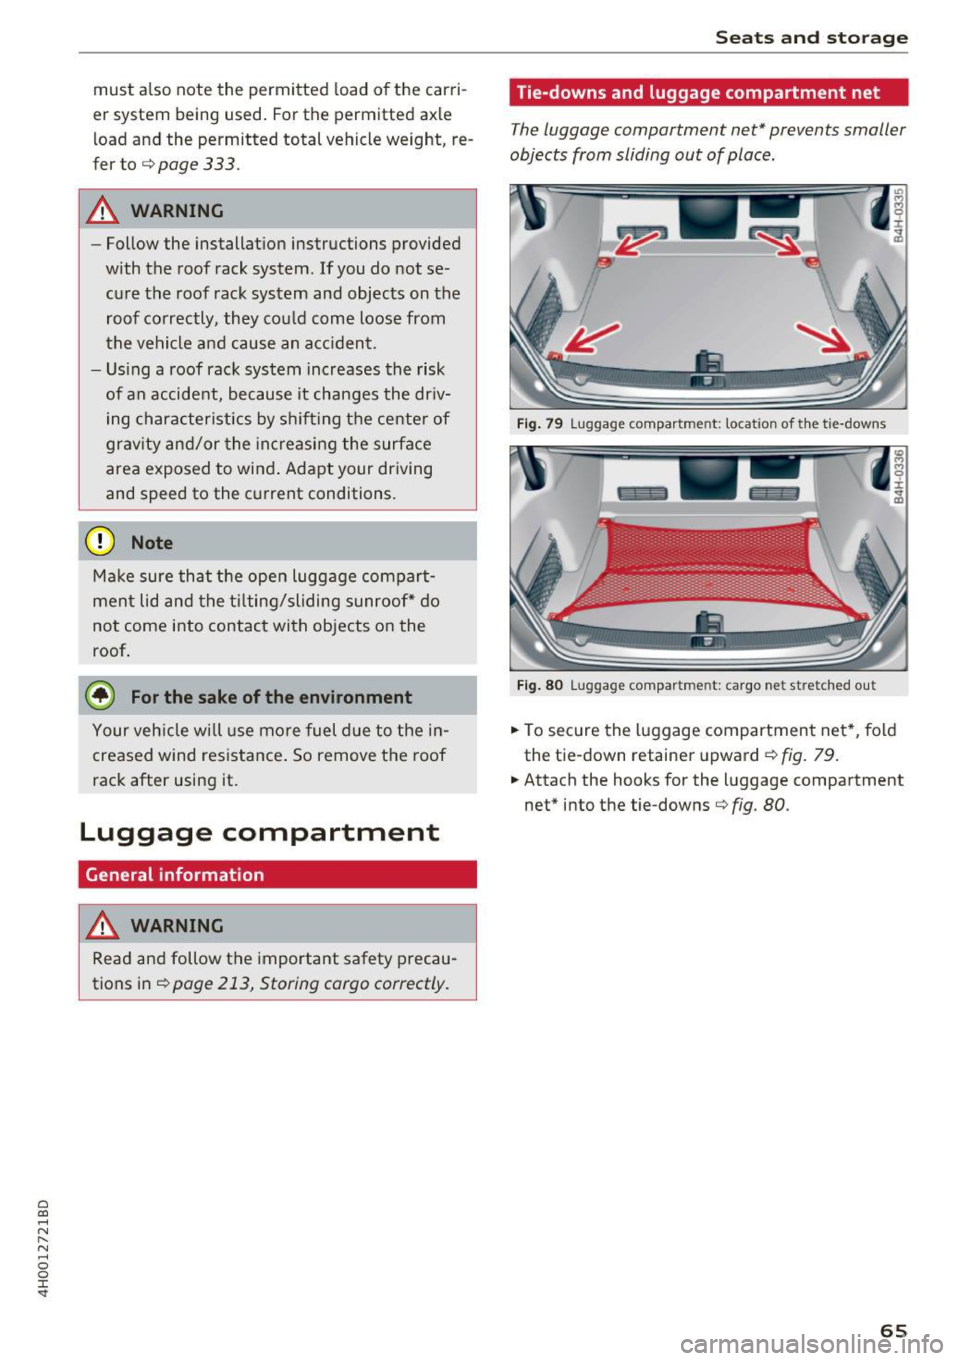
The luggage compartment net* prevents smaller
objects from sliding out of place.
F ig . 79 Luggage compartment: location of th e tie-downs
F ig . 80 Luggage compa rtment: ca rgo net stretched out
.,. To secure the l uggage compartmen t net *, fold
the tie-down retainer upward¢
fig. 79.
.,. Attach the hooks for the luggage compartment
net" into the tie -downs¢
fig. 80.
65
Page 68 of 354
Sea ts and stor age
Pass-through with ski
bag
Preparing the pass-through
Applies to: vehicles with pass-through and ski bag
Long objects, such as skis, can be transported in
the bag.
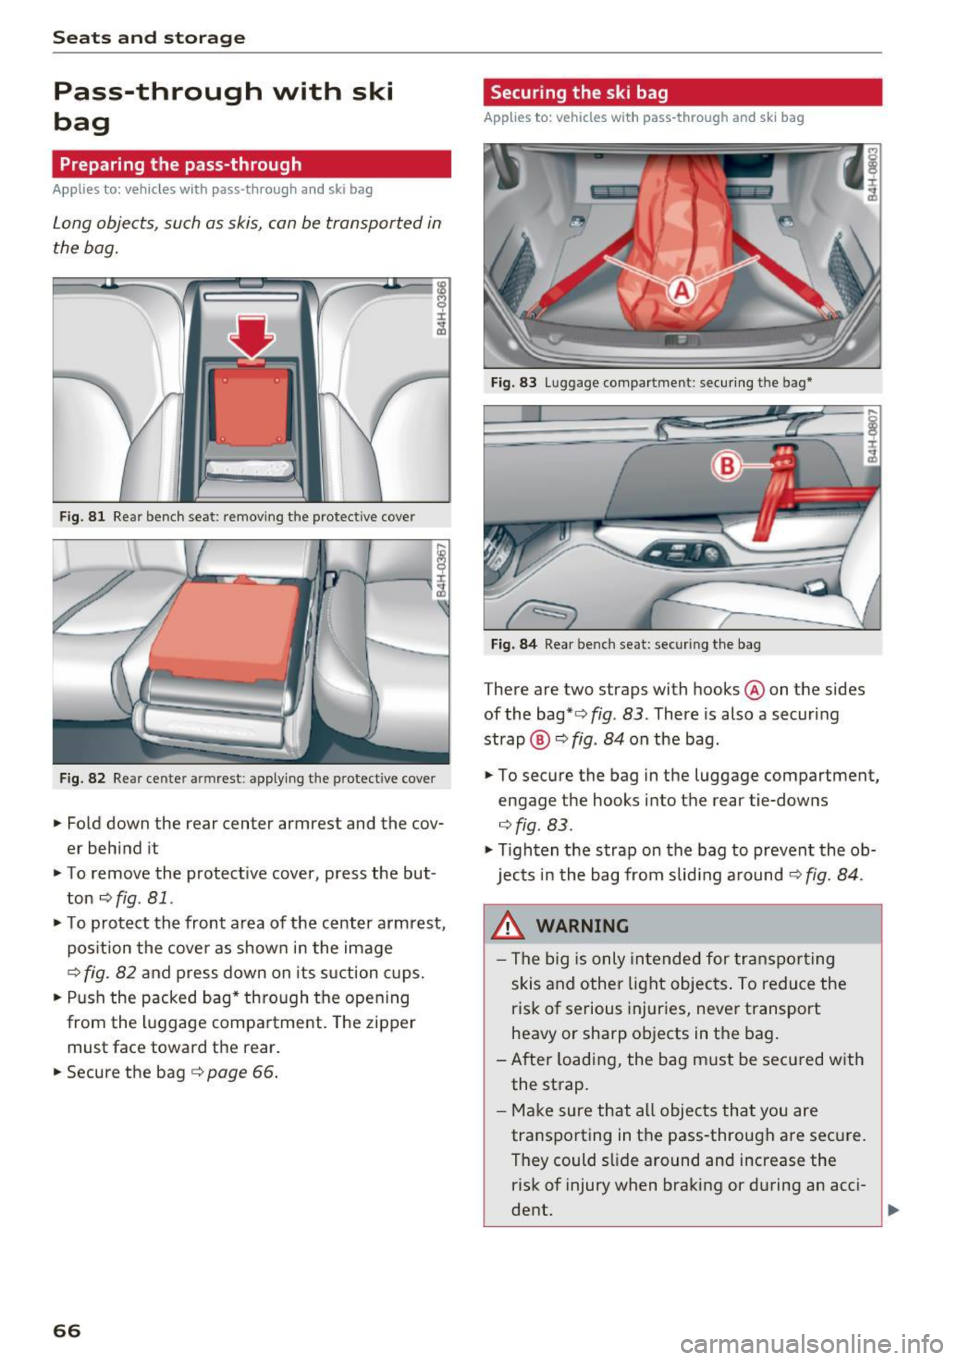
F ig. 81 Rear bench seat: removing the protective cover
Fig. 82 Rear center armrest: applying the protect ive cover
• Fold down the rear center armrest and the cov
er behind it
• To remove the protective cover, press the but
ton<=>
fig. 81 .
• To protect the front area of the center armrest,
pos ition the cove r as show n in the image
<=>fig. 82 and press down on its suction c ups.
• Push the packed bag* through the opening
from the luggage compa rtment. The zipper
must face toward the rear .
• Secure the bag
r:::;, page 66.
66
Securing the ski bag
Applies to: vehicles with pass -through and ski bag
Fig. 83 Luggage compartment: securing the bag*
Fig. 8 4 Rea r bench seat: securing the bag
There are two straps with hooks @on the sides
of the
bag* r=;,fig. 83. There is also a securing
strap @
c::> fig. 84 on the bag.
• To secure the bag in the luggage compartment,
engage the hooks into the rear tie-downs
r:::;, fig. 83 .
• Tighten the strap on the bag to prevent the ob
jects in the bag from s lid ing a round
r:::;, fig. 84.
.&_ WARNING
- The big is only intended for transpo rting
skis and other light objects . To reduce the
risk of serious injuries, never transport
heavy or sharp ob jects in the bag.
-
- After load ing, the bag m ust be sec ured w ith
the st rap.
- Make sure that a ll objec ts that you are
transporting in the pass -through are secure.
They could slide around and increase the risk of injury when braking or during an acci-
dent.
~
Page 69 of 354
C) C0 ....
"' " "' .... 0 0 :r
-Only fold the bag up if it is dry.
- When transporting skis or snowboards,
tighten the securing strap between the
bindings.
- Lay skis in the bag with the points facing
forward and snowboards and ski pole points
facing the rear.
Refrigerator
Introduction
Applies to: vehicles with refrigerator
Clean the refrigerator before the first use ~ table
on page 308.
You can only switch the refrigerator on, if :
- the temperature in the luggage compartment
is less than 131
° F (55 °(). If the refrigerator is
switched on , it will automatically switch off if
the temperature in the luggage compartment
exceeds 131
° F (55 °(). If the temperature
goes back below 131
° F (55 °(), the refrigera
tor will automatically switch on again.
- The charge level of the vehicle battery is suffi.
cient. The refrigerator is automatically switch
ed off if the electrical system voltage falls be
low the spec ified minimum value. This prevents
the vehicle battery from discharging . The re
frigerator automatically switches back on if th e
electrical system voltage increases again, for
example after starting the vehicle.
When the cooling function is working optimally,
the cooling function reaches 43° F
(+6 °C) and
the free zing function reaches 21 ° F
(-6 °C). The
cooling temperature in the refrigerator also de
pends on the luggage compartment tempera
ture. When the temperature in the luggage com
partment is high, there may only be a limited
cooling effect.
.&, WARNING
-
To avoid any injury risks to the passengers
caused by the refrigerator, the following safe
ty precautions must be followed:
Seats and storage
-The maximum load capacity for the freezer
is
5.5 lbs (2 .5 kg).
- Never overload the refrigerator. There is a
risk of injury in the event of a collision or
sudden braking.
- The refrigerator cover must always be
closed and locked while driving. The refrig
erator contents could enter the vehicle inte
rior during a collision or sudden braking ma
neuver, which increases the risk of injury.
- Never store flammable fluids, gas contain
ers and similar objects in the refrigerator
due to the risk of an explosion . This also ap
plies to goods and products that can emit
volatile or flammable gases.
-At temperatures of 32° F
(0 °() and lower,
frozen liquid inside glass containers can
cause the containers to burst.
(D Note
- The ventilation openings for the refrigerator
are at the rear panel trim panel in the lug
gage compartment and must not be cov
ered.
- If the refrigerator is not functioning correct
ly, turn it off to prevent any damage. Have it
checked by an authorized Audi dealer or au
thorized Audi Service Facility.
Operation
Applies to: vehicles with refrigerator
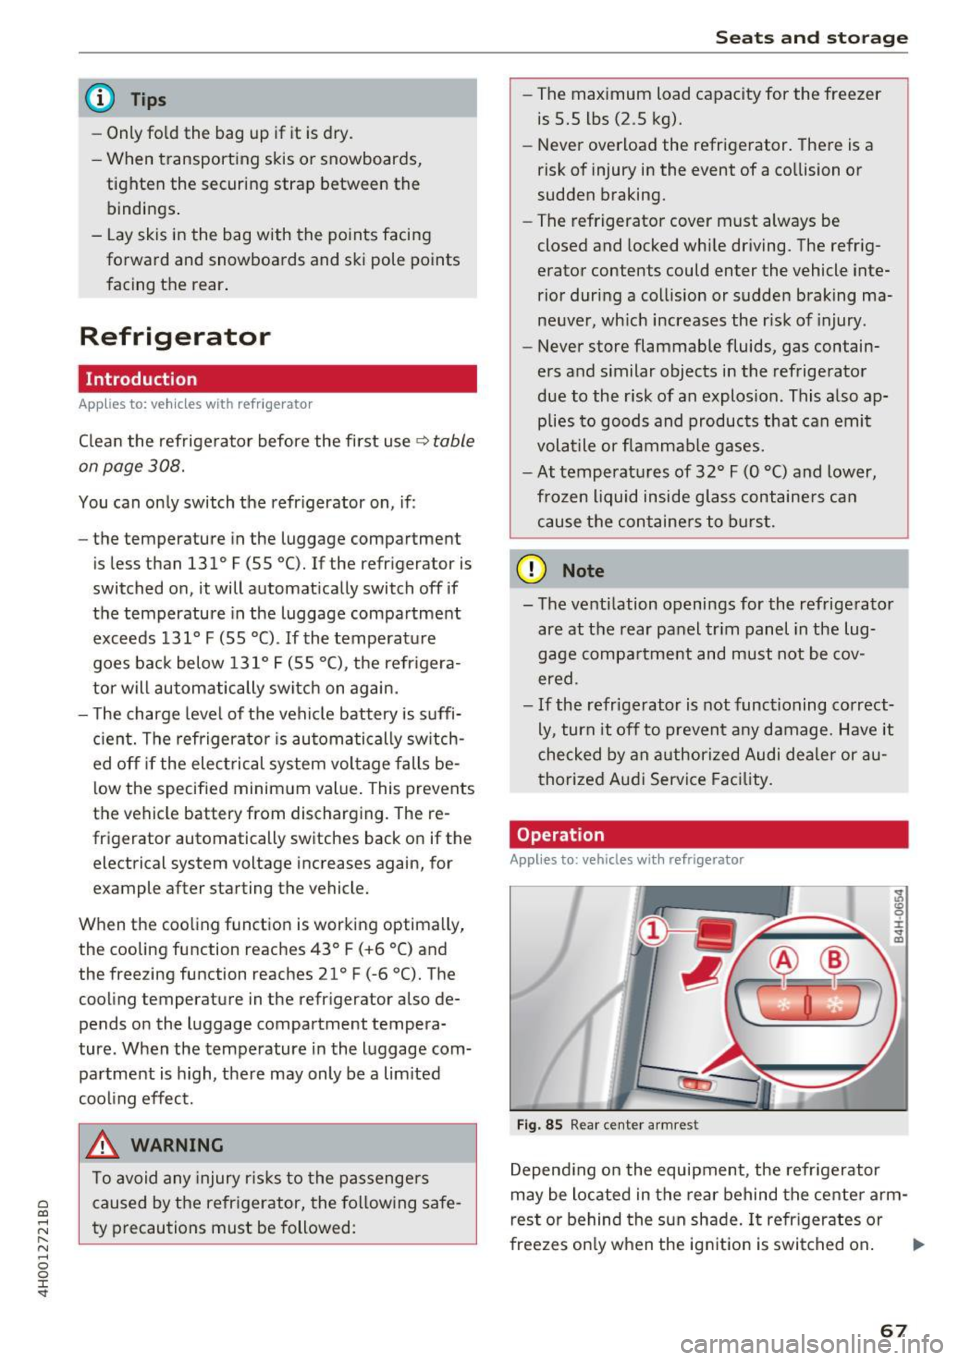
Fig. 85 Rear center armres t
Depending on the equipment , the refrigerator
may be located in the rear behind the center arm
rest or behind the sun shade. It refrigerates or
freezes only when the ignition is switched on. ..,.
67
Page 70 of 354
Seats and storage
Opening and closing the refrigerator
.,. Pull the release lever CD<=? fig. 85 to open the
refrigerator .
.,. Push the cover back into its closed position to
close the refrigerator . The cover is closed cor
rectly if the re lease lever CD audibly engages.
Switching on/off
.,. Press the button @<=? fig. 85 to switch the
cooling function on or off. The symbo l in the
button lights up when the function is switched
on .
.,. Press the button @ to switch the freezer func
tion on or off. The symbol in the button lights
up when the function is switched on .
(D Tips
-To avoid a build-up of condensat ion, only
open the refrigerator cover as briefly and
quickly as possible.
- Do not p lace any warm food or drinks in the
refrigerator.
68