window AUDI A8 2018 Owners Manual
[x] Cancel search | Manufacturer: AUDI, Model Year: 2018, Model line: A8, Model: AUDI A8 2018Pages: 356, PDF Size: 54.71 MB
Page 4 of 356
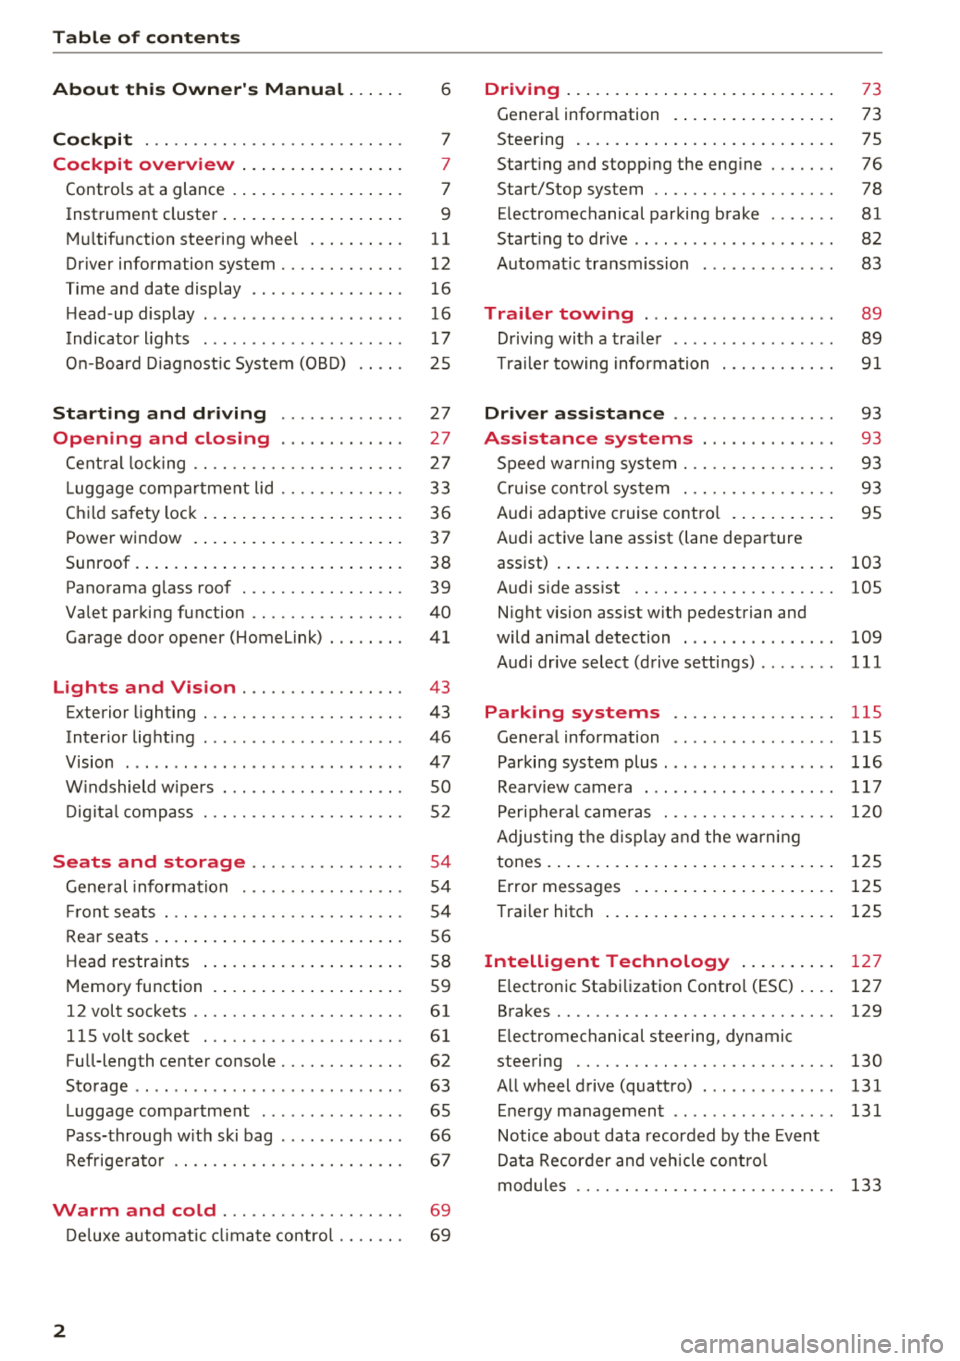
Table of contents
About this Owner's Manual. . . . . .
6
Cockpit . . . . . . . . . . . . . . . . . . . . . . . . . . . 7
Cockpit overview . . . . . . . . . . . . . . . . . 7
Controls at a glance . . . . . . . . . . . . . . . . . . 7
Instrument cluster . . . . . . . . . . . . . . . . . . . 9
M ultif unction steering wheel . . . . . . . . . . 11
Driver information system . . . . . . . . . . . . . 12
T ime and date display . . . . . . . . . . . . . . . . 16
H ead-up display . . . . . . . . . . . . . . . . . . . . . 16
Indicato r lights . . . . . . . . . . . . . . . . . . . . . 17
O n-B oard Diagnost ic System (OB D) . . . . . 25
Starting and driving . . . . . . . . . . . . . 27
Opening and closing . . . . . . . . . . . . . 27
Cent ral lock ing . . . . . . . . . . . . . . . . . . . . . . 27
L ugg age com pa rt ment lid . . . . . . . . . . . . . 33
Ch ild safety lock . . . . . . . . . . . . . . . . . . . . . 36
P ower window . . . . . . . . . . . . . . . . . . . . . . 37
Sunroof. . . . . . . . . . . . . . . . . . . . . . . . . . . . 38
Panorama glass roof . . . . . . . . . . . . . . . . . 39
Valet par king function . . . . . . . . . . . . . . . . 40
Garage doo r opener (Home Link) . . . . . . . . 41
Lights and Vision . . . . . . . . . . . . . . . . . 43
Exterior lighting . . . . . . . . . . . . . . . . . . . . . 43
Interior lighti ng . . . . . . . . . . . . . . . . . . . . . 46
V1s1on . . . . . . . . . . . . . . . . . . . . . . . . . . . . . 47
W indshield w ipe rs . . . . . . . . . . . . . . . . . . . 50
D ig ita l compass . . . . . . . . . . . . . . . . . . . . . 52
Seats and storage . . . . . . . . . . . . . . . . 54
Gene ral information . . . . . . . . . . . . . . . . . 54
Fr ont seats . . . . . . . . . . . . . . . . . . . . . . . . . 54
Rear seats . . . . . . . . . . . . . . . . . . . . . . . . . . 5 6
Head restraints . . . . . . . . . . . . . . . . . . . . . 58
M emory function . . . . . . . . . . . . . . . . . . . . S9
12 volt sockets . . . . . . . . . . . . . . . . . . . . . . 61
llSvoltsocket . ............. .... .. . 61
Fu ll-length center console. . . . . . . . . . . . . 62
Storage . . . . . . . . . . . . . . . . . . . . . . . . . . . . 63
L uggage compartment . . . . . . . . . . . . . . . 65
P ass-throug h w it h ski bag . . . . . . . . . . . . . 66
R efrige rato r . . . . . . . . . . . . . . . . . . . . . . . . 67
Warm and cold . . . . . . . . . . . . . . . . . . . 69
D eluxe a utomat ic cli ma te contro l . . . . . . . 69
2
Driving ... .. .. .... .. ... .. ..... ... . .
Genera l information . .... .. ..... ... . .
Steering . ... .. .... .. ... .. ..... ... . .
Start ing and stopping the eng ine ..... . .
Start/Stop system .. .. ............. . .
E lectromechanical parking brake ...... .
Start ing to drive .. .. .. .............. .
A utomat ic transmission
Trailer towing ... .. .............. .
D rivi ng with a tra ile r .. .............. .
T ra ile r towing information .......... . .
Driver assistance .. .............. .
Assistance systems .. .. ..... ... . .
S peed warning system . ............. . .
Cru ise cont rol sys tem . ............. . .
Audi adaptive cruise contro l ...... ... . .
Audi active lane assist (lane departure 73
73
7 5
76
78
81
82
83
89 89
9 1
93
93
93
93
95
assist) . . . . . . . . . . . . . . . . . . . . . . . . . . . . . 103
Audi s ide ass ist . . . . . . . . . . . . . . . . . . . . . 105
N ight vision assist w ith pedestrian and
wild animal detection . . . . . . . . . . . . . . . . 109
Audi drive select (drive setti ngs) ........ 111
Parking systems . . . . . . . . . . . . . . . . . 115
General information . . . . . . . . . . . . . . . . . 115
Parking system plus ... ............... 116
Rearv iew camera . . . . . . . . . . . . . . . . . . . . 117
Per iphera l came ras . . . . . . . . . . . . . . . . . . 120
Adjus ting the d isp lay and the wa rn in g
tones. . . . . . . . . . . . . . . . . . . . . . . . . . . . . . 125
Error messages . . . . . . . . . . . . . . . . . . . . . 125
T raile r hitch . . . . . . . . . . . . . . . . . . . . . . . . 125
Intelligent Technology . . . . . . . . . . 127
E lectronic Stabi lization Contro l (ESC). ... 127
Brakes .... .. .. .. .. .. ............. .. 129
E lectromechanical steering, dynamic
steering . . . . . . . . . . . . . . . . . . . . . . . . . . . 130
All wheel drive (quattro) . . . . . . . . . . . . . . 131
Energy management . . . . . . . . . . . . . . . . . 131
Notice about data recorded by the Event
Data Recorder and veh icle co ntro l
modules . . . . . . . . . . . . . . . . . . . . . . . . . . . 133
Page 10 of 356
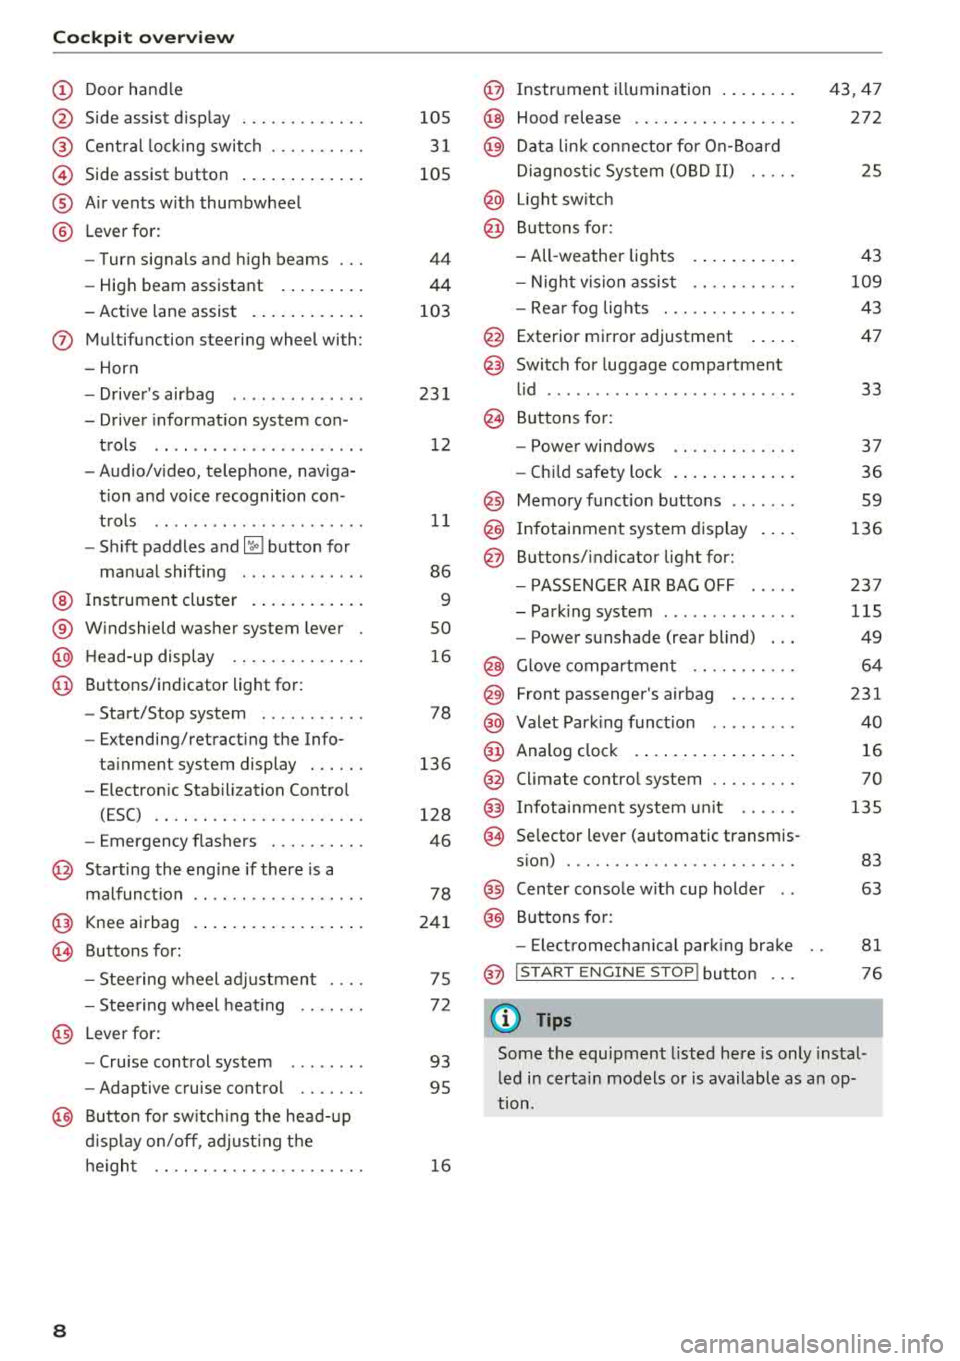
Cockpit overv ie w
CD
@
®
©
®
®
Door hand le
S ide assist d isp lay
Cent ral lock ing switch ....... .. .
Side assist button .. ..... ... .. .
A ir vents w ith thumbwheel
L ever fo r:
- Turn signals and h igh beams
- High beam assistant ... ... .. .
- Active lane assist . ..... ... .. .
(J) Multifunction steering wheel with :
- Horn
- Drive r's airbag ............. .
- Drive r informat io n system con -
trols .. .. .. ............... .
- Audio/v ideo, telephone, naviga
t ion and voice recognition con -
t rols .. .. .. ............... .
- Shift paddles
and ~ button for
manual shifting ............ .
@ Ins trumen t cluster . ..... ... .. .
® W indshield washer system lever
@ H ead-up display ........... .. .
@ Buttons/ indicator light for :
- Start/Stop system .......... .
- Extending/retract ing t he Info-
ta inment system display . .. .. .
- E lectron ic Stabili zation Contro l
(ESC) .. .. .. ............. .. .
- Emergency flashers ....... .. .
@ Starting the eng ine if there is a
malfunct ion
@ Knee airbag
~ Buttons for :
- Stee ring wheel adjustmen t ... .
- Stee ring wheel heat ing
@ Lever for:
- Cru ise control system ....... .
- Adaptive cruise control .... .. .
@ Butto n for sw itch ing the head- up
d isp lay on/off , adjust ing t he
h e igh t .. .. .. ............. .. .
8
105
3 1
105
44
44
103
23 1
1 2
11
86
9
so
1 6
78
136
128
46
78
24 1
75
7 2
93
95
1 6
@ Instr ument i llumination .. ..... .
@ Hood release .. .. .. .......... .
@ Data lin k co nne ctor fo r On-Board
Di agnos tic Sys tem (OB D II) .....
@ Light sw itch
@ Buttons for:
- All -weather lights
- Night v is ion assis t .......... .
- Rea r fog lights . .. .......... .
@ Exterior mi rror adjustment .... .
@ Switch for luggage compartment
l id ........ ... .. .. .......... .
@ B uttons for:
- Powe r windows .. .......... .
- Ch ild safety lock . .... .. ..... .
@ Memory funct io n buttons ...... .
@) Infotainment system d isplay
@ B uttons/indicator light for:
- PA SSE NG ER AIR BAG OFF .... .
- Park ing system ... .......... .
- Power sunshade (rear blind) .. .
@ Glove comp artment .......... .
@) Front passenger's airbag ...... .
@ Valet Park ing funct ion ........ .
@ Analog cloc k .... .. ... .. ..... .
@ Climate contro l system ........ .
@ Infota inment system u nit ..... .
@ Se lector lever (automatic transmis -
s ion) ... .. .. .. .. .. .......... .
@ Center conso le w ith cup holder ..
@ Buttons for:
- Electromechan ica l park ing bra ke
@ I START EN GINE STO P! button
(D Tips
43,47
272
25
43
109
43
47
33
37
36 59
136
23 7
115
49
64
231
40
16
70
135
83 63
81
76
Some the equipment l isted here is only instal
l ed i n certa in models or is available as a n op
tion.
Page 30 of 356
Opening and clo sin g
@ Tips
- Do not leave valuables unattended in t he ve
hicle . A locked vehicle is not a safe!
- The LED in the driver 's door rail blinks when
you lock the vehicle . If the LED lights up for
approximately 30 seconds after locking,
there is a ma lfunction in the central locking
system. Have the problem corrected by an
authorized Audi dealer or authorized Audi
Service Fac ility.
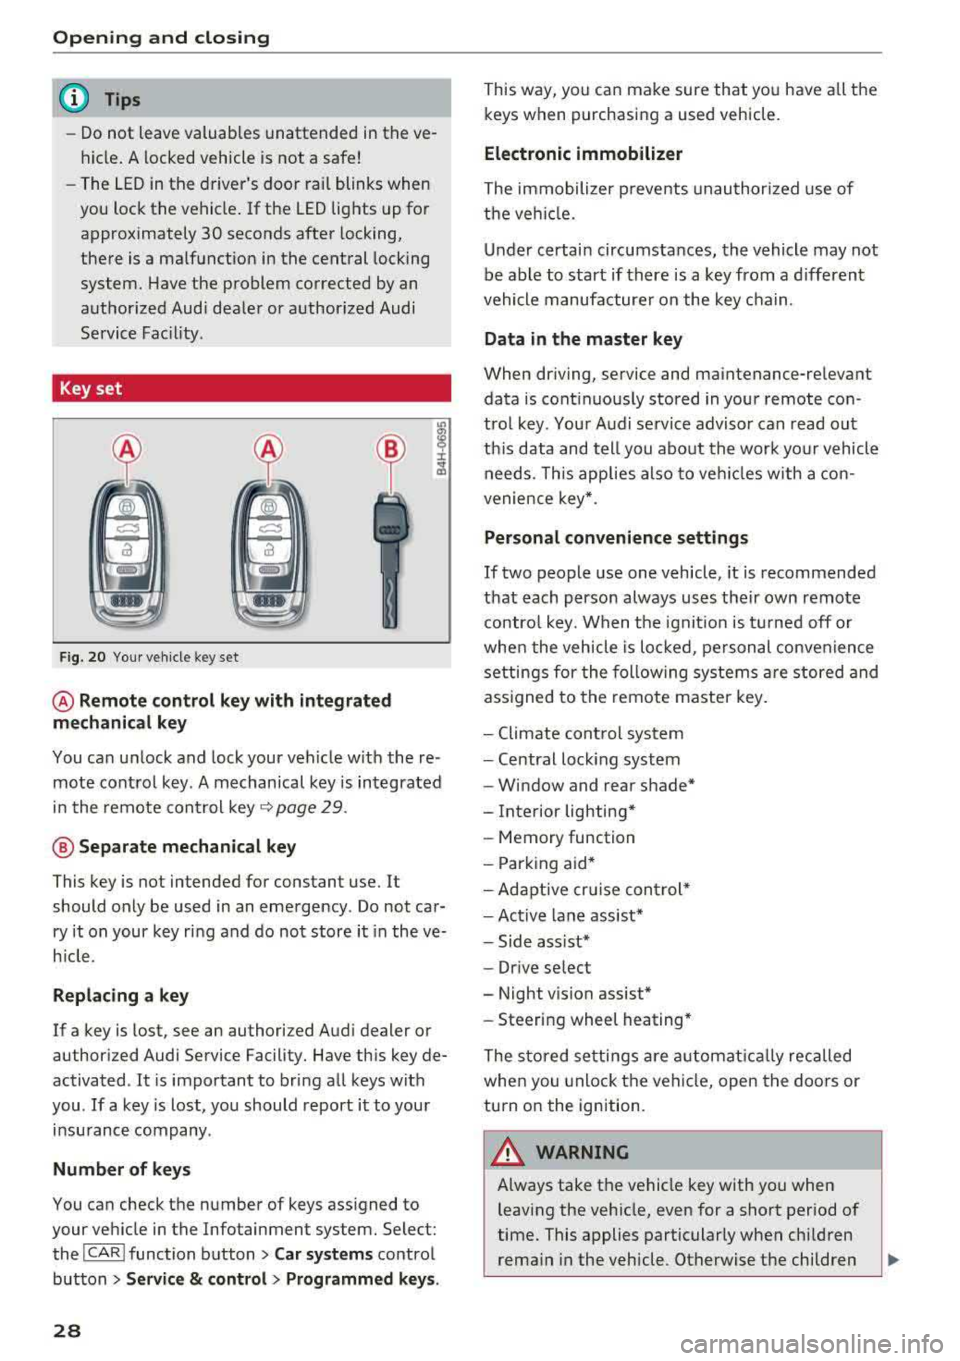
Key set
F ig. 20 You r veh icle key set
@ Remote control ke y with integr ated
mechanica l key
You can unlock and lock your vehicle w ith the re
mote control key . A mechanical key is integrated
in the remote control key
Q page 29 .
@ Separate mechanical ke y
This key is not intended for constant use. It
should only be used in an emergency . Do not car
ry it on your key ring and do not store it in the ve
h icle.
Rep lacing a ke y
If a key is lost, see an authorized Audi dealer or
authorized Audi Service Facility. Have this key de
activated . It is important to bring all keys with
you .
If a key is lost, you should report it to your
insurance company .
Number of keys
You can check the number of keys ass igned to
your veh icle in the Infotainment system. Select:
the
I CAR I function button > Car sy st e m s control
button
> Ser vice & cont rol > Pr ogrammed ke ys.
28
This way, you can make sure that you have all the
keys when purchasing a used vehicle.
Electronic immobilizer
The immobilizer p revents unauthorized use of
the ve hicle.
Under certain circumstances, the vehicle may not
be able to start if there is a key from a d ifferent
vehicle manufacturer on the key chain .
Data in the master ke y
When driving, service and maintenance-relevant
data is cont inuous ly stored in your remote con
trol key . Your A udi se rvice advisor can read out
th is data and tell you abo ut the work yo ur vehicle
needs . T his applies also to veh icles w ith a con
venience key *.
Personal convenience sett ings
If two people use one vehicle, it is recommended
that each person always uses their own remote contro l key. When the ignit io n is tu rned off or
whe n the vehicle is lo cked, pe rsonal convenience
settings for the following systems a re stored and
ass igned to the remote master key .
- Climate cont rol system
- Central lock ing system
- Window and rear shade*
- Interior lighting*
- Memory function
- Park ing aid*
- Adaptive cr uise control *
- Ac tive lane assist*
- Side ass ist*
- Dr ive select
- Night vision assist*
- Steeri ng wheel heating*
The stored settings are automat ica lly recalled
when you unlock the vehi cle, open the doors or
turn on the ignition.
A WARNING
A lways take the vehicle key with you when
leaving the vehicle, even for a short period of
time. This applies particularly when child ren
rema in in the vehicle . Otherwise the children
-
Page 31 of 356
lL t:0 ....
"' ......
"' .... 0 0 :c '
equipment such as power windows.
(D Tips
-The operation of the remote control key can
be temporarily disrupted by interference
from transmitters in the vicinity of the vehi
cle work ing in the same frequency range
(such as a cell phone or radio equipment).
-Using the mechanical key, you can:
- Locking/unlocking the glove compartment
,;:;,page 64.
-Manually lock/unlock the vehicle
,;:;,page 32.
-Mechanically lock the doors c:> page 32.
-Unlock the luggage compartment lid us-
ing the emergency release r;;:;, page 36.
-For an explanation on conformity with the
FCC regulations in the United States and the
Industry Canada regulations, see
r;;:;,page 339.
(D Tips
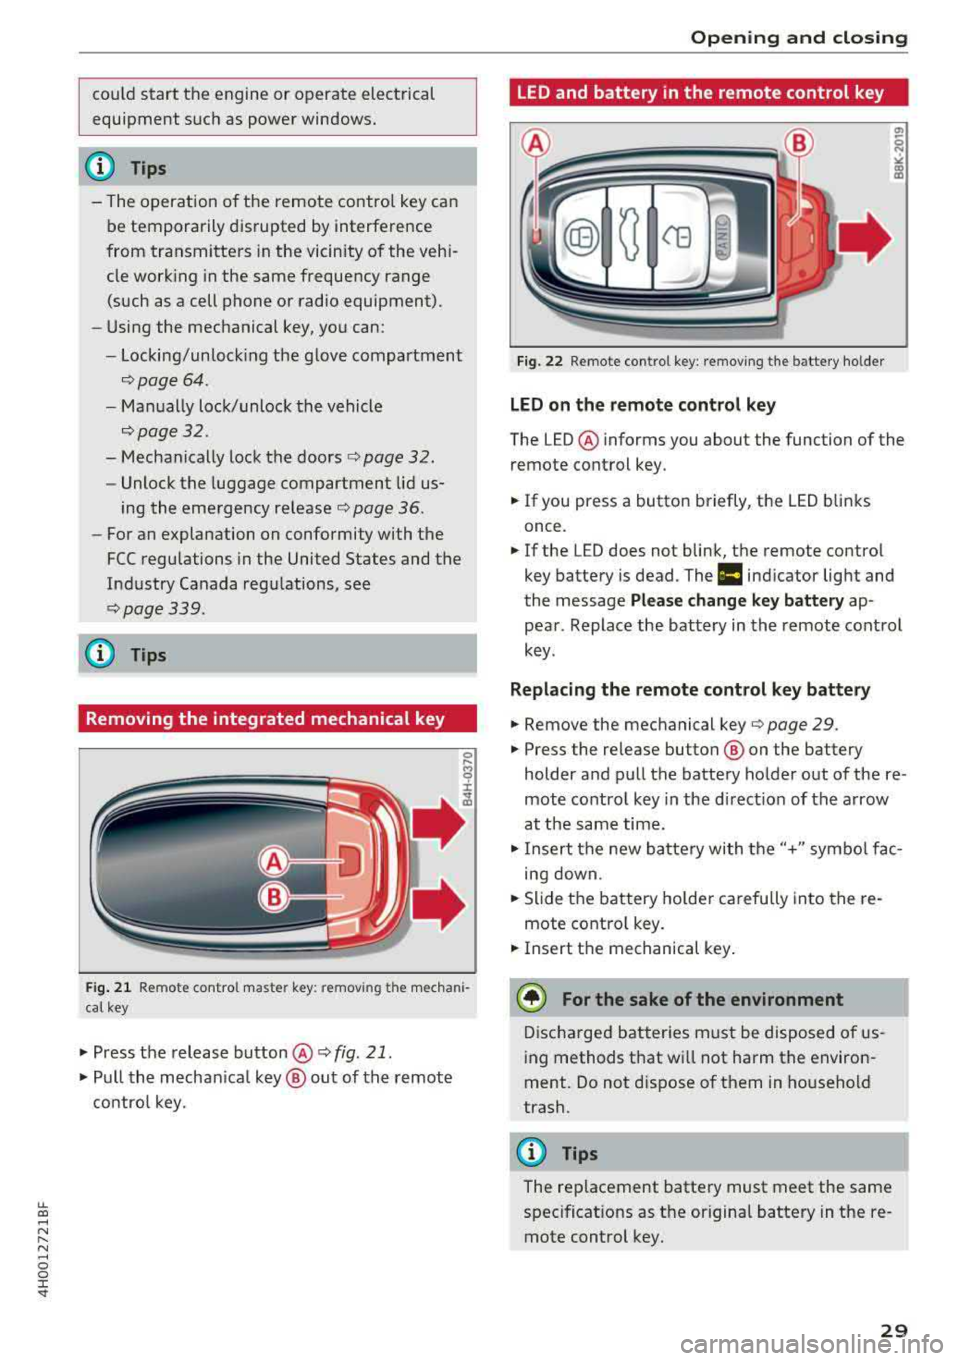
Removing the integrated mechanical key
Fig. 21 Remote control master key : remov ing t he mechani
cal key
.,. Press the release button@ r;;:;, fig. 21.
.,. Pull the mechanica l key @ out of the remote
control key.
Opening and closing
LED and battery in the remote control key
Fig. 22 Remote control key: removing the battery holder
LED on the remote control key
The LED @ informs you about the function of the
remote control key.
.. If you press a button briefly, the LED blinks
once.
.. If the LED does not blink, the remote contro l
key battery is dead. The
ml indicator light and
the message
Please change key battery ap
pear . Replace the battery in the remote control
key .
Replacing the remote control key battery
.. Remove the mechanical key r;;:;, page 29 .
.. Press the release button ® on the battery
holder and pull the battery holder out of the
re
mote control key in the d irect ion of the arrow
at the same time .
.,. Insert the new battery with the"+" symbol fac
ing down .
.,. Slide the battery holder carefully into the re
mote contro l key .
.. Insert the mechanical key.
@ For the sake of the environment
Discharged batteries must be disposed of us
ing methods that wi ll not harm the environ
ment. Do not d ispose of them in household
trash.
{!) Tips
The replacement battery must meet the same
spec ificat ions as the origina l battery in the re
mote control key .
29
Page 38 of 356
Opening and closing
-there is interference to the radio signal from
the vehicle key, such as from cell phones or re
mote controls
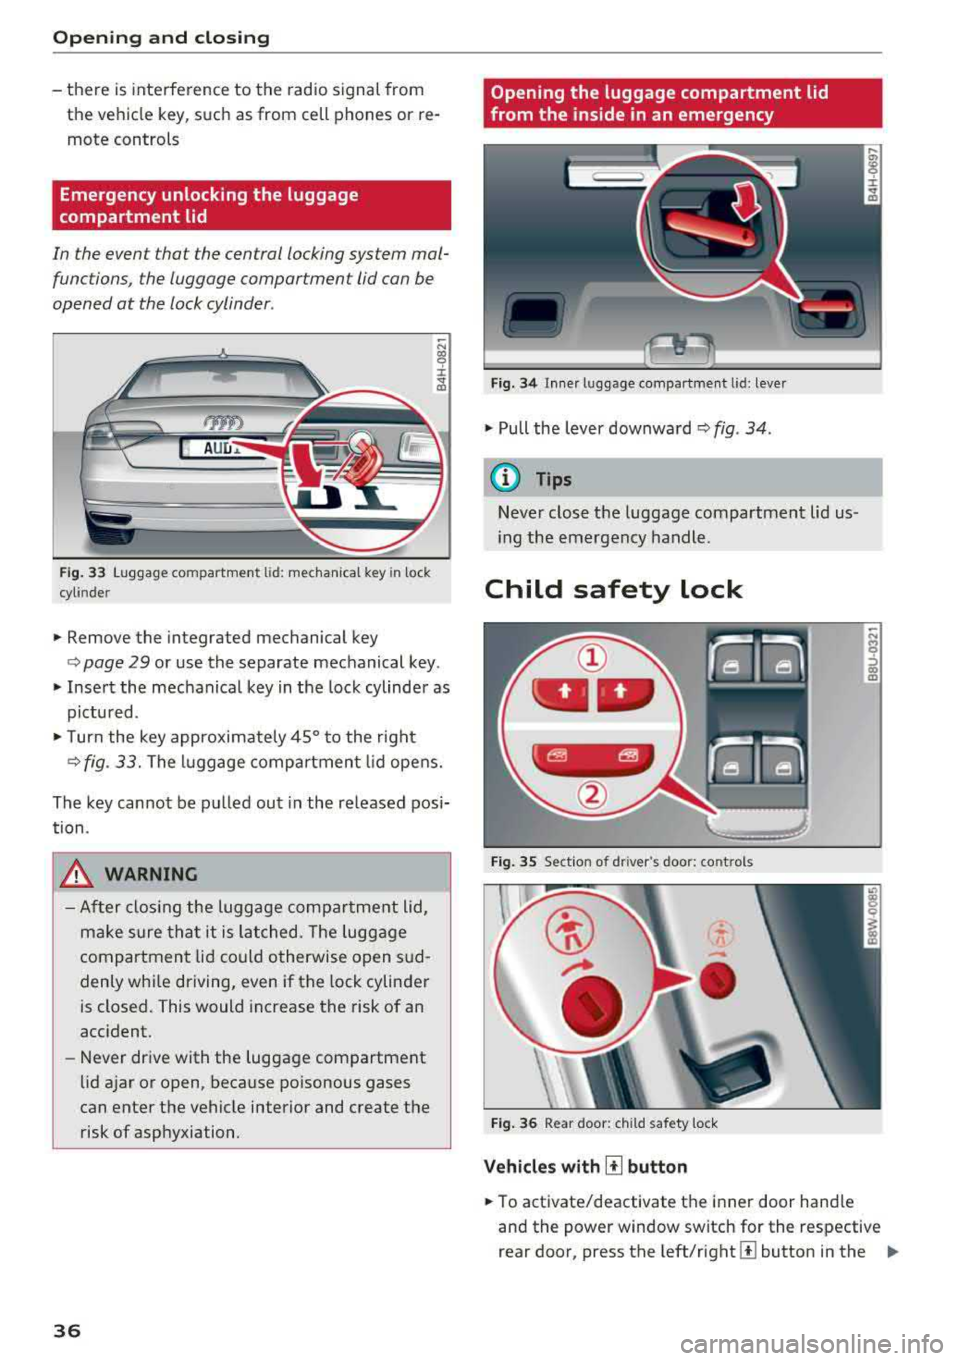
Emergency unlocking the luggage
compartment lid
In the event that the central locking system mal
functions , the luggage compartment lid can be
opened at the lock cylinder .
AUD.a.
Fig. 33 Luggage compartment lid: mechanica l key in lock
cyl inde r
.,. Remove the integrated mechanical key
-N CX) '9 ::c
"" "'
<=> page 29 or use the separate mechanical key.
" Insert the mechanical key in the lock cylinder as
pictu red.
"T urn the key approximate ly 45° to the right
<=> fig. 33. The luggage compartment lid opens.
The key cannot be pulled out in the released posi
tion .
_&. WARNING
-After closing the luggage compartment lid,
make sure that it is latched. The luggage
compartment lid could otherwise open s ud
denly whi le driving, even if the lock cylinder
is closed. This would increase the risk of an
acc ident.
- Never drive with the luggage compartment
lid ajar or open, because poisonous gases
can enter the vehicle interior and create the
risk of asphyxiation .
36
Opening the luggage compartment lid
from the inside in an emergency
Fig. 34 Inne r luggage compartment l id : lever
" Pull the lever downward c> fig . 34 .
@ Tips
Never close the luggage compartment lid us
i ng the emergency handle.
Child safety lock
Fig. 35 Section of dr iver 's doo r: co ntrols
Fig. 36 Rear door: child safety lock
Vehicles with [!] button
" To activate/deactivate the inner door hand le
-N
~ co
"'
and the power window switch for the respective
rear door, press the
l eft/right [±] button in the ..,,
Page 39 of 356

lL t:0 ....
"" ......
"" .... 0 0 :c '
the button turns on/blinks.
.,. To activate/deactivate the child safety lock on
both sides, you must press
the [±] buttons one
after the other.
Vehicles with ~ button
.,. To deactivate/activate the power window
switch in the rear doors, press the [@button in
the driver's
door @ c;, fig. 35. The indicator
light in the button turns on/blinks .
.,. To also deactivate/activate the inner door han
dle, open the respective rear door and turn the
key switch w ith the mechanical key in the direc
t ion of the arrow or opposite the d irection of
the arrow
¢fig. 36.
The follow ing funct ions are also turned off when
the child safety lock is act ivated :
- The buttons for the sunshade* in the rear win
dow .
- The buttons for the power sunshades* in the
side windows.
- The button for the front passenger seat ad just
ment* (for vehicles with
the[±] button when the
child safety lock is activated for the rear door
on the passenger's side).
.&_ WARNING
Always take the veh icle key with you when
leaving the vehicle, even for a short period of
time. This applies particularly when children
remain in the vehicle. Otherwise children
could start the engine or operate electrical
equipment (such as power windows), which
increases the risk of an accident.
-
Opening and closing
Power window
Controls
The driver can control all power windows.
Fig. 37 Section of driver 's doo r: controls
All power window switches are equipped with a
two -stage function:
Opening and closing the windows
CD N M 0
::> CD m
.,. To open or close the window completely, press
the switch down or pull the switch up brief ly to
the second level. The ope rat ion will stop if the
sw itch is pressed/pulled again.
.,. To select a position in between opened and
closed, press/p ull the switch to the first level
until the des ired window position is reached .
Power window switches
CD Left front door
@ Right front door
® Left rear door
@ Right rear door
.&_ WARNING ~
-Always take the vehicle key with you when
leaving the vehicle, even for a short period
of time. This applies particularly when chil
dren remain in the vehicle. Otherwise the
children could start the engine or operate
electrical equipment such as power win
dows, which increases the risk of injury. The
power windows continue to function until
the driver's door or front passenger's door
has been opened.
- Pay careful attention when closing the win
dows. Pinching could cause serious inj uries .
37
Page 40 of 356
Opening and clo sin g
- When locking the vehicle from outside, the
vehicle must be unoccupied since the win
dows can no longer be opened in an emer
gency .
(D Tips
-Using switches @ and@, the driver can a l
so operate the power sunshades* in the side
windows.
- After turning the ignition off you can still
open and close the windows for approxi mately 10 minutes . The power windows do
not switch off until the driver's door or front
passenger's door has been opened .
Correcting power window malfunctions
You can reactivate the one-touch up/down func
tion if it malfunctions .
• Pull the power window switch up until the win
dow is comp letely ra ised.
• Release the sw itch and pull it up again for at
least one second .
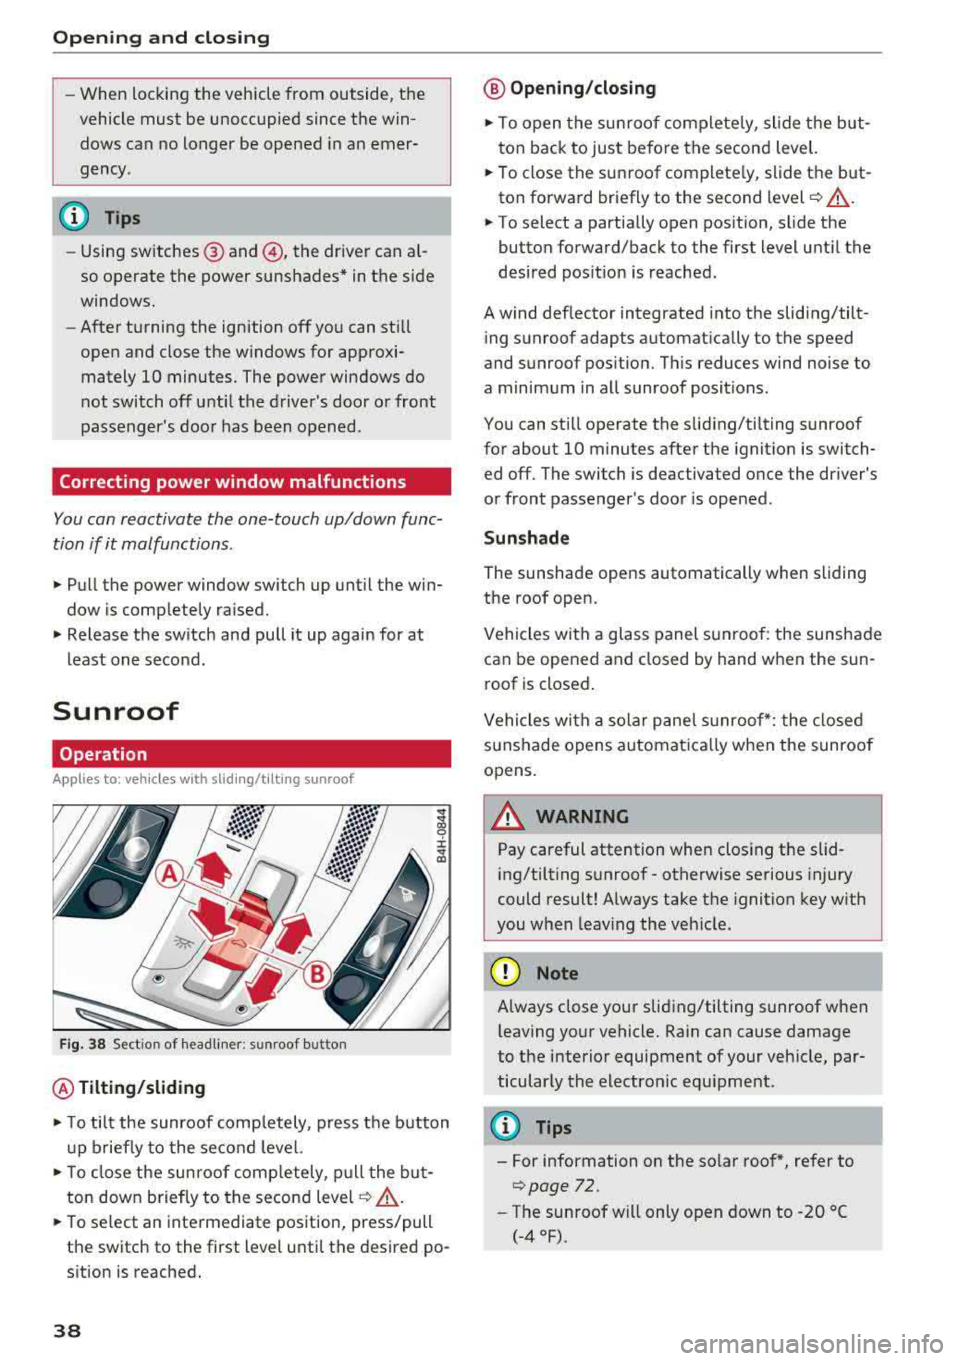
Sunroof
Operation
Applies to: vehicles with sliding/tilting sunroof
Fig . 38 Sect io n of headli ner: sunroof button
@ Tilting /sliding
• T o tilt the sunroof comp letely, press the button
u p briefly to the second level.
• T o close the sunroof comp letely, pull the but
ton down briefly to the second
leve l¢ ,&. .
• To se lect an intermediate position, press/pull
the switch to the first level until the desired po
sition is reached.
38
@ Op ening /closing
• To open the sunroof complete ly, slide the but
ton back to just before the second level.
• To close the s unroof complete ly, slide the b ut
ton forward briefly to the second level
c::> ,&. .
• To select a partially open position, slide the
bu tton forward/back to the first level until the
desired pos it ion is reached.
A wind def lector integrated into the sliding/tilt
ing sunroof adapts automatically to the speed
and sunroof pos ition. Th is reduces wind noise to
a minimum in all sunroof posit ions.
You can still operate the sliding/tilting sunroof
for about 10 minutes after the ignit ion is swi tch
ed off. The switch is deactiva ted once the driver's
or front passenger's door is opened .
Sunshad e
The sunshade opens automatically when sliding
the roof open.
Vehicles with a glass panel sunroof : the sunshade
can be opened and closed by hand when the sun
roof is closed.
Vehicles with a solar panel s unroof*: the closed
sunshade opens automatica lly when the sunroof
opens.
~ WARNING
Pay careful attention when clos ing the slid
ing/tilting sunroof - otherwise serious injury
could result! Always take the ignition key w ith
you when leav ing the veh icle.
(D Note
-
A lways close your sliding/tilting sunroof when
l eaving your vehicle. Rain can cause damage
to the interior equipment of your vehicle, par ticularly the electronic equ ipment .
(D Tips
- For information on the so lar roof *, refer to
¢ page 72 .
-The sunroof will only open down to -20 °C
(-4 °F).
Page 51 of 356
lL t:0 ....
"' ......
"' .... 0 0 :c '
seek medical attention.
- If electrolyte flu .id comes into contact with
the skin, flush the affected area with clean
water for at least 15 minutes and then clean
with soap and water and seek medical at
tention. Clean affected clothing and shoes
thoroughly before wearing again .
- If the fluid was swallowed and the person is
conscious, flush the mouth with water for at
least 15 minutes. Do not induce vomiting
unless this is recommended by medical pro
fessionals . Seek medical attention immedi
ately.
(D Note
The electrolyte fluid that leaks out of broken mirror glass corrodes plastic surfaces and the
paint. Clean this liquid as quickly as possible,
for example with a wet sponge .
(D Tips
-If the light reaching the interior rearview
mirror is obstructed (for example by the
sunshade*), the automatic dimming rear
view mirror will not function correctly.
- The automatic dimming mirrors do not dim
when the interior lighting is turned on or
the reverse gear is selected.
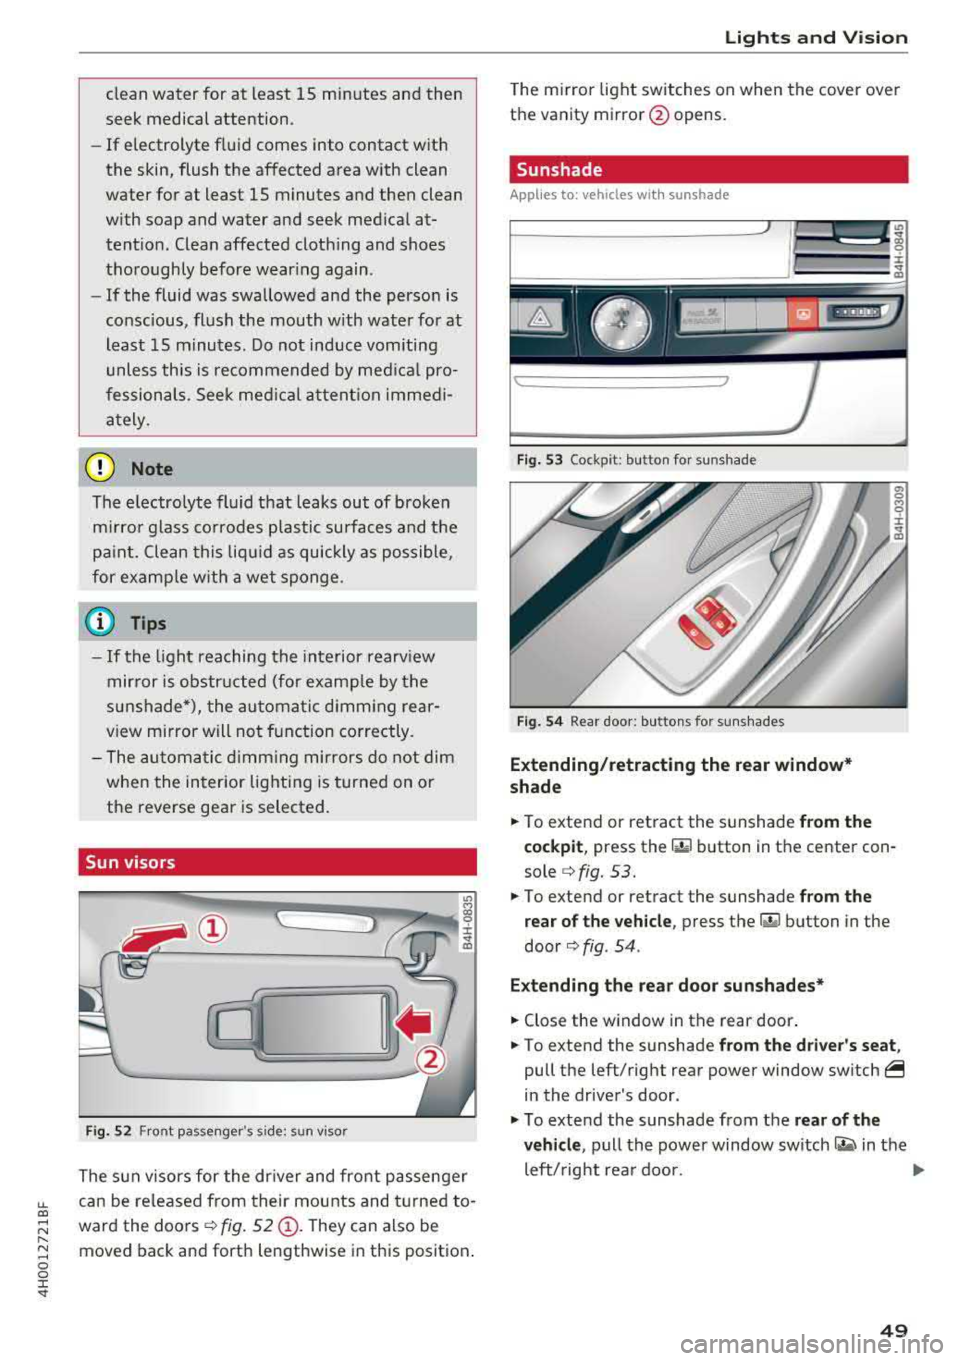
Sun visors
I 1
'D
,
. J "
Fig. 52 Front passenger 's side: sun vis or
0 ::i: ..,. a,
The sun visors for the driver and front passenger
can be released from their mounts and turned to
ward the doors
¢ fig. 52 (D . They can also be
moved back and forth lengthwise in this position.
Lights and Vision
The mirror light switches on when the cover over
t h e vanity mirror @opens .
Sunshade
Applies to: vehicles wi th sunshade
Fig. 53 Cockpit: button for sunshade
Fig. 54 Rear door: b utt ons for s unshade s
Extending/retracting the rear window*
shade
.,. To exte nd or retract the sunshade from the
cockpit,
press the~ bu tton in the center con
sole
¢ fig. 53 .
.,. To extend or retract the sunshade from the
rear of the vehicle,
press the Iii.I button in the
door ¢ fig. 54 .
Extending the rear door sunshades*
.,. Close the window in the rear door.
.,. To extend the sunshade from the driver's seat,
pull the left/right rear power window switch ~
in the driver's door .
.,. To extend the sunshade from the rear of the
vehicle,
pull the power window switch~ in the
left/right rear door.
.,,.
49
Page 52 of 356
Lights and Vision
Retracting the rear door sunshades*
~ To re tract the sunshade from the driver's seat,
press the left/right rear power window switch
~ in the driver's door.
~ To retract the sunshade from the rear of the
vehicle,
press the power window switch Q;;; in
the left/right rear door.
You can adjust the settings for the rear sunshade
so the shade retracts automatically when you se
lect the reverse gear. Select:
CAR function button
> Car systems control button > Vehicle settings
> Automatic rear blind > On. The settings are au
tomatically stored and assigned to the remote
control key. T he sunshade is extended again as
soon as the vehicle is traveling forward at a speed
greater than 9 mph (15 km/h) if the ignition has
not been switched off in the meantime .
&_ WARNING
Always pay careful attention when closing the
sunshades. Pinching could cause serious inju
ries.
@ Tips
- Pressing the l~•~l button several times in a
r ow can trigger the overload protection. The
sunshade can on ly be extended/retracted
again after a brief waiting period.
- The rear window sunshade only functions
when the vehicle interior is warmer than
14°F (-10°().
Vanity mirror in the rear
Appl ies to: ve hicles w ith vanity mirro rs in th e rear
Fig. 55 Rear headl iner: vanity m irror
50
~ Press the button to fold the mirror open. The
mirror lighting turns on automatically .
~ To change the mirror's angle, move it forward/
back with your hand.
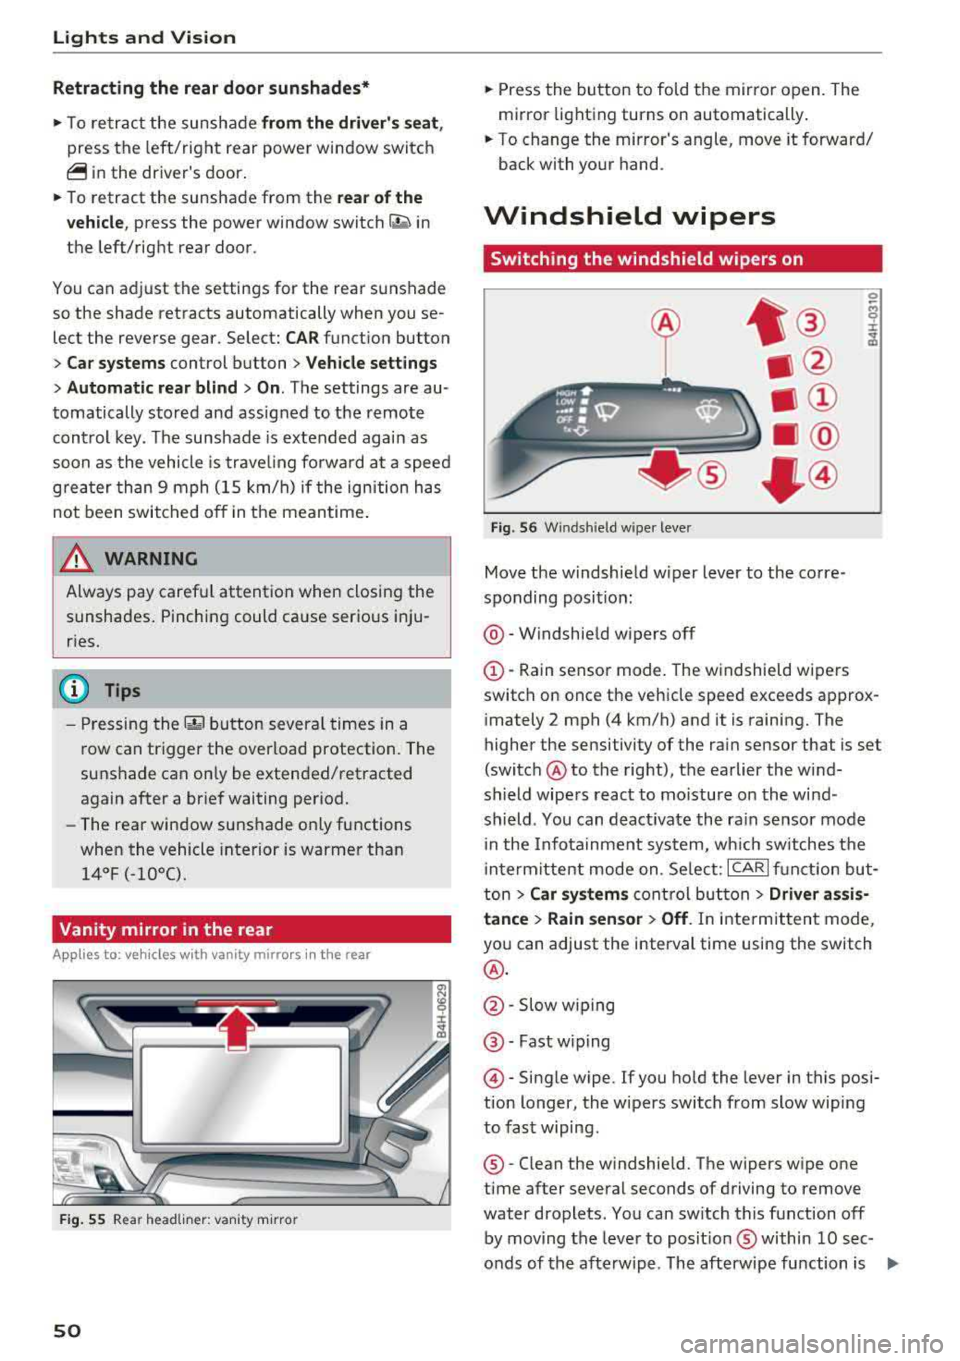
Windshield wipers
Switching the windshield wipers on
Fig . 56 Windsh ield w iper lever
Move the windshield w iper lever to the corre
sponding posit ion:
@ -Windshield wipers off
G)-Rain sensor mode. The windshield wipers
switch on once the vehicle speed exceeds approx
imately 2 mph (4 km/h) and it is raining. The
higher the sensitivity of the rain sensor that is set
(switch @to the right), the earlier the wind
shield wipers react to mo isture on the wind
shield. You can deact ivate the rain sensor mode
i n the Infotainment system, which sw itches the
i ntermittent mode on. Se lect:
ICARI function but
ton
> Car systems control button > Driver assis·
tance
> Rain sensor> Off. In intermittent mode,
you can adjust the interval time using the switch
@.
@ -Slow wiping
@ -Fast w iping
@ -Single wipe. If you hold the lever in this posi
tion longer, the wipers switch from slow wiping
to fast wiping.
®-Clean the windshield. The wipers wipe one
time after several seconds of driving to remove
water droplets. You can sw itch this function off
by moving the lever to posit ion ® within
10 sec
onds of the afterwipe . The afterwipe function is
IJII>
Page 66 of 356
Seats and storage
(D Note
Beverage containers in the cup holders should
always have a lid. If not, beverages could spill
and cause damage to vehicle equipment, such
electronics or seat covers.
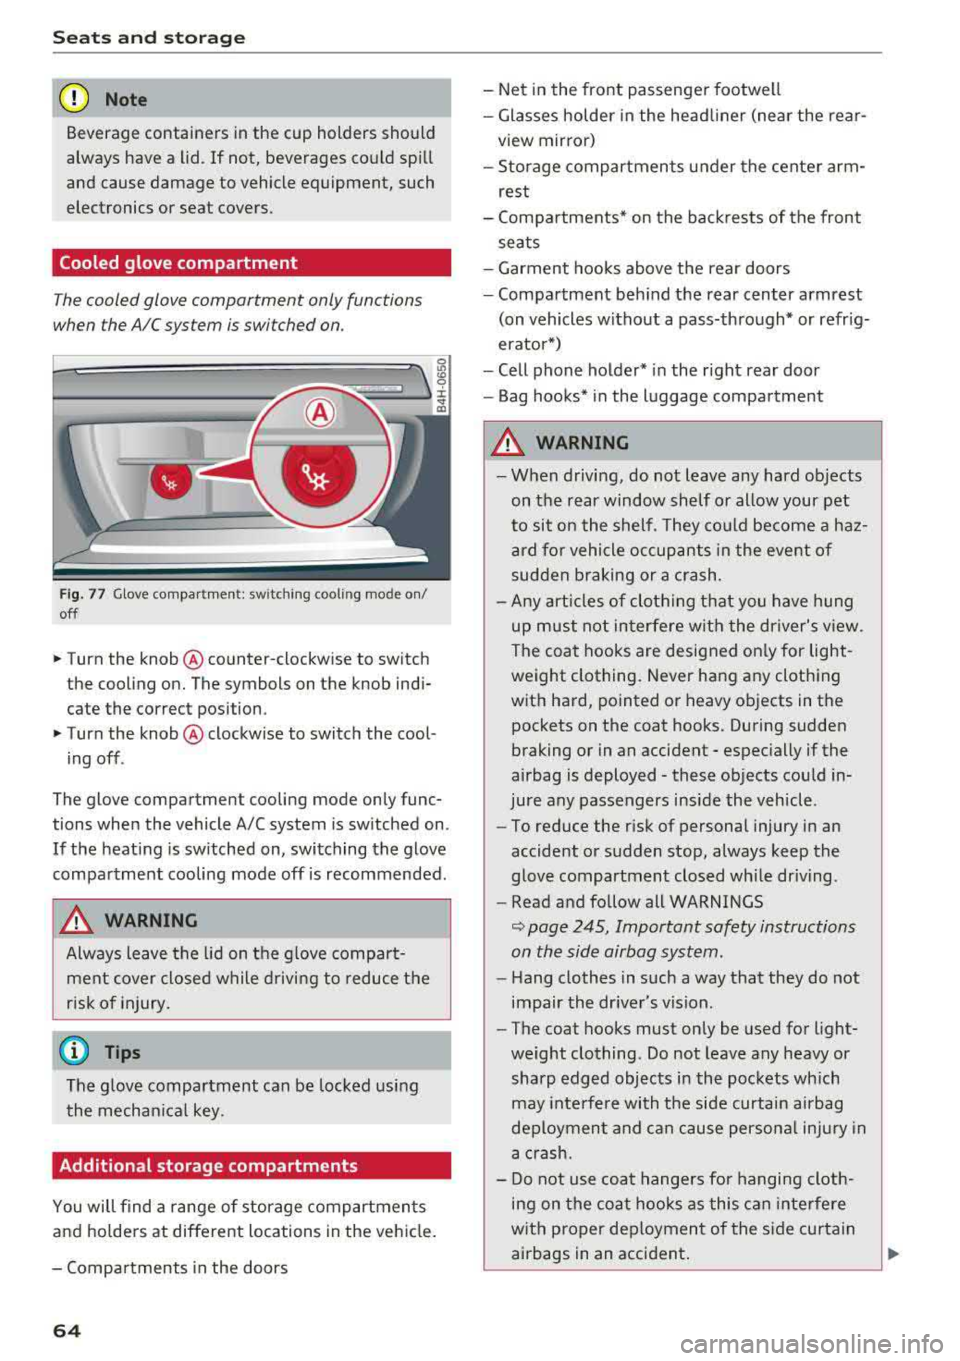
Cooled glove compartment
The cooled glove compartment only functions
when the A/C system is switched on.
Fig. 77 Glove compar tment: switching cooling mode on/
off
.. Turn the knob @counter-clockwise to switch
the cooling on. The symbols on the knob indi
cate the correct position.
.. Turn the knob @clockwise to switch the cool-
ing off .
The glove compartment cooling mode only func
tions when the vehicle A/C system is switched on.
If the heating is switched on, switching the glove
compartment cooling mode off is recommended.
A WARNING
-
Always leave the lid on the glove compart
ment cover closed while driving to reduce the
risk of injury.
(D Tips
The glove compartment can be locked using
the mechanical key.
Additional storage compartments
You will find a range of storage compartments
and hold ers at different locations in the vehicle.
- Compartments in the doors
64
- Net in the front passenger footwell
- Glasses holder in the headliner (near the rear-
view mirror)
- Storage compartments under the center arm
rest
- Compartments* on the backrests of the front
seats
- Garment hooks above the rear doors
- Compartment behind the rear center armrest
(on vehicles without a pass-through* or refrig
erator*)
- Cell phone holder* in the right rear door
- Bag hooks* in the luggage compartment
A WARNING
-When driving, do not leave any hard objects
on the rear window shelf or allow your pet
to sit on the shelf. They could become a haz
ard for vehicle occupants in the event of
sudden braking or a crash.
- Any articles of clothing that you have hung
up must not interfere with the driver's view .
The coat hooks are designed only for light
weight clothing. Never hang any clothing
with hard, pointed or heavy objects in the
pockets on the coat hooks. During sudden
braking or in an accident
-especially if the
airbag is deployed
-these objects could in
jure any passengers inside the vehicle .
- To reduce the risk of personal injury in an
accident or sudden stop, always keep the
glove compartment closed while driving.
- Read and follow all WARNINGS
~ page 245, Important safety instructions
on the side airbag system.
- Hang clothes in such a way that they do not
impair the driver's vision.
- The coat hooks must only be used for light
weight clothing. Do not leave any heavy or
sharp edged objects in the pockets which
may interfere with the side curtain airbag
deployment and can cause personal injury in
a crash.
- Do not use coat hangers for hanging cloth
ing on the coat hooks as this can interfere
with proper deployment of the side curtain
airbags in an accident.