lock AUDI Q5 2016 Repair Manual
[x] Cancel search | Manufacturer: AUDI, Model Year: 2016, Model line: Q5, Model: AUDI Q5 2016Pages: 300, PDF Size: 75.02 MB
Page 185 of 300
,....,
N
co
er::
co
,....,
the child restraint is installed is in an up
right position and securely latched into
place and cannot fold forward. Otherwise,
the seatback with the child safety seat at
tached to it could f ly forward in the event of
an accident or other emergency situation.
- Always read and heed all WARNINGS when
ever using a child restrained in a veh icle is
being used
r=;, page 171. Specia l precaut ions
apply when installing a child safety seat on
the front passenger seat
¢ page 152, Child
restraints on the front seat -some impor
tant things to know.
Deactivating the convertible locking
retractor
The convertible locking retractor for child re
straints will be deactivated automatically when
the belt is wound all the way back into the re
tractor .
~ Press the red button on the safety belt buckle.
The belt tongue will pop out of the buckle.
~ Guide the safety belt all the way back into its
stowed position .
Always let the safety belt retract completely into
its stowed position. The safety belt can now be
used as an ordinary safety belt without the con
vertible locking retractor for child restraints.
If the convertible locking retractor should be ac
tivated inadvertently, the safety belt must be un
fastened and guided completely back into its
stowed position to deact ivate this feature. If the
convert ible locking retractor is not deactivated,
the safety belt w ill gradually become tighter and
uncomfortable to wear.
_& WARNING
-
Improperly installed chi ld safety seats in
crease the risk of serious personal injury and
death in a collision.
- Never unfasten the safety belt to deactivate
the convertible locking retractor for child re
straints while the vehicle is moving . You
Child safety
would not be restrained and could be seri
ously injured in an accident.
- Always read and heed all WARNINGS when
ever using a child restrained in a vehicle is
be ing used
¢page 171. Special precautions
apply when installing a child safety seat on
the front passenger seat
¢ page 152, Child
restraints on the front seat -some impor
tant things to know.
LATCH system (Lower
anchorages and tethers
for children)
Child Restraint System anchors and how
are they related to child safety
To provide a simpler and more practicab le way to
attach the child restraint on the vehicle seat,
Federal regulations require special lower ancho
rages in vehicles and devices on new child re
straints to attach to the vehicle anchorages .
In the United States, the combination of the
tether anchorages and the lower anchorages is
now generally called the LATCH system for
"Lower Anchorages and Tethers for Children". In
Canada, the terms "top tether" with "lower uni
versa l anchorages" (or "lower universal anchor
age bars") are used to descr ibe the system .
In other countries the term "ISOFIX" is used to
describe the lower anchorages .
Forward-facing child restraints manufactured af
ter September 1, 1999, are required by U.S. fed
eral regulations to comply with new child head
movement performance req uirements. These
new performance requirements make a tether
necessary on most new ch ild seats.
Installing a child restraint that requires a top
tethe r without one can seriously impair the per
formance of the child restraint and its ab ility to
protect the child in a collision. Installing a child
restra int that requi res a top tether without the
top tether may be a violation of state law.
Child restraint manufacturers offer LATCH lower
anchorages on their child seats w ith hook-on or ..,.
183
Page 187 of 300
..... N
co ~ CX)
..... I.Cl U"I
..... I.Cl .....
are not equipped with the lower anchorage at
tachments can still be installed in compliance
with the child restra int manufacturer 's instruc
tions on using vehicle safety belts.
A WARNING
Improper use of LATCH lower anchorages can
cause serious personal injury in an accident.
- Always carefully follow the child restra ints
manufacturer's instructions for proper in
stallation of the child restra int and proper
use of the lower anchorages or safety be lts
in you r vehicle.
- Never secure or attach any luggage or other
items to the
LATCH lower anchorages .
-Always read and heed the important infor mation about child restraints in this chapter
and WARN INGS
¢page 171, Child safety.
Installing a child restraint with LATCH
lower anchorages
Whenever you install a child restraint always fol
low the child restraint manufacturer's instruc
tions.
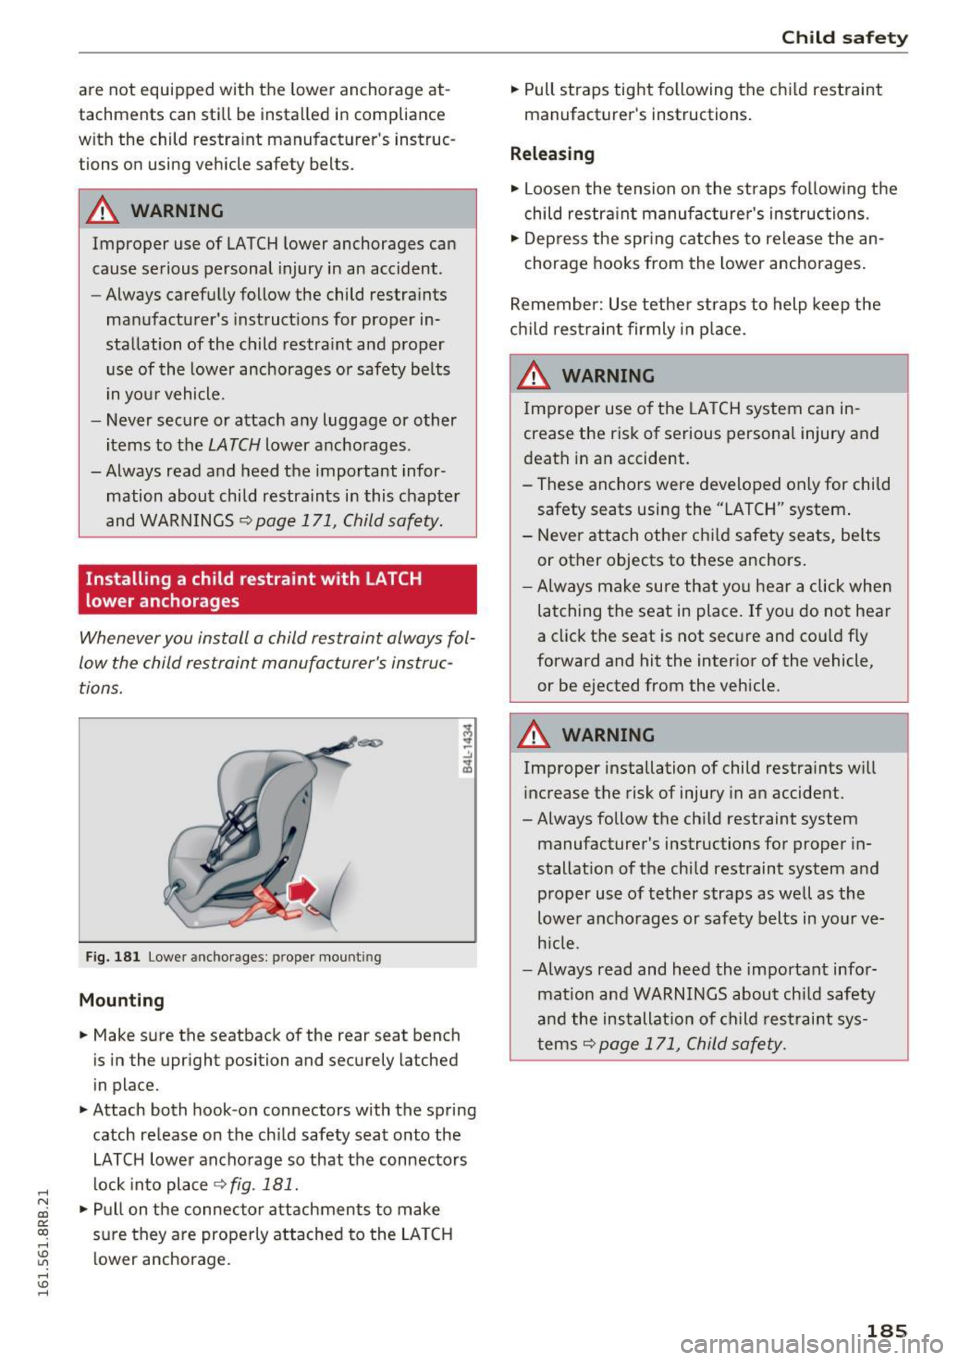
F ig. 181 Lower anchorages: proper mounting
Mounting
• Make sure the seatback of the rear seat bench
is in the upright position and securely latched
in place.
• Attach both hook-on connectors with the spring
catch re lease on the ch ild safety seat onto the
LATCH lower anchorage so that the connectors
lock into place
r=;, fig. 181 .
•Pullon the connector attachments to make
sure they a re properly attached to the LA TCH
lower anchorage.
Ch ild sa fety
• Pull straps tight following the chi ld restraint
manufacturer's instructions.
Releasing
• Loosen the tension on the straps fo llow ing the
child restra int manufacture r's ins tructions.
• Depress the spr ing catches to release the an
chorage hooks from the lower anchorages.
Remember: Use tethe r straps to help keep the
c hi ld rest raint firmly in p lace.
A WARNING ~
I mproper use o f the LA TCH system can in -
crease the risk of serious personal injury a nd
death i n an accident.
- These anchors were developed only for child safety seats using the "LATCH" system.
- Never attach other chi ld safety sea ts, be lts
or other objects to these anchors .
- Always make sure that yo u hear a click whe n
latching the seat in place. If you do not hear
a click the seat is not sec ure and co uld f ly
forward and hit the interior of the vehicle,
or be ejected from the vehicle.
A WARNING .
Improper installation of child restra ints w ill
i nc rease the risk of injury in an accident.
-A lways follow the child restraint system
manufacturer's instructions for proper in
stallat ion of the chi ld restraint system and
proper use of tether straps as well as the lowe r anchorages or safety belts in yo ur ve
h icle.
- Always read and heed the important info r
mat ion and WARNINGS about ch ild safety
an d the ins tallat io n of child restrai nt sys
tems
r=;, page 171, Child safety.
185
Page 192 of 300
Intelligent Technology
shared, please see your contract with the
wireless te lecommunications provider and the
"About Aud i connect" tab in your vehicle's
MMI*:
I MENU ! button > Audi connect > About
Audi connect .
Electronic Stabilization
Control (ESC)
Description
The Electroni c Stab ili z at ion Control (ESC) re infor
ces driver safety. It reduces the r isk of slipping
and improves driving stability. ESC detects crit i
cal s ituations suc h as the vehicle overstee ring
and understeering o r the wheels sp inning. The
ve hicl e is stab ilized by applying the b rakes o r re
ducing e ngine torque . Once t he ESC is acti ve , the
i n dicator light
m bli nks in the instrument cl us
ter.
The fo llow ing sys tems a re integrated in the ESC:
Anti-lock b rake system (ABS)
ABS preve nts the wheels from lock ing up when
b raking . The veh icle can sti ll be steered even dur
i n g ha rd brak ing . Apply steady press ure to the
b rake pedal. Do no t pump t he pedal. A pulsing in
the brake pedal indicates tha t the system i s help
i n g you to br ake the vehicle .
Brake assist system
The brake assist system can decrease brak ing dis
tance . It increases brak ing power when the d river
p resses the brake pedal q uic kl y in eme rgency si t
uations . You m ust press and hold t he b rake pedal
until the situa tion is over. In vehi cles w it h ad ap
tive cruise contro l* , the brake assist system is
mo re sensit ive if the distance detected to the ve
h icle ahead is too small.
Anti -slip regulation (ASR)
A SR re duces eng ine power when the drive w heels
begin to spin and adapts the force to the roa d
conditions. This makes it easie r to sta rt, acceler
ate and drive up hi lls.
190
Electronic differential lock (EDL)
The EDL brakes wheels that are spi nning and
transfers the drive power to the other w heels .
This function is not ava ilable at higher speeds.
I n ext reme cases , ED L automat ica lly swi tches off
to help keep the b rake on the bra ke d whee l from
overheating . EDL will sw itch on again automa ti
ca lly w hen conditions have returned to normal.
Steering recommendation
The ESC he lps to stabilize the vehicle by cha ng ing
t h e s teer ing torque .
On vehicles with dynam ic steering*, ESC helps
stab il ize the steer ing in crit ica l sit uat ions .
Selective wheel torque control
Selective wheel torque cont rol is used when d riv
i ng o n curves. The front whee l on the inside of
the curve or both wheels on the i nside of the
curve are braked selectively as needed . Th is al
l ows mo re prec ise driving in c urves . The applica
ble sys tem may not a ctivate w hen d riv in g in we t
o r snowy cond it ions.
_8. WARNING
- The ESC and i ts integ ra ted systems cannot
overcome the laws of physics . This is espe
cially important on slippery or wet roads. If
the systems begin act ing to stab ilize your
veh icle, you should immediately change
your speed to matc h the road and traffic
conditions. Do no t let the increased safe ty
provided by t hese systems tempt yo u to
t ake risks. Doing so will i ncreas e th e risk of
a loss of vehicle con trol, collisi on and se ri
ou s person al injur ies .
- Always a dap t your spee d to road , traffic and
weather condi tions. The risk of los ing con
t rol of the vehicle in cr eases w hen driving
t oo f ast, es pecially throu gh curves and on
slippe ry or wet roads, and when driving too
close to ve hicles up ahea d. The ESC and its
integ rated systems cannot always prevent
col lisions - there is still a risk of accidents!
- Always accelerate w ith special ca re on even,
smooth surfaces s uch as those that are wet
o r covered with ice and snow. The drive .,..
Page 203 of 300
,....,
N
co
er::
co
,....,
conditions and off-road
General information
The operation of the Electronic Stabilization Con
trol (ESC) is expanded for operation away from paved roads. In situations where slip or a differ
ential locking fun ction is required , the offroad
mode can be activated ¢
page 190. Your Audi al
so has permanent all-wheel drive in addition .
However, your Audi is not a pure offroad vehicle.
It was not built for driving under extreme condi
tions, e.g. for tr ips that are in the nature of an
expedition .
Drive only on roads and offroad sections which
match the design of your vehicle and your abili
ties as a driver. Never take risks!
Before driving offroad
-Check the engine oi l level, tire pressure, coo l
ant level, and the fluid level in the windshield
washer reservo ir.
- Stow luggage items and other objects in the
luggage compartment, and secure them
against sliding around.
After driving offroad
-After trips offroad, remove any twigs and other
foreign objects from the gri ll, the underbody
and the wheels. Pay special attention to foreign
objects (stones) which have become lodged in
the tire tread.
- Clean the body and the vehicle underside, and
inspect the vehicle for possible damage.
- Clean dirty windows, headlamp lenses, rear
lights, and license plates.
- Perform a brake check (particularly after travel
ling through water).
A WARNING
-Drive especially attentively and plan ahead
in difficult road condit ions and when off
road. Excessive speed or incorrect maneu
vers can cause injuries and damage to the
vehicle .
Offroad driving
-Always adapt your speed and driving style to
road, offroad, traffic, and weather condi
tions. Drive especially slowly offroad when
your view is restricted.
- Please be aware that in offroad mode, par
ticularly on a smooth and slippery road, the
wheels may have an increased tendency to spin and the vehicle may break away - dan
ger of skidd ing!
- Stability is lim ited in the offroad mode .
@) For the sake of the environment
Avoid damage to the environment and re
spect nature.
(D Tips
Only drive where it is permitted and stay on
marked roads and paths.
Explanation of some technical terms
The following data refer to ideal conditions. De
pending on vehicle load and ground conditions
and the environment, the numbers may vary. It is
the driver's responsibility to decide whether ave
hicle can overcome a specific s ituation
¢ ,&. .
Gradient angle
The number of meters in altitude gained over a
distance of 109.4 yards or 100 meters (grade)
are given as a percentage or degrees. Informa
t ion about the gradient the vehicle can cl imb un
der its own power (depends in part on the road
s ur face and eng ine power). Maximum permitted
grade: 31
°
Ground clearance
The distance between the road surface and the
lowest point of the vehicle underbody. Ground
clearance 7.9 in (200 mm)
_& WARNING
-
Exceeding the stated maximum figures can
result in severe injuries or vehicle damage.
- All the information was gathered on level,
firm and non-slippery road surfaces, and un-
der dry weather conditions.
~
201
Page 208 of 300
Trailer mod e
Parking on a slope
Do not park on a slope with a trailer. If it cannot
be avoided, do so only after doing the following:
When parking:
.,. Apply the foot brake .
.,. Have someone place chocks under both the ve
hicle and the trailer wheels .
.,. With chocks in p lace, slowly release the brakes
unt il the wheel chocks absorb the load .
.,. Turn the wheels towards the curb .
.,. Apply the pa rking brake .
.,. Move the selector lever to P .
When resta rting after parking:
.,. Apply the foot brake .
.,. Start the engine .
.,. Move the selector leve r to 0/5 .
.,. Release t he pa rking brake and slow ly pull out
and away from the wheel chocks.
"' Stop and have someone retrieve the wheel
chocks.
(D Tips
If you move the se lector lever of the automat
ic transmission to P before applying the park
ing brake and before blocking the wheels, you may have to use more force later to move the
lever out of the P position .
206
Page 211 of 300
,....,
N
co
er::
co
,....,
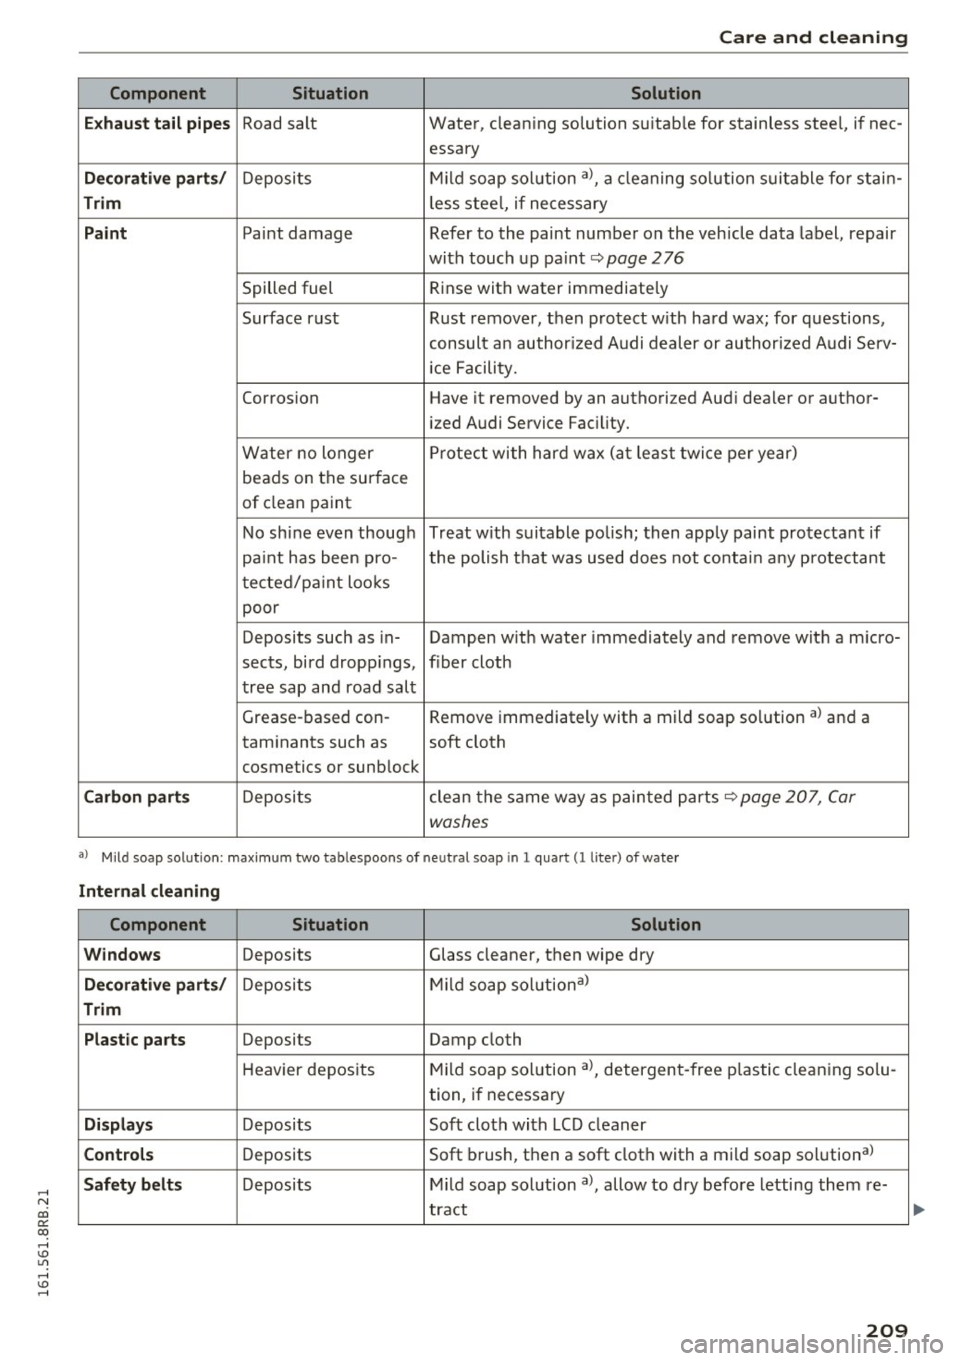
Component Situation Solution
Ex haust t ail p ip es
Road salt Water, cleaning solution suitab le for stainless steel, if nee-
essary
D eco rative p art s/ Deposits Mild soap solution
al, a cleaning so lution suitable for stain-
Trim less stee l, if necessary
Paint Paint damage Refer to the paint number on the vehicle data label, repair
with touch up paint
c:::;, page 276
Spilled fuel R
inse with water immediately
Surface rust Rust remover, then protect w ith hard wax; for questions,
consult an author ized Audi dealer or author ized Audi Serv-
ice Facility.
Corrosion Have it removed by an authorized Audi dealer or author-
ized Audi Service Facility.
Water no longer P
rotect with hard wax (at least twice per year)
beads on the surface
of clean paint
No sh ine even though Treat with suitable po lish; then apply paint protectant if
pa int has been pro- the polish that was used does not contain any protectant
tected/pa int loo ks
poor
Deposits such as in- Dampen w ith water immediately and remove wit h a m icro-
sects, bird dropp ings, fiber cloth
tree sap and road salt
Grease-based con- Remove immediately with a mild soap solution al and a
taminants such as
soft cloth
cosmetics or sunb lock
C arbon p art s Deposits clean the same way as painted parts c:::;, page 207, Car
washes
a) Mil d soap solution: maximum two tables po ons of neu tral soap in 1 quar t (l lite r) of wate r
Internal cl ea ning
Component Situation Solution
Windows
Deposits Glass cleaner, then wipe dry
Decorativ e part s/ Deposits M
ild soap solutional
Trim
Pla st ic par ts
Deposits Damp doth
H eavier deposits M
ild soap solution al, detergent-free p lastic clea ning so lu -
tion, if necessary
D ispla ys Deposits Soft cloth with LCD cleaner
Cont ro ls Deposits Soft brush,
then a soft cloth with a mild soap solution al
Safety bel ts Deposits Mild soap solution al, allow to dry before letting them re-
tract
209
Page 216 of 300
Fuel and R efu eli ng
Gasoline additives
Applies to veh icles: w ith gaso li ne engine
A major concern among many auto manufactur
ers is carbon deposit build- up ca used by the type
of gasoline you use.
Although gasoline grades d iffer from one manu
facturer to another, they have certain things in
common. All gaso line grades contain substances
that can cause deposits to collect on v ita l engine
parts, such as fue l injectors and intake valves . Al
though most gasoline brands include additives to keep engine and fuel systems clean, they are not
equally effective.
Audi recommends using TOP TIER Detergent Gas
oline. For more information on TOP TIER Deter
gent Gasoline, please go to the official website (www.toptiergas.com).
After an extended pe riod of using inadequate
fue ls, built-up carbon depos its can rob your en
gine of peak performance.
(D Note
- Damage or ma lfunction due to poor fue l
quality is not covered by the Audi New Vehi
cle Limited Warranty.
- Do not add aftermarket fuel additive prod
ucts to yo ur fuel tank.
Diesel fuel
Applies to veh icles: w ith d iese l e ngine
Always use ULSD (Ultra Low Su lfur Diesel) No. 2 .
The ULSD No . 2 meets the ASTM D97S.
Diese l fuel with concentrations of biodiesel high
er than S % such as 811,820 or 8100 are strictly prohibited.
Service station f uel pumps are labeled with the
correct fue l information for easy recognition by
the user.
If the diesel fuel pump is not labeled
ask the station operator what fuel is be ing dis
pensed before filling up your vehicle .
ULSD No . 2 may not be availab le outside the USA
and Canada . Be sure to check before traveling to
other countries .
214
ULSD No. 2 can become thicke r in very cold tem
peratures, and this can impair the engine's start
i ng and running. Depend ing on the season, gas
stations provide ULSD No. 2 that flows better in
cold temperatures so that you can continue oper
at ing your vehicle as usual.
(D Note
- Your vehicle's diese l eng ine was designed
so ley for use w ith ULSD No. 2. Therefore,
never use gasoline, heating oil, other fuels
or flow improvers. These contain substances
that will severely damage the fuel system and the engine. Such damage will no t be
c ove red by your New Vehicle Limited War
ranty .
-If you pu t any amo unt of inco rre ct fuel in
the fuel tank, do not start the engine u nder
any circumstances. Immed iate ly contact the
nearest authorized Audi dealer or author
ized Audi Serv ice Facility for ass istance .
These fuels contain substances that can se
verely damage the fuel system and the en gine if the engine is started .
Refueling
Fuel filler neck
The fuel filler neck is located on the right rear
s ide panel behind the fuel filler flap .
If the power lock ing system shou ld fai l, you can
still open the flap manually -fo r detailed instruc
tions see
¢ page 216 .
You can find the fuel tan k capacity of your vehicle
in ¢ page277.
The label on the inside of the fuel filler flap tells
you the correct fuel for your veh icle. For more in
fo rmat ion about fuel specifications, see
¢ page 212.
Your vehicle f uel tank has an on-board refuelling
vapor recovery system . Th is feature helps to pre
ven t fue l vapors from escaping from the tank and
po lluting the environment wh ile you refue l yo ur
vehicle. In order to fill the tank properly wh ile
protecting the environment, p lease follow this
refue ling procedure carefully .
Page 217 of 300
..... N
co ~ CX)
..... I.Cl U"I
..... I.Cl .....
,&_ WARNING
Under normal operating conditions, never car
ry additiona l fue l containers in your car. Gas
canisters and other containers used to trans
port fuel can be dangerous. Such containers,
full or empty, may leak and could cause a fire
in a collision. If you must transport fuel to
use for your lawn mower, snow blower, etc.,
be very careful and a lways observe local and
state laws regarding the use, transportation
and storage of such fue l conta iners. Make cer
tain the container meets industry standards
(ANSI/ASTM F852 -86) .
(D Note
Never d rive your vehicle unt il the fuel tank is
completely empty. The irregu lar supply of
fue l can cause misfiring. Gasoline cou ld enter
the exhaust system and damage the catalytic
converter.
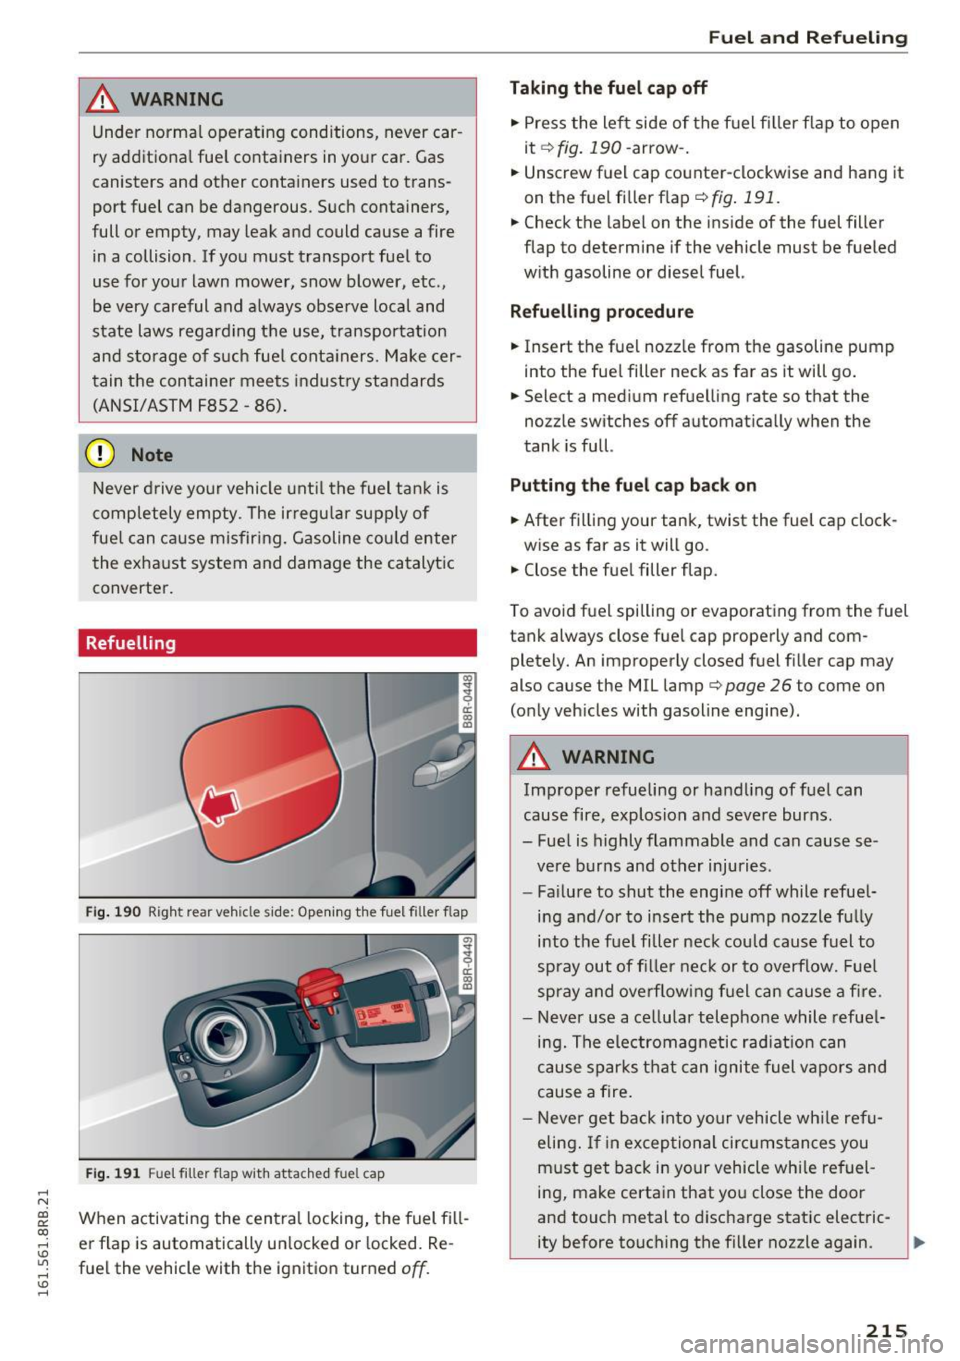
Refuelling
Fig . 190 Righ t rear vehicle side: Opening the fuel fille r flap
Fig . 191 Fuel filler flap wit h attac hed fuel cap
When activating the central locking, the fuel fill
er flap is automatically unlocked or locked. Re
fuel the vehicle with the ignition turned
off .
Fue l an d Re fuelin g
Taking the fuel c ap off
.,. Press the left side of the f uel filler flap to open
it¢fig.190-arrow-.
.,. Unscrew fuel cap counter-clockwise and hang it
on the fuel filler flap¢
fig. 191 .
.,. Check the label on the inside of the fuel filler
flap to determine if the vehicle must be fueled
w ith gasoline or diesel fuel.
Refu ellin g pr ocedure
.,. Insert the fuel nozzle from the gasoline pump
into the fuel fill er neck as far as it will go.
.,. Select a medium refuelling rate so that the
nozzle switches off automatically when the
tank is full.
Pu tting th e fuel cap ba ck on
.,. After filling your tank, twist the fuel cap clock-
wise as far as it will go.
.,. Close the fuel filler flap.
T o avoid fuel spilling or evaporating from the fuel
tank always close fue l cap properly and com
pletely. An improperly closed fuel filler cap may
also cause the MIL lamp ¢
page 26 to come on
(only vehicles with gasoline engine).
A WARNING
-
Improper refueling or handling of fuel can
cause fire, explosion and severe burns . -
- Fuel is highly flammable and can cause se
vere burns and other injuries.
- Fa ilure to shut the engine off while refuel
ing and/or to insert the pump nozzle fully
into the fue l filler neck could cause fuel to
spray out of fi ller ne ck or to overflow. Fue l
spray and overflowing f uel can cause a fire.
- Never use a cellular telephone while refue l
ing. The electromagnetic rad iat ion can
cause sparks that can ignite fuel vapors and
cause a fire.
- Never get back into your vehicle while refu
eling. If in exceptional circumstances you
must get back in your vehicle whi le refuel
ing, make certa in that you close the door
and touch metal to discharge static electric-
ity before touching the filler nozzle again. ..,
215
Page 218 of 300
Fuel and Refueling
Static electricity can cause sparks that can
ignite fuel vapors released during refueling .
- Never smoke or have an open flame any
where in or near your vehicle when refueling
or filling a portable fuel container.
- For your safety, we strongly recommend
that you do not travel with a portable fue l
container in your vehicle. The container, full
or empty may leak and could cause a fire, especially in a crash.
- If, under exceptional circumstances , you
must transport a portable fuel container,
please observe the follow ing :
- Never fill a portable fuel container while it
is anywhere in or on the vehicle (for exam
ple, in the luggage compartment, or on
the trunk) . Static electricity can build up
while filling and can ignite fuel vapors
causing a fire.
- Always place a portable fuel container on
the ground before filling .
- Always keep the filler nozzle completely
inside the portable container before and
during filling .
- If filling a portable container made of
metal, the filler nozzle must always be in
contact w ith the container . This will help
prevent static electric ity from discharg ing
and cause a fire.
- Never spill fuel inside the vehicle or lug
gage compartment . Fuel vapors are highly
f lam mable.
- Always observe local and state/provincial
laws regard ing the use, storage and trans
portation of fuel containers.
- Make certain the fuel conta iner meets in
dustry standards (ANSI/ ASTM F852-86).
(D Note
If any fuel has spilled onto the car, it should
be removed immediately to prevent damage
to the paint .
@ For the sake of the environment
As soon as the correctly operated nozzle switches off automatically for the first time,
the tank is full. Do not try to add more fuel
216
because fuel may spill out. In addition, the
expansion space in the fuel tank will be filled -
causing the fue l to overf low when it becomes
warm and pollute the environment.
(D Tips
- Running your engine white refuelling may
cause vapors to escape or even cause fuel to
spill out of the tank. This wou ld then shut
off the fuel nozzle before the tank is full.
- Do not refuel your vehicle with the ignition
turned on. The fuel gauge may otherwise not indicate the correct fuel level after refu
elling .
- Diesel vehicles* are equipped with a diesel
misfueling protector. It allows the vehicle
to be fueled only with a diesel fuel pump
nozzle. A worn or damaged nozzle or a noz
zle that is too small may not be able to open
the diesel misfueling protector . If this is the
case, try turning the nozzle before inserting
it in the fuel filler neck, use a different fuel
pump or see your authorized Audi dealer or
authorized repair facility for assistance.
- Th e fue l fi ller f lap of your vehicle is not
locked when you lock the vehicle from the
inside.
Unlocking the fuel filler flap
by hand
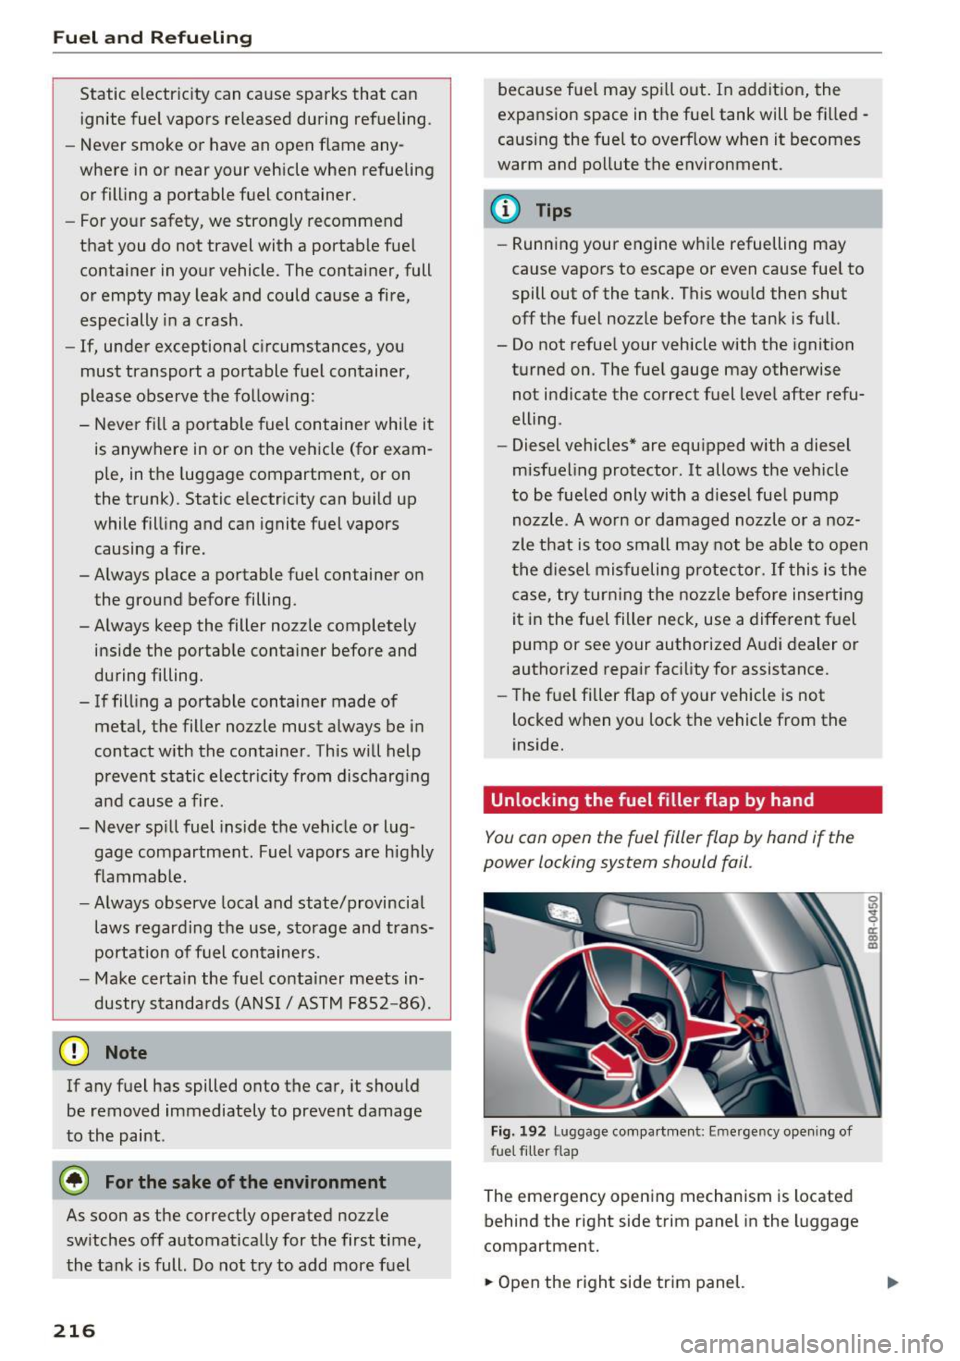
You can open the fuel filler flap by hand if the
pow er locking syst em should fail .
Fig. 192 Lu ggage compa rt men t: Em ergency open ing of
fu el filler fl ap
Th e emergency open ing mechanism is located
behind the right side trim panel in the luggage
compar tment.
.. Open the right side trim panel.
Page 220 of 300
Fuel and R efue li ng
Filling AdBlue
Applies to veh icles: w ith selective cata ly ti c reduction
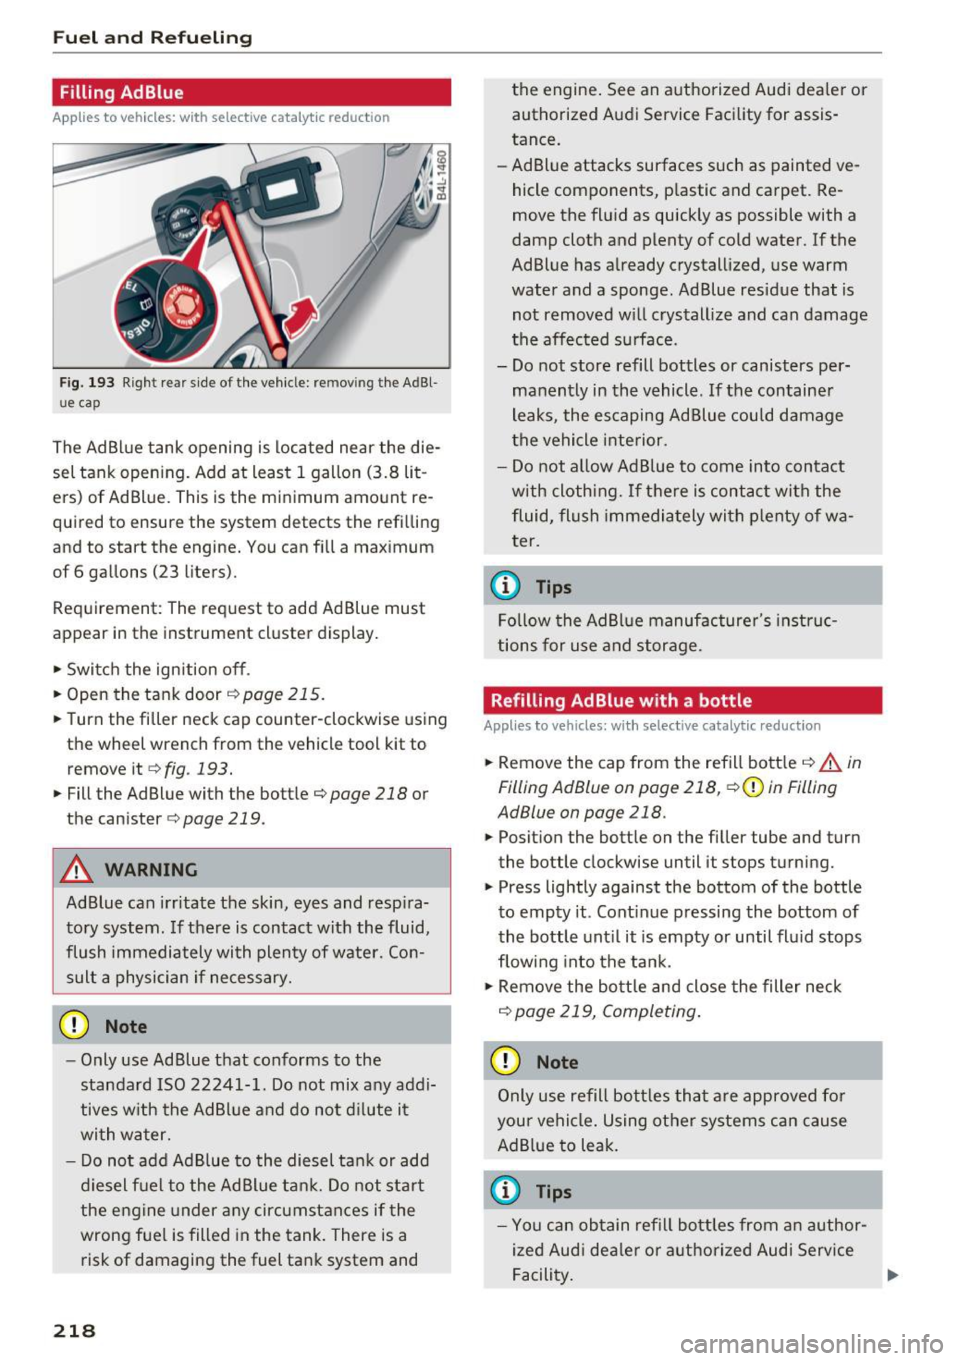
Fig. 193 Right rear side of the vehicle: removing the AdBl
ue cap
The Ad Blue tank opening is located near the die
sel tank opening. Add at least 1 gallon (3.8 lit
ers) of Ad Blue. This is the minimum amount re
quired to ensure the system detects the refilling
and to start the engine. You can fill a maximum
of 6 gallons (23 liters).
Requirement: The request to add Ad Blue must
appear in the instrument cluster display.
• Switch the ignition off.
• Open the tank door
r::!) page 215.
• Turn the filler neck cap counter-clockwise using
the wheel wrench from the vehicle tool kit to
remove it
¢ fig . 193.
• Fill the Ad Blue with the bottle¢ page 218 or
the canister ¢
page 219.
A WARNING
AdBlue can irr itate the skin, eyes and resp ira
tory system. If there is contact with the fluid,
flush immediately with plenty of water. Con sult a physician if necessary.
CD Note
- Only use Ad Blue that conforms to the
standard ISO 22241-1. Do not mix any addi
tives w ith the AdBl ue and do not d ilute it
wi th water.
- Do not add Ad Blue to the diesel ta nk or add
diesel f uel to the AdBlue tan k. Do not start
the engine under any circumstances if the
wrong fue l is filled in the tank. There is a
risk of damaging the fuel tank system and
218
the engine . See an authorized Audi dea le r or
authorized Audi Service Facility for assis
tance.
- Ad Blue attacks surfaces such as painted ve
hicle components, p lastic and carpet. Re
move the fluid as quickly as possible with a
damp cloth and plenty of cold water. If the
AdBlue has a lready crystall ized, use warm
water and a sponge. Ad Blue residue that is
not removed w ill crystall ize and can damage
t he affected s urface.
- Do not store refill bottles or canisters per
manently in the vehicle. If the container
leaks, the escaping Ad Blue could damage
the vehicle inte rior.
- Do not allow Ad Blue to come into contact
with cloth ing. If t here is contac t w ith the
fluid, flush immediately wi th plenty of wa
ter.
(0 Tips
Fo llow the AdBlue manufacture r's instruc
tions for use and storage.
Refilling Ad Blue w ith a bottle
App lies to vehicles : wi th selec tive cata lyt ic reduct ion
• Remove the cap from the refill bott le ¢ &. in
Filling AdBlue on page 218,
¢ 0 in Filling
AdBlue on page 218.
• Posit ion the bottle on the filler tube and turn
the bottle clockwise until it stops turning.
• Press lightly against the bottom of the bottle
to empty it . Cont inue pressing the bottom of
the bottle unt il it is empty or until fluid stops
flowing into the tank.
• Remove the bottle and close the filler neck
¢ page 219, Completing .
CD Note
Only use refill bott les tha t are approved for
you r vehicle. Using other systems can cause
Ad B lue to leak.
(0 Tips
- You can obtain refill bottles from an author
ized Audi dea le r or authorized Audi Service
Facility.