lock AUDI Q5 2016 Owner's Manual
[x] Cancel search | Manufacturer: AUDI, Model Year: 2016, Model line: Q5, Model: AUDI Q5 2016Pages: 300, PDF Size: 75.02 MB
Page 44 of 300
Opening and clo sin g
Locking and unlocking the vehicle from
inside
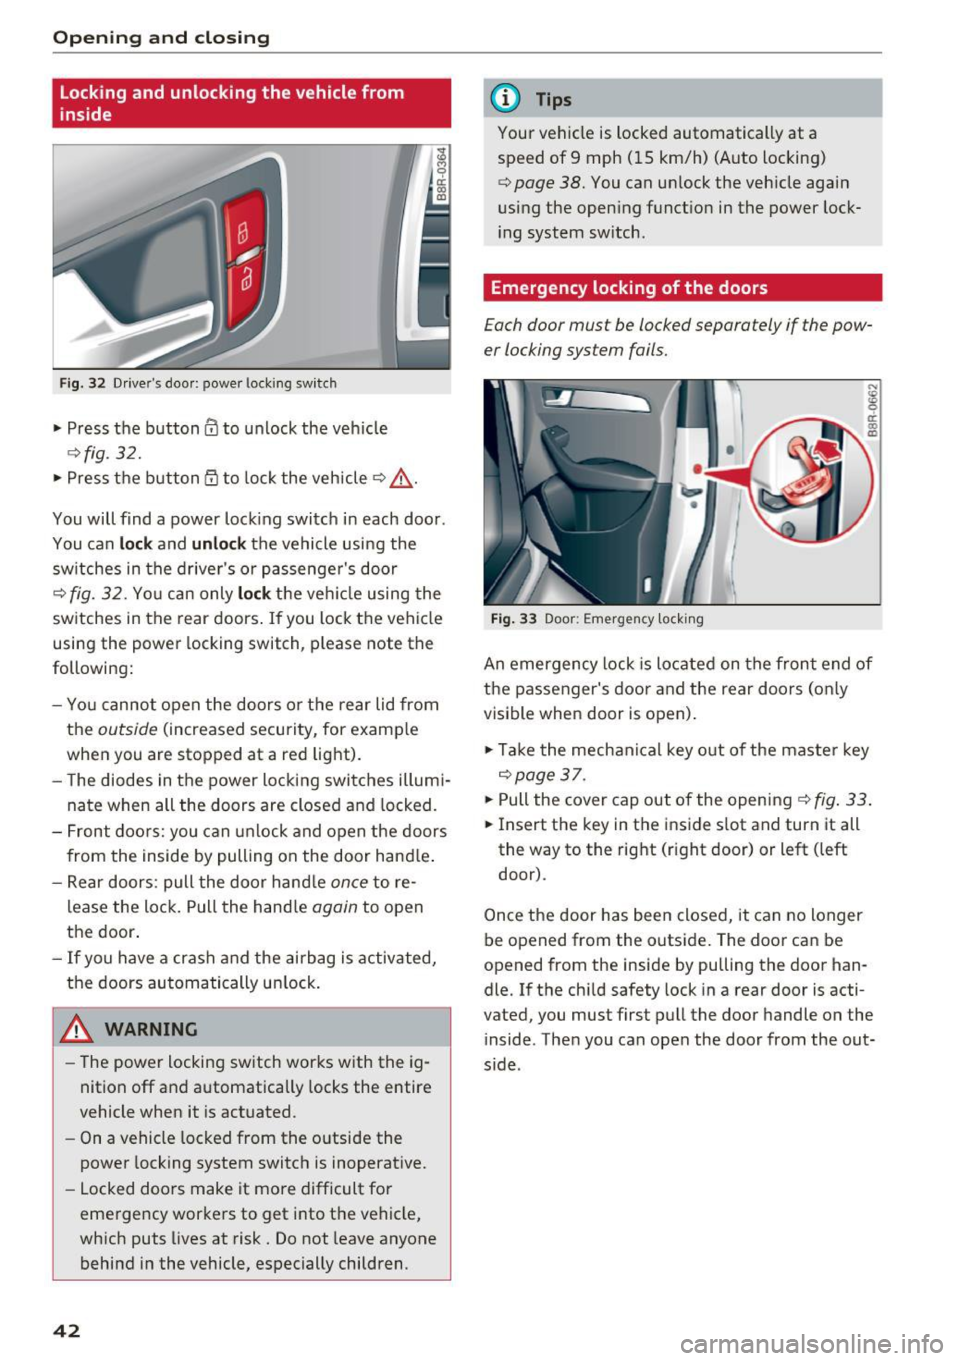
Fig. 32 Driver's doo r: powe r loc king sw itch
• Press the button@ to unlock the veh icle
¢ fig. 32.
• Press the b utton CD to lock the vehicle ¢ ,& .
You will find a power lock ing switch in each door.
You can
lo ck and unloc k the vehicle using the
sw itches in the drive r's or passenger's door
¢ fig. 32. Yo u can only lock the ve hicle using the
switches in the rear doors . If you lock the vehicle
using the power locking switch, please note the
following:
- You cannot open the doors or the rear lid from
the
outside (increased security, for examp le
when you are stopped at a red light).
- The diodes in the power locking switches illumi
nate when all the doors are closed and locked.
- Front doo rs: you can unlock and open the doors
from the inside by pulling on the door hand le .
- Rear doors: pull the door hand le
once to re
lease the lock. Pull the hand le
again to open
the door.
- If you have a crash and the airbag is activated,
the doors automatically un lock .
A WARNING
-The power locking sw itch works with the ig
nition off and automatically locks the entire
vehicle when it is actuated.
- On a vehicle locked from the outside the
power locking system switc h is inoperat ive.
- Locked doors make it mo re difficult for
emergency workers to get into the vehicle,
wh ich puts lives at risk. Do not leave anyone
behind i n the vehicle, especially children.
42
@ Tips
Your vehicle is locked automatically at a
speed of 9 mph ( 15 km/h) (Auto locking)
¢ page 38. You can un lock the veh icle again
using the open ing funct ion in the power lock
i ng system sw itch.
Emergency locking of the doors
Each door must be locked separately if the pow
er locking system fails.
Fi g. 33 Door: Em erge ncy lock ing
An emergency lock is located on the front end of
the passenger's door and the rear doors (on ly
visible when door is open) .
• Ta ke the mechani cal key out of the maste r key
¢page 37.
• Pull the cover cap out of the opening¢ fig . 33 .
• Insert the key in the inside s lot and turn it all
the way to the right (right door) or left (left
door).
Once the door has been closed, it can no longer
be opened from the outs ide. The doo r can be
opened from the inside by pulling the door han
dle. If the chi ld safety lock in a rear door is acti
vated, you must first pull the door handle on the
i nside . Then you can open the door from the out
s ide .
Page 45 of 300
..... N
co ~ CX)
..... I.Cl U"I
..... I.Cl .....
Opening and closing rear
lid
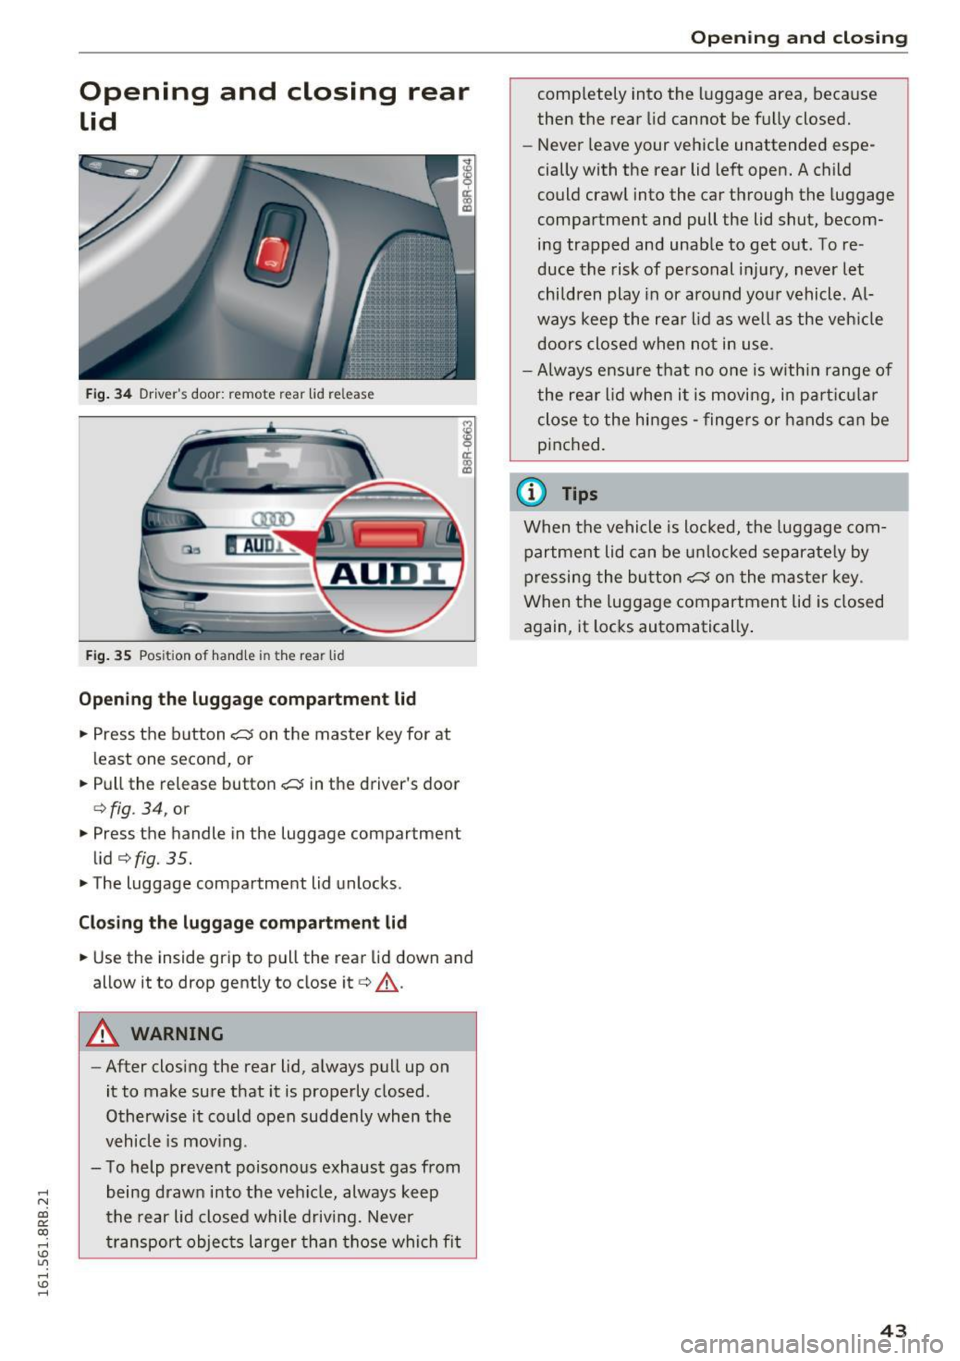
Fig. 34 Drive r's door: re m ote rea r lid re lease
Fig. 35 Posit ion of handle in the re ar lid
Opening the luggage compartment lid
.,. Press the button cs on the master key for at
least one second, or
.. Pull the release button
cs in the driver's door
c:> fig . 34, or
.,. Press the handle in the luggage compartment
lid
c:> fig. 35 .
.. The luggage compartment lid unlocks .
Closing the luggage compartment lid
.. Use the ins ide grip to pull th e rear lid down and
allow it to drop gently to close it
c:> &_ .
A WARNING
-After closing the rear lid, always pull up on
it to make sure that it is properly closed .
Otherwise it could open suddenly when the
vehicle is mov ing .
- To help prevent poisonous exhaust gas from
being drawn into the vehicle, always keep
the rear lid closed while driving. Never
transport objects larger than those which fit
Opening and closing
comp letely into the luggage area, because
then the rear lid cannot be fully closed.
- Never leave your vehicle unattended espe
cially with the rear lid left open. A child
could crawl into the car through the luggage
compartment and pull the lid shut, becom
ing trapped and unable to get out. To re
duce the risk of personal injury, never let
children play in or around your vehicle. Al
ways keep the rear lid as wel l as the veh icle
doors closed when not in use .
- Always ensure that no one is with in range of
the rear lid when it is moving, in part icular
close to the hinges -fingers or hands can be
pinched.
(0 Tips
When the vehicle is locked, the luggage com
partment lid can be unlocked separately by
pressing the button
cs on the master key .
When the luggage compartment lid is closed
again, it locks automatically .
43
Page 46 of 300
Opening and closing
Automatic rear lid/trunk lid operation
A pp lies to veh icles: w ith a uto mat ic rea r lid/tr unk lid opera ·
t io n
The trunk lid con be opened and closed outomot·
icolly.
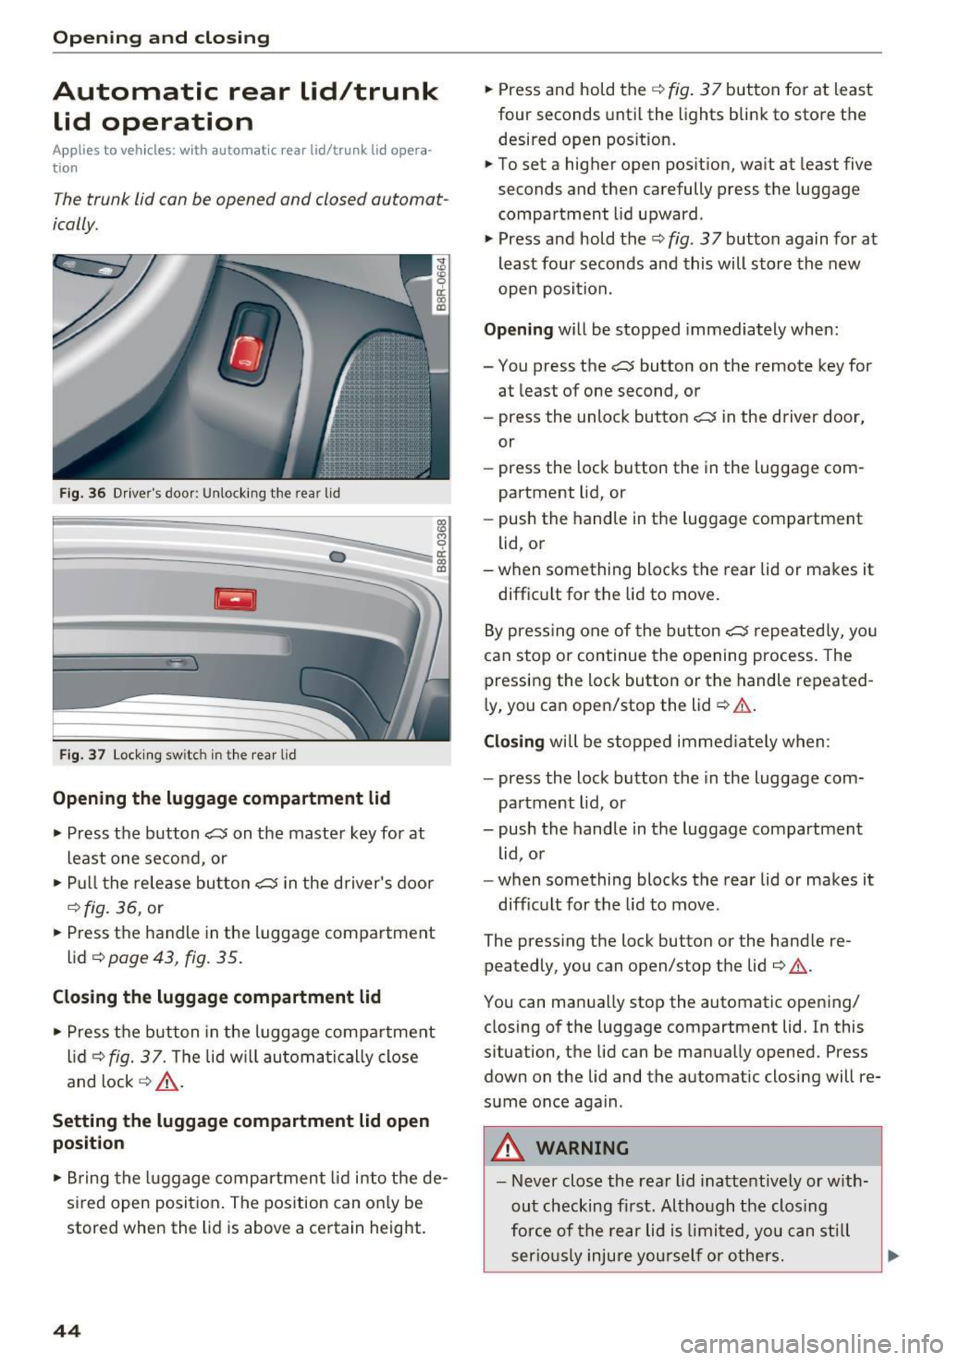
F ig . 36 D river's doo r: Unlock ing the rea r lid
Fig . 37 Loc king sw itc h in th e rea r lid
Opening the luggage compartment lid
., Press the b utton c::5 on the maste r key for at
least o ne se cond, or
., Pu ll t he rele ase bu tton
c::5 in the driver's door
c::> fig. 36, or
., Press the handle in the luggage compartment
lid
c:;, page 43, fig. 35.
Closing the luggage compartment lid
., Press t he b utton in the luggage compartment
li d
c::> fig. 37. Th e lid w ill automa tic ally close
and lock
c::> ,&. .
Setting the luggage compartment lid open
position
0 cl:
"' al
., Br ing the luggage comp artment lid i nto the de·
sired open position . The pos ition can on ly be
stored when the lid is above a ce rtain height .
44
., Press and hold the c::> fig . 3 7 but ton for at lea st
four seconds until the lights bli nk to store the
desired open pos ition .
.,. To set a higher open pos ition, wa it at least five
seconds and then carefully press t he luggage
compartment lid upward .
., Press and hold the
c::> fig . 37 button again for at
least four seconds and this will store the new
open posit ion.
Opening w ill be stopped immediately when:
- You press the
c::5 button on the remote key for
at least of one second, or
- press the unloc k button
c::5 in the driver door,
or
- press the lock button the in the luggage com·
partment lid, or
- push the handle in t he luggage compartment
lid, o r
-when something blocks the rear lid or makes it
diffic ult for the lid to move .
B y pre ssing one of the button
c::5 repe ated ly, yo u
can stop or continue the ope ning process. The
pressing the lock button or the handle repeated ·
l y, you can ope n/stop the lid
c::> & .
Closing wi ll be stoppe d im medi ate ly when :
- press the lock button the in the luggage com·
par tment lid, or
- push the handle in the luggage compartment
lid , o r
- when some thing blocks the rear lid or makes it
diff ic u lt for the lid to move .
The press ing the lock button or the hand le re·
peatedly, you can open/stop the lid
c:;, & .
You can manua lly stop the automatic opening/
closing of the luggage compartment lid. In this
s ituation, the lid can be manua lly opened. Press
down on the lid and the automat ic closing will re·
s u me once again .
_& WARNING
-Never close the rea r lid inattentively or w ith
ou t checking fi rst. Al tho ugh the clos ing
for ce of th e re a r lid i s limited, you can stil l
serio usly i njure you rself o r others .
Page 47 of 300
..... N
co ~ CX)
..... I.Cl U"I
..... I.Cl .....
-Always ensure that no one is within range of
the rear lid when it is moving, in particular
close to the hinges and the upper and lower
edges - fingers or hands can be pinched.
- To help prevent poisonous exhaust gas from
being drawn into the veh icle, always keep
the rear lid closed while driving . Never
transport objects larger than those which fit
completely into the luggage area, because
then the rear lid cannot be fully closed.
- Never leave your vehicle unattended espe cially w ith the rea r lid left open . A chi ld
cou ld crawl into t he car thro ugh the luggage
compartmen t and pull the lid shut, becom
ing trapped and unable to get out. To re
duce the risk of persona l injury, never let
children p lay in or around your veh icle. Al
ways keep the rear lid as well as the vehicle
doors closed when not in use.
- If there is a l uggage rack or bicycle rack
mounted on the rear lid, it may not be able
to open completely or an opened rear lid may close by itself because of the added
we ight. So the open rear lid must be sup
ported or the weight must be removed from
the luggage rack first.
(O} Tips
- As soon as the electrical connection to the
trailer socket is completed on vehicles with
a factory installed tow ing hitch, or a t railer
hitch that was instal led later ac co rding to
factory specifications, the a utomat ic rear lid
funct ion can only be ope rated via the handle
in the rear lid.
- If the vehicle battery charge drops below a ce rtain level, you can still open or close the
rear lid manually, however, you will need to
apply more force to close it .
- If the rear lid on a locked vehicle is unlocked
with the middle button
,c:$ on the remote
key, the rear lid is automatically locked
again immediately after closing. This is ind i
cated by the turn signals bli nking .
- The following applies to veh icles equipped
with the Convenience key* feature: if the re mote control key is left in the luggage com
partment, luggage compartment w ill auto-
Op enin g an d clos ing
matically unlock itse lf after you lock the ve
hicle. This prevents you from unintentiona l
ly locking yo ur key in the luggage compart
ment.
Emergency unlocking of
the luggage compartment lid
The luggage compartment lid can be released in
an emergency from the inside.
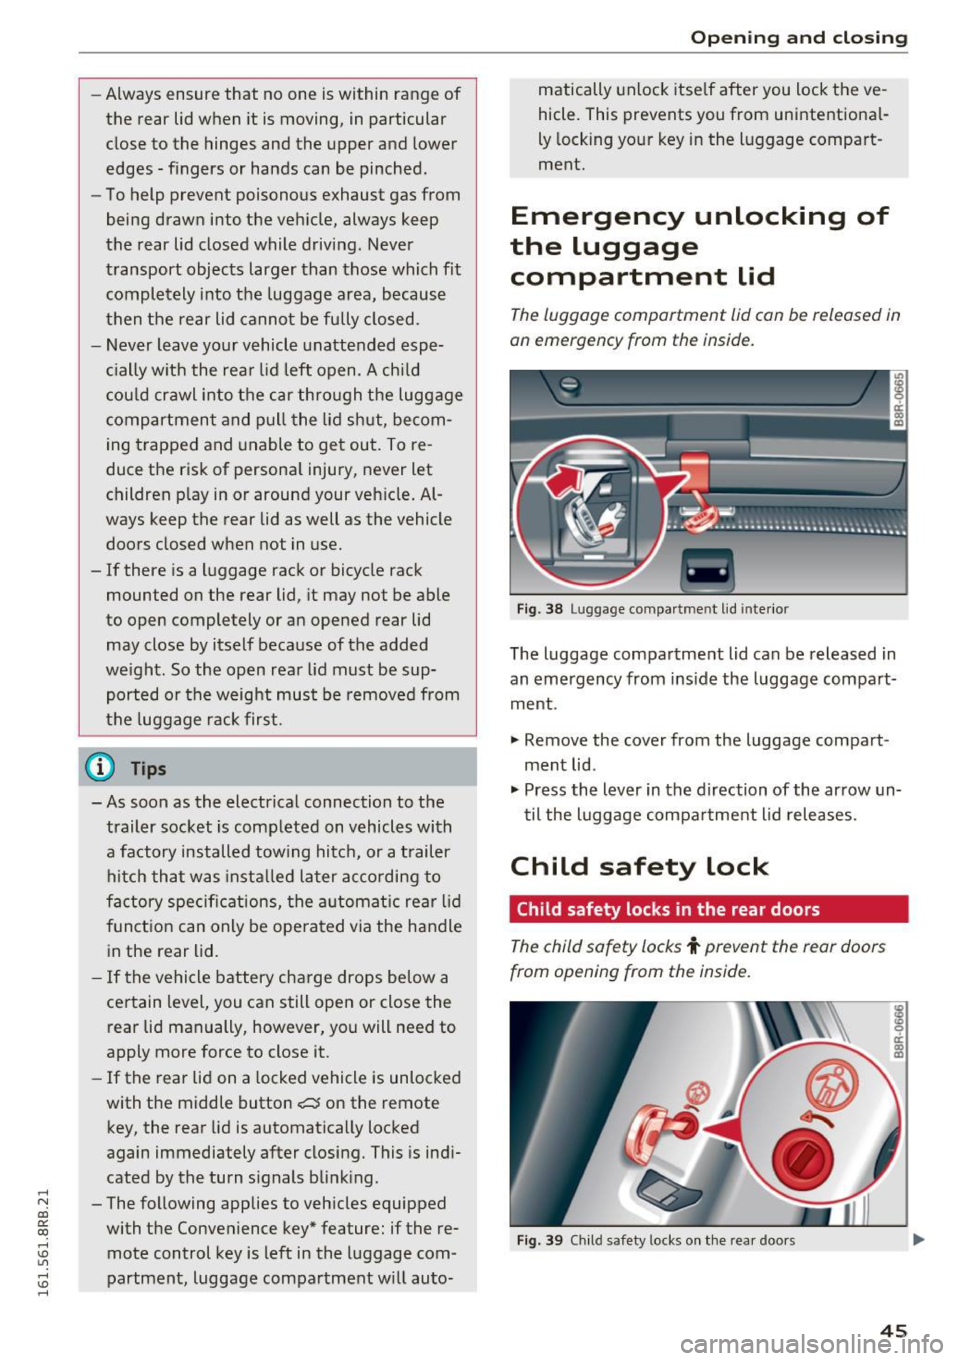
F ig . 3 8 Luggage compa rt me nt lid inte rior
The luggage compartment lid can be released in
an emergency from ins ide the luggage compart
ment .
.,. Remove the cover from the luggage compart
ment lid .
.,. Press the lever in the d irection of the ar row un
til the luggage compa rtme nt l id releases.
Child safety lock
Child safety locks in the rear doors
The child safety locks t prevent the rear doors
from opening from the inside.
F ig . 39 Ch ild safety locks on the rea r doors
45
Page 48 of 300
Opening and clo sin g
The rear doors are equipped wit h child safety
locks. The lock is only visib le when the door is
open . Take the mechanica l key out of the master
key
9 page 3 7 .
Swi tch ing th e child saf ety locks on
" Turn the key in the d irect ion of the arrow
~ fig. 39.
Switching the child safety locks off
"Turn the key in the opposite direction of the ar·
row .
When the child safety locks are activated, the in·
side door handles do not work and the doors can
only be opened from the outs ide.
Power windows
Controls
The driver can control all power windows .
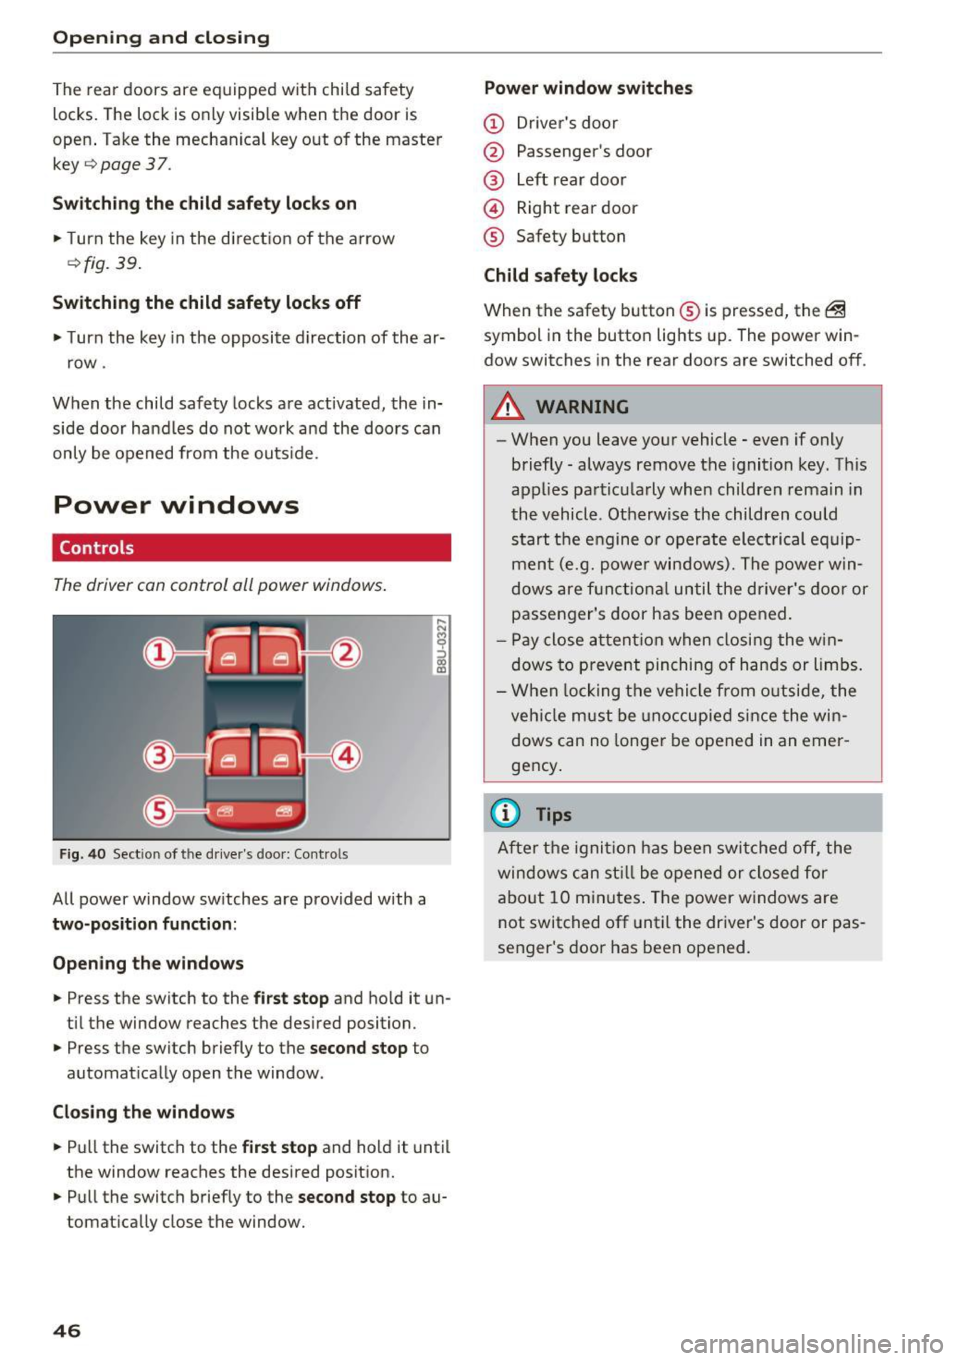
Fig. 40 Sect ion of the driver 's doo r: Contro ls
All power window switches are provided with a
two-position funct ion :
Open ing the windo ws
... Press the switch to the first stop and ho ld it un·
ti l the window reaches the desired position .
... Press the switch briefly to the
second stop to
automat ically open the window .
Closing the window s
... Pull the switch to the first s top and hold it until
the window reaches the desired posit ion .
... Pull the switch briefly to the
sec ond stop to au·
tomatically close the window.
46
Power window swit ches
(D Driver 's doo r
@ Passenger's door
@ Left rear door
@ Right rear door
® Safety button
Child safety l ocks
When the safety button ® is pressed, the @
symbol in the butto n lights up. The power win·
dow switches in the rear doors are switched off.
A WARNING
-When you leave your vehicle· even if only
briefly· always remove the ignition key. This
appl ies particularly whe n children rema in in
the vehicle . Otherwise the children could
start the engine or operate electrical eq uip·
ment (e.g. powe r windows). The power win·
dows are f unctio nal until the driver's door or
passenger's door has been opened.
- P ay close a ttent ion when closing the w in·
dows to prevent pinching of hands or limbs.
- W hen locking the vehi cle from o utside, the
veh icle must be unoccupied si nce the win·
dows can no longer be opened in an emer ·
gency .
{i) Tips
After the ignit ion has been swi tched off, the
windows can st ill be opened or closed for
abo ut 10 minutes . The power w indows are
not switched off unt il the dr iver's door or pas·
senger's door has been opened.
-
Page 49 of 300
..... N
co ~ CX)
..... I.Cl U"I
..... I.Cl .....
Convenience opening/closing
The windows and the Panoramic sliding sunroof*
can be opened and closed with the mechanical
key or the emergency key .
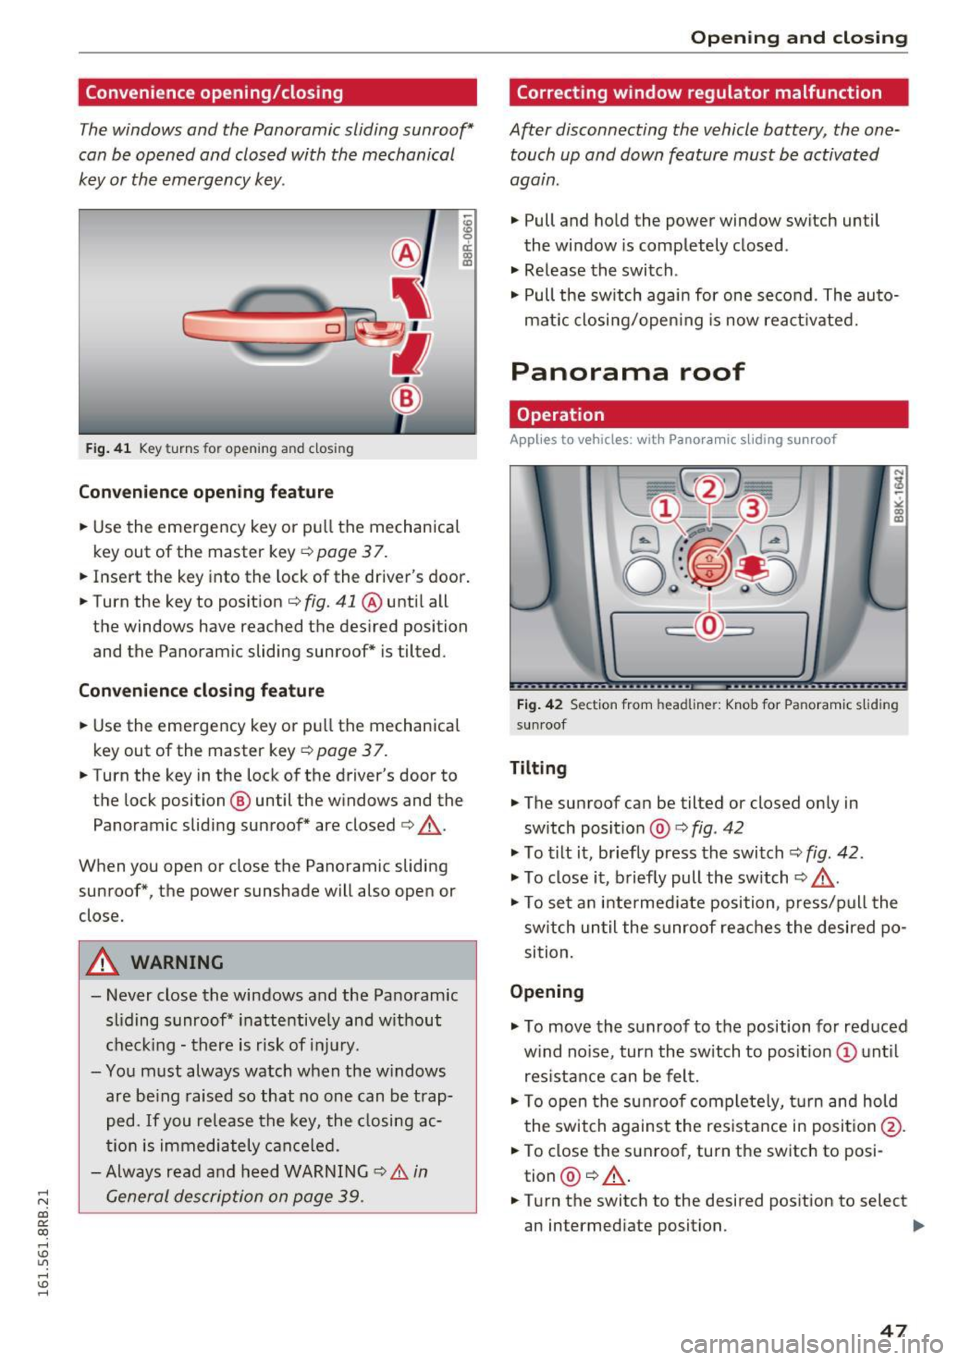
Fig . 41 Key turns for opening and closing
Convenience opening feature
• Use the emergency key or pu ll the mechanical
key out of the master key
c::> page 3 7.
18 9 a::
"' a,
• Insert the key into the lock of the driver's door.
• Turn the key to position
c::> fig. 41 ® until all
the windows have reached the desired position
and the Panoramic sliding sunroof" is tilted.
Convenience closing feature
• Use the emergency key or pu ll the mechanical
key out of the master key
c::> page 3 7.
• Turn the key in the lock of the driver's door to
the lock position @ until the w indows and the
Panoramic sliding sunroof" are closed
c::> A_ .
When you open or close the Panoramic sliding
sunroof*, the power sunshade will also open or
close.
A WARNING
- Never close the windows and the Panoramic
sliding sunroof* inattentive ly and without
checking -there is risk of injury.
- You must always watch when the w indows
are be ing raised so that no one can be trap
ped.
If you release the key, the closing ac
tion is immediately canceled.
- Always read and heed WARNING
c::> & in
General description on page 39 .
Open ing and closing
Correcting window regulator malfunction
After disconnecting the vehicle battery, the one
touch up and down feature must be activated
again .
"' Pull and hold the power window switch until
the window is completely closed .
"' Release the switch .
"' Pull the sw itch again for one second . The auto
mat ic closing/opening is now reactivated.
Panorama roof
Operation
Applies to veh icles: w it h Pano ra mi c slid ing sunroof
Fig. 42 Section from headliner: Knob for Panoramic s lid in g
su nroof
Tilting
"'The sunroof can be tilted or closed only in
switch position @
c::> fig. 42
"'To tilt it, briefly press the switch c::> fig. 42.
"'To close it, briefly pull the switch c::> A_.
"'To set an intermed iate position, press/pull the
sw itch until the sunroof reaches the desired po
sition.
Opening
"' To move the sunroof to the position for reduced
w ind no ise, turn the switch to posit ion @ until
res istance can be felt.
• To open the sunroof completely, turn and hold
the switch against the resistance in posit ion @.
• To close the sunroof, turn the switch to posi
tion @
c::> A..
• Turn the switch to the desired position to select
an intermediate position.
II>
47
Page 55 of 300
..... N
co ~ CX)
..... I.Cl U"I
..... I.Cl .....
-Some exterior lighting functions can be a d
j u sted
¢page 53 .
-When yo u remove your key from the igni
tion while the vehicle's lights are t urne d on,
a buzzer sounds as long as the driver's door
i s open.
- In coo l or damp weather, the inside of the
headlights, turn signals and tai l lights can
fog over d ue to the temperature d ifference
between the inside and outs ide. They will
clea r short ly after switch ing them on. This
does not affect the serv ice life of the lig ht
i ng .
- In the event of a light sensor malfunct ion,
the d river is not ifi ed in t he i nstr ument clus
te r dis play¢
pag e 32.
Fog lights
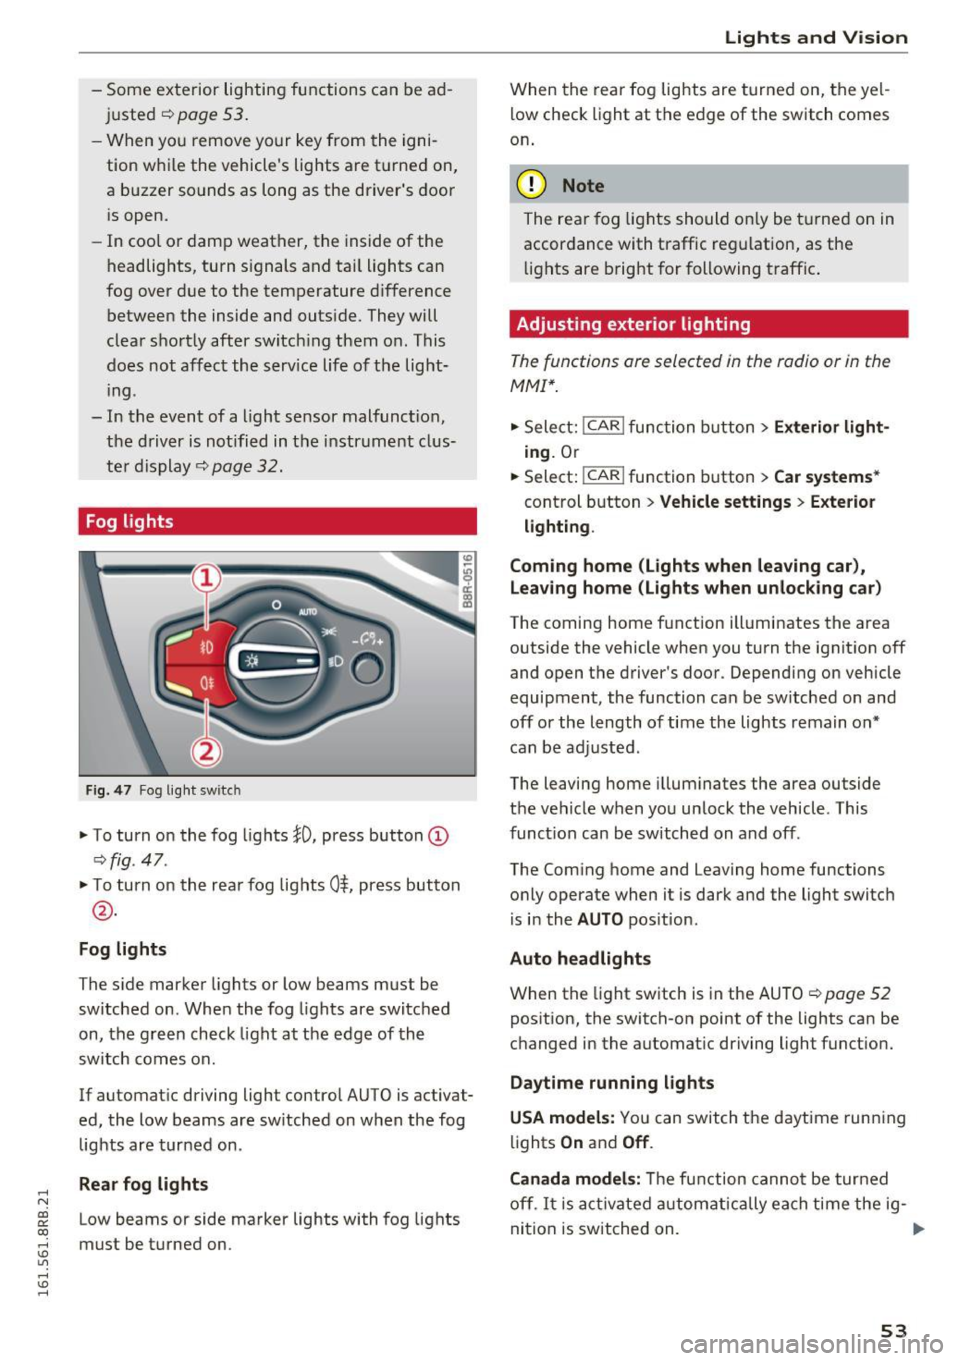
Fig . 4 7 Fog ligh t sw itc h
"To turn on the fog lights }O, press button (D
¢ fig. 47.
"T o turn on the rea r fog lights 0$, press but ton
@ .
Fog lights
The s ide marker lights or low beams must be
switche d on. When the fog lights are switc hed
on, the g reen check light at the edge of the
sw itch comes on.
If automat ic driving light control AUTO is activat
ed, the low beams are sw itched on w hen the fog
lights are tur ned on .
Rear fog lights
Low beams or side marker lights with fog lights
must be t urned on .
Lights and V ision
W hen the rear fog lights are t urned on, the yel
l ow check light at the edge of the switch comes
on .
(D Note
The rear fog lig hts should o nly be t urne d on in
accor dance with traffic reg ulation, as the
li g hts are b right for f ollowing traffic .
Adjusting exterior lighting
The functions are selected in the radio or in the
MMI*.
"Sele ct: !CAR ! func tion b utton> Exterior light
ing .
Or
.. Select:
-,c- A- R~I function button > Car systems *
control b utton > Vehicle settings > Exterior
lighting .
Coming home (Lights when leaving car ),
Leav ing home (Lights when unlock ing car )
The coming home f unction illuminates the area
outside the vehicle when you turn the ignit ion off
and open the d river's doo r. Dependi ng on vehicle
equipment, the function can be sw itched on and
off or the length of time the lights remain on*
c an be ad justed .
The leaving home i llum inates the area outside
t h e ve hicle when you un lock the vehicle . This
funct ion can be switched on and off .
The Com ing home and Leaving home functions
o nly operate when it is dark and the light switch
i s i n the
AUTO pos it ion.
Auto headlights
When the light sw itch is in the AU TO ¢ page 52
pos ition, the switch-on point of the lights can be
changed in the automat ic driving light funct ion.
Daytime running lights
USA models: You can switch the daytime runn ing
li ghts
On and Off .
Canada models:
Th e fu nction canno t be turned
off .
It is a ct ivate d automatica lly ea ch time the ig-
ni tio n i s switched on. ..,
53
Page 60 of 300
Lights and Vi sion
switched back on by moving the windshield
wiper lever to any position .
- Worn or dirty windshield wiper blades result
in streaking. This can affect the rain sensor
function . Check your windshield wiper
blades regularly.
- The washer fluid nozzles of the windshield
washer system are heated at low tempera
tures when the ignition is on .
- When stopp ing temporarily, e .g . at a traffic
light, the set speed of the windsh ield wipers
i s automatically reduced by one speed .
Cleaning windshield wiper blades
Clean the windshield wiper blades when they be
gin to leave streaks . Use a soft cloth and g lass
cleaner to clea n the windshield wipe r blades .
Front wipe r
.,. Place the windshield wiper arms in the service
pos ition. Refer to¢
page 58.
.,. Lift the wiper arm away from the front window .
Rear wiper
.,. Lift the wiper arm away from the rear window .
A WARNING
Dirty windshield wiper blades can impair your
view. This can lead to accidents.
Replacing windshield wiper blades
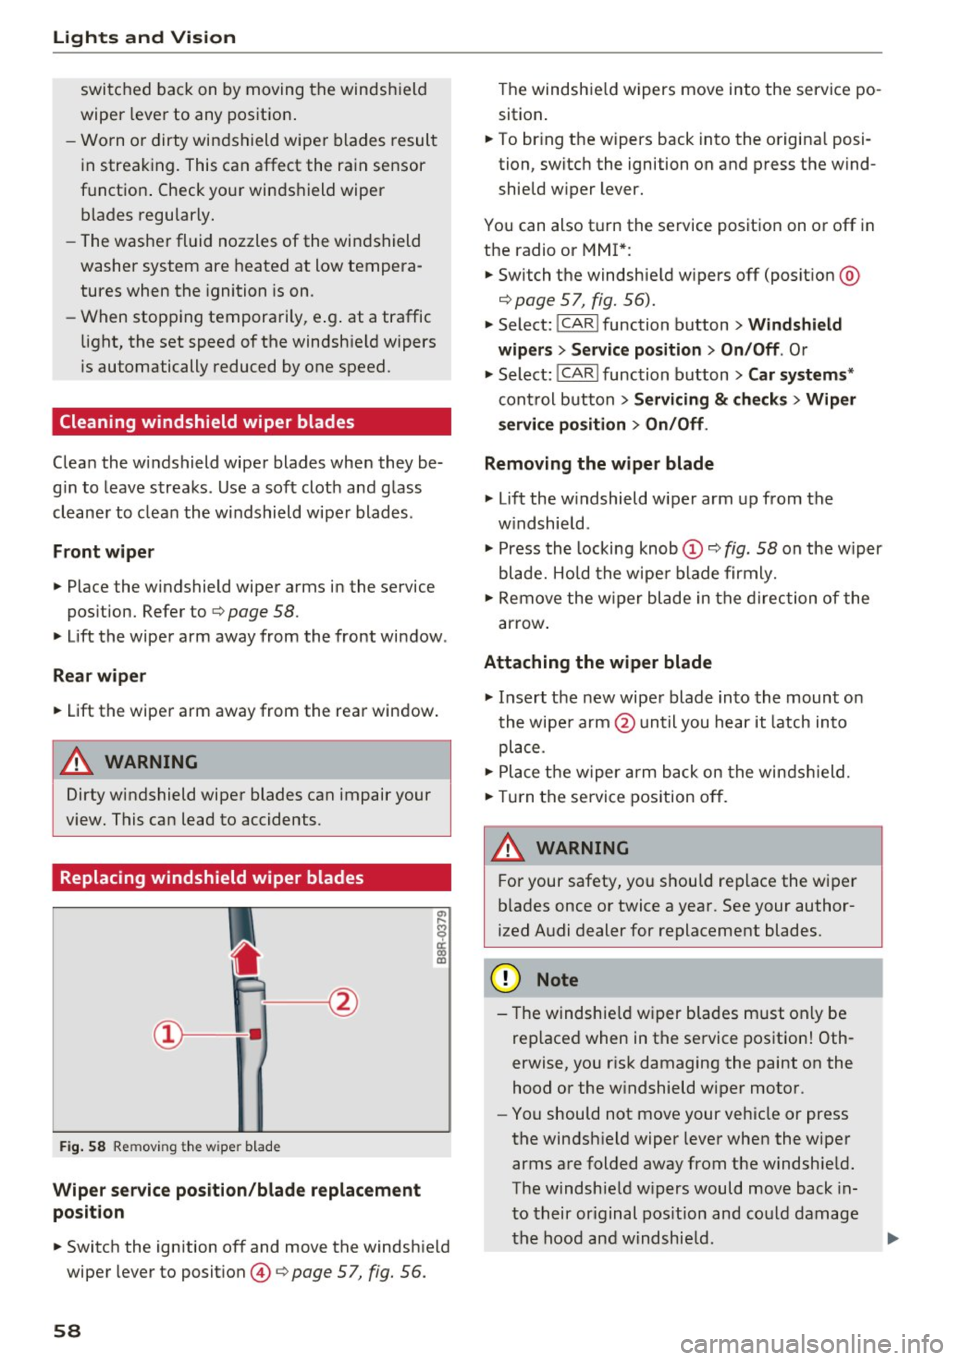
F ig. 58 Remov ing the w ipe r blad e
Wiper servic e position /blad e re placem ent
po sit ion
"' ij
a: CX) ID
.,. Switch the ignition off and move the windsh ie ld
wiper lever to position @ ¢
page 57, fig. 56.
58
The windshie ld wipers move into the service po
sition .
.,. To br ing the w ipers back into the origina l posi
tion, switch the ignition on and press the wind
shie ld w iper lever.
You can also turn the service position on or off in
the radio or MMI *:
.,. Switch the windshie ld w ipers off (posit ion @
¢page 57, fig. 56).
.,. Select:
!CAR I function button> Windshield
wiper s
> Servic e po sition > On /Off . Or
.,. Select :
!CAR I function button> Car system s*
control button > Ser vicing & ch eck s > Wiper
s ervi ce po sition
> On /Off .
Removing the wiper blade
.,. Lift the w indshield w iper arm up from the
w indshie ld .
.,. Press the locking knob@¢
fig. 58 on the w iper
blade. Ho ld the wipe r blade firmly .
.,. Remove the w iper blade in the direction of the
arrow .
Attaching the wiper blade
.,. Insert the new wiper blade into the mount o n
the wipe r arm @unt il you hear it latch into
place .
.,. Place t he w iper a rm back on the winds hield.
.,. Tur n the se rvice pos ition off.
A WARNING
F or your safety, you shou ld replace the wiper
b lades once or twice a year. See your author
ized Audi dealer for replacement blades.
(D Note
- The windshie ld wiper blades must only be
replaced when in the service pos ition! Oth
erwise, you r isk damaging the paint on the
hood or the w indshield wiper moto r.
- You should not move your vehicle or press
the windsh ield wiper lever when the wiper
arms are folded away from the windshie ld.
The windshie ld w ipers would move back in
to their or iginal pos ition and could damage
the hood and w indshie ld .
Page 67 of 300
..... N
co ~ CX)
..... I.Cl U"I
..... I.Cl .....
Memory function
Memory for driver's seat
Applies to vehicles: with seat memory
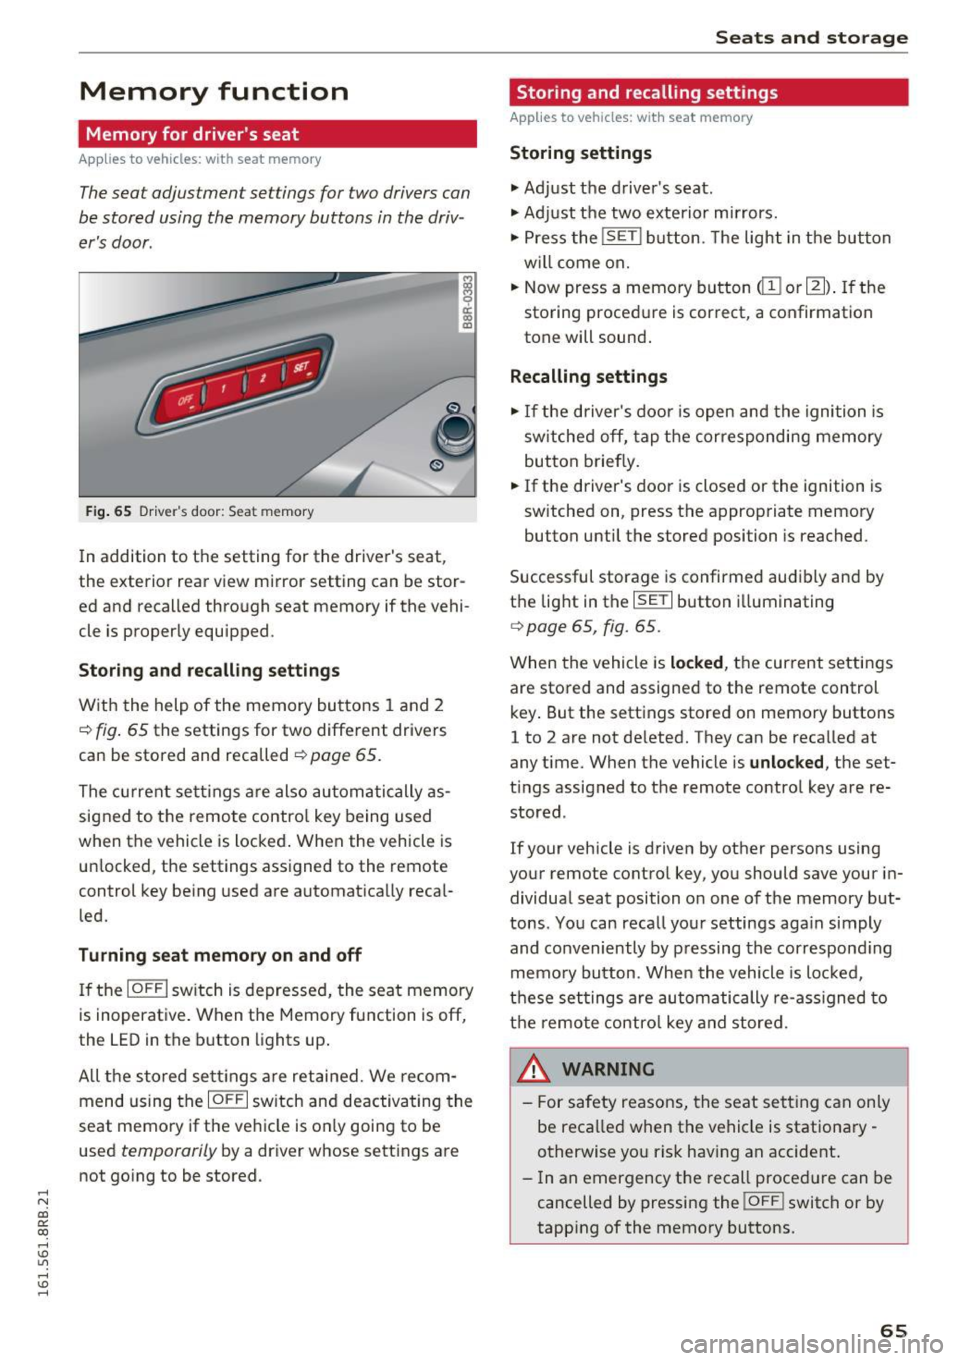
The seat adjustment settings for two drivers con
be stored using the memory buttons in the driv
er's door .
Fig . 65 D ri ver's door : Sea t memory
! co ID
In addition to the setting for the driver's seat ,
the exterior rear view mirror setting can be stor
ed and recalled through seat memory if the vehi
cle is proper ly equ ipped .
Storing and recall ing s ettings
With the help of the memory buttons 1 and 2
¢ fig . 65 the settings for two different drivers
can be stored and recalled
¢ page 65.
The cu rrent sett ings are also automatically as
signed to the remote contro l key being used
when the vehicle is locked . When the vehicle is
un locked, the settings ass igned to the remote
control key being used are automatica lly reca l
led.
Turning seat memory on and off
If the IO FFI sw itch is depressed, the seat memory
is inoperat ive . When the Memory fu nction is off,
the LED in the button lights up .
All the sto red se ttings a re retained. We recom
mend us ing the
IO FF I sw itch and deactivating the
seat memory if the ve hicle is on ly going to be
used
temporarily by a driver whose settings are
not go ing to be stored .
Seats and storag e
Storing and recalling settings
Applies to vehicles: with seat memory
Storing settings
.,. Adj ust the d river's seat.
.,. Adjust the two exterior mirrors.
.,. Press the
!S ET I button. The light in the button
w ill come on.
.,. Now press a memory button
(ill or 121) . If th e
sto ring procedure is correct, a confirmation
tone will sound .
Recalling settings
.,. If the driver's door is open and the ignition is
sw itched off, tap the corresponding memory
button briefly .
.,. If the driver's door is closed or the ignition is
sw itched on, press the approp riate memory
button until the stored position is reached.
Successful storage is confirmed audibly and by
t h e light in the
ISET I button i lluminating
r=> poge 65, fig. 65.
When the vehicle is locked , the current settings
are stored and assigned to the remote control
key . But the settings stored on memory buttons
1 to 2 are not de leted. They can be reca lled at
any time . When the vehicle is
unlocked , the set
t ings assigned to the remote control key are re
stored .
If your vehicle is driven by other persons using
your remote control key, you should save your in
dividua l seat position o n one of the memory but
tons . You can reca ll you r settings aga in simply
and conveniently by pressing the correspond ing
memo ry button. When the vehicle is loc ked,
t h ese settings are automatically re-ass igned to
t h e remo te contro l key and stored.
_& WARNING
-
- For safety reasons, the seat sett ing can on ly
be recalled when the vehicle is stationa ry -
otherwise yo u risk having an accident .
- In an emergency the recall proced ure can be
cancelled by pressing the
! OF FI switch or by
tapp ing of the memory bu ttons.
65
Page 68 of 300
Sea ts and stor age
Activating remote control key memory
Applies to vehicles: with seat memory
To assign the drive r's seat settings to the remote
con trol key when locking the vehicle, the function
m ust be activated in the radio or M MI*.
• Select:
ICARI funct ion button > Seat adjust
ment > Dr iver' s se at
> Key mem. profi le > On .
Or
• Se lect:
I CARI funct io n button > Car sy stem s*
contro l button > Vehicle sett ing s > S eats >
Driv er's s eat > Remote control key > On .
@ Tips
If you do not want another driver's settings to
be assigned to the remote control key, switch
off the memory function using the radio or
MMI* or the
j o FF I button ¢ page 65.
Rear seat
General information
Safe transportation of passengers on the rear
seats requires proper safety precautions.
All passengers on the rear seats must be seated
in compliance w ith the safety guidelines ex
p lai ned in
¢ page 143 and ¢page 151. The cor
rect seating positio n is critical for the safety of
fron t
and rear seat passengers a like ¢ page 13 7.
_8. WARNING
- O ccupan ts in the front and rear seats m ust
always be properly res trained.
- Do not let anyone ride in the vehicle withou t
t h e head restraints prov ided. Head re
straints hel p to reduce injuries.
- Loose items ins ide the passenger compa rt
ment, can fly forward in a crash or sudden
maneuver and injure occupants. Always
store articles in the luggage compartment
and use the fasten ing eyes, especially when
t h e rear seatbacks have been folded down.
- Read and heed all WARNINGS
¢page 137,
Proper seating positions for passengers in
rear seats.
66
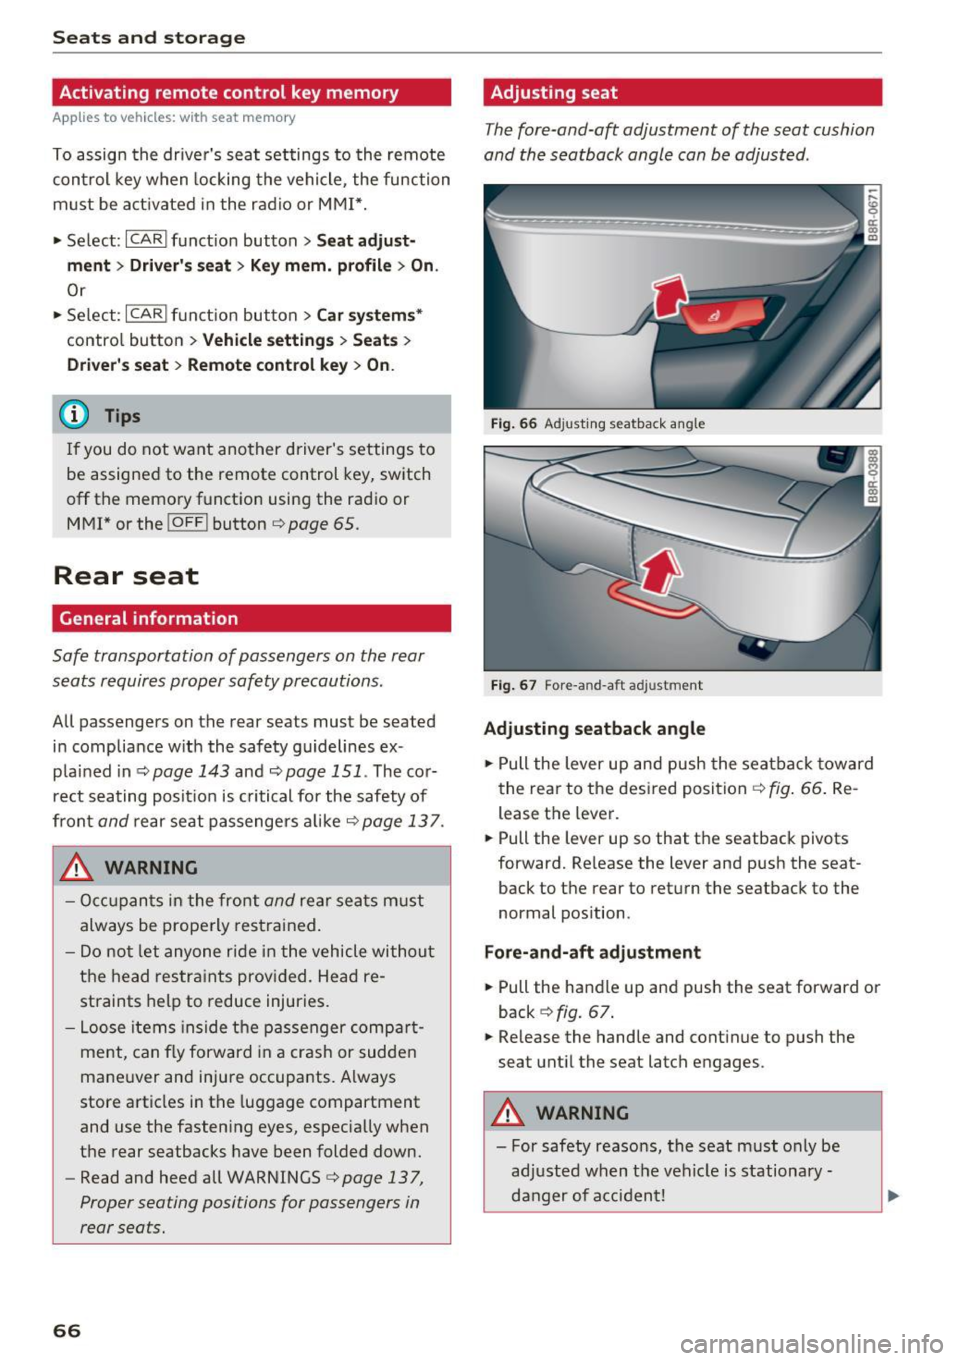
Adjusting seat
The fore-and-a~ adjustment of the seat cushion
and the seatback angle can be adjusted .
Fig. 66 Ad justing seatback angle
F ig . 67 Fore -a n d-aft ad justment
Adjusting seatback angle
• Pull the lever up and push the seatba ck toward
the rea r to the desired position~
fig. 66 . Re
lease the lever.
• Pull the lever up so that the seatback pivots
forward. Release the lever and push the seat
back to the rear to retu rn the seatback to the
normal pos ition .
Fore-and-aft adju stment
• Pull the handle up and push the seat forward or
back ¢
fig. 67.
• Release the handle and cont inue to push the
seat until the seat latch engages .
_8. WARNING
- For safety reasons, the seat must only be
ad justed when t he vehicle is stationa ry -
danger of acci dent!