ECU AUDI Q5 2016 Owners Manual
[x] Cancel search | Manufacturer: AUDI, Model Year: 2016, Model line: Q5, Model: AUDI Q5 2016Pages: 300, PDF Size: 75.02 MB
Page 5 of 300
.... N
co
er::
co
....
Driving safety . . . . . . . . . . . . . . . . . . . . 134
Basics . . . . . . . . . . . . . . . . . . . . . . . . . . . . . 134
Correct passenger seating positions . . . . . 135
Pedal area . . . . . . . . . . . . . . . . . . . . . . . . . . 138
Storing cargo correct ly . . . . . . . . . . . . . . . 139
Repo rt ing Safety Defects . . . . . . . . . . . . . . 14 1
Safety belts . . . . . . . . . . . . . . . . . . . . . . 143
Ge ne ral information . . . . . . . . . . . . . . . . . 143
Why use safety belts? . . . . . . . . . . . . . . . . 144
S afety belts . . . . . . . . . . . . . . . . . . . . . . . . 14 6
Bel t tensione rs . . . . . . . . . . . . . . . . . . . . . . 14 9
Airbag system .......... .... ... .. . 15 1
I mportant info rm ation . . . . . . . . . . . . . . . 151
Fr on t air bags . . . . . . . . . . . . . . . . . . . . . . . 155
M oni toring the A dvanced Airbag Sys tem . 16 1
Side airbags . . . . . . . . . . . . . . . . . . . . . . . . 165
Side curtain airbags . . . . . . . . . . . . . . . . . . 168
Child safety . . . . . . . . . . . . . . . . . . . . . . 171
Important information . . . . . . . . . . . . . . . 17 1
Ch ild seats . .. ............... .. .... . 17 6
Secur ing child seats . . . . . . . . . . . . . . . . . . 180
LATCH system (Lower anchorages and
tethers for children) . . . . . . . . . . . . . . . . . 183
Addit ional information 188
Driver messages . . . . . . . . . . . . . . . . . 189
Intelligent Technology . . . . . . . . . . 189
Not ice about data reco rded by the Event
D ata Recorde r and vehicle control
mod ules . . . . . . . . . . . . . . . . . . . . . . . . . . . 189
E lectronic Stabilization Con trol ( ESC) . . . . 190
Braking . . . . . . . . . . . . . . . . . . . . . . . . . . . . 192
Elect romechanica l power assist, Dynam ic
steering . . . . . . . . . . . . . . . . . . . . . . . . . . . 194
Driving w ith your quattro . . . . . . . . . . . . . 194
Energy management . . . . . . . . . . . . . . . . . 195
Driving and the environment . . . . 197
Breaking in . . . . . . . . . . . . . . . . . . . . . . . . . 197
Cata lytic converte r . . . . . . . . . . . . . . . . . . . 197
D iese l part icu late filter . . . . . . . . . . . . . . . 198
Avoid damagi ng the vehicle . . . . . . . . . . . 198
E conomical and environmentally-fr iendly
driving . . . . . . . . . . . . . . . . . . . . . . . . . . . . 198
Table of contents
Offroad driving . . . . . . . . . . . . . . . . . . .
201
Driving under diffic ult con ditions and off -
road . . . . . . . . . . . . . . . . . . . . . . . . . . . . . . 201
Trailer mode . . . . . . . . . . . . . . . . . . . . . 203
Driving with a trai ler . . . . . . . . . . . . . . . . . 203
Trailer mode notes . . . . . . . . . . . . . . . . . . . 205
Operating instructions . . . . . . . . . . . 207
Care and cleaning . . . . . . . . . . . . . . . . 207
Genera l information . . . . . . . . . . . . . . . . . 207
Car washes . . . . . . . . . . . . . . . . . . . . . . . . . 207
Cleaning and care informat ion . . . . . . . . . 208
Plac ing your vehicle out of serv ice . . . . . . 211
Fuel and Refueling ............... 212
Fuel ......... ...................... 212
Refue ling . . . . . . . . . . . . . . . . . . . . . . . . . . 214
Se lective cata lytic red uction (AdBlue) 217
Checking and Filling . . . . . . . . . . . . . 220
Hood . . . . . . . . . . . . . . . . . . . . . . . . . . . . . . 220
En gine compartment . . . . . . . . . . . . . . . . . 22 2
En gine oi l . . . . . . . . . . . . . . . . . . . . . . . . . . 2 22
Cooling sys tem . . . . . . . . . . . . . . . . . . . . . . 2 26
Brake fl uid . . . . . . . . . . . . . . . . . . . . . . . . . 228
Battery . . . . . . . . . . . . . . . . . . . . . . . . . . . . 229
Windsh ield/headlight washer container 233
Wheels .. .. .. .. .. ... .. ..... ... .. .. 234
Wheels and Tires . . . . . . . . . . . . . . . . . . . . 234
Tire p ressure mon itoring system
251
Do It Yourself . . . . . . . . . . . . . . . . . . . . 254
Emergency assistance . . . . . . . . . . . 254
Vehicle jack, vehicle tool kit and
collapsib le spare tire . . . . . . . . . . . . . . . . . 254
T ire mobility kit . . . . . . . . . . . . . . . . . . . . . 257
Replacing w heels . . . . . . . . . . . . . . . . . . . . 259
Fuses and bulbs . . . . . . . . . . . . . . . . . . 265
Fuses . . . . . . . . . . . . . . . . . . . . . . . . . . . . . . 265
B ulbs. . . . . . . . . . . . . . . . . . . . . . . . . . . . . . 268
Emergency situations . . . . . . . . . . . . 270
Genera l . . . . . . . . . . . . . . . . . . . . . . . . . . . . 270
Start ing by p ushi ng o r tow ing . . . . . . . . . . 270
Sta rt ing wi th ju mpe r cab les . . . . . . . . . . . 270
3
Page 39 of 300
from transmitters in the vicinity of the vehi
cle work ing in the same frequency range
(e .g . a cell p hone, radio equipment) .
- If yo u open the dr iver's doo r with t he key
l eft in the ignition Lock, a chime w ill sound.
This is your remi nder to remove the key and
l ock the door.
- Fo r security reasons, replacement keys are
on ly availab le from Audi dealers.
- Fo r De claration of Comp liance to U nite d
States FCC and Ind ustry Canada reg ulations
r:=> page283 .
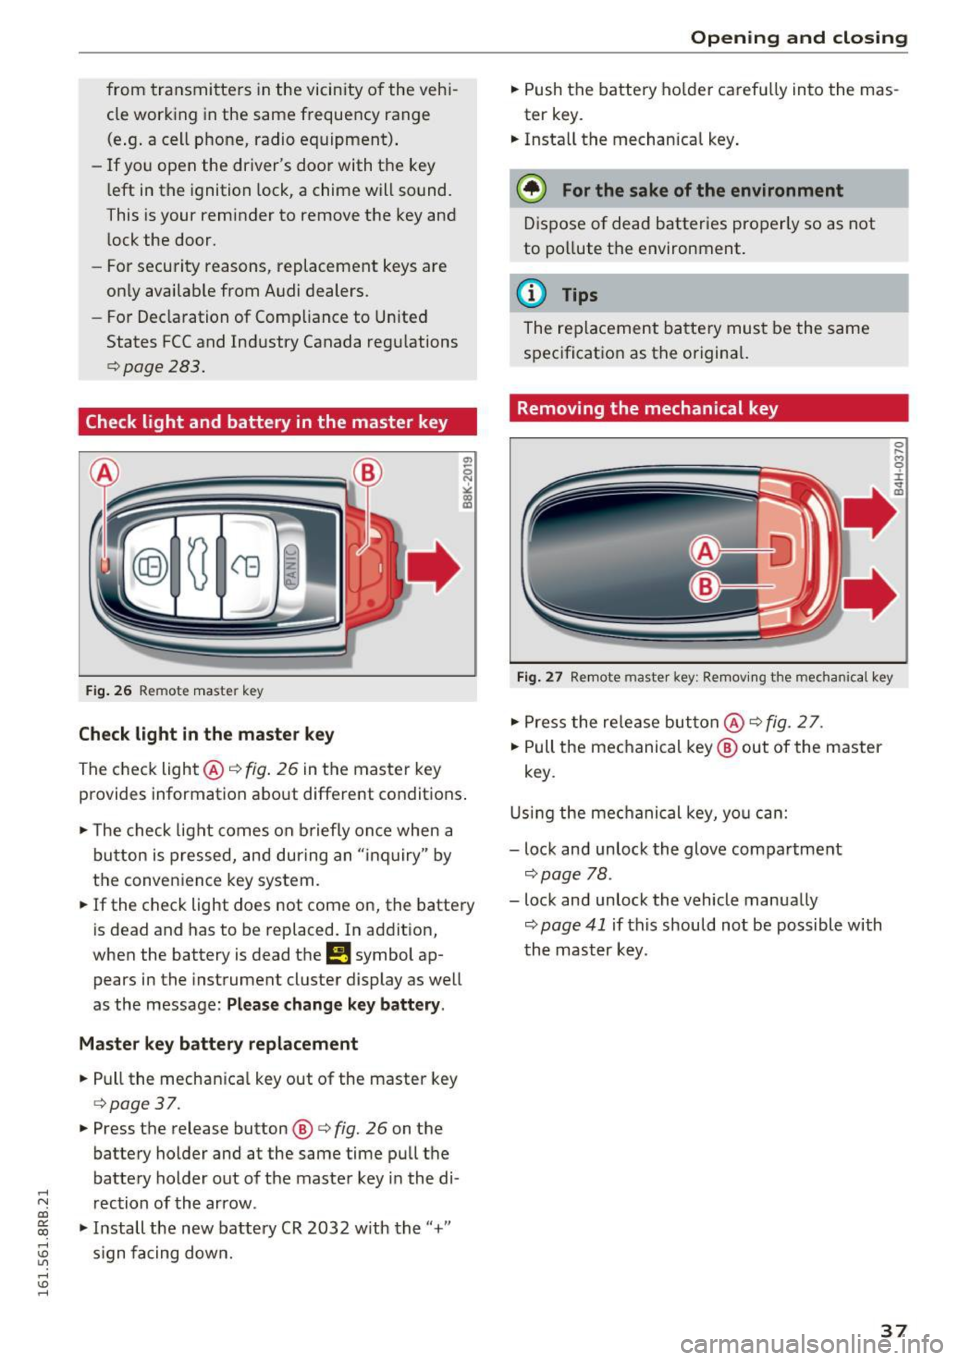
Check light and battery in the master key
Fig. 26 Re mote mast er key
Check light in the master key
The check light@q fig. 26 in t he master key
p rovides information abo ut different condit ions .
.,. The check light co m es on briefly on ce when a
button is pressed, and dur ing an " in qu iry" by
the conven ience key system .
.,. If the check light does not come on, the batte ry
is dead and has to be replaced. In ad dition,
when the battery is dead
the m symbol ap
pears in the instrument cluster display as well
as the message :
Please change key battery .
Master key battery replacement
.,. Pull the mechan ica l key out of the master key
c=> page 37 .
.,. Press the release button @ r=> fig. 26 on the
batte ry holder and at the same time pu ll th e
batte ry holder out of t he maste r key in the di-
.....
'"" rection of the arrow . co
~ .,. In stall the new battery CR 2032 w ith the "+"
; s ign f acing dow n.
Open ing and closing
.,. Push the batt ery ho lder caref ully into the mas
ter key.
.,. Insta ll the mechanical key .
@ For the sake of the environment
Dis pose of dead batter ies properly so as not
to po llute t he environment.
@ Tips
The re placeme nt ba tte ry mus t be the same
s p ec ificat ion as t he o rigina l.
Removing the mechanical key
Fig. 27 Remote maste r key: Re mov ing the mecha nical key
.,. Press the re le a se but ton @ r=> fig. 2 7.
.,. Pull the me chanical key @ out of the master
key .
U sing th e mec hanical key, yo u ca n:
- lock and unlock the glove compartment
c=> page 78 .
-lock and unlock the vehicle manua lly
c=> page 41 if this should no t be possible with
t h e m aster k ey .
37
Page 41 of 300
,....,
N
co
er::
co
,....,
When you unlock the vehicle, the turn signa ls
flash twice. When you lock the vehicle, the turn
signals flash once. If they do not flash, one of the
doors, the rear lid or the hood is not locked .
Unintentionall y loc king your self out
In the following cases there safeguards to pre
vent you locking yo ur remote master key in the
veh icle:
- T he veh icle does not lock with the power lock
ing switch ~
page 42 if the dr iver's door is
open .
- On vehicles with Co nvenience key*, if the most
recently used master key is in the luggage com
partment, the rear lid is automatically un locked
again after it is closed.
Do not lock you r vehicle with the
remot e ma st e r
ke y or C onvenience key *
unti l all doors and the
r ear lid are closed . In t his way you avoid locking
yourse lf out accidentally.
& WARNING
- When you leave the vehicle, always remove
the ignition key and take it with you. This
will prevent passengers (children, for exam
ple) from accidentally being locked in the
vehicle should they acc identally press the
power locking switch in the front doors.
- Do not leave children inside the vehicle un
su perv ised. In an emergency it wou ld be im
poss ible to open the doors from the outs ide
withou t the key.
(D} Tips
- In the event of a crash with airbag deploy
ment all locked doors w ill be automatically
unlocked to give access to the veh icle occu
pants from the outside.
- If the power lock ing system should mal
funct ion, you can lock the dr iver's door us
i ng the me chanical key~
page 42.
- If the power lock ing system should fail, you
ca n still open the fuel tan k flap in an eme r
gency
~page 216.
-You are well adv ised not to keep valuables
:;;: inside an unattended vehicle, v is ible or not.
,....,
Op ening and cl osing
Even a properly locked vehicle cannot p ro
vide the security of a safe.
- If the LED in the upper edge of the driver's
door pane l comes on for about 30 seconds
after the vehicle is locked, there is a mal
function in the power locking or the anti
theft warning system. Have the malfunction
corrected by an authorized Aud i dealership
or qualified repair fac ility.
Setting power locking
The driver can determine the functions for power
locking in the radio or in the MMI* .
.. Select: !CAR I function button> Cent ral locki ng .
Or
.,. Select:
!CAR I function button > Car syst ems *
control button > Vehicl e setting s> (Ce ntr al
loc king )* .
Unloc king single door /Unloc k doo rs -
you can
specify which doors unlock when you open the ve
hicle .
-Select ing Off /All and pressing the IQ] button on
the remote control key unlocks the entire vehi
cle .
- Select ing
On /Dri ver and pressing the IQ] button
on the remote control key once unlocks only
the dr iver's door. In vehicles w ith a convenience
key*, only the door whose handle you pull will
un lock. If you press the
Im button tw ice, the en
tire veh icle w ill unlock.
If you press the I:@ but
ton, the entire ve hicl e w ill always lock .
Trunk lid/tailgate /lock e xterior trunk handle -if
you select
On , the rea r lid handle locks
c=> page 43, fig. 35 . In this case, the rear lid can
be opened with the
l asl bu tto n on the master key
c=> page 40, fig. 29 or with the~ button in the
driver's door
c:> page 43, fig . 34 .
Fold mirrors * -if you se lect On , the outside m ir
rors w ill fold i n autom atic ally when you press the
Im but ton on the remote control key c:> page 59.
Confirmation ton e/Tone wh en lo cking -if you
select
On , a tone w ill sound when you lock the ve
hicle.
39
Page 44 of 300
Opening and clo sin g
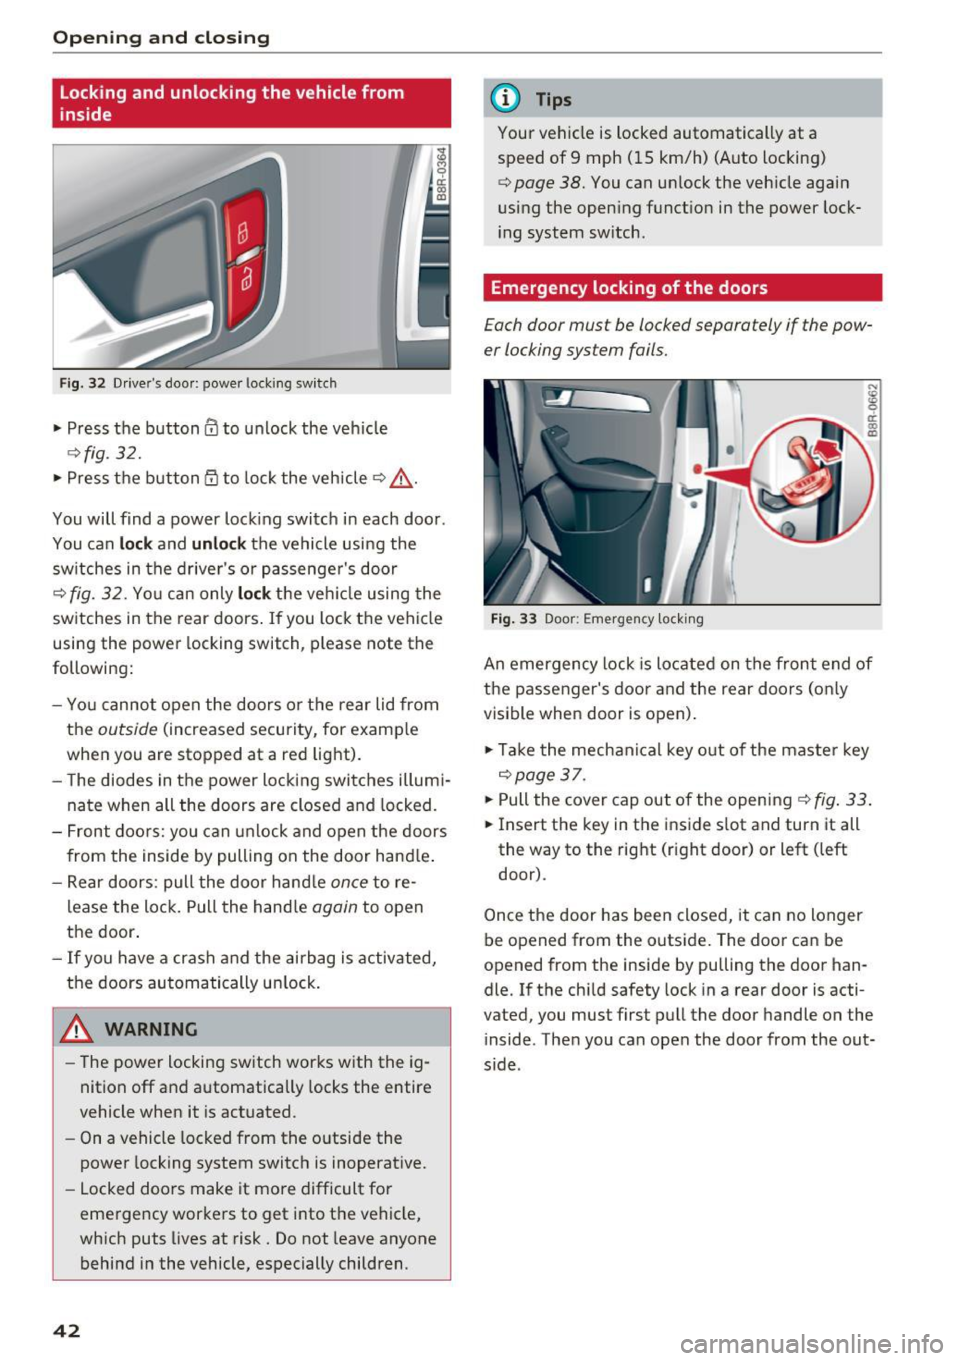
Locking and unlocking the vehicle from
inside
Fig. 32 Driver's doo r: powe r loc king sw itch
• Press the button@ to unlock the veh icle
¢ fig. 32.
• Press the b utton CD to lock the vehicle ¢ ,& .
You will find a power lock ing switch in each door.
You can
lo ck and unloc k the vehicle using the
sw itches in the drive r's or passenger's door
¢ fig. 32. Yo u can only lock the ve hicle using the
switches in the rear doors . If you lock the vehicle
using the power locking switch, please note the
following:
- You cannot open the doors or the rear lid from
the
outside (increased security, for examp le
when you are stopped at a red light).
- The diodes in the power locking switches illumi
nate when all the doors are closed and locked.
- Front doo rs: you can unlock and open the doors
from the inside by pulling on the door hand le .
- Rear doors: pull the door hand le
once to re
lease the lock. Pull the hand le
again to open
the door.
- If you have a crash and the airbag is activated,
the doors automatically un lock .
A WARNING
-The power locking sw itch works with the ig
nition off and automatically locks the entire
vehicle when it is actuated.
- On a vehicle locked from the outside the
power locking system switc h is inoperat ive.
- Locked doors make it mo re difficult for
emergency workers to get into the vehicle,
wh ich puts lives at risk. Do not leave anyone
behind i n the vehicle, especially children.
42
@ Tips
Your vehicle is locked automatically at a
speed of 9 mph ( 15 km/h) (Auto locking)
¢ page 38. You can un lock the veh icle again
using the open ing funct ion in the power lock
i ng system sw itch.
Emergency locking of the doors
Each door must be locked separately if the pow
er locking system fails.
Fi g. 33 Door: Em erge ncy lock ing
An emergency lock is located on the front end of
the passenger's door and the rear doors (on ly
visible when door is open) .
• Ta ke the mechani cal key out of the maste r key
¢page 37.
• Pull the cover cap out of the opening¢ fig . 33 .
• Insert the key in the inside s lot and turn it all
the way to the right (right door) or left (left
door).
Once the door has been closed, it can no longer
be opened from the outs ide. The doo r can be
opened from the inside by pulling the door han
dle. If the chi ld safety lock in a rear door is acti
vated, you must first pull the door handle on the
i nside . Then you can open the door from the out
s ide .
Page 50 of 300
Opening and clo sin g
Open ing and clo sing th e sunsh ade
.. To a utomat ically open the sunshade complete
ly, briefly press the switch @ in the des ired ar
row direction.
.. To stop the sunshade in an intermediate posi
tion, press the switch again, or
.. Press and hold the switch in the desired arrow
direction .
.. Release the sw itch when sunshade is at desired
pos ition .
After the ignition is switched off, you can still op
erate the Panoramic sliding sunroof for about 10 minutes . As soon as the driver's o r passenger's
door is opened, the switch is inoperat ive.
The power sunshade can also be closed when the Panoramic sliding sunroof is open.
A WARNING
Pay careful attention when closing the Panor
am ic sliding sunroof- otherwise ser ious injury
cou ld result! For this reason, always remove
the ignition key when leaving the vehicle.
(D Note
Always close your Panoramic sl iding sunroof
when leaving yo ur vehicle. Sudden rain can
cause damage to the i nterior equipment of
your veh icle, particularly the electron ic eq uip
ment.
(j) Tips
I nformat ion regarding convenience opening/
closing
¢page 47.
Emergency closing of the Panoramic slid ing
sunroof
Applies to veh icles: w ith Panoramic sliding sunroof
If the Panoram ic sliding sunroof detects an ob
ject in its path when it is clos ing , it will open
aga in automatically . In this case, you can close
the roof with the power emergency clos ing func
tion .
.. Within five seconds after the sunroof opens au
tomat ically, pull the switch unt il the roof
closes .
48
Garage door opener
(Homelink)
Description
Applies to vehicles: with garage door opene r (Home Link)
F ig. 43 Ga rage door opene r: examples of us ing w it h d iffer·
ent syste ms
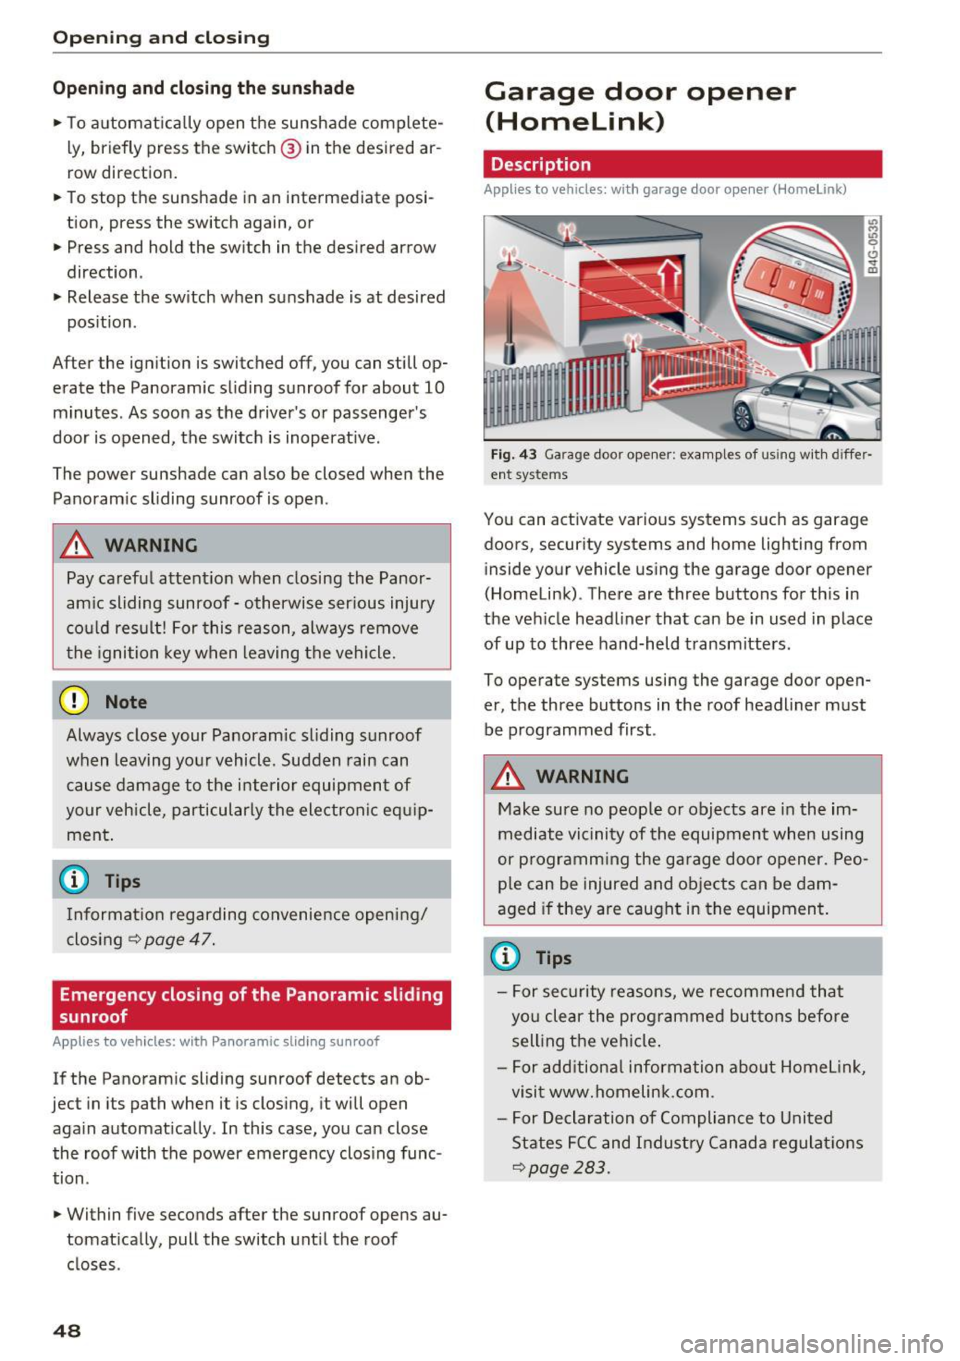
You can act ivate various systems suc h as garage
doors, secur ity systems and home lighting from
inside your vehicle using the garage door opener
(Homelink) . There are three buttons for th is in
the veh icle headliner that can be in used in place
of up to three hand-held transmitters.
To operate systems using the garage door open
er, the three buttons in the roof headliner must be programmed first .
A WARNING
Make sure no people or objects are in the im
mediate vi cinity of the equipment when using
or p rogramm ing the ga rage door opener. Peo
p le can be injured and ob jects can be dam
aged if they are caught in the equipment.
(D Tips
- For sec urity reasons, we recommend that
yo u clear the prog rammed but tons before
sell ing t he ve hicl e.
- For add itiona l information about Homel ink,
visit www.homelink.com .
- For Declaration of Compliance to United
States FCC and Indust ry Canada regulat ions
~page 283.
Page 71 of 300
..... N
co ~ CX)
..... I.Cl U"I
..... I.Cl .....
Luggage compartment
Expanding the passenger compartment
The rear seat backrests can be folded forward
separately or together.
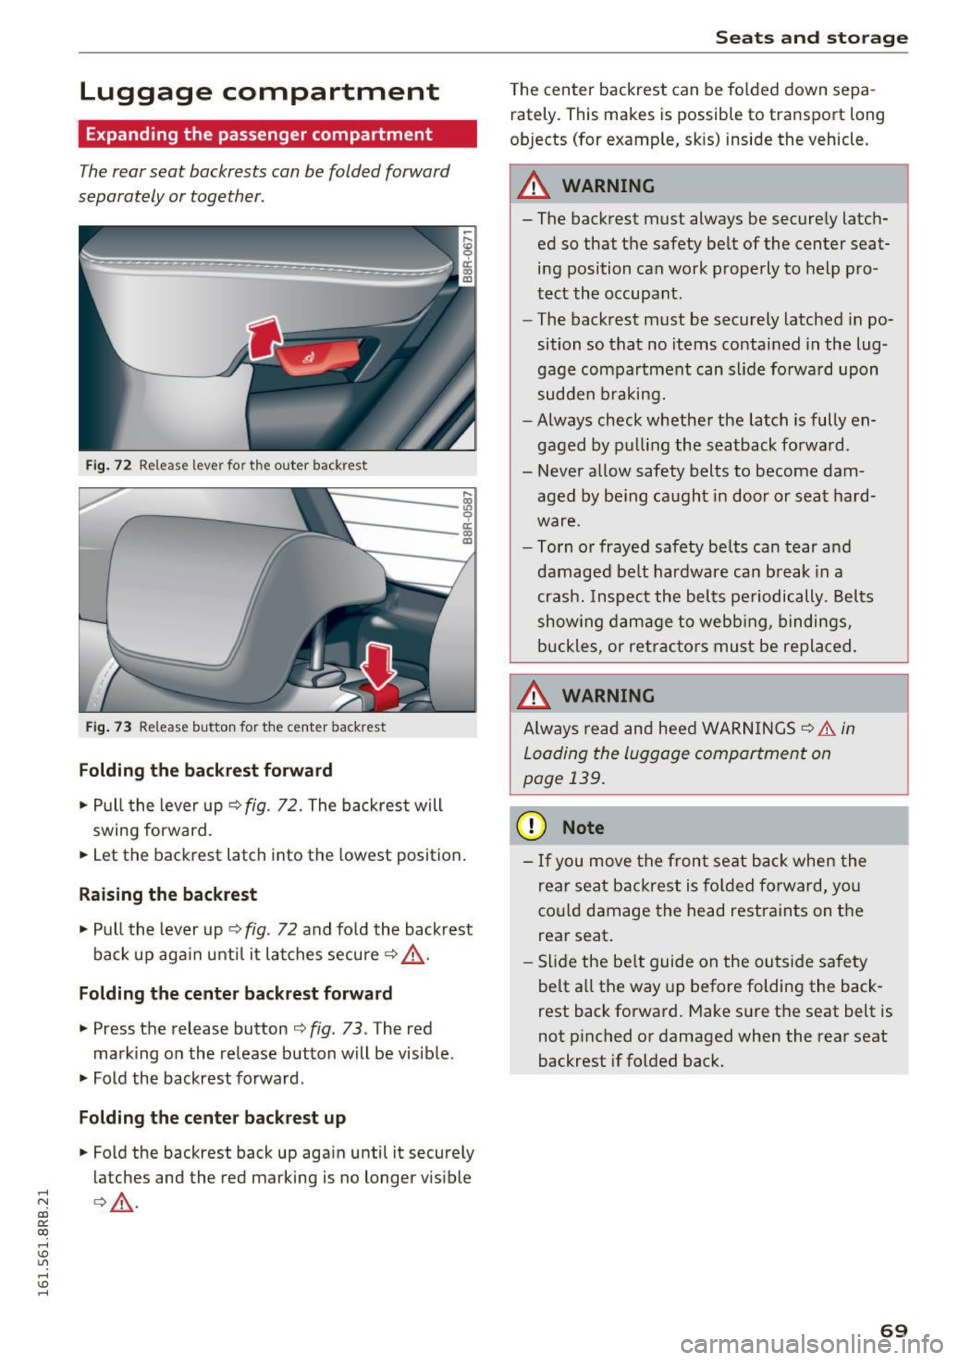
Fi g. 72 Release lever for the outer backrest
....
ill 9
~---- 1:i ID
Fig. 73 Release button fo r the center backrest
Folding th e ba ckre st forward
... Pull the lever up ¢ fig . 72. The backres t will
swing forward .
... Let the backrest latch into the lowest position .
Raising the backrest
... Pull the lever up Q fig . 72 and fold the backrest
back up aga in until i t lat ches secure
Q &_ .
Folding the center back re st forw ard
... Press the release button ¢ fig. 73 . The red
mark ing on the release button will be visible.
... Fold the backrest forward.
Folding the cen ter backre st up
... Fold the backrest back up aga in until it secure ly
latches and the red marking is no longer v isible
¢ .&_ .
Seats and storag e
The center backrest can be fo lded down sepa
rately. This makes is possible to transport long
objects (for example, sk is) inside the vehicle.
A WARNING
=
- The backrest must always be secure ly latch-
ed so that the safety be lt of the center seat
i n g position can wo rk properly to help pro
tect the occupant.
- The backrest must be securely latched in po
sition so that no items contained in the lug
gage compartment can slide fo rwa rd upon
sudden b raking.
- Always check whether the latch is fully en
gaged by p ulli ng the seatback fo rwa rd .
- Never allow safety belts to become dam aged by be ing caught in door or seat hard
ware.
- To rn o r frayed safety be lts can tear a nd
damaged be lt hardware can break in a
cras h. Inspect the belts pe riodically. Belts
show ing dam age to webb ing, bindings,
buckles, or re trac to rs mus t be replaced.
A WARNING
= -
Always read and heed WARN INGS Q &. in
Loading the luggage compartment on
page 139 .
(D Note
- If you move the front seat back when the
rear seat backrest is fo lded fo rwa rd, yo u
co uld damage the head restraints on the
rear seat .
- Slide the be lt guide on the outside safety
belt a ll the way up before folding the back
rest back forward. Make su re the seat belt is
not p inched or damaged when the rear seat
backrest if folded back .
69
Page 72 of 300
Sea ts and stor age
Expanding the luggage compartment
The rear seat backrests can be folded forward
separately or together .
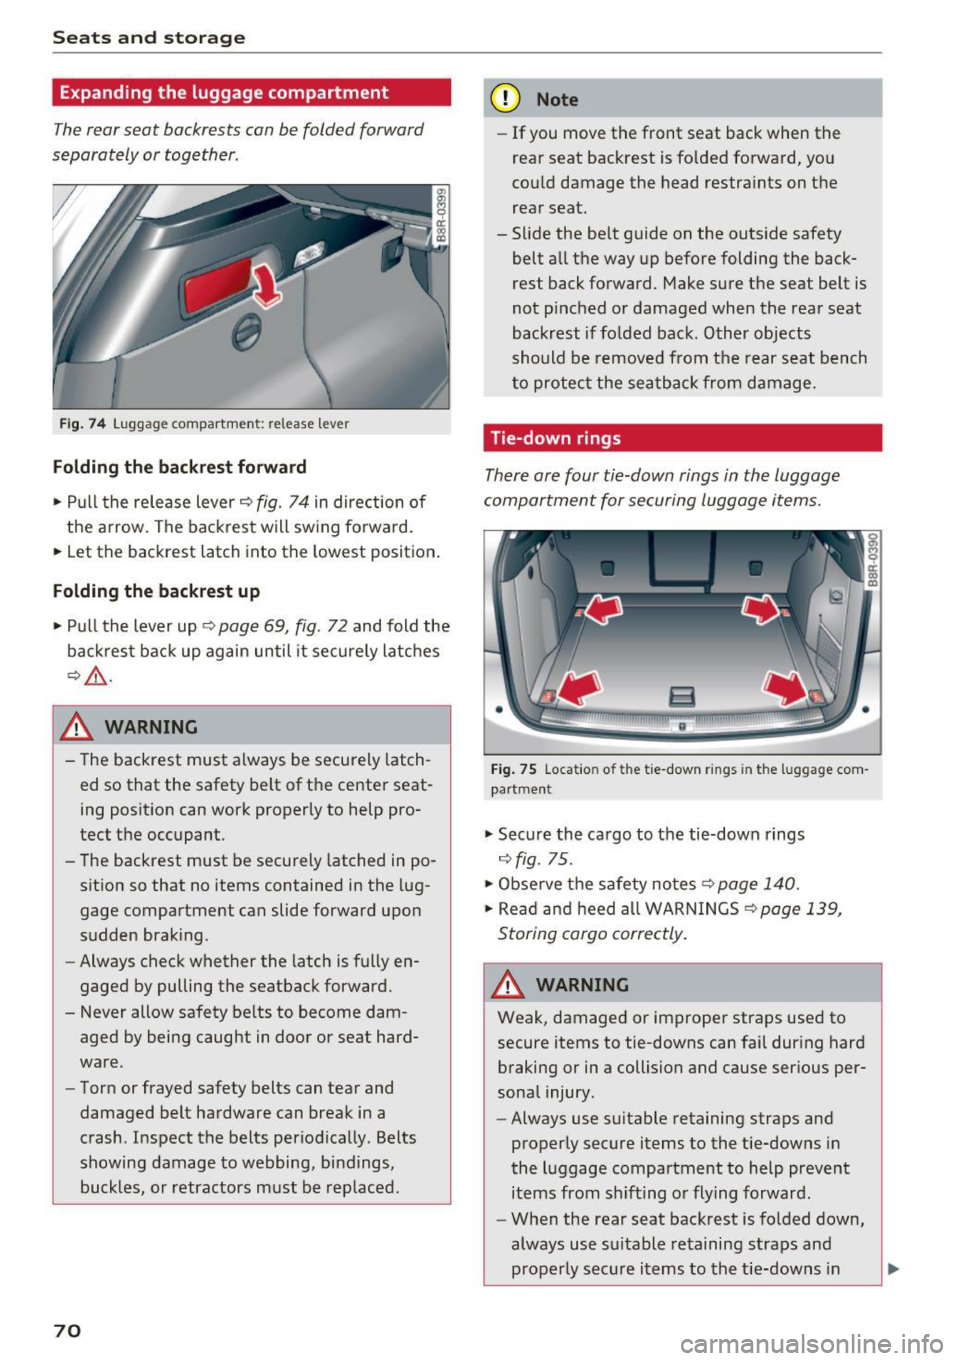
Fig . 74 Luggage compartment: release lever
Folding the ba ckrest forward
• Pull the release lever ¢ fig. 74 in direction of
the a rrow . The back rest will swing fo rward.
• Let the backrest latch into the lowest position .
Folding the backrest up
• Pull the lever up ¢ page 69, fig. 72 and fold the
backrest bac k up again until it securely latches
¢ _& .
& WARNING
- The backrest must always be securely latch
ed so that the safety belt of the center seat
ing position can work properly to help pro
tect the occupant.
- The backrest must be securely latched in po
sition so that no items contained in the lug
gage compartment can slide forward upon
sudden brak ing.
- Always check whether the latch is fully en
gaged by pulling the seatback forward.
- Never allow safety be lts to become dam
aged by being caught in door or seat hard
ware .
- Torn or frayed safety belts can tear and
damaged belt hardware can break in a
crash . Inspect the belts periodically . Belts
showing damage to webbing, bind ings,
buck les, or retractors must be rep laced.
70
(D Note
- If you move the front seat back when the
rear seat backrest is folded forward, you
cou ld damage the head restraints on the
rear
seat.
- Slide the belt guide on the outside safety
belt all the way up before folding the back
rest back forward. Make sure the seat belt is
not pinched or damaged when the rear seat
backrest if fo lded back. Other objects
sho uld be removed from the rear seat bench
to protect the seatback from damage .
Tie-down rings
There are four tie-down rings in the luggage
compartment for securing luggage items.
Fig . 75 Locat io n of the tie -down rings in the luggage com
pa rtment
.,. Secure the cargo to the tie-down rings
¢ fig. 75.
.,. Obse rve the safety notes ¢ page 140.
• Read a nd heed a ll WARNINGS ¢ page 139,
Storing cargo correctly .
& WARNING
Weak, damaged or improper straps used to
secure items to tie-downs can fail dur ing hard
braking or in a collision and cause ser ious per
sonal injury.
- Always use suitable retaining straps and
properly secure items to the tie-downs in
the luggage compartment to help prevent items from s hifting o r fly ing forward .
- When the rear seat backrest is folded down,
always use suitable retaining straps and
proper ly sec ure items to the tie-downs in
-
Page 74 of 300
Sea ts and stor age
Removing th e cargo fl oor, in stalling
.. To remove, lift the cargo floor folded together
and pull it toward the rear lid .
.. To insta ll, place the folded cargo floo r into
both retainers and unfold it.
Grab the protective tray on the handles and pu ll
it out. You can also install a divider to divide @
the storage area . Depending on the vehicle
equipment level, the protective tray can have dif
ferent sizes and shapes.
Cargo net and storage hooks
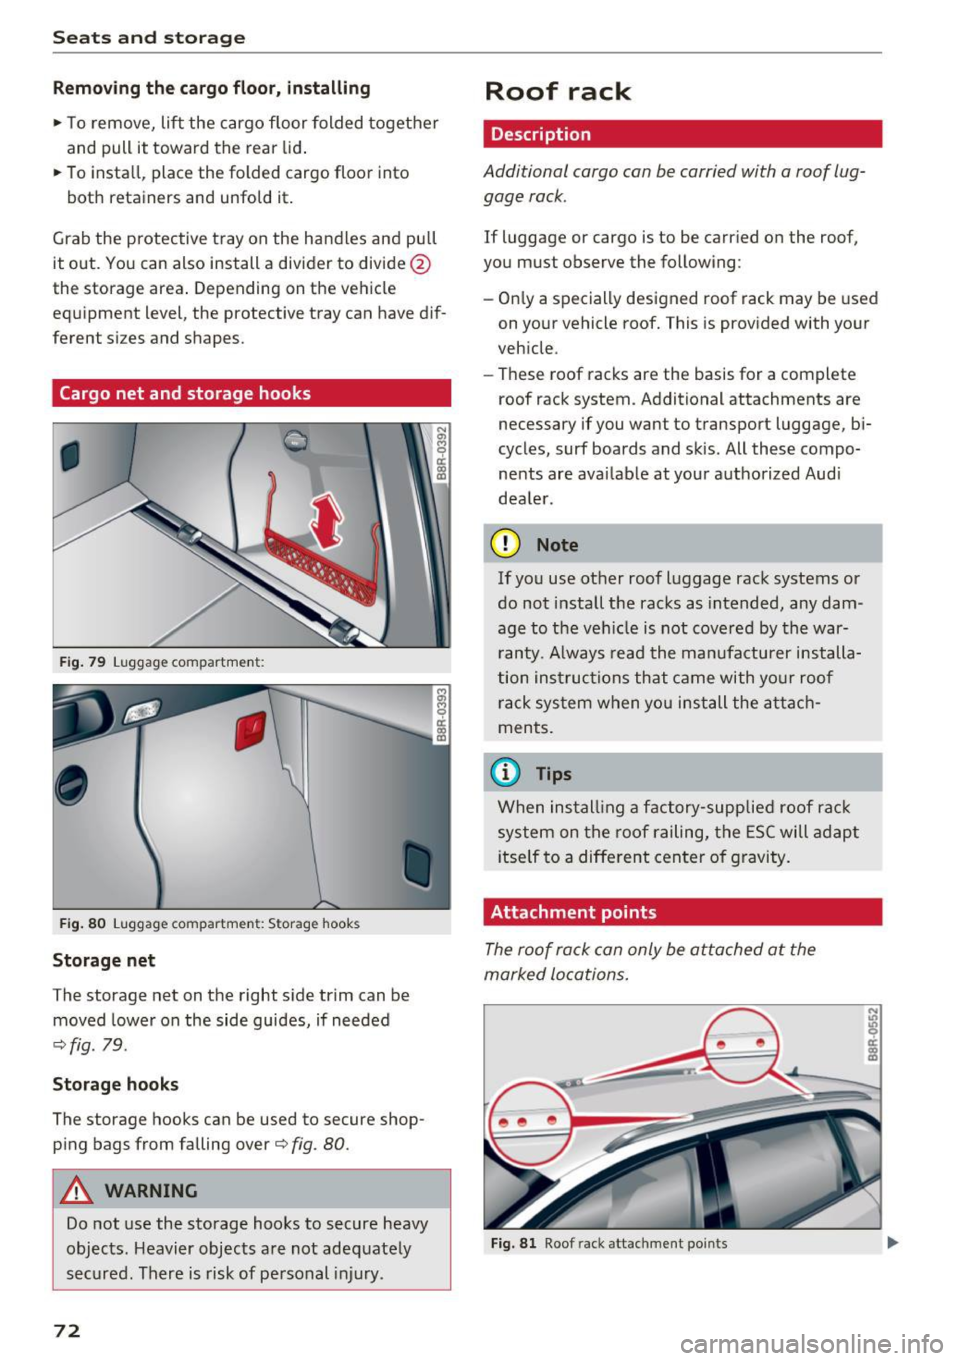
F ig . 79 Luggage compartment :
•
Fig . 80 Luggage compartment: Storage hooks
Storage net
The storage net on the right s ide trim can be
moved lower on the side guides, if needed
.:;. fig . 79.
Storag e ho oks
The storage hooks can be used to secure shop
ping bags from falling over¢
fig. 80.
A WARNING
Do not use the storage hooks to secure heavy
objects. Heavier objects are not adeq uately
secured. There is risk of personal in jury .
72
Roof rack
Description
Additional cargo can be carried with a roof lug
gage rack .
If luggage or cargo is to be carr ied on the roof,
you must observe the following:
- On ly a specially designed roof rack may be used
on your vehicle roof. This is provided with your
veh icle .
- These roof racks are the basis for a complete
roof rack system. Additional attachments are
necessary if you want to transport luggage, b i
cycles, surf boards and skis. All these compo
nents are avai lable at your authorized Audi
dea le r.
(D Note
If you use other roof luggage rack systems or
do not install the racks as intended, any dam
age to the veh icle is not cove re d by the war
r anty . A lways read the manufacturer installa
tion instructions that came with yo ur roof
rack system when you install the attach
ments.
(D Tips
When install ing a factory-supplied roof rac k
system on the roof railing, the ESC will adap t
i tself to a diffe rent cente r of gravity.
Attachment points
The roof rack can only be attached at the
marked locations.
Fig. 8 1 Roof r ack attachment points
Page 75 of 300
..... N
co ~ CX)
..... I.Cl U"I
..... I.Cl .....
Attach the roof rack only at the attachment poin ts on the roof railing. On the inside of th e
roof railing there are two holes for attaching the
rear end of the roof rack. To p revent confusing
the front and rear roof rack attachment s, there
are three holes on the left and two holes on the
ri ght for mounting the front part of the roof rack
q fig . 81 .
The roof racks have a sti cker on the left side un
derneath to ident ify front and rear .
A WARNING
When installing the roof rack, make sure the
st icker is on the left side of the vehicle and
faces the stamped arrow in the drive dire c
t ion.
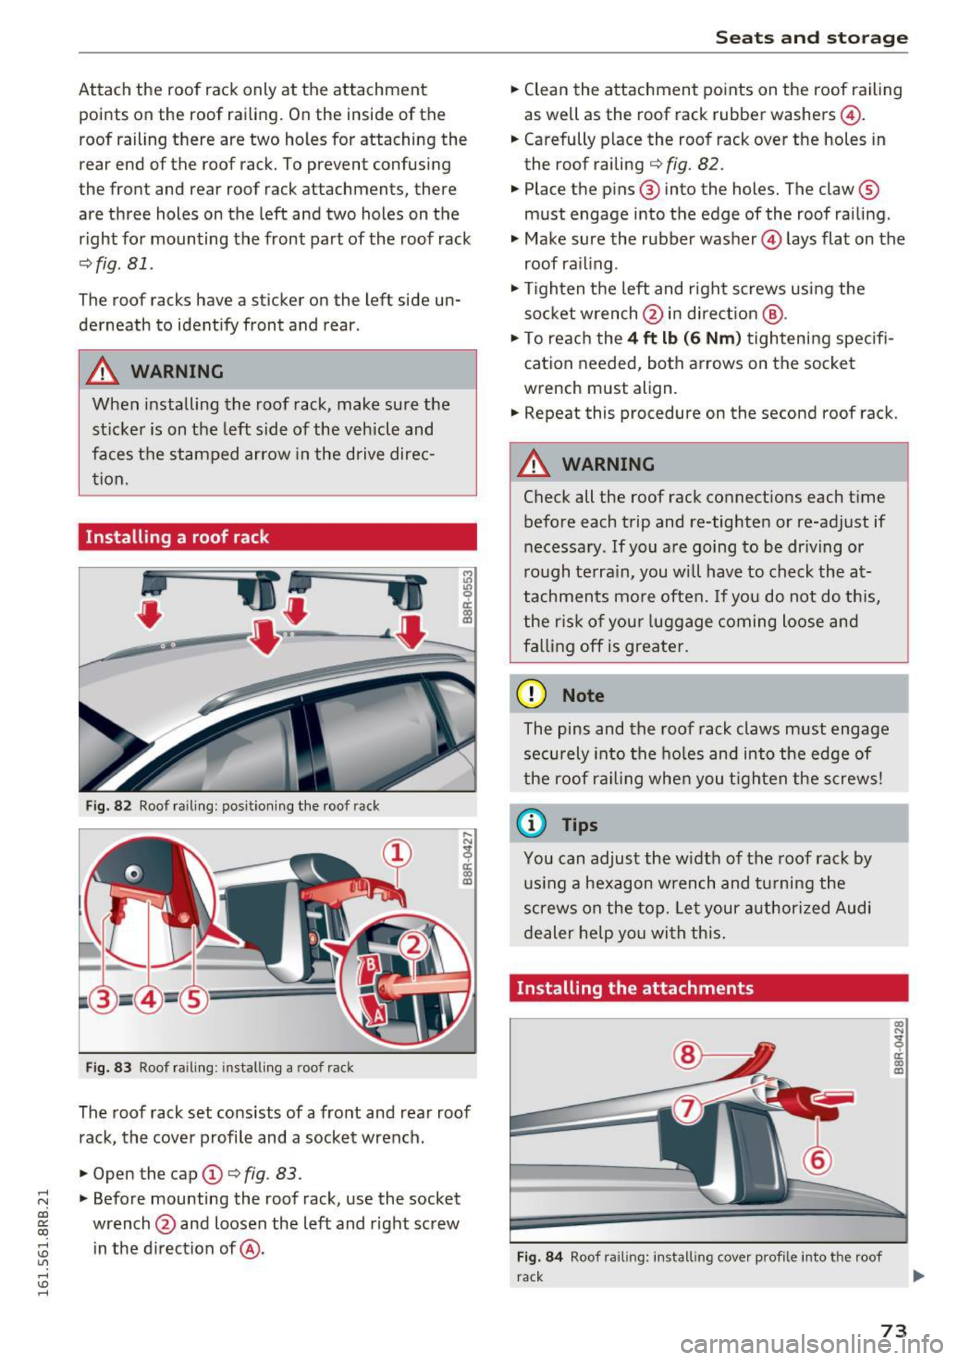
Installing a roof rack
Fig. 82 Roof railing: posi tion ing the roo f rac k
Fig . 83 Roof railing: installing a roo f rack
The roof rack set cons ists of a front and rear roof
rack, the cove r profile and a socket wrench.
• Open the cap
(D q fig . 83 .
• Before mounting the roof rack, use the socket
wrench @and loosen the left and right screw
in the d irect ion of@ .
Seats and storag e
• Clean the attachment po ints on the roof railing
as well as the roof rack rubber washers@.
• Carefully place the roof rack over the holes in
the roof railing
q fig. 82.
• Place the p ins @ into the holes. The claw ®
must engage into the edge of the roof rai ling .
"' Make sure the rubber washer © lays flat on the
roof railing .
"' Tighten the left and r ight screws using the
soc ket wrench @ in d irect ion @.
"' To reac h the
4 ft lb (6 Nm ) tightening specif i
cation needed, both arrows on the socket
wrench must align .
"' Repeat this procedure on the second roof rack.
A WARNING
Check all the roof rack connect ions each t ime
before each trip and re-tighten or re-adjust if
necessa ry . If you a re going to be dr iving or
r ough te rra in, you w ill have to check the at
tachments mo re often. If yo u do not do th is,
the r isk of you r luggage coming loose and
fa lling off is greate r.
(D Note
The pins and the roof rack claws must engage
securely into the holes and into the edge of
the roof railing whe n you t ighten the screws!
(0 Tips
You can adjust the w idt h of the roof rack by
u sing a hexagon wrench and t urning the
screws on the top. Let your authori zed Audi
dealer help you wi th this.
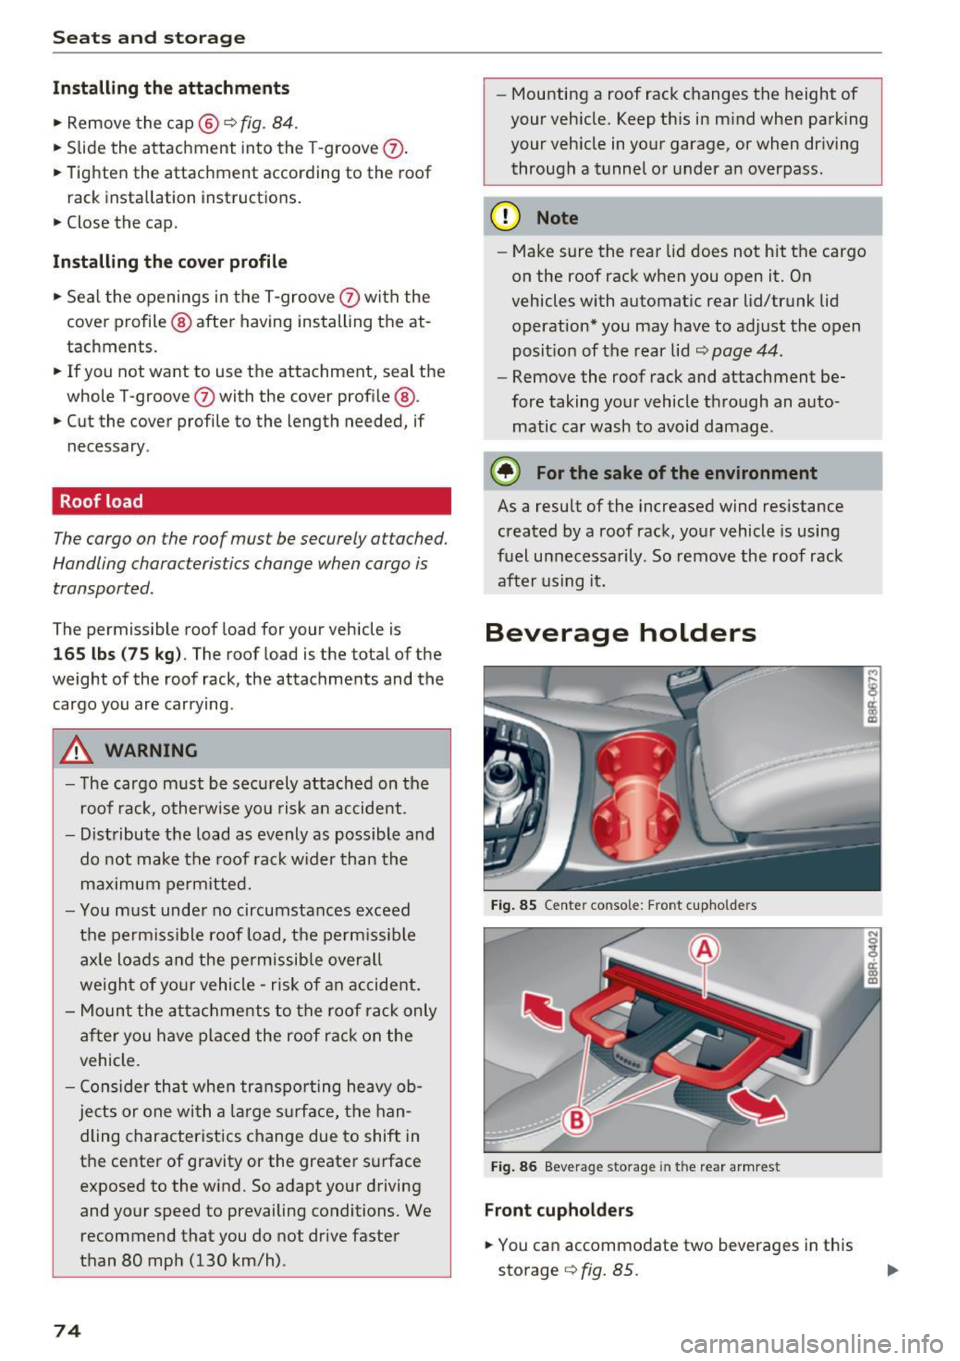
Installing the attachments
Fi g. 8 4 Roof ra ilin g: i nstall ing cov er pro file into the roo f
rack
a)
"' 9 a: a) m
73
Page 76 of 300
Sea ts and stor age
Install ing the attachments
.. Remove the cap @~ fig. 84 .
.. Slide the attachment into the T-groove (2) .
.. Tighten the attachment according to the roof
rack installation instruct ions .
.. Close the cap.
Installing th e cover p rofile
.. Seal the openings in the T-groove (2) wi th the
cover profile @ after having installing the at
tachments.
.. If you not want to use the attachment, seal the
whole T-groove
0 with the cover profile @.
.. Cut the cover profile to the length needed, if
necessary.
Roof load
The cargo on the roof must be securely attached.
Handling characteristics change when cargo is
transported .
The permissible roof load for your vehicle is
1 65 lbs (75 kg ). The roof load is the total of the
weight of the roof rack, the attachments and the
cargo you are carrying .
_&. WARNING
-The cargo must be secu rely attached on the
roof rack, otherwise you risk an accide nt.
- Distribute the load as evenly as possible and
do not make the roof rack wider than the
maximum pe rmitted.
- You m ust under no circumstances exceed
the permiss ible roof load, the perm iss ible
axle loads a nd the permissib le overa ll
weight of your vehicle -risk of an accident.
- Mount the attachments to the roof rack only
after you have placed the roof rack on the
vehicle.
- Consider that when transpo rting heavy ob
jects or one wi th a large surface, the han
dling characteristics change due to shift in
the center of gravity or the greater surface
exposed to the wind. So adapt your driving
and your speed to prevailing conditions. We recommend that you do not dr ive faster
than 80 mph (130 km/h) .
74
-Mounting a roof rack changes the height of
your veh icle. Keep th is in m ind when parking
your veh icle in your garage, or when dr iving
through a tunnel or under an overpass .
(D Note
- Make sure the rear lid does not hit the cargo
on the roof rack when you open it. On
vehicles with automat ic rear lid/trunk lid
operation* you may have to adjust the open
posit ion of the rear lid
~ page 44 .
-Remove the roof rack and attachment be
fore taking your vehicle through an auto matic ca r wash to avoid damage .
@ For the sake of the environment
As a result of the increased wind resistance
created by a roof rack, your vehicle is using
fuel unnecessarily . So remove the roof rack
after using it.
Beverage holders
Fig . 85 Cente r co nso le : F ro nt cupho lders
Fig . 86 Beverage storage in th e rea r armrest
Fr ont cuphold ers
.. You can accommodate two beverages in this
storage
q fig. 85.