AUDI Q5 2018 Owners Manual
Manufacturer: AUDI, Model Year: 2018, Model line: Q5, Model: AUDI Q5 2018Pages: 392, PDF Size: 60.56 MB
Page 91 of 392
u co ..... N ,..._
N ..... 0 <( 0 00
Launch control program
App lies to: ve hicles with S tro nic tra nsm issio n
The launch control program provides the best
possible acceleration when starting from a stop.
Requirement: the eng ine must be at operating
temperature and the steer ing whee l must not be
turned .
~ Deactivate the Start/Stop system* c:> page 80.
The LED in the 10~ ·1 button turns on.
~ With the engine runn ing, press the ~
l fl - O~FF =I but
ton briefly
c> page 141 . The Ill indicator light
tu rns o n and the message
Stabil ization control
( ESC ): offroad . Warning! Reduc ed stabilit y
ap
pears in the inst rumen t cluste r display.
~ Pull the selector lever back o ut of t he "D/S" po
s it ion briefly to select the "S " position or se lect
the
D ynamic driving mode in drive se -
lect* ¢ page 12 7.
~ Press the brake pedal firmly with your left foot
and hold it all the way down for at least one
second.
~ At the same t ime, press the gas pedal all the
way dow n with your right foot unt il the engi ne
reaches and stays at a h igh RPM level.
~ Remove yo ur foot from t he b rake pedal within
five seconds
c:> ,&. .
A WARNING
-Always adapt yo ur driving to the traffic flow.
- O nly use the La unch contro l prog ram when
road and traffic conditions allow it and ot h
er drivers wi ll not be endangered or both
ered by your driving and the vehicle's accel
eration.
- Please note that the drive whee ls can spin
and the vehicle can break away when off
road mode is switched on, espec ia lly when
the road is slippery.
- Once the vehicle has started moving, press the
I~ OF F! button briefly to turn the offroad
mode off .
(D Tips
-The transmiss ion temperature may increase
s ignificantly after using the launc h control
program. If that happens, the program may
Driving
not be ava ilab le for a few minutes. It will be
avai lab le agai n after a coo l-down period.
- Whe n accelerati ng usi ng the launch cont ro l
program, all vehicle parts are s ubject to
heavy loads. This can lead to increased
wear.
Transmission malfunction
• Tran smiss ion: too hot. Please stop vehicle
Do not continue driving. Se lect the "P" selector
l ever posit ion and contact an authorized A udi
dealer or authorized Audi Service Fac ility for as
s istance.
• Tran smiss ion: malfunction! Plea se stop ve
hicle and shift to P
Do not continue dr iv ing . Se lect t he "P" selec to r
l ever posit ion and contact an authori zed A udi
dealer or authorized Audi Service Facility for as
s istance.
[O] Selector lever : malfunction ! You can con tin
ue d riving. Please contact Se rvice
The re is a system malfu nction in t he transmis
s io n. Dr ive to an a uth orized Aud i de aler o r au
tho rized Aud i Serv ice Facili ty immedia tely to have
the mal function corrected.
[i'J P button : malfun ction! Auto P when engine
off . Pl ea se conta ct Servi ce
T here is a malfunct ion in the "P" button on the
selector lever . The transm ission automatically
engages "P " when you sw itch off t he engine.
D rive to an author ized A udi dealer or autho riz ed
Audi Se rvice Faci lity immed iate ly to have the
malfunction corrected.
[i'J Select or lever : malfun ction! Gear change on
l y pos sibl e using both paddl e le ver s. Plea se con
ta ct Service
T here is a system malfunction in the transmis
s io n. You can con tinue dr iv ing with restr icted
funct ion. The se lector lever is not wo rk ing . Gea rs
can on ly be selected by tapping bo th shift pad
dles at the same time when the vehicle is station
ary
c> page 88 , fig . 92 . Pay attention to these-
l ected transmission position in the instrument
.,.
89
Page 92 of 392
Driving
cluster display. The parking lock engages auto
matica lly when you turn off the engine. Drive to
an author ized Audi dealer or authorized Audi
Serv ice Facility immediately to have the malfunc
tion corrected .
[O] Transmission : Please p ress brake pedal and
select gear ag ain
Press the bra ke pedal and se lect the des ired se
lector lever position again. You can then continue
driving.
[il Tran smi ssion: too h ot. Please adapt driving
s tyle
The transm ission tempe rature has increased s ig
n ificant ly. Dr ive ve ry ca utiously or take a b reak
from dr iv ing unt il the tempera ture returns to the
normal range and the ind icator light turns off .
[O] Transmis sion : malfunction ! You can contin
ue driving . See owner' s manual
There is a system malfunct ion in the transm is
sion . You may continue dr iv ing . Drive to an au
thor ized A udi dealer or authorized Audi Service
F acility soon to have the malfunction co rrected.
[il T ransmission : malfunct ion! You can contin
ue dri ving in D until engine is off
There is a system malfunct ion in the transmis
sion . The transmission is switching to emergency
mode . If you tur n the engine off, you will not be
able to select any other selector lever pos it ions
after start ing the eng ine again . Drive to a n au
thor ized Audi dealer or author ized A udi Service
F a cility immediately to have the malfunc tion cor
rected.
[O] Tran smis sion: malfunction! You can contin
ue driving with limited function . Pl ea se conta ct
Service
There is a system malfunct ion i n the transm is
sion . The transmission is switching to emergency
mode. This mode only shifts into certa in gea rs o r
w ill no longer shift at all. The engine may stall.
Dr ive to an a utho rized Aud i dea ler or a uthorized
Audi Serv ice Facility immediately to have the
malfunction corrected .
90
[il Transmis sion: malfunction! You can contin
ue dri ving with limited fun ction. No reve rse
gear
There is a system malfunction in the tra nsmis
s ion . The transmission is switch ing to emergency
mode. This mode only s hifts into certain gears or
will no longer shift at a ll. The eng ine may sta ll.
You cannot engage the reverse gear. Drive to an
authori zed Audi dealer or authori zed Audi Service
Facility immediately to have the ma lfunction cor
rected .
[il Danger of rolling away! P not poss ible.
Plea se apply park ing bra ke
- The parking lock was re leased using the emer
gency re lease
c::> page 90 . Or
- The parking lock can no longer be engaged .
Dr ive to an authorized Audi dealer or author
ized Aud i Service Facility immed iately to have
the malfunction corrected.
[il Mo ve selector le ver to automatic position
There is a ma lf u nction in the tiptron ic mode. End
tiptroni c mode by pus hing the se lec tor lever to
the left into the "D/S " position .
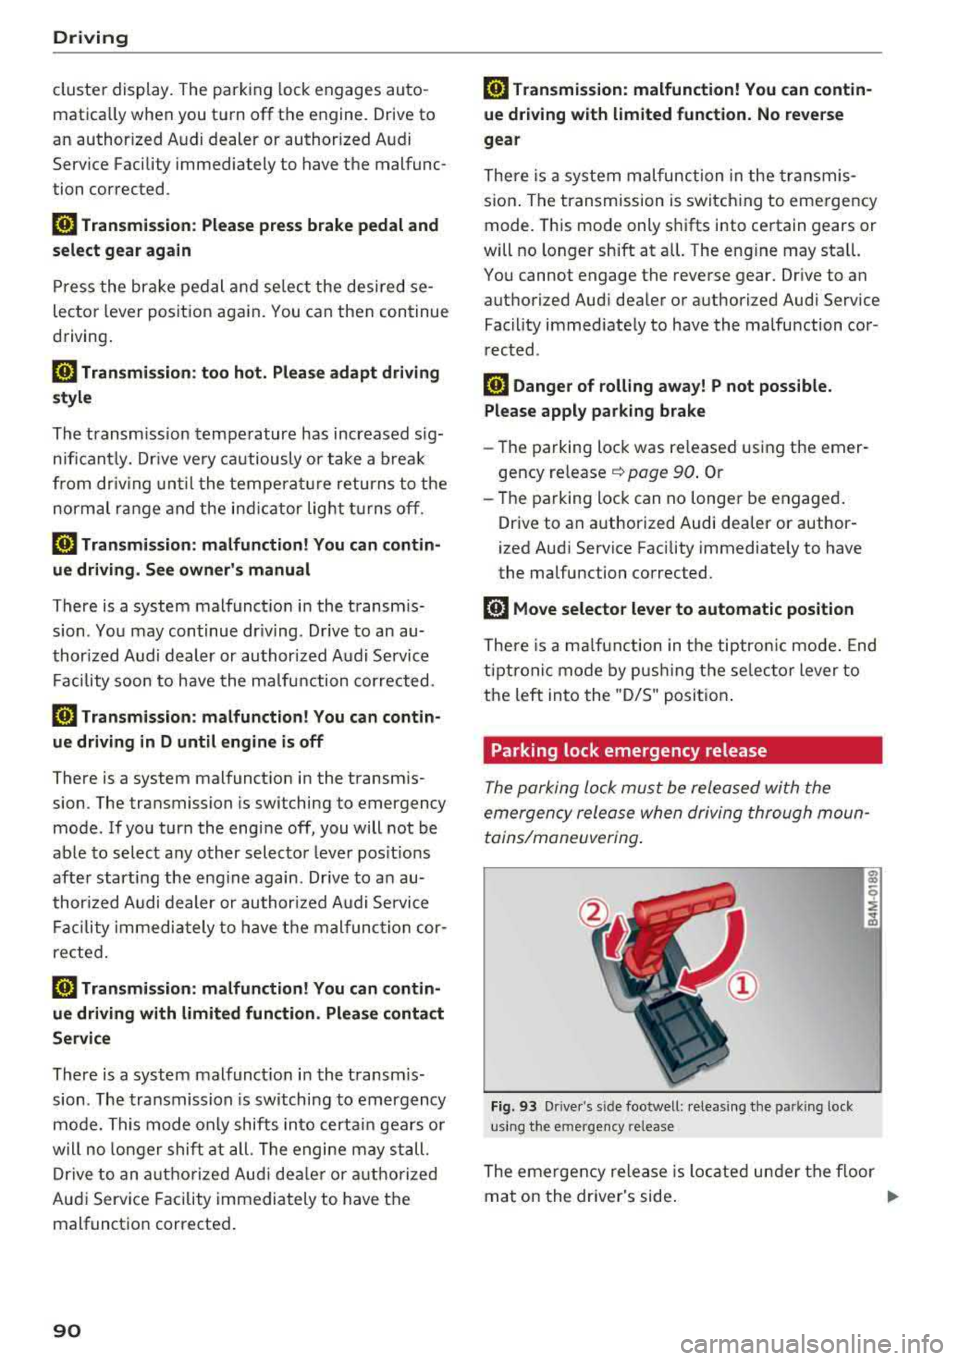
Parking lock emergency release
The parking lock must be released with the
emergency release when driving through moun
tains/maneuvering .
Fig. 93 Drive r's s ide footwell : relea sin g the parkin g lock
us ing the e mergency release
The emergen cy release is located under the f loor
mat on the dr iver's side .
.,.
Page 93 of 392
u co .... N r--N .... 0 <( 0 00
Releasing the parking lock using th e
e m erg enc y re leas e
~ To prevent the vehicle from ro lling unintention
ally, set the parking brake(®}
c> page 80 or
press the brake pedal.
~ There are two slits o n the cover . Position the
screwdriver from the vehicle tool kit in one of
the slits on the cover and pry the cover off .
~ Insert the socket wrench (from the vehicle tool
ki t) into the openi ng
c> fig. 93.
~ T urn the soc ket wrench all the way clockw ise (!)
and press it downward @unti l it locks into
place .
~ Leave the socket wrench inserted i::> .&_.
Re setting the parking lock
~ Press t he b rake peda l and sta rt the eng ine.
~ Keep the brake pedal pressed and engage the
f o llowing se lector lever positions one afte r the
other : "N", "D" and back to "N" .
~ Turn the engine off again .
~ Grasp the socket wrench w ith both hands and
pull it up and out carefully to remove
c> (D .
~ Install the cover .
When the parking lock emergency re lease is
used, the
[O] ind icator light and the "N" selector
lever position turn on in the instrument cluster.
The message
D ang er of rolling a way! P not pos
s ible . Plea se apply parking brake
also appears .
A WARNING
-Only activate the eme rgency re lease while
on a level s urface o r a s light slope.
- T he pa rking lock may only be released us ing
the emergency release if the parking brake
is set.
If i t i s no t fu nct ion ing, secure the ve
hicle from rolling using the brake ped al or
ot her s uitab le means, such as blocking a
front and a rear whee l. An unsec ured vehicle
may roll away, wh ich increases the r isk of an
acc ident.
- To reduce the risk of an accident, you m ust
not drive when the emergency re lease is ac
t ivated.
-
Driving
@ Note
- Read and follow the important instructions
about
tow ing ¢ page 365 .
-The risk of damage increases if yo u do not
remove the socket wrench caref ully w hen
resetting the parking lock.
91
Page 94 of 392
Trail er to wing
Trailer towing
Driving with a trailer
General information
Your veh icle is primari ly intended for transport
ing peop le and luggage. Howeve r, if you dr ive
with a tra iler , follow the techn ica l requirements ,
the operation and driving tips, and the lega l reg
ulations.
Dr iving w ith a trailer affects the vehicle 's fuel
consumpt ion, performance and wear. It a lso re
quires higher concentration from the driver .
A WARNING
Do not transport any people in a trailer due to
the risk of fatal injury .
Technical requirements
Certain requirements must be met when towing
a trailer.
Trailer hitch
Only use a trailer hitch with a removab le ball
h itch mount and ball h itch. The tra ile r hitc h must
be pe rm it t ed for the vehicle, the tra iler and the
permitted tota l weight of the trailer being
pu lled . Above all, it must be secure ly and safe ly
attached to the vehicle trailer.
Never mo unt a t rai ler hitch on the bumper. The
trai ler hitc h must be mounted in a way that does
not impair the function of the bumper. Do not
make any changes to the exhaust system and the
brake system.
Check regu larly if the trai ler hitc h is securely
mounted . A lways follow the instructions given by
the trai ler hitch manufacturer .
Trailer brakes
If t he tra ile r has its own bra ke system, then fol
low the manufacturer specifica tions. Howeve r,
the brake system on the trai ler must never be
connected to the vehicle brake system.
92
Engine cooling system
D riving w ith a tra ile r means a higher load on t he
engine and the cooling sys tem. The coo ling sys
tem must be designed for additiona l load and
contain enoug h
coolant ~@ .
A WARNING -
- Never mount a "weight -distributing" or
"load-balancing" trailer coupler as the trail
er hitch. The ve hicle was not des igned for
these types of tra iler h itches. The tra iler
h itch can malfunction and t he tra ile r can
b reak off from the vehicle.
- If t he tra ile r i s equ ipped w ith elect ronic
brakes, these brakes can not be activated by
a facto ry-installed control system, whi ch in
creases the r isk of an accide nt.
- To red uce the r is k of injury, always remove
the ball hitch mount if no tra ile r is mo unt
ed.
@ Note
L onge r incl ines cannot be dr iven without a
su itab le cooli ng system, especially if the out
s ide temperatu res a re high. ot herwise, this
i nc reases the risk of eng ine da mage.
Operating instructions
Several things must be noted when towing a
trailer.
Towing capacity
The permitted towing capacity must not be ex
ceeded under any
circumstances ~ page 370.
You can dr ive up larger inclines if you are not us
i ng the maximum towing capacity.
The towing capacities given only apply to e leva
tions up to 3,200 ft (1,000 m) above sea level. As
the e levation increases, the engine power de
creases due to the decreasing air pressures. T his
reduces the hill climb ing ability and towing ca
pac ity . For every additional 3,200
ft (1,000 m),
t h e maximum permitted tow ing weight must be
r educed by app roximately 10% . T he pe rm itted
tow ing weight is t he comb ined we igh t of the
( loaded) vehicle and the (loaded) trailer .
Page 95 of 392
u co ..... N r--N ..... 0 <( 0 00
Tongue weight
The maximum permitt ed tongue weight of the
trailer drawbar on the trailer hitch ball head may
not be exceeded .
I f the tongue we ight is too low, th is affects t he
trailer's handling. For driv ing safety, we recom
mend to always utilize the maximum permitted
tongue weight, but not exceed it. You can reach
it, for example, by distributing the cargo in the
trailer correctly.
You can determine the tongue weight, for exam
p le, with a bathroom scale or a public weigh sta
tion .
The permitted tongue we ight of your veh icle can
be found in the vehicle documentation or in
¢page 370.
Load distribution
Poor cargo load and distribution can negatively
i mpact ve hicle handl ing .
-Store objects preferably in the vehicle luggage
compartment. The vehicle shou ld always carry
the heaviest possible load and the trailer
shou ld have the lightest possible load.
-Distribute the load in the tra iler so that the
heavy objects are as close to the axle as possi
ble.
-Secure objects from slid ing out of p lace.
-Utilize the maximum permitted tongue weight
if possible .
Tires
Set the tire pressure on your vehicle for a "full
load"; see the t ire pressure
sticker¢ page 335 .
If necessary, also adjust the tire pressure on the
trailer according to the manufacturer's recom
mendation .
W inter tires should be mounted on the vehicle
and on the trailer during winter temperatures .
Outside mirrors
If you cannot see the traffic behind the trailer
with the standard exterior mirrors, then you must attach addit ional exterior m irrors. Adjust
them so you have a sufficient visibility behind
you .
Trailer towing
Exterior lighting
Follow the legal regu lations rega rding the light
ing equipment on your trailer. Contact an author
ized Audi dea ler or authorized Audi Service Facili
ty for more information.
Before starting to drive , check all lighting eq uip
ment on the hitched trailer.
T he headlight range cont rol adjusts automat ica l
ly to the light range of the headlights .
Safety chains
Make sure the safety chains are correctly applied
when pulling a trailer . The cha ins should hang
enough so that the trailer can drive around
curves . Howeve r, th ey must not touch the
ground.
Air suspension
Applies to: vehicles with air suspension
The air suspens ion must be at the standard vehi
cle height before you set the tongue weight on
the tra iler and hitch the
trailer ¢@ , ¢page 128,
Raising/lowering the vehicle.
For vehicles with a factory-installed trailer hitch,
the a ir suspension trailer mode w ill automatically
switch on if you connect the trailer cable to the
socket.
For vehicles with a retrofitted trailer hitch, you
must sw itch on the a ir suspension trailer mode
manua lly . Select in the Infotainment system:
IMENU I button> Vehicle> left cont rol button>
Vehicle settings > Air suspension: trailer. Switch
i t off again after towing a tra iler .
You can also sw itch off trailer mode manually
wh ile dr iving, for example, whe n using a bicycle
rack system.
If you have to dr ive through d ifficult road cond i
tions, you can ra ise the vehicle again after hitch
i ng the tra iler o r after adjusting the tongue
we ight.
(UJ} Note
Applies to: vehicles with air suspension
-Changes in temperature or load can affect
the height of the vehicle .
93
Page 96 of 392
Trail er to wing
- Set the a ir suspension to the standard vehi
cle height, otherwise the applicab le tongue
weight no longer applies to your vehicle.
(D Tips
- Use chocks when parking on incl ines if the
trailer is loaded .
- We recommend also having the vehicle in
spected between the inspection intervals if
you are towing a trai ler frequent ly .
- Avo id driving with a trailer d uring the vehi
cle break-in period .
Driving with a trailer
Driving with a trailer requires extra caution .
Speed
Adhere to the legal speed limits. Follow the legal
regulat ions spec ific to the country.
As the speed increases, the driving stability of
the trailer decreases . Therefore you should not
exceed the maximum legal speed l imit whe n
there a re unfavorabl e road, weathe r and/or wind
conditions. This especially appl ies when dr iv ing
downhill.
You must always reduce you r speed as soon as
you not ice even the s lightest sw inging motion of
the t railer. Neve r try to "straighte n ou t" the t rail
e r by accelera ting.
The weight distribution is very poor if t he veh icle
is empty and the t railer is loaded . H oweve r if you
m ust dr ive under these c ircumstances, t hen d rive
espec ially slowly.
Brakes
Brake in a t imely manner . Downshift before driv
i n g downhill so that the engine can assist w ith
b raking
¢ ,&. .
When us ing a tra iler with overrun brakes, first
brake gently then qu ickly . This reduces the risk of
je rk ing w hile brak ing if the tra ile r w heels lock up .
Engine coolant temperature
Pay attention specif ica lly to the coolant tempera
ture display when there are h igh outside tempe r
atures, and when dr iv ing o n long inclines
94
¢ page 11. Shift to a higher gear in a timely man
ner .
A WARNING
Constant braking causes the brakes to over
heat and substantially reduces braking per
formance, increases braking distance or caus
es complete failure of the brake system.
-
Page 97 of 392
u co ..... N r-N .....
~ 0 co
Assistance systems Speed warning system
Description
App lies to: vehicles with speed warning system
The speed warning system helps you to stay be
low a specified maximum speed that can be set,
changed or deleted in the Infotainment system .
The speed warning system warns you if you are
exceeding the maximum speed that you have set .
A warning tone will sound as soon as your speed
exceeds the stored value slightly. The
(Ol (USA
models)/
(01 (Canada models) indicato r light
and a message appear i n the ins trumen t cluster
d isplay at the same time. The
(Sl / (Ol indicator
light and the message turn
off if the speed falls
back below the stored maximum speed .
Sett ing a threshold is recommended if you would
like to be reminded when yo u reach a certa in
maximum speed . Situations where you may want
to do so include driving in a country with a gener
al speed limit or if there is a specified maximum
speed for winter tires.
Setting the warning threshold
Select in the I nfotai nment system: IMENU I but
ton
> Ve hicle > le ft control button > Dri ver a ssis
tan ce
> Speed warning > Manual.
@ Tips
Regard less of the speed warning system, you
should always monitor your speed using the
speedometer and make sure you are following
the legal speed limit.
A ssi st a nce systems
Cruise control system
Switching on
Applies to: vehicles with cruise control system
The cruise control system makes it possible to
drive at a constant speed starting at 15 mph
(20 km/h).
0
f
~
0
Fig . 94 Operat ing leve r: cru ise control system
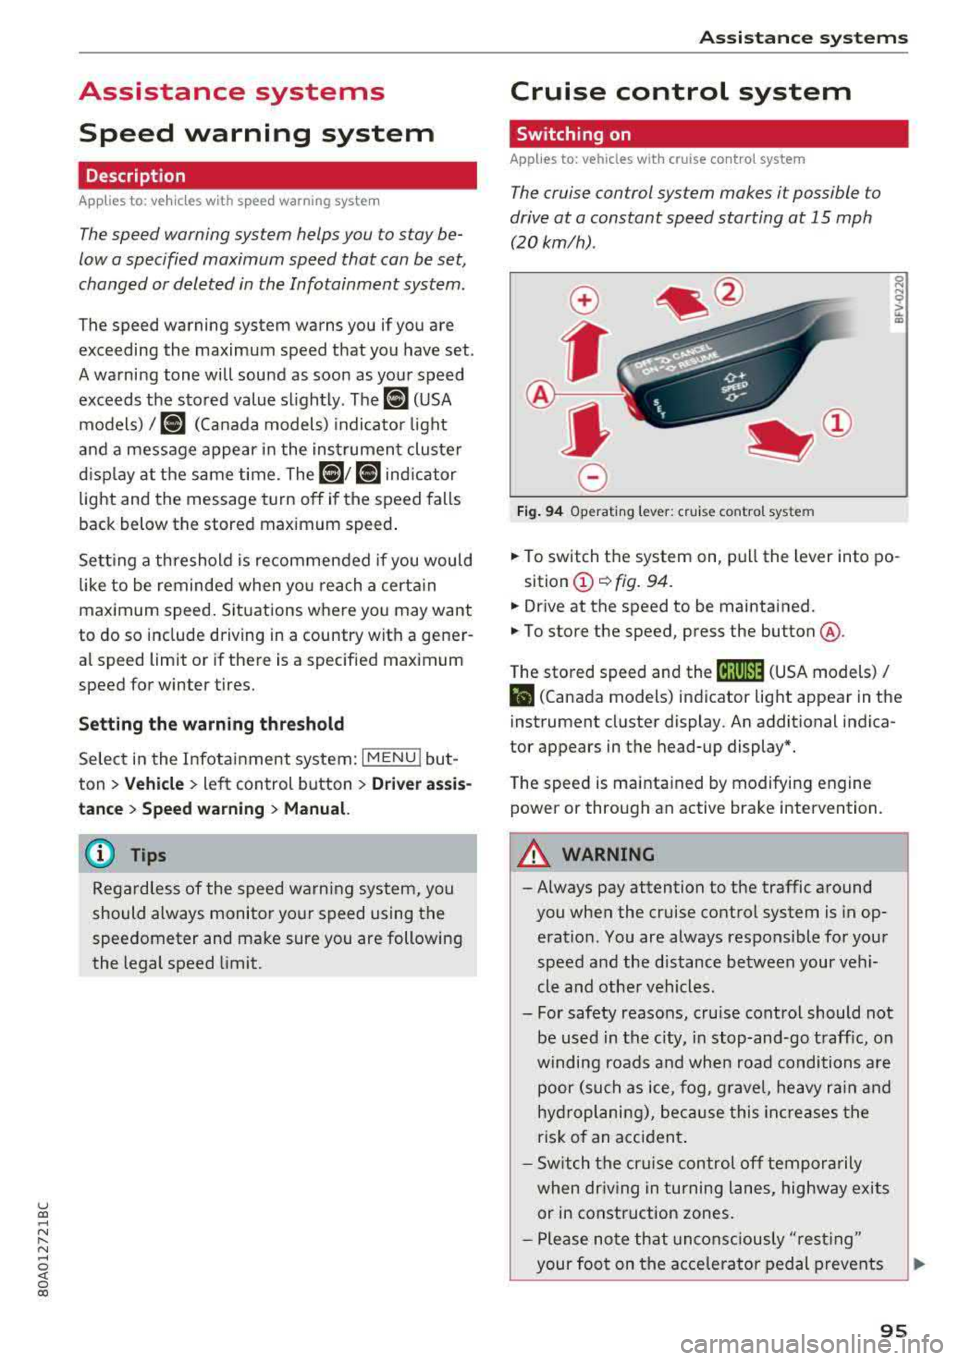
.,. To switch t he system on, pull the lever into po-
sition
(D ¢ fig. 94.
.,. Drive at the speed to be maintained.
.,. To store the speed, press the button @.
T he stored speed and the
@jltJ~i, (USA models) /
l'I (Canada models) ind icator lig ht appear in the
instrument cluster display. An additional indica
tor appears in the head-up display*.
T he speed is mainta ined by modifyi ng engine
power or through an active brake intervention.
A WARNING
-Always pay attention to the traffic around
you when the cruise control system is in op
eration. You are always responsible for you r
speed and the distance between your vehi
cle and othe r vehicles .
- For safety reasons, cru ise control should not
be used in the city, in stop -and-go t raff ic, on
winding roads a nd when road conditions a re
poor (such as ice, fog, g rave l, heavy ra in and
hy droplani ng), bec ause this in cr eases the
risk of an acciden t.
- S witch the cr uise con trol
off tempor arily
when dr iv ing in turning lanes, highway exits
or in construction zones.
- P lease no te th at unconsc iously
"rest ing"
your foot on the accelerator ped al prevents
95
Page 98 of 392
Ass is tanc e system s
the cruise control from braking. This is be
cause pressing the accelerator pedal over
rides the cruise contro l system .
- If a brake system ma lfunction such as over
heating occurs when the cruise control sys
tem is sw itched on, the braking function in
the system may be switched off . The rest of
the cruise control system functions remain act ive as long as
the @;\l)~ij (USA models) /
Bl (Canada models) indicato r light is on.
@ Note
Before driving downhill a long distance on a
steep hill, decrease you r speed and select a
lower gear. This makes use of the eng ine
brak ing effect and re lieves the bra kes.
(D Tips
The b rake l ights turn on w hen the brakes a re
app lied automat ically .
Changing the speed
Applies to: vehicles with cruise control system
.,. T o inc rease/decrease the speed in 1 mph (1
k m/h) increments, br ie fly
tap the leve r toward
0 10 ¢ page 95, fig. 94 to the f irst leve l.
.,. To increase/decrease the speed in S mph (10
km/ h) increments, br iefly
tap the leve r toward
0 10 to the second level.
.,. To increase or decre ase the speed quickly, hold
the lever toward
0 10 to the first or second
level until the des ired speed is reached .
Overriding the speed
Applies to: vehicles with cruise control system
You can p ress t he accelerator pedal to inc rease
your speed, for examp le if you want to pass
someo ne. The speed yo u se t earlier w ill res ume
as soon as yo u release the accelerator peda l.
H oweve r, if you are exceeding the stored speed
by a cons ider able amo unt for a long time , the
cr uise con trol sys tem w ill tempo rar ily switch off.
The
[ij;\l)~ij (USA models) tBI (Canada models) in
dicator light in the instrument cluster turns off
and the stored speed is maintained .
96
Preselecting a speed
Applies to: vehicles with cruise control system
You can pre-select your desired speed when the
vehicle is stationary .
.,. Switch the ignition on.
.,. Pull the lever into pos ition (D ¢ page 95,
fig . 94 .
.,. To increase or decrease the speed, tap the leve r
toward
0 10 .
This function makes it possible , for example , to
save the speed you want before driving on the highway . Once you are on the expressway, acti
vate the c ruise control system by pull ing t he lev
e r in to position
(D .
Switching off
Applies to: vehicles with cruise control system
Deactivating temporarily
.,. Press the br ake pedal, or
.,. Press the lever towar d@ (not loc ke d in to
place)
¢ page 95, fig. 94.
Switching off completely
.,. Press the lever into position @(clicked into
place), or
.,. Switch the ignit io n off.
The speed you stored will be ma intained if the
c ruise contro l has been switched off tempora rily .
To resume the stored speed, re lease the bra ke
pedal and pull the lever to posi tion
(D .
Switc hing the ignit ion off w ill erase the stored
speed .
.&_ WARNING
You sho uld only resume the s to red speed if i t
i s no t too h igh fo r exis ting traff ic condi tions .
Ot herwise you can increase the risk of an acci
dent .
Page 99 of 392
Camera-based traffic
sign recognition
Description
Applies to: vehicles with camera-based traffic sign recogni
tion
~ 180 m 1 & I f1' I! ' I Pl I
! IJ' mm .. I~ / .-.
I 1:9:11 " '
) ' a!i ,,' i '
F ig. 95 Instrument cluste r: tr aff ic sign reco gnit ion
F ig. 96 W indsh ie ld: ca mera w indow for t raffic s ig n recog
n ition
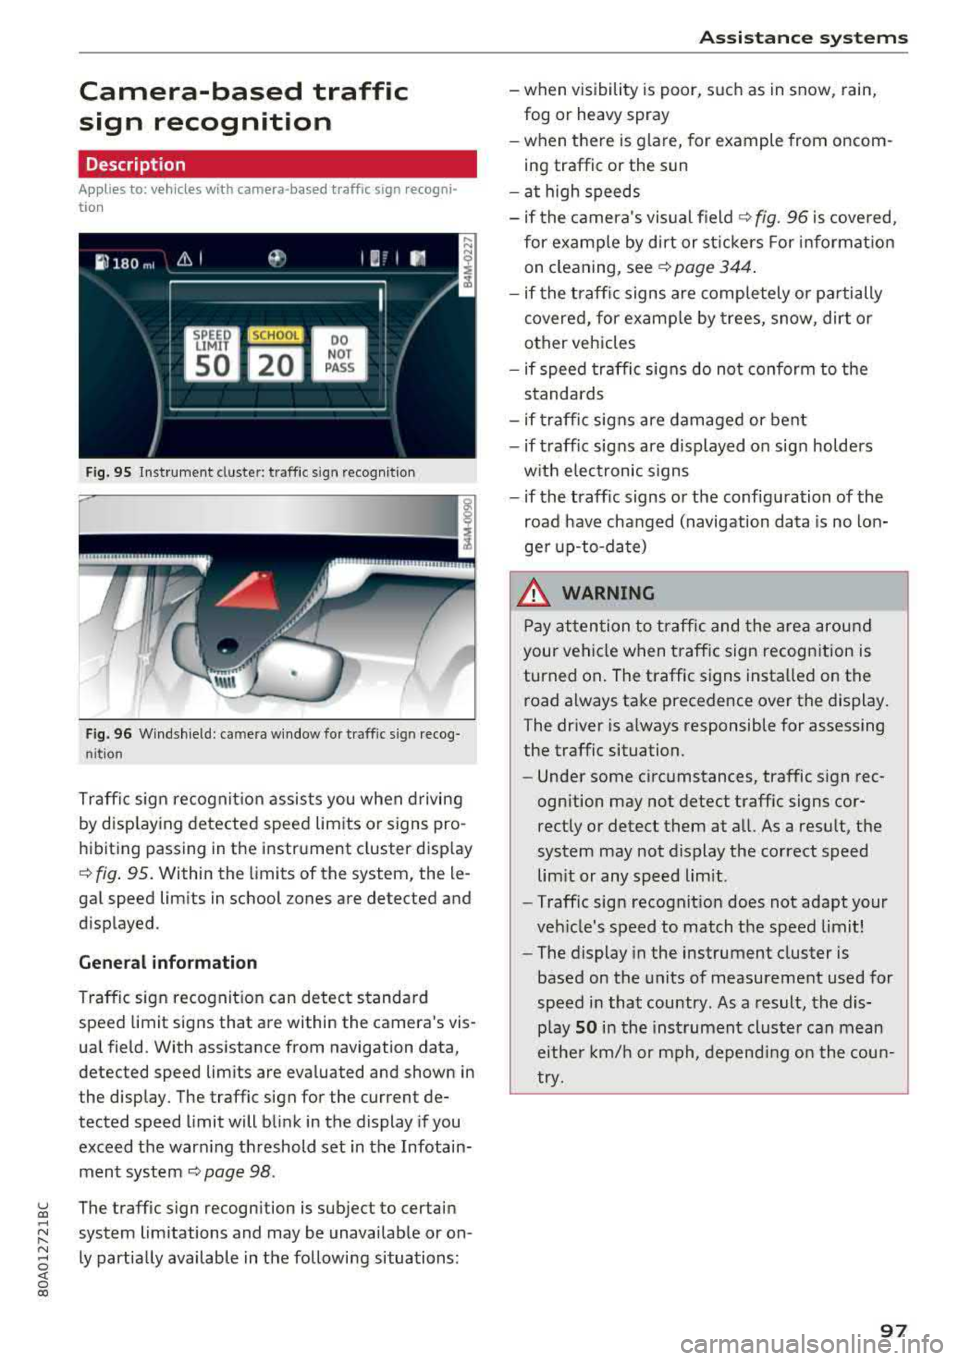
Traffic sign recognit io n assis ts you when driving
by d isp lay ing detected speed limits or signs pro
h ibit ing passing in the instrument cluster d isp lay
c::> fig . 95. Within the limits of the system, the le
gal speed lim its in school zones are detected and
d isp layed.
General info rmation
Traffic sign recognit ion can detect standa rd
speed limit sig ns that are within the camera's vis
ua l field. With assistance from navigation data,
detected speed lim its are evaluated and shown in
the disp lay . The traffic sign for the current de
tected speed l imit will bli nk in the display if you
exceed the war ning th reshold set in the Infotain
ment system
c::> page 98 .
~ The traffic sign recogn ition is subject to certain .....
~ system limitations and may be unavailab le or on -
~ Ly partia lly available in the followi ng situations:
~ 0 co
A ssi st a nce systems
- when visibility is poor, s uch as in snow, rain,
fog or heavy spray
- when there is glare, for example from oncom
ing traffic or the sun
- at high speeds
- if the camera 's visual field
c::> fig. 96 is cove red,
for examp le by dirt or st icke rs For informat ion
on cleaning, see
c::> page 344 .
- if the traff ic signs are comp letely or partially
covere d, for examp le by trees, snow, dirt or
other vehicles
- if speed traffic signs do not conform to the
stand ards
- if traffic signs are damage d or ben t
- if traff ic sig ns are d isplayed o n sig n holders
w ith elec tronic s igns
- if the traffic signs o r the configu ration of the
road have changed (navigation data is no lon
ge r up-to-da te)
_&. WARNING
P ay atten tion to traffic and the area around
your vehicle when traffic sign recogn ition is
turned on . The traffic signs insta lled on the
road a lways ta ke precedence over the display.
The dr iver is a lways responsible for assessing
the traffic situation.
- Under some circ umstances, traffic s ign rec
ognition may not detect traff ic signs cor
rectly or detect them at a ll. As a resu lt, the
system may not dis play the correct speed lim it or any speed limit .
- Traffic sign recognit ion does not adapt your
veh icle's speed to match the speed limit!
- The display in the instrument cluster is
based on the units of measurement used for
speed in that country . As a result, the dis
p lay
50 i n t he inst rument cl uste r can mean
eithe r km/h or mph, depend ing o n the cou n
try.
-
97
Page 100 of 392
Ass is tance sy stem s
Operating
Applies to: vehicles with camera -based traffic sign recogni
tion
F ig . 97 Instrument clus te r: addi tiona l d isplay
Ac ces sing traffic sign recogn iti on
... Se lect: the first tab> T ra ffic si gns.
Setting a speed warning
You can set a warn ing th reshold down to 10 mph
(15 km/h). The traffic sign for the current detect
ed speed limit w ill blink in the disp lay if you ex
ceed the set thresho ld.
... Select in the Infotainment system: IM ENU I but
ton >
V ehi cle> left contro l button > Driver a s·
s is tan ce
> S pe ed war ning > Tr affic sign ba sed
w arning .
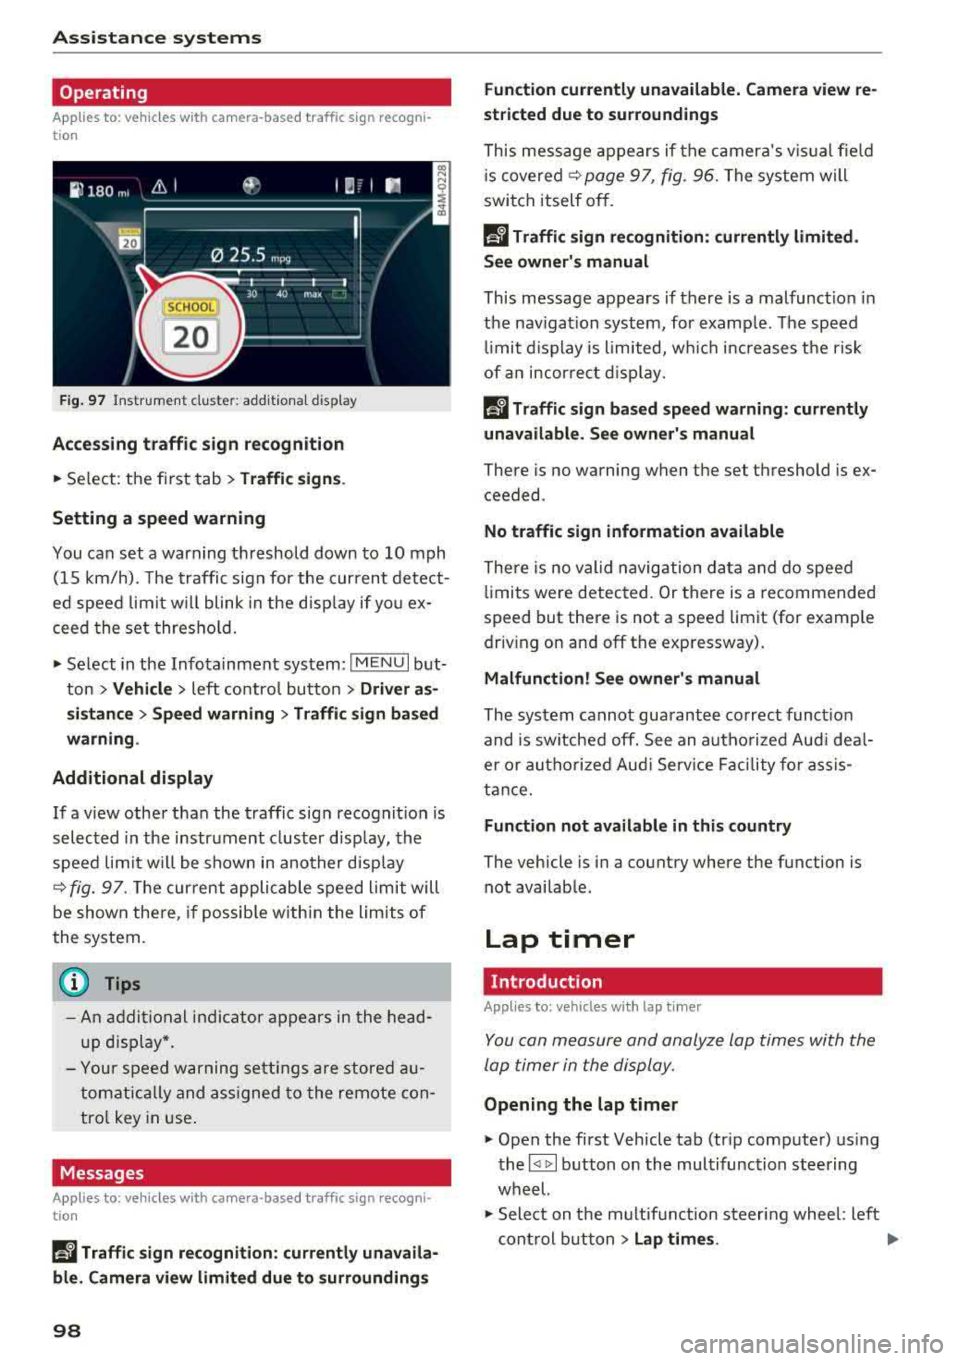
Add itional display
If a view other than the traffic sign recognit ion is
selected in the instrument cluster disp lay, the
speed limit w ill be shown in another disp lay
~ fig. 97 . The cur rent applicable speed limit will
be shown there , if possib le with in the limits of
the system.
(D Tips
- An additional indicator appears in the head
up d isplay*.
- Your speed warning settings a re stored au
tomatically and ass igned to the remote con
tro l key in use .
Messages
Applies to: vehicles with camera-based traffic sign recogn i
tion
P!\i Traffi c sign recognition : curren tly unavaila
ble _ Camera view limit ed du e to su rrounding s
98
Function currentl y una va ilable. Camera view re
stricted due to surroun ding s
This message appears if the camera's v is ual fie ld
i s
covered ~ page 97, fig. 96. The system will
switch itself o ff.
la Tr affic sign r ecog nition : currentl y limit ed .
Se e owner' s manua l
This message appears if there is a malfunct ion in
the nav igation system, for example . The speed
li mit d isplay is limited, wh ich inc reases the risk
of an incorrect d isp lay.
P!\i Traffic sign based speed warnin g: current ly
una vail able . Se e own er' s manual
There is no warning when the set threshold is ex
ceeded .
No traffic sign inf ormation available
There is no valid navigation data and do speed
li mits were detected. Or there is a recommended
speed but there is not a speed lim it (for examp le
driv ing on and off the expr essway) .
Malfun ction! S ee owner's manu al
The system cannot guarantee correct funct ion
and is switched off. See an autho rized Aud i dea l
er or autho rized Aud i Serv ice Faci lity for assis
tance.
Functi on not av ailable in this country
The vehicle is in a country where the function is
not availab le .
Lap timer
Introduction
Applies to: vehicles with lap t imer
You can measure and analyze lap times with the
lap timer in the display.
Opening the lap timer
... Open the first Vehicle tab (trip computer) using
the
l <1 1>I button on the multifunction steering
wheel.
... Sele ct on the m ultifunction steering wheel : lef t
cont rol b utton
> Lap time s. Ill-