stop start AUDI Q7 2010 Owner´s Manual
[x] Cancel search | Manufacturer: AUDI, Model Year: 2010, Model line: Q7, Model: AUDI Q7 2010Pages: 390, PDF Size: 93.04 MB
Page 129 of 390
_________________________________________________ O_ n_ t_ h_ e_ r _o_ a_d _ __.fflll
0 Note
Do not stop the engine immediately after hard or extended driving .
Keep the engine running for approximately two minutes to prevent
excessive heat build-up.•
Starting and stopping the engine
with Convenience key
Applies to veh icle s: with Con venie nce ke y
Starting the engine with the {START) button
This button switches on the ignition and starts the
engine.
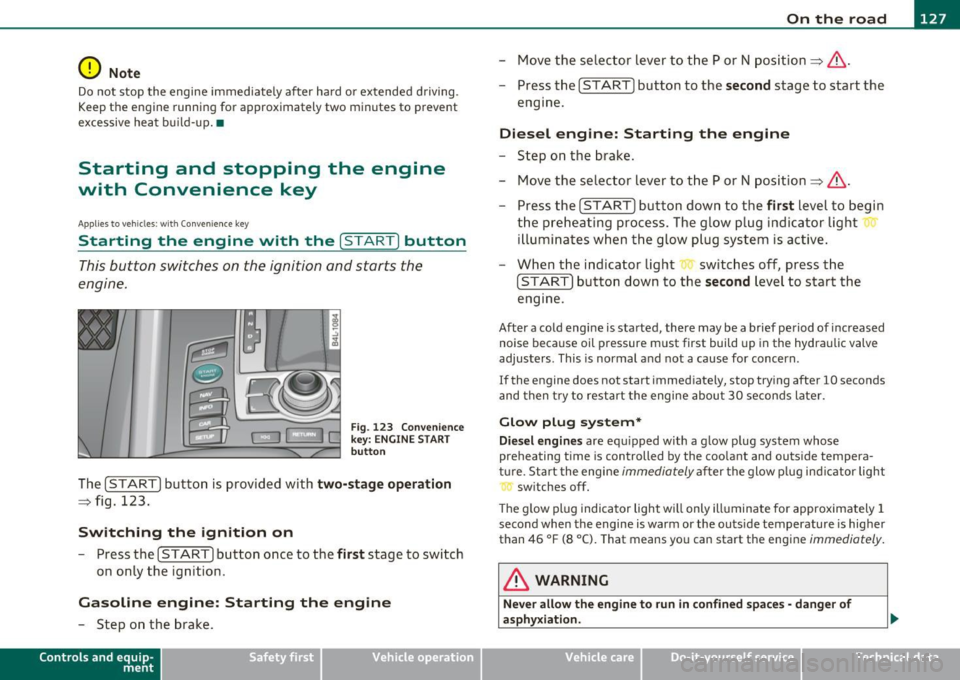
Fig . 123 Convenience
key: ENGINE START
button
The [START] button is provided with two-stage operation
=:> fig. 123.
Switching the ignition on
- Press the [ START] button once to the first stage to switch
on only the ignition .
Gasoline engine: Starting the engine
-Step on the brake.
Contro ls a nd e quip
m en t Vehicle
OP-eration
-Move the selector lever to the P or N position =:>& .
- Press the
[START] button to the second stage to start the
engine.
Diesel engine: Starting the engine
- Step on the brake.
- Move the selector lever to the P or N position =:>& .
- Press the
[START] button down to the first level to begin
the preheating process. The glow plug indicator light
illuminates when the glow plug system is active.
- When the indicator light switches off, press the
[START] button down to the second level to start the
engine.
After a cold engine is started, there may be a brief period of increased
noise because oil pressure must first build up in the hydraulic valve
adjusters . This is normal and not a cause for concern .
If the engine does not start immediately, stop trying after 10 seconds
and then try to restart the engine about 30 seconds later.
Glow plug system*
Diesel engines are equipped with a glow plug system whose
preheating time is controlled by the coolant and outside tempera
ture . Start the engine
immediately after the glow plug indicator light
switches off.
Th e glow plug indicator light will only illuminate for approximately 1
second when the engine is warm or the outs ide temperature is higher
than 46 °F (8 °C). That means you can start the engine
immediately.
& WARNING
Never allow the engine to run in confined spaces· danger of
asphyxiation.
Vehicle care Do-it-yourselt service iTechnical data
Page 130 of 390

1111..__0_ n_ t_h _e_ r_o _ a_ d _________________________________________________ _
0 Note
• Avoid high eng ine rpm, full thrott le and heavy engine loads unt il
the eng ine has reached operating tempe ratur e -othe rwise you risk
eng ine damage.
• T he engine cannot be started by p ushing or tow ing the vehicle.
dr iving right away. In this way yo u avoid unnecessary emiss io ns.
(I] Tips
If you open the drive r's door when the ignition is switched on, a
bu zzer sounds and the message
Ignit ion is on appears in the instru
me nt cl uste r display. Please swi tch t he ig nition off. •
Applies to ve hicle s: with Co nve nie n ce ke y
Switching engine off with the !STOP] button
-Bring your vehicle to a comp lete stop .
Fig. 124 C onv enience
k ey:
ENGINE STO P
bu tt on
- Move the se lector lever to the P or N position.
- P ress the [S T OP] button ~ fig . 12 4.
Pressing the (S T OP] button once switches off the engine and the igni
t ion .
If you press the I ST OP I bu tto n ag ain for more tha n 1 second,
the steering is loc ked, provided that the selector lever is in the P posi
tion =>& .
Emergency OFF function
If necessary, the en gine can be sw itched off w ith the se lec tor lever in
the
R, Dor S positions . To do so, step on the brake pedal and press
and hold t he [STOP) but ton (veh icle speed mus t be less than
6 mph
/ 10 km/h .
& WARNING
• Never turn off the engine until the vehicle has come to a
c omplete stop.
• The brake booster and servotronic only work when the engine
i s running. With the ignition turned off , you have to apply more
force when steering or b raking. Since you cannot steer and stop
normally, this can lead to accident s and seriou s injuries.
• For safety rea sons , you should always park your vehicle with
the selector lever in P. Otherwi se, the vehicle could inadvertently
roll away.
• After the engine has been switched off, the radiator fan can
continue to
run for up to 10 minutes -even with the ignition
switched off . It can al so swit ch on again after some time if the
coolant temperature r ises as the result of a heat buildup or if the
engine i s hot and the engine compartment is additionally he ated
by the sun's rays.
0 Note
If the eng ine has bee n under heavy load for an extended period, heat
builds up in the engine compartment after the engine is switched off
- there is a risk of damaging the eng ine. Allow the engine to run at idle
for abo ut 2 min utes befo re switching it off .•
Page 131 of 390
_________________________________________________ O_ n_ t_ h_ e_ r _o_ a_d _ __.ffl'I
A ppli es to veh icl es: wi th Conven ie nc e key
Driver messages in the instrument cluster
display
If a function is not present, a driver message appears.
No key identified
This message appears when the [START] button is pressed if there is
no master key inside the vehicle or if the system does not recognize
it. For example, the master key cannot be recognized if it is covered
by an object (e.g. aluminum brief case) which
screens the radio
signal. Electronic devices such as cell phones can also interfere with
the radio signal.
Press brake pedal to start engine
This message appears if you press the I ST ART ] button to start the
engine and do not depress the brake pedal. The engine can only be
started if the brake pedal is depressed.
Engage Nor P to start engine
This message appears when the engine is started if the selector lever
for the automatic transmission is not in the P or N position . The
engine can only be started with the selector in these positions.
Key not in vehicle
This message appears along with the ' symbol if the master key is
removed from the vehicle with the engine running . It is intended to
remind you (e.g. when changing drivers) not to continue the journey
without the master key.
If the master key is no longer in the vehicle, you cannot switch off the
ignition after stopping the engine and you also cannot start the
engine again. Moreover, you cannot lock the vehicle from the outside
with the key.
Con tro ls a nd e quip
m en t Vehicle
OP-eration
Shift to P otherwise vehicle can roll away. Doors do not lock if you
are not in P.
This message appears for safety reasons along with a warning buzzer
if the selector lever for the automatic transmission is not in the P
position when the ignition is switched off with the
[STOP] button and
the driver's door is opened. Move the selector lever to the P position,
otherwise the vehicle is not secured against rolling away. You also
cannot lock the vehicle using the locking button on the door handle
or using the remote key.
To engage steering lock, press and hold STOP button
This message appears for safety reasons if the engine and the ignition
have been switched off by pressing the
[STOP] button once, and then
the driver's door is opened. In this instance, the steering is not
locked. The steering is locked:
• If you press the
[STOP] button again for more than 1 second.
• If you close the driver's door and lock your vehicle from the
outside. •
Parking brake
Operation
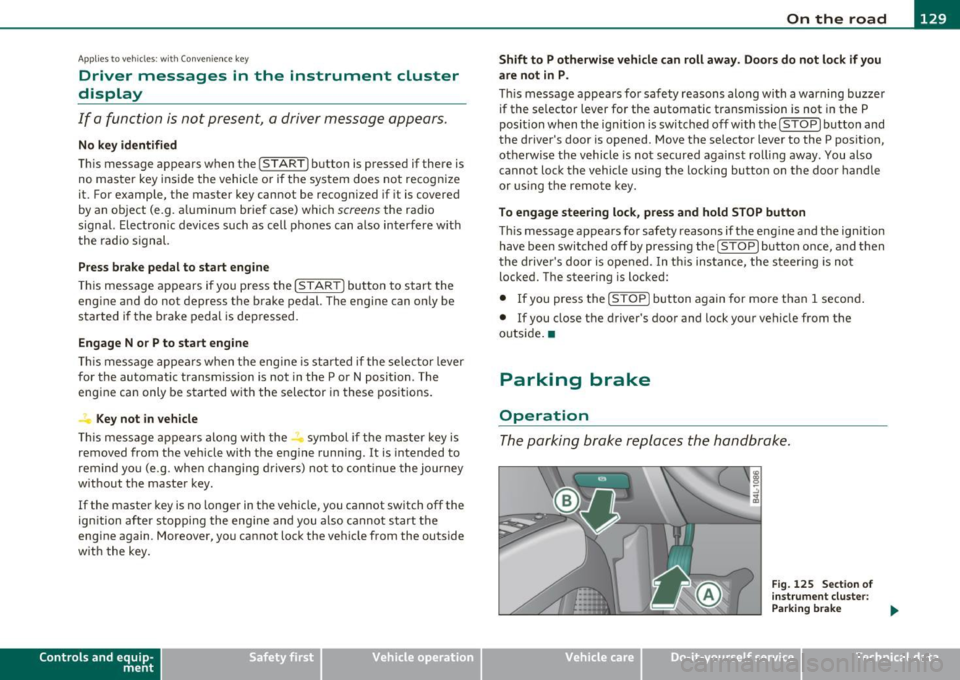
The parking brake replaces the handbrake.
Vehicle care
Fig. 125 Section of
instrument cluster:
Parking brake
~
Do-it-yourselt service iTechnical data
Page 133 of 390
On the road -
----------------
& WARNING (co ntinued )
• When parking on hills, always turn the wheel s so that the front
wheels will fir st roll into the curb, if the vehicle should start to
roll.
• Never allow anyone -especially small children -to remain in
the vehicle when it i s locked. Locked door s make it more d ifficult
for rescuer s to acce ss the pa ssenger compartment in the event of
an emergency. Danger to life!
• Never leave children un supervised in the vehicle . Children
could release the parking brake or mo ve the gearshift lever out of
gear . The vehicle could start to roll away and cause an accident .
• No matter what the season is , the temperature in a parked
vehicle can reach dangerou s levels.
0 Note
• Please exerc ise care when you park your vehicle in parking areas
with park ing barriers or c urbs. Pa rking barriers and c urbs vary in
height and co uld damage you r bumpe r and related componen ts as
the front of your vehicle moves over a barrier or curb that is too h igh,
as you par k or a s yo u back out of a p arking s pot. I n or der to be s ure
that no such damage can occ ur, yo u may wish to stop short of having
t he fro nt t ires of you r ca r tou ch the pa rk in g barrier or curb.
• Please a lso exerc ise except ional care when yo u drive up or down
s t eep ram ps or drive ove r curb s or other obst acles, for which t he
vehicle is not designed, because components of the vehicle close to
t he g roun d, s uch as bumpe r cove rs, spoilers and s uspension and
exhaust system components, may become damaged. •
Starting on hills
Hill Hold makes it easier to start on hills.
Controls and equip
ment Safety first
T
he system is activated whe n the brake peda l is depressed for a few
s econds .
For this, t he vehicle mus t be st andi ng in u phill driving direc
t ion .
After releas ing the brake pedal, the brake power is he ld for a
brief
moment to preve nt the vehi cle from rolling back when s tarting. At
this time, you can easi ly begin to move your vehicle .
& WARNING
• If you did not begin moving immediately after releasing the
brake pedal, under certain circumstances, the vehicle wou ld begin
to roll backward. Depress the brake pedal immediately or engage
the parking brake .
• Should the engine stall , depress the brake pedal immediately
or engage the parking brake .
• In order to prevent the vehicle from rolling back unintention
ally when starting in stop-and-go traffic, keep the brake pedal
depressed for a few seconds before driving off .
• When you leave the vehicle -even if only briefly - , sw itch off
the ignition and make sure to remove the ignition key . Also
engage the parking brake to prevent your vehicle from rolling
unintentionally. This particularly applies if children are left in the
vehicle -danger of accident! •
Vehicle care Technical data
Page 163 of 390
__________________________________________ A_ u _ t_o _m_ a_ t_ i _c _ t_ra _ n_s _ m_ i_ s _s _ i_ o _n _ __.fflll
Automatic transmission
tiptronic ® (6-speed automatic
transmission)
General information
Your vehicle is equipped with an e lectron ically contro lled automatic
transmission . Upshifting and downshifting takes place
outomoti
colly.
The transmission is also equipped with tiptronic®. It allows the driver
to shift gears
manually if desired ~ page 165. •
Driving the automatic transmission
Starting th e engine
- The selector lever must be in Nor P.
Starting off
- Press and hold the brake pedal.
Con tro ls a nd e quip
m en t
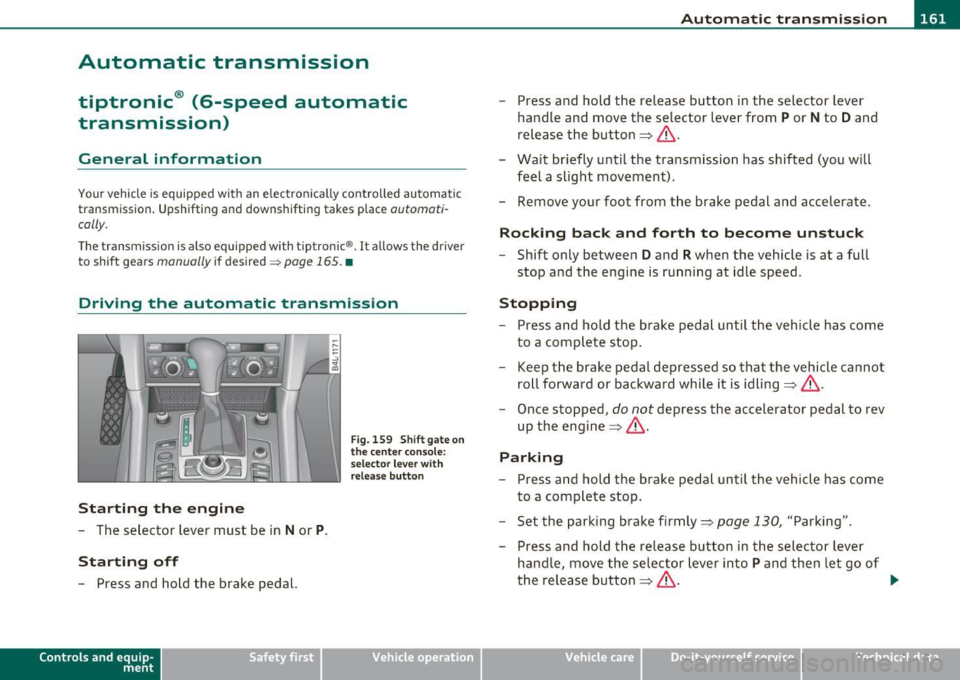
Fig . 159 Shift gate on
the ce nte r co nso le :
selec tor lever with
r elease b utto n
Vehicle OP-eration
-Press and hold the release button in the selector lever
handle and move the selector lever from
P or N to D and
release the button =:> & .
- Wait briefly until the transmission has shifted (you will
feel a slight movement).
- Remove your foot from the brake pedal and accelerate .
Rocking back and forth to become unstuc k
-Shift only between D and R when the vehicle is at a full
stop and the engine is running at idle speed.
Stopping
- Press and hold the brake pedal until the veh icle has come
to a complete stop .
Keep the brake pedal depressed so that the vehicle cannot
roll forward o r backward while it is idling =:> & .
- Once stopped,
do not depress the accelerator pedal to rev
up the engine=:> &.
Parking
-Press and hold the brake pedal unt il the veh icle has come
to a complete stop .
- Set the parking brake firmly =:>
page 130, "Parking".
- Press and hold the release button in the selecto r lever
handle, move the selector lever into
P and then let go of
the release button:::;,& . .,,_
Vehicle care Do-it-yourselt service iTechnical data
Page 185 of 390
_____________________________________________________ H_ o_m_ e_ L_i_n _k_ ®_ • __ _
Homelink ®
Universal remote control
Applies to veh icles: w ith Hom eli nk ® universal remote control
General information
The Homelink ® feature can learn up to three radio
frequency codes for most current transmitters used for
operating garage doors, estate gates, home or outdoor
lighting systems, and other devices.
You must first program the Homelink ® transm itter before you can
use the system=>
page 184, "Programming the Home link® trans
mitter".
I n order to program the Homelink ® transmitter for devices utilizing
rolling code, a second person on a ladder who can safe ly reach the
garage door opener motor is recommended. It is also necessary to
locate the "learn" button on your garage door opener motor. Refer to
the operating instructions for the opener, as the location and color of
this button may vary by manufacturer.
You can still use the original remote control for the device at any
time.
& WARNING
• Never use the Homelink'"' transmitter with any garage door
opener that does have not the safety stop and reverse feature as
required by federal safety standards. This includes any garage
door opener model manufactured before Aprill, 1982.
• A garage door opener which cannot detect an object, signaling
the door to stop and reverse does not meet current federal safety
standards. Using a garage door opener without these features
increases risk of serious injury or death.
Controls and equip
ment Safety first
& WARNING
(continued)
• For safety reasons never release the parking brake or start the
engine while anyone is standing in front of the vehicle.
• A garage door or an estate gate may sometimes be set in
motion when the Homelink ® remote control is being
programmed. If the device is repeatedly activated, this can over
strain motor and damage its electrical components -an over
heated motor is a fire hazard!
• To avoid possible injuries or property damage, please always
make absolutely certain that no persons or objects are located in
the range of motion of any equipment being operated.
rn Tips
• If you would like more information on Homelink ®, where to
purchase the Homelink ® compatible products, or would like to
purchase the Homelink ® Home Lighting Package, please call toll
free: 1-800-355-3515.
• For Declaration of Compliance to United States FCC and Industry
Canada regulations=>
page 369. •
Vehicle care Technical data
Page 273 of 390

pressure label is located o n the dr iver's side B-pillar. Inflate trailer
t ires to tra ile r and t ire ma nufacturers' spec ifications.
Lights
T he headl ight settings shou ld be chec ked with the tr ailer attached
before driving off. Check to make sure both vehicle and trailer lights
are wo rking properly.
Safety chains
Be sure tra ile r safety cha ins are p roperly connected from the t rai ler
to the hitch on the vehicle. Leave enough slack in the chains to perm it
tu rning corners . When you install sa fe ty ch ains, ma ke sure they will
not drag on the road when you are driving.
T he chains should cross under the trai ler tongue to prevent it from
dropping in case of separation from the h itch .
0 Note
If you are goi ng to tow a trai ler , you must activate the trai ler opera
tion mode =>
page 180, "Towing a trailer". •
Driving instructior,s
Driving with a trailer always requires e xtra care and
consideration.
To obtain the best possib le handling of ve hicle a nd trailer ,
please note the following :
- Do not tow a loaded trailer when your car itself is not
loaded.
- Be especia lly careful when pass ing other vehicles .
- Observe speed limi ts.
- Do not drive at the maximum pe rmissible speed.
Controls and equip
ment Safety first Vehicle operation
- Always apply brakes early.
- Mo
nitor the temperature gauge.
Weight distri but ion
T owing a loaded trailer with an empty car results in a highly unstable
distribution of we ight . If t his cannot be avoided , drive at very low
speeds only to avoid the risk of losing steering control.
A "balanced" rig is easier to operate and control. This means that the
tow veh icle shou ld be loaded to the extent poss ible and permissib le,
wh ile keeping the tra ile r as lig ht as poss ible unde r the ci rc u mstances.
Whe never possible, transfer some cargo to the luggage compart
me nt o f the tow vehicle while observing tongue load requirements
and vehicle loading considerations.
Speed
The higher the speed, the more d ifficult it becomes for the driver to
control the r ig . Do not dr ive at the maxim um permiss ible speed .
Reduce your speed eve n more if load, weather or w ind conditions are
unfavorable -particular ly when going downhill.
Reduce vehicle speed
immed iately if the tra ile r shows the slightest
sign of swaying.
Do not tr y to stop the s wayi ng by a ccele rating .
Observe speed lim its. In some areas, speeds for veh icles towing
trailers are lowe r than for regular veh icles .
Always apply brakes early. When driving downhi ll, shift into a lower
gear to use the engine brak ing effect to slow t he ve hicle . Use of the
brakes alone can cause them to overheat and fa il.
Coolant temperatur e
The coo lant temperature gauge=> page 10 must be observed care
fu lly. If the needle moves close to the upper end of the sca le, reduce
speed immediately and/or turn off the air conditioner.
If the coo lant temperature warning light in the instrument clus ter
starts flash ing
- F- , pull off the road, stop and let the engine idle for
about two m inutes to prevent hea t buil d-up.
Vehicle care Do-it-yourself service Technical data
Page 274 of 390
Trailer towing
"---------------------------------------------------
in. WARNING
Anyone not properly restrained in a moving vehicle is at a much
greater risk in an a ccident . Never let an yone ride in y our car who i s
not prop erly wearing the re straints provided by Audi. •
Trailer towing tips
Important to know
Your vehicle handles differe ntly when tow ing a tra iler because of the
additiona l weight and different we ight distribution. Safety, perfor
man ce and economy w ill greatly depend on how ca refu lly yo u load
your trailer and operate your rig.
Be fore you actua lly tow your tra ile r, prac tice turning, stopp ing and
back ing u p in a n area away from traffic. Keep pract ic in g until you have
become completely familiar with the way your vehicle -trailer combi
nation behaves and responds .
Backing up is diff icult and requ ires pract ice. Backing up w ith a trailer
gene rally requires s teer ing a ction opposi te to th at when ba cki ng up
your vehicle witho ut a trailer.
Maintain a greate r d istance between your ve hicl e and the one in front
of yo u. You will need more room to stop . T o compensate fo r the
trai ler, you will need a larger than normal turning radius .
W hen p assing, remember that you c annot acceler ate as fast as yo u
normally wou ld because of the added load. Make sure yo u have
enoug h room to pass. After passi ng, allow plen ty of room fo r yo ur
tra iler before changing lanes again .
Avoid jerky starts, sharp turns or rapid lane changes .
[ i ] Tips
• Do not tow a trai ler d uring the brea k-in perio d of your vehicle. •
If you tow a tra iler, your Aud i may require more frequent mai nte
n an ce due to the ex tra load:::::>
page 366. •
Parking on a slope
Do not park on a slope with a trailer. If it cannot be
av oided, do so only after doing the following:
When parking:
- Apply the foot brak e.
- Have someone p lac e chocks un der bo th the vehicle and t he
traile r w he els .
- With c hoc ks i n place, slowly release the brakes u ntil the
wheel c hoc ks absorb t he load.
- Turn the w hee ls towards t he curb .
- A pply the parking brake.
- M ove th e selector le v er to
P.
When restarting after parking:
- A pply the foot brake .
- Start the engine .
- Mov e th e s elector lever to
D .
- Release the par king brake a nd s low ly pull o ut and away
fro m the w heel chocks.
- Stop a nd have someone retr ieve the w heel chocks .
(I) Tips
If you move the se lector lever of the a utomat ic t ransmiss ion to P
befo re applying t he par king br ake an d befo re blo cking the w heels, II-
Page 295 of 390
If Ad Blue usage increases due to individual driving style, the driver
must add AdBlue between scheduled maintenance intervals
=>page 294 .
& WARNING
Failure to heed Ad Blue refill information in the instrument cluster
can prevent the vehicle from being started and driven . If the
vehicle cannot be driven and an emergency arises, personal injury
can occur.
• Always have the Ad Blue tank refilled well before the tank runs
dry.
[ i J Tips
• If the Ad Blue tank is completely empty, the engine w ill not start
agai n after the igni tion is sw itched off. The instrument cluster display
indicates the distance remaining that can be driven=>
page 293.
• Ad Blue is required by law to operate this vehicle.
• AdBlue ® is a registered trademark of the Registered Automob ile
Association (Verband der Automobilindustrie e . V. -VOA). •
Safety first
Fuel supply and filling your fuel tank
App lies to ve hicles : w ith d iese l eng ine
Indicator in the instrument cluster display
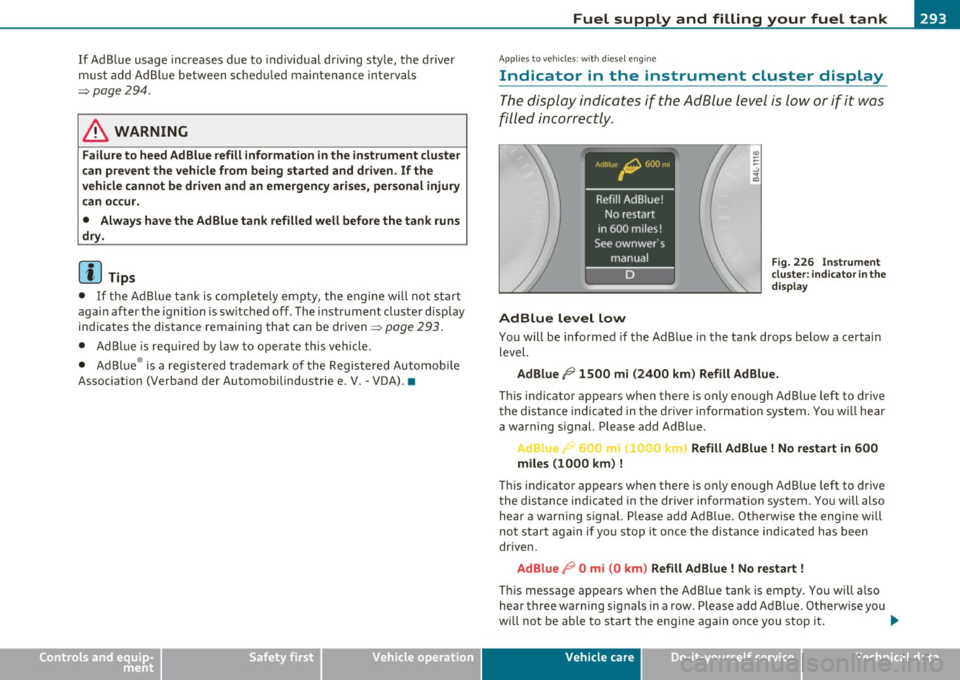
The display indicates if the Ad Blue level is low or if it was
filled incorrectly .
AdBlue level low
Fig. 226 Instrument
cluster: indicator in the
display
You will be informed if the Ad Blue in the tank drops below a certain
level.
Ad Blue /9 1500 mi (2400 km) Refill AdBlue.
This indicator appears when there is only enough Ad Blue left to drive
the distance indicated in the driver information system. You will hear
a warning s ignal. Please add Ad Blue.
... 0C_ .c Refill Ad Blue ! No restart in 600
miles (1000 km)
!
Th is indicator appears when there is only enough Ad Blue left to drive
the distance indicated in the driver informat ion system . You will also
hear a warning signal. Please add Ad Blue . Otherw ise the engine w ill
not start again if you stop it once the distance indicated has been
dr iven .
AdBlue 19 0 mi (0 km) Refill Ad Blue ! No restart !
Thi s message appears when the Ad Blue tank is empty. You will also
hear three warning signals in a row. Please add Ad Blue. Otherwise you
wi ll not be able to start the engine again once you stop it . ._
Vehicle care Technical data
Page 296 of 390

Fuel supply and filling your fuel tank
When the minimum Ad Blue level has been reached, you must add at
least 1 gallon (3.8 liters) . This is equal to two bott les from the refill
conta iner available from authorized dealers=>
page 294. This is the
minimum amount required to ensure the system detects the refilling
and to start the engine .
Filling incorrectly
If the Ad Blue tank was filled with a different fluid than Ad Blue and
the system detects that it is incorrect, you will be notified as follows:
1 , I 110 J Check AdBlue ! No restart
in 600
miles (1000 km)
!
This message appears when it is only possible to drive the distance
indicated in the driver information system . You will also hear a
warning signal. Drive to the nearest qualified workshop to have the
malfunction repaired. Otherwise the engine will not start again if you
stop it once the distance indicated has been driven .
Ad Blue ,0 0 mi (0 km) Check Ad Blue ! No restart !
This message appears if the system detects it was filled incorrectly.
You will also hear three warning signals in a row. Drive immediately
to the nearest qualified workshop to have the malfunction repaired.
Otherwise you will not be able to start the engine again once you stop
it .•
A pp lies to vehicles : w ith diesel engine
Filling AdBlue
A special refill bottle must be used to fill the Ad Blue.
Fig . 227 Right rear
vehicle side: removing
the AdBlue cap
Fig . 228 Ad Blue filler
tube: inserting the refill bottle
The filler flap automatically unlocks or locks when the central
locking system is operated. The Ad Blue filler tube is located
at the right near the diesel filler tube.
Opening the filler tube and adding AdBlue
-Press the left side of the fuel filler flap to open it
=> page 290, fig. 222 -arrow- .
- Turn the cap counterclockwise with the lug wrench from
the vehicle tool ki t to remove it~ fig. 227.
~