steering wheel AUDI Q7 2010 Owner´s Manual
[x] Cancel search | Manufacturer: AUDI, Model Year: 2010, Model line: Q7, Model: AUDI Q7 2010Pages: 390, PDF Size: 93.04 MB
Page 5 of 390
Safety belts ................... 199
General notes ................. 199
Why safety belts? . . . . . . . . . . . . . 200
Safe ty be lts . . . . . . . . . . . . . . . . . . 203
Safety belt pretensioners . . . . . . . 207
Airbag system ................ 209
I mpor tant things to know . . . . . . 209
Front airbags ............ ..... 213
Monitoring the Advanced Airbag
System ................... ... 220
Side airbags . . . . . . . . . . . . . . . . . . 225
Side curtain airbags . . . . . . . . . . . . 228
Child Safety ................... 231
Important things to know ...... 231
Child safety sea ts . . . . . . . . . . . . . 236
Installing a child safety sea t . . . . 241
LATCH Lower anchorages and
t ethers for children . . . . . . . . . . . . 244
Additional Information ......... 251
Vehicle operation ...... 2s2
Intelligent technology ........ 252
Notice about data recorded by
vehicle control modules . . . . . . . . 252
Electronic Stabilization Program
( E SP) ........................ 252
Braking . . . . . . . . . . . . . . . . . . . . . . 255
Servotronic® -advanced power
steering system ............... 257
Dr iving with your quattro® . . . . . . 258
Energy management . . . . . . . . . . . 259
Driving and environment ...... 261
The first 1,000 miles (1,500 km)
and afterwards ........... .... 261
Catalytic converter . . . . . . . . . . . . 262
Diesel pa rt ic u late filter . . . . . . . . . 263
Controls and equip
ment Safety first
Avoid damaging
the veh icle 263
Ope rate your vehicle economically
and m inimize pollution . . . . . . . . 263
Driving off road ............... 266
Dr iving in difficult road cond itions
and offroad . . . . . . . . . . . . . . . . . . 266
Trailer towing . . . . . . . . . . . . . . . . 269
Driving with a trailer . . . . . . . . . . . 269
Trailer towing tips . . . . . . . . . . . . . 272
Vehicle care .............. 274
Cleaning and protection ...... 274
General informa tion . . . . . . . . . . . 274
Care of ex terior . . . . . . . . . . . . . . . 274
Care of interior . . . . . . . . . . . . . . . 281
Fuel supply and filling your fuel
tank ..........................
287
Fuel supply . . . . . . . . . . . . . . . . . . . 287
Diesel fuel
Fuel tank ............. ....... .
TOI clean diesel .... ....... ... . 288
289
292
Checking and filling . . . . . . . .
. . . 296
Engine hood . . . . . . . . . . . . . . . . . . 296
Engine oil . . . . . . . . . . . . . . . . . . . . 299
Engine cooling system . . . . . . . . . 304
Brake fluid . . . . . . . . . . . . . . . . . . . 307
Battery . . . . . . . . . . . . . . . . . . . . . . 308
W indshield/headl igh t washer
container .................... 312
Tires and wheels ......... ..... 314
T ires
Tire pressure monitoring system 314
333
Table of contents
Do-it-yourself service
What do I do now? ..........
.
Jack, tools and infla table spare
tire ........................ .
Changing a wheel .... ........ .
Fuses and bulbs ............. .
Fuses ...................... .
Bulbs ......... .......... ... .
Emergency situations ....... .
General ..................... .
Starting by pushing or towing ..
Starting with jumper cables ... .
Use of jumper cables ......... .
Emergency towing with
commercial tow truck ........ .
Lifting vehicle ............... .
Technical data
General information
Explana tion of technical data .. .
Vehicle iden tification ......... .
We ights .................... .
Dimensions ................. .
Data ........... ........ .... .. .
280 hp, 6-cylinder engine, with all
whee l dr ive ................. .
350 hp, a-cylinder engine, with all
whee l dr ive ................. .
225 hp, 6-cylinder engine, with all
wheel dr ive .............. ... .
Consumer Information ...... .
War ranty cove rages ......... . .
Operating your vehicle ou ts ide the
U.S .A. or Canada ......... .... .
Aud i Service Repair Ma nuals and
Li terature . .................. . 336
336
336
339
346
346
350
352
352
352
352
353
355
357
360
360
360
360
361
362
363
363
364
365
366
366
366
366
Ma intenance . . . . . . . . . . . . . . . . . 366
Vehicle operation Vehicle care Do-it-yourself service Technical data
Page 11 of 390
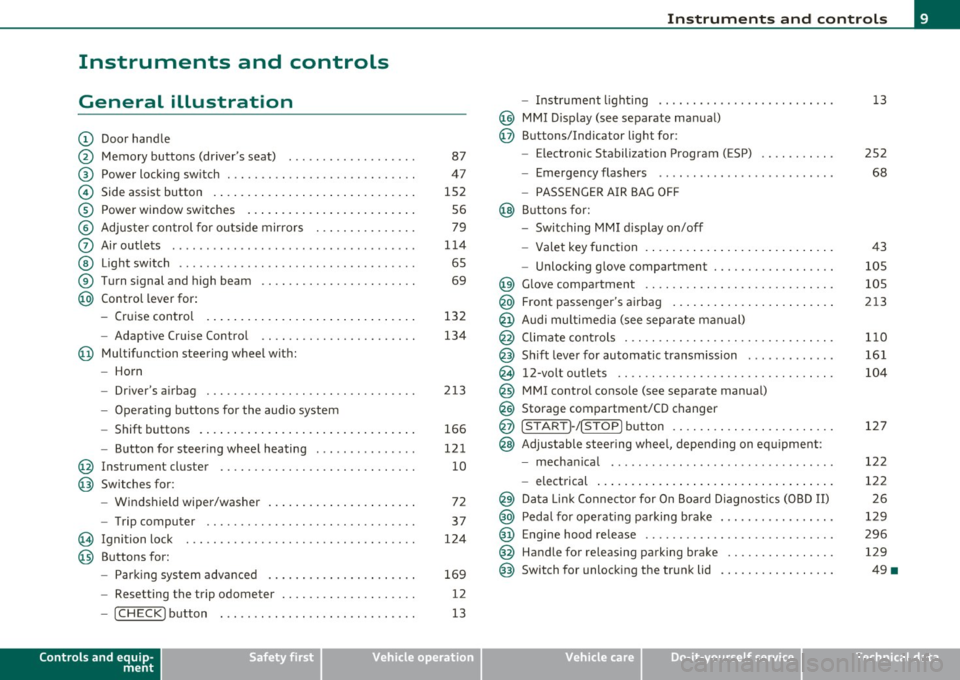
Instruments and controls
General illustration
(D Door handle
@ Memory buttons (driver's seat) .................. .
@ Power locking sw itch ........................... .
© Side assist button ... .. ... ... ... .. .. .. ... . .. ... .
® Power window sw itches ... .... .. .. .. .. .. ... ... . .
© Adjuster con trol for outs ide mir rors .............. .
0 Air outlets .......... .... .. .... ............... .
@ Light switch ...... .. .... ... .. .. .. ... ... .. .. ... .
® Turn s ignal and high beam ...................... .
@ Control lever for:
- Cru ise control . .... ... ... .. .. .. .. .. .. .. .. ... .
- Adaptive Cruise Control .. .. ................ .. .
@ Mu ltifunction steering wheel with:
- Horn
- Driver's airbag .............................. .
- O pera ti ng butto ns for the audio system
- Shift buttons . ... .. .. .. .... .. .. .. .. .. ...... . .
- Button for steer ing whee l heating ..... ... ...... .
@ Instrument cluster ............................ .
@ Switches for:
- Windshield wiper/washer ... ...... .. ..... .... . .
- Trip computer .............................. .
@ Ignition lock ................................. .
@ Buttons for:
- Par king sys tem advance d .... ..... .. .. ... .. .. . .
- Resetting the trip odometer ................... .
- ICHECK ]button ......................... ... .
Controls and equip
ment Safety first
87
47
1S2 S6
79
1 14
6S
69
132
134
2 13
166
12 1
10
72
37
124
169
12
13
Instruments and controls
- Instrument lighting ......................... .
@ MMI Disp lay (see separate ma nual)
@ Buttons/Indicator light for:
- Electronic Stabilization Program (ESP) .......... .
- Emergency flashers ...... .. ................. .
- PASS ENGER A IR BAG O FF
@ B uttons for:
- Switching MMI d isplay on/off
- Valet key function .. .. .. .. .. .. .. ...... ... .. .. .
- Unlocking g love compartment ................. .
@ Glove compartment ........................... .
@ Front passenger's airbag ...... ..... .. ..... .. .. . .
@ Audi mu ltime dia (see separate man ual)
@ Climate cont rols .............................. .
@ Shift leve r for automatic transmission ............ .
@ 12-volt outlets ............................... .
@ MMI contro l console (see separate manua l)
@ Storage compartment/CD changer
@ ISTART]-/ISTOP] button ....................... .
@ Adjustable stee ring whee l, depending on eq uipme nt:
- mecha nical .... .. .... ... .. .. .. ... .... ..... . .
- electrical ..... . ... .. .. .. .... .... .. .. .. ... .. .
@ Da ta Lin k Connecto r for On Boa rd Diagnos tics (OBD II)
@ Peda l for operating pa rking brake ................ .
@ Engine hood release ............. ... .. ......... .
@ Handle for releasing parking brake ............... .
@ Switch for unlocking the trunk lid ................ .
Vehicle care
13
2S2
68
43
105
105
213
1 10
161
104
127
12 2
122 2 6
129
296 129
49 •
Technical data
Page 43 of 390
• For security reasons, replacement keys are only available from
Audi dealers. •
Master key with remote control
The remote control allows you to lock or unlock the
vehicle electronically .
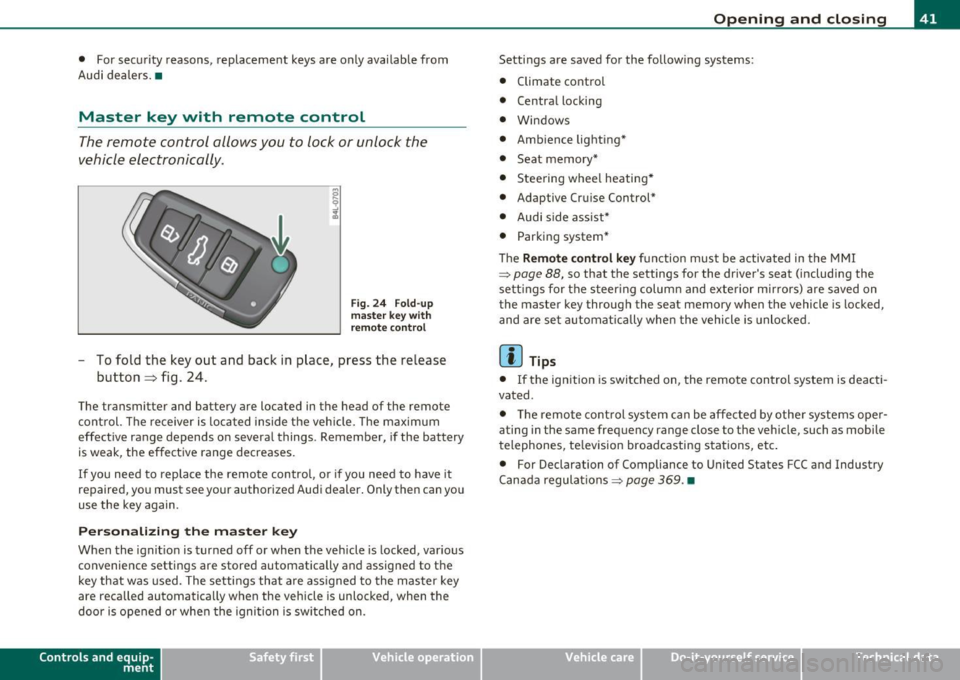
Fig. 24 Fold-up
master key with
remote control
- To fold the key out and back in place, press the release
button~ fig. 24.
The transmitter and battery are located in the head of the remote
control. The receiver is located inside the vehicle. The maximum
effective range depends on several things . Remember, if the battery
is weak, the effective range decreases.
If you need to replace the remote control, or if you need to have it
repaired, you must see your authorized Audi dealer. Only then can you
use the key again.
Personalizing the master key
When the ignition is turned off or when the vehicle is locked, various
convenience settings are stored automatically and assigned to the
key that was used. The settings that are assigned to the master key
are reca lled automatically when the vehicle is unlocked, when the
door is opened or when the ignition is switched on.
Contro ls a nd e quip ·
m en t Vehicle
OP-eration
Opening and closing
Settings are saved for the follow ing systems:
• Climate control
• Central locking
• Windows
• Ambience lighting*
• Seat memory*
• Stee ring wheel heating*
• Adaptive Cruise Control*
• Audi side assist*
• Parking system*
Th e
Remote control key function must be activated in the MMI
~ page 88, so that the settings for the driver's seat (including the
settings for the steering column and exterior mirrors) are saved on
the master key through the seat memory when the vehicle is locked,
and are set automatically when the vehicle is unlocked.
[ i ] Tips
• If the ignition is switched on, the remote control system is deacti·
vated .
• The remote control system can be affected by other systems oper·
ating in the same frequency range close to the vehicle, such as mobile
telephones, television broadcasting stations, etc.
• For Declaration of Compliance to United States FCC and Industry
Canada regulations~
page 369. •
Vehicle care Do-it-yourselt service iTechnical data
Page 70 of 390
Clear vision
Applies to vehicles : with Adaptive Light
Adaptive Light
When driving around bends, the relevant area of the road
is better illuminated.
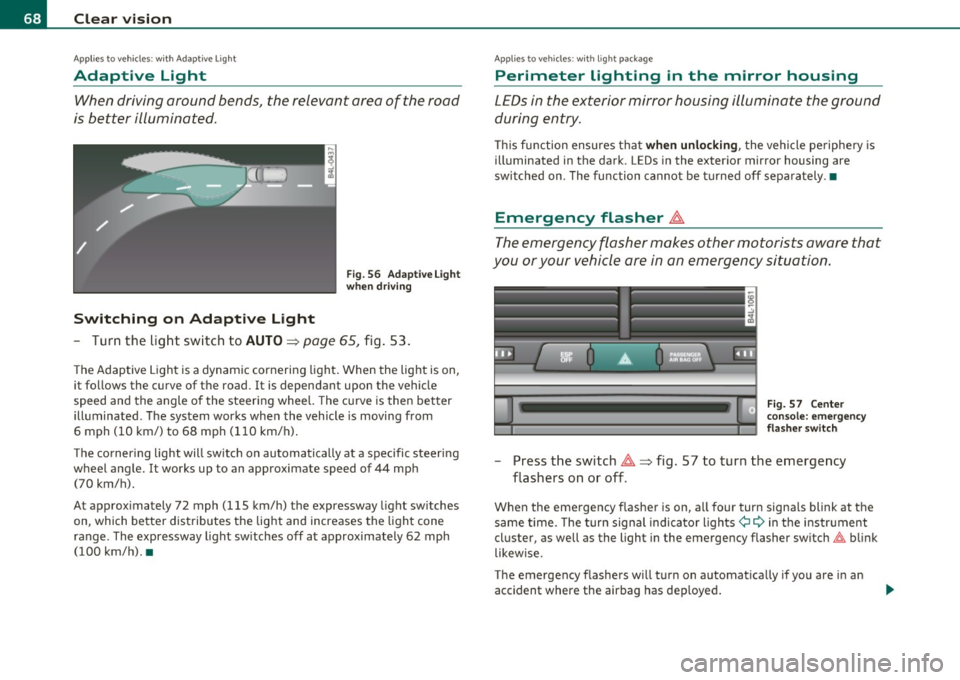
Switching on Adaptive Light
Fig . 56 Adaptive Light
when driving
- Turn the light switch to AUTO~ page 65, fig. 53.
The Adaptive Light is a dynamic cornering light. When the light is on,
it follows the curve of the road. It is dependant upon the vehicle
speed and the angle of the steering wheel. The curve is then better
illuminated. The system works when the vehicle is moving from
6 mph (10 km/) to 68 mph (110 km/h).
The cornering light will switch on automatically at a specific steering
wheel angle. It works up to an approximate speed of 44 mph
(70 km/h).
At approximately 72 mph (115 km/h) the expressway light switches
on, which better distributes the light and increases the light cone
range . The expressway light switches off at approximately 62 mph
(100 km/h). •
Applies to vehicles : w ith light package
Perimeter lighting in the mirror housing
LEDs in the exterior mirror housing illuminate the ground
during entry.
This function ensures that when unlocking, the vehicle periphery is
illuminated in the dark. LEDs in the exterior mirror housing are
switched on. The function cannot be turned off separately .•
Emergency flasher ~
The emergency flasher makes other motorists aware that
you or your vehicle are in an emergency situation.
Fig. 57 Center
console: emergency
flasher switch
-Press the switch~~ fig. 57 to turn the emergency
flashers on or off .
When the emergency flasher is on, all fou r turn signals blink at the
same time. The turn signal indicator lights¢
9 in the instrument
cluster, as well as the light in the emergency flasher switch~ blink
likewise.
The emergency flashers will turn on automatically if you are in an
accident where the airbag has deployed.
Page 71 of 390
![AUDI Q7 2010 Owner´s Manual (]] Tips
You shou ld turn on t he emergency flashers when :
• you are the last vehicle stand ing in a traffic jam so that any other
vehicles com ing can see you , or w hen AUDI Q7 2010 Owner´s Manual (]] Tips
You shou ld turn on t he emergency flashers when :
• you are the last vehicle stand ing in a traffic jam so that any other
vehicles com ing can see you , or w hen](/img/6/40275/w960_40275-70.png)
(]] Tips
You shou ld turn on t he emergency flashers when :
• you are the last vehicle stand ing in a traffic jam so that any other
vehicles com ing can see you , or w hen
• your vehicle has broken down o r yo u are in an eme rgency s itua
tion, or when
• your vehicle is be ing towed by a tow tr uck o r if you are tow ing
another vehicle behind you .•
Turn signal ¢¢ and high beam ~D Lever
The lever on the le~ side of the s teering column is used to
operate the turn signals and the high beam as well a s the
headlight flasher .
-"' M
-w ... m
Fig. 5 8 Tu rn sig nal
and hi gh bea m l ever
The tu rn s ignal and high beam lever has the follow ing func
tions:
Turn signals ¢ ¢
- Lift the lever up all the way~ fig. 58 (D to use the right
turn signals, or push the lever down all the way@ to use
the left turn signals.
Con tro ls a nd e quip
m en t Vehicle
OP-eration
Clear vision
Auto -blink
- Move the lever (up or down) just to the point of resistance
to use the turn signa ls for as long as you need them, for
examp le when chang ing lanes.
- M ove the lever (up or down) just to the poi nt of res istance
and t hen re lease it right away to make the turn signa ls
blink
three times . You can use this feature for examp le
w hen changing lanes on highways.
High beam ~D
- Push the lever forward @ to switch on the high beam .
- Pull the lever back towa rds you to switc h off the high
beam .
Headlight flasher ~D
Pull the lever toward the steering wheel© to use the
head light flasher .
Notes on these features
• The turn signals only work with the ignition t urned on. The indi
cato r lights ¢ or¢ in the instrument cluster=>
page 14 a lso blink.
• After you have t urned a co rner, the tu rn signal switches off auto
matically .
• Th e
high beam works only when the hea dlights are o n. Th e ind i
ca tor light
aD in the instrument cluster illuminates when the high
beams are on.
• The
headligh t flasher works only as long as you ho ld the lever -
even if there are no l igh ts turned o n. Th e indic ator lig ht
aD in the
instrument clus ter illuminates when you use the headlight flasher. .,,_
Vehicle care Do-it-yourselt service iTechnical data
Page 85 of 390
Seats and storage
General recommendations
Why is your seat adjustment so important?
The safety belts and the airbag system can only provide
maximum protection if the front seats are correctly
adju sted.
Th ere a re various ways of adjusting t he front seats to provide safe and
comfortable support for the driver and the front passenger . Ad just
your seat properly so that :
• you can easily and quickly reach a ll the switc hes and contro ls in the
ins trumen t pa nel
• your body is properly supported thus reducing phys ica l stress and
fatigue
• the safety be lts and airbag system can offer maximum protection
=>
page 209 .
In the following sections, you w ill see exact ly how you can best ad just
your sea ts .
Th ere are special regulations a nd instr uctions for install ing a child
safety seat on the front passenger's sea t. Always follow the informa
tion regarding child safety p rovided in=>
page 231, "Child Safety ".
& WARNING
Incorrect seating posit ion of the dri ver and all other passengers
can result in seriou s personal injury.
• Always keep your feet on the floor when the vehicle is in
motion -never put your feet on top of the instrument panel, out
of the window o r on top of the seat cush ion. This applies especially
to the passengers.
If your seating po sition is incorrect, you
increase the ri sk of injury in the case of sudden braking or an acci-
Controls and equip
ment Safety first
Seats and storage
& WARNING
(con tinu ed)
dent . If the airbag inflates and the seating position is incorrect ,
this could result in per sonal injury or even death .
• It is important for both the dri ver and front passenger to keep
a distan ce of at least 10 inche s (25 cm) between themselves and
the steering wheel and /or instrument panel. If you 're sitting any
closer than this , the airbag system cannot protect you properly. In
addition, the front seats and head restraints must be adjusted to
your body height so that they can give you maximum protection .
• Always try to keep as much distance as possible between your
self and the steering wheel or instrument panel.
• Do not adjust the driver's or front passenger 's seat while the
vehicle is moving. You r seat may move unexpectedly , causing
sudden loss of vehicle control and personal injury . If you adjust
your seat while the vehicle is moving , you are out of position. •
Driver's seat
The correct seat position is important for saf e and
re lax ed driving.
W e recomme nd that you a djust the drive r's sea t in the
f ollowing man ner :
- Ad just the seat in fore and aft direction so that you can
easily pus h the pedals to the floor w hile keeping your
knees slightly bent=>
& in "Why is yo ur seat a djus tme nt
so importa nt?" .
- Adjust the seatback so that when yo u sit with yo ur back
agai nst t he seatback , you can st ill grasp t he top of the
steering w heel. ..,
Vehicle care Technical data
Page 123 of 390

Warm and cold -_______________ __.
Applies to veh icles: w ith stee ring whee l hea ting
Steering wheel heat ing (j)
The steering wheel can be heated electrically .
Fig. 118 Multifunc
tion steering wheel:
Button for steering
wheel heating
-Press the I~] button to turn the steering wheel heating on
and off =>fig. 118. The message
Steering wheel heating on ! or
Steering wheel heating off! appears in the instrument
cluster display .
When the steering wheel heating is switched on, the steering wheel
is heated to about 82 °F (+28 °C) and held there .
The last sett ing se lected for the steer ing wheel heating (on or off) is
automatically saved when the vehicle is shut off and is assigned to the
remote key. •
Contro ls a nd e quip
m en t Vehicle
OP-eration Vehicle care Do-it-yourselt service iTechnical data
Page 124 of 390

-On the road .Ml..___ ______________ _
On the road
Steering
Applies to vehicles: w ith man uall y ad justable steering whee l
Manually adjustable steering wheel
The heig ht and r ea ch of t he steering wheel c an be
adjusted.
Firs t, adjust t he driv er's s eat corre ctly.
Fig. 119 Le ver un der
the stee ring colu mn
-Pull t he le ve r~ fig . 1 19 -Arrow-~ & -
- Move the stee ring w hee l to t he des ired pos ition.
- Push t he leve r agai nst t he steeri ng col umn until i t loc ks.
T he re m ust be at le ast 1 0 inc hes (25 cm) be tween you r che st and the
center of the steering whee l. If you cannot sit more than 10 inches
( 2 5 cm) from the s teering wheel, see if ada ptive equipmen t is avai l
able to help you reach the pedals and increase the d istance from the
steeri ng wheel.
For detailed info rmation on how to adju st the dr ive r's seat, see
=> page 84 .
& WARNING
Improper use of steering wheel adjustment and improper seating
position can cause serious personal injury.
• Adjust the steering wheel column only when the vehicle is not
moving to prevent loss of vehicle control.
• Adjust the driver's seat or steering wheel so that there is a
minimum of 10 inches (25 cm ) between your chest and the
s teering wheel=>
page 190, fig. 183. If you cannot maintain this
minimum distance , the airbag system cannot protect you prop
erly .
• If physical limitations prevent you from sitting 10 inches (25
cm ) or more from the steering wheel, check with your authorized
Audi dealer to see if adaptive equipment is available.
• If the steering wheel is aligned with your face , the supple
mental driver's airbag cannot provide as much protection in an
accident. Always make sure that the steering wheel i s al igned with
your chest.
• Always hold the ste ering wheel with your hands at the 9 o'clock
and 3 o'clock positions to reduce the risk of personal injury if the
driver' s airbag deploys .
• Never hold the steering wheel at the 12 o 'clock position or with
your hands inside the steering wheel rim or on the steering whe el
hub. Holding the steering wheel the wrong way can cause serious
injuries to the hands, arms and head if the driver's airbag
deploys .•
Page 125 of 390

On the road Ill _______________ __.
Applies to veh icles : w ith electrically adju stab le steer ing wheel
Electrically adjustable steering wheel
The height and reach of the stee ring wheel ca n be ele ctri
c ally adj usted to sui t th e d river.
Firs t, a djust t he dr iver's se at correct ly.
Height adjustment
Fig . 120 Sw itch for
s teering whee l ad ju st
ment
- Push t he s witch © up or down=> fig. 12 0. The st ee ring
w he el heig ht chang es f or as long as you press t he swi tch .
Reach adjustment
- Push t he switc h© forward or backward=> fig . 120 . T he
ste ering w hee l reac h changes for as long as yo u press the
swi tch .
The re m ust be at least 10 inches (25 cm) between you r chest and the
cen ter of the steering whee l. If you cannot sit more than 10 inches
(25 cm) from the steer ing wheel, see if adapt ive equ ipment is ava il
able to h elp you reach the pedals and increase the distance from the
steeri ng wheel.
For detailed information on how to adjust the dr iver 's seat , see
~ page 84.
Con tro ls a nd e quip
m en t Vehicle
OP-eration
The steering wheel ca n be adjusted even when the ign ition is turned
O ff. For veh icles with sea t memory, the individu al pos it io ns for the
steer ing wheel can be sto red along with t he seat pos it ion.
& WARNING
Improper use of steering wheel adjustment and imprope r seating
position can cau se seriou s per sonal injury.
• Adjust the steering wheel column only when the vehicle i s not
moving to prevent loss of vehicle control.
• Adjust the driver 's seat or steering wheel so that there is a
minimum of 10 in ches (25 cm) between your chest and the
steering wheel~
page 190, fig. 183. If you cannot maintain this
minimum distance , the airbag system cannot prote ct you prop
erly.
• If phy sical limitations prevent you from sitting 10 inches (25
cm ) or more from the steering wheel, check with you r authorized
Audi dealer to see if adaptive equipment is available .
• If the steering wheel is aligned with your face , the supple·
mental driver 's airbag cannot provide as much protection in an
accident. Always make sure that the steering wheel is aligned with
your che st.
• Always hold the steering wheel with your hands at the 9 o'clock
and 3 o'clock po sition s to reduce the risk of personal injury if the
drive r's airbag deploys.
• Never hold the steering wheel at the 12 o'clock po sition or with
your hands inside the steering wheel rim or on the steering wheel
hub. Holding the steering wheel the wrong way can cause serious
injuries to the hands, arms and head if the driver's airbag
deploy s.•
Vehicle care Do-it-yourselt service iTechnical data
Page 126 of 390
1111..__0_ n_ t_h _e_ r_o _ a_ d _________________________________________________ _
Easy entry feature
The easy entry feature makes it easier to enter and e xit
the vehicle by automatically adjusting the steering
wheel.
Press the button®~ page 123, fig. 120 to turn the easy
entry feature on or off .
When the easy entry feature is turned on (button depressed), the
steering wheel moves up to the parked position when the ignition is
t urned off . After you enter the vehicle, the steer ing wheel moves to
the stored pos ition as soon as you t urn on the ig nition .
Easy entry feature on vehi cles with memory seat *
For the stored steering whee l position to be recalled, t he driver's seat
memory must be switched on ( ( ON/OFFI switch in depressed posi
tion) .
If the easy e ntry feature i s sw itched off, the steer ing wheel mov es to
the stored pos ition as soon as you press the seat memory button. •
Ignition Lock and ignition switch
Ignition key positions
The engine can be st arted or turned off with the ign ition
key .
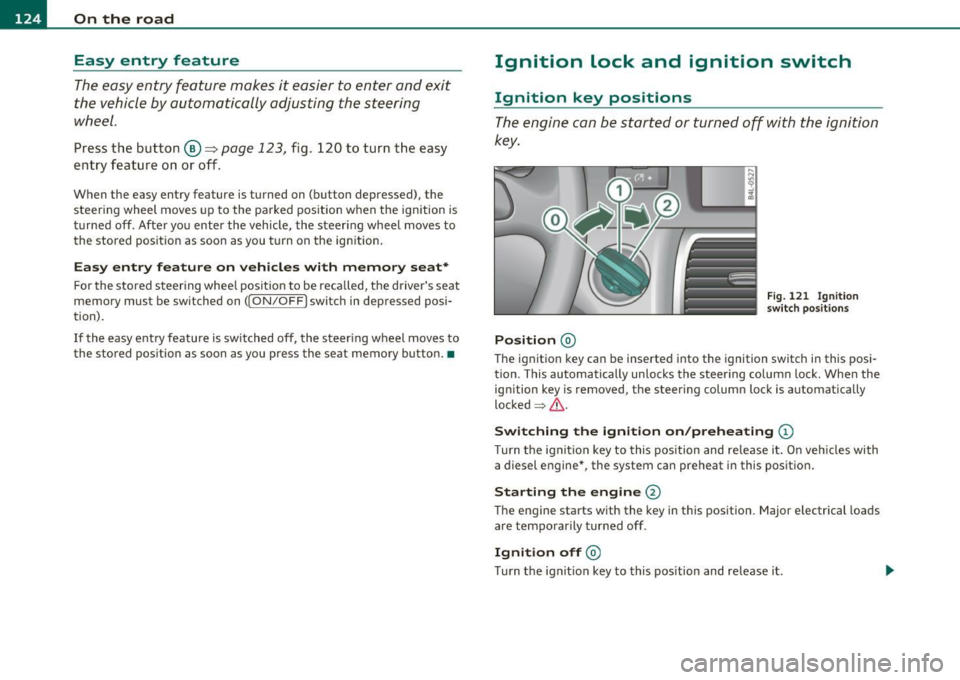
Position @
Fig. 121 I gn ition
sw itch position s
The ig nition key can be inserted into the ignition switch i n this posi
tion. This automatically unlo cks the steering co lumn lo ck. When the
ign ition key is removed, the steer ing colum n lock is automat ically
lo ck ed
~ & .
Switching the ignition on /preheating (D
Tu rn the ignit ion key to this position and re lease i t. On veh icles wi th
a diesel engine *, the system can preheat in this position.
Starting the engine@
The engine starts with the key in this position. Major e lectrical loads
are tempo rar ily tur ned off .
Ignition off@
Turn t he ign it ion key to this pos ition and re lease i t.