seat AUDI Q7 2012 Owner´s Manual
[x] Cancel search | Manufacturer: AUDI, Model Year: 2012, Model line: Q7, Model: AUDI Q7 2012Pages: 342, PDF Size: 86.42 MB
Page 75 of 342
unattended in the vehicle -they could be
injured!
- Exercise caution when adjusting the seat
height. Unsupervised or careless seat ad
justment can pinch fingers or hands
causing injur ies.
- While the vehicle is moving, the seat
backs of the front seats must not be in
clined too far to the rear because the ef
fectiveness of the safety belts and the
airbag system is severely compromised -
there is a risk of injury.
- To reduce the r isk of injury in the case of
sudden braking or accident, front pas
sengers must never ride in a moving ve
hicle wi th the seatback reclined. Safety
belts and the airbag system only offer
maximum protection when the seatback
is upright and the safety be lts are prop
erly positioned on the body. The more
the seatback is reclined, the greater the
risk of personal injury from an incorrect
seating pos ition and improperly posi
t ioned safety belts.
Seat memory
Driver's seat memory
Ap plies to vehicles: with seat memo ry
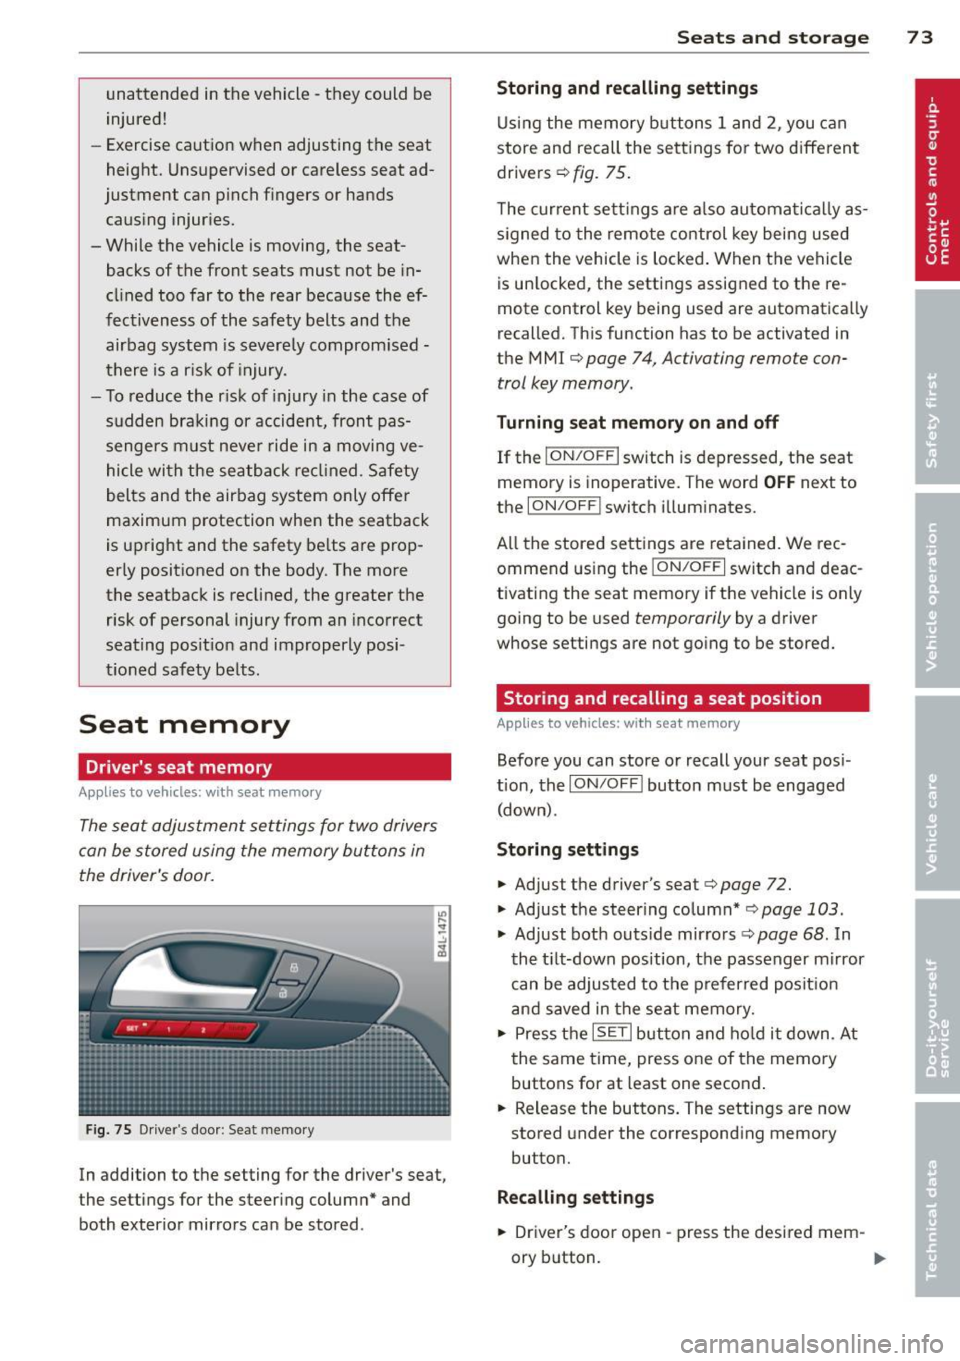
The seat adjustment settings for two drivers
can be stored using the memory buttons in
the driver's door.
F ig. 75 Driver's door : Seat memory
In addition to the setting for the driver's seat,
the settings for the steering column* and
both exterior mirrors can be stored .
Seats and storage 73
Storing and recalling settings
Using the memory buttons 1 and 2, you can
store and recall the settings for two different drivers ¢
fig. 75.
The current settings are also automatical ly as
s ig ned to the remote control key being used
when the vehicle is locked. When the vehicle
is un locked, the settings assigned to the re
mote control key being used are automatically
recalled. This function has to be activated in
the M MI ¢
page 7 4, Activating remote con
trol key memory.
Turning seat memory on and off
If the I ON/O FF I switch is depressed, the seat
memory is inoperative. The word
OFF next to
the
ION/O FF I switch illuminates.
All the stored settings are retained. We rec
ommend using the
ION/OF F I switch and deac
tivating the seat memory if the vehicle is only
going to be used
temporarily by a driver
whose settings are not going to be stored.
Storing and recalling a seat position
App lies to vehicles: wit h seat memory
Before you can store or recall your seat pos i
tion, the
ION /OFF! button must be engaged
(down) .
Storing settings
.,. Adjust the driver's seat¢ page 72 .
.,. Adjust the steer ing column* ,=;, page 103 .
.,. Adjust both outs ide mirro rs ¢ page 68 . In
the tilt-down position, the passenger mirror
can be adjusted to the preferred posit ion
and saved in the seat memory .
.,. Press the
ISETI button and hold it down . At
the same time, press one of the memory
buttons for at least one second .
... Release the buttons. The settings are now
stored under the corresponding memory
button.
Recalling settings
.,. Driver's door open -press the desired mem-
ory b utton.
ll-
Page 76 of 342
7 4 Seats and stor age
• Driver's door closed -press the correspond
ing memory button unti l the stored position
is reached.
Successf ul s torage is conf irmed a ud ibly and
by the l ight i n the
!SET ! button illuminating .
When the ve hicle is
locked , the cur rent set
tings are stored and ass igned to the remo te
control key. Bu t th e set tings stored on memo
ry buttons 1 and 2 are not deleted. They can
be reca lled at any time . When the vehicle is
unlocked , the settings assigned to the remote
control key are restored.
If you r vehicle is driven by other persons using
your remote control key, you should save yo ur
individua l seat position on one of the memory
buttons. You can reca ll your settings aga in
simply and conve niently by pressing the corre
spond ing memory butto n. When the vehicle is
l oc ked, these setti ngs are automatically re-as
signed to t he remote control key and stored.
.&_ WARNING
- F or safe ty re ason s, the sea t sett in g can
only be rec alled w hen the veh icle is st a
t ionary -othe rwise you r isk having an ac
cident.
- In an emergency, the recall operation
can be stoppe d by pressin g the
!ON/OFF I
button or by br iefly p ress ing any given
memory button.
Activating remote control key memory
App lies to vehicles: with seat memo ry
To assign the driver's seat settings to the re
mote contro l key when locking the vehicle, the
function must be activated in the MMI.
• Se lect: Funct ion button
ICARI > Cont ro l but
ton
Systems * > Seat adjustment > Driver 's
seat > Key mem. p rofile > On .
Or
• Se lect: Funct io n button
ICA RI > Cont ro l but
ton
Car system s* > Vehicle settings > Seats
> Driver's seat > Remote control key > On .
(D Tips
If you do not want anothe r driver's set
tings to be assigned to the remote control key, switch off the memory function using
the MMI or the
I ON/OF F! button
c> page 73.
Rear seats
General information
Safe transportation of passengers on the rear
seats requires proper safety pre cautions.
All passengers on the rear seats mus t be seat
ed in comp lian ce with the safety guide lines
exp lained in c>
page 170 and c> page 179 .
The co rrec t seating pos ition is cr it ic al f or the
sa fe ty of front
and rear seat passenge rs a like
c> page 163 .
A WARNING
--Occupants in the f ront and rear seats
m ust always be proper ly restrained.
- Do not let anyone ride in the ve hicle
witho ut the head restraints prov ided.
Head restraints help to reduce injuries .
- Loose items inside the passenge r com
pa rtment, can fly forward in a crash or
sudden maneuve r and injure occupants.
Always store a rticles i n the luggage com
pa rtment an d use the fastening eyes, es
pecially w he n the rea r seatbac ks hav e
been fo lded down.
- Read and heed all WARNI NGS
c> pag e 163, Prop er s eating positions
for passengers in rear sea ts.
Page 77 of 342

Adjusting seat (second row seating)
The fore-and-aft adjustment* of the seat
cushion and the seatback angle can be ad
justed .
Fig. 76 Adjust ing seatbac k an gl e
Fi g. 77 Fore -a nd -aft ad just ment
Adjusting seatback angle
,. Pull the leve r up and push the seatback to
ward the rear to the desi red pos ition
¢
fig. 76. Release the lever.
... Pull t he leve r up so tha t the sea tback p ivots
forward . Release the lever and p ush the
seatback to the rear to return the seatback
to the norma l posit ion.
Fore-and -aft adjustment*
... Pull the hand le up and push the seat for
war d or back ¢
fig. 77 .
... Re lease the hand le and continue to push
t h e seat until the seat latch engages .
A WARNING
-For safety reasons, th e seat must only be
adjusted when the vehicle is stationary -
dange r of accident!
- Exercise caut ion when adjusting the seat.
Adjusting t he sea t w ithout chec kin g or
Seats and storage 75
paying attention can p inch fingers or
limbs - danger of in jury!
Entry assist (second row seating)
Applies to veh icles: w it h entry assist
The entry assist makes it easier for occupants
to reach the third row seating*.
Fig . 78 Seatback seco nd row seat ing: Seatback latch
Pushing second row of seats forward
"' Lift the lever c> fig. 78 .
... Tilt the seatback forward .
... Push the seat forward.
Pushing second row of seats back
... Push the seatback .
... Fold the seatback up unti l it latches.
T o make entry to and exit from the rear o f th e
vehicle easier, the seatbacks for t he second
row seat ing can be folded forwa rd. At the
same t ime, the seats can be p ushed forward
and to the rear .
Page 78 of 342

76 Seats and storage
Folding seatback up and down (third
row seating)
Applies to vehicles: with third row seating
The third row s eating i s suitable for p ersons
up to 1.6 meters (5
~ 3 in) in height.
F ig. 79 Thi rd row of seats : F old ing seatba ck up
F ig. 80 T hi rd row of seats: Fold ing seatback dow n
Raising seatback
• Lift the lever -Arrow- ¢ fig. 79 and r aise the
seatback until it loc ks.
• Raise t he head restra int until it locks.
Folding seatback down
• Lift the lever -Arrow- ¢ fig. 80 and fold the
seatba ck down comp lete ly un til it lock s.
• The hea d restra int is a utoma tica lly ti pped
down .
A WARNING
-Only persons up to a height of 5 feet 3
inches (1.6 m) may be carried on the
seats i n the t hird row.
- Exercise caut ion when folding the seat
backs up and down. Inattentiveness o r
carelessness when folding the seatback
up and down can pinch finge rs or hands . -
Always check whether the latc h is fully
engaged by pull ing the seatback for
ward.
Head restraints
Front head restraints
Fi g. 81 Front seats head rest rain ts: a djusting the
h eig ht
T he he ad restr aints on the fr ont sea ts can be
adjus ted to provide safe s upport to he ad and
neck at the optim um height . When optimally
adjusted, the top of the rest raint shou ld be
l evel with the top of the head . If that is not
poss ible, try to adjust the head restraint so
that it is as close to t his position as possible
¢ page 163, Proper adjustment of head re
s traints .
• To move the head restraint up , hold it at the
sides with both hands and s lide it upward .
• To m ove t he head restra int down, press the
button and slide th e head restraint down
wa rd ¢
fig . 81.
Refer to ¢ page 163, Proper adjustment of
head restraints
fo r gu idelines on how to ad
just th e height of the front head r estraints to
s ui t the occupa nt's b ody siz e.
A WARNING
- D riving w ithou t head re str ain ts or wit h
hea d restr aints th at are not pro perly ad
justed increases t he risk of ser ious or fa
tal neck inju ry dramatica lly.
- Read and hee d all W ARNINGS
¢pa ge 163.
-
Page 79 of 342

@ Tips
Correctly adjusted head restraints and
safety belts are an extremely effective
com bi nation of safety features.
Rear head restraints
F ig . 82 Rear seat: outer head restraint
Fig. 83 Rear seat; ce nte r head restraint
If there are passengers in the rear seat, fold
the head restraints up on the occupied seats
or slide the ce nter head restraint upward at
least to the next notch ¢ &, .
Adjusting the outer head restraints
• To fold the head restraint out, pull on the
tab
¢fig. 82.
• To fold the head restraint up, til t it upward
until you feel it click into place.
Adjusting the center head restraint
• To move the head restrai nt up, hold it at the
s ides with both hands and slide it upward
u ntil you feel it click into p lace
~ fig. 83.
• To move the head restraint down, press the
button -arrow- and slide the head restraint
downward.
Seats and storage 77
Removing the center head restraint
• Move the head restraint upward as far as it
can go.
• Press the b utton -arrow- and pull the head
restraint out of the backrest¢&,.
Installing the center head restraint
• Slide the posts on the head restraint down
into the guides until you fee l the posts click
into place.
• Press the button -arrow- and sl ide the head
restraint all the way down . You should not
be able to pull the head restraint out of the
backrest.
A WARNING
- Only remove the rear seat head restraint when necessary in order to install a child
seat. Install the head restraint again im mediately once the child seat is removed .
Driving without head restraints or with
head restraints that are not properly ad
justed increases the risk of serious or fa
tal neck injury dramatica lly .
- The head restraints for the outer seats in
the second row must be folded up when
persons are being carried in the third row
seating* -danger of injury!
- Read and heed all WARNINGS
¢page 163
Armrest
The armrest contains a storage compartment
and two cup holders.
Fig. 84 Armrest betwee n dri ver's and passe nger's seat
• Push on the release lever ¢ fig. 84 to open
the storage compartment.
Page 80 of 342

78 Seats and storage
A maximum of two beverages can be accommodated in the armrest. The second c up ho ld
er is located under a cover.
.&_ WARNING
Spilled hot liquid can cause an accident
and personal injury.
-
- Never carry any beverage containers with
hot liquids, such as hot coffee or hot tea,
in t he vehicle while it is moving. In case
of an accident, sudden brak ing or other
vehicle movement, hot liqu id could spill,
caus ing sca ld ing bur ns. Sp illed hot liqu id
c an also ca use an accident and perso nal
injury.
- Use only soft cups in the cupholde r. H ard
c u ps and g lasses can ca use in jury in an
acc ident.
CD Note
On ly drink containe rs wi th lids should be
car ried in the cupho lder. Liq uid could spi ll
ou t and damage your veh icle's e lectronic
equ ipment o r sta in the upholstery, etc.
Long center console
App lies to vehicles: with long center console
Fig. 85 Long rear ce nter co nsole
There are two cupho lders and a storage bin in
the
long rear center console. The armrest is
also height adjustable .
Bever age holder
.,. Tap the cover ¢ fig. 85 -Arrow-for it to
open automat ica lly .
.,. Push the cover down to close the bin.
Storage compartment
.,. Lift the cover by the front to open the com-
pa rtment .
.,. Push the cover down to close the bin .
Adjusting the armrest
.,. Press the release button. The a rmrest
moves up automatically.
.,. Release the but ton when the desired height
is reached.
.,. Press the release button again and at the
same time push the armrest down to lower
it .
.&_ WARNING
Spi lled hot liqu id can cause an accident
and personal injury .
- Never carry any beverage conta iners with
hot liquids, such as hot coffee o r hot tea,
in the vehicle while it is moving. In case
of an acc ident, sudden braking o r other
ve hicl e movement, hot l iquid could spill,
causing s calding burns. Spilled hot liquid
can also cause an a ccident a nd personal
inj ury .
- Use on ly soft c ups in the c upholder. Ha rd
cups and glasses can cause injury in an
accident.
CD Note
Only drink conta iners with lids should be
ca rried in the c upholder. Liquid cou ld spill
out and damage you r vehicle's electronic
equipment or stain the upho lstery, etc.
Page 81 of 342
Luggage compartment
Expanding luggage compartment
To expand the luggage compartment, the
seatbacks can be folded forward separately or together .
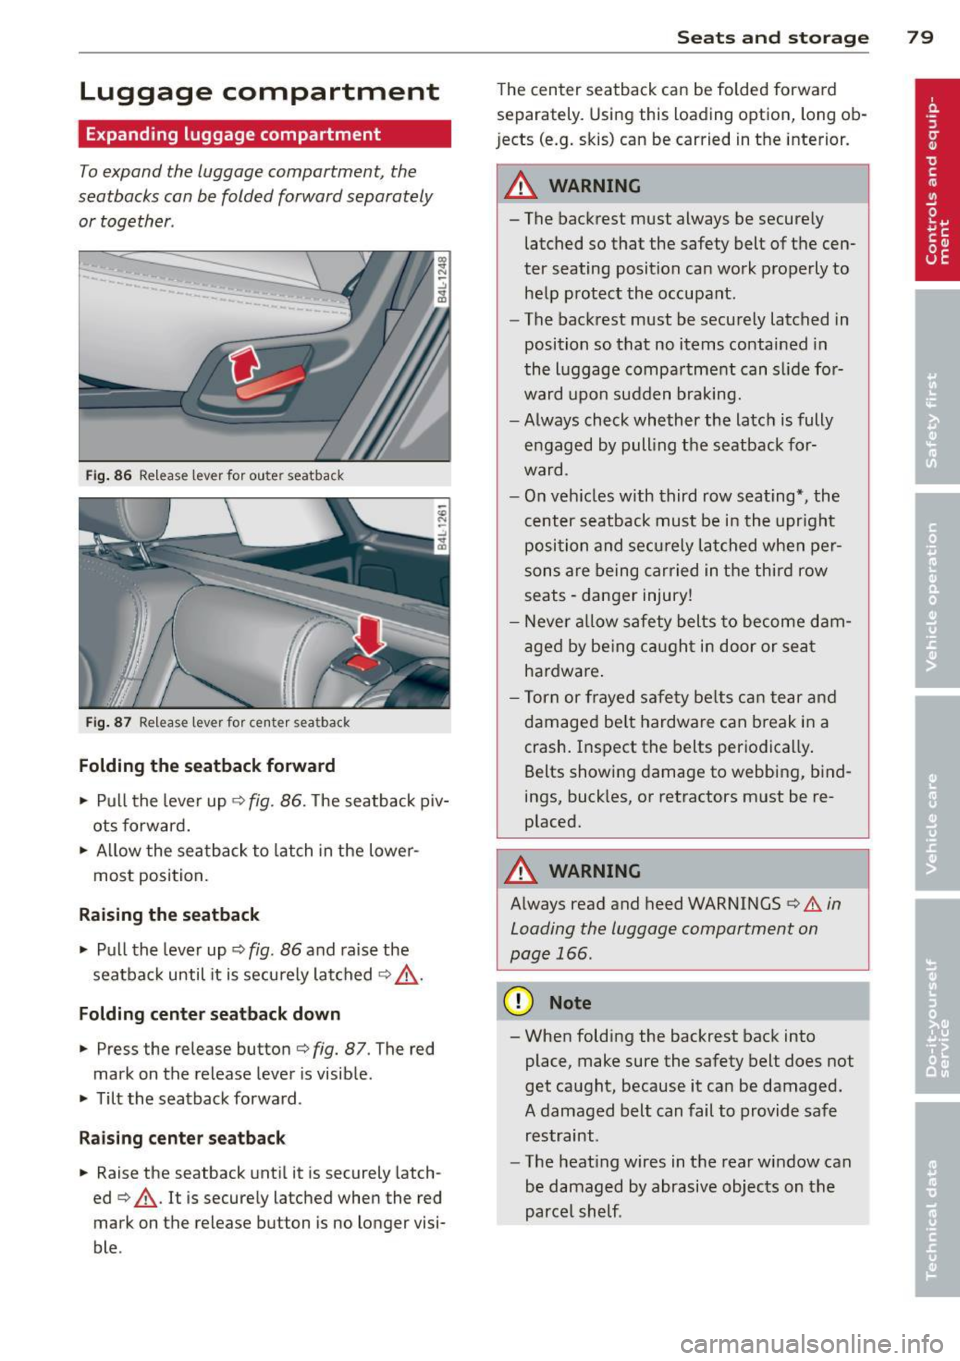
Fig. 86 Release lever for ou ter seatback
Fig. 87 Release leve r fo r cente r seatback
Folding the seatback forward
.. Pu ll the lever up ¢ fig. 86. The seatback piv
ots fo rward .
.. Allow the sea tba ck to latch in the lowe r
most posi tion.
Raising the seatback
.. Pull the lever up ¢ fig. 86 and ra ise the
seatba ck until it is secu rely latched ¢ _&. .
Folding center seatback down
.. Press the release button ¢ fig. 87. The red
mark on the release lever is visib le .
.. Tilt the seatback forward .
Raising c enter seatback
.. Raise the seatback unt il it is securely latch
ed ¢_&. . It is securely latched when the red
mark on the release button is no longer visi
ble .
Seats and storage 79
The cen ter seatback can be folded forwa rd
separately. Using this loading option, long ob
jects (e.g. skis) can be carried in t he interior.
_& WARNING
-
- The backrest must always be secure ly
latched so that the safety belt of t he cen
ter seating position ca n wo rk p roperly to
he lp p rot ect the occupant.
- The back rest must be securely latched in
position so that no items contai ned in
the l uggage compa rtment can s lide fo r
ward upon sudden braking.
- Always check whether the latc h is fully
e ngaged by pull ing t he seatback for
ward .
- On veh icles with third row seating*, the
cent er seatback must be i n the upr ight
posi tion and se curely la tched whe n pe r
sons are being carried in t he thir d ro w
seats -danger injury!
- Never a llow safety belts to become dam
age d by be ing c augh t in door or sea t
ha rdware .
- Tor n or frayed s afety be lts c an t ear and
damage d be lt hardware can break in a
crash. I nsp ect the belts per io d ica lly.
Belts showi ng damage to webbing, b ind
ings, buck les, or retractors m ust be re
placed.
_& WARNING
A lways read and heed WARNINGS ¢.&. in
Loading the luggage compartment on
page 166 .
(D Note
-When fold ing the backrest back into
place, make sure the safety belt does not
get ca ught, because it can be damaged .
A damaged belt can fail to provide sa fe
restraint .
- The heat ing wires in the rea r window can
be damaged by abrasive objects on the
parce l shelf .
Page 82 of 342
80 Seats and storage
Tie-down rings
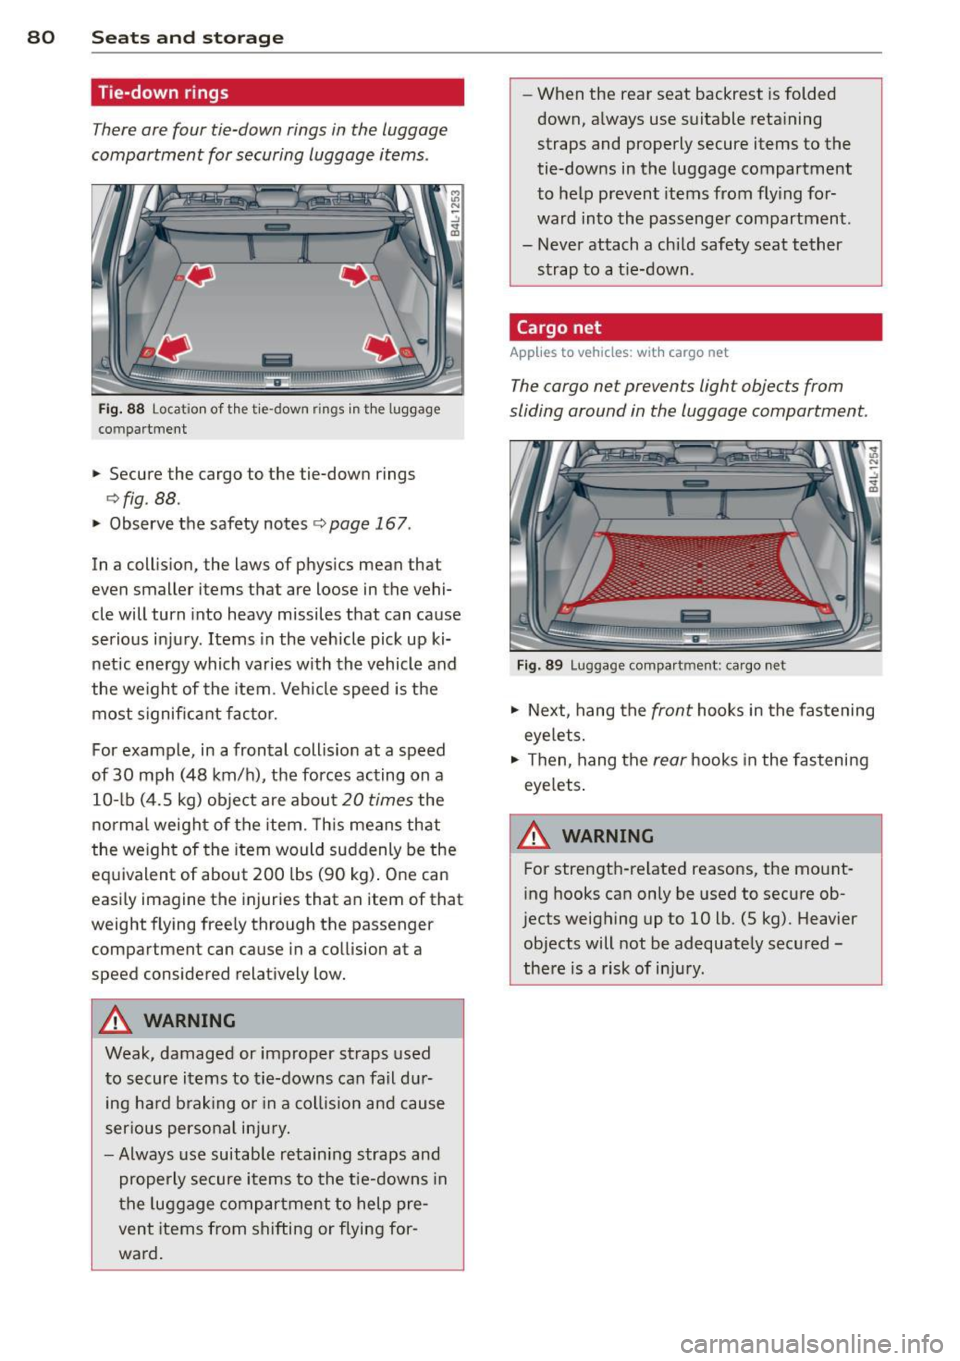
There are four tie-down rings in the luggage
compartment for securing luggage items .
liiiil
Fig. 88 Location of the tie-down rings in th e luggage
compartment
., Secure the cargo to the tie-down rings
¢fig. 88 .
., Observe the safety notes ¢ page 167 .
In a collis ion, the laws of physics mean that
even smaller items that are loose in the vehi
cle will turn into heavy missiles that can cause
serious injury. Items in the vehicle pick up ki
netic energy which varies with the vehicle and
the we ight of the item. Vehicle speed is the
most significant factor.
For example, in a frontal collis ion at a speed
of 30 mph (48 km/h), the forces acting on a 10- lb (4. 5 kg) object are about
20 times the
normal weight of the item. T his means that
the weight of the item would suddenly be the
equivalent of about 200 lbs (90 kg). One can
easily imagine the injuries that an item of that
weight flying freely through the passenger
compartment can cause in a collision at a
speed considered relatively low.
A WARNING
Weak, damaged or improper straps used
to secure items to tie-downs can fail dur
ing hard braking or in a collision and cause
serious personal injury.
- Always use suitable retaining straps and
properly secure items to the tie-downs in
the luggage compartment to help pre
vent items from shifting or flying for
ward.
.
- When the rear seat backrest is folded
down, always use suitable retaining
straps and properly secure items to the
tie-downs in the luggage compartment
to help prevent items from flying for
ward into the passenger compartment.
- Never attach a child safety seat tether strap to a tie-down.
Cargo net
Applies to vehicles: wit h cargo net
The cargo net prevents light objects from
sliding around in the luggage compartment.
Fig. 89 Luggage compartment: cargo net
., Next, hang the front hooks in the fastening
eyelets.
., Then, hang the
rear hooks in the fastening
eyelets .
A WARNING
--
For strength-related reasons, the mount·
ing hooks can only be used to secure ob
jects weighing up to 10 lb. (5 kg). Heavier
objects will not be adequately secured -
there is a risk of injury.
Page 83 of 342
Retractable luggage compartment cover
The luggage compartment cover keeps lug
gage or other objects out of view .
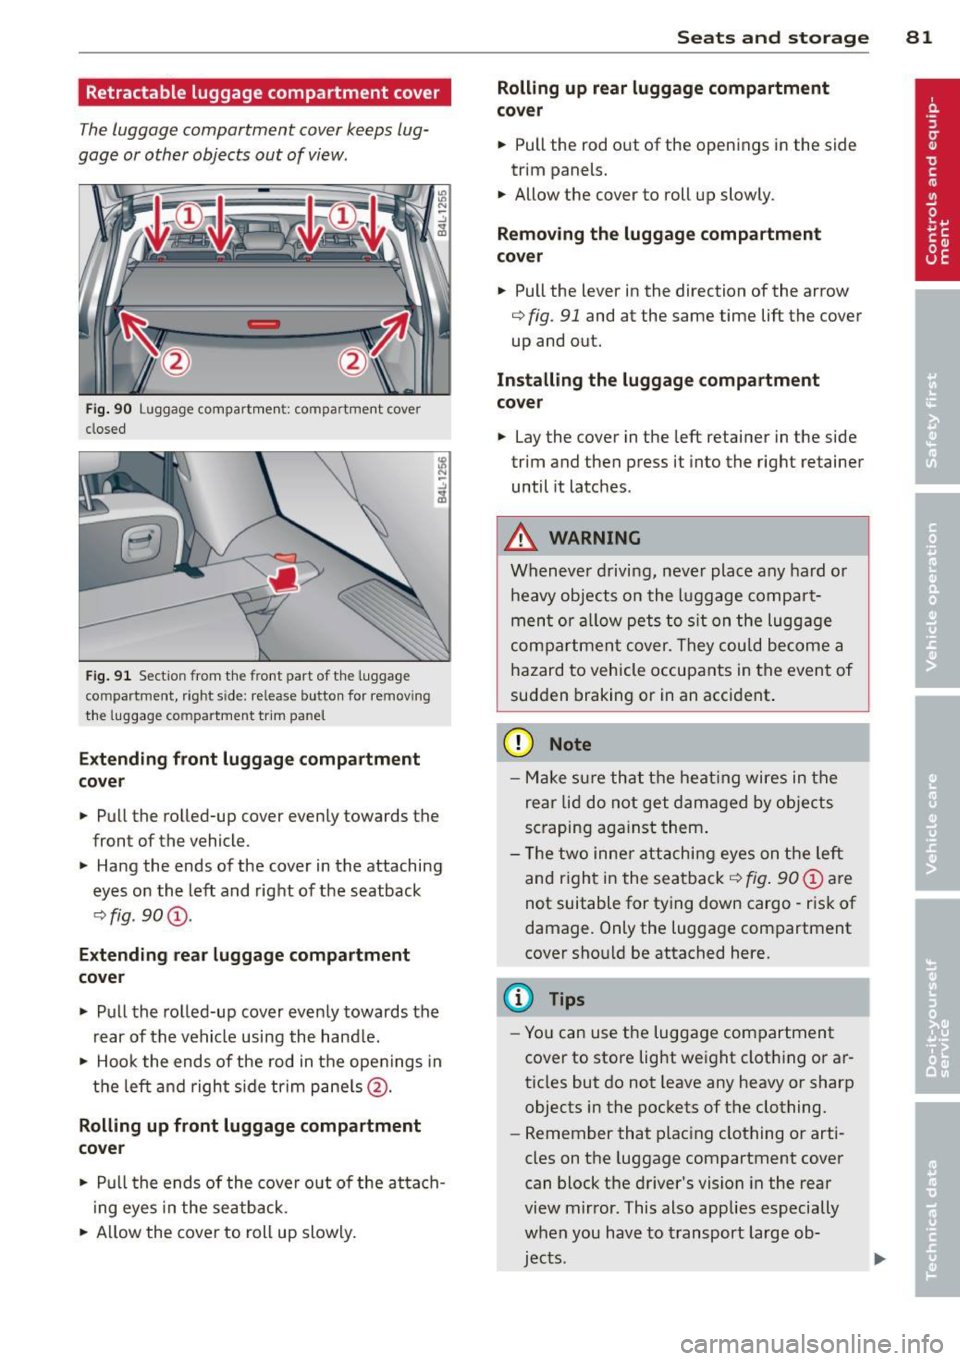
Fig. 90 Luggage compartmen t: compartment cove r
closed
Fig. 91 Sectio n from the front pa rt of the luggage
c o m partment , righ t side: release button for removing
the luggage compa rtment trim panel
Extending front luggage compartment
cover
"' Pull the rolled-up cover evenly towards the
front of the vehicle.
"' Hang the ends of the cover in the attaching
eyes on the left and right of the seatback
¢fig . 90 @.
Extending rear luggage compartment
cover
"' Pull the rolled-up cover evenly towards the
rear of the vehicle using the handle.
"' Hook the ends of the rod in the openings in
the left and right side trim panels@.
Rolling up front luggage compartment
cover
"' Pull the ends of the cover out of the attach
i ng eyes in the seatback.
"' Allow the cover to roll up slowly.
Seats and storage 81
Rolling up rear luggage compartment
cover
"' Pull the rod out of the openings in the side
trim panels.
"' Allow the cover to roll up slowly .
Removing the luggage compartment
cover
"' Pull the lever in the direction of the arrow
¢ fig. 91 and at the same time lift the cover
up and out.
Installing the luggage compartment
cover
"' Lay the cover in the left retainer in the side
trim and then press it into the right retainer
until it latches .
A WARNING
Whenever driving, never place any hard or
heavy objects on the luggage compart
ment or allow pets to sit on the luggage
compartment cover. They could become a
hazard to vehicle occupants in the event of
sudden braking or in an accident .
(D Note
-Make sure that the heat ing wires in the
rear lid do not get damaged by objects
scraping against them.
- Th e two inner attaching eyes on the left
and right in the seatback
¢ fig . 90 @ are
not suitable for tying down cargo - risk of
damage. Only the luggage compartment
cover should be attached here.
(D Tips
- You can use the luggage compartment
cover to store light weight clothing or ar
ticles but do not leave any heavy or sharp
objects in the pockets of the clothing.
- Remember that plac ing clothing or arti
cles on the luggage compartment cover
can block the driver's vision in the rear
view mirror . This also applies especially
when you have to transport large ob
jects .
Page 84 of 342
82 Seats and st o rage
- So that stale a ir can escape from the ve
hicle be sure not to cover the ventilation
s lot between the rear lid and the lug
gage compartment cover.
Protective liner
Dirty or wet objects con be tronsported under
the cargo floor in a protective tray.
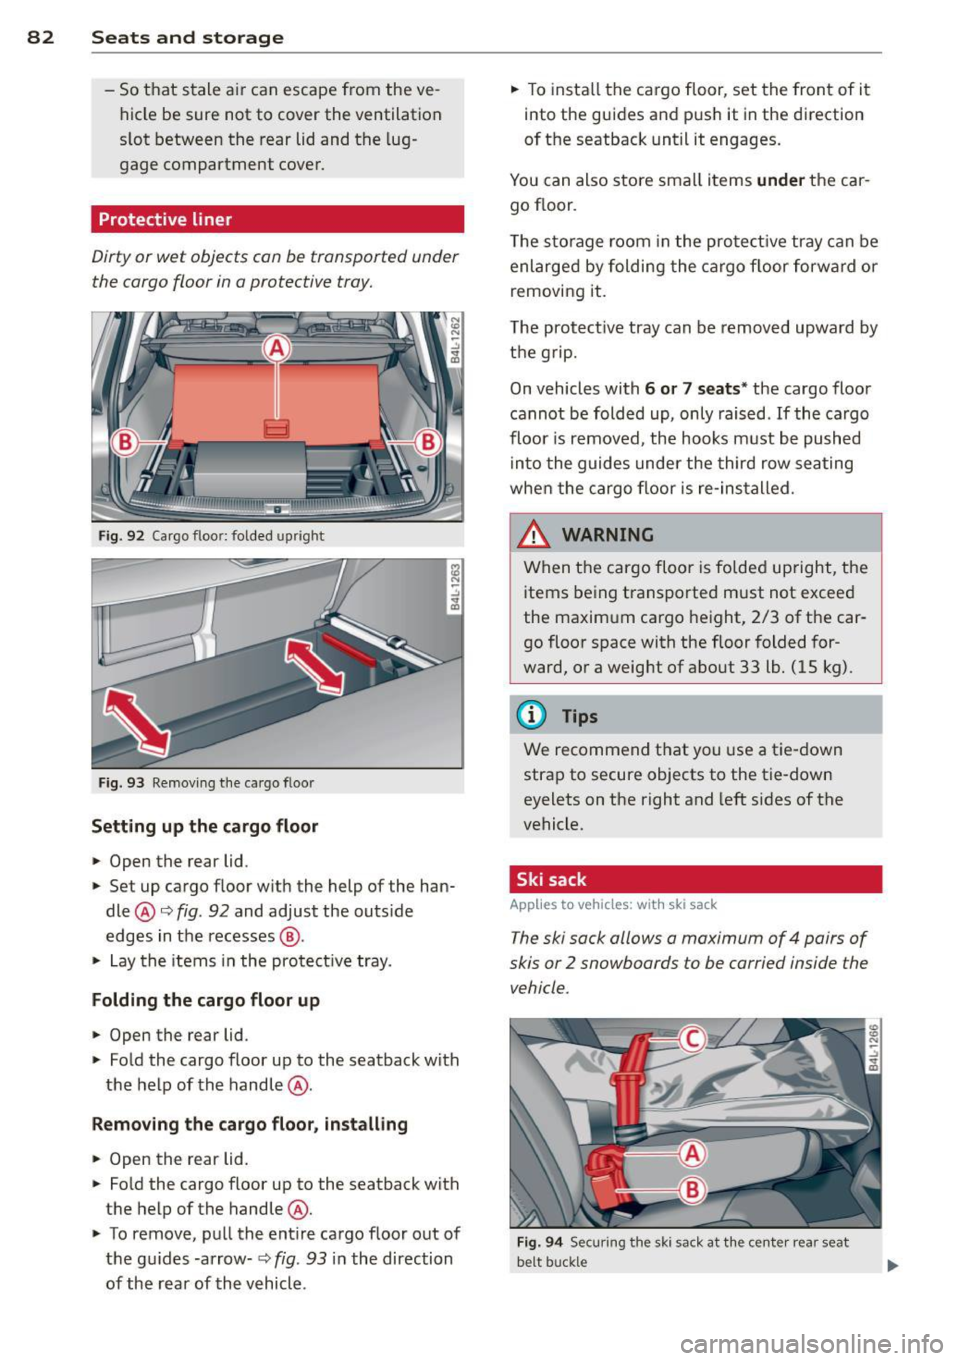
Fig. 92 Cargo floor: folded upright
Fig. 93 Remov ing t he cargo floor
Setting up the ca rg o flo or
• Open the rear lid.
• Set up cargo floor with the help of the han
dle @¢
fig. 92 and adjust the outs ide
edges in the recesses @.
• Lay the items in the protect ive tray.
Folding the cargo floor up
• Open the rear lid.
• Fold the cargo floor up to the seatback with
the help of the handle @.
Rem oving the c arg o floor , in sta ll ing
• Open the rear lid.
• Fo ld the cargo floor up to the seatback with
the help of the handle @.
• To remove, pull the enti re cargo floor out of
the gu ides -arrow-
Q fig . 93 in the direction
of the rear of the vehicle. •
To insta ll the ca rgo floor, set the front of it
into the guides and pus h it in the direction
of the seatback until it engages.
You can also store sma ll items
und er the car
go floor.
T he sto rage room in the pro te ct ive tray can be
enlarged by folding the cargo floor forward or
removing it .
T he protect ive tray can be removed upward by
the grip.
On vehicles with
6 or 7 sea ts* the cargo floor
cannot be folded up, only raised. If the ca rgo
floor is removed, the hooks must be pushed
into the guides under the third row seating
whe n the cargo floor is re-installed.
& WARNING
When the cargo floor is folded upright, the
items being transported must not exceed
the maximum cargo height, 2/3 of the car
go floor space with the floor folded for
ward, or a weight of about 33 lb. (15 kg).
@ Tips
We recommend that you use a tie-down
strap to secure objects to the tie-down
eyelets on the right and left sides of the
vehicle.
· Ski sack
Applies to vehicles: with ski sack
The ski sack allows a maximum of 4 pairs of
skis or 2 snowboards to be carried inside the
vehicle.
F ig. 9 4 Securing the ski sack at the center rear seat
be lt buckle