tire pressure AUDI Q7 2012 Owner´s Manual
[x] Cancel search | Manufacturer: AUDI, Model Year: 2012, Model line: Q7, Model: AUDI Q7 2012Pages: 342, PDF Size: 86.42 MB
Page 5 of 342
Adaptive Air Suspension .. .. . .
Air suspension and damping 150
150
Homelink ® . . . . . . . . . . . . . . . . . . . . 156
Universal remote control . . . . . . . . . . . 156
Safet y fir st . . . . . . . . . . . . . . . . . . . . 160
Driving Safely . . . . . . . . . . . . . . . . . 160
Gene ral notes . . . . . . . . . . . . . . . . . . . . 160
Proper occupant seating posit ions . . . 161
Ped al area . . . . . . . . . . . . . . . . . . . . . . . 165
Stowing luggage . . . . . . . . . . . . . . . . . 166
Report ing Safety Defects . . . . . . . . . . . 167
Safety belts . . . . . . . . . . . . . . . . . . . 170
General notes . . . . . . . . . . . . . . . . . . . . 170
Why safety belts? . . . . . . . . . . . . . . . . 171
Safety belts . . . . . . . . . . . . . . . . . . . . . 17 4
Safety bel t pretens ioners . . . . . . . . . . 177
Airbag system .......... ... ... .
Important things to know .. .. .. .. . .
Fr ont airbags ............ .... .. . .
M on itoring the A dvanced Airbag
System .... .. ... .. ..... ... .. .. . .
Side airbags . ... ...... ... .. .. .. . .
Side curtain airbags .... ... .. .. .. . .
Child Safety .. .. .... ... .. .. .. . .
Important th ings to know . ... .. .. . .
Ch ild safety seats ......... .... .. . .
Instal ling a child safety seat .. .. .. . .
LATC H Lower ancho rages and tethers
for chi ldren .... .. .. ...... .. .. .. . .
Addit ional Information
Vehicle operation ..... .. .. .. . .
Intelligent technology .. .. . .. .
179
179
183
190
194
197
200
200
205
209
212
218
219
219
Not ice about data recorded by vehi cle
con trol mod u Les . . . . . . . . . . . . . . . . . . 2 19
E lect ronic S tabili ty Control ( ES C) . . . . 219
Braking . . . . . . . . . . . . . . . . . . . . . . . . . 222
Servotronic ® -advanced power
steering system . . . . . . . . . . . . . . . . . . 224
Driving w ith your quattro ® . . . . . . . . . 225
Energy management . . . . . . . . . . . . . . 225
Table of contents 3
Driving and environment . . . . .
228
The first 1,000 miles (1,SOO km) and
afterwa rds . . . . . . . . . . . . . . . . . . . . . . 228
Catalytic co nverter . . . . . . . . . . . . . . . . 229
Diesel particulate filter . . . . . . . . . . . . 229
Avoid damaging the vehicle . . . . . . . . . 230
Operate your vehicle eco nomically and
min imize poll ution . . . . . . . . . . . . . . . . 230
Driving off road . . . . . . . . . . . . . . . 232
Driving in d ifficult road conditions and
offroad . . . . . . . . . . . . . . . . . . . . . . . . . 232
Trailer towing . . . . . . . . . . . . . . . . . 235
D riving with a trailer . . . . . . . . . . . . . . 235
T rai le r tow ing tips . . . . . . . . . . . . . . . . 237
Vehicle care . . . . . . . . . . . . . . . . . . . 239
Cleaning and protection . . . . . . 239
General information . . . . . . . . . . . . . . 239
Care of ex terior . ... .. .. .. .... ... .
Care of inte rior ... .. . .. .. ..... ... .
Fuel supply and filling your
fuel tank ... .... .. . .. .. ..... ... .
Fuel supply ...... .. . .. .. ..... ... .
Diesel f uel .. .. .. .. .. ... ..... ... .
Fuel tank .. .. .. .. .... ........... .
Se lective cata lytic reduction ..... .. .
Checking and filling .......... .
Engine hood ... .. ............... .
E n gine oi l ... .... ... .. .... ...... .
Engine cooling system .. .. ... ..... .
B rake fluid ....... ...... ........ .
B attery ... .. .. .. .. . ............ .
Windsh ie ld/headl ight washer
conta iner . .. .. .. .. ............. . 239
244
25
0
250
251
252
255
258
258
260
265
268
2 69
2 73
Tires and wheels . . . . . . . . . . . . . . 274
T ires . . . . . . . . . . . . . . . . . . . . . . . . . . . 274
T ire pressure monitoring system 292
Do -it -yourself service . . . . . . . . . 295
What do I do now? . . . . . . . . . . . . 295
Jack , tools and inflatab le spare tire . . 295
Changing a wheel . . . . . . . . . . . . . . . . . 298
•
•
Page 16 of 342
14 Instruments and warning/indicator lights
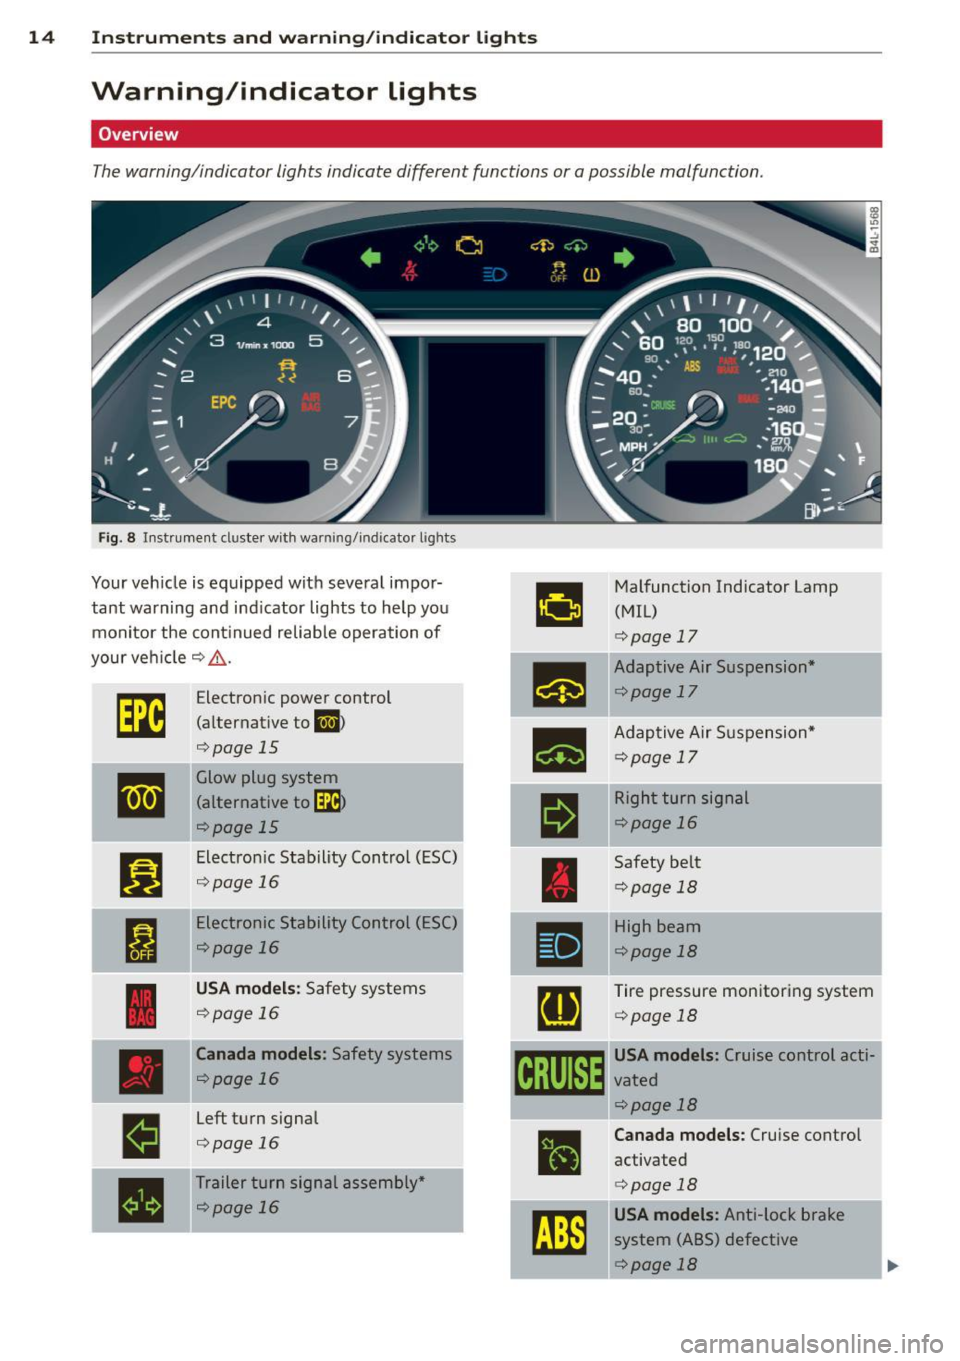
Warning/indicator lights
Overview
The warning/indicator lights indicate different functions or a possible malfunction.
Fig . 8 Instrument duster w ith warning/indicator ligh ts
Your veh icle is equipped with several impor·
a
Malfunction Indicator Lamp
tant warning and indicator lights to help you (MIL)
monitor the continued reliable operation of
<=:>page 17
your veh icle c:> _& .
•
Adaptive Air Suspension*
rm
Electron ic power control <=:>page 17
(alternative to l,;I) -
•
Adaptive Air Suspension*
<=:>page 15
<=:>page 17
II
Glow plug system ~
(alternative to~
rl
Right turn signal
<=:>page 15 <=:>page
16
•
Electron ic Stability Control (ESC)
Safety belt
<=:>page 16
<=:>page 18
I
Electronic Stability Control (ESC)
•
High beam
<=:>page 16
¢page 18
USA models: Safety systems
[g
Tire pressure monitoring system
<=:>page 16
<=:>page 18
Canada models : Safety systems
gm
USA models: Cruise control acti·
<=:>page 16 vated
<=:>page 18 j
Left turn signal
E
Canada models: Cruise control <=:>page 16
•
activated
•
Trailer turn signal assembly* c:>pafe 18
<=:>page 16
~
USA models: Anti-lock brake
system (ABS) defective
¢page 18
Page 20 of 342
18 Instrum ent s and w arn ing /indic ato r light s
because low -lying vehicle parts can bot
tom out as you drive over uneven ground
and be damaged as a res ult .
~ Safety belts
This warning/indicator light reminds you to
put on your safety b elt.
The . warn ing/ indicato r light illum inates
when the ignition is switched on to remind
the d river and (on USA models only) any front
passenger to put on the safety belt . Add ition
ally, an acous tic warning (gong) will also
sound.
F or more Information
r=) page 170, Safety
belt warning light.
~D High beam
The ii warning/indicato r light illuminates
when the high beams are on or when you use
the head light flasher . For more informat ion
about using the h igh beams, seer=)
page 60.
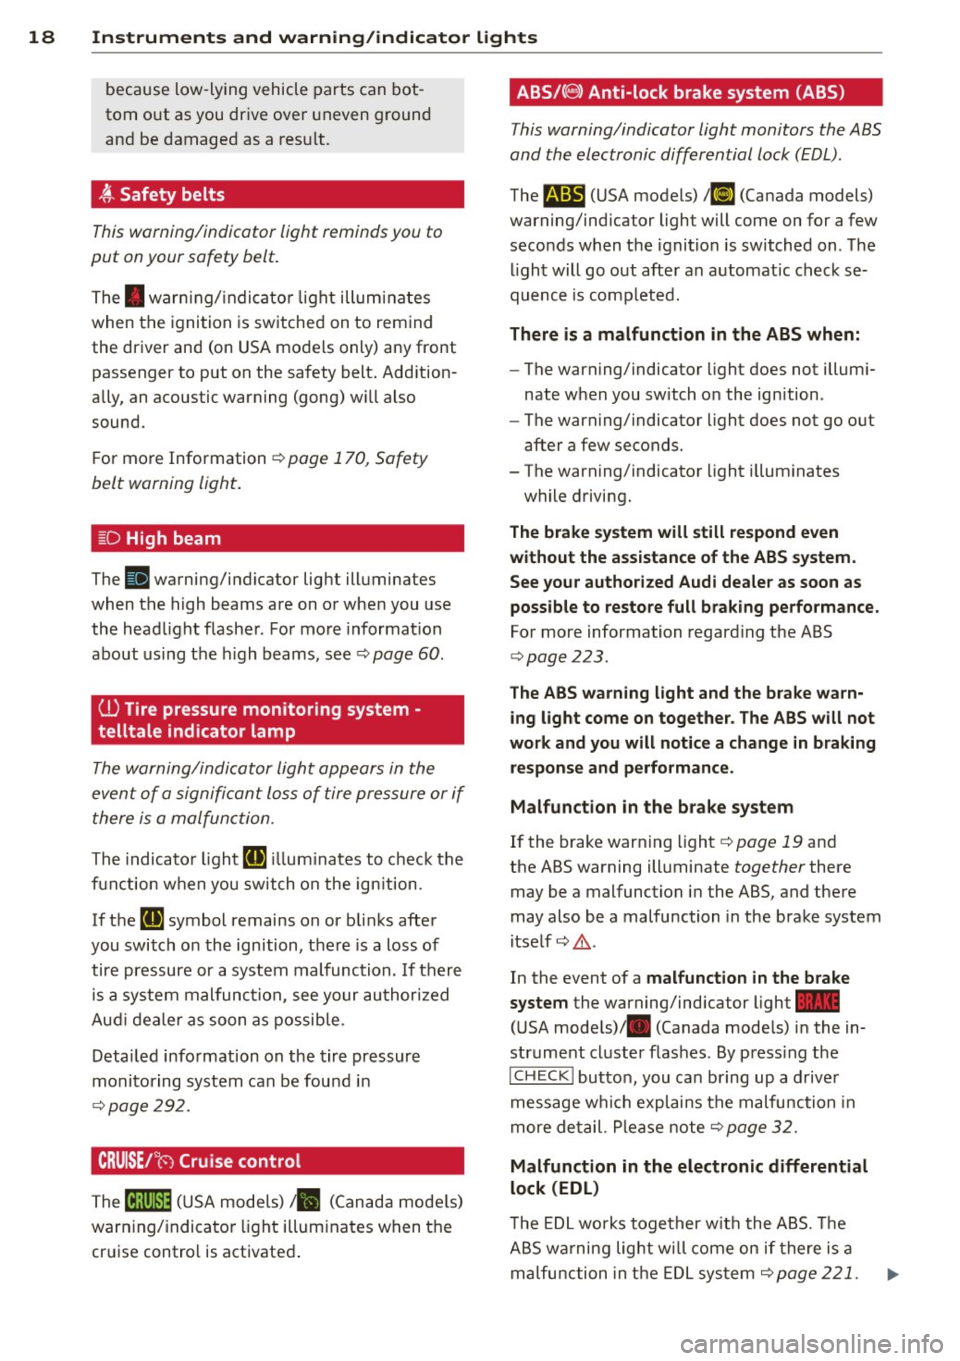
(l) Tire pressure monitoring system -
telltale ind icator lamp
The warning/indicator light appears in the
event of a significant loss of tire pressure or if there is a malfunction .
The indicator light (I] ill um inates to check the
function w hen you switch on the ign ition.
If the
(I] symbol remains on or b links after
you switch on the ignition, there is a loss of
tire pressure or a system malfunction . If there
is a system malfunction , see your au thorized
Aud i dealer as soon as possib le.
Detailed info rmation on the tire pressure
monitoring system can be found in
r=) page292.
CRUISE /'(-) Cruise control
The lff;jl)~i~ (USA mode ls) ;II (Canada mode ls)
warning/indicato r light illuminates when the
cr uise contro l is activated .
ABS/(8) Anti -lock brake system (ABS)
T his warning/indicator light monitors the ABS
and the electronic differential lock (EDL) .
Them (USA models) ;ii] (Canada models)
warning/indica tor ligh t will come on for a few
seconds when the ignition is switched on . T he
l ight will go out after an automat ic check se
quence is comp leted.
There is a malfunction in the ABS when:
-The warning/indicator light does not illum i
nate when you switch on the ignition .
- The warning/indicator light does not go out
after a few seconds.
- T he wa rning/indicator light i llum inates
while driving.
The brake system will still respond e ven
without the ass istance of the ABS system.
See your authorized Audi deale r as soon as
possible to restore full braking perfo rmance.
For more information regard ing the ABS
<=> page 223.
The AB S warning light and the brake wa rn
ing light come on together. The ABS will not
work and you will notice a change in braking
r es ponse and p erform ance.
Malfunction in the brake system
If the brake warning light r=) page 19 and
the ABS warning ill uminate
together there
may be a malfunction in the ABS, and there
may also be a malfunction in the brake system
i tself <=>
A.
In the event of a malfunction in the brake
system
the warning/indicator ligh t 1111
(USA models)/ . (Canada mode ls) in the in
st rument cluster flashes . By press ing the
jCH ECKI button, you can b ring up a d river
message whi ch explains the malfunction in
more de tail. Please note
<=> page 32 .
Malfunction in the electronic differential
lock (EDL)
The EDL works toge ther w it h the ABS. The
ABS wa rning lig ht w ill come on if there is a
malfu nction in the EDL sys tem
<=> page 221 .
Page 37 of 342
II
Low fuel level
¢page 35
fi.fl1::jfl1-j Kefill Ad Blue*
¢page255
-Ad Blue,/'
•
•
•
••NI@
AdBlue ma lfunction*
¢poge255
Battery voltage
¢poge36
Worn brake pads
¢poge36
Dy namic headlight range
control defective
¢poge36
Check eng ine oil level
¢poge36
Engine oil sensor malfunc
tion
¢poge36
Engine speed limitat ion*
¢poge36
Diesel particulate filter *
clogged
¢poge37
A dapt ive lig ht* defec tive
¢poge37
-Ignition lock malfunction
¢poge37
W indshield wiper defective
¢poge37
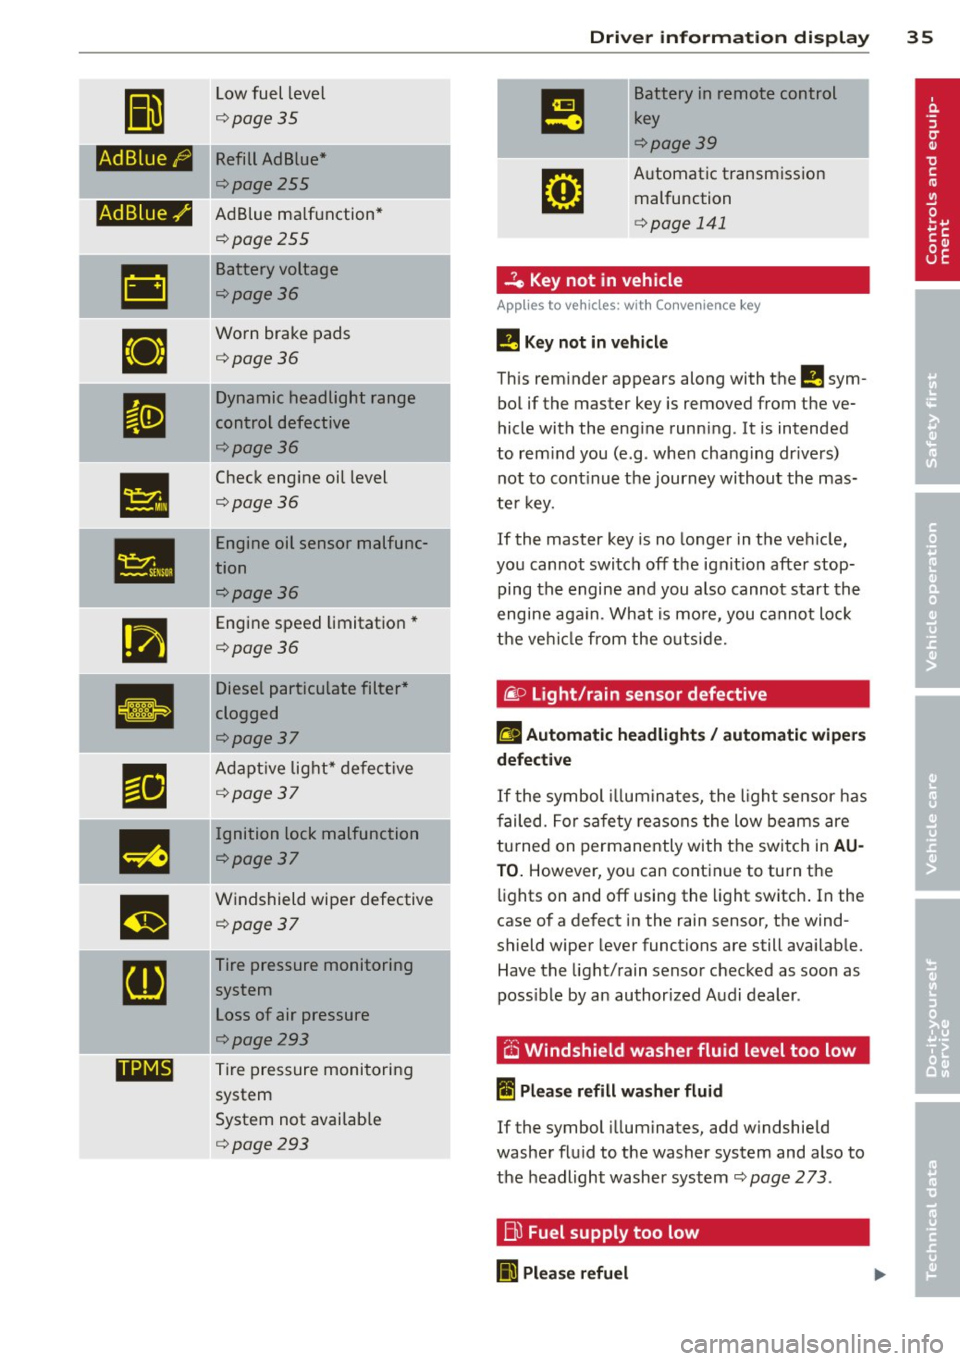
Tire pressure monitoring
sys tem
Loss of air pressure
¢poge293
T ire pressure monitoring
system
System not availab le
¢poge293
Dri ver information di spla y 35
Battery in remote control
key
¢poge39
A utomat ic transm iss ion
malfunction
¢ page 141
...?c, Key not in vehicle
Applies to vehicles: with Convenience key
!!I Key not in vehicle
This reminder appears along with the !!I sym
bol if the master key is removed from the
ve
hicle with the engine runn ing. It is intended
to rem ind you (e .g. whe n cha ng ing dr ive rs)
not to cont inue the journey without the mas
te r k ey.
If the master key is no longer in the ve hicle ,
you cannot swi tch off t he ig nit io n after stop
ping the engine an d you also cannot start the
engine aga in. What is mo re, you cannot lo ck
t he ve hicl e from the o utsi de.
@. D Light/rain sensor defective
fll Automatic headlights/ automatic wipers
defective
If t he symbol illumina tes, the l ight se nsor has
f ailed. For safe ty rea sons the low beams are
tu rned on permanently with t he switc h in
AU
TO. However , yo u can cont inue to tu rn the
li g hts on and off using the light switch . In the
case of a defect in the rain sensor, t he wind
shield wiper lever functions are still availab le.
Have the light/rain senso r ch ecked as soon as
poss ible by an author ized Audi dealer .
6 Windshield washer fluid level too low
~ Please refill washer fluid
If the symbol illuminates, add w indshie ld
washe r fl ui d to the washer system and also to
t h e headlight washer system
¢ page 2 73 .
Bl Fuel supply too low
II Please refuel
Page 162 of 342
160 Driving Safel y
Driving Safely
General notes
Safe driving habits
Please remember -safety first!
This chapter contains important information,
tips, instructions and warnings that you need
to read and observe for your own safety, the
safety of your passengers and others . We have
summarized here what you need to know
about safety belts, a irbags, ch ild restra ints as
well as child safety. Your safety is for us
priori
ty number 1.
Always observe the info rmat ion
and warn ings in th is sect ion -fo r yo ur own
safety as well as that of your passengers .
The information in this se ction app lies to all
model ve rsions of your veh icle . Some of the
feat ures desc ribed in this sec tions may be
standard equipment on some models, or may be optional equipment on others . If you are
not sure, ask your authorized Aud i dealer.
A WARNING
- Always make sure that you follow the in
struct ions and heed the WARNINGS in
this Manual. It is in your interest and in
the inte rest of you r passengers.
- Always keep the complete Owner's Liter
ature in your Audi when you lend or sell
yo ur vehicle so that this important info r
mation will always be ava ilable to the
dr iver and passengers.
- Always keep the Owner's literature handy
so that you can find i t eas ily if you have
ques tions.
Safety equipment
The safety features are part of the occupant
restraint system and work together to help
redu ce the risk of injury in a wide variety of
accident situations.
Your safety and the safety of your passenge rs
should not be left to chance. Advances in
technology have made a varie ty o f fea tures
avai la bl e to he lp re duce the risk of inj ury in an accident
. The following is a list of just a few of
the safety features in your Audi:
- sophis tic ated s afety be lts for d rive r and a ll
passenger sea ting pos it ions,
- be lt te nsione rs fo r th e fro nt sea ts a nd the
ou ter sea ting posit ions in the second row
seating,
- be lt h eight adjustment fo r th e front sea ts
an d the o ute r seat ing pos itions in the sec
ond row seating,
- he ad restra ints for e ach sea ting pos ition,
- front airbags,
- side airbags in the fro nt seats and the outer
seating positions in the second row seat ing*,
- side curta in ai rbags,
- specia l LATCH anchorages for child re-
st raints,
- ad justab le steering colum n.
These individual safety features, can work to gether as a system to he lp protect you and
your passengers in a wide range of accidents .
These features cannot work as a system if
they are not always correctly adjusted and cor rectly used .
Safety is everybody's responsibil ity!
Important things to do before driving
Safety is everybody 's job! Vehicle and occu
pant safety always depends on the informed
and careful driver.
For yo ur safety and the safety of your passen
gers,
before driving always:
.. Make s ure that all lights and signa ls a re op
erati ng correctly .
.. Ma ke s ure that the tire pressure is correct .
.. Make s ure that all windows are clean and
afford good v is ibility to the o utside.
.. Secure a ll luggage a nd other items carefu lly
¢ page 87.
.. Make su re that nothing can in terfe re with
the peda ls.
.. Adjust fron t se at, head restraint and mir
rors co rrec tly for you r heigh t.
Page 163 of 342
.. Instruct passengers to adjust the head re
straints according to their height.
.. Make sure to use the right child restraint
correctly to protect children
c:> page 200,
Child Safety .
.. Sit properly in your seat and make sure that
your passenge rs do the same
c:> page 71,
General recommendations .
.,. Fasten your safety belt and wear it properly.
Also ins truc t your passengers to fasten their
safety belts properly
c:> page 170.
What impairs driving safety?
Safe driving is directly related to the condi
tion of the vehicle, the driver as well as the
driver's ability to concentrate on the road
without being distracted.
The driver is respons ible for the safety of the
vehicle and a ll of its occupants . If your ability
to drive is impaired, safety risks for everybody
in the vehicle increase and you also become a
hazard to everyone else on the road
c:> .&,. .
Therefore:
.. Do not let yoursel f be distracted by passen
gers or by using a cellular telephone .
.. NEVER drive when your driving ability is im
paired (by medications, alcohol, drugs, etc.).
.. Observe all traffic laws, rules of the road
and speed limits and plain common sense .
.,. ALWAYS adjust your speed to road, traffic
and weather cond it ions .
.. Take frequent breaks on long trips. Do not
drive for more than two hours at a stretch.
.. Do NOT drive when you are tired, under
pressure or when you are stressed .
A WARNING
Impaired driving safety increases the risk
of serious personal injury and death when
ever a veh icle is being used.
Driving Safely 161
Proper occupant
seating positions
Proper seating position for the driver
The proper driver seating position is impor
tant for safe, relaxed driving.
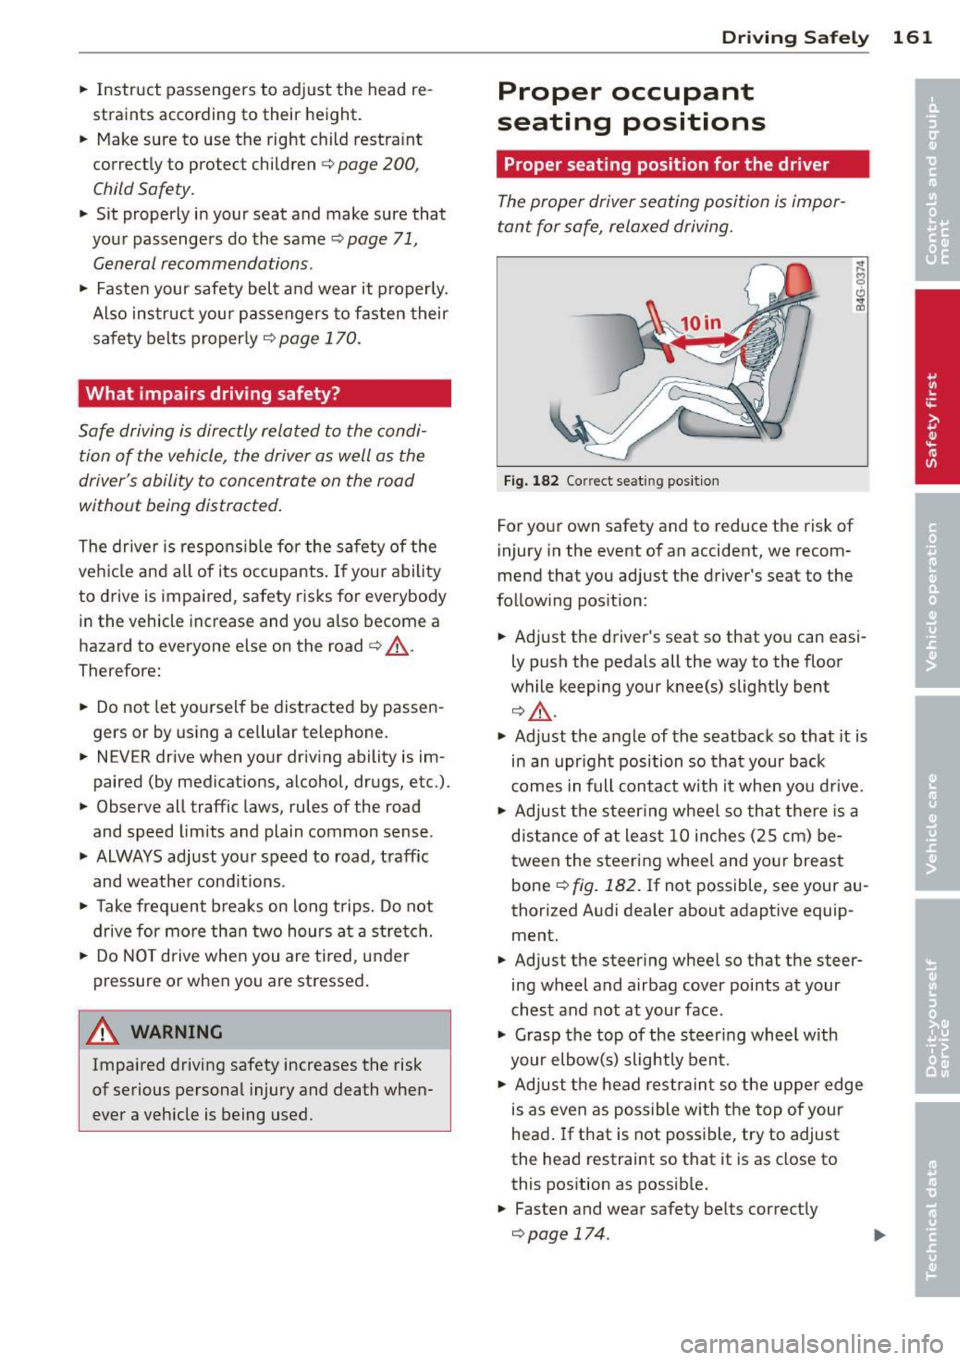
Fig. 182 Correct seat ing pos it ion
For your own safety and to reduce the risk of
injury in the event of an accident, we recom
mend that you adjust the driver's seat to the
follow ing position:
.. Adjust the driver's seat so that you can easi
ly push the pedals all the way to the floor
wh ile keeping your knee(s) slightly bent
c:> .&,. .
.. Adjust the angle of the seatback so that it is
in an upr ight position so that your back
comes in full contact w ith it when you drive .
.. Adjust the steering wheel so that there is a
distance of at least 10 inches (25 cm) be
tween the steering wheel and yo ur breast
bone ~
fig. 182. If not possible, see your au
thorized Audi dealer about adaptive equip
ment .
.. Adjust the steer ing wheel so that the steer
ing wheel and airbag cover points at your
chest and not at your face.
.,. Grasp the top of the steer ing whee l with
your elbow(s) slightly bent.
.. Adjust the head restraint so the upper edge
is as even as possible with the top of your
head. If that is not poss ible, try to adjust
the head restraint so that it is as close to
this position as possible .
.. Fasten and wear safety belts correctly
c:>page 174.
Page 169 of 342
to reduce the risk of injury when the vehi
cle is not be ing used.
- After closing the rear lid, always make
sure that it is properly closed and locked.
- Never leave your vehicle unattended es
pecially with the rear lid left open . A
child could crawl into the vehicle through
the luggage compartment and close the
rear lid becoming trapped and unable to
get out . Be ing trapped in a vehicle can
lead to serious persona l injury .
- Never let children play in or around the vehicle .
- Never let passe ngers r ide in the luggage
compartment . Ve hicle occupants must
always be properly restrained in one of
the vehicle's seating positions.
(D Tips
- Air c irculation helps to reduce window
fogging . Sta le air escapes to the outside
th rough vents in the trim pane l. Be su re
to keep these slots free and open .
-The t ire pressure must correspond to the
load. The t ire pressur e is shown o n the
tire p ress ure label. The tire pressure la
bel is loc ated on the d river's s ide B-pi ll a r.
The t ire pressure label lists the recom
mended cold ti re inflat ion pressu res for
the vehicle at its maximum capacity
weig ht and the tires that were on you r
vehicle at the time it was man ufactured .
For recommended t ire pressures fo r nor
mal load conditions, please see chap ter
c:> page278 .
Tie-downs
The luggage compartment is equipped with
four tie-downs to secure luggage and other
items .
Use the tie-downs to secure your cargo prop
erly
c:> page 166, Loading the luggage com
partment.
In a coll is ion, the l aws of phys ics mean that
even smalle r items that are loose in the vehi
cle will become heavy missiles that can cause
Dr iving S afel y 167
serious injury. Items in the ve hicle possess en
ergy which vary with vehicle speed and th e
weight o f the item . Vehicle speed is the most
s ignificant factor.
Fo r example, in a fronta l collision at a speed
of 30 mph (48 km/h), the forces acting on a
10 -lb (4.5 kg) object are about 20 t imes the
no rmal weight of the item. This means t hat
the weigh t of the item would sudden ly be
about 200 lbs. (90 kg) . You can imag ine the
i njur ies that a 200 lbs . (90 kg) item fly ing
fr eely th ro ugh the passenger compar tme nt
c ould cause in a co lli sion like this.
A WARNING
We ak, dam aged or imprope r str aps used
to secure items to tie -downs can fail dur
ing hard braking or in a collision and cause
serio us personal injury .
-Always use s uita ble mount ing stra ps and
properly secu re items to the tie-downs in
the l uggage compa rtme nt to he lp pre
vent items from shift ing or f ly ing fo r
ward as dangerous missiles .
-When the rea r seat backrest is folded
down, a lways use suitable mounting
straps and properly secure items to the
tie-downs in the luggage compartment
to hel p prevent items from fly ing for
ward as da ngerous missiles into the pas
s enger compartment .
- Never attach a chi ld safety seat te th er
s trap to a t ie- down .
Reporting Safety
Defects
Applicable to U.S.A.
If you b elieve that your v ehi cle
has a d efe ct whi ch could cause
a crash or could cause injury or
d eath, you should imm ediately
inform the National Highway
Tr affic Safet y Admini stration ..,.
•
•
Page 221 of 342
Intelligent technology Notice about data
recorded by vehicle
control modules
Your vehicle is not equipped with an Event Da
ta Recorder (EDR), installed by some manu
facturers for the express purpose of capturing
data for retrieval after an accident or crash
event. EDRs are sometimes called "crash re
corders".
Some state laws restrict the retr ieval or down
loading of data stored by EDRs that were in
stalled in a vehicle for the express purpose of
retrieving data after an accident or crash
event without the owner's consent.
Although your vehicle is not equipped with an
EDR, it is equipped with a number of electron
ic control modules for various vehicle systems
such as, for example, engine function, emis
sion control, as well as for the airbags and
safety belts.
These electronic control modules also record
vehicle-related data during norma l vehicle op
eration for diagnostic and repair purposes.
The recording capacity of the electronic con
trol modules is limited to data (no sound is re
corded) and only a small amount of data is ac
tually recorded over a very limited period of
time and stored when a system fault or other
condition is sensed by a control unit. Some of
the data then stored may relate to vehicle
speed, direction, braking as we ll as restraint
system use and performance in the event of a
crash or other condition. Stored data can only be read and downloaded with special equip
ment.
Intelligent technology 219
Electronic Stability
Control (ESC)
General information
The ESC improves the vehicle stability.
. ..---------..
------- -
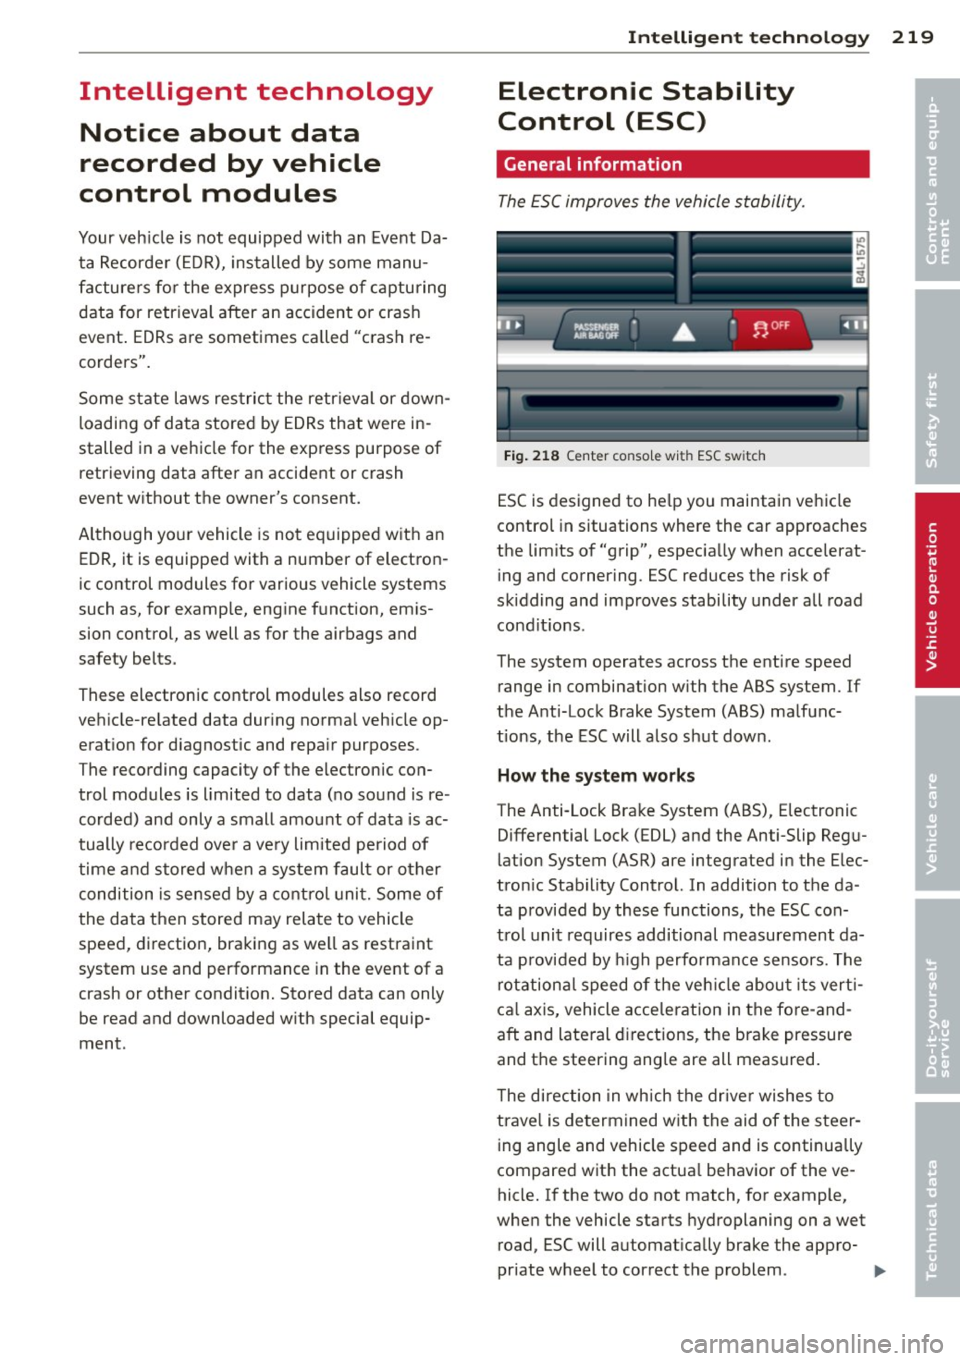
Fig. 218 Center console with ESC sw itch
ESC is designed to help you maintain vehicle
control in situations where the car approaches
the limits of "grip", especially when accelerat
ing and cornering. ESC reduces the risk of
skidding and improves stability under all road
condit ions .
The system operates across the entire speed range in combination with the ABS system. If
the Anti-Lock Brake System (ABS) malfunc
tions, the ESC will also shut down.
How the system works
The Anti-Lock Brake System (ABS), Electronic
Differential Lock (EDL) and the Anti-Slip Regu
lation System (ASR) are integrated in the Elec
tronic Stability Control. In addition to the da
ta provided by these functions, the ESC con
trol unit requires additional measurement da
ta provided by high performance sensors. The
rotational speed of the vehicle about its verti
cal axis, vehicle acceleration in the fore-and
aft and lateral directions, the brake pressure and the steering angle are all measured.
T he direction in wh ich the driver wishes to
travel is determined with the aid of the steer
ing angle and vehicle speed and is continually
compared with the actua l behavior of the ve
hicle. If the two do not match, for example,
when the vehicle starts hydroplaning on a wet
road, ESC will automatically brake the appro-
priate wheel to correct the problem. ..,_
•
•
Page 225 of 342
-Before descending a steep grade, reduce
speed and shift transmiss ion into a lower
gear or lower driving range. Do not ride
the brakes or hold the pedal down too
long or too often. This could cause the
brakes to get hot and dimin ish braking
efficiency.
- Do not "r ide the brakes" by resting your
foot on the pedal when you do not intend
to bra ke. Th is may cause the brakes to
overheat, prema ture wear and increased
stopping distance .
- Under certain climat ic and operating
condit ions such as passing through wa
ter, driving in heavy rain or after washing
the vehicle, the effectiveness of the
brakes can be reduced . In winter, ice can
accumulate on the brake pads, linings,
discs and drums. Carefully apply brakes
for a test . Brakes will dry and ice coat
ings will be cleaned off after a few care
ful brake applications.
- Driv ing for an extended period of time on
salt-covered roads w ithout us ing your
brakes can also affect braking efficiency .
Clean off accumulated salt coating from
brake discs and pads w ith a few caref ul
brake applicat ions.
- If you damage the front spoiler, or if you
install a different spoiler, be sure the air
flow to the front brakes is not obstruct
ed. Otherwise the brake system co uld
overheat reducing the effectiveness of
the entire brake system.
- Failure of one brake circuit will impair
the braking capability resulting in an in
creased stopp ing distance. Avoid driv ing
the vehicle and have it towed to the near
est author ized Audi dealer or qualified
workshop .
Brake booster
The brake booster adds extra braking power.
The brake booster works with vacuum pres
sure which is created only when the engine is
running¢ &,.
Int ellig ent technolog y 223
A WARNING
-Never let the veh icle roll to a stop with
the engine shut off .
- If the brake booster is not working, for
example when towing your vehicle, or because the brake booster has somehow
been damaged, the brake pedal must be
pressed considerably harder to make up
for the la ck of booster assistance .
Functioning of Anti-Lock Brake System
(ABS)
ABS prevents the wheels from locking up un
der braking.
T he ABS contributes effect ively to vehicle con
trol s ince it preve nts the whee ls from
locking
when the brakes are applied. This means that
the vehicle remains steerable and is less likely
to skid .
With ABS y ou do not nee d to pump the
bra ke. Just h old t he br ake ped al d own .
However, do not expect the ABS to shorten
braking distance under
all circumstances.
When dr iving on g ravel or on new ly fallen
snow o n top of icy s urfaces, braking dis tance
may be even longer, therefore, under these
circumstances, it is especia lly important that
you drive s low ly and wit h great care.
How the ABS s ystem works
An a utomat ic check is made when a speed of
about 12 mph (20 km/h) is reached . When
th is happens, a pumping noise can be heard.
If an ind iv idual whee l begi ns to rotate too
s low ly in relation to vehicle speed and tends
to lock, the ABS automatically reduces brake
pressure to prevent tha t whee l from locking .
T his automatic adjustment p rocess will cause
a
sli ght vibrati on of the brake pedal and some
no ises to a le rt you that ve hicle speed m ust be
adapted to existing road and traffic condi
tions. •
•
Page 238 of 342
236 Trailer to wing
-The Gross Vehicle Weight Rating for yo ur
Audi Q7 would be exceeded if your vehi
cle is simultaneously equ ipped w ith Pan
oramic sl iding sunroof; th ird-row seat
ing; trailer towing equipment (factory or
dealer-installed), and running boards
(dea le r-installed) . UNDER NO C IRCUM
STANC ES MAY AL L SUC H ITE MS BE IN
STALLED ON THE SAM E VEH ICLE.
Operating instructions
MAX 6 .9 "
MAX175mm
E
"' E
"' .... a)
rt
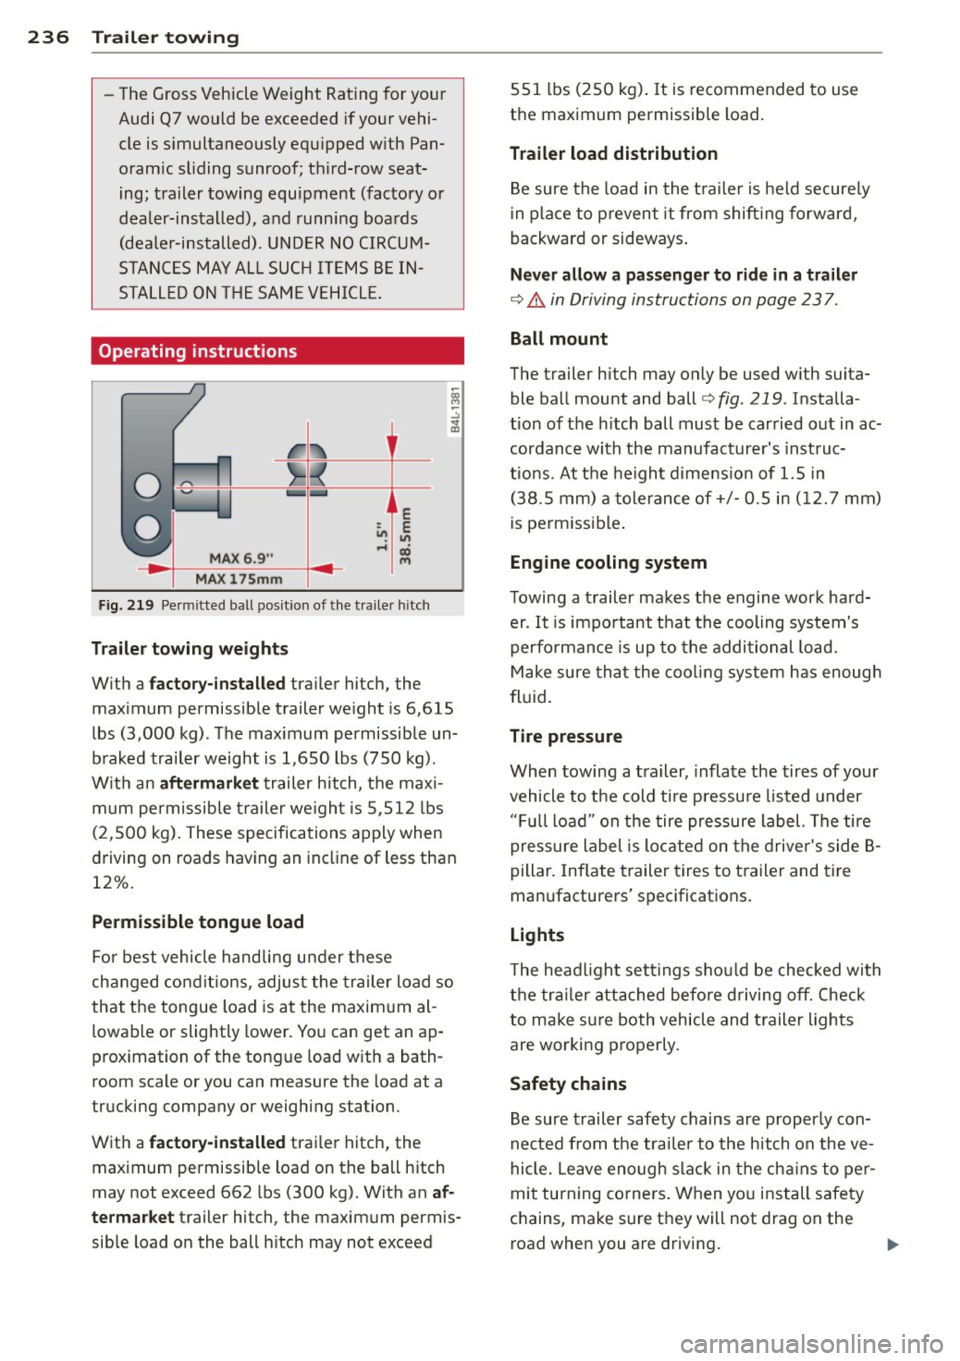
Fig. 219 Permi tted ball p osit ion of the t ra iler hitc h
Traile r to wing we ight s
W it h a fac tor y-ins talled trailer hitch, the
maximum permissible trailer we ight is 6 ,615
lbs (3,000 kg) . The maximum permissible un
braked trailer weight is 1,650 lbs (750 kg) .
W ith an aft er mar ket trailer hitch, the maxi
m um permissible trailer we ight is 5,512 lbs
(2,500 kg) . These specifica tions apply when
driving on roads having an incline of less than
12%.
Perm issible tongue load
F or best vehicle handli ng u nder these
changed condit ions, adjust the trailer load so
that the tongue load is at the maxim um al
l owable or slightly lower. Yo u can get an ap
proximation of the tongu e load with a bath
room scale o r you c an measu re the load at a
trucking company or weighing s ta tion.
With a factory-in stalled trailer hitch, the
maximum permissib le load on the ball hitch
may not exceed 662 lbs (300 kg). With an af
termarket trailer hi tch, the maximum permis
sib le load on the ball h itch may not exceed 551
lbs (250 kg) . It is recommended to use
the maximum permissible load.
Trailer load distribution
Be sure the load in the t ra iler is held secure ly
in place to prevent it from shift ing forward,
backward or sideways.
Nev er allow a pas seng er t o rid e in a trai ler
¢&. in Driving instructions on page 23 7.
Ball m ount
The trailer hi tch may only be used w ith suita
ble ball mount and ball¢
fig. 219 . Installa
tion of the h itch ball must be carried out in ac
cordance with the manufacturer's inst ruc
tions . At the height dimens ion of 1.5 in
(38 .5 mm) a tolerance of+/- 0.5 in ( 12. 7 mm)
is permissible .
Engine cooling system
Towing a trailer makes the engine work hard er . It is impo rtant that the cooling system's
performance is up to the additional load.
Make sure that the cooling system has enough
fluid.
T ire pressur e
When towing a trailer, inflate the tires of your
vehicle to the cold ti re pressu re listed under
" F u ll load" on the tire pressure label. The tire
pressure label is located on the drive r's side B
pillar . Inflate trailer tires to t railer and tire
manufacturers' specifications.
Lights
T he headlight settings should be checked wi th
t h e trai ler attached before d riving
off. Check
to make s ure both vehicle and trailer lights
are worki ng properly.
Safety chains
Be sure trailer safety chains are properly con
nected from the trai le r to the hitch on the ve
hicle. Leave enough slack in the ch ains to pe r
mit turning corners. When you install safety
chains, make sure they will not drag on the
road when you are driving. ..,.