display AUDI Q7 2013 Owner´s Manual
[x] Cancel search | Manufacturer: AUDI, Model Year: 2013, Model line: Q7, Model: AUDI Q7 2013Pages: 348, PDF Size: 87.72 MB
Page 158 of 348
156 Adapti ve Air Susp en sion
possible to raise the suspension to a h igh level
above certain speeds .
When a speed of about 75 mph (120 km/h) is
exceeded for more than 30 seconds, the vehi
cle is automatically lowered to
low level when
in comfort and automatic mode. Ground
clearance is about 0.6 inch (15 mm) less,
compared to the
normal level .
When a speed of about 100 mph (160 km/h)
is exceeded for more than 20 seconds, the ve
h icle is automat ica lly lowered to
highway l ev
el
when in automatic and dynamic mode.
G round clearance is about 1.4 inches (35 mm)
less, compared to the
normal level. Road
hold ing is optimized as a result of the lower
center of gravity, and fuel consumption is re
duced as a result of reduced wind resistance .
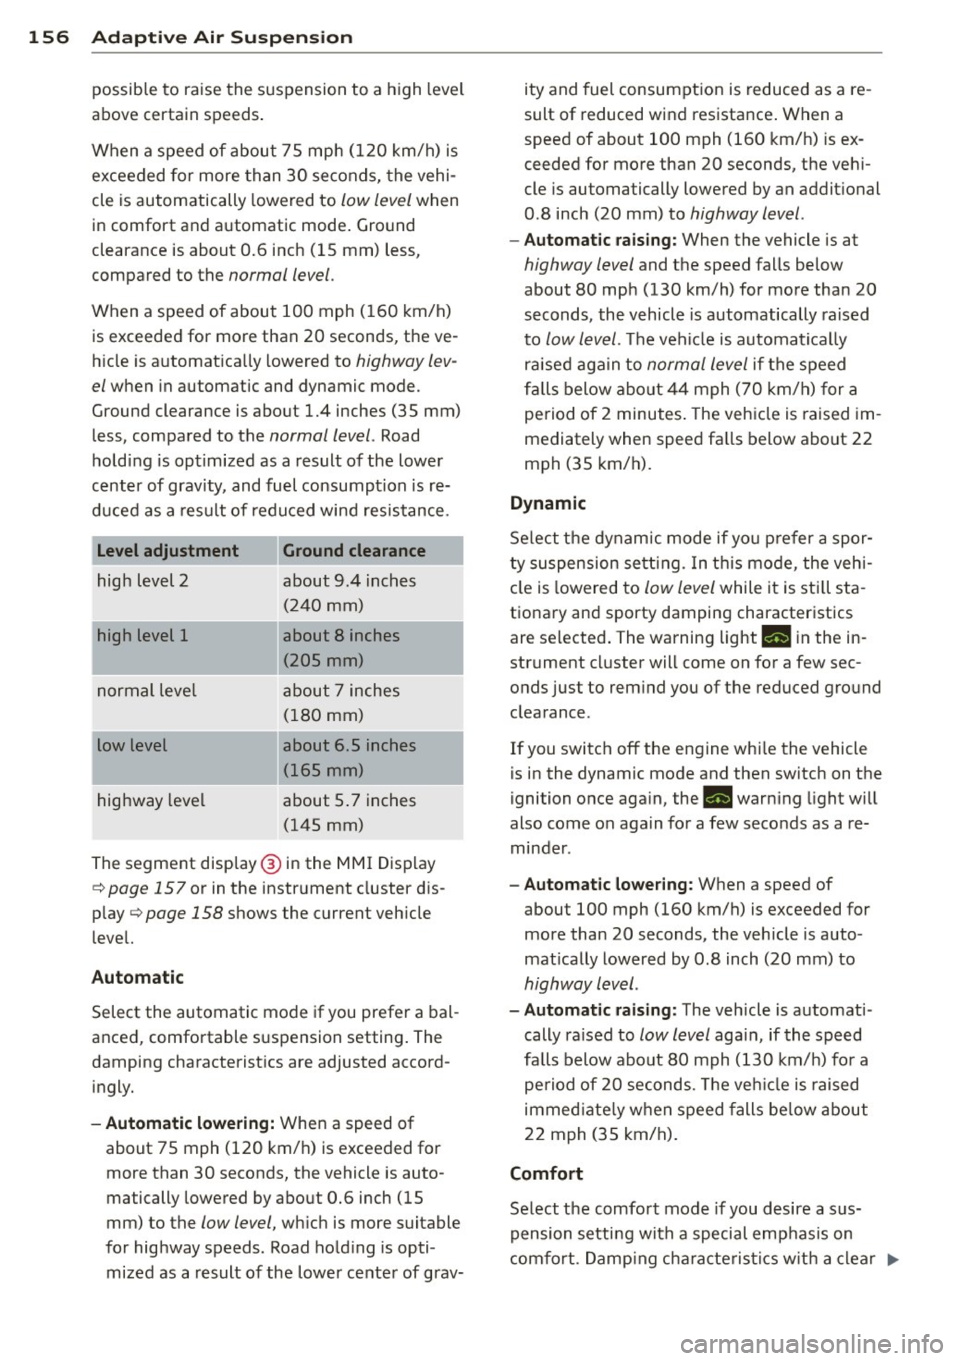
I
Level adjustment
high level 2
high level 1
normal level
low level
highway level
Ground clearance
about 9.4 inches
(240 mm)
about
8 inches
(205 mm)
about 7 inches (180 mm)
about 6 .5 inches
(165 mm)
about 5 .7 inches
(145 mm)
The segment disp lay @ in the MMI Display
c:::> page 157 or in the instr ument cluste r dis
p lay
c:::> page 158 shows the current veh icle
level.
Automatic
Select the automatic mode if you prefer a bal
anced, comfortable suspension setting . The
damping characteristics are adjusted accord ingly.
- Automatic lowe rin g: When a speed of
about 75 mph (120 km/h) is exceeded for
more than 30 seconds, the vehicle is auto
matically lowered by about 0.6 inch (15
mm) to the
low level, wh ich is more suitable
for highway speeds . Road hold ing is opti
mized as a result of the lower ce nter of grav- ity and fuel consumption is reduced as a re
sult of r educed wind resistance . When a
speed of about 100 mph (160 km/h) is ex
ceeded for more than 20 seconds, the veh i
cle is automa tically lowered by an addi tional
0 .8 inch (20 mm) to
highway level .
-Automat ic raising: When the vehicle is at
highway level and the speed falls below
about 80 mph (130 km/h) for more than 20
seconds , the vehicle is automatically raised
to
low level. Th e vehicle is automatica lly
raised aga in to
normal level if the speed
fa lls below about 44 mph (70 km/h) for a
pe riod of 2 minutes . The vehicle is raised im
mediately when speed fa lls below about 22
mph (35 km/h) .
Dynamic
Select the dynam ic mode if yo u pre fer a spor
ty suspension se tti ng. In t his mode , the veh i
cle is lowered to
low level while it is still sta
t ionary and sporty damping characteristics
are selected . The warning light
Ill in the in
strument cluster will come on for a few sec
onds just to rem ind you of the reduced ground
clearance .
If you switch off the engine whi le the vehicle
is in the dynamic mode and then switch on the
igni tion once aga in, the
Ill warn ing light will
also come on again for a few seconds as a re minder .
-Automat ic lowe ring: When a speed of
about 100 mph (160 km/h) is exceeded for
more than 20 seconds , the veh icle is auto
mat ically lowered by 0 .8 inch (20 mm) to
highway level .
-Automa tic raising: The vehicle is automati
cally ra ised to
low level again , if the speed
fa lls below about 80 mph (130 km/h) for a
pe riod of 20 seconds. The ve hicle i s raised
immed iate ly when speed falls be low about
22 mph (35 km/h).
Comfort
Select the comfort mode if you desire a s us
pension setti ng w ith a special emp hasis on
comfort . Damp ing cha racte ris tics w ith a clear .,.
Page 159 of 348
emphasis on comfort are selected in this
mode.
- Automatic lowering : When a speed of
abo ut 75 mph (120 km/h) is exceeded for
more than 30 seconds, the vehicle is auto
matically lowered by 0.6 inch (15 mm) to
low level .
-Automatic raising: The vehicle is automati
ca lly raised to
normal level again, if the
speed falls below about 44 mph (70 km/h)
for a period of 2 minutes . The vehicle is
raised immediately when speed falls below
about 22 mph (35 km/h) .
Offroad
Select the offroad mode when you have to
travel over poor quality sections of road (e .g.
trails). In th is mode, the vehicle is raised to
high level 1, and damp ing characteristics for
poor road stretches are selected . When
sw itch ing to offroad mode, the Adaptive Air
Suspension indicator appears automat ically in
the instrument cluster display ¢
page 158.
The offroad mode can only be activated at
speeds below 37 mph (60 km/h) . Offroad
mode ends automatically and the automatic
mode is activated when a speed of approxi
mately 50 mph (80 km/h) is exceeded.
Lift
Select the lift mode when except ionally high
ground clearance is needed at a reduced
speed. In this mode, the vehicle is raised to
high level 2. When switching to lift mode , the
Adaptive A ir Suspension indicator appears au
tomatically in the instrument cluster display
¢ page 158.
The lift mode can be activated only at speeds
be low 12 mph (20 km/h) . When a speed of
about 25 mph (40 km/h) is exceeded, the sys
tem automatically leaves lift mode and the
offroad mode is activated. The instrument
cluster display automat ically switches the dis
play to Adaptive Air Suspens ion to indicate re
duced ground clearance .
Adaptive Air Suspension 15 7
MMI settings
Applies to vehicles: wit h Adaptive A ir Suspension
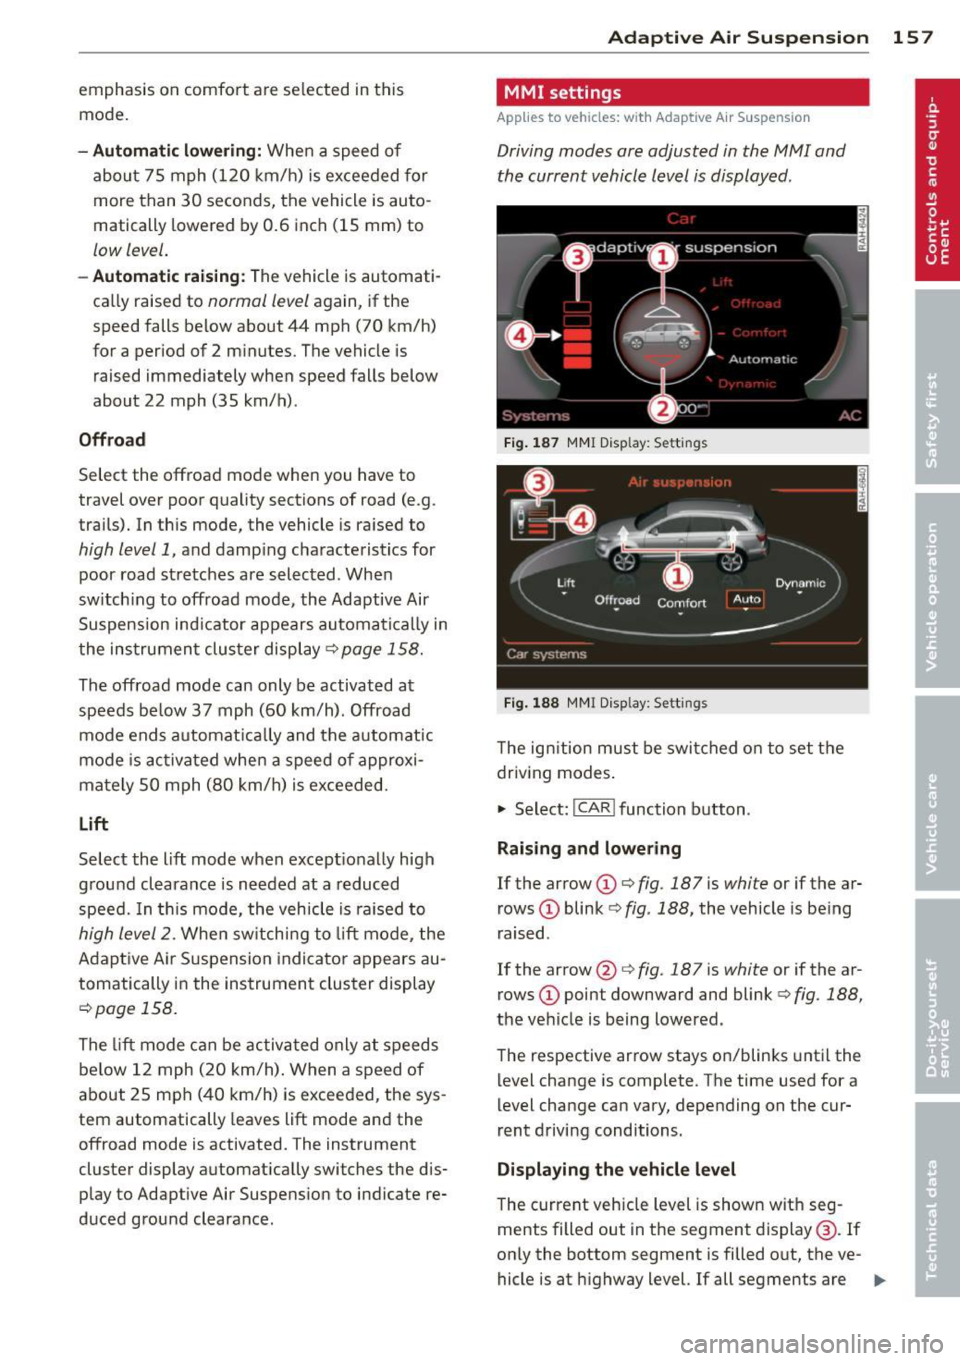
Driving modes are adjusted in the MMI and
the current vehicle level is displayed .
Fig. 187 MMI Display: Sett ings
Fig. 188 MMI Display: Sett ings
Th e ign ition must be switched on to set the
driving modes.
1-Select: !CAR ! function button .
Raising and lowering
If the arrow (D ¢ fig. 187 is white or if the ar
rows
(D blink ¢ fig. 188, the vehicle is being
raised .
If the arrow @¢
fig. 187 is white or if the ar
rows
(D point downward and blink ¢ fig. 188,
the vehicle is being lowered .
The respective arrow stays on/blinks until the
level change is complete . The time used for a
level change can vary, depending on the cur
rent driving conditions .
Displaying the vehicle level
The c urrent vehicle level is shown with seg
ments filled out in the segment display@. If
only the bottom segment is filled o ut, the ve-
hicle is at highway level. If all segments are
IJJ>-
Page 160 of 348
158 Adapti ve Air Suspens ion
fi lled out, the vehicle is at high level 2 and has
the greatest amount of ground clearance pos
sib le.
While the vehicle is being raised or lowered,
the target level is indicated by an arrow@
c::> fig. 187 or a white border @ c::> fig. 188 . The
arrow/border disappears aga in when the vehi
cle is at the target level.
Limitations to MMI s etting s
Please note that not eve ry dr iving mode can
be selected in every d riving situation . For ex
ample, it is not possible to switch to "lift"
mode at speeds above 12 mph (20 km/h) .
This mode is then shown
greyed out in the
MMI Display.
The vehicle can only be lowered when
all of
the vehicle's doors are closed. If one door is
open, all driving modes whose level sett ing is
belo w the current vehicle level appear
greyed
out
i n the MMI Display. If a door is opened
while the veh icle is being lowered, the lower
ing p rocess is interrupted u ntil all doors are
closed again .
If the system is temporar ily unava ilable due
to, for instance, an empty compressed air
tank, the driving modes that cannot be set ap pear
greyed out in the MM I Disp lay. As soon
as the system is available again, the driv ing
modes can once more be selected in the dis
p lay .
(D} Tips
- Fo r addition al in forma tion on the driv ing
modes
c:;> page 155, Chassis controls.
- When the compressed air tank is empty,
the compressor c an be switched on by
starting the engine . The Adaptive Air
Suspension is once again available, after
waiting a few minutes .
- To prevent over load, the system switches
off tempera rily if seve ral adj ustments
are made in a row. The Adaptive Air Sus
pension is once again available, after
waiting a few minutes. Appearance in the instrument cluster
display
Applies to veh
icles: w ith Adapt ive A ir Suspens ion
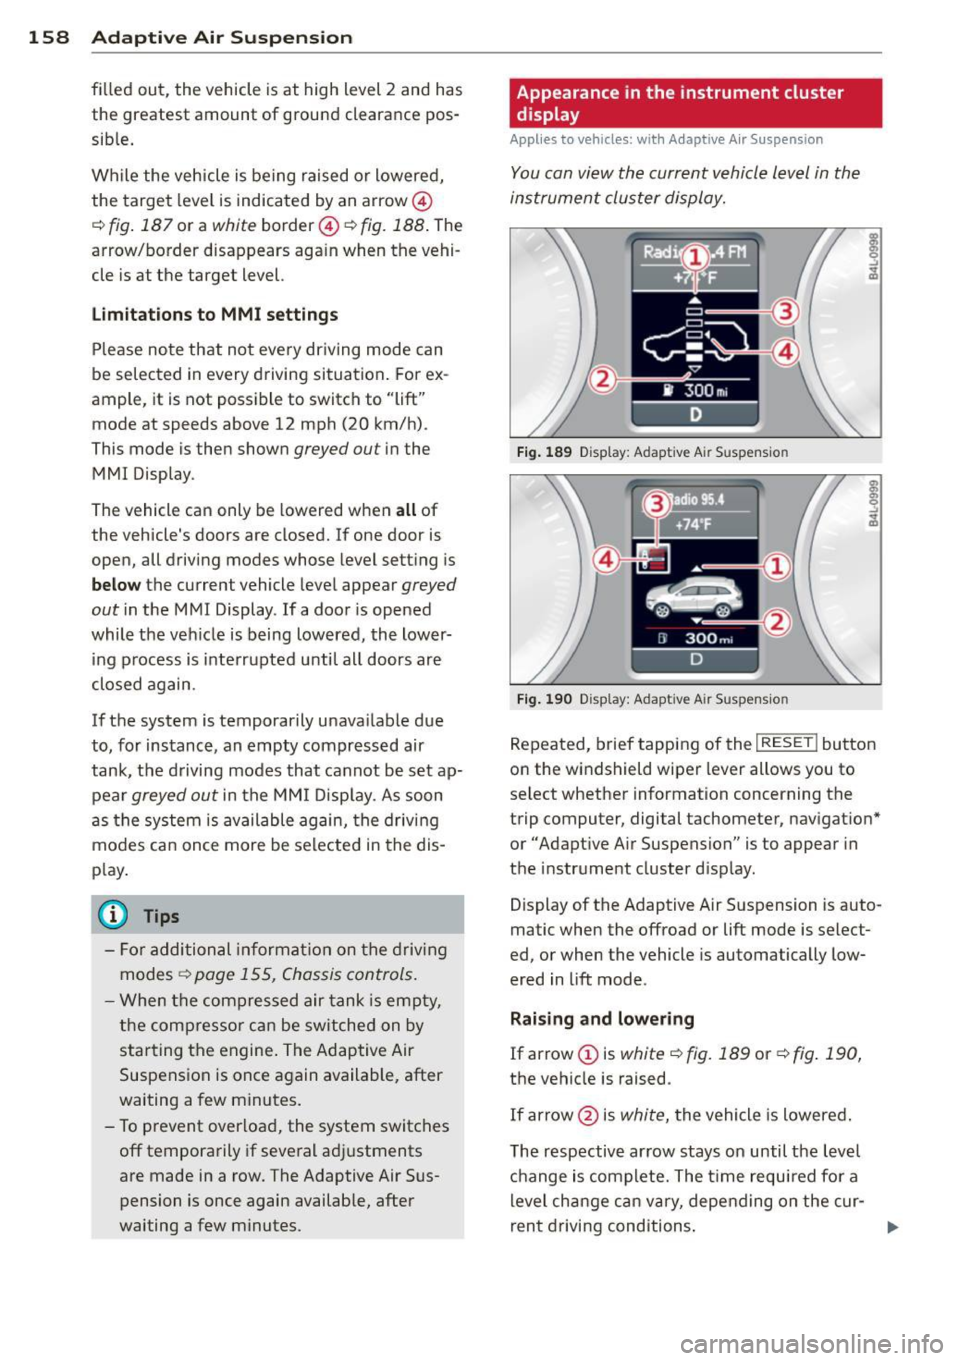
You can view th e current vehicle l evel in the
instrument cluster display.
Fi g. 1 89 Display: Adaptive Air Suspension
F ig . 190 Display: Adaptive Air Suspension
Repeated, brief tapping of the I RESET ! button
on the windshield wiper lever allows you to
se lect whether information concerning the
trip computer, digital tachometer, nav igat ion*
or "Adapt ive A ir Suspension" is to appear in
t h e instrument cluster d isp lay .
Display of the Adaptive A ir S uspension is auto
matic when the offroad or lift mode is select
ed, or when the vehicle is automatically low
ered in lift mode.
Rai sing and lowe ring
If arrow
(J) is white c::> fig. 189 or c::> fig . 190,
the vehicle is raised.
If arrow @is
white, the vehicle is lowered .
The respective arrow stays on until the level ch ange is complete. The time requ ired fo r a
level change can vary, depending on the cur-
ren t drivi ng conditions . ..,_
Page 161 of 348

Displaying the vehicle level
The current vehicle leve l is shown with seg
ments fi lled out in the segment disp lay @. If
on ly the bottom segment is filled out, the ve
hicle is at highway leve l. If all segments are
fi lled out, the vehicle is at high level 2 and has
the greatest amount of ground clearance pos
sible.
While the vehicle is being raised or lowered,
the target level is indicated by an arrow @
¢
fig. 189 or a white border @¢ fig. 190. The
arrow/border disappears aga in when the vehi
cle is at the target level.
Jacking mode when changing a flat tire
Applies to vehicles: with Adaptive Air Suspension
This mode must be activated in the MMI be
fore raising the vehicle with a jack or on a ve
hicle lift.
.,. Select: ICARI funct ion button> ! SETUP I
function button > Jacking mode . Or
.,. Select:
I CARI funct ion button > Car sys
tems *
control button > Servicing & checks >
Air susp.: tire change .
The vehicle jack mode must be activated be
fore changing a wheel so that the automatic
control processes fo r the a ir suspension do
not make lift ing with the vehicle jack more dif
ficult.
The check lamp
II in the instrument cluster
d isplay illuminates in vehicle jack mode.
0) Tips
The vehicle jack mode is switched off auto
mat ically at speeds above 9 mph (15 km/
h).
Towing a trailer
Appl ies to vehicles: with towing hitch and Adaptive Air
Suspension
Automatic lowering is not desirable when
towing a trailer.
.,. Se lect: ICARI function button > !SETUP I
function button > Towing mode. Or
Adaptive A ir Suspension 159
.,. Select: I CAR I function button > Car sys
tems*
control button > Vehicle settings >
Air susp.: towing.
As long as towing mode is activated, a vehicle
with a trai ler appears in the
adaptive air sus
pens ion
main menu.
Level Adjustment when towing a trailer
- Before hit ching up the trailer and before ad
jus ting the tongue weight at the trailer, the
automatic or comfort mode
must be se lect
ed so that the ve hicle can be at normal level
¢ page 157, MMI settings.
-If driving in dynamic mode is desired, this
mode
must be selected before hitching up
the trailer and before adjusting the tongue
weight. However, note that your vehicle is lowered and ground clearance is reduced.
- If you have to dr ive under difficult road con
ditions, you can select offroad or lift mode,
after hitch ing up the trailer or after adjust
ing the tongue weight .
- If the veh icle is at
normal level, and you se
lect offroad mode wh ile traveling at speeds
higher than 22 mph (35 km/h), the veh icle
w ill not be ra ised. Offroad mode will appear
as the active mode in the MMI Display.
- If the veh icle is in offroad mode at
high level
1 ,
it automatically lowers to normal level
when the vehicl e is t ravel ing at speeds ex
ceeding approximately 31 mph (SO km/h).
The vehicle is automatical ly raised to
high
level 1
again when the traveling speed falls
be low approx imately 25 mph (40 km/h).
Restrictions when operating with a trailer
When operating w ith a trailer, the lift mode
can only be selected up to about 12 mph (20
km/h) . Lift mode is automatically cance led
again when a speed of about 25 mph (40 km/
h) is exceeded.
If t he vehicle is in automatic, comfort, offroad
or lift mode before the trai ler towing mode is
activated, the dynamic mode cannot be acti
vated .
If t he vehicle is in dynamic mode before tow-
ing operation is activated, it can be driven in
IJI,-
Page 162 of 348
160 Adapti ve Air Su spen sion
this mode. If the suspension is switched from
this mode to another mode, dynamic mode
cannot be re-selected .
(D Tips
-For vehicles with a factory installed tow
ing hitch or a trailer hitch that was in
stalled later accord ing to factory specifi
cations, the system recognizes "Trailer
tow ing mode" and activates this specia l
mode automatically, as soon as the elec
trical connection on the trailer socket is
connected. The mode ceases a utomat i
ca lly when the elect rical connection to
t h e trai ler socket is d isconnected.
- If the tra iler towing mode has been acti
vated, the vehicle will not drop to the
l ow or highway level.
Cargo mode
Applies to vehicles: with Adapt ive Air Suspe nsio n
The rear of the vehicle can be lowered to
make it easier to load.
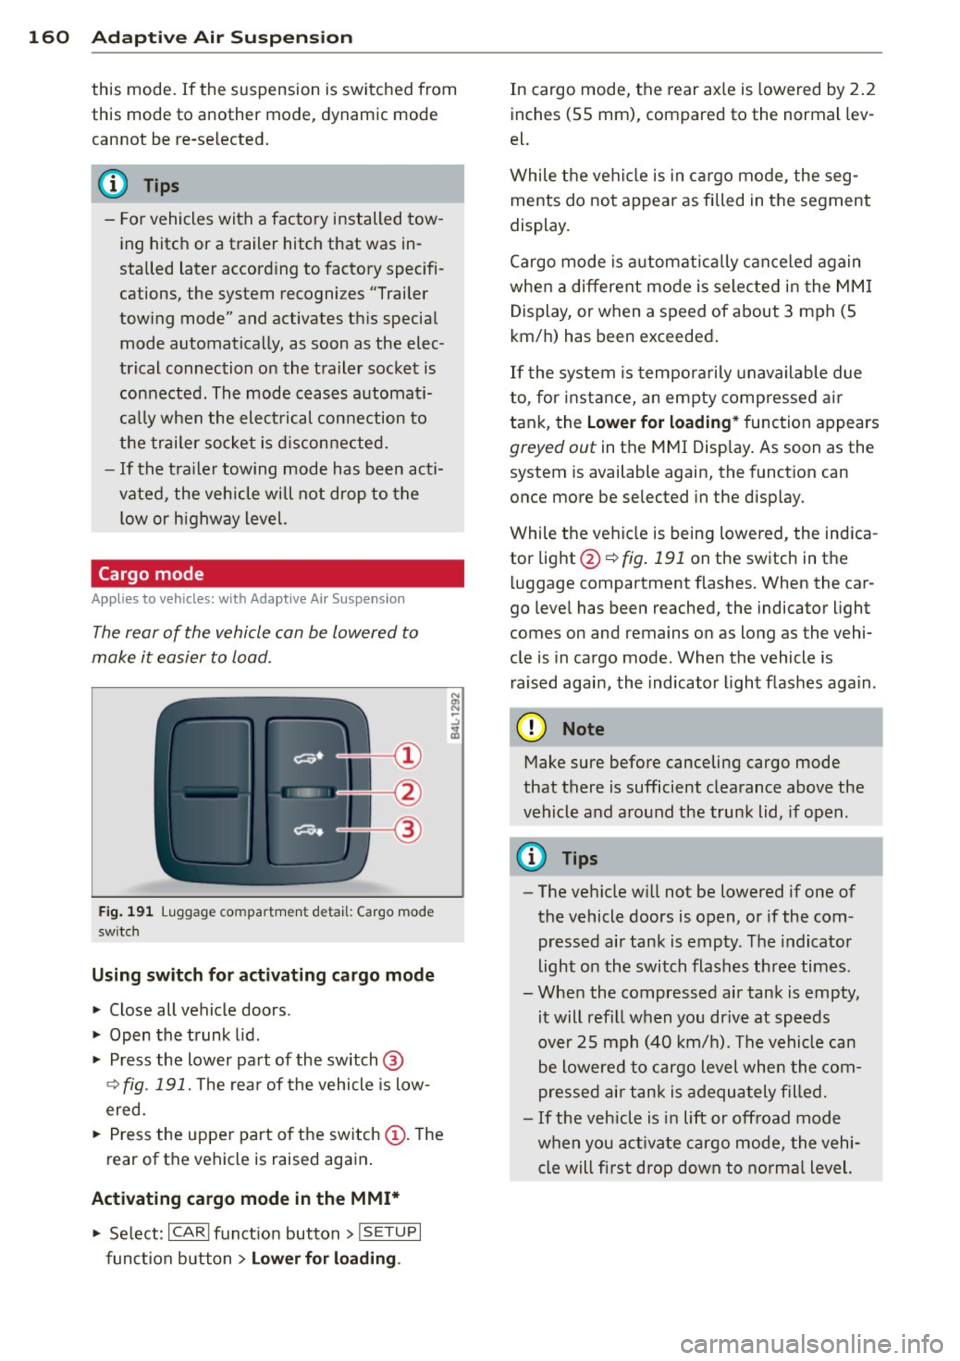
Fig. 191 Luggage compa rtment detail: Cargo mode
sw itch
Using switch for activating c argo mode
.. Close all vehicle doors .
.. Open the trunk lid.
.,. Press the lower part of the sw itch ®
~ fig. 191. The rea r of the vehicle is low
ered.
.. Press the uppe r part o f the sw itch
(D . The
rear of the vehicle is raised again.
Activating cargo mode in the MMI*
.. Se lect: ICARI funct ion button> I SE TUP I
func tion button > Lower for loading .
In cargo mode, the rear ax le is lowered by 2 .2
inches (55 mm), compared to the normal lev
el.
While the veh icle is in ca rgo mode, the seg
ments do not appear as filled in the segment
display.
Cargo mode i s automatic ally c an ce le d again
when a different mode is selected in the MM I
Display, or when a speed of about 3 mph (5
km/ h) has been exceeded.
If the system is tempora rily unavailable due
to, for instance, an empty compressed air
tank, the
Lower for loading * function appears
greyed out in the MMI Display. As soon as the
system is available again, the funct ion can
once more be selected in the disp lay.
While the vehicle is being lowered, the indica
tor light @~
fig. 191 on the switch in the
l uggage compartment flashes. When the car
go leve l has been reached, the indicator light
comes on and remains on as long as the vehi
cle is in cargo mode. When the vehicle is
r aised agai n, the indicator light flashes again.
(D Note
M ake sure before canceling cargo mode
that there is sufficient clearance above the
vehicle and a round the trunk lid, if open.
(D Tips
- The vehicle w ill not be lowered if one of
the vehicle doors is open, or if the com
pressed air tank is empty. The indicator
light on the switch flashes three times.
- Whe n the compressed air tank is empty,
it will refill when you drive at speeds
over 25 mph (40 km/ h). The vehicle can
be lowered to cargo level whe n the com
pres sed air tan k is a dequately filled.
- If the vehicle is i n lift or off road mode
when you act ivate cargo mode, the vehi
cle will fi rst drop down to no rma l level.
Page 189 of 348
as defined in the electronic control unit
¢ page 195, PASSENGER AIR BAG OFF light .
Always remember, a chi ld safety seat or infant
carrier installed on the front seat may be
struck and knocked out of position by the rap
id ly inflating passenger's airbag in a frontal
coll is ion . The airbag cou ld greatly reduce the
effectiveness of the child restraint and even
seriously injure the child during inflat ion.
F or this reason, and because the back seat is
the safest p lace for children -when properly
restra ined accord ing to their age and si ze - we
strongly recommend that children always sit in the back seat¢
page 205, Child Safety.
A WARNING
A child in a rearward-facing child safety
seat insta lled on the front passenger seat
w ill be seriously injured and can be k illed if
t he fron t airbag inf lates - even with an Ad
vanced Airbag System .
- The inflating a irbag w ill hit the child
sa fety seat or infant carrier w it h great
f orce and w ill smash the ch ild safety seat
and child against the backrest, center
armrest, door or roof.
- Always install rear -facing child sa fety
seats on the rear seat.
- If you mus t install a rearward facing
child safety seat on the front passenger
seat because of exceptional circ umstan
ces and the
PASSENGER AIR BAG O FF
light does not come on and stay on, im
med iately install the rear-facing child
safety seat in a rear seating posit ion and
have the a irbag system inspected by you r
authori zed Aud i dealer.
- Forward-fac ing ch ild safety seats instal
led on the front passenger's seat may in
terfere with the deployment of the air
b ag and cause serious person al injury to
the ch ild .
WARNING
If, in exceptional c ir c umstances, you mus t
install a forwa rd -facing child restra int on
the front passenger's seat:
A irbag system 187
-Always ma ke sure the forward-facing
seat has been designed and certified by its manufacturer for use on a front seat
with a passenger front and s ide a irbag.
- Never put the forward-facing child re
straint up against or very near the instru ment panel.
- Always move the passenger seat into its
rearmost position in t he seat's fore and
aft adj ustment range, as fa r away from
the airbag as possible before installing
the forward-fa cing ch ild restra int. The
backrest mu st be a dju ste d to an upright
posi tion.
- Ma ke sure that the
PASSENGER AIR BAG
OFF
li ght comes on and stays on all the
time wheneve r the ignit ion is swi tched
on.
A WARNING
To reduce the risk of serious injury, make
sure that the
PASSENGER AIR BAG OFF
light wi ll be displayed whenever a child re
straint is installed on the front passenger
seat and the ignition is sw itched on.
- If the
PASSENGER AIR BAG OFF light
does not stay on, perform the checks de
scribed ¢
page 195, Monitoring the Ad
vanced Airbag System .
-Take t he chi ld restraint off the front pas
senger seat and install it properly at one
of the rear seat positions if the
PASSEN
GER AIR BAG OFF
li g ht does not stay on.
- Have the airbag system inspected by
your author ized Audi dealer immed iate
ly.
- Always carefully follow instr uctions from
child r estraint manufa cture rs when in
s tall ing c hild restra ints.
A WARNING
If, in exce ptiona l circumstan ces, you must
ins tall a forward or rearw ard-facing c hild
restra int on the front passenger's seat:
- Imp roper ins tal lation o f ch ild restraints
can reduce their effec tiveness or even
•
•
Page 199 of 348
-the safety belt is being p roperly worn and
that there is not a lot of slack in the safety
belt webbing,
- accessory seat covers or c ushions or other
things that may cause an incorrect reading
or impression on the weight-sensing mat under the upholstery of the seat have been
removed from the front passenger seat,
- a safety be lt extender has not been left in
the safety belt latch for the front passenger
seat .
In addition to the
PASSENGER AIR BAG OFF
light in the center of the instrument panel,
the message
PASSENGER AIR BA G OFF or
PA SS ENGER AIR BA G ON will briefly appear
i n the instrument cluste r display . Th is is to in
form the driver of the current front passenger
ai rbag status .
Important safety instructions on
monitoring the Advanced Airbag System
A WARNING
An airbag system that is not funct ioning
prope rly cannot provide supplemental p ro
tection in a frontal crash.
- If the airbag indicato r light comes on, it
means that the re may be someth ing
wrong with the Advanced Ai rbag System .
It is possible that the airbag will inflate
when it is not s upposed to, or w ill not in
flate when it should.
- Have the airbag system inspected imme
diately by your author ized Audi dealer .
A WARNING
If the front airbag inflates, a ch ild without
a child restraint, or in a rearward-fac ing
child safety seat, o r in a forward-facing
child restraint that has not been properly
installed will be serio usly injured and can
be killed.
- Even though your veh icle is equipped
with an Advanced Airbag System, make
certain that a ll children, especially 12
years and younge r, a lways ride on the
A irbag sys tem 197
back seat properly rest rained for their
age and size.
- Always install forward or rear-facing
child safety seats on the rear seat -even
with an Advanced A irbag System.
- If you must install a rearwa rd-facing
child safety seat on the front passenger
seat because of exceptional c ircumstan
ces and the
PASSENGER AIR BAG OFF
light does not appear and stay on, imme
diate ly install the rear-facing child safety
seat in a rea r seat ing pos ition and have
the air bag sys tem inspected by y our au
thori zed A udi dealer.
- A t ight tether or other strap on a rea r
ward-facing child rest raint attached to
the front passenger seat can p ut too
m uch p ressu re on the weight-sensing
mat in the seat and register more weight
than is actually on the seat. The heavier
weight registered can make the system
work as though an adult were on the seat and deploy the Advanced Airbag when it
must be suppressed causing ser ious or
even fata l injury to the ch ild.
- If, in exceptiona l circumstances, you
m ust install a forward-fac ing ch ild re
straint on the front passenger seat, al
ways move the sea t into its rearmos t po
sition in the seat's fore and aft adjust
ment range, as far away from the a irbag
as poss ible . The backrest must be ad just
ed to an upright pos ition. Make sure that
the
PASSENGER AIR BAG OFF light
comes on and stays on all the time when
eve r the ignit ion is switched on.
A WARNING
-
- If the PASSENGER AIR BAG OFF light
does not go out when an ad ult is sitting
on the front passenger sea t after taking
the steps described above, make su re the
a du lt is properly seate d and restra ined at
one o f the rea r seat ing pos itions.
- Have the airbag sy stem inspe cted by
your author ized Audi dealer befo re trans
port ing anyone on the front passenger
seat.
•
•
Page 228 of 348
226 Intellig ent technol ogy
The vehicle is then stabilized by the forces act
ing on the whee l during braking. If the vehicle
is
oversteering (rear tends to sk id out of the
turn), the brakes are ma inly applied on the
wheel that is on the outside of the curve. In
the case of a vehicle that is
understeering
(tendency to slide out of the curve), the
brakes are applied as needed on the whee l
that is on the ins ide of the curve or addit ional
l y on the o ther wheels. An acoustic s ignal indi
cates when ESC b rake app lication cuts in
¢ A .
The system operates across the entire speed
range in combination with the ABS system
¢ page 229. If the Anti-Lock Brake System
(ABS) malfunctions, the ESC wi ll be out of ac
tion as well .
Activating
When you turn on the engine, ESC w ill auto
mat ica lly be act ivated and will perform a se lf
test. As soon as the test is comp leted, the sys
tem is in normal operating mode.
Offroad mod e
ESC should normally be ope rated in normal
mode because this ensures maximum vehicle
stability. If necessary, you can act ivate the
ESC offroad mode by pressing the but to n
¢ fig . 232 to obtain maximum traction and
braking ability when driving
off paved roads at
l ow speeds. In ESC offroad mode, the indica
tor light
Ii) ill uminates and the message Sta
b ilization control (E S C): Offr oad . Wa rning !
R estric te d stabilit y
appears br iefly in the dis
p lay .
The ESC offroad mode can be useful in the fo l
low ing except ional situations when slip or a
h ighly effective differential locking function is
des irable . Examp les:
- when driving with tire chains,
- when driving in deep snow or on loose
ground,
- when driving on uneven surfaces with the
whee ls severe ly unloaded (articulation), and
- when rocking the vehicle loose after it has
become stuck . When the
unusual situation is past, you
sho uld shift back to the norma l ESC operating
mode by pushing the button again . The mes
sage
S ta b ilizat ion cont rol (ES C): O n then ap
pears briefly in the display.
H ill desc ent control
The hill descent control is switched on in ESC
offroad mode . When slowly descending steep
gradients on loose ground or when the axles
are articulated, hill descent control provides ass istance by automatically apply ing the
brakes to keep vehicle speed constant. The ve
hicle is also rendered easier to steer by selec
t ive d istr ibut ion of braking force. Hill descent
control intervenes when:
- the acce lerator pedal is not pressed,
- the vehicle is travelling less than 12 mph
(20 km/h),
- a steep gradient is detected,
- wheel behavior indicates loose ground or
conditions with poor adhesion (e .g. also axle
art iculation).
Hill descent contro l operates both d riving for
ward and in reverse. Active hill descent con
tro l is deactivated by pressing the accelerator
pedal until the condit ions for activation al
ready listed are met again .
A WARNING
--
- The Electronic Stabilization Contro l is
neverthe less s ubject to the laws of phys
ics. It is part icularly important to pay at
tention to this fact on wet and slippe ry
roads . It i s therefore important that you
always adapt your dr iving to the cond i
tion of the road and traffic conditions . Do
not a llow the increased safety provided
by the E lectronic Stabilization Contro l
system to lull you into accepting addi
tional safety risks .
- Please be aware that in ESC offroad
mode, particularly on a smooth and s lip
pe ry road, the wheels may have an in
creased tendency to sp in and the vehicle
may b reak away - dange r of skidding!
~
Page 234 of 348
232 Intelligent technology
can result in there being insufficient energy
avai lab le to start the engine .
I ntell igent energy management in your vehi
cle handles the distribution of electrical ener
gy . Starting abi lity is markedly improved and
the life of the battery is extended .
Basically , energy management consists of
battery diagnosis , idling current manage
ment
and dynamic energy management.
Battery diagnosis
Battery diagnosis continuously determines
the state of the battery. Sensors determine
battery volta ge, battery current and battery
temperature. This determines the current
state of charge and the power of the battery.
Idling current management
Idling current management reduces energy
consumption while the vehicle is stand ing.
With the ignition switched off, it contro ls the
energy supply to the various e lectrica l compo
nents. Data from battery diagnosis is consid
ered.
Depending on the battery's state of charge,
individua l consumers are gradually turned off
to prevent excessive discharge of the battery
and thus maintain starting capability.
Dynamic energy management
While the vehicle is being dr iven , dynamic en
e rg y management distributes the energy gen
erated according to the needs of the individu
a l components. It regulates consumption, so
that more ele ctrical energy is not being used
than is being generated and ensures an opti mal state of cha rge for the battery.
{D) Tips
- But even energy management cannot
negate the limits of physics. Consider
that the power and life of a battery are
limited .
- If starting ab ility is threatened, you are
i nformed by a warn ing
c> page 233,
Driver notification in the instrument
cluster display .
What you should know
The highest priority is given to maintaining
starting capability .
The battery is seve rely taxed in shor t-distance
driving, in city tra ffic and dur ing the cold time
of year . Abundant electrical energy is re
quired, but only a little is generated . It is also
critical if the engine is not running and e lectri
ca l components are turned on . In this in
stance energy is being consumed but none is
being generated.
It i s in precisely these situations that you will
notice energy management actively regulat
ing the distribution of energy.
Vehicle stands for an extended period
If you do not drive your vehicle over a period
of several days or weeks , e lectr ica l compo
nents are gradually cut back or sw itched off.
T his reduces energy consumption and main
ta ins start ing capability over a longer period .
Take into consideration that when you unlock
your vehicle , some conven ience functions ,
s uc h as the inte rior lights or the power seat
adjustment, may not be available. The con
venience functions will be available again
when you turn on the ignition and start the e ngine .
With the engine turned off
If you listen to the radio, for example, w ith
the engine turned off or use other MMI func
tions, the battery is being discharged .
If starting capability is jeopardized due to en
ergy consumption , the following warning ap
pears in the MMI display:
Please start engine, otherwise system will
switch off in 3 minutes .
The warning indicates that the system will be
turned off automatically after 3 minutes . If
you w ish to continue using the funct ions, you
have to sta rt the eng ine.
1111>
Page 235 of 348
With the engine running
Although electrical energy is generated when
the vehicle is being driven, the battery can be
come discharged. This happens most ly when
litt le energy is being generated and a great
deal consumed and the battery's state of
charge is not optimal.
To bring the energy balance back into equili
brium, consumers which require especia lly
large amounts of energy are temporarily cut
back or switched off. Heating systems in par
ticular requ ire a great deal of energy. If you
notice, for example, that the heated seats* or
the heated rear window are not heating, they h ave been temporar ily cut back or switched
off. These systems will be available again as
soon as the energy ba lance has been restored.
You will also notice that engine idle speed has
been increased slightly. This is normal and not
a cause for concern . By increasing engine idle
speed the additional energy required is gener
ated and the battery is charged .
Driver notification in the instrument
cluster display
If battery power drops into the range where it
can limit the ab ility of the engine to start, th is
is shown in the instrument cluster display
with the following driver message:
(•) Low battery charge: battery will be
charged while driving
This notification reminds you that the starting
capability of the engine may be limited. As
soon as you start driving again, the battery
will be recharged and the notification will go
out.
Driver notification appears and goes out
again
If th is driver notification appears after the ig
nition is turned on or while driving and it goes
out again after a wh ile, the battery has been
adequately recharged.
Intelligent technology 233
Driver notification appears and does not
go out again
If this driver notification appears after the ig
nition is turned on or whi le driving and does
not go out again, the battery's state of charge
is not in the optimal range. Starting ab ility is
restricted . Have the battery checked as soon
as possible by an authorized Aud i dealer or
qualified workshop.
•
•