AUDI R8 2007 Owner's Guide
Manufacturer: AUDI, Model Year: 2007, Model line: R8, Model: AUDI R8 2007Pages: 210, PDF Size: 8.1 MB
Page 31 of 210

Driver information system29
Controls
Safety
Driving tips
General maintenance
Self-help
Technical data Each time a lap time is stored, it moves one line up the display
⇒page 28, fig. 24. The time for the new lap appears in the bottom
line .
Recording further lap timesEach time you press the top part of the rocker switch when
the lap timer is running, the current lap time is stored and
the next lap time is started simultaneously. Simply repeat
this procedure to record subsequent laps.The current lap time always appears in the bottom line of the display
⇒fig. 25.
When you store a lap time, it moves up one line ⇒fig. 25 from
the bottom of the display. The previous lap time also moves up one
line again . The time for the new lap appears in the bottom line
.
Displaying split times and pausing the lap timer
The split time (for an intermediate section of a lap, etc.) is
marked with an asterisk.You can retrieve split times for different sections of the lap.
You can pause the lap timer if you want to take a break
during a session.
Displaying a split time and pausing the lap timer
– Press the bottom part of the rocker switch to display the
split time . The recording of the lap time continues in
the background while the split time (marked with an
asterisk) is displayed.
– Press the bottom part of the rocker switch again if you
want to pause the timer. The lap timer is interrupted and
the asterisk in the bottom line disappears.
Resuming recording of lap time
– Press the top part of the rocker switch to resume lap time
recording from the split time or pause mode.
A1
A2
Fig. 25 Display: Lap 2
recorded
AC
AB
AA
AC
Fig. 26 Display: Split
time
AC
document_0900452a816e6cc9.book Seite 29 Mittwoch, 21. Februar 2007 1:32 13
Page 32 of 210
Driver information system 30Switching the display between lap timer and on-board computerYou can call up information from the on-board computer
while the stopwatch of the lap timer is running.
Calling up the on-board computer
– Briefly press the button to display the on-board
computer. You can now use the on-board computer in
the usual way.
Calling up the lap timer
– Keep pressing the button until the lap timer
⇒page 28, fig. 22 appears.Finishing the session and evaluating or resetting lap timesAfter evaluating the lap times, you can reset the lap timer
data or continue recording further laps ⇒page 31.Finishing the lap time session
– When you cross the start/finish line, press the top part of
the rocker switch to store the final lap time. The new lap
time (which always starts simultaneously) will not be
recorded if you now evaluate the lap times.
Evaluating lap times
– Press the button for about two seconds. A
summary of key lap times appears in the display.
Resetting the lap timer
– While the overall results are shown in the display
⇒fig. 27, press and hold the button for at least
two seconds to reset all data of the lap timer to zero.
Overall lap time results
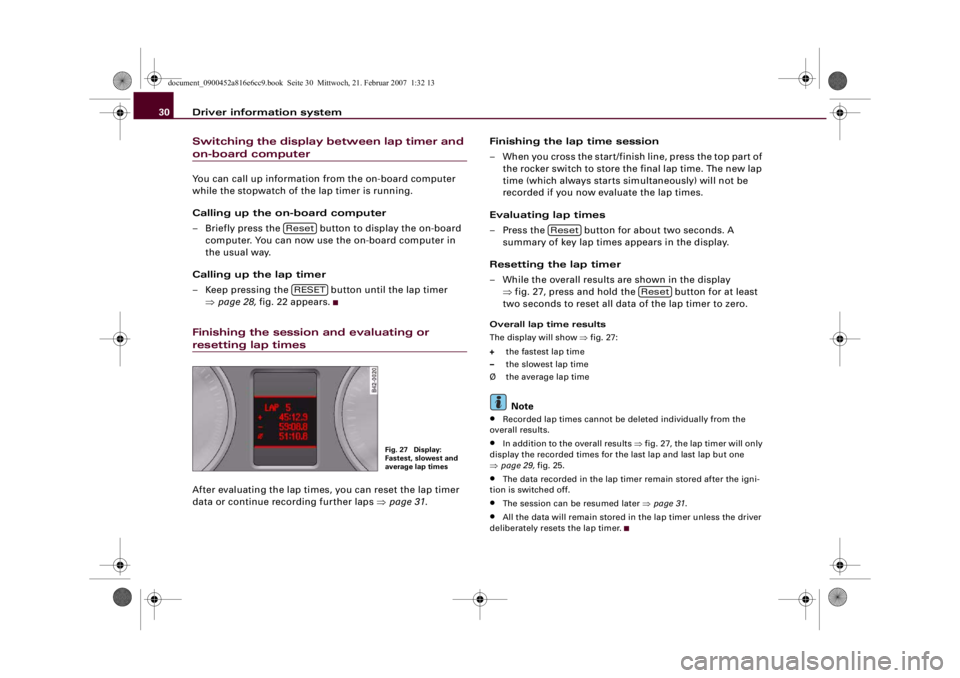
The display will show ⇒fig. 27:
the fastest lap time
the slowest lap time
Ø the average lap timeNote
•
Recorded lap times cannot be deleted individually from the
overall results.
•
In addition to the overall results ⇒fig. 27, the lap timer will only
display the recorded times for the last lap and last lap but one
⇒page 29, fig. 25.
•
The data recorded in the lap timer remain stored after the igni-
tion is switched off.
•
The session can be resumed later ⇒page 31.
•
All the data will remain stored in the lap timer unless the driver
deliberately resets the lap timer.
ResetRESET
Fig. 27 Display:
Fastest, slowest and
average lap times
Reset
Reset
document_0900452a816e6cc9.book Seite 30 Mittwoch, 21. Februar 2007 1:32 13
Page 33 of 210
Driver information system31
Controls
Safety
Driving tips
General maintenance
Self-help
Technical data
Resuming the lap time session laterWhen you have evaluated the lap times, you can resume the
session and continue recording lap times later.
– Keep pressing the button until the lap timer
appears ⇒page 30, fig. 27.
– Press the top part of the rocker switch to start recording
a new lap time.
– To record further lap times, repeat the procedure
described earlier ⇒page 29, “Recording further lap
times”. To evaluate the overall results, refer to ⇒page 30,
“Finishing the session and evaluating or resetting lap
times”.Speed warning functionApplies to vehicles: with speed warning functionIntroduction
The speed warning function can help you keep below a
pre-set maximum speed.
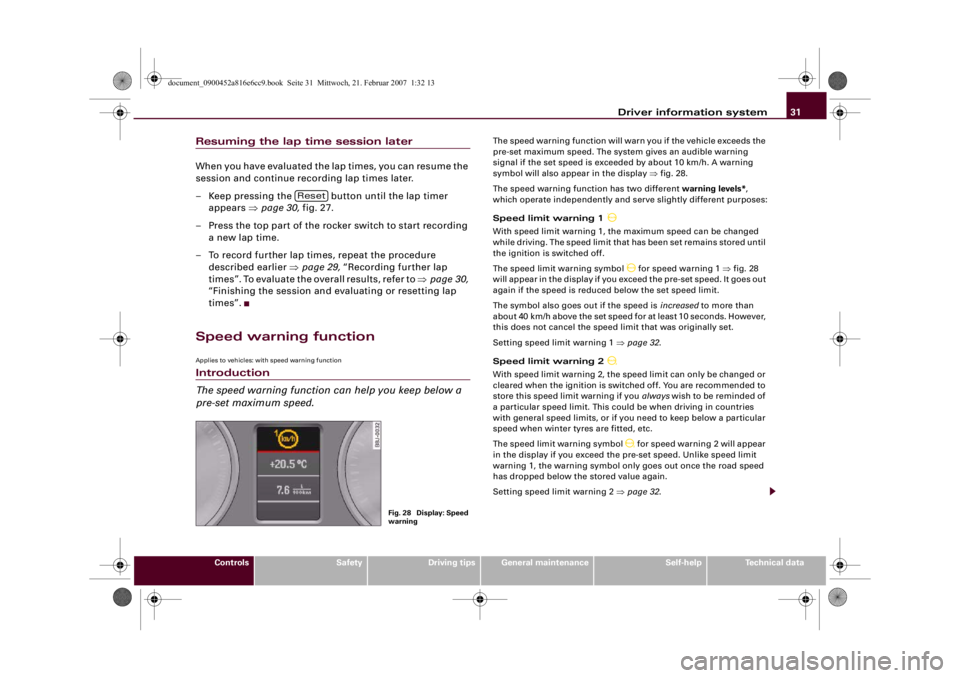
The speed warning function will warn you if the vehicle exceeds the
pre-set maximum speed. The system gives an audible warning
signal if the set speed is exceeded by about 10 km/h. A warning
symbol will also appear in the display ⇒fig. 28.
The speed warning function has two different warning levels*,
which operate independently and serve slightly different purposes:
Speed limit warning 1
With speed limit warning 1, the maximum speed can be changed
while driving. The speed limit that has been set remains stored until
the ignition is switched off.
The speed limit warning symbol
for speed warning 1 ⇒fig. 28
will appear in the display if you exceed the pre-set speed. It goes out
again if the speed is reduced below the set speed limit.
The symbol also goes out if the speed is increased to more than
about 40 km/h above the set speed for at least 10 seconds. However,
this does not cancel the speed limit that was originally set.
Setting speed limit warning 1 ⇒page 32.
Speed limit warning 2
With speed limit warning 2, the speed limit can only be changed or
cleared when the ignition is switched off. You are recommended to
store this speed limit warning if you always wish to be reminded of
a particular speed limit. This could be when driving in countries
with general speed limits, or if you need to keep below a particular
speed when winter tyres are fitted, etc.
The speed limit warning symbol
for speed warning 2 will appear
in the display if you exceed the pre-set speed. Unlike speed limit
warning 1, the warning symbol only goes out once the road speed
has dropped below the stored value again.
Setting speed limit warning 2 ⇒page 32.
Reset
Fig. 28 Display: Speed
warning
document_0900452a816e6cc9.book Seite 31 Mittwoch, 21. Februar 2007 1:32 13
Page 34 of 210
Driver information system 32
NotePlease bear in mind that, even with the speed warning function, it is
still important to keep a check on the car's speed with the speedom-
eter and to observe the statutory speed limits.Applies to vehicles: with speed warning functionSetting speed limit warning 1
Speed limit warning 1 is controlled via the adjuster/test
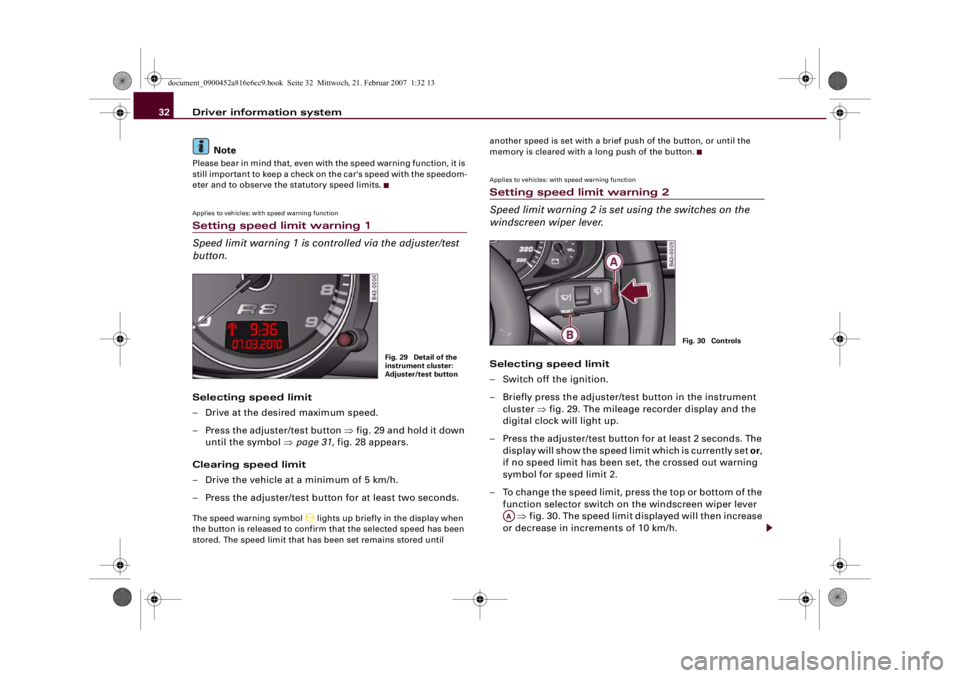
button.Selecting speed limit
– Drive at the desired maximum speed.
– Press the adjuster/test button ⇒fig. 29 and hold it down
until the symbol ⇒page 31, fig. 28 appears.
Clearing speed limit
– Drive the vehicle at a minimum of 5 km/h.
– Press the adjuster/test button for at least two seconds.The speed warning symbol
lights up briefly in the display when
the button is released to confirm that the selected speed has been
stored. The speed limit that has been set remains stored until another speed is set with a brief push of the button, or until the
memory is cleared with a long push of the button.
Applies to vehicles: with speed warning functionSetting speed limit warning 2
Speed limit warning 2 is set using the switches on the
windscreen wiper lever.Selecting speed limit
– Switch off the ignition.
– Briefly press the adjuster/test button in the instrument
cluster ⇒fig. 29. The mileage recorder display and the
digital clock will light up.
– Press the adjuster/test button for at least 2 seconds. The
display will show the speed limit which is currently set or,
if no speed limit has been set, the crossed out warning
symbol for speed limit 2.
– To change the speed limit, press the top or bottom of the
function selector switch on the windscreen wiper lever
⇒fig. 30. The speed limit displayed will then increase
or decrease in increments of 10 km/h.
Fig. 29 Detail of the
instrument cluster:
Adjuster/test button
Fig. 30 Controls
AA
document_0900452a816e6cc9.book Seite 32 Mittwoch, 21. Februar 2007 1:32 13
Page 35 of 210
Driver information system33
Controls
Safety
Driving tips
General maintenance
Self-help
Technical data
Clearing speed limit
– Switch off the ignition.
– Briefly press the adjuster/test button in the instrument
cluster ⇒page 32, fig. 29. The mileage recorder display
and the digital clock will light up.
– Press the adjuster/test button for at least 2 seconds. The
display will show the speed limit which is currently set.
– Now press and hold the button on the wind-
screen wiper lever ⇒page 32, fig. 30 until the
crossed-out warning symbol for speed limit 2 appears on
the display.The display lighting for the mileage recorder and digital clock goes
off again a few seconds after the button is released.
Note
This speed limit function can also be operated via the on-board
computer ⇒page 25, “Selecting options from the menu”.Notes and symbolsRed symbols
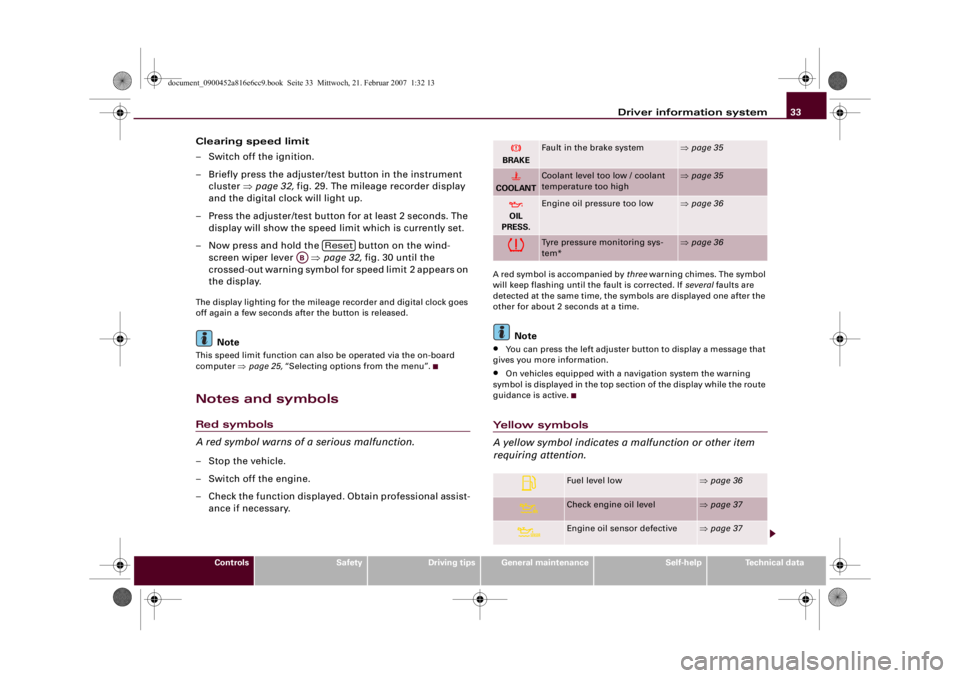
A red symbol warns of a serious malfunction.–Stop the vehicle.
– Switch off the engine.
– Check the function displayed. Obtain professional assist-
ance if necessary.
A red symbol is accompanied by three warning chimes. The symbol
will keep flashing until the fault is corrected. If several faults are
detected at the same time, the symbols are displayed one after the
other for about 2 seconds at a time.
Note
•
You can press the left adjuster button to display a message that
gives you more information.
•
On vehicles equipped with a navigation system the warning
symbol is displayed in the top section of the display while the route
guidance is active.
Yellow symbols
A yellow symbol indicates a malfunction or other item
requiring attention.
Reset
AB
BRAKE
Fault in the brake system
⇒page 35
COOLANT
Coolant level too low / coolant
temperature too high
⇒page 35
OIL
PRESS.
Engine oil pressure too low
⇒page 36
Tyre pressure monitoring sys-
tem*
⇒page 36
Fuel level low
⇒page 36
Check engine oil level
⇒page 37
Engine oil sensor defective
⇒page 37
document_0900452a816e6cc9.book Seite 33 Mittwoch, 21. Februar 2007 1:32 13
Page 36 of 210
Driver information system 34Yellow symbols are accompanied by one warning chime. The func-
tion indicated should be checked as soon as possible. If several
faults are detected at the same time, the symbols are displayed one
after the other for about 2 seconds at a time.
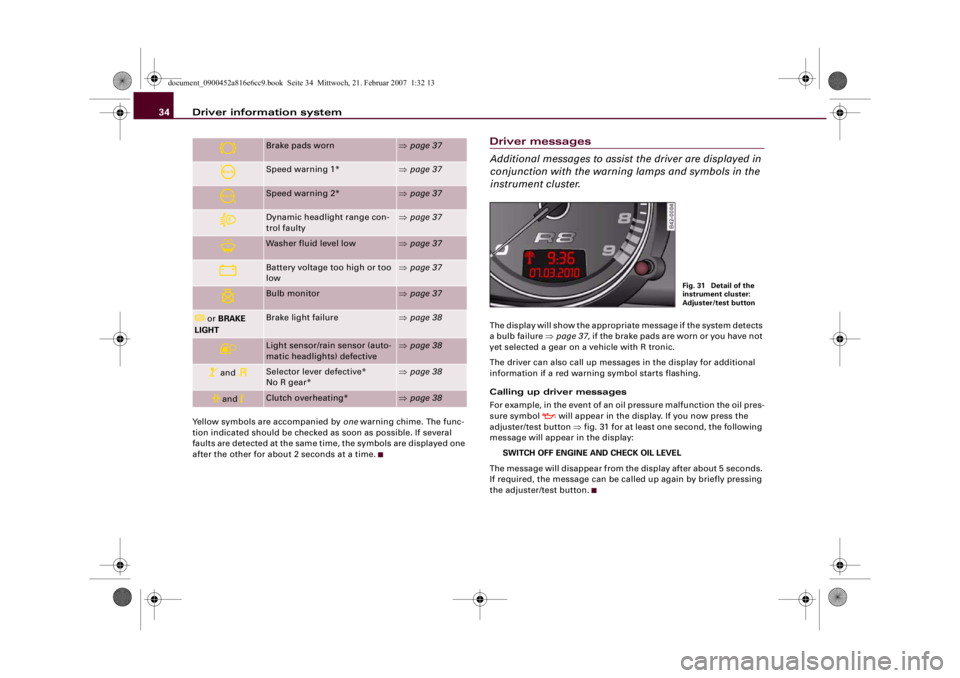
Driver messages
Additional messages to assist the driver are displayed in
conjunction with the warning lamps and symbols in the
instrument cluster.The display will show the appropriate message if the system detects
a bulb failure ⇒page 37, if the brake pads are worn or you have not
yet selected a gear on a vehicle with R tronic.
The driver can also call up messages in the display for additional
information if a red warning symbol starts flashing.
Calling up driver messages
For example, in the event of an oil pressure malfunction the oil pres-
sure symbol
will appear in the display. If you now press the
adjuster/test button ⇒fig. 31 for at least one second, the following
message will appear in the display:
SWITCH OFF ENGINE AND CHECK OIL LEVEL
The message will disappear from the display after about 5 seconds.
If required, the message can be called up again by briefly pressing
the adjuster/test button.
Brake pads worn
⇒page 37
Speed warning 1*
⇒page 37
Speed warning 2*
⇒page 37
Dynamic headlight range con-
trol faulty
⇒page 37
Washer fluid level low
⇒page 37
Battery voltage too high or too
low
⇒page 37
Bulb monitor
⇒page 37
or BRAKE
LIGHT
Brake light failure
⇒page 38
Light sensor/rain sensor (auto-
matic headlights) defective
⇒page 38
and
Selector lever defective*
No R gear*
⇒page 38
and
Clutch overheating*
⇒page 38
Fig. 31 Detail of the
instrument cluster:
Adjuster/test button
document_0900452a816e6cc9.book Seite 34 Mittwoch, 21. Februar 2007 1:32 13
Page 37 of 210

Driver information system35
Controls
Safety
Driving tips
General maintenance
Self-help
Technical data
Fault in the brake system
The warning lamp flashes when the handbrake is applied,
or if the brake fluid level is too low or if there is a fault in
the ABS system.If the symbol
flashes in the display when the handbrake
is not applied, there is a fault in the brake system. One of the
following messages will appear in the display together with
the symbol:
Stop vehicle and check brake fluid level
Brake fault ! Drive carefully to nearest workshop
–Stop the vehicle.
– You should obtain professional assistance.
If the ABS fails, the ABS warning lamp
will light up together with
the brake warning symbol
⇒.
Handbrake applied
The warning lamp
also lights up when the handbrake is applied.
In addition to this, a warning buzzer will sound after driving for
3 seconds at a speed above 5 km/h.
WARNING
•
If the brake fluid level in the reservoir is too low, this could
result in an accident. Do not drive on. You should obtain profes-
sional assistance.
•
If the brake warning lamp lights up together with the ABS
warning lamp, this can mean that the control function of the ABS
is out of action. As a result the rear wheels can lock relatively
easily when braking. This could cause the tail of the vehicle to skid
sideways. Drive carefully to the nearest qualified workshop and
have the fault rectified.
Fault in the cooling system
Faults in the cooling system must be rectified immedi-
ately.If the
symbol flashes in the display, this means that either
the coolant temperature is too high or the coolant level is
too low. The following message will appear in the display
together with the symbol:
Switch off engine, check coolant level
– Stop the vehicle.
– Switch off the engine.
– Check the coolant level ⇒page 160.
– Add more coolant if necessary ⇒page 160.
– Wait for the symbol to go out before driving on.
– Obtain professional assistance if necessary.
If the coolant level is correct, the overheating may be caused by a
malfunction of the radiator fan.
If the alternator warning lamp lights up as well ⇒page 18, it is
possible that the drive belt has broken.
WARNING
•
If your vehicle should break down for technical reasons, stop it
at a safe distance away from moving traffic, switch off the engine
and turn on the hazard warning lights ⇒page 56, “Hazard
warning lights ”.
•
Never open the engine lid if you can see or hear steam or
coolant escaping from the engine compartment; there is a risk of
being scalded. Wait until you can no longer see or hear escaping
steam or coolant.
document_0900452a816e6cc9.book Seite 35 Mittwoch, 21. Februar 2007 1:32 13
Page 38 of 210
Driver information system 36•
The engine compartment of any motor vehicle is a dangerous
place. Before carrying out any work in the engine compartment,
switch off the engine and allow it to cool down. Please observe the
important safety warnings ⇒page 155, “Working on components
in the engine compartment”.Caution
Do not drive on if the symbol
has come on to indicate a fault in
the cooling system, otherwise there is a risk of damaging the
engine.
Engine oil pressure too low
If the engine oil pressure is too low the fault must be recti-
fied immediately.If the
symbol flashes in the display, the oil pressure is
too low. The following message will appear in the display
together with the symbol:
Switch off engine and check oil level
– Stop the vehicle.
– Switch off the engine.
– Check the engine oil level ⇒page 157.
– Obtain professional assistance if necessary.
If the engine oil level is too low
If the engine oil level is too low, add more oil ⇒page 158.If the engine oil level is correct
If the
symbol flashes and the engine oil level is correct, obtain
professional assistance. Do not drive on. Do not continue to run the
engine, not even at idle speed.
Applies to vehicles: with tyre pressure monitoring systemTyre pressure monitoring system
The tyre pressure should be corrected as soon as possible
if it is too low.If the
symbol appears, the tyre pressure on at least one
of the wheels is too low. The message Tyre pressures too
low will be displayed.
–Stop the vehicle.
– Check the tyre(s).
– Adjust the tyre pressure ⇒page 167.
For more detailed information on the tyre pressure monitoring
system please refer to ⇒page 172.Fuel level low
When this symbol
comes on for the first time, there are about
10 litres of fuel left in the tank. You should fill up as soon as possible
⇒page 152.
If this warning symbol lights up although the fuel tank is sufficiently
filled, there is a malfunction in the fuel tank system. The display will
also show the driver message Tank system malfunction ! Contact
workshop. Please take the vehicle to a qualified workshop.
WARNING (continued)
document_0900452a816e6cc9.book Seite 36 Mittwoch, 21. Februar 2007 1:32 13
Page 39 of 210
Driver information system37
Controls
Safety
Driving tips
General maintenance
Self-help
Technical data
Check engine oil level
Please check oil level
If the symbol lights up, add 1 litre of oil at the next opportunity
⇒page 158.
Engine oil sensor defective
If the
symbol lights up, take the vehicle to a qualified workshop
and have the oil level sensor checked.
Front brake pads worn
If the
symbol lights up, have the front brake pads (and, for
safety's sake the rear pads as well) inspected by a qualified
workshop.
Speed warning 1
If the
symbol lights up, this means you are exceeding the speed
that has been pre-set with the speed warning function. You should
reduce your speed accordingly ⇒page 31.
Speed warning 2
If the
symbol lights up, this means you are exceeding the speed
that has been pre-set for speed warning 2. You should reduce your
speed accordingly ⇒page 31.
Headlight range control defective
This symbol
indicates a malfunction in the dynamic headlight
range control. Take the vehicle to a qualified workshop to have the
dynamic headlight range control function repaired.
Washer fluid level low
If the
symbol lights up, top up the fluid for the windscreen
washer and headlight washer system ⇒page 164.
Battery voltage too high or too low
If the
symbol lights up, take the vehicle to a qualified workshop
and have the following items checked:
•
Poly-V belt
•
Battery condition
It is also advisable to check whether the alternator warning lamp
has come on ⇒page 18.
Bulb monitor
The bulb monitor checks whether the lights on the vehicle
are working.If a defective bulb is detected, or if one of the lights has failed for
any reason, the bulb monitor symbol
will appear in the display
together with an additional message (which goes out after
5 seconds). For instance, if the rear left turn signal is not working,
the display in the instrument cluster will show the following
message:
REAR LEFT TURN SIGNAL
document_0900452a816e6cc9.book Seite 37 Mittwoch, 21. Februar 2007 1:32 13
Page 40 of 210
Driver information system 38The message disappears after 5 seconds. Press the adjuster/test
button ⇒page 10, fig. 2 briefly if you wish to call up the message
again.
If the display indicates that one of the lights is not working, this can
have a number of causes:•
Bulb failure ⇒page 193.
•
A “blown” fuse ⇒page 190, “Changing fuses”.
•
Defective electrical wiring.
Have the components replaced or the wiring repaired as necessary
by a qualified workshop.
WARNING
•
Bulbs are sensitive to pressure. The glass can break when you
touch the bulb, causing injury.
•
Incorrect handling of the high-voltage element of xenon gas-
discharge bulbs can have potentially fatal consequences.
Brake light failure
If the symbol
or the text BRAKE LIGHT lights up, check the
following components:
•
Brake light bulbs
•
Wiring connections
•
Brake light switch
Have the components repaired or replaced by a qualified workshop.Note
The brake light switch is only tested during the initial systems check
after starting the engine.
Applies to vehicles: with light sensor/ rain sensorLight sensor/rain sensor
This indicator lamp comes on if the automatic headlights/
automatic wipers are defective.If the
symbol appears, this means that the light sensor/ rain
sensor is not functioning. For safety reasons, the dipped beam
headlights will then be switched on permanently when the light
switch is set to the AUTO position. However, you can still switch the
lights on and off in the normal way with the light switch. If the rain
sensor is defective, the functions operated via the windscreen wiper
lever will still be available. You should have the light sensor/ rain
sensor checked by a qualified workshop as soon as possible.
Applies to vehicles: with R tronicSelector lever defective
and
Selector lever defective! No R gear!
If these symbols light up, there is a fault in the R tronic selector
lever. The indicators on the selector lever will go out or flash. It is no
longer possible to engage reverse gear. If you were using the
gearbox in manual mode, it will switch back to automatic mode.
You can continue to change gear manually. Starting in neutral (N),
pull the paddle lever on the steering wheel to engage first gear.
The gearbox will now remain in manual mode and you can select the
gears using the paddle levers.
You should have the selector lever checked by a qualified workshop
as soon as possible.
Applies to vehicles: with R tronicClutch overheating
and
Clutch is overheating ! If possible please stop vehicle.
A8
A+
document_0900452a816e6cc9.book Seite 38 Mittwoch, 21. Februar 2007 1:32 13