Mode AUDI S3 2015 User Guide
[x] Cancel search | Manufacturer: AUDI, Model Year: 2015, Model line: S3, Model: AUDI S3 2015Pages: 310, PDF Size: 76.15 MB
Page 24 of 310
22 Instruments and indicator lamps
See an authorized Audi dealer o r autho riz ed
Audi Service Facility for assistance.
A WARNING
If the eng ine stops whi le driving, yo u wi ll
need to use more force to b rake the vehi
cle. This increases the risk of an accident.
T here will still be power steer ing if the ig
nition is switched on w hile the vehicle is
rolling and ther e is suffici ent ba tte ry
c h arge. Othe rwise, you mu st use greate r
force when s tee ring.
f;! ~ Electronic stabilization control
(ESC) and
( @ ) anti-lock braking system
(ABS)
If t he Jj;J indicato r light b links w hile driving,
the ESP or ASR (anti-s lip regulat io n) is actively
regulat ing .
If the
J;.) indicato r light turns on, t he system
h as sw itched the ESC off . In this case, you can
sw itch the ignition off and then on to switch
the ESC on again. The indicator light turns off
when t he system is functioning fully .
Stabilization control (ESC): spo rt. Warning!
Restricted stability
If the II indicato r light turns on, ESC sport
mode was switched o n using the!.$ OFF I but
ton
c> page 190 . You can turn the ESC on
aga in by press the!.$ OFFI button again .
Stabilization control (ESC ): off. Warning!
Restricted stab ility
I f the II indicator light turns on, t he ESC was
restricte d or sw itched off using the
I .$ OFF i button
c> page 190. The message ESC
OFF
also appears. You can tu rn the ESC o n
again by p ress the!.$ OFFI button again .
The system switc hes on when the ign ition is
switched on. The
II i ndicato r light turns off
when t he system is functioning fully .
Stabilization control (ESC) malfunction! See
owner's manual
Stabilization control (ESC/ABS) malfun c
tion! See owner 's manual ABS malfunction! See owner's manual
I
f the Bl ind icator light and the ABS indica to r
li gh t
El] (US A mode ls)/ ilJ (C anad a m ode ls)
tu rn on and th is message appears, t he re is a
malfunction in the A BS system or electronic
differentia l lock. This also causes the ESC to
malfu nction. The b rakes st ill function with
their normal power, but ABS is not active.
Drive to an au thori zed A udi dealer or au tho r
ized Audi Serv ice Facility immediately to have
t h e mal function c orrected .
A WARNING "--
If th e . (U SA mode ls) /. (Canada mod -
e ls) b rake system indicator light turns on
t o gether wi th the ABS a nd ESC indicato r
lig hts, the A BS/ ESC regula ting func tion
may have fa iled. F unctions that stabilize
t he veh icle are no longe r ava ilable. This
could cause the vehicle to swerve, wh ich
i nc reases the r is k th at the vehicle will
slide . Dr ive caref ully to the nearest aut ho r
i zed A udi dealer or authorized A udi Service
Facility and have the mal funct ion c orrect
ed.
(D Tips
Fo r additional informat io n on ES C an d
ABS, refer to
c> page 189 .
BRAKE/{ 0: Brake pads
1111 (USA models ) I riJ (Canada models )
Brake pads!
If the warning light i lluminates, imme diate ly
contact your a uthorized Audi dea ler or qua li
fied workshop to have all b rake pads inspect
ed. Both sets of brake pads on an axle must
always be replaced at the same t ime .
A WARNING
Driving w it h ba d brakes can cause a colli
sion and s erious pe rsonal in ju ry.
Page 34 of 310
32 Driver information system
Lap timer and engine
oil temperature
indicator
Introduction
Applies to vehicles: with lap timer (S mode ls)
The engine oil temperature is only shown in
the lap timer disp lay .
Lap timer
You can record and evaluate lap times with
the lap timer in the display
c:> page 32 ,
fig . 18. The time is measured in minutes, sec
onds and 1/10 seconds. With lap times longer
than 60 minutes, the hour is also shown and
the display of 1/10 seconds is removed .
The time measurement on an individual lap
ends after 99 hours 59 minutes and 59 sec
onds . A new lap starts automatically after
that .
The measu rement ends after a maximum of
30 laps . You can then evaluated the lap times
or start a new time measurement .
Engine oil temperature indicator
If the engine oil temperature is be low 60 ° (,
the 't::7-symbol followed by three hyphens" --
-" and the °C uni t is shown.
The engine has reached its operating temper
ature when the engine oil temperature is be
tween
80 °C and 120 °C under normal driving
conditions. The engine oil temperature may be h igher if there is heavy engine load and
high temperatures outs ide. This is not a cause
for concern as long as the.
c:> page 20 or
Ill c:> page 24 indicator lights in the display
do not b link.
.&, WARNING
Your focus should always be on driving
your vehicle safely. As the dr iver, you have
complete responsibility for safety in traf
fic. Only use the functions such as the lap
timer in such a way that you a lways main
tain complete control over your veh icle in
all traffic situations .
(D Tips
You can retrieve information from the trip
computer wh ile the lap timer stopwatch is
running.
Opening the lap timer and measuring
time
Applies to vehicles: with lap timer (S models)
Fig. 17 Mult ifun ction stee ring w hee l: Con trols
Fig. 18 Instrume nt clust er: L ap timer
Opening the lap timer
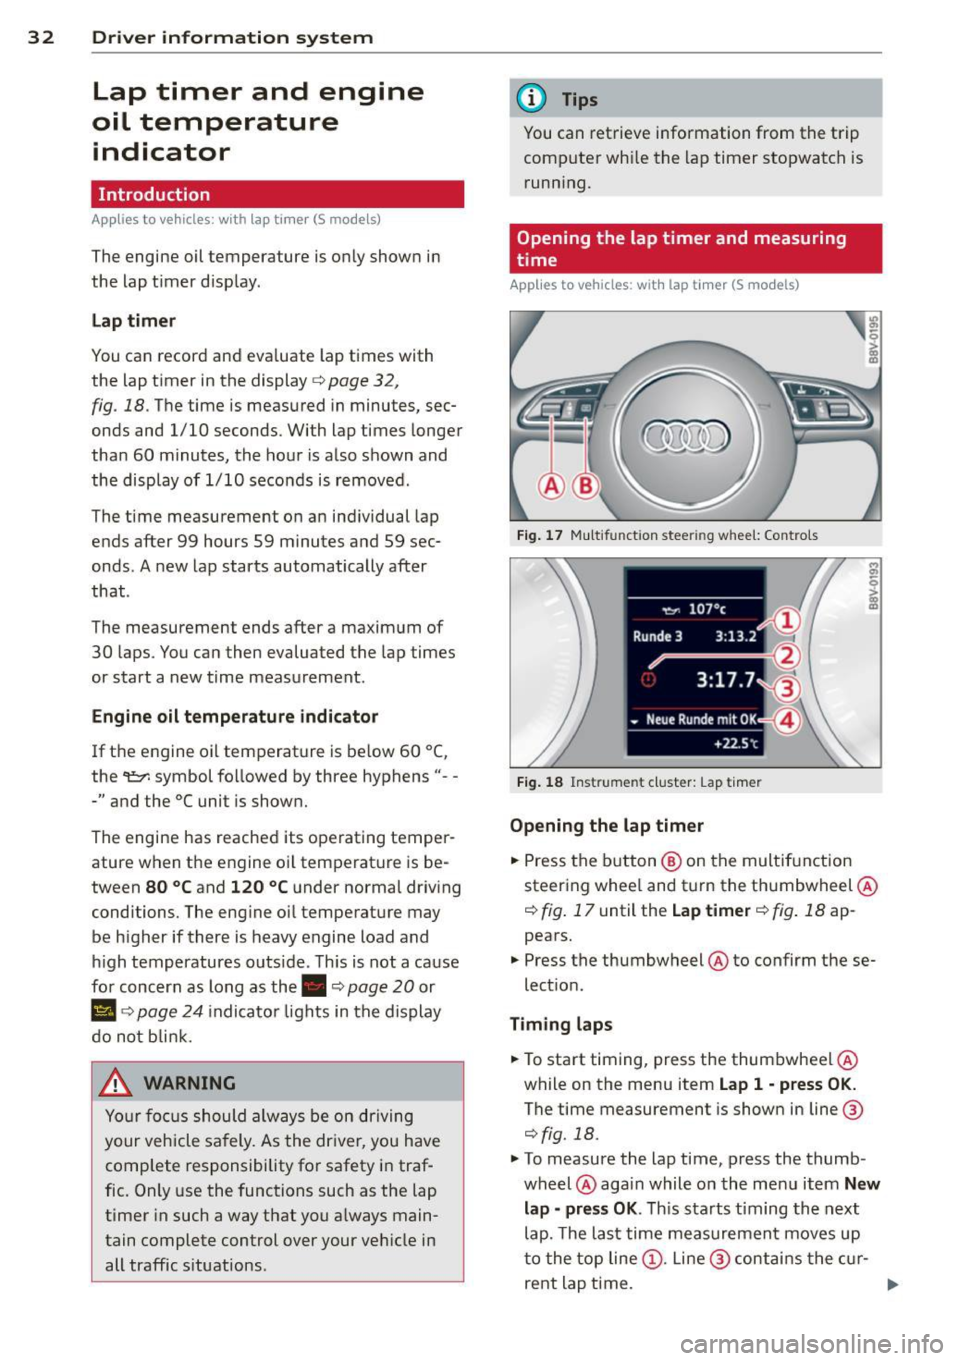
... Press the button® on the multif unction
steering whee l and turn the thumbwheel @
¢ fig. 17 until the Lap timer ¢ fig. 18 ap
pears .
... Press the thumbwheel @to confirm these
lect ion.
Timing laps
... To start timing, press the thumbwheel @
while on the menu item
Lap 1 -press OK.
The time measurement is shown in line@
¢fig. 18.
... To measure the lap time, press the thumb
wheel @again while on the menu item
New
lap -press OK. This starts t iming the next
lap. The last time measurement moves up
to the top line@. Line @ contains the cur-
rent lap time. ..,.
Page 35 of 310
....,
N
0 > co
rl I.O
"' ....,
"' rl
If the symbol . is green d uring the current
l ap time measurement, the current time is
faster than the previous best time .
If the sym
bo l. is red, the current time is slower @.
Display ing split time and pausing timing
.,. To d isplay a split time r~J . turn the thumb -
wheel @ unti l
Split time appea rs in line @.
Press the thumbwhee l@ to confirm these
lection. The split t ime appears for approxi
mately 10 seconds in line@. The timing of
the current lap continues.
If yo u wou ld like to insert a pause
m immedi
ately after the split time, first press the
thumbwheel @and then the menu item
Press OK to go b ack to confirm.
.,. To insert a pause, turn the thumbwheel @
unt il
Pause appears in the line @. P ress the
thumbwheel @to confirm the selection .
T he pause symbol
m appears in line @.
.,. To con tinue t iming, press the th umb-
whee l@ .
I f timing is paused, you can contin ue it late r
even if you switch the ignitio n
off.
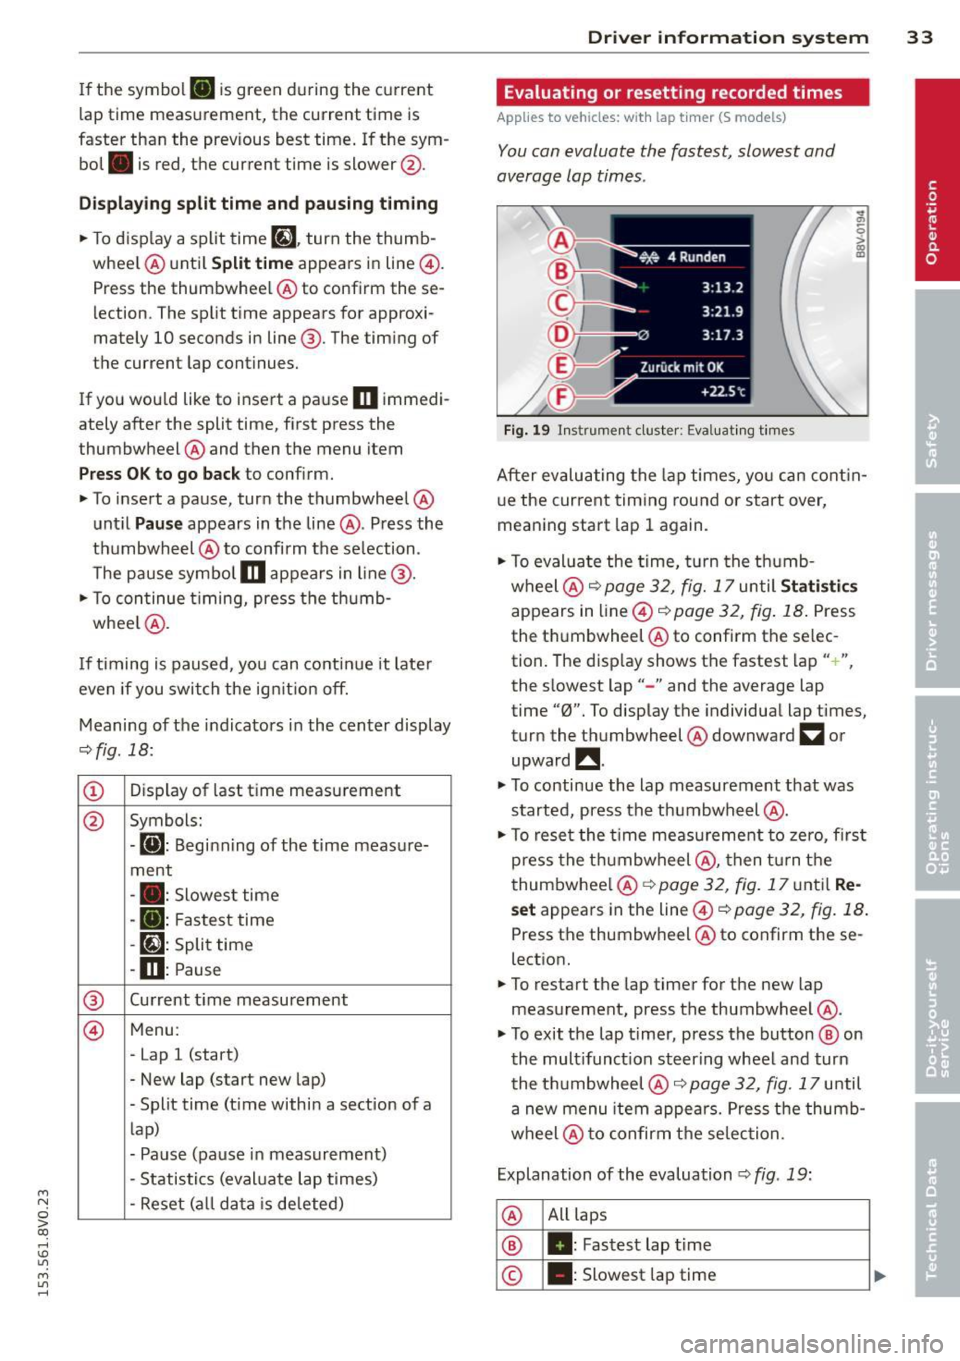
Meaning of the indicators in the center display
¢ fig. 18 :
CD Display of last time measu rement
@ Symbols:
-
[O]: Beginn ing of the time meas ure-
ment
- . : Slowes t time
- •: Fastest time
- [~]: Split time
-m : Pause
® Current t ime measurement
@ M
enu:
- lap 1 (start)
- New lap (start new lap)
- Split time (t ime within a section of a
l ap)
- Pause (pause in measurement)
- Statistics (eval uate lap times)
- Reset ( all data is de leted)
Dr iver in formation system 33
Evaluating or resetting recorded times
Applies to vehicles: wit h lap timer (S models)
You can evaluate the fastest, slowest and
average lap times .
Fig. 1 9 In strument cluster: Evaluating t imes
.., a,
-0
~
After evalu ating the lap times, yo u can cont in
u e the current timing round or start over,
mean ing start lap 1 again .
.,. To eval uate the time, t urn the thumb
wheel @9
page 32, fig. 17 until Statistic s
appears in line @ c::> page 32, fig . 18 . Press
the t humbwheel @to confirm the se lec
tion. The disp lay shows the fastest lap" +",
the slowest lap"-" and the average lap
time "0". To display the individual lap times,
turn the thumbwheel @downward
a or
upward !!.
"' To continue the lap measurement that was
started, press the thumbwheel @.
.,. To rese t the time meas urement to zero, fi rst
press the th umbwheel @, then tu rn the
t humbwhee l@ c::>
page 32, fig. 17 unt il Re
set appears in the line @¢ page 32, fig. 18 .
Press the thumbwheel @to confirm these
lect ion.
"' To restart the lap timer for the new lap
measurement , press the thumbwheel @.
"' To exit the lap t imer, press the button @ on
the mult ifunct ion steering wheel and turn
the t humbwheel @9
page 32, fig. 17 until
a new menu item appea rs. Press the thumb
wheel @to confirm t he selec tion.
Explanation of the evaluation
c::> fig . 19:
@ All laps
® II: Fastest lap
time
© .: Slowest lap time
Page 48 of 310
46 Lights and Vi sion
Lights and Vision
Exterior lighting
Switching lights on and off
Fig . 33 Instr ument pane l: lig ht sw itc h (example)
The headlights only work when the ignition is
switched on. The headlig hts turn
off automat
ically when the engine is switched on or when
the ign ition is switc hed off . Only the side·
marker lights stay on .
A warning symbol w ill appear in the driver in
formation display if the system is no t func
tioning correctly
c:> page 25 .
Light switch ·'ti-·
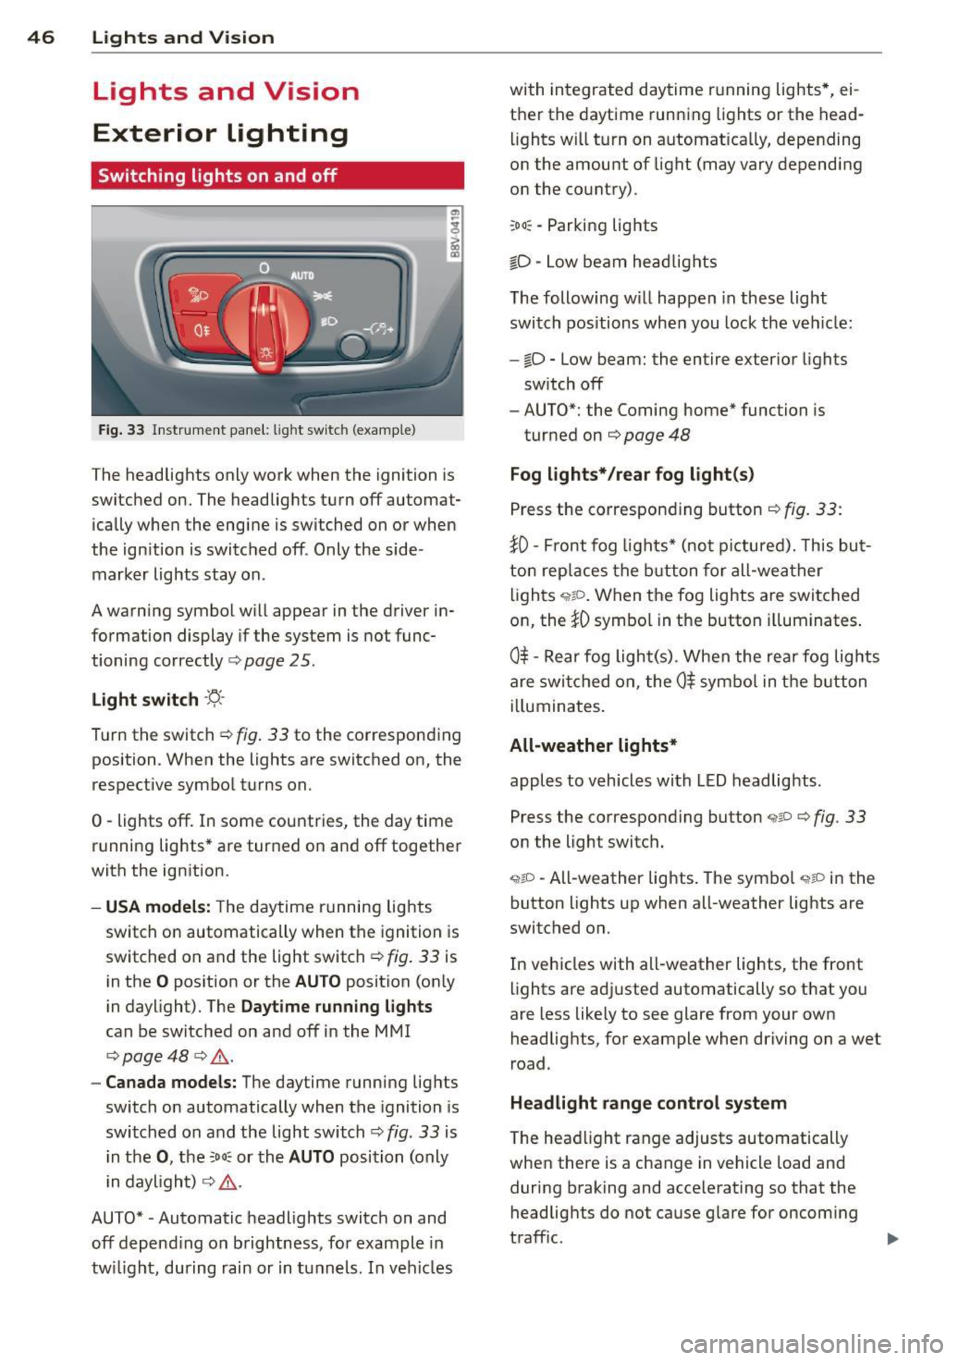
T u rn the switch c:> fig . 33 to the corresponding
position . When the lights are switched on, the
respective symbol t urns on.
0 -lights off. In some countries, the day time
running lights* are turned on and
off together
with the ign ition.
- USA models: The daytime r unnin g lights
switch on automatically when the ignition is
switched on and the light switch
c:> fig. 33 is
in the
O pos ition or the AUTO position (on ly
in daylight). The
Daytime running lights
can be switched on and off in the MMI
c:> page 48 c:> ,& .
-Canada models: The daytime running lig hts
switch on automatically when the ignition is
switched on and the light switch
c:> fig . 33 is
i n t he
0 , the :oo : or th e AUTO position (only
i n daylight)
c:> ,& .
AUTO* -Automatic headlights switch on and
off depend ing on b rightness, fo r example in
tw ilight, during rain or in tunnels . In veh icles with in
tegrated daytime r unning lights*, ei
t h e r the daytime running lights or the head
lights wi ll tu rn on automat ica lly, depending
on the amount of light (may vary depending
o n the country).
:oo : -Parking lights
iD · Low beam he ad lights
T he following w il l happen in these light
switch pos itions whe n you lock the ve hicle:
-iD -Low beam: the entire exterior lights
sw itch
off
- AUTO*: the Coming home* function is
turned on
c:> page 48
Fog lights* /rear fog light(s)
P ress the correspon ding button c:> fig. 33 :
}0-Front fog lig ht s* (no t picture d). Thi s bu t
ton rep laces the button for all-wea ther
li gh ts ,;,rto . When the fog lights are swi tched
on, the
iD symbo l in the button illuminates .
0$ -Re ar fog ligh t(s) . When the rea r fog lig hts
are swi tched on, the
0$ sym bo l in t he bu tton
i ll uminates .
All-weather lights*
apples to vehicles with LED headlig hts.
Press the corresponding button
,;;iP c:> fig. 33
on the light switch .
<,t;O -All-weather lights . The sym bo l <,tP in the
button lights up when all-weather lights are
switched on.
In veh icles with all-weather lights, the front
li ghts are ad justed automatically so that you
are less like ly to see glare from your own
headlights, for example when driving on a wet
r oad.
Headlight range control system
T he hea dlight range adjusts automatically
when there is a change in vehicle load and
during b raking and accele rating so that the
headlig hts do not cause g lare for oncom ing
t raff ic.
Page 51 of 310
....,
N
0 > co
rl I.O
"' ....,
"' rl
Daytime running lights*
USA models:
The day time running lights can
be switched on or off using the MMI. Select
on or off .
Canada models :
This function can be switched
off. They activate automatically each time the
ignition is switched on. This menu item is
shown with a "gray background".
Travel mode*
The headlight beam is asymmetrical. This pro
v id es s tronger illum inati on on the side of the
road on which you are driving. In vehicles with
Xenon headlights* with turning light* or LED
headlights* ,
you must adjust the headlights
when you are driving in a country where the
traffic direction is opposite from your own
country. Otherwise, oncom ing traff ic w ill be
blinded by the glare from the headlights. An
adjustment is not needed in vehicles with Xe
non head lights without turning lights .
To prevent glare:
- Trave l mode must be activated in vehicles
with Xenon headlights* and turning light * or
LED headlights*. Select: the
I MENU I button
> Car > Systems * control button > Vehicle
settings
> Exterior lighting > Light for driv
ing on left,
for example.
After you have adjusted the headlights, the
following message will appear:
la Headlight converter active for driving on
left. Range reduced!
(D Tips
When travel mode is activated, a display in
the driver information system indicates
this each time you switch the ignit ion on .
Lights and Vision 49
Interior Lighting
Front and rear interior lighting front
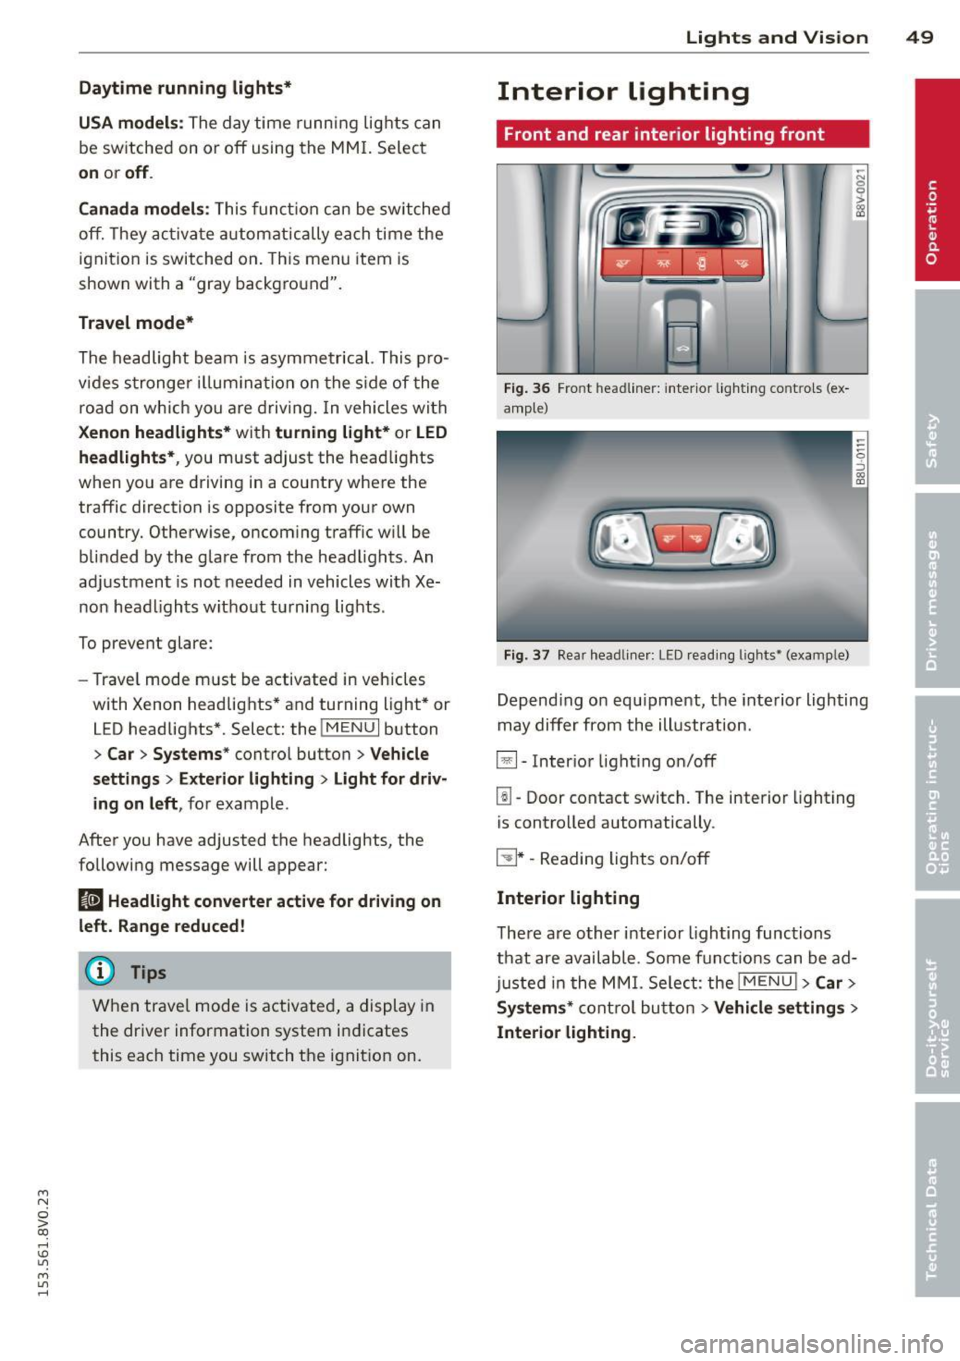
Fig. 36 Front headline r: inter ior light ing co ntrols (ex
ample)
Fig . 37 Rear headline r: LE D read ing lights• (examp le)
-N 0
0
> gg
Depend ing o n equipment, the interior lighting
may differ from the illustration.
~- Inter ior lighting on/off
[!I-Door contact switch. The interior lighting
is controlled automatically .
~ * -Reading lights on/off
Interior lighting
There are other interior lighting functions
that are available . Some functions can be ad
just ed in the MMI. Select: the
!ME NUI >Car >
Systems*
control button > Vehicle settings >
Interior lighting.
Page 52 of 310
50 Lights and Vision
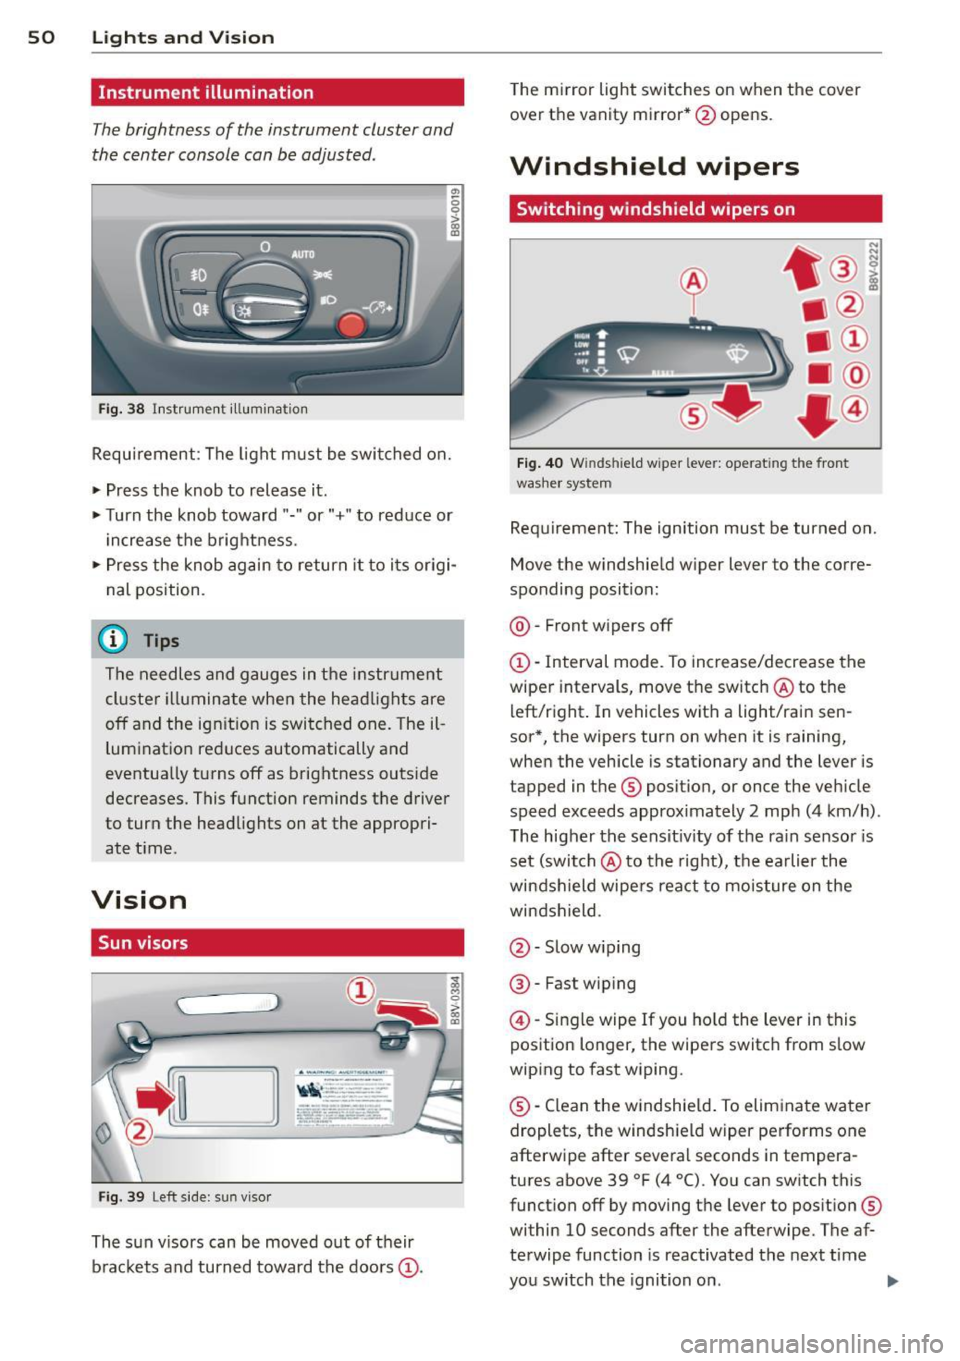
Instrument illumination
The brightness of the instrument cluster and
the center console can be adjusted.
"' 0 0
'
Fig. 38 Instrument illumination
Requirement : The light must be switched on.
.. Press the knob to release it .
.. Turn the knob toward"." or"+" to reduce or
increase the brightness.
.. Press the knob again to return it to i ts origi
nal position.
¢j) Tips
The needles and gauges in the instrument
cluster illuminate when the headlights are
off and the ignition is switched one. Theil
lumination reduces automatically and
eventually turns off as brightness outside
decreases. This function reminds the driver
to turn the headlights on at the appropri
ate t ime.
Vision
Sun visors
( ___ _____ )
Fig . 39 Left s ide: sun visor
The sun v isors can be moved out of their
brackets and turned toward the doors@.
i 0 > 00 a,
The mi rror light switches on when the cover
over the vanity mirror* @opens .
Windshield wipers
Switching windshield wipers on
Fig. 40 Winds hield w iper leve r: ope rat ing the front
washer system
Requ irement: The ignition must be turned on.
Move the windshield w iper lever to the corre
sponding position:
@ -Front wipers off
@ · Interval mode. To increase/decrease the
wiper intervals, move the switch @ to the
left/right . In vehicles with a light/rain sen
sor*, the wipers turn on when it is raining,
when the vehicle is stationary and the lever is
tapped in the ® position, or once the vehicle
speed exceeds approximately 2 mph (4 km/h) .
T he higher the sensit iv ity of the ra in sensor is
set (switch @ to the right), the earlier the
windshield wipers react to moisture on the
windshield.
@ · Slow w iping
@ -Fast wip ing
@ · Single wipe If you ho ld the lever in this
position longer, the wipers switch from slow
wiping to fast wiping.
® ·Clean the windshield . To eliminate water
droplets, the windsh ield wiper performs one
afterwipe after several seconds in tempera
tures above 39 °F (4 °() . You can switch this
funct ion off by moving the lever to position ®
within 10 seconds after the afterwipe. The af
terwipe function is reactivated the next time
you sw itch the ignition on . ..,
Page 57 of 310
M N
0 > co ,...., \!) ..,.,
M ..,., ,....,
~ Press the button@repeated ly to select the
correct magnetic zone. The selection mode
turns off after a few seconds.
Calibrating the compass
Applies to vehicles: with dig ital compass
You must recalibrate the compass if it does
not display the correct direction .
~ Press and hold the button @ ~page 54,
fig . 44
until a C appears in the rearview mir
ror.
~ Drive in a circle at about 5 mph ( 10 km/h)
unti l a direction is displayed in the rearview
mirror.
A WARNING
- To avoid endanger ing you rself and other
dr ivers, calibrate the compass in an area
whe re the re is no traff ic.
- The dig ital compass should only be used
as an or ientat ion aid . If you want to
check the compass while dr iving, you
must still pay atten tion to traff ic, the
road, the weather and any other possible
hazards.
Light s and Visi on 55
•
Page 71 of 310
....,
N
0 > co
rl I.O
"' ....,
"' rl
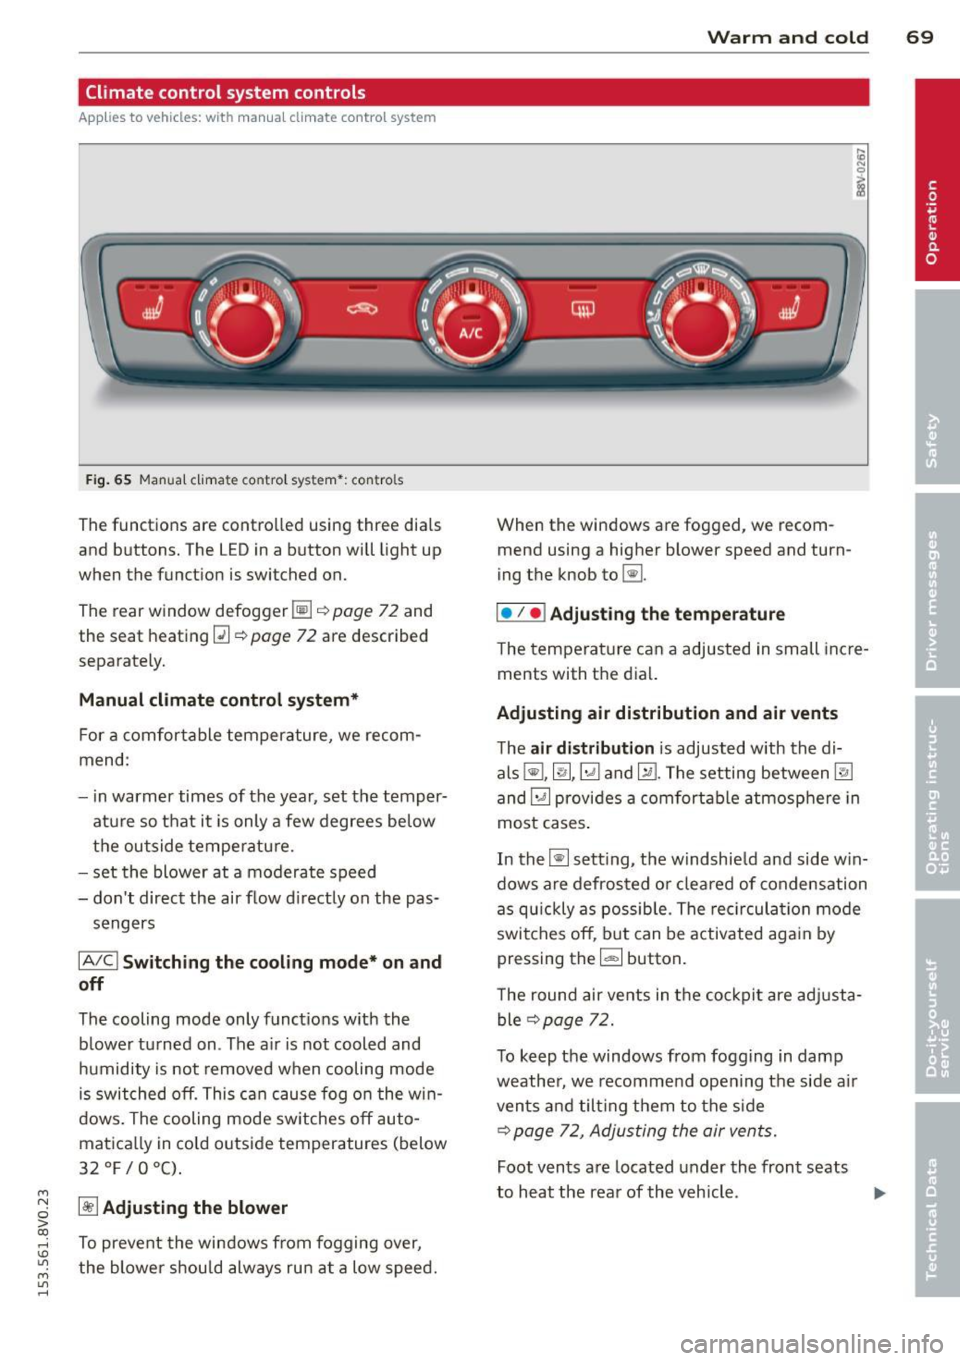
Climate control system controls
App lies to ve hicles: with manu al cl im ate c ontrol syst em
F ig . 65 Man ual cl ima te con tro l sy ste m•: con tro ls
The functions are contro lled using three dia ls
and buttons. The L ED in a button will light up
when the function is switched on.
The rear window defogger~¢
page 72 and
the seat heating~
c::> page 72 are described
separate ly.
Manual climat e control sy stem*
For a comfortable temperature, we recom
mend :
- in warmer times of the yea r, set the temper
atu re so that it is only a few degrees be low
the outside tempe ratu re.
- set the blower at a moderate speed
- don't direct the air flow d irectly on the pas-
sengers
IA/C l Switching the cooling mode* on and
off
The cooling mode only f unct ions w ith the
b lower turned on . The a ir is not cooled and
h umidity is not removed when cooling mode
i s swit ched off. This c an cause fog o n the w in
dows. The cooling mode sw itches off auto
matica lly in co ld outside temperatures (below
32°F/0°C) .
~ Adjusting the blower
To prevent the windows from fogging over,
the blower shou ld always ru n at a low speed .
W arm and cold 69
When the w indows are fogged , we recom
mend using a h igher blowe r speed and tu rn
ing t he knob to~-
I• I • I Adjusting the temperature
T he tempera ture can a adjusted in small inc re
ments with t he dial.
Adjusting air distribution and air vents
The air di stribution is adjusted with the di
als ~'~ .~ and ~-The setting between
@J
and~ provides a comf ort abl e atmosphere in
most cases .
In the~ setting, the windshie ld and side w in
dows are defros ted o r cleared of condensation
as q uickly as possib le . The rec ircul ation mode
switche s off , b ut can be activated aga in by
pressing the
l d;) I button.
T he round air ve nts in t he coc kp it are adj usta
ble
¢ page 72.
T o keep the windows from fogg ing in damp
weathe r, we recomme nd open ing the side a ir
vents and tilt ing them to the s ide
c::> page 7 2 , Adjusting the air vents.
Foot vents a re located under the front seats
to h eat the rear of the veh icle . ...,
Page 72 of 310
70 Warm and cold
1- 1 Sw itching r ecircul ation mode on and
off
In recirculation mode, the air inside the vehi
cle is circu lated and filtered. This prevents the
unfiltered air outside the vehicle from enter ing the vehicle inter ior. We recommend
switch ing recirculation mode on when driving
through a tunnel or when sitt ing in traffic
c::> ,& .
Automatic climate control system controls
App lies to vehicles: with a utomat ic climate contro l system
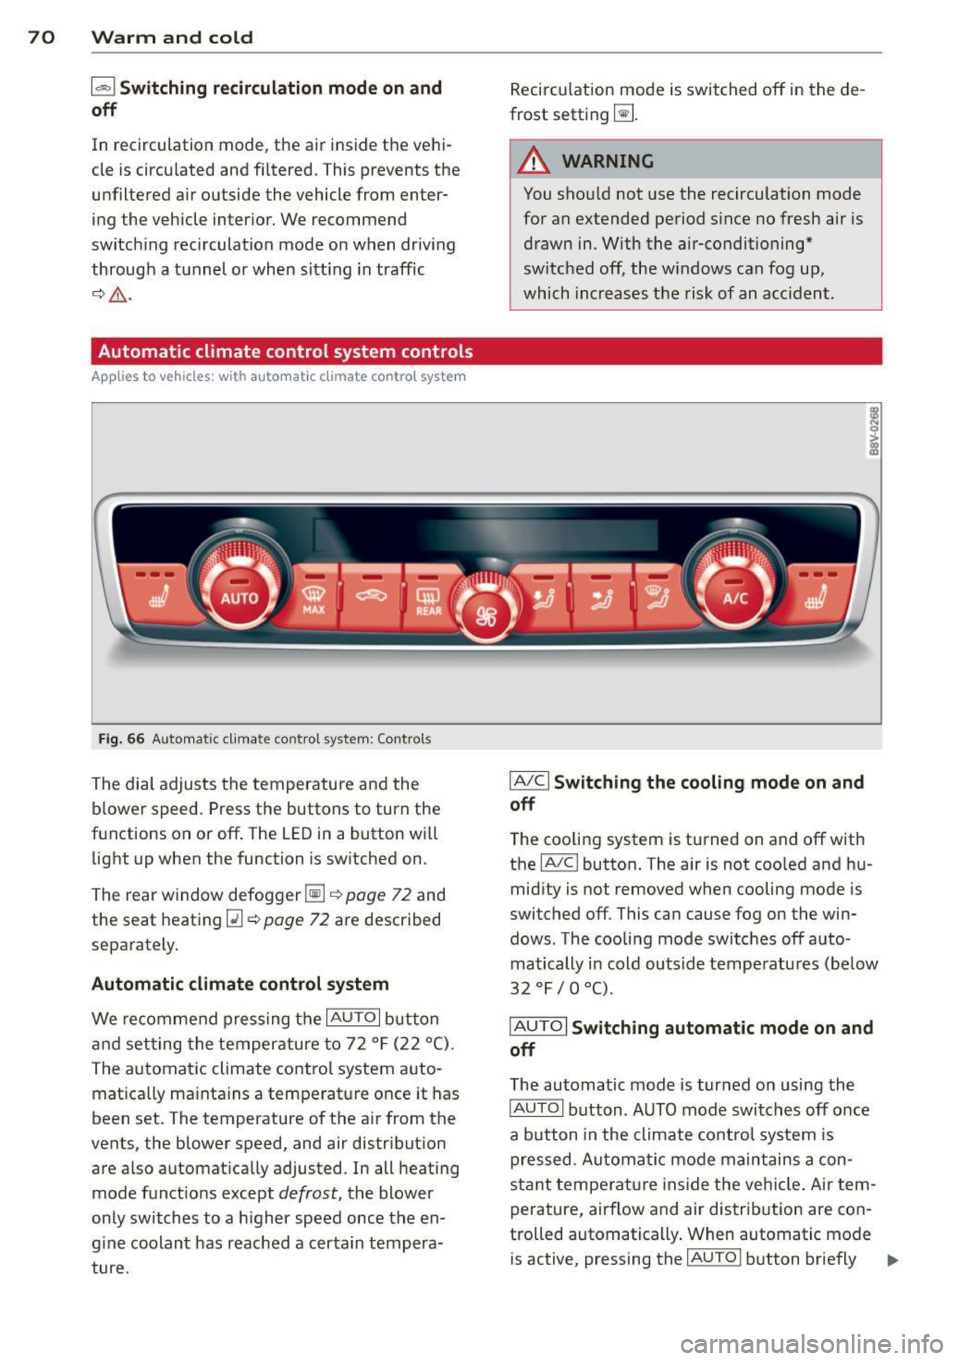
Fig . 66 A ut oma tic cl ima te co ntro l sy ste m: Control s
The dial adjusts the temperature and the
blower speed. Press the buttons to turn the
functions on or off . T he LED in a button w ill
light up when the function is sw itched on .
The rear window defogger~
c::> page 72 and
the seat heating
Q] c::> page 72 are described
separately.
Automatic climate control syst em
We re commend pressing the IAU TO I button
and setting the temperature to 72
° F (22 °() .
The automatic climate control system auto
matica lly ma inta ins a temperature once it has
been set. The temperature of the air from the
vents, the blower speed, and air distribution
are also automat ically adju sted . In all heat ing
mode funct ions except
defrost, the blower
only switches to a h igher speed once the en
g ine coolant has reached a certa in tempera
ture . Recirculation mode is switched off in the de
frost setting ~-
.&_ WARNING
-You shou ld not use the recirculation mode
for an extended period s ince no fresh air is
drawn in. With the air-conditioning*
switched off, the w indows can fog up,
which increases the risk of an acc ident .
IA/ Cl Switching th e cooling mode on and
off
T he cooling system is turned on and off with
the
IA/C l button. The air is not coo led and hu
mid ity is not removed when cooling mode is
switched off . This can cause fog on the win
dows . The cooli ng mode switches off auto
matically i n cold outside temperatu res (be low
32 °F / 0 °() .
IAUTOI Switch ing automatic mode on and
off
The automatic mode is turned on using the
IAUTOI button . AUTO mode switches off once
a b utton in the climate control system is
pressed . Automatic mode maintains a con
sta nt temperature ins ide the ve hicle . Air tem
perature, airflow and air d istribution are con
trolled automatically . When automatic mode
is active, pressing the
IAU TO I button briefly IJJ,-
Page 73 of 310
M N
0 > co ,...., \!) ..,.,
activates the "eco" mode*1>. I n "eco" mode*,
a ll settings are lowered slightly to save fuel.
When in "eco" mode* ,
eco is shown in the dis
play. To ex it "eco" mode*, press the
!AU TO !
button again .
I• I • I Setting the temperature
The temperature can be adjusted individually
for the driver and front passenger using the
dials . Temperatu res between 60 °F (+16 °C)
and 84 °F (+28 °C) can be set . Outs ide of this
range,
Lo or Hi will appear in the climate con
trol system display. In both settings, the cli mate control runs with constantly at the max
i mum cooling or heating level. The tempera
ture is not regu lated.
Synchronization: By pressing the ! AU TO I but
ton for two seconds , the temperature setting
for the driver is transferred to the front pas
senger's side. This applies a temperature
change to the front passenger's side.
~ Adjusting the blower
To prevent the windows from fogging over,
the blower should always run at a low speed.
You can adj ust the volume of air generated by
the blower to you r preference. To have the
blower regulated automatically, press the
!AU TO! button.
Adjusting the air distribution
The air distribution is adjusted with the~, [Ml
and ~ buttons. To have the air distribution
r eg ulated automatically, press the
!AUTO ! but
ton .
The round air vents in the cockpit are adjusta
ble
~ page 72.
T o keep the w indows from fogging in damp
weather, we recommend opening the side air
vents and tilting them to the side
~ page 72, Adjusting the air vents.
Foot vents are located under the front seats
and adjustable vents on the end of the center
console to heat the rear of the vehicle.
M "' l) This func tio n is not available in all c oun tri es . ,....,
Warm and cold 71
~ Switching the defroster on and off
The w indshield and side windows are defrost
ed or cleared of condensation as quickly as
possible . The maximum amount of air flows
main ly from the vents below the windshield.
Recircu lation mode switches off. The tempera
ture is controlled automatically. In the
[i] set
ting, the
! AIC ! cooling mode sw itches on auto
matically, depending on the outside air tem
perature .
The
! AU TO ! button sw itches the defroster off.
l""'I Switching recirculation mode on and
off
The recircu lation mode can be turned on man
ually or automatically* .
- Switching manual recirculation mode on and
off: Press the~ button. The LED light up
when switched on.
- Automatic* recirculation mode: The recircu
lation mode must be activated in the MMI.
Select: the
I MENU I button >C ar> Systems*
con trol button> AC > Auto recirculation.
The a ir quality sensor that is des igned for
diesel and gasoline exhaust automatically
switches the recirculation mode on or off
depending on the leve l of pollutants in the
outside air .
In recirculation mode, the air inside the vehi
cle is circulated and filtered . This prevents the
unfiltered air outside the vehicle from enter
ing the vehicle interior. We recommend
switching recircu lation mode on when driving
th rough a tunne l or when sitting in traffic
~ .&. .
The 1- 1 button, IAU TO ! or the [i] button
switches rec irc ulation mode off.
The system switches to recirculation mode
whe n driving in reverse when the engine is
cold.
•