ECU AUDI S3 SEDAN 2015 Owners Manual
[x] Cancel search | Manufacturer: AUDI, Model Year: 2015, Model line: S3 SEDAN, Model: AUDI S3 SEDAN 2015Pages: 282, PDF Size: 71.14 MB
Page 5 of 282
M N
0 > co ,...., \!) ..,.,
..,.,
..,., ,....,
Adjusting the disp lay and the warning
tones .... .. .. .. .... .... ... .. .. .... . 121
Error messages . . . . . . . . . . . . . . . . . . . . . 121
Intelligent Technology . . . . . . . . . . 122
Notice about data recorded by the Event
Data Recorder and vehicle cont rol
modules . . . . . . . . . . . . . . . . . . . . . . . . . . . 122
Electronic stabilization control (ESC) . . . . 123
Brakes . . . . . . . . . . . . . . . . . . . . . . . . . . . . . 125
Electromechanical steering . . . . . . . . . . . . 126
All wheel drive (quatt ro) . . . . . . . . . . . . . . 127
En ergy management 128
Safety . . . . . . . . . . . . . . . . . . . . . . . . . . . . 130
Driving safety . . . . . . . . . . . . . . . . . . . . 130
Basics . . . . . . . . . . . . . . . . . . . . . . . . . . . . . 130
Correct passenger seating positions..... 131
Driver's and front passenger's footwe ll . . 13 5
Pedal area . . . . . . . . . . . . . . . . . . . . . . . . . . 135
Storing cargo correct ly . . . . . . . . . . . . . . . 136
Reporting Safety Defects . . . . . . . . . . . . . . 138
Safety belt s . . . . . . . . . . . . . . . . . . . . . . 140
General notes . . . . . . . . . . . . . . . . . . . . . . . 140
Why use safety belts? . . . . . . . . . . . . . . . . 141
Safety belts . . . . . . . . . . . . . . . . . . . . . . . . 143
Belt tensioners . . . . . . . . . . . . . . . . . . . . . . 146
Airb ag sy stem . . . . . . . . . . . . . . . . . . . . 148
Important information . . . . . . . . . . . . . . . 148
Front airbags . . . . . . . . . . . . . . . . . . . . . . . 152
Monito ring the Advanced Airbag System . 160
Knee airbags . . . . . . . . . . . . . . . . . . . . . . . . 164
Side airbags . . . . . . . . . . . . . . . . . . . . . . . . 166
Side curtain airbags . . . . . . . . . . . . . . . . . . 169
Child safety . . . . . . . . . . . . . . . . . . . . . . 172
I mportant information . . . . . . . . . . . . . . . 172
Child seats . . . . . . . . . . . . . . . . . . . . . . . . . 178
Securing child seats . . . . . . . . . . . . . . . . . . 182
LATCH system (Lower anchorages and
tethers for children) . . . . . . . . . . . . . . . . . . 185
Additional information . . . . . . . . . . . . . . . 189
Table of contents
Maintenance and Care . . . . . . . . . . .
190
Checking and Filling . . . . . . . . . . . . . 190
Gasoline . . . . . . . . . . . . . . . . . . . . . . . . . . . 190
Diesel f uel . . . . . . . . . . . . . . . . . . . . . . . . . 191
Refueling . . . . . . . . . . . . . . . . . . . . . . . . . . 192
Catalytic co nverter . . . . . . . . . . . . . . . . . . . 194
D ie sel particulate filter . . . . . . . . . . . . . . . 195
Selective catalytic reduction . . . . . . . . . . . 195
En gine compartm ent . . . . . . . . . . . . . . . . . 198
Eng ine oil . . . . . . . . . . . . . . . . . . . . . . . . . . 20 1
Cooling system . . . . . . . . . . . . . . . . . . . . . . 205
Brake fluid . . . . . . . . . . . . . . . . . . . . . . . . . 207
Battery . . . . . . . . . . . . . . . . . . . . . . . . . . . . 208
Windshield washer system . . . . . . . . . . . . 212
Serv ice interval display
212
Tires and wheels . . . . . . . . . . . . . . . . . 214
Wheels . . . . . . . . . . . . . . . . . . . . . . . . . . . . 214
Tire pressure monitoring system . . . . . . . 232
Care and cleaning . . . . . . . . . . . . . . . . 235
General information . . . . . . . . . . . . . . . . . 23S
Car washes . . . . . . . . . . . . . . . . . . . . . . . . . 23S
Cleaning and care information 236
Troubleshooting . . . . . . . . . . . . . . . . . 240
Emergency assistance . . . . . . . . . . . 240
Luggage compartment lid emergency
re lease . . . . . . . . . . . . . . . . . . . . . . . . . . . . 240
General informat ion . . . . . . . . . . . . . . . . . 240
Equipm ent . . . . . . . . . . . . . . . . . . . . . . . . . 241
Replacing wheels . . . . . . . . . . . . . . . . . . . . 241
Spare tire . . . . . . . . . . . . . . . . . . . . . . . . . . 246
Fu se s and bulbs . . . . . . . . . . . . . . . . . . 248
El ectrica l fuses . . . . . . . . . . . . . . . . . . . . . . 24 8
Bulbs. . . . . . . . . . . . . . . . . . . . . . . . . . . . . . 250
Emergency situation s . . . . . . . . . . . . 252
General . . . . . . . . . . . . . . . . . . . . . . . . . . . . 252
Starting by pushing or towing . . . . . . . . . . 252
Starting with jumper cables . . . . . . . . . . . 252
Using jump start cables . . . . . . . . . . . . . . . 253
Towing with a tow truck . . . . . . . . . . . . . . . 254
Raising the vehicle . . . . . . . . . . . . . . . . . . . 256
3
Page 39 of 282
....,
N
0 > co
rl I.O
"'
"'
"'
rl
Unlocking/locking with the key
In the event that the power locking system fails,
the driver's door can locked and unlocked using
the door lock.
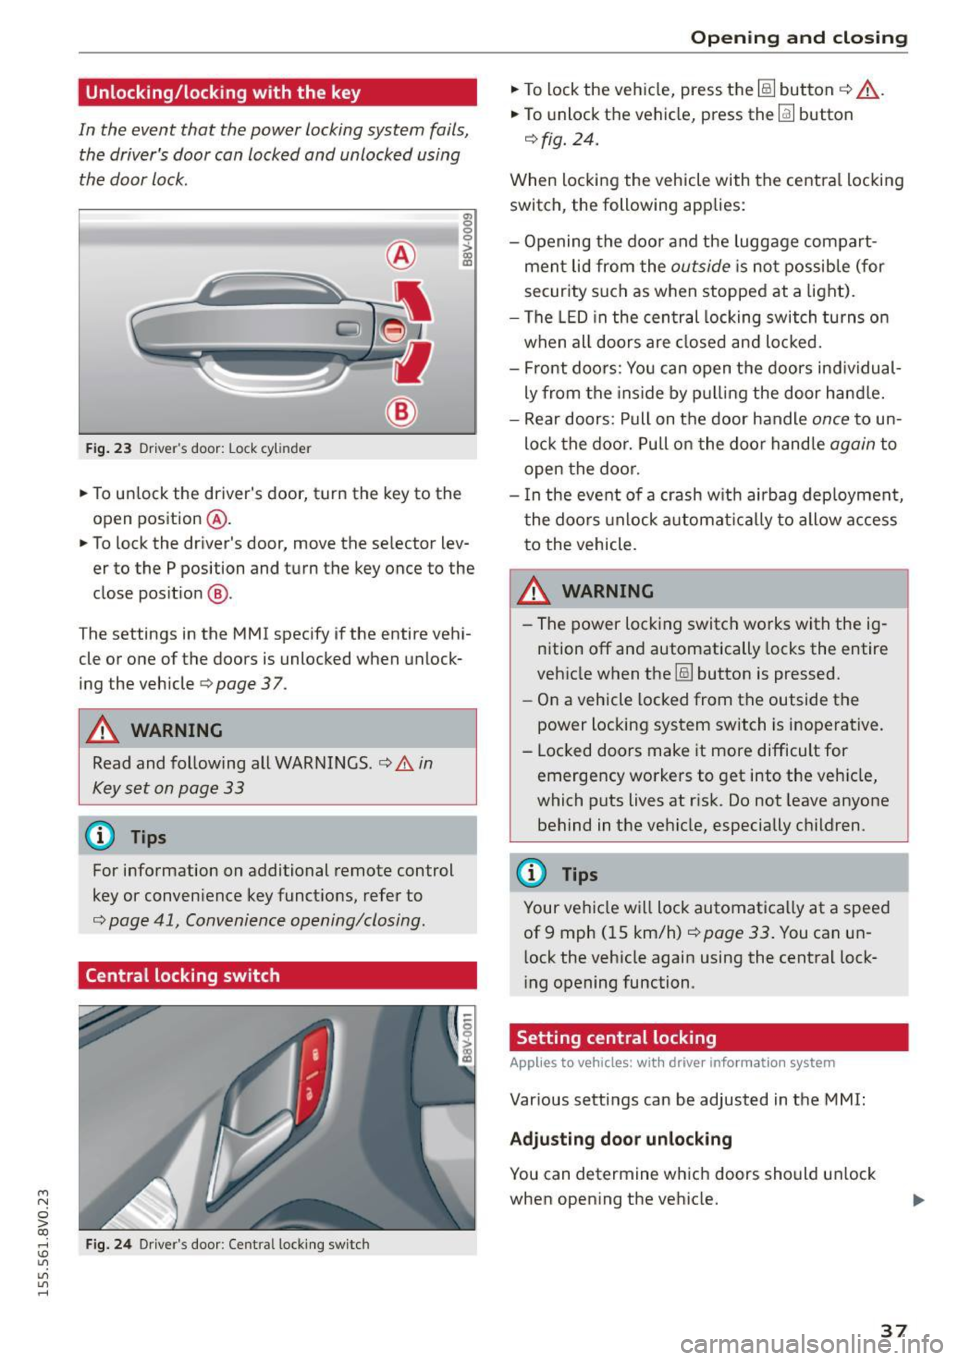
F ig . 23 Dr ive r's door: Lock cylinder
• To un lock the driver's door, turn the key to the
open position
® ·
a, 0 0 0 :> Q) a,
• To lock the driver's door, move the selector lev
er to the P position and turn the key once to the
close pos it ion
® ·
The settings in the MMI specify if the entire vehi
cle or one of the doors is unlocked when unlock
ing the vehicle
c:::> page 3 7.
A WARNING
Read and following all WARNINGS. c:::> &. in
Key set on page 33
@ Tips
For information on additional remote control
key or conven ience key functions, refer to
c::> page 41, Convenience opening/closing .
Central locking switch
Fig. 24 Dr iver 's door : Centra l lock ing switch
Open ing and clo sing
• To lock the vehicle, press the~ button c:::> .&_.
• To unlock the vehicle, press the~ button
c:::>fig. 24.
When loc king the vehicle with the centra l locking
switch, the following app lies:
- Opening the door and the luggage compart
men t lid from the
outside is not possible (for
secur ity such as when stopped at a light).
- The LED in the central locking switch tu rns o n
when all doors are closed and loc ked.
- Front doo rs: You can open the doors ind ividual
ly from the ins ide by p ulling the door hand le.
- Rear doors: Pull on t he door handle
once to un
lo ck the doo r. Pull on the doo r handle
again to
open the doo r.
- I n the event of a crash w it h ai rbag deploymen t,
t he doo rs unlock a utoma tically to allow access
to the vehicle.
_&. WARNING
- The power locking switch wo rks with the ig
n ition off an d automatically locks the entire
veh icle when the~ button is pressed.
- On a vehicle locked from the outside the
power loc king system switch is inoperative.
- Locked doors make it more difficult for emergency workers to get into the ve hicle,
which puts lives at ris k . Do not leave anyone
behind in the ve hicle, especially c hildren.
(D Tips
Your ve hicle w ill lock automatica lly at a speed
of 9 mph ( 15 km/h)
c::> page 33 . You can un
l ock the vehicle again using the central lock
i ng opening function.
Setting central locking
Applies to vehicles: with drive r in fo rmat io n system
Var ious settings can be adjusted in the MMI:
Adju sting door unlocking
You can determine wh ich doors should u nlock
when open ing the vehicle.
37
Page 43 of 282
M N
0 > co ,...., \!) 1.1'1
1.1'1
1.1'1
,....,
@ Switch for the window in the right rear door.
® Safety button* .
Child safety lock
When the safety button®~ fig. 29 is pressed,
the@ symbol in the button lights up. The power
window switches in the rear doors are switched
off.
A WARNING
- When you leave your vehicle - even if only
br iefly -always remove the ignition key. This
applies part icularly when children remain in
the vehicle. Otherwise the children could start the engine or operate e lectr ica l equip
ment (e.g. power windows). The power win
dows are functional until the driver 's door o r
passenger's door has been opened .
- Pay caref ul attent ion when closing the win
dows.
It could cause injury by pinching .
- When locking the veh icle from outs ide, the
vehicle must be unoccupied since the win
dows can no longer be opened in an emer
gency.
-
(D Tips
After turning the ignition off you can st ill
open and close the windows for approximate
ly 10 seconds. The power windows are not
switched off unti l the driver's door or pas
senger's door has been opened.
Convenience opening/closing
With the convenience opening/closing funct ion,
you can centrally and easily open the windows and the panorama sunroof* from the outside.
Con veni enc e op en f eatur e
.. Press the open button Iii on the remote control
key until all windows and the panorama sun
roof* have reached the desired position, or
.. Hold the key in the driver's door lock until all
windows and the panorama sunroof* have
reached the desired position.
Op ening and cl osing
Conven ience clo se feature
.. Ho ld the key in the driver's door lock in the lock
position unti l all windows and the panorama
sunroof* are closed.
Con venienc e closing wi th the convenience
key*
.. Touch the sensor * on one of the front door han
dles and contin ue touching it until all of the
windows and the panorama sunroof* are
closed. Do not place your hand in the door han
dle when doing th is .
Adju sting the con venience opening in the
MMI
.. Select: the I MENU I button >Car> Sys tems*
control button > Vehicle se ttings > Cent ral
loc king > Long-pr ess to open w indo ws
To enable convenience opening of the w indows
and the roof*, the
Front windo ws, Rear win
do ws*
and Roo f* functions must be switched On.
A WARNING
- Never close the w indows or panorama sun
roof* care lessly or in an uncontrolled man
ner, because this increases the risk of injury.
- For secur ity reasons, the w indows can only
be opened with the remote control key at a
maximum distance of approximately 6 feet
(2 meters) from the vehicle.
- Pay attention when using the lock cylinder
to close the w indows and the panorama
sunroof* so that no one is pinched. Closing
stops when the key is moved into the start
ing position.
Correcting power window malfunctions
After disconnecting the vehicle battery, the one touch up and down feature must be activated
again .
.,. Pull the power wi ndow switch until the window
is completely ra ised.
.. Release the switch and pull it again for at least
one second.
4 1
Page 59 of 282
....,
N
0 > co
rl I.O
"'
"'
"'
rl
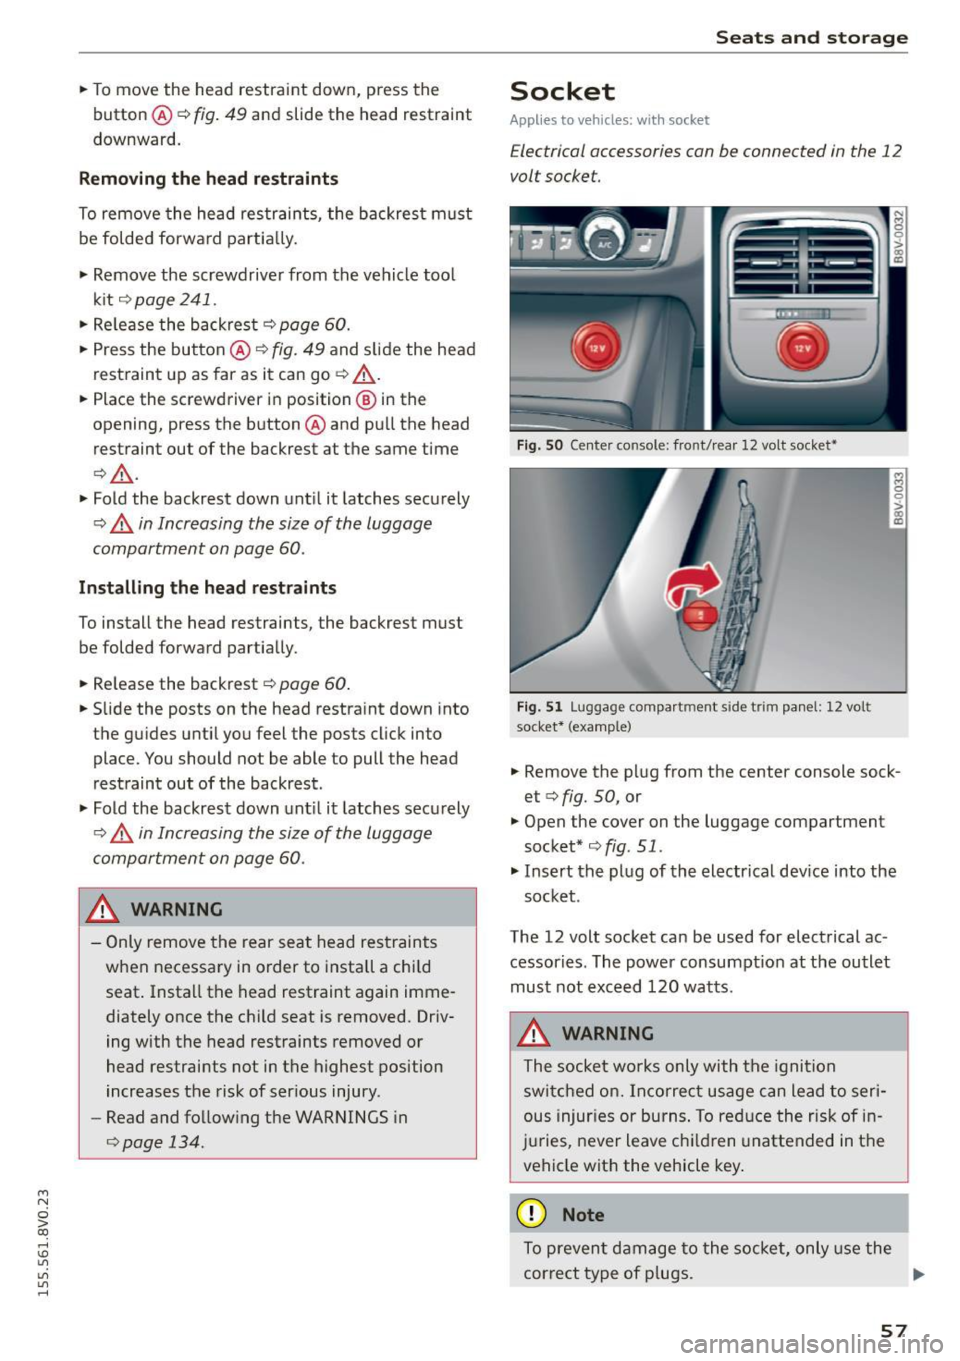
.. To move the head restraint down, press the
button ®
<::>fig . 49 and slide the head restraint
downward.
Removing the h ead restraints
To remove the head restraints, the backrest m ust
be folded forwa rd partia lly .
.. Remove the screwdrive r from the vehicle too l
k it
9 page 241 .
.. Re lease the backrest<::> page 60 .
.. Press the but ton @ c:? fig. 49 and s lide the head
restraint up as far as it can go<::>
_A .
.. Place the screwdriver in position @ in the
opening, press the button ® and pu ll the head
restraint out of the backrest at the same time
t::>_& .
.. Fold the backrest down unt il it latches securely
t::> .A in Increasing the size of the luggage
compartment on page 60 .
Installing the head re st ra int s
To install the head restraints, the backrest must
be folded forward partially .
.. Re lease the backrest <::>
page 60 .
.. Slide the posts on the head restra int down into
the guides until you feel the posts click into
place. You should not be able to pull the head
restraint out of the backrest .
.,. Fold the backrest down unt il it latches securely
9 .A in Increasing the si ze of the luggage
compartmen t on page 60.
A WARNING
- Only remove the rear seat head restraints
w hen necessary in o rder to i nstall a chi ld
seat . Install the head restraint again imme
diately once the chi ld seat is removed. Driv
ing with the head restraints removed or
head restraints not in the highest position
increases the risk of ser ious injury .
- Read and fo llow ing the WARNINGS in
<::>
page 134.
-
Seats and storage
Socket
Applies to veh icles: w it h socket
Electrical accessories can be connected in the 12
volt socket.
F ig. S O Center co nsole: front/ rear 12 volt socket•
F ig. 5 1 Luggage compartm ent side trim panel: 12 volt
socket* (examp le)
.. Remove the plug from the center console sock
et <::>
fig. 50, or
.,. Open the cover on the luggage compartment
socket* <::>
fig. 51.
.,. Insert the plug of the electrical dev ice into the
socket .
The 12 volt socket can be used for electrical ac
cessories . The power consumpt ion at the outlet
must not exceed 120 watts.
A WARNING
The socket wo rks only with the igni tion
switc hed on. Inco rrect usage can lead to ser i
ous injur ies or burns . To red uce the risk of in
j u ries, never leave c hildren unattended in the
vehicle with the vehicle key .
@ Note
To prevent damage to the socket, only use the
correct type of p lugs. .,,.
57
Page 61 of 282
....,
N
0 > co
rl I.O
"'
"'
"'
rl
_& WARNING
Always leave the lid on the glove compartment cover closed while driving to reduce the
risk of injury.
Additional storage compartments
There are additional storage compartments,
compartments and holders at other locations in
the vehicle :
- In the upper part of the glove compartment.
- In the center console under the center arm-
rest* .
- On the back of the right front seat . The com
partment* can hold a maximum weight of
2 lbs
(1 kg).
- Garment hooks on the B-pillar ¢
&.
_& WARNING
-Do not place any objects on the instrument
panel. Objects that are not stored securely
can slide around in the vehicle while driving,
when accelerating or braking or when turn
ing.
- Make sure that objects cannot fall out of the
center console storage compartment or oth
er compartments and into the footwell
while driving. These objects could prevent
you from braking or accelerating during sud
den braking maneuvers.
- Garments hung on the hooks must not ob
struct the driver's view. The garment hooks
are only designed for light objects . Do not
hang any garments with hard, sharp or
heavy objects in the pockets on the garment
hooks . These objects could injure vehicle oc
cupants during sudden brak ing or in a colli
sion - especially if the airbags deploy.
- Always keep the glove compartment closed
while driving to reduce the risk of injury dur
ing a collision or heavy brak ing.
- Read and following the WARNINGS in
¢ page 168, Important safety instructions
on the side airbag system.
-Hang garments so that they do not obstruct
the driver's view.
Seats and storage
-The garment hooks should only be used for
light articles of clothing . Do not leave any
heavy or sharp-edged objects in the pockets
that could interfere with the side airbags unfolding and cause injuries in the event of
a collision .
- Do not use coat hangers to hang garments,
because this could reduce the effectiveness
of the side curtain airbags.
- Do not hang any heavy objects on the gar
ment hooks, because they could cause injury
during heavy braking.
- Because of their load capacity, the hooks
should only be used to secure objects that
weigh a max imum of 10 lb (5 kg). Heavy ob
jects will not be secured sufficiently, and
this increases the risk of injury.
luggage compartment
Loading luggage compartment
Luggage items must be stowed securely.
Fig. 55 Place heavy objects as far forward as poss ib le.
Note the following to preserve the vehicle's good
handling characteristics .
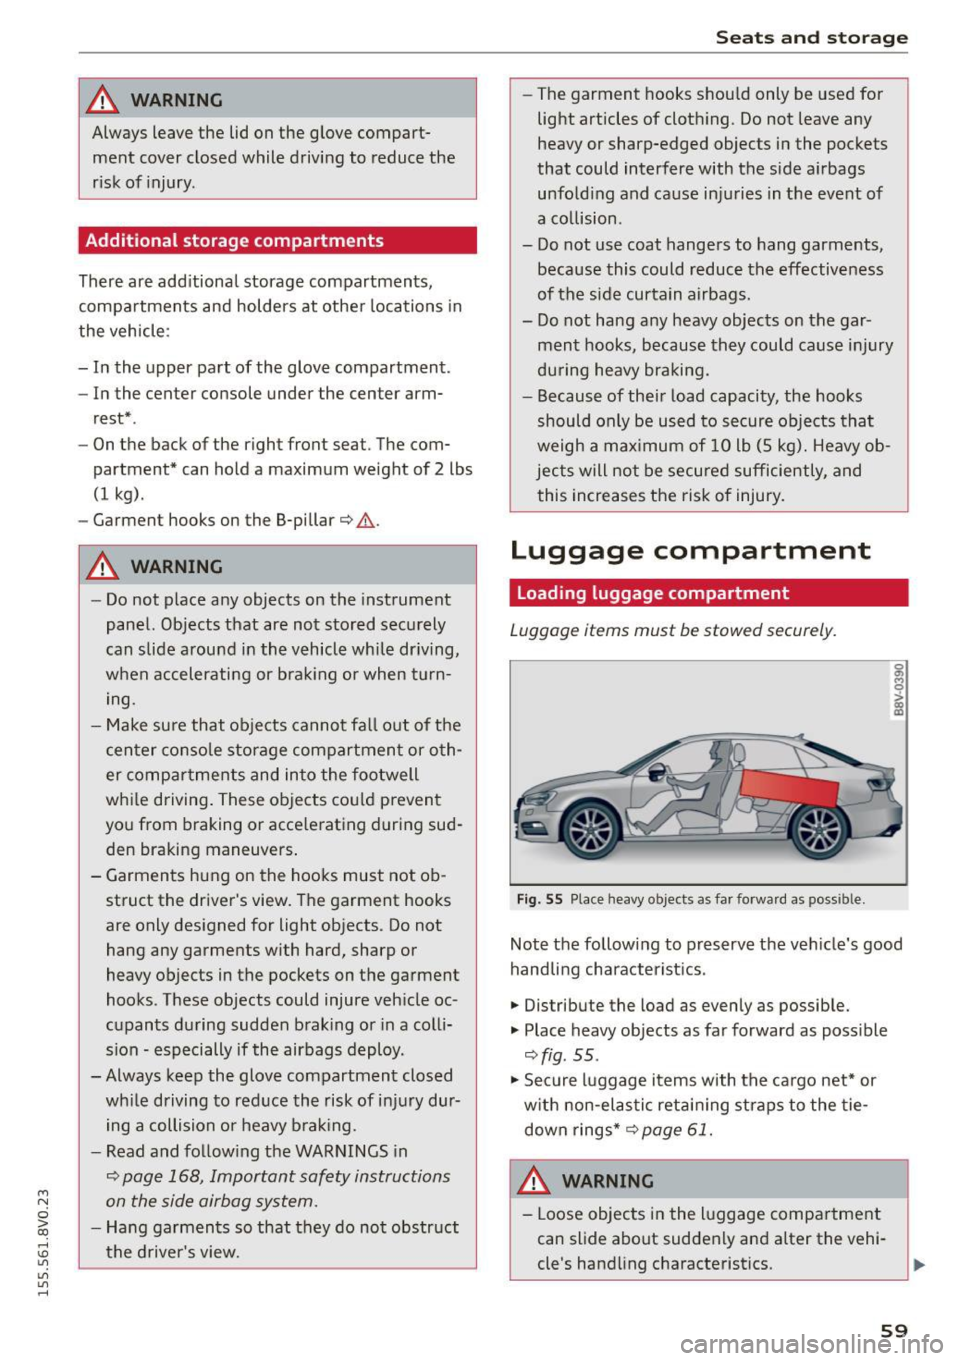
.,. Distribute the load as evenly as possible.
.,. Place heavy objects as far forward as possible
¢ fig . 55 .
.,. Secure luggage items with the cargo net* or
with non-elastic retaining straps to the tie
down rings* ¢
page 61.
WARNING
-Loose objects in the luggage compartment
can slide about suddenly and alter the vehi
cle's handling characteristics.
59
Page 62 of 282
Seats and storag e
-Loose objects in the passenger compart
ment can fly forward during abrupt maneu
vers or acc idents and injure occupants.
- Always store objects in the luggage com
partment and use suitable straps, particu
larly with heavy objects.
- When you transport heavy objects, a lways
remember that a change in the center of
gravity may result in a change in the veh i
cle's handling character istics.
- Follow all warnings
Q page 130, Driving
safety .
(D Tips
The tire pressure must be adjusted to the load
- see the tire pressure sticker located on the
driver's side B-pillar.
General information
.&, WARNING
Refer to the chapter Dr iving Safely
Q page 130, Driving safety for important in
formation, tips, suggestions and warnings that you should read and fo llow for your own
safety and the safety of your passengers.
Increasing the size of the luggage
compartment
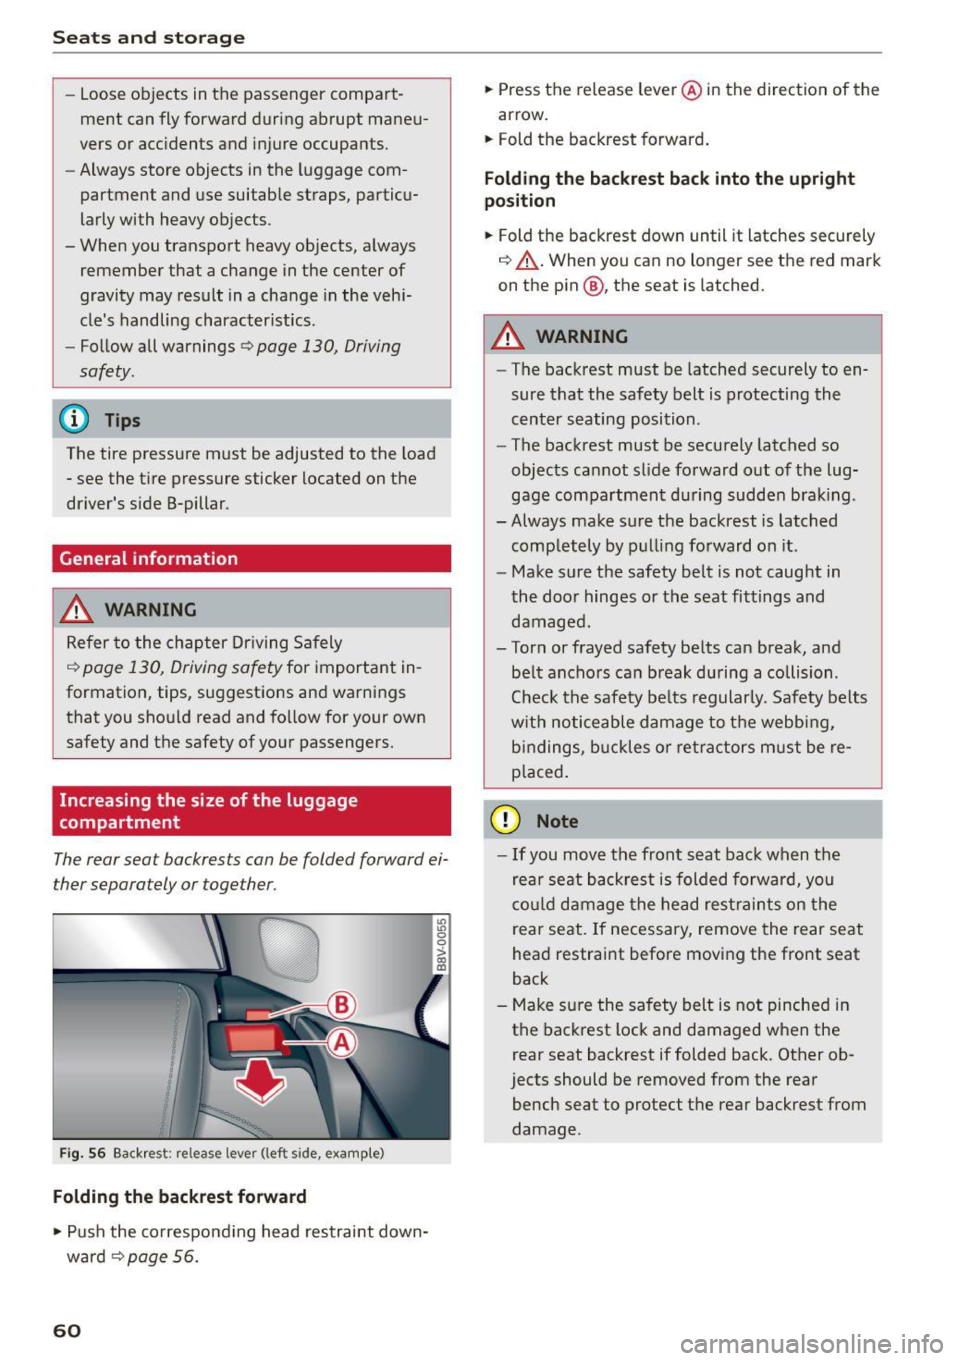
The rear seat backrests can be folded forward ei
ther separately or together.
Fig. 56 Backrest: release lever (left side, example)
Folding the backrest forward
.,. Push the co rresponding head restraint down
ward ¢
page 56.
60
.,. Press the release leve r@ in the direction of the
arrow.
.,. Fold the backrest forward .
Folding th e backre st back into the upright
po sition
.,. Fold the backrest down until it latches securely
¢ ,&. .When you can no longer see the red mark
on the pin@, the seat is latched.
.&, WARNING
- The backrest must be latched securely to en
sure that the safety belt is protecting the
cent er seating position .
- The backrest must be securely latched so
objects cannot slide forward o ut of the lug
gage compartment du ring sudde n brak ing .
- Always make sure the backrest is latched
comp letely by pulling forward on it .
- Make sure the safety belt is not caught in
the doo r hinges or the seat fittings and
damaged.
- Torn or frayed safety be lts can break, and
be lt ancho rs can b reak du ring a collision .
Check the safety be lts regularly. Safety belts
w it h noticeable damage to t he webb ing,
bi ndings, b uckles o r ret ra ctors m ust be re
placed.
(D Note
- If you move the front seat back when the
rear seat backrest is folded forward, you
c o ul d damage the head res traints on the
rear seat. If necessary, remove the rear seat
head restraint before moving the front seat
back
- Make su re the safety belt is not pinched in
the back rest lock and damaged when the
rear seat backrest if folded back. Other ob
jects should be removed from the rear
bench seat to protect the rear backrest from
damage .
Page 63 of 282
....,
N
0 > co
rl I.O
"'
"'
"'
rl
Tie-downs and cargo net
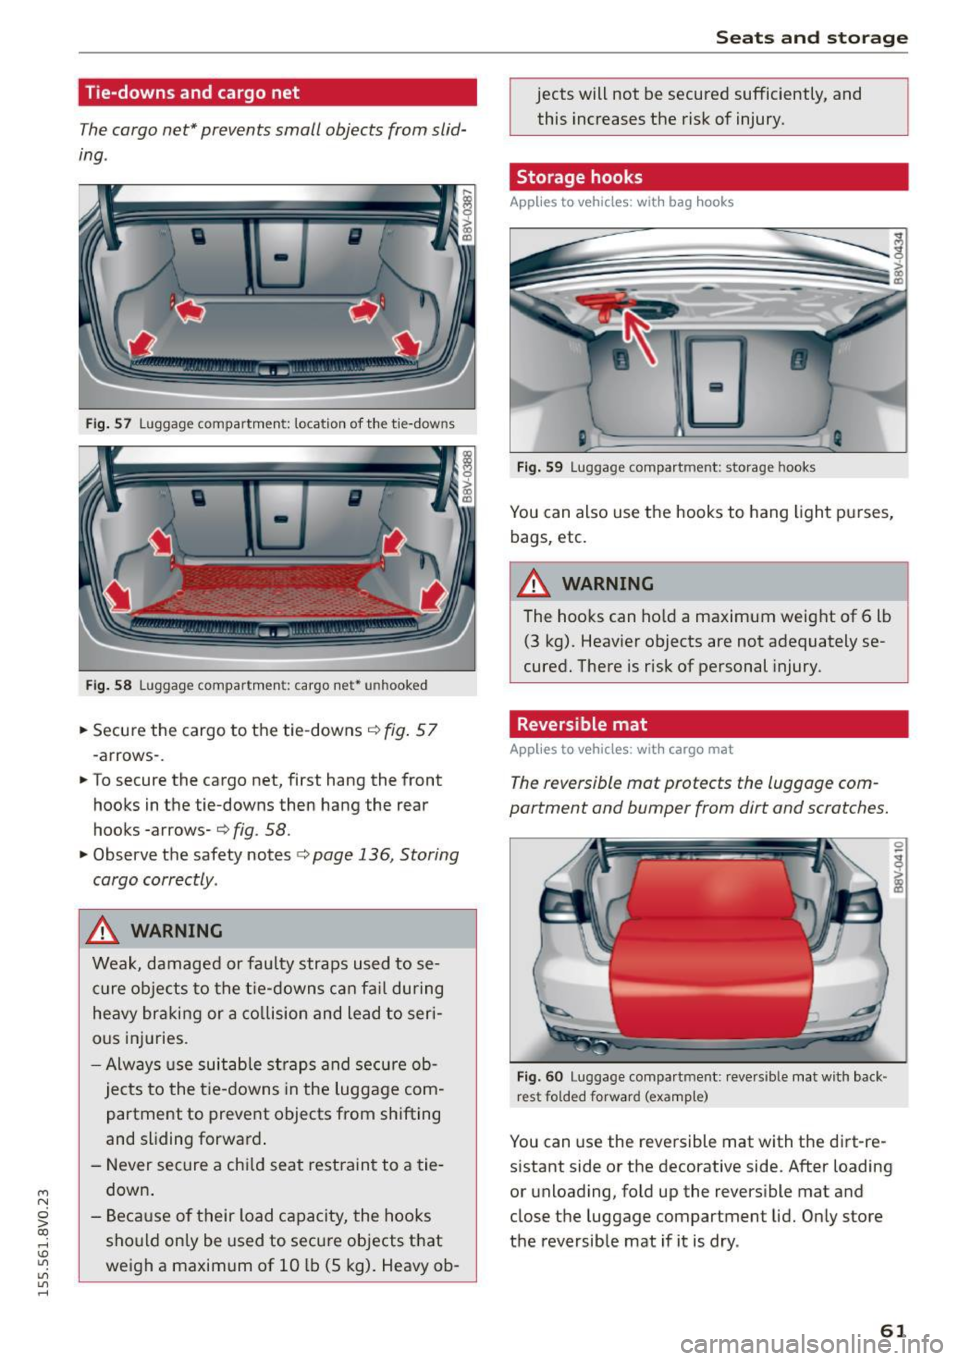
The cargo net* prevents small objects from slid
ing .
Fig. 57 Luggage compartment: location of the tie-downs
Fi g. 58 Luggage compartment: cargo net• unhooked
.. Secu re the cargo to the tie-downs¢ fig. 57
-arrows- .
.. To secure the cargo net, first hang the front
hooks in the tie-downs then hang the rear
hooks -arrows-
¢ fig. 58 .
.. Observe the safety notes c> page 136, Storing
cargo correctly .
A WARNING
Weak, damaged or faulty straps used to se
c u re obje cts to the t ie-downs ca n fa il du ring
he avy braking or a co llision and lead to seri
ous inj uries.
- Alw ays use suitab le st raps and se cure ob
jects to the t ie-downs in the luggage com
partment to preve nt objects from sh ifting
and sliding forward .
- Never sec ure a ch ild seat restrain t to a tie
down .
- Be ca use of their load capacity, the hooks
sho uld on ly be used to secu re objects t hat
weigh a maximum of 10 lb (5 kg). Heavy ob-
-
Seats and storage
jects will not be secured sufficiently, and
this increases the risk of injury.
Storage hooks
Applies to vehicles: wit h bag hooks
Fig. 59 Luggage compart ment: storage hooks
You can also use the hooks to hang ligh t pu rses,
bags, etc.
A WARNING
The hooks can ho ld a maximum weight of 6 lb
(3 kg). Heav ier objects are not adequately se
cured. There is risk of personal injury.
Reversible mat
Applies to vehicles: wit h cargo mat
The reversible mot protects the luggage com
partment and bumper from dirt and scratches.
Fig . 60 Luggage co mpa rtment: revers ible mat with back ·
rest folded forward (examp le)
You can use the reve rsible mat with t he dirt-re
s istant side or the decorative side. After loading
or unloading, fo ld up the revers ible mat and
close the luggage compartment lid. Only store
the reversib le mat if it is dry .
61
Page 64 of 282
Seats and storag e
Pass-through
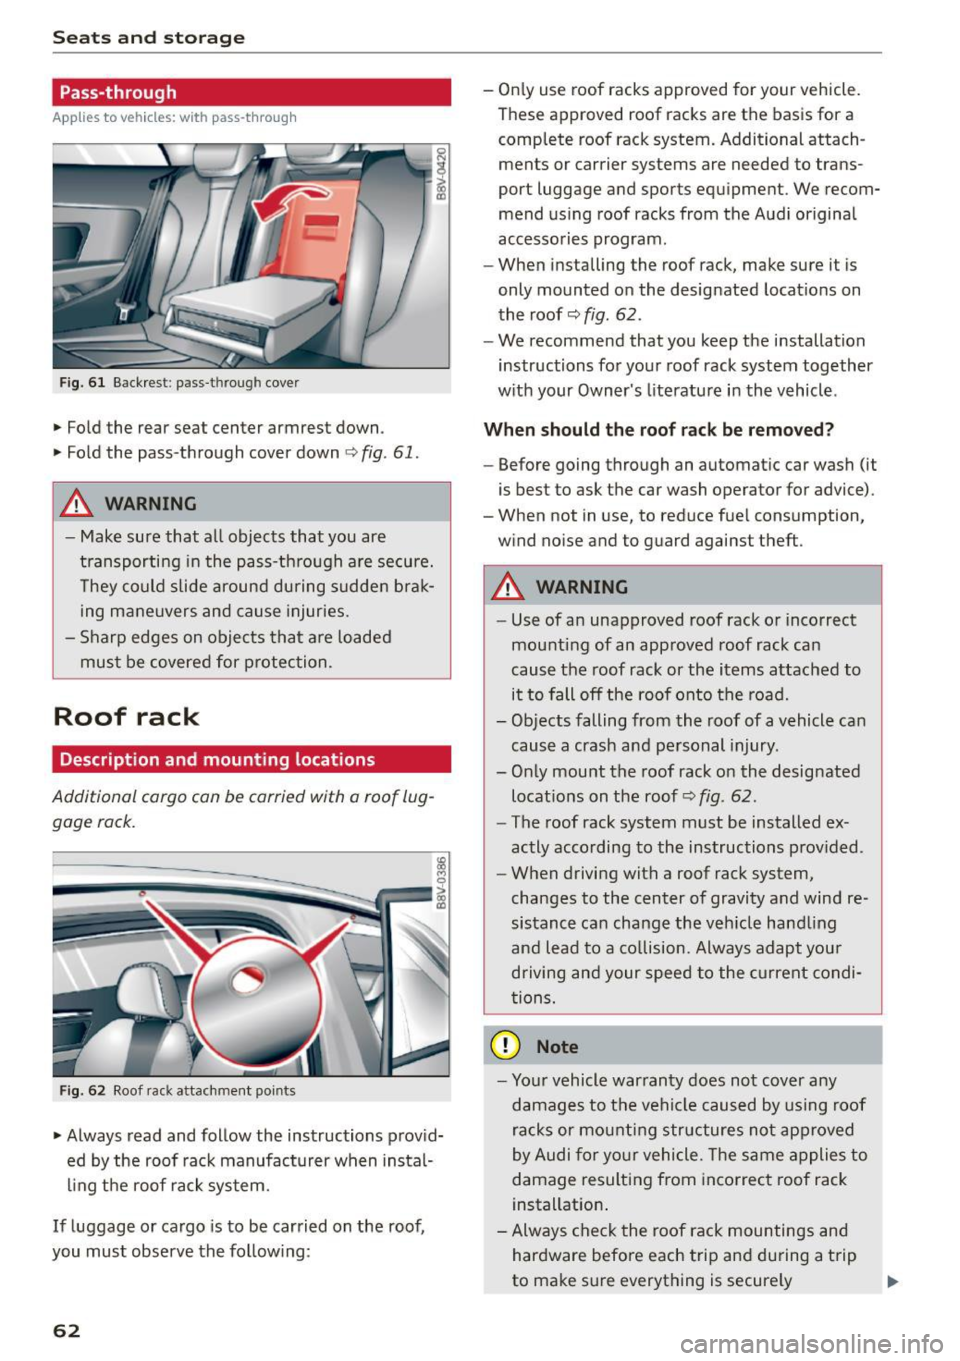
Applies to veh icles: w ith pass-t hro ug h
Fig. 6 1 Back rest : pass -through cover
.,. Fold the rear seat center armrest down.
.,. Fo ld the pass-through cover down ¢
fig. 61 .
A WARNING
0 N
i (D
-
- M ake sure that all objects that you are
transporting in the pass-th rough a re secu re.
T hey co uld slide around during sudden brak
ing mane uvers and cause injuries.
- Sharp edges on objects that are loaded
must be covered for protection.
Roof rack
Description and mounting locations
Additional cargo con be carried with a roof lug
gage rock.
Fig. 62 Roof rack attachment points
.,. Always read and follow the instructions provid
ed by the roof rack manufacturer when instal
ling the roof rack sys tem.
If luggage or cargo is to be carried on the roof,
you must observe the follow ing:
62
- On ly use roof racks approved for your vehicle.
These approved roof racks are the basis for a
complete roof rack system. Additional attach
ments or carrier systems are needed to trans
port luggage and sports equipment. We recom
mend us ing roof racks from the Audi original
accessories program.
- When installing the roof rack, make sure it is
only mounted on the designated locat ions on
the roof¢
fig. 62.
- We recommend that you keep the installation
instructions for yo ur roof rack system together
w ith your Owner's literature in the vehicle .
When should the roof rack be remo ved?
- Before going through an automatic car wash (it
is best to ask the car wash operator for advice).
- When not in use, to reduce fuel consumption,
w ind no ise and to guard against theft .
A WARNING
-Use of an unapproved roof rack o r incorrect
mounting of an approved roof rack can
cause the roof rack or the items attached to
it to fall off the roof onto the road.
- Objects falling from the roof of a vehicle can
cause a crash and personal injury.
- Only mount the roof rack on the designated
locat ions on the roof¢
fig . 62.
- The roof rack system must be installed ex
actly according to the instructions p rov ided.
- When driving with a roof rack system,
changes to the center of gravi ty and wind re
sistance ca n change the veh icle hand ling
and lead to a co llision. Always adapt you r
driving and your speed to the current condi
t ions.
(D Note
- Yo ur vehicle war ranty does not cov er any
damages to t he vehi cle caused by using roof
racks or mounting structures not ap proved
by Audi for yo ur vehicle. The same a pplies to
damage resulting from incorrec t roof rack
installation .
- Always che ck the roof rack mountings and
hardware before each trip and du ring a t rip
to make sure everything is secure ly
Page 65 of 282
M N
0 > co ,...., \!) ..,.,
..,.,
..,., ,....,
tightened. If necessary, retighten the mountings and check the entire system
from t ime to t ime.
- After mounting a roof rack system, or when
you transport objects on the roof of your ve
hicle, the height of the veh icle is naturally
increased. Be careful when driving under
l ow bridges or in parking garages for exam
ple. This could cause damage to the load
and even the vehicle itself.
- Make sure the open rear lid and the sun
roof* do not come into contact with the roof
rac k.
Loading the roof rack
Always distribute loads evenly . Make sure any
thing on the roof rack is securely tied down .
... Always distribute the loads on the roof rack
evenly .
... Always attach items to the roof rack securely
before you d rive off .
The maximum perm iss ible roof weight is
165 lb
( 75 kg ). The roof weight is the total of the
weight of the roof rack, the attachments and the
cargo you a re ca rrying . You must also not exceed
the maximum load weight fo r the roof rack you
a re using.
When using a roof rack system wh ich has a lower
l oad carrying capacity, you must not use up the
tota l maxim um permissible load car ry ing capac i
ty specified above. Inste ad , you shou ld load t he
roof rack system only to the maximum capacity
specified by the manufact urer of the roof rack
system .
A WARNING
Weak, damaged or improper straps used to
secure items to the roof rack can fa il during
hard brak ing or in a collision and cause seri
ous personal injury.
- Make sure the roof rack is insta lled exactly
as spec ified above
¢ page 62.
- Always use suitable mounting straps for se
curing items to the roof rack to help prevent
items from shift ing or f ly ing fo rward.
-
S eat s and stor age
- Items on the roof rac k must always be se
curely mounted.
- The use of a roof rack can negatively affect
the way a vehicle handles. Cargo that is
large, heavy, bulky, long or flat will have a
greater negative inf luence on the vehicle's
ae rodynamics, center of gravity and overall
h a ndling. Always drive slowly, avoid sudden
b rak ing and maneuvers when transpor ting
cargo on the roof of your veh icle.
- Never exceed the maxim um permissible
load carrying capacity of the roof of your ve
h icle, the permiss ible axle weights and the
perm issib le tota l we igh t of your vehicle
¢ page 258, Weights .
@ For the sake of the environment
As a result of the increased wind resistance
created by a roof ra ck , your vehicle is using
fuel unnecessarily. So remove the roof rac k af
ter using it.
63
Page 81 of 282
M N
0 > co ,...., \!) 1.1'1
1.1'1
1.1'1
,....,
brake provides various convenience and safety
functions.
When starting from rest
- The integral hill start assist helps you when
driving by automatically releasing the parking
brake ¢
page 80 , Starting from a stop.
- When starting on inclines, the hill start assist
prevents the vehicle from unintentionally roll
ing back. The braking force of the parking brake
is not r eleased until sufficient driving forc e has
b ee n built up at the wh eels.
Emergency brake function
An emergency braking functions ensures that the
vehicle can be slowed down even if the
normal
brakes fail¢ page 80, Emergency braking func
tion.
A WARNING
- Do not press the accelerator pedal inadver
tently if the vehicle is stationary but the en gine is running and a gear is selected . Other
wise the vehicle will start to move immedi
ately and could result in a crash.
-If the power supply fails, the released park
ing brake can no longer engage. In this case,
park the vehicle on level ground and secure
it by placing the selector lever in the P posi
tion. See an authorized Audi dealer or au
thorized Audi Service Facility for assistance.
(D Note
If the . or 1111 (USA models)/ . (Canada
models) indicator light in the instrument clus
ter blinks , there is a malfunction in the brake
system. Refer to the detailed description of
the indicator lights¢
page 17.
-If the - (USA models)/ . (Cana-
da models) or
Ill indicator light turns on,
there is a malfunction in the parking brake
¢ page 18.
(D Tips
-If the parking brake is set while the ignition
is switched
off, thP l<@) indicator light in the
button and in the instrument cluster dis
play - (USA models) /. (Canada mod-
Driving
els) will turn off after a certain amount of
time.
- If driver's door is opened while the ignition
is switched on, the parking brake sets auto
matically. This prevents unintended rolling
of the vehicle.
- Occasional noises when the parking brake is
applied and released are normal and are not
a cause for concern.
- When the vehicle is parked, the parking
brake goes through a self-test cycle at regu
lar intervals. Any noises associated with this
are normal.
- If there is a power failure, the parking brake will not set if it is released, and it will not
release if it is set¢&. See an authorized
Audi dealer or authorized Audi Service Fa
cility for assistance .
Parking
.. Press the brake pedal to stop the vehicle.
.. Pull the switch@¢
page 78, fig . 71 to set the
parking brake.
.. Place the selector lever in the P position.
.. Turn th e engine off¢,& .
.. Turn the steering wheel when pa rking on in
clines so that the wheels will roll into the curb
if the vehicle starts moving .
A WARNING
--Always take the vehicle key with you when
leaving the vehicle, even for a short period
of time. This applies particularly when chil
dren remain in the vehicle. Otherwise the
children could start the engine , release the
parking brake or operate electrical equip
ment (e.g. power windows). There is the risk
of an accident.
- When the vehicle is locked, no one -particu
larly not children should remain in the vehi
cle. Locked doors make it more difficult for
emergency workers to get into the vehicle,
which puts lives at risk.
79