ECO mode AUDI S6 2009 Owner's Manual
[x] Cancel search | Manufacturer: AUDI, Model Year: 2009, Model line: S6, Model: AUDI S6 2009Pages: 398, PDF Size: 43 MB
Page 109 of 398
![AUDI S6 2009 Owners Manual Warm and cold
"
-----------------------------------
Air distribution @]
The automatically controlled air distribution can be
changed manually.
- Press the Distribution(!).
Fig. 107 Di AUDI S6 2009 Owners Manual Warm and cold
"
-----------------------------------
Air distribution @]
The automatically controlled air distribution can be
changed manually.
- Press the Distribution(!).
Fig. 107 Di](/img/6/57595/w960_57595-108.png)
Warm and cold
"'
-----------------------------------
Air distribution @]
The automatically controlled air distribution can be
changed manually.
- Press the Distribution(!).
Fig. 107 Display: Air
distribution
- Rotate the control knob to the desired setting=:> fig. 107.
You can adjust the air circulation so that air flows from specific
vents. In position
O air flows only to the w indows, in position@ to
the driver or passenger and in position
-0,, to the footwell. There are
additional combinations available to adjus t air distribu tion as
needed.
To regulate air distribution automatically , switch to !AU TO) .•
Defrosting [@)
The windshield and side windows are rapidly defrosted or
defogged.
- To turn on the defogger/defroster, press the button[@].
- Press[ @] aga in or press !AUTO] to turn off the
defogger/defroster.
Controls and equip
ment
Temperature is controlled automatically . The maximum amount of
air flows mainly from the vents below the windshield.
By p ressing
lliii?L both air recirculation and ECON are swi tched off .•
Manual air circulation[~]
Air recirculation prevents exhaust fumes or other pollu
tion from entering the vehicle.
Turning on air recirculation
- Press[ ~]=:>
&
Turning off air recirculation
- Press
@a again, or
- press [AUTO], or
- press[ @].
In the air recircula tion mode , the air in the passenger compartmen t
is recirculated and filtered to prevent exhaust fumes and other
pollution from en tering the vehicle. We recommend that you use the
manual air recirculation under the following conditions:
• when driving through tunnels
• in a traffic jam.
& WARNING
Do not use this setting for extended periods of time. The windows
could fog up since no fresh air can enter the vehicle. If the
windows fog up, press the air recirculation button again immedi
ately to switch off the air recirculation function or select defrost. •
I • •
Page 111 of 398
_________________________________________________ w_ a_ r_ m __ a_n_ d_ c_ o_ld __ llfflll
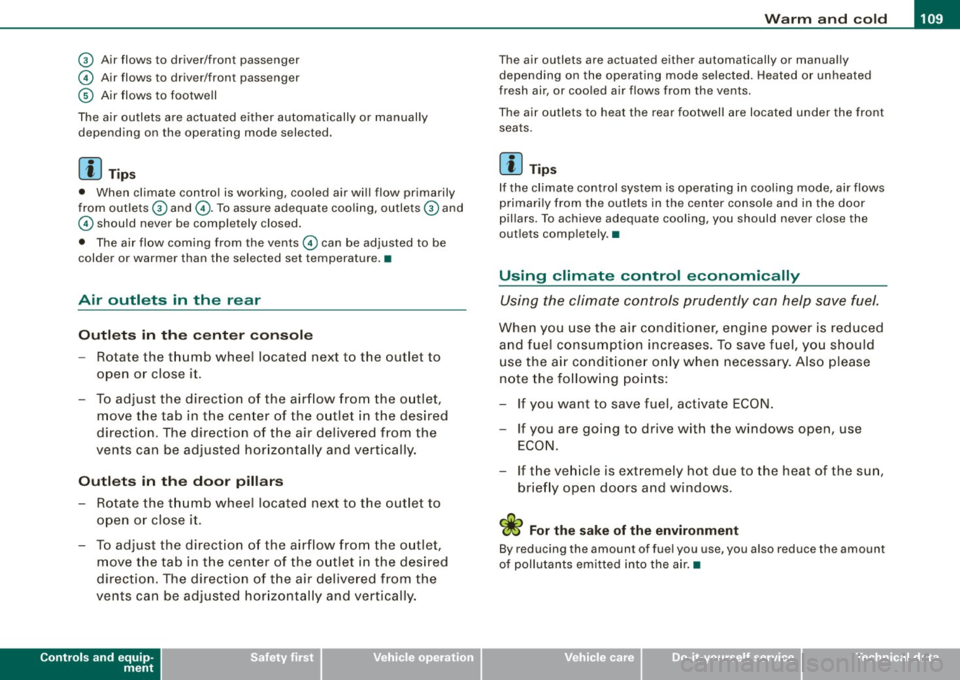
© Air flows to driver/front passenger
© Air flows to driver/front passenger
© Air fl ows to footwell
The air outlets are actuated either automatically or manually depending on the operating mode selected.
[ i J Tip s
• When climate control is working, cooled air wi ll flow primarily
from out lets
G) and @. To assure adequate coo ling, outlets G) and
© should never be completely closed.
• The air flow coming from the vents © can be adjusted to be
colder or warmer than the selected set temperature. •
Air outlets in the rear
Outlets in the center console
- Rotate the thumb whee l located next to the outlet to
open or close it.
- To adjust the direction o f the airflow from the o utlet,
move the tab in the center of the outlet in the desired
direction. The direction of the air delive red from the
vents can be adjusted hor izontally and vertically.
Outl ets in the door pill ars
- Rotate the t humb whee l located next to the outlet to
open or close i t.
- To adjust the direction o f the air flow from the o utlet,
move the tab in t he cen ter of the o utlet in the desi red
direction . The direction of the air delive red from the
vents can be adjusted hor izonta lly and vertically .
Controls and equip
ment
The air outlets are actuated either automatically or manual ly
depending on the operati ng mode selected. Heated o r unheated
fresh air, or cooled air f lows from the vents .
The air outlets to heat the rear footwell are located under the front seats .
[ i J Tip s
If the climate control system is opera ting in cooling mode, air flows
primari ly from the out lets in the center console and in the door
pillars. To achieve adequate cooling, you should never close the
out lets comp letely. •
Using climate control economically
Using the climate controls prudently can hel p save fuel.
When you use the air condi tioner, engine power is reduced
and fuel c onsum ption increases. T o save fuel, you should
use the a ir condit io ner onl y when necessa ry. Also please
note the fo llow ing po ints:
If you want to save fuel, activate ECON.
- If you are going to drive with the windows open, use
ECO N.
- If the ve hicle is ext remely hot due to the heat of the sun,
brie fly open doors and windows.
'£> For the sake of the environment
By reducing the amount of fuel you use, you a lso reduce the amount
of pollutants emitted into the a ir. •
I • •
Page 114 of 398
-Warm
and cold --------------------
ECON
The ECON mode helps to save fuel.
The air conditioning is turned off in ECON mode. "ECON" means
"Economy". By switching off the air conditioning (compressor), you
save fuel.
Please note that vehicle interior temperature cannot be lower than
the outside temperature in the ECON mode. The air is not cooled or dehumidified.
If the vehicle interior becomes too hot or if the windows fog up,
ECON mode should be turned off. As soon as the
jAUTO I button in
the air conditioning controls is pressed, the system automatically leaves the ECON mode, and the air conditioning compressor is
turned on again. •
Automatic recirculation mode
An air quality sensor detects increased concentrations of
pollutants in the outside air and automatically switches
to recirculation mode.
We recommend that you always keep automatic air recirculation ON
to prevent polluted outside air from entering the vehicle interior.
If the
air quality sensor located in the air conditioning system
detects polluted outside air, the sensor decides whether the air
pollution can be reduced by the factory -installed pollutant filter or
whether it is necessary to switch to air recirculation. With heavy concentrations of pollutants, the air conditioning system is
switched automatically to recirculation mode and the supply of
outside air is blocked. As soon as the concentration of pollutants in
the outside air drops, fresh air is supplied to the vehicle interior
again.
In the event that the windows fog up during automatic air recircula
tion, you must press the® button immediately. Under certain operating conditions, automatic air recirculation is
switched off automatically. With outside temperatures below about
+ 10
°C, automatic air recirculation is limited to 30 seconds. With
outside temperatures below about -1 °C and in the ECON mode,
automatic air recirculation is limited to 15 seconds. •
Synchronization
One climate control setting for the passenger's and
driver's seats.
After Synchronization is set to on, all of the subsequent climate
control settings (except for seat heating*) for the driver are trans
ferred to the front passenger.
Synchronization is canceled when settings are adjusted on the front passenger's side. •
Center air vent
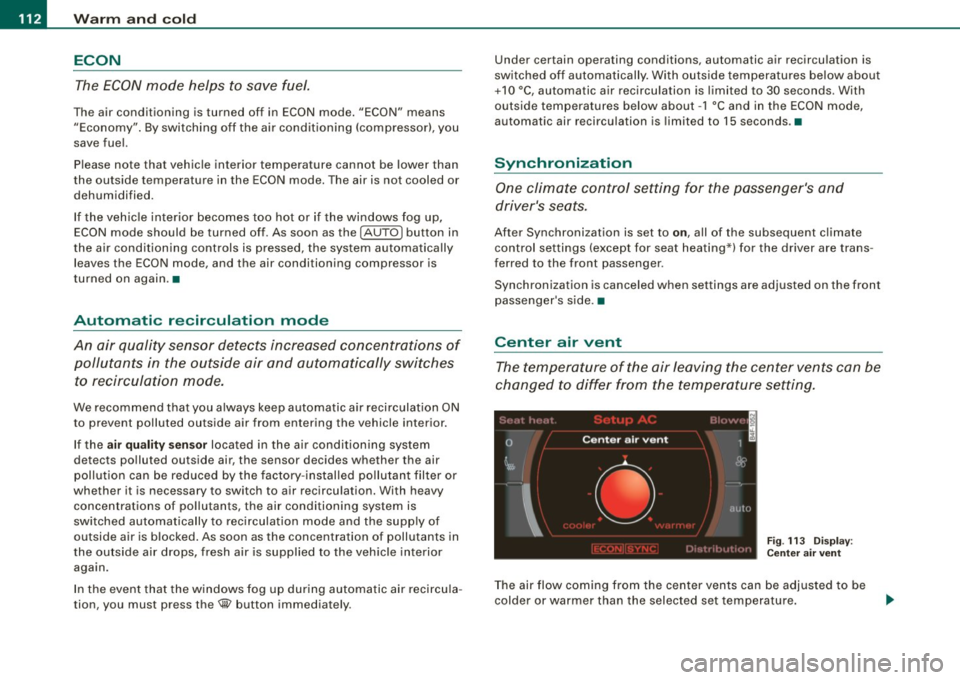
The temperature of the air leaving the center vents can be
changed to differ from the temperature setting.
Fig. 113 Display:
Center air vent
The air flow coming from the center vents can be adjusted to be
colder or warmer than the selected set temperature.
Page 123 of 398
![AUDI S6 2009 Owners Manual On th e road -
-------------------
and then the drivers door is opened. In this instance, the steering is
not locked . The steering is locked :
• If you press the
I STOP ] b AUDI S6 2009 Owners Manual On th e road -
-------------------
and then the drivers door is opened. In this instance, the steering is
not locked . The steering is locked :
• If you press the
I STOP ] b](/img/6/57595/w960_57595-122.png)
On th e road -
-------------------'
and then the driver's door is opened. In this instance, the steering is
not locked . The steering is locked :
• If you press the
I STOP ] button aga in for more than 1 second.
• If you c lose the driver's door and lock your vehicle from the
outside .•
Electromechanical parking brake
Operation
The electromechanical parking brake replaces the hand
brake.
Fi g. 120 Center
co nso le: Parki ng bra ke
- Pull the switch to app ly the park ing brake => fig. 12 0. The
indicator light in the switch will come on .
- Step on the brake pedal or the accelerator pedal and
press the switch at the same time to rel ease the parking
brake. The indicator lig ht in the switch wi ll go out.
Your vehicle is equipped with an elect romechanical parking brake
which replaces the handbrake . T he parking brake is designed to
prevent the vehicle from rol ling unintentional ly.
Con tro ls and eq uip
ment
I n add ition to the normal functions of a traditional hand brake, the
e lectromechanica l parking brake provides various convenience and
safety functions.
Emergen cy brake
An emergency brake ensur es that the vehicle can be slowed even if
t he
normal brakes fail=> page 123, "Emergency braking".
Ind icator lights
• If the parking brake is applied with the ignition tu rned on , the
indicator light in the instrument cluster (U.S models :
::i.:,, Canadian
models: ®)) and in the switch <®) will com e on .
• I f the parking brake is app lie d with the ignition
turn ed off , the
indicator light in the instrument cluster (U.S. models: ::.:\,, Canadian
models :(®) ) and in the switch(®) will come on for about 30 seconds
and then go out .
& WARNING
If the vehicle i s stationary and the tr ansmi ssion is engag ed with
the engine ru nning , the engine should not be speeded up (e .g .
manu ally from under the hood ). Otherwi se the vehicle will sta rt to
move -you run the risk of a n accident .
0 Note
If the warning/indica tor light (U.S . mode ls: BRAKE , Canadian mode ls :
(Ci)) ) flashes in the instrument clus ter, there is a brake system
malfunction . By pressing the
I CHECK] button, you can bring up a
driver message which explai ns the ma lfunc tion in more detail. If the
message
P a rki ng brake ! Please conta ct w ork shop appears, there is
a par king brake malfunction which you should have repaired imme -
d iate ly by an authorized dealership=>
page 30. ..
Vehicle care
I I irechnical data
Page 176 of 398
_____ A_ u_d _ i_ P_ a_r _k _in _ g=- S--=- y_s _t _e _m ____________________________________________ _
"Parking mode 1" appears by default in the MMI Display if the rear
v iew came ra is activate d=>
page 171 . You can switch to " parki ng
mode
2" by pressing the control button with the mode @
=> page 175, fig. 180 function . By repeatedly p ressing the control
button with the
mode function, you can switch back and forth
between "parking mode
1 " and "pa rking mode 2".
Orientation lines and marked surfa ces
Orientati on l ines and col ored ma rke d surfaces( => page 175, fig . 179
or => page 177, fig. 181) a re projected into the rear -view ca mer a
pictu res, subject to the two diffe rent par king modes . These orienta
tion lines and surfaces offer aid when parking or maneuvering. The
orientation lines and su rfaces refer to the height of a leve l driving
sur face.
When the indicated orientation lines and indicated blue surfaces
sup erimpos e veh ic le s or o bjects, a t the lates t, t he respectiv e
d istance to the vehicles or objects has become too short
=>
p age 179 .
If the tr unk lid is open, the o rien tat io n lin es and marked su rfaces are
not displayed .
& WARNING
• The rear-view camera has blind spots , in which objects cannot
be detected . Be especially careful to check for small children and
animals before backing up . Small children and animals will not
always be detected by the sensors.
• The Audi Parking System is not a substitute for being careful
and alert when backing up . Be especially careful during parking
and similar maneuvers . Always watch where you are driving and
make sure that nothing is in the way.
• Remember that low obstacles which have already been
signaled may pass below the system 's sensing zone when the
vehicle is backing up . The fact that the signal stops does not mean
that you have cleared the obstacle . When the signal stops , impact
is imminent . Objects such as trailer hit ches, chains , narrow posts
& WARNING (continued )
or fences covered by a thin layer of paint may not always be
detected by the sy stem. They can still damage your vehicle
without warning .
• Always make sure that the volume and frequency of the chime s
is adjusted so that you can easily hear the acoustic distance signal
even if the radio is playing , the air -conditioner blower is on High or
there is a high level of outside noise .
- Check the settings whenever someone else has driven the
vehicle before you .
• Improper reliance on the Audi Parking System can cause colli
sions and serious personal injury .
- Never rely only on parking assi st w hen changing backing up .
- Always check rear view mirrors to make sure it is safe to back
up .
[ i ] Tips
• B efore parking with the rear -view camera, the Adaptive Air
Su spensi on* co mfort or automatic mode must be switched on
=>
page 20.
• The rea r-v iew ca mera pic ture is avai la bl e as soon as the M MI
Display or the MMI is sw itched on, or the start -up phase is
completed.
• I n order for the rear-view camera to function proper ly, the
c a m era len s=>
page 171 , fig. 17 4 mu st be kept clea n, a nd free of
snow and ice. P lease follow the additional notes on=>
page 182.
• The came ra c overage a ngle changes when the trunk lid is open .
T herefore, the rear-view camera picture is d isplayed without orien
t a tion lin es an d w ith out blue surfaces .•
Page 177 of 398
Audi Parking System -
----------------=----=------'
Applies to vehicles: with Audi Parking System (r ear) and rea r-v iew came ra
Rear -view camera coverage area
®
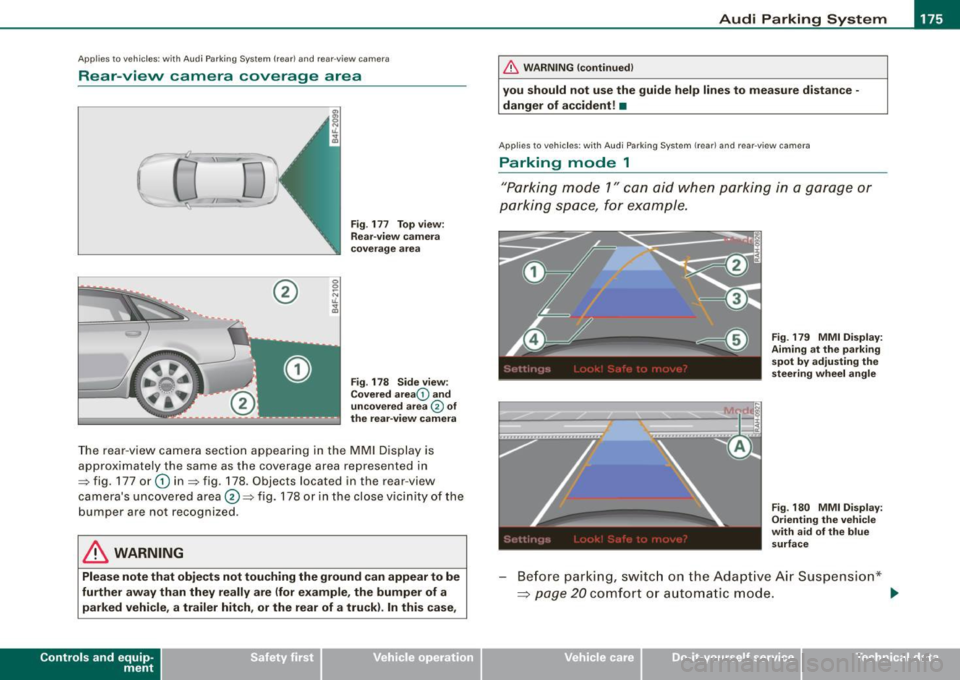
Fig . 177 Top view:
Rear-view camera
coverage area
Fig . 178 Side view :
Covered area 0 and
uncovered area
0 of
the rear-view camera
The rear-view camera section appearing in the MMI Display is
approximately the same as the coverage area represented in
=> fig. 177 or
G) in=> fig . 178. Objects located in the rear-view
camera's uncovered area@=> fig . 178 or in the close vicinity of the
bumper are not recognized.
& WARNING
Please note that objects not touching the ground can appear to be
further away than they really are (for example, the bumper of a
parked vehicle, a trailer hitch , or the rear of a truck) . In this case,
Contro ls and eq uip
ment
& WARNING !continued)
you should not use the guide help lines to measure distance -
danger of accident! •
Applies to veh ic les : w ith Aud i Park in g Sys tem (re ar) and rear-view camera
Parking mode 1
"Parking mode 1" can aid when parking in a garage or
parking space, for example .
M I ij
~------------------:
Fig. 179 MMI Display:
Aiming at the parking
spot by adjusting the
steering wheel angle
Fig . 180 MMI Display:
Orienting the vehicle
with aid of the blue
surface
Before parking, switch on the Adaptive Air Suspension*
~ page 20 comfort or automatic mode. .,,_
Vehicle care I I irechnical data
Page 184 of 398
• .___A_ u_d_ i _P _a_ r_ k_ i_ n ..:g=-- S_ y=-- s_t _ e _m _____________________________________________ _
Applies to vehic les: with Audi Park ing System (rearl and rear-view camera
Rear-view camera tips
We recommend that you practice parking with t he rear -view camera
in a traff ic -free location, or parking lot, to become fami liar with the
system, the orientati on line s, a nd th eir functi on. When doi ng this,
there should be good light and weather conditions.
In the MMI Display, objects or vehicles ap pea r closer or further away
i f:
• you are driving in reverse gear from a level surface onto an
inc lin e, o r a downwa rd sl ope,
• you are driving in reverse gear toward protruding objects,
• the ve hicle is carrying too much load in the rear.
The accuracy of the orientation lines and blue surfaces diminishes if :
• the Adaptive Air Suspension* is defective, or th e dynamic, off
road, o r lift mode is swi tched on,
• the rear -view camera does not provide a reliable image, for
exam ple, in po or vi sibi lit y c ondi tio ns or if the lens is dirt y,
• the image on the screen is not visible due to sun g lare and reflec
t ion .
Caring for the rear-view camera lens:
• Dampen the lens with a household a lcoho l- based g lass c leaner,
and c lean th e lens wit h a dry cl oth.
• Remove snow with a hand brush.
• Remove ice, preferably with de -icing spray~
0.
& WARNING
• The rear-v iew camera does not replace the view to the rear and
the rear view mirrors .
• The rear-view camer a - because of technical limitat ions -does
not show the entire area behind the vehicle~
page 175 , fig. 178.
& WARNING (continued )
Be especially careful to che ck for small children and animals
before backing up . Small children and animals will not alway s be
shown in the rear-view display .
• The Audi Parking System is not a sub stitute for being careful
and alert when back ing up . Be especially careful during parking
and similar maneuver s. Always watch where you are driving and
make su re that nothing is in the way .
• Do not allow yourself to be distracted from traffic by the rear
view camera pi ctures .
• When maneuvering or parking , do not only u se the MMI Display
for orientat ion . Certain obje cts - depending on the screen resolu
tion -may not, or not entirely, be displayed ; for example tr ailer
hitches , cha ins , narrow posts , or fences .
• Only use the rear -view camera for aid if it shows a good , clear
picture . The image may be obscured , for example , by the sun
shining into the lens, dirt on the lens, or as the result of a defect -
danger of accident!
• If the image i s hazy when the MMI Display is switched on or the
area behind the vehicle is not visible (for e xample , as the result of
a dirty or defective lens ), the rear -view camera must not be used
for aid in maneuver ing - danger of accident!
• The rear -view camera generates two -dimensional images . For
this reason , please note that recesses in the ground and
protruding parts on another vehicle , or protruding objects fixed to
the ground , will be more difficult or impossible to recognize on the
MMI Di splay, due to the missing spacial depth .
• If the position and the installation angle of the camera has
changed, for example , after a rear end collision , do not continue to
use the system for safety reasons . Have it checked by an autho
rized Audi dealer or qualified work shop .
• Only use the rear-v iew camera when the rear lid is fully closed .
Make sure that objects mounted on the rear are not obscuring the
camera v iew .
Page 187 of 398
____________________________________________ A_ d_a--' p=-- t_iv _e_ A_ ir_ S_u_ s-=- p_e _ n_ s _ io_ n __ llll
Ap plies to vehicl es: wi th Adap tive Ai r Su sp ension
Chassis controls
Four different driving modes can be set by the driver.
The automatic contro l processes are speed -and time -dependent.
For example, it is not possib le to raise the suspension to the lift
mode above certain speeds.
L ev el a djustment
automatic
dynamic
aut om ati c Ground clearan
ce
about 4.7 - 4 .1 inches
(120 -105 mm)
about 4.7 inches (120 mm)
about 4.1 inches (105 mm)
a bo ut 5.3 inches ( 135 mm)
Se lect the automatic mode i f you p refer suspension and damping
settings emphasizing comfort .
• Low ering : When a speed of about 75 mph (120 km/h) is exceeded
for more than 30 seconds, the vehicle is automatically lowered by about 0.6 inch (15 mm) to the dynamic level which is more suitable
for highway speeds. Road holding is optimized as a result of the lower center of gravity and fuel consumption is reduced as a result
of reduced wind res istance.
• Rais ing : The vehicle is automatically raised again if the speed
falls below about 44 mph (70 km/h) for a period of 2 minutes . The
vehic le is raised immediate ly when speed falls below about 22 mph
(35 km/h).
s ta nd ard
Select the standard mode if you desire a suspension setting with a
special emphasis on comfort. In the standard mode there is
no
lowering of the suspension. Even a t high speeds, the vehicle stays
at the same level. Damping characteristics with a decided emphasis
on comfort are selected in this mode.
Controls and equip
ment d
y n ami c
Select the dynamic mode if you prefer a sporty suspension setting .
In this mode, the vehicle is lowered whi le it is still stationary and
spo rty damping characteristics are selected . The warn ing light
c.::i
in the instrument cluster will come on for a few seconds just to
remind you of the reduced ground clearance .
If y ou switch off the engine wh ile the ve hicle is in the dynamic mode
and then switch on the ignition once again, the
c.::i warning light
wi ll also come on again f or a few seconds as a reminder .
lift
Select the lift mode when you have to travel over poor sect ions of
road (e .g. trails). In the lift mode, the vehic le is raised by 0.6 inch (15
m m) compared to norma l leve l while it is stil l stationary and
damping characteristics are adjusted to emphasize comfort .
The lift mode can be activated only at speeds below 50 mp h (80
km/h) . When a speed of about 62 mph (100 km/h) is exceeded, the
system automatical ly leaves lift mode and the mode set previously
(standard, automat ic, dynam ic) is activated aga in. •
App lies to v ehic les : with Ada ptive Air Suspens io n
Setting the driving modes
The driving modes are set in MM/.
Fig . 189 MMI di splay:
Settin gs _,.
I • •
Page 190 of 398
• .___H_ o_ m _ e _L_i _ n _k _® ____________________________________________________ _
Homelink®
Universal remote control
Applies to vehic les: w ith Home link ® universal remote cont ro l
General information
The HomeLink® fe ature c an learn th e up to th re e r adio
fre que nc y c odes for m ost cu rrent t ransmi tters us ed for
operating gar age do ors, es tate gates , home o r out doo r
lighti ng sy stems, an d other de vice s.
Yo u must first pro gram t he Hom elink ® trans mitter b efor e you c an
use the system=>
page 189, "Pro gramm ing th e Home link® tra ns
mit ter".
In o rd er to pro gram t he Homelink® tra nsmitter fo r dev ices utiliz ing
ro lling code, a second person on a ladder who can safe ly reach the
ga rag e door o pener motor is reco m me nd ed. It is also necessa ry to
l ocate the "learn" button on yo ur garage do or opener moto r. R efer
to t he op era tin g instr uctions for the open er, as the loc ation and
co lor of th is button may vary by manufacturer .
Y o u c an still u se the o rigi na l r emo te c ontrol for th e dev ice at a ny
tim e.
& WARNING
• Never use the Homelinkl1JI transmitter with any garage door
opener that does have not the safety stop and reverse feature as
required by federal safety standards . This includes any garage
door opener model manufactured before April 1, 1982.
• A garage door opener which cannot detect an object , signaling
the door to stop and reverse does not meet current federal safety standards . Using a garage door opener without these features
increases risk of serious injury or death .
& WARNING (continued)
• For safety reasons never release the parking brake or start the
engine while anyone is standing in front of the vehicle.
• A garage door or an estate gate may sometimes be set in
motion when the Homelink ® remote control is being
programmed . If the device is repeatedly activated , this can over
strain motor and damage its electrical components -an over
heated motor is a fire hazard!
• To avoid possible injuries or property damage , please always
make absolutely certain that no persons or objects are located in
the range of motion of any equipment being operated.
[ i ] Tips
• If y ou wou ld l ik e mor e inf ormation o n Hom elink®, wh ere to
purchase the Homelink ® compatib le products, or wou ld li ke to
pu rchase th e Home link® Ho m e Lightin g Pack age, please call toll
fre e: 1 -8 0 0 -355 -3515.
• For Declara tion of Comp lia nc e to Un ited St ates FCC and Indust ry
C anada regulations=>
page 3 75. •
Page 191 of 398
___________________________________________________ H_ o_m _ e_ L_ i_ n _k_ @_R _ __.11111
Ap plies to vehic les: wit h Hom elin k® un iversal remo te contro l
Programming the Homelink ® transmitter
The transmitter is programmed in two phases. For rolling
code transmitters, a third phase is also necessary.
[i Ii It~
Fig . 192 Overhead
console: HomeLink®
keypad
Fig . 193 Front bumper,
passenger side : loca
tion of transmitter unit
Phase 1: programming the overhead keypad
1. Make sure your vehicle is with in operating range of the
remote controlled garage door opener.
2. Set the parking brake=>
& in "General information " on
page 188 .
3. Turn the ignition on . Do not start the engine!
Con tro ls and eq uip
ment
4. Press and hold the two outside Homelink® buttons (0
and @for approximately 20 seconds until indicator
light @=> fig. 192 begins to flash. Then release both
buttons. Do not hold the buttons for longer than 30
seconds.
This procedure only needs to be performed
once. It
erases the factory-set default codes and does not have to be repeated to program additional remote controls.
5. Press and hold the Homelink® button
(0 ,@ or @ until
the indicator l ight @starts flashing
slowly. Release the
button.
- The system will now remain in programming mode for 5
minutes.
Go to the front of the vehicle and proceed with
phase 2.
Phase 2:
programming the bumper mounted transmitter
6. Hold the original remote control at a distance between 0-
6 in. (0-15 cm ) from the bumper below the appropriate
headlight for your vehicle=> fig . 193 (use the shortest
distance possible) .
7. Aim the remote control just below the
passenger side
headlight.
8. Press and hold the activation button on the remote control.
- May be different in Canada. If so, press and re-press (cycle) the activation button on your remote control every
two seconds. .,_
Vehicle care I I irechnical data