ECO mode AUDI S6 2009 Service Manual
[x] Cancel search | Manufacturer: AUDI, Model Year: 2009, Model line: S6, Model: AUDI S6 2009Pages: 398, PDF Size: 43 MB
Page 325 of 398
Tires and wheels -
----------------
•
The correct tire pressure for the spare wheel is located on a label on
the driver's side 8 -pillar.
Because technical changes may be made to vehicle equipment
during the mode l year, always compare the tire size designation on
the tire pressure label on your vehicle with the tires on your vehicle.
Make sure that the tire size information on the vehicle label is the
same as the size of the tires on the vehicle. This is especially impor
tant if the vehicle belongs to someone else or you bought the
vehic le with different rims/tires or you bought the vehicle as a previ
ously owned vehicle.
Remember, your safety and that of your passengers also depends
on making sure that load l imits are not exceeded. Vehicle load
includes everybody and everything in and on the vehicle . These load
limits are techn ically referred to as the vehicle's Gross Veh icle
Weight Rating ("GVWR"l. The Gross Axle Weight Rating ("GAWR"l is
the maximum load that can be applied at each of the vehicle's two
axles. The Gross Vehicle Weight Rating and the Gross Axle Weight
Rating are listed on the safety compliance sticker label located on
the driver's side 8-pillar. The tire pressure label on your Audi lists
the maximum comb ined weight of all of the occupants and luggage
or other cargo that the vehicle can carry. For the location of the tire
pressure label =>
page 327, fig. 247.
& WARNING
Overloading a vehicle can cause loss of vehicle control, a crash or
other accident , serious personal injury, and even death .
• Carrying more weight than your vehicle was designed to carry
will prevent the vehicle from handling properly and increase the
risk of a loss of vehicle control.
• The brakes on a vehicle that has been overloaded may not be
able to stop the vehicle within a safe distance.
• Tires on a vehicle that has been overloaded can fail suddenly
causing loss of control and a crash.
& WARNING (continued)
• Always make sure that the total load being transported -
including the weight of a trailer hitch and the tongue weight of a
loaded trailer -does not make the vehicle heavier than the
vehicle's Gross Vehicle Weight Rating .
& WARNING
• Incorrect tire pressures and/or underinflation can lead to a
serious or fatal accident.
• Incorrect tire pressures and/or underinflation cause increased
tire wear and can affect the handling of the vehicle.
• Incorrect tire pressures and/or underinflation can also lead to
sudden tire failure, including a blowout and sudden deflation,
causing loss of vehicle control. •
Checking tire pressure
The correct tire pressure for the tires originally installed
on your vehicle is listed on the tire pressure label located
on driver's side 8-pillar.
The recommended tire pressures are on the tire pressure label and
in the table=>
page 327, "Cold tire inflation pressure". This means
that the pressure must be checked and adjusted when the tire has
not been driven for more than a couple of mi les (kilometers) at low
speeds during the previous three hours. Air in the tires expands
when the tire heats up as a result of internal friction as it flexes in
use. The tire pressure is higher when the tire has warmed up than
when it is "cold ."
It is the inflation pressure in a "cold" tire that counts. Therefore, you
should never let air out of a warm tire to match "Cold tire inf lation
pressure" recommendations=>
page 327. The tires wou ld then be
underinflated and could fail suddenly. .,_
Vehicle care I t •
Page 337 of 398
Tires and wheels -_______________________ ..::...:..:..-=::.......:.:..;::..:....____;___
•
Wheel bolts
Wheel bolts must always be tightened to the correct
torque.
The design of wheel bolts is matched to the factory installed rims. If
different rims are fitted, the correct wheel bolts with the right length
and correctly shaped bolt heads must be used. This ensures that
wheels are fitted securely and that the brake system functions
correctly.
In certain circumstances, you may not use wheel bolts from a
different vehicle - even if it is the same model~
page 374.
& WARNING
Improperly tightened or maintained wheel bolts can become loose
causing loss of control, a collision and serious personal injury.
• Always keep the wheel bolts and the threads in the wheel hubs
clean so the wheel bolts can turn easily and be properly tightened.
• Never grease or oil the wheel bolts and the threads in the wheel
hubs. They can become loose while driving if greased or oiled,
even if tightened to the specified torque.
• Only use wheel bolts that belong to the rim being installed.
• Never use different wheels bolts on your vehicle.
• Always maintain the correct tightening torque for the wheel
bolts to reduce the risk of a wheel loss.
If the tightening torque of
the wheel bolts is too low, they can loosen and come out when the
vehicle is moving. If the tightening torque is too high, the wheel bolts and threads can be damaged and the wheel can become
loose.
0 Note
The specified torque for the wheel bolts is 90 ft lb (120 Nm) with a
tolerance of ± 7,4 ft lb(± 10 Nm). Torque wheel bolts diagonally.
After changing a wheel, the torque must be checked as soon as possible with a torque wrench
-preferably by an authorized Audi
dealer or qualified workshop. •
Low aspect ratio tires
Your Audi is factory-equipped with low aspect ratio tires. These tires
have been thoroughly tested and been selected specifically for your
model for their superb performance, road feel and handling under
a variety of driving conditions. Ask your authorized Audi dealer for
more details.
The low aspect ratio of these tires is indicated by a numeral of 55 or
less in the tire's size designation. The numeral represents the ratio
of the tire's sidewall height in relation to its tread width expressed
in percentage. Conventional tires have a height/width ratio of 60 or
more.
The performance of low-aspect-ratio tires is particularly sensitive to improper inflation pressure. It is therefore important that low
aspect ratio tires are inflated to the specified pressure and that the
inflation pressure is regularly checked and maintained. Tire pres
sures should be checked at least once a month and always before a
long trip~
page 323, "Checking tire pressure" .
What you can do to avoid tire and rim damage Low aspect ratio tires can be damaged more easily by impact with
potholes, curbs, gullies or ridges on the road, particularly if the tire
is underinflated.
In order to minimize the occurrence of impact damage to the tires
of your vehicle, we recommend that you observe the following
precautions:
• Always maintain recommended inflation pressures . Check your
tire pressure every 2,000 miles (3,000 km) and add air if necessary.
• Drive carefully on roads with potholes, deep gullies or ridges.
The impact from driving through or over such obstacles can
damage your tires. Impact with a curb may also cause damage to
your tires. ..,
Vehicle care
I t •
Page 347 of 398
_______________________________________________ W_ h_ a_t _ d_ o_ l _d _o_ n_ o _ w_ ? __ IIII
•
& WARNING (continued)
front wheel is lifted off the ground, placing the Automatic Trans
mission in "P" {Park) will
not prevent the vehicle from moving.
• Before you change a wheel , be sure the ground is level and firm.
If necessary, use a sturdy board under the jack.
• After installing the spare wheel, make sure that you replace the
flat tire/wheel in its storage area properly and tighten the knurled
retaining screw securely. •
Changing a vvheel
When you change a wheel, follow the sequence described
below step-by-step and in exactly that order.
1. Act ivate the vehicle jack mode (only vehicles with Adap
tive Air Suspension) ~
page 186.
2. Remove the decorative wheel cover*. For more details
see also ~
page 346, "Decorative wheel covers".
3. Loosen the
wheel bolts ~ page 346.
4. Locate the proper mounting point for the jack and align
the jack below that point~
page 347.
5. Lift the car with the jack~ page 347.
6. Remove the wheel with the flat tire and then install the
spare
~ page 348.
7. Tighten all wheel bolts lightly.
8.
Lower the vehicle with the jack.
9. Use the wheel bolt wrench and
firmly tighten all wheel
bolts
~ page 346.
10. Replace the decorative wheel cover*.
11. Deactivate the veh icle jack mode (only vehicles with
Adaptive Air Suspension)~
page 186.
& WARNING
Always read and follow all WARNINGS and information => & in
"Raising the vehicle" on
page 347 and => page 349. •
After changing a vvheel
A wheel change is not complete without the doing the
following.
- Store and secure the wheel you replaced in the spare
wheel well.
- Replace the tools and the jack in their proper location.
-Check the tire pressure on the spare wheel immediately
after mounting it.
- As soon as possible, have the
tightening torques on all
wheel bolts checked with a torque wrench. The correct
tightening torque is 90 ft lb (120 Nm).
- Have the flat tire
replaced as soon as possible.
[ i] Tips
• If you notice that the wheel bolts are corroded and difficult to
turn while changing a tire, they should be replaced before you check
the tightening torque.
• Drive at reduced speed until you have the tightening torques
checked. a
Do-it-yourself service
Page 354 of 398
-Fuses and bulbs Pffl..._ _____________________ _
[ i J Tip s
You are wel l advised to keep a supply of spare fuses in your vehicle .
Fuses with the proper ampere ratings are availab le at your Audi
dea ler. •
Fuse Location , Instrument Panel left
Fig . 267 Fuse pa nel
l ayo ut
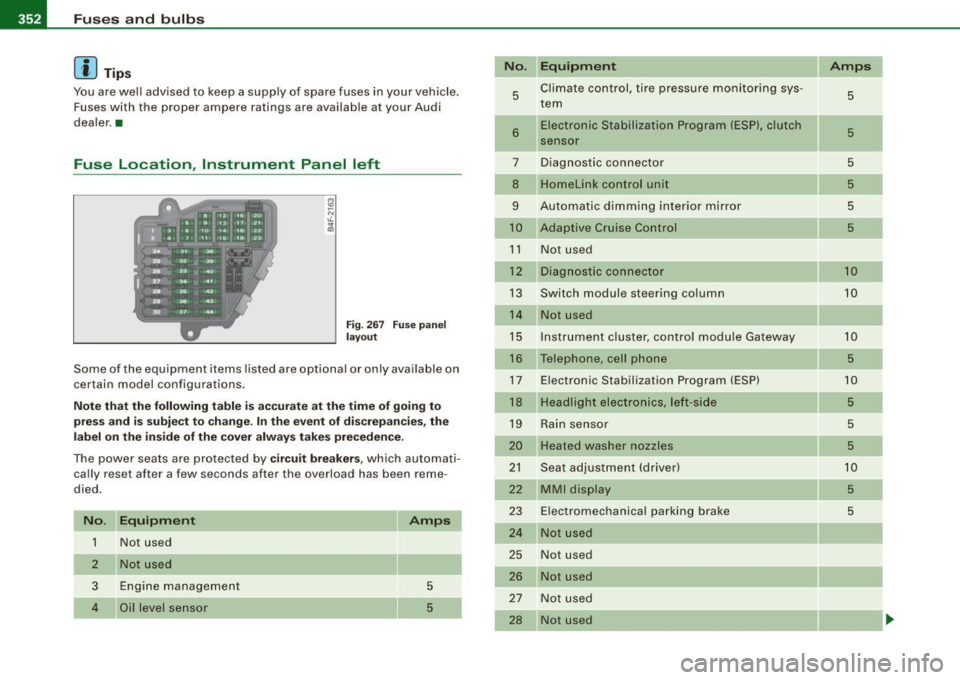
Some of the equipment items listed are optional or only ava ilable on
certain model configurations .
Note th at t he fo llo wi ng t able i s acc urat e at th e time of goin g to
pr ess and is subject t o ch ang e. In th e eve nt of d iscrep ancie s, th e
labe l on th e in side of th e cover always ta kes prece de nce .
The power seats are protected by cir cuit br eaker s, which automati
cally reset after a few seconds after the overload has been reme
died.
N o. Equipm ent
1 Not used
2
3
4
Not used
Engine management
Oil level sensor Amps
5
5
No
.
5
6
..
7
8
9
10
1 1
12
13
14
15
16
17
18
19
20
21
22
23
24
25
26
27
28
Equipm ent
Climate cont rol , tire pressure monitoring sys
tem
Electronic Stabilization Program (ESP), clutch
sensor
Diagnostic connector
Homelink control unit
Automa tic dimming interior mirror
Adaptive Cruise Control
Not used
Diagnostic connector
Switch modu le steering column
Not used
I nstrument c luster, control module Ga teway
Telephone, cell phone E lectronic Stabilization Program (ESP)
Headlight electronics, left -side
Rain sensor
Heated washer nozzles
Seat adjustment (driver)
MMI display
E lectromechanica l parking brake
Not used
Not used
Not used
N ot used
Not used Amps
5
5
5
5
5
5
10
10
10
5
10
5
5
5
10
5
5
-
Page 355 of 398
Fuses and bul bs -_____________ -----=----.;....:..::.:....:.::;______J
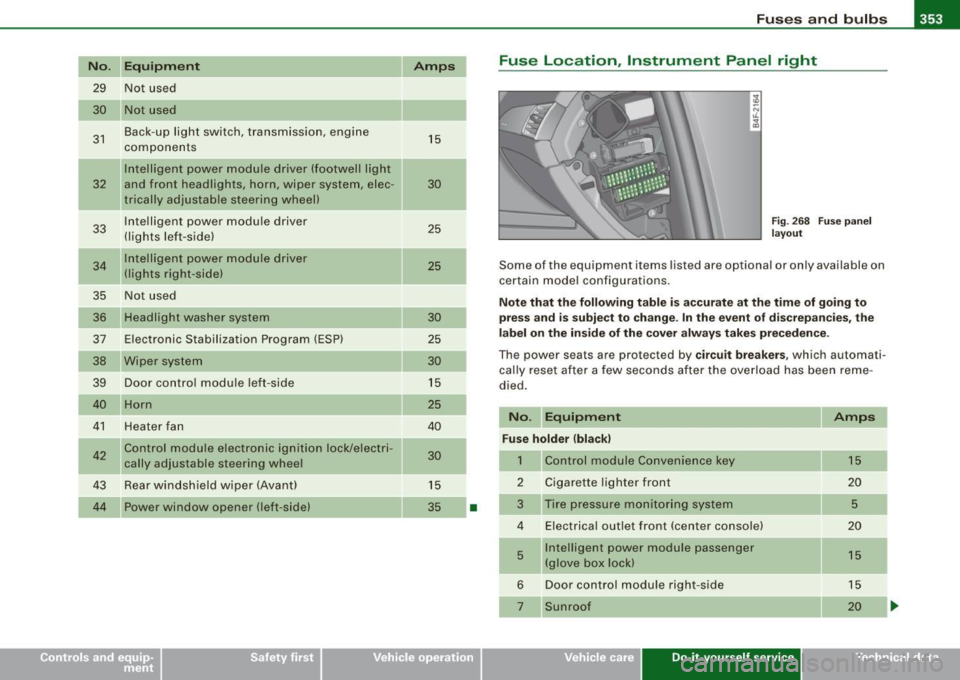
No. Equipm ent
29 Not used
30 Not used
31 Back-up light switch, transmission, engine
components
Intelligent power mo dule driver (footwell l ight
32 and front headlights, horn, wiper system, elec
trically adjusta ble steering wheel)
33 Intelligent power modu le driver
(lights left-side)
---,--
34
35
36
37
38
39
I nte lligent power module driver
(lights right-side)
Not used
Headlight washer system
E lectronic Stabilization Program (ESP)
Wip er system
Door control module left -side
Horn
41 Heater fan
42 Control module electronic ignition lock/electri
cally adjustable steering wheel
43 Rear windsh iel d wiper (Avant)
44 Power window opener (left-side) Amps
15
30
25
25
30 25
30
15
25
40
30
15
35
-
•
Fuse Location , Instrument Panel right
Fig. 2 68 F use pan el
la yo ut
Some of the equipment items listed are optional or on ly available on
certain model configu rations.
Note that the following table is ac curate at the time of g oing to
press and is subject t o change . In the eve nt of d iscrepan cies , th e
l a b el on t he in side of the cover alw ay s take s prec eden ce.
The power seats are protected by cir cuit breaker s, which automati
ca lly reset after a few seconds a fter the ove rload has been reme
died.
No . Equipment Amps
Fu se holder (bla ck )
1 Control module Convenience key 15
2
Cigarette lighter front 20
3
Tire pressure moni tor ing system 5
4 E lectrica l outlet front (center conso le) 20
5
Intelligent power module passenger 15 (glove box lock)
6 Door control module right -side 15
Sunroof 20
Vehicle care Do-it-yourself service irechnical data
Page 361 of 398
________________________________________________ E _m_ e_r.:g :;,. e_ n_c ...: y:.- s_ i_ t _u _a_ t_ i_ o _ n_ s __ ffllll
•
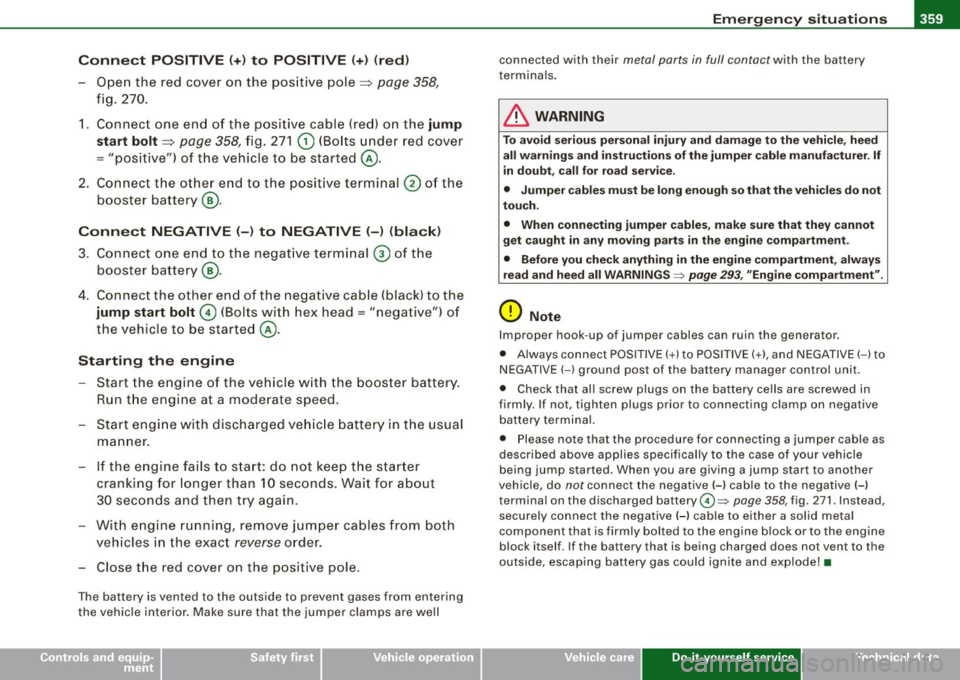
Conn ect POSITIVE (+ ) to PO SITIVE (+ ) (r ed )
- Open the red cover on the pos itive pole => page 358,
fig. 270.
1. Connect one end of the positive cable (red) on the
jump
start bolt=>
page 358, fig. 27 1 G) (Bolts under red cover
= "positive") of the vehicle to be started @.
2. Connect the other end to the positive terminal@ of the
booster battery ®·
Conn ect NEGATIVE (- ) to NEGATIVE (-) (black )
3. Connect one end to the negat ive termi nal 0 of t he
boos ter battery ®·
4 . Connect the other end of the negative cable (black) to the
jump sta rt bolt 0 (Bolts with hex head = "n egative") of
the vehicle to be s tarted @.
Startin g th e e ngin e
-Start the engine of the veh icle w ith the booster battery .
Run t he engine at a moderate speed .
- Start engine with discharged ve hicle battery in the usual
ma nner.
- If the engine fails to s tart: do not keep the star ter
cranking for longer than 10 seconds. Wait f or about
30 seconds and then try again.
- With engine running, remove jumper cables from both
vehicles in the exact reverse order.
- Close the red cover on the positive pole.
The battery is vented to the outside to prevent gases from entering
the vehic le interior . Make sure that the jumper clamps are well connected with their
metal parts in full contact with the battery
t erminals .
& WARNING
To avoid seriou s per sonal in jur y a nd d amage to the vehicle , heed
a ll wa rning s and in stru ction s o f th e jum per ca ble man ufa cturer . If
in doubt , call for ro ad serv ice.
• Jump er c able s must b e lo ng eno ugh so that the vehi cle s d o not
touch .
• When conne cting jumpe r cable s, ma ke sure th at the y cann ot
g et caught in an y mo ving p arts i n the engine comp art m ent .
• Before you che ck anyth ing in the en gin e com partm ent , a lwa ys
r ea d and h eed all W ARNIN GS~ pag e 293, "E ngine compa rtm ent ".
0 Note
Improper hook -up of jumper cables can ruin the generato r.
• Always connect POSITIVE(+) to POS ITIVE( +), and NEGATIVE( -) to
NEGATIVE( -) ground post of the battery manager control unit.
• Check that al l screw p lugs on the battery ce lls are screwed in
firm ly . If not, tighten plugs prior to connecting clamp on negative
battery termi nal.
• Please note that the procedure for connecting a jumper cab le as
described above applies specifical ly to the case of your vehicle
being jump started. When you are giving a jump start to another
vehicle, do
not connect the negative(-) cable to the negative (-1
terminal on the discharged battery©~
page 358, fig. 271. Instead,
securely connect the negative ( -1 cable to either a solid metal
component that is firmly bolted to the engine b lock or to the engine
block itself . If the battery that is being charged does not vent to the
outside, escap ing battery gas could ignite and exp lode! •
Do-it-yourself service
Page 374 of 398
-Consumer Inform ati o n PV:f _______________ _
Consumer Information
Warranty coverages
Your A udi i s cov ered b y the follo wing war ra nt ies:
• Limited New Vehicle Warranty
• Limited Warranty Against Corrosion Perforation
• Emissions Control System Warranty
• Emissions Performance Warranty
• California Emissions Control Warranty (USA vehicles only)
• California Emissions Performance Warranty (USA vehicles only)
Detailed information rega rding your warranties can be found in
your Warr ant y
& Maint enan ce book let. •
Operating your vehicle outside the
U .S.A. or Canada
Government regulations in the United States and Canada require
that automobiles meet specific em ission regulations and safety
standards . Therefore, vehic les bui lt for the U .S .A. and Canada differ
from vehicles sold in other countries .
If you plan to take your vehic le outside the continental limits of the
United States or Canada, there is the possibility that
• unleaded fue ls for vehicles with catalyt ic converter may not be
available;
• f uel may have a considerably lower octane rating . Improper fuel
may cause engine damage;
• service may be inadequate due to lack of proper service facilities,
tools or testing equipment;
• replacement parts may not be readi ly available . •
Navigation systems for vehicles built for the U.S.A . and Canada
wil l not necessarily work in Europe, and may not work in other coun
tries outside of North Amer ica.
0 Note
Audi cannot be responsible for mechanica l damage that could
result from inadequate fuel, service or parts avai lability .•
Audi Service Repair Manuals and
Literature
Audi Official Factory Service Manuals are published as soon as
possible after model introduction . Service manuals are availab le
from :
Audi Techni cal Literature Ordering Center
Ca ll tol l-free:
Tel. : 1 (800) 544-8021
(from 8 :00 AM to 8 :00 PM, EST, Monday through Friday)
or access their website www.audi .dd sltd .com on the Internet to
order repair manua ls and other Audi literature .•
Maintenance
General
You r ve hicle has been designed to he lp keep maintenance requ ire
ments to a minimum. However, a certain amount of regu lar mainte
n ance is sti ll necessary to assure your vehicle's safety, economy and .,_
Page 385 of 398
______________________________________________ A_ l_,_ p _h_ a_ b_e _t_i c_ a _ l _in _ d_e _ x __ lllll
Climate controls
Air distribution ... .... .... ........ 107
Air outlets ..... .. .... .... .... .... 108
Air outlets (rear) .... ...... ... ..... 109
Air recirculation .. .... .... ... .... . 107
AU TO (standard setting) ........ .. . 105
Basic se ttings ... .. ... .... .. .. .... 111
Center ai r vent .... .... ... ... ..... 112
Contro ls ..... .... ... .. .... .. .... 104
Defrosting/defogging ..... ... .... . 107
Descr iption ... ... .... .... ...... .. 102
ECON operation .. ..... .. .... .... . 112
Fan . .... ...... .. .... ..... .. ... .. 106
Heated seats , front ..... .. ...... .. 110
Key coded set ting ................ 102
Recircu lation mode (automatic) ..... 112
Recommended settings ... ... .... . 102
Residual heat .... .... .... ...... .. 105
Setting the temperature ..... . .... . 106
SETUP . ......... .... .... ... .... . 112
Solar operat ion ...... .... .. . .... . 113
Switching on and off ...... .. . .... . 105
Synchronization ...... .... ... .... . 112
Using climate contro l economically . 109
Clock ... .... .... .... .... ... .... .... . 13
Closing Pow er sunroof .... ... ... ... .. ..... 59
Coat hooks . . . . . . . . . . . . . . . . . . . . . . . . . 101
Co ld tire inflation pressure .... ...... . 321
Compass m irror . .... .... ... .... .... . 78
Comp liance ... .. ........ ... .. ...... 375
Consumer Information .. ........ . 203, 372
Contacting NHTSA ....... ... .. .. .... 203
Controls and equip
ment Safety first
Continuously Variable
Transmission (CVTJ D
See multitronic® . ........... ..... 16 1
Conven ience key ... .. .... .... ... .... . 52 Damping
Driver messages ...... .... .... ... 1 20
See Adaptive Air Suspension ...... . 184
Locking vehicle ... .... .... .... .... . 53 Data .. ... .... .... .... ... .... .... ... 369
STAR T button . ..... ........ ...... 118
Data reco rder . ... .... .... .. . .... .. .. 262
Star ting engine .. ... .... ... .. .... 118
Date display ....... .... ........ ... ... 13
STO P button ... .. .... ..... .. ..... 1 19
Switching engine off . ....... .... .. 119
Switching on ignition . ...... .. .... 118
Un lock ing vehic le ........ .... .... . 53 Dayti
me runn ing lights ... .... .... .. 63, 64
Dec laration of compliance
Adaptive Cruise Control .... ....... 375
Audi side ass ist ... .... ...... ... .. 375
Convertible chi ld s eats
Cell phone package ... .... .... .. . . 375
How do I prop erly install a convertible
chi ld sea t in my vehicle? .. ...... . 244 Conve
nience key ...... ... .... .. .. 375
E lec tronic immobil izer . ... .... .. .. 375
Safety instruct ions ... .. ....... .... 244
Homelink® universal remote control 375
Conver tible locking re trac tor
Activating .... ...... .... ..... .... 250 Remote control key ..
.... . .... .. .. 375
de f
Deactivati ng . .... ... .... .... .... . 251
Using to secure a chi ld sa fety seat . 248,
250
Co olan t system ..... .. .. .... .... .... 307
Coo ling System
E xpans ion tank .... ..... .. .... .... 308
Cru ise control What does this mean when it appea
rs in
t he trip odomet er disp lay? .. ... .... 14
De fect ive light bu lb warning ...... ... .. 25
D efrosting/defogging the windows ... . 107
Defrosting /defogging windows ....... . 108
Dete rmin ing cor rec t load li mit .. ...... . 3 26
Changing sp eed .. .... ...... ... ... 125
P resetting your speed ....... .... .. 125 Digita
l clock ...... ..... .... .... ...... 13
Digi ta l compass ... .. .... .... .... .. .. . 78
Switching off .................... 125 D
igita l speedometer . ...... .. .... ..... 25
Switching on .... ... .... ... .. .... 124 D
imensions .. .... .... ... .... .... ... 368
Warning/indicato r lights .. .... .... .. 20 Dipstick
See also Adaptive Cruise Control ..
.. 127 Readi
ng th e dipstick p roper ly ..... . 305
Cruising range ... .... .... .... .... ... . 38 Distance control sys
tem
Cupholder ...... ..... .. .... .... .. 95, 96
See Adaptive C ru ise Contro l ..... ... 127
Vehicle operation Vehicle care Do-it-yourself service Technical data