ESP AUDI S8 2011 User Guide
[x] Cancel search | Manufacturer: AUDI, Model Year: 2011, Model line: S8, Model: AUDI S8 2011Pages: 302, PDF Size: 76.07 MB
Page 29 of 302
Instrument s and warning /indicator lights 2 7
sounds. After about S seconds the display
switches back to normal.
Calling up th e service schedules
If or when an oil change or inspe ct io n is due,
can be shown in the MM I disp lay by select ing
the servi ce inte rva l disp lay in the car menu .
Select the
I CA R I function button > Car s ys
tems
contro l button > Servicing & chec ks >
Service interval d isplays.
Resetting the service interval display
Your au thori zed A udi dealer w ill reset the cor
responding service sched ule after per forming
the approp riate service on yo ur vehicle. You
also have the possib ility to reset the o il
change sched ule after having performed an
oil change accord ing to Audi specifications.
Select the
I CAR I function button > Car sys
tems
control bu tton > Servicing & checks >
Service interval display s > Reset oil change
interval.
CJ) Note
If you disconnect the battery termina ls , no
calc ulations can be made for the service
interval display d uring this tim e and no
service remi nder w ill appea r. Remembe r
t h at observ ing the prope r serv ice intervals
is v ita lly impo rtant to ex tend ing the life o f
your veh icle , particu larly the engine, a nd
maintaining its va lue . Even if t he mileage
driven is low, the maximum period of one
year from one service to the next must not
be exceeded.
{!) Tips
- Do not reset the display between o il
changes, otherw ise the display will be i n
cor rect.
- The information in the Service Reminder
r ema ins stored even when the vehicle
battery is discon nected .
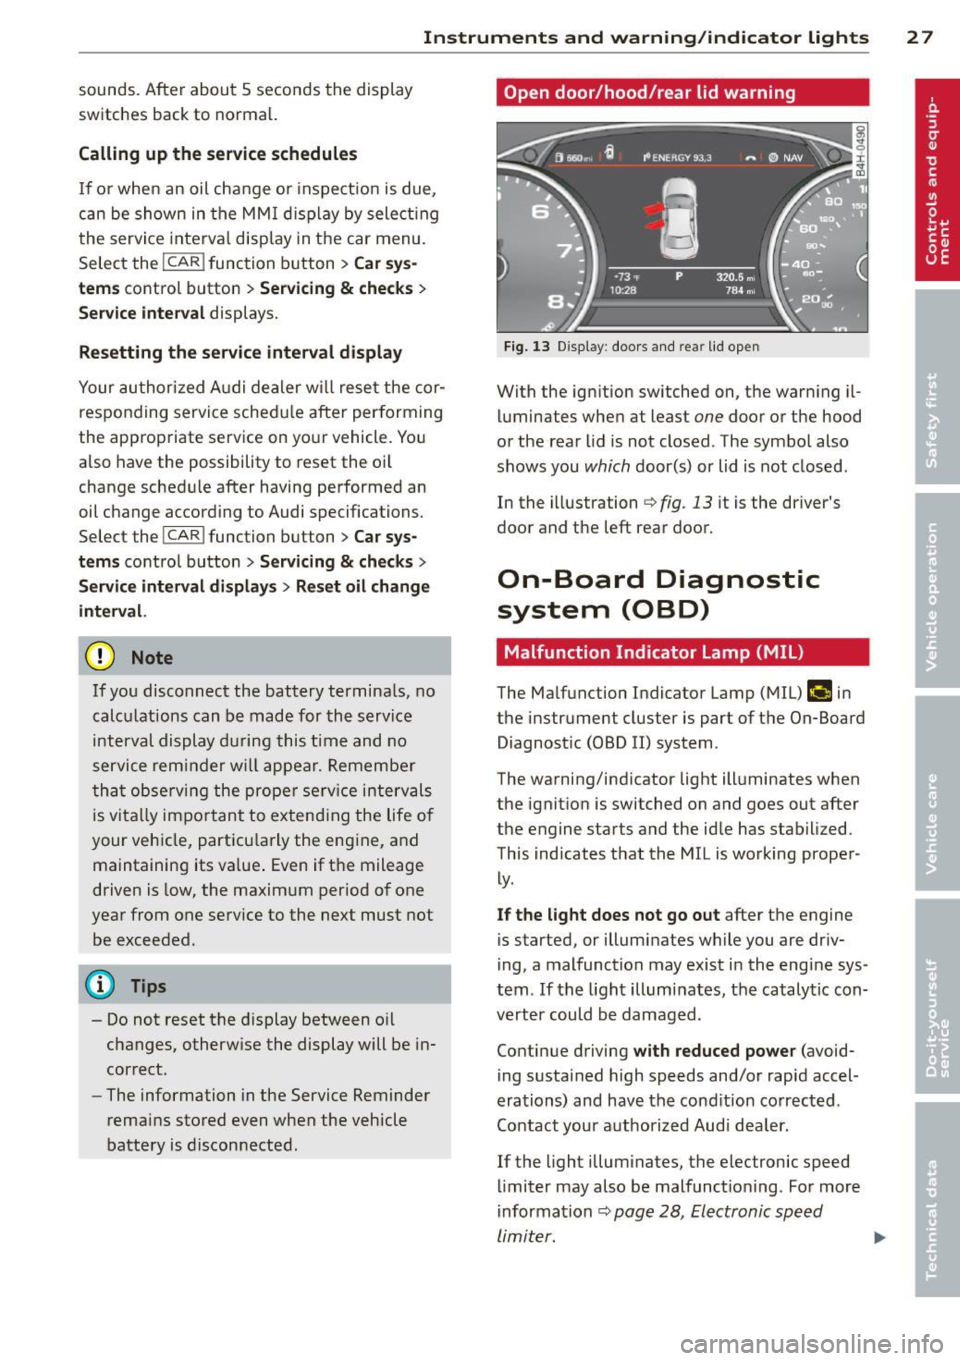
Open door /hood /rear lid warning
Fi g. 13 Display : doo rs a nd re ar lid open
With the ign ition switched on, the warn ing il
luminates when at least
one door or the hood
or the rear lid is not closed . The symbo l also
shows you
which door(s) or lid is not closed .
In the illustrati on
i:> fig . 13 it is the driver's
door and the left rear door.
On-Board Diagnostic
system (OBD)
Malfunction Indicator Lamp (MIL )
The Ma lfunction Indicator Lamp (MIL) fllllij in
the instrument cluster is part of t he On-Board
Diagnost ic (OBD II) system.
The warning/indicator light ill uminates when
the ignitio n is switched on and goes out after
the engine starts and the id le has stabilized.
This indicates that the MIL is working proper
ly .
If the light does not go out after the engine
is started, or illuminates while you are driv
i ng, a malfunction may exis t in the engi ne sys
tem . If the light illumi nates, the catalyt ic con
verter could be damaged .
Contin ue d riving
with reduced power (avoid
i ng s ustai ned h igh speeds and/or rapid accel
erations) and have the cond ition co rrected .
Contact your aut horized Aud i dea le r.
If the light illum inates, the electronic speed
li miter may also be malfunct io ni ng . For more
i nformation
~ pag e 28, Electronic speed
limiter. ...,
Page 31 of 302
Opening and closing Keys
Key set
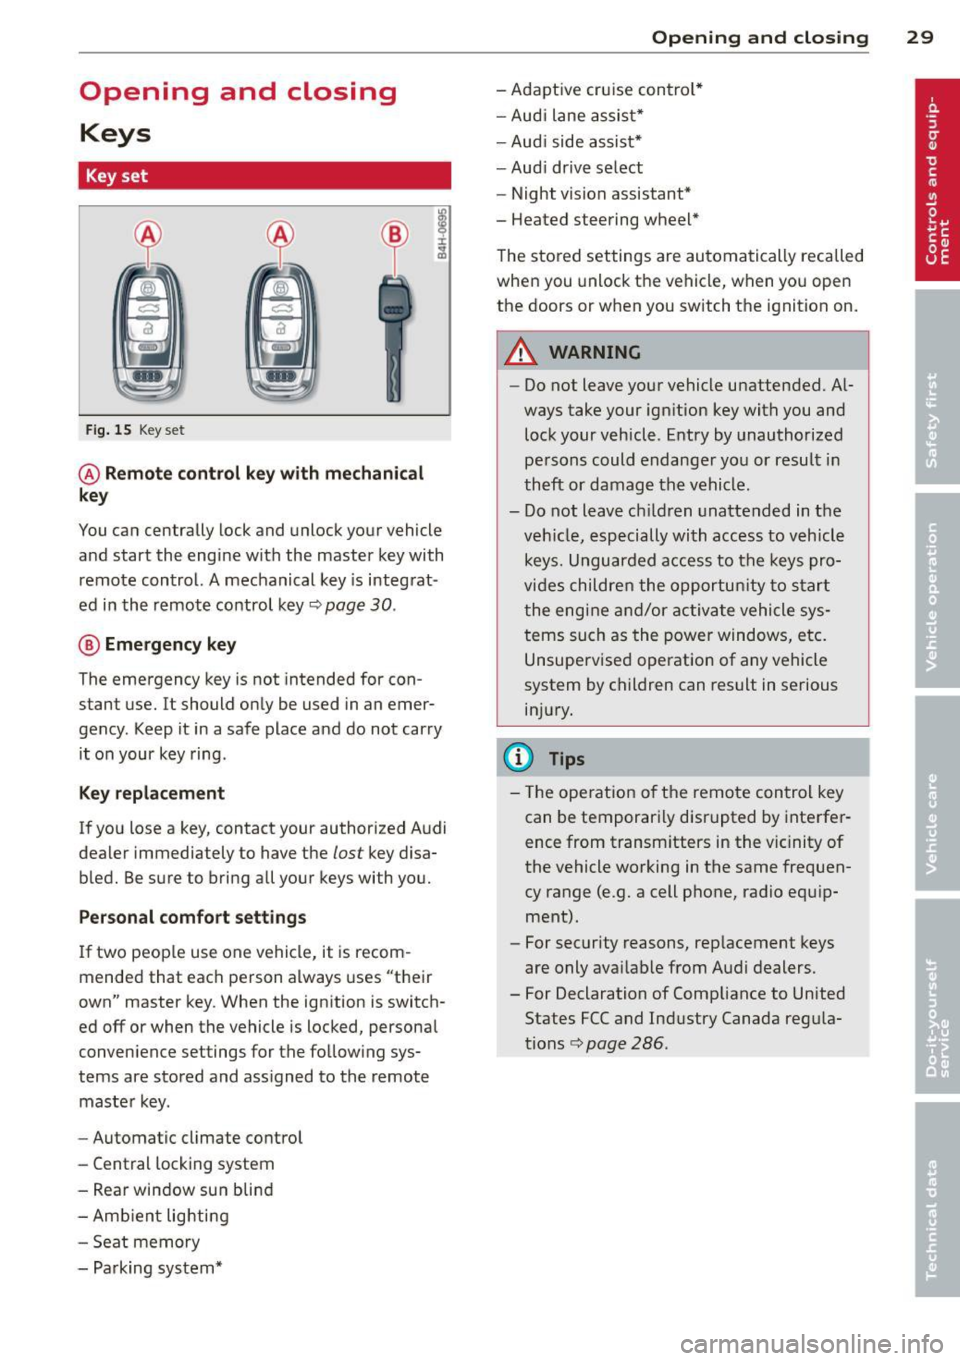
Fig. 15 Key set
@ Remote control key with mechanical
key
You can centrally lock and unlock your vehicle
and start the engine with the master key with
remote control. A mechanical key is integrat
ed in the remote control key¢
page 30.
® Emergency key
The emergency key is not intended for con
stant use.
It should only be used in an emer
gency. Keep it in a safe place and do not carry
it on your key ring .
Key replacement
If you lose a key, contact your authorized Audi
dealer immediately to have the
lost key disa
bled. Be sure to bring all your keys with you.
Personal comfort settings
If two peop le use one vehicle, it is recom
mended that each person always uses "their
own" master key . When the ignition is switch
ed
off or when the vehicle is locked, personal
conven ience settings for the follow ing sys
tems are stored and ass igned to the remote
master key.
- Automatic climate control
- Central locking system
- Rear window sun blind
- Amb ient lighting
- Seat memory
- Parking system*
Opening and closing 29
- Adaptive cruise control*
- Audi lane assist*
-Audi side assist*
-Audi drive select
- Night vision assistant*
- Heated steering wheel*
The stored settings are automatically recalled
when you unlock the vehicle, when you open
the doors or when you switch the ignition on.
A WARNING
---Do not leave your vehicle unattended. Al-
ways take your ignition key with you and
lock your vehicle . Entry by unauthorized
persons could endanger you or result in
theft or damage the vehicle.
- Do not leave ch ildren unattended in the
veh icle, especially with access to vehicle
keys. Unguarded access to the keys pro
vides children the opportunity to start
the engine and/or activate vehicle sys
tems such as the power windows, etc.
Unsupervised operation of any vehicle
system by children can result in serious
injury.
(!} Tips
- Th e operation of the remote control key
can be temporarily disrupted by interfer
ence from transm itters in the vic inity of
the vehicle working in the same frequen
cy range (e.g. a cell phone, radio equip
ment).
- For security reasons, replacement keys
are only ava ilable from Audi dealers.
- For Declaration of Compliance to United States FCC and Industry Canada regu la
tions¢
page 286.
Page 33 of 302

Power locking system
General description
The power locking system locks or unlocks all
doors and th e re ar l id simultan eously.
Yo u ca n lo ck and un lock t he vehicle centrally.
Y ou have the following ch oices:
- Remote master key ¢
page 32,
-Door handles with convenience key*
¢ page 33 ,
-Lock cylinder at the dr iver's door
¢ page 34, or
- Power loc king swi tch inside ¢
page 34.
Selective unlocking
When they are closed, the door and rear lid
are locked. When unlocking, you can set in t he
M MI whether only the driver's door or the en
tire veh icle sho uld be un locked
¢ page 32.
Automatic locking
The automat ic locking featu re locks all the ve
h icle doo rs and the rear lid when you drive
faster tha n 9 mph ( 15 km/h) .
The car is un locked again, when the opening
function in the power locking system sw itch
or at one of the door leve rs is actuated . The
Auto Lock function can be turned on and off in
the MMI
¢ page 32 .
Anti-theft alarm warning system
If the anti-theft alarm warning system de
tects a break -in in to the ve hicle, acoustic and
v isua l warning sig nals are triggered .
The anti -theft warning system is activated a u
tomatically when you lock the vehicle . It is de
activated when un locking using the remote
key, with t he mechanical key, and when you
sw itch the ignition o n.
The alarm also turns off whe n the alarm cycle
has expired .
Tu rn signal s
W hen you unlock the vehicle, the tur n signa ls
flash twice, when you lock it once . If they do
Opening and clo sin g 31
not flash, one of the doo rs, the rear lid o r the
hood is not locked.
Unint entionally locking yourself out
In the fo llow ing cases there safeg ua rds to
preve nt yo u loc king you r remo te mas ter key in
the ve hicl e:
- The vehi cle does not loc k w ith th e cent ral
lo cki ng swit ch¢
page 34 if the d rive r's
do or is open.
- On ve hicles with co nvenience key*, if the
most re cen tly used maste r key is in the lug
g age compartmen t, the rear lid is automat i
cally un locked again after it is closed
¢ page 35.
Do not lock your ve hicle with the remote ma s
ter key
un til all doo rs and t he rear lid are
closed. In this way yo u avoid locking yourse lf
out acc identally .
Power side door closer*
T he veh icle doo rs a re equipped with a powe r
s ide doo r closer . W hen clos ing a door, you o n
l y have to le t it fa ll light ly in to the latch. fhe
doo r will then automatically close by itself
~ .& -
A WARNING
--When you lock yo ur vehicle from o utside,
nobody - espec ia lly children - should re
main inside the vehicle. Remember,
when yo u lock the vehicle from the out
side the wi ndows cannot be o pened from
the inside.
- W hen you leave the ve hicle , always take
the ignition key w ith you . Th is w ill pre
vent pass enge rs (c hildren, for e xample)
fr om accidenta lly being lo cked in the ve
hicle sho uld they accident ally pres s the
power locking sw itch in the doors.
- Do n ot leave childr en inside the vehicle
unsupe rv ised . In an emergen cy it would
be imposs ible to open the doors from
the o utside wit hout t he key .
- App lies to vehi cles w ith power side doo r
closer *:
Page 45 of 302

Clear vision Lights
Switching the headlights on and off
Fig . 35 Instrument pane l: lig ht sw itc h wit h all -weath
er ligh ts•
The headlights only wo rk when the ignition is
switched on. Wh ile start ing the eng ine o r
when switching off the ign ition, the head
lights will go off and on ly the side marker
lights will be on .
If the system is not operating p roperly, a
war ning symbol in the dr iver information dis
p lay is d isplayed
c::, page 21 .
Light switch ·'ti- -
Tu rn the switch c::> fig . 35 to the correspond ing
position . When the lights are switched on, the
:oo: symbo l tu rns on .
0 · The lig hts are off or the dayt ime runn ing
lights are on:
- USA models: The daytime running lights
will come on automatically when the igni
t ion is on and the light switch
c::, fig . 35 is in
the
O posit ion or the AUTO position (only in
daylight cond itions). The
Daytime running
light s
function can be turned on and off in
t h e M MI
c::> page44, c::>A .
-Canada model s: The daytime running lig hts
will come on automa tically when the igni
t ion is on and the light switch
c::> fig . 35 is in
the
O position, the : oo: pos ition or the AUTO
position (only in daylight conditions) c::> A .
AUTO -Automatic headlights swi tch on and
off depend ing o n brightness, for example i n
tw ilight, during rain or in tunnels
c::, &. .
Clear vision 43
:oo: -Parking lig hts
gD -Low beam headlights
~ -All-weather lig hts* (vehicles with LED
headlights *)
c::, fig. 35
@!] -Rear fog lights*. When the rear fog lights
are on, the symbol
0$ on the switch will illu
minate .
All-weather lights*
In vehicles with all-weather lights, the front
lights are ad justed automatically so that you
are less like ly to see glare from your own
headlights, for example when dr iving on a wet
road.
Automat ic dynamic headlight range
con trol*
Your vehicle is equipped with a headlight
range cont ro l system so that the headlights
do not bl ind oncoming traff ic if the vehicle
load cha nges. The headlight range a lso ad
justs au toma tic ally when braking and acceler
at ing .
Light funct ions
The following light funct ions are availab le de
pend ing on vehicle equipment and on ly func
tion when the light switch is in the AUTO posi
t ion. You can dea ctivate these functions i n the
MM I under
Audi adaptive light c::>page 44.
Static corn ering light * (vehicles with LED
headlights o r adaptive light) - the corner ing
ligh t sw itches on automa tically w hen the
stee ring wheel is turned at a ce rtain angle at
speeds up to approximately 4 4 mph (70 km/
h) and when the turn signal is activated at
speeds up to approximate ly 25 mph (40 km/
h). The area to the s ide of the vehicle is illumi
nated better when turn ing .
Dynamic cu rve light* (vehicles with adaptive
li ght) - the curve light only functions at
speeds between approximately 6 mph (10
km/h) and 110 km/h and adapts itself to the
curves in the road.
Page 46 of 302
44 Clear vision
Highway light function*
(vehicles with LED
headlights) -this function adapts the lighting
for highway driving based on vehicle speed.
.&_ WARNING
- Automatic headlights are only intended
to assist the driver . They do not relieve
the driver of his responsibility to check the headlights and to turn them on man
ually according to the current light and
visibility conditions . For example, fog
cannot be detected by the light sensors.
So always switch on the headlights §,0
under these weather conditions and
when driving in the dark.
- Crashes can happen when you cannot see the road ahead and when you cannot be seen by other motorists. Always turn on
the headlights so that you can see ahead
and so that others can see your car from
the back .
(D Note
The rear fog lights should only be turned
on in accordance with traffic regulation, as
the lights are bright for following traffic.
(D Tips
- In the event of a light sensor malfunc
tion, the driver is notified in the instru
ment cluster display
q page 21 .
-You will hear a warning tone if you open
the driver door when the exterior lights
are switched on.
- Please observe legal regulations when
using the lighting systems described .
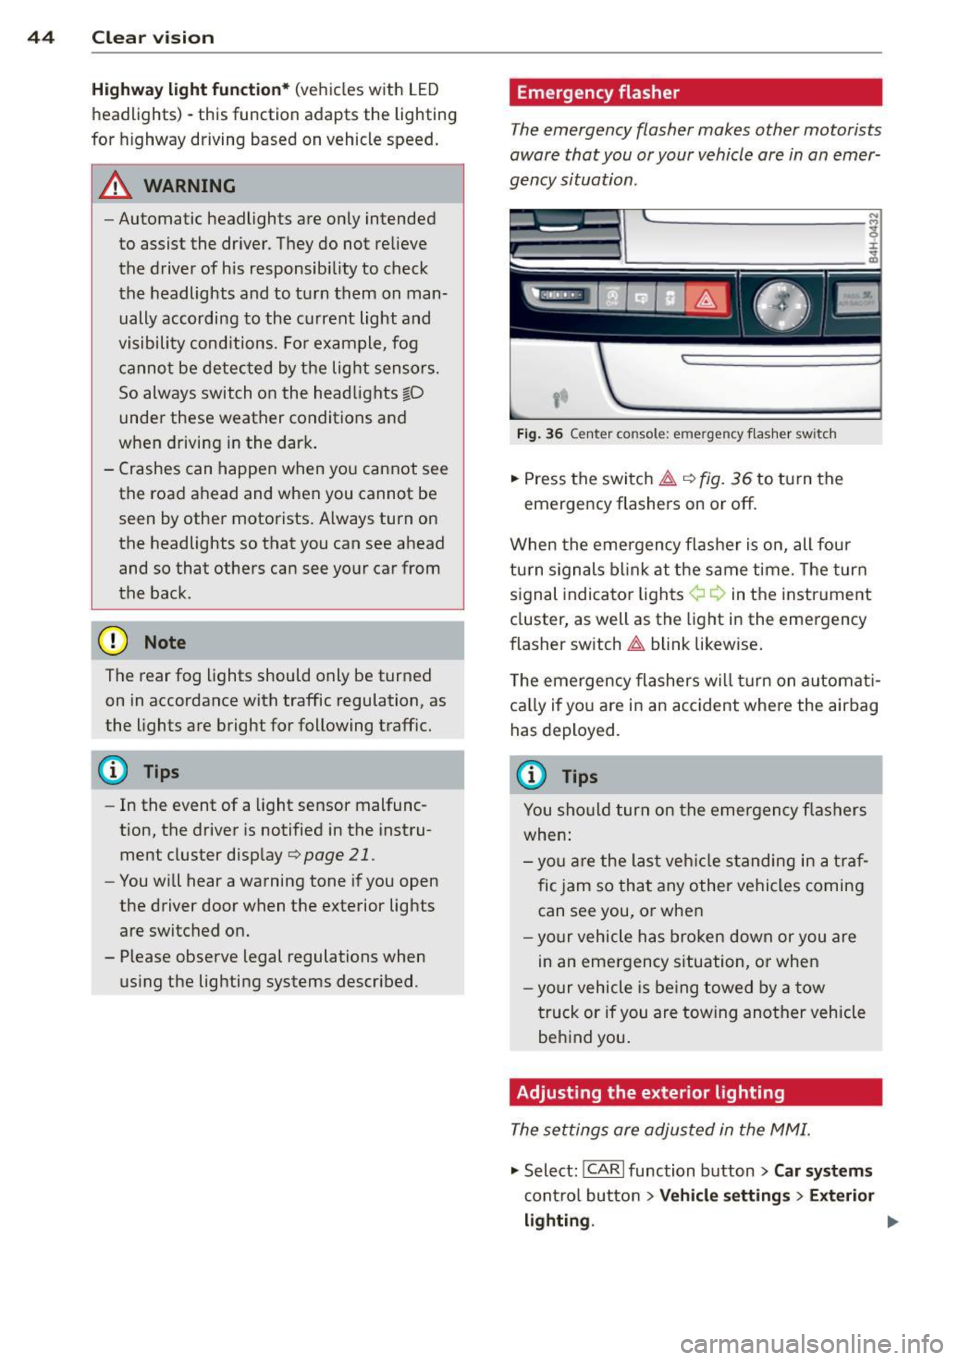
Emergency flasher
The emergency flasher makes other motorists
aware that you or your vehicle ore in on emer
gency situation .
Fig. 36 Ce nte r co nso le: em erg en cy flash er sw itch
.,. Press the switch~ c:> fig. 36 to turn the
emergency flashers on or off.
When the emergency flasher is on, all four
turn signals blink at the same time. The turn
signal indicator lights¢¢ in the instrument
cluster, as well as the light in the emergency
flasher switch
~ blink likewise.
The emergency flashers will turn on automati
cally if you are in an accident where the airbag
has deployed.
@ Tips
You should turn on the emergency flashers
when:
- you are the last vehicle standing in a traf
fic jam so that any other vehicles coming
can see you, or when
- your vehicle has broken down or you are
in an emergency situation, or when
-your vehicle is being towed by a tow
truck or if you are towing another vehicle
behind you.
Adjusting the exterior lighting
The settings ore adjusted in the MMI.
"'Select: !CARI function button> Car systems
control button > Vehicle settings > Exterior
lighting. ""
Page 51 of 302

(!)-Rain s ensor mode. The windshield wipers
switch on once the vehicle speed exceeds ap proximately 2 mph (4 km/h) and it is raining.
The higher the rain sensor sensitivity is set (switch @to the right), the earlier the wind
shield wipers react to moisture on the wind
shield. You can deactivate ra in sensor mode in
the MMI, which will then activate intermittent mode. Select:
ICARI function button> Car sys
tems
control button > Driver assist > Rain
se nsor
> Off. In intermittent mode, you can
adjust the interval time using the switch @.
@-Slow wiping
®-Fast wiping
@ -Single wipe. If you hold the lever in this
position longer, the wipers switch from slow
wiping to fast wiping.
® -Clean the windshield. The wipers wipe
one time after several seconds of driving to
remove water droplets. You can switch this
f unction
off by moving the lever to position ®
within 10 seconds after the afterwipe . The af
terwipe function is reactivated the next time
you switch the ignition on .
Cleaning the headlights. The headlight wash
er system* only functions when the lights are
switched on. The headlights and the night vi
sion system camera* are cleaned automatical ly the first time the lever is press in position
® and every 8 times it is pressed after that.
They are also cleaned every time you hold the lever in position ® for longer than 8 seconds.
A WARNING
-The rain sensor is only designed to assist
and support the driver. It remains entire
ly the driver's responsibility to monitor
outside weather conditions and to man
ually activate the wipers as soon as rain
or drizzle reduces visibility through the
windshield .
- The windshield must not be treated with
water-repellent materials . They can in
crease glare under poor visibility condi
tions such as wetness, darkness, or when
the sun is low on the horizon. In addi-
Clear vision 49
tion, they can cause the windshield wip
ers to chatter.
- Properly functioning windshield wiper
blades are required for a clear view and
safe driving
c:::> page SO, Replacing
windshield wiper blades.
([) Note
-In the case of frost, check whether the
windshield wiper blades are frozen to
the windshield. Switching on the wind
shield wipers can damage the wiper
blades!
- Prior to using a car wash, the windshield
wiper system must be switched
off (lever
in position 0) . This helps to prevent unin
tentional switching on and damage to
the windshield wiper system.
- Do not use the wipers to clear a frosted
window. Using the wipers as a conven ient ice scraper will destroy the wiper
blades .
(D Tips
- The windshield wipers are switched off
when the ignition is off. Activate the
windshield wipers after the ignition is
switched back on by moving the wind
shield wiper lever to any position.
- Worn or dirty windshield wiper blades
result in streaking. This can affect the
rain sensor function . Check your wind
shield wiper blades regularly .
- The washer fluid nozzles of the wind
shield washer system are heated at low
temperatures when the ignition is on.
- When stopping temporarily, e.g. at a
traffic light, the set speed of the wind
shield wipers is automatically reduced by
one speed.
Page 53 of 302
Mirrors
Adjusting the exterior mirrors
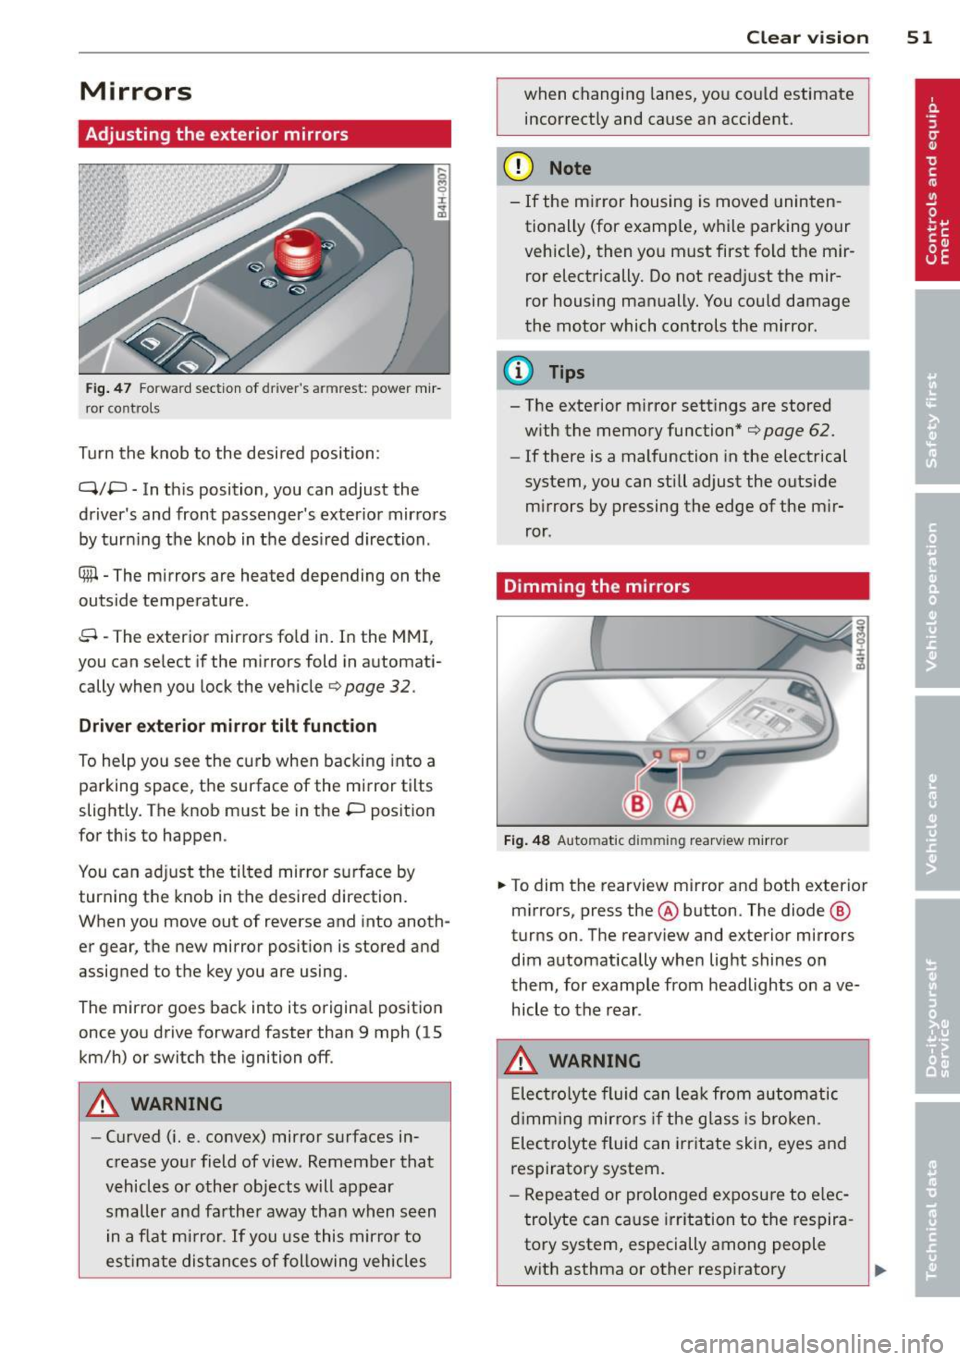
Fig . 47 Fo rw ar d section of driver's armrest: powe r m ir
r or co nt rols
Turn the knob to the desi red position :
Q/P -In th is position, you can adjust the
driver's and front passenger's exter ior mir rors
by turn ing the knob in t he des ired direction .
® -The m irrors are heated depending on the
out side temperature .
8 -The exterior mirrors fo ld in. In the MMI,
you c an se lect if the m irro rs fold in automat i
cally when you lock the vehicle
¢ page 32 .
Driver exter io r mi rro r tilt funct ion
To help yo u see the curb when backing into a
parking space, the surface of the mirror tilts
slightly. The knob must be in the P position
for this to happen .
You can ad just the tilted mirror s urface by
turning the knob in the desired direction.
When you move out of reverse and into anoth
er gear, the new mirror position is stored and
assigned to the key you a re using.
The mirror goes back into its origina l posit io n
once yo u dr ive forward faster than 9 mph (15
km/h) or switch the ignition off .
A WARNING
-Curved ( i.e. convex) mirror s urfaces in
crease your field of view . Remember that
vehicles or other objects will appear
small er and farther away than when seen
in a f lat m irror .
If you use this mirro r to
est imate distances of following vehicles
.
Clear vi sion 51
when changing lanes, you co uld estimate
incor rectly and cause an accident.
(D Note
- If the m irror housing is moved uninten
tionally (for examp le, w hile pa rking your
vehicle), then yo u must first fold the mir
ror electrically. Do not read just the mir
ror housing man ually. You cou ld damage
the motor which controls the mirror.
(D Tips
- The exterior m irror settings are stored
w ith the memory function*
¢ page 62.
- If there is a malfunction in the electrical
system, you can still adjust the outside
mi rrors by pressing the edge of the m ir
ror .
Dimming the mirrors
Fig . 48 Automatic dimming rearview mirro r
.. To dim the re arview mirror and both exterior
m irrors, press the@ button . The diode ®
turns on. T he rearv iew and exterior mirrors
dim automatically whe n light shines o n
t hem, for examp le from headlights on ave
hicle to the rear .
A WARNING
Elect ro lyte fluid can lea k from au to matic
d imm ing mir rors if the g lass is b roken .
E lec tro lyte fluid can irr itate skin, eyes and
respiratory system.
- Repeated or prolonged exposu re to e lec
trolyte can cause irritation to the respira
tory system, especially among people
with asthma or other resp iratory
.
Page 56 of 302
54 Seat s a nd s tor ag e
Seats and storage
General recommen
dations
Why is your seat adjustment so
important?
The safety belts and the airbag system can
only provide maximum protection if the front
seats are correctly adjusted.
There are various ways of adjust ing the front
seats to provide safe and comfortable support
for the driver and the front passenger. Adjust
you r seat prope rly so that :
- you can easily and quick ly reach all the
switches and controls in the instrument
panel
-your body is prope rly supported thus reduc
ing physical stress and fatigue
- the safety be lts and airbag system can offe r
maximum protection
¢ page 145 .
In the following sec tions, you will see exactly
how you can best adjust you r seats .
There are special regulations and instructions
for insta lling a child seat on the front pas
senger's seat. Always fo llow the information
regarding child safety provided in
q page 169, Child Safety .
A WARNING
Incorrect seating position of the driver and
all other passengers can result in serious
personal injury.
- Always keep your feet on the floor when
the vehicle is in motion -never p ut your
feet on top of the instrument panel, out
of the w indow or on top of the seat cush
ion . Th is app lies especially to the passen
gers .
If your seating position is incorrect,
you increase the r isk of injury in the case
of sudden braking or an acc ident.
If the
airbag infla tes and the seating position
is incorrect, this could resul t in personal
injury or even death.
- It is important for bo th the driver and
front passenger to keep a distance of at least 10 inches (25 cm) between them
selves and the steering wheel and/or in
strument panel. If you're s itting any
closer than th is, the a irbag system can
not protect you properly . In addition, the
front seats and head restraints must be
adjusted to your body height so that they
can give you max imum protect ion.
- Always try to keep as much distance as
pos sible between yourself and the steer
ing wheel o r instrument panel.
- Do not adjust the driver's o r front pas
senger's seat whi le the vehicle is moving.
Your sea t may move unexpected ly, caus
ing sudden loss of vehicle control and
personal injury . If you adjust yo ur seat
while the veh icle is moving, yo u are out
of posit ion.
Driver's seat '
The correct seat position is important for safe
and relaxed driving.
We recommend tha t you adjus t the dr iver's
seat in the fo llowing manner :
"' Adjust th e seat in fore and aft direction so
t ha t you can eas ily push the peda ls to the
floor wh ile keeping your knees sl igh tly bent
q A in Why is your seat adjustment so im
portant? on page 54.
"' Adjust the backrest so that when you sit
w ith your back agains t th e backrest, you can
still g rasp the top of the steering wheel.
"' Adjust the head restraint so the upper edge
is as even as poss ible with the top of your
head . If that is not poss ible , try to adjust
the head restraint so that it is as close to
t his pos it ion as possib le
q page 61.
A WARNING
Neve r place any objects in the dr iver's foot
well. An object could get into the pedal
area and interfere with pedal function . In
case of sudden braking or an acc ident, you
would not be able to brake or accelerate .
Page 58 of 302
56 Seats and st o ra ge
Multifunction button
App lies to vehicles: wit h memory fu nctio n
You can adjust the massage function, upper
section of the backrest, lumbar support, side bolsters, seating surface and safety belt
height using the multifunction button.
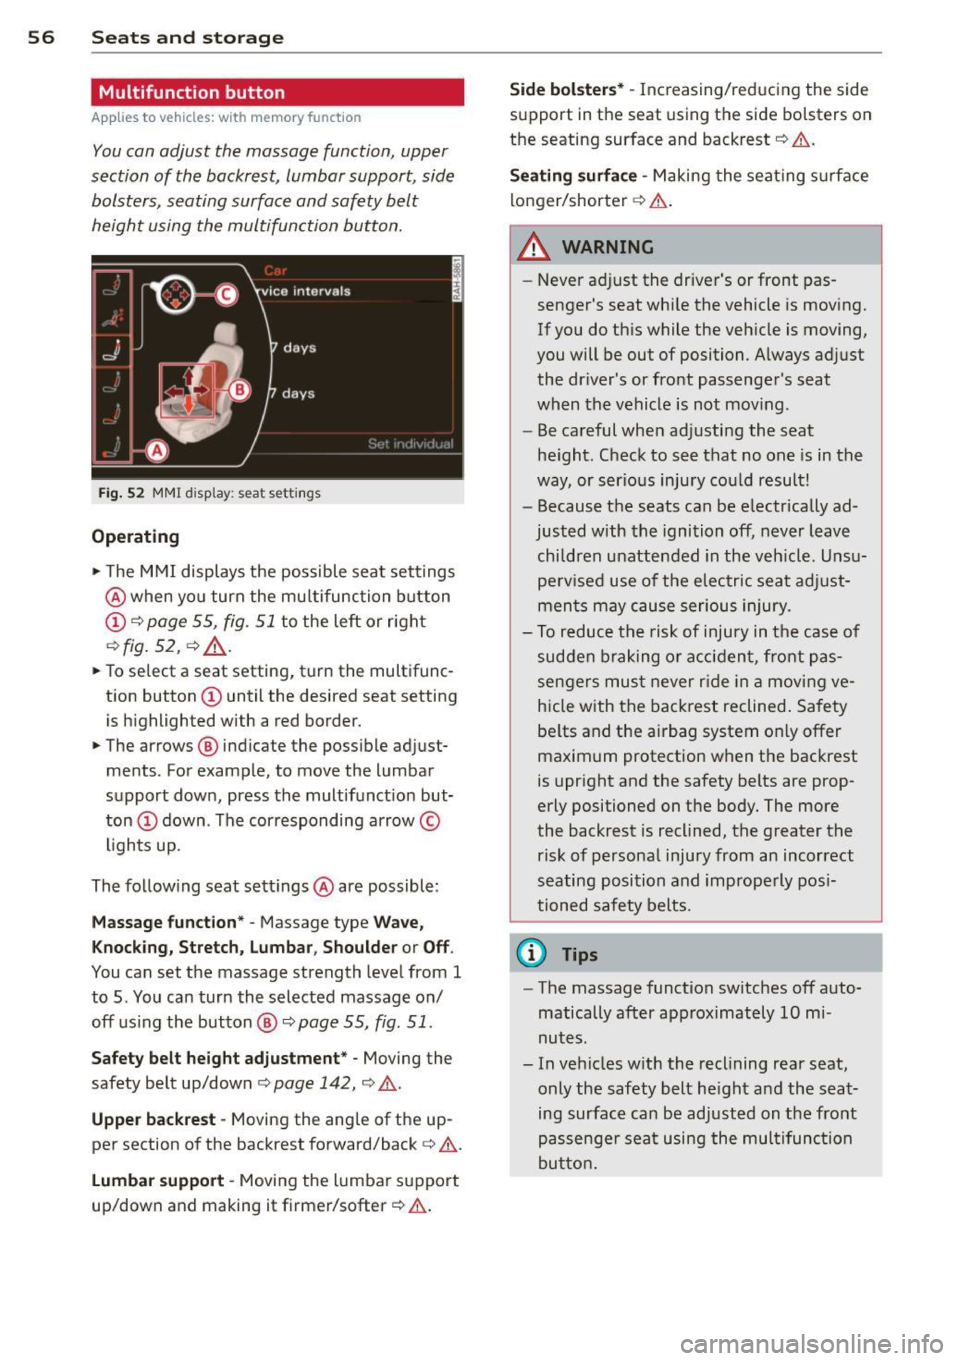
F ig. 52 MMI display : seat settings
Operating
• The M MI displays the possible seat sett ings
@ when yo u turn the mu ltifunction button
(D c:> page 55, fig. 51 to the left or right
c:> fig. 52, c:> .&_ .
• To select a seat setting, turn the multifunc
tion button
(D until the desired seat setting
is h ighlighted with a red border.
• The arrows ® indicate the possible adjust
ments . For example, to move the lumbar
support down, press the multifunct ion but
ton
(D down . The cor responding arrow ©
l ights up .
The following seat settings @are possible:
Mas sage funct ion* -Massage type Wave,
Knock ing, Stretch, Lumbar , Shoulder or Off.
You can set the massage strength level from 1
to 5 . You can turn the selected massage on/
off us ing the button ®
c:> page 55, fig. 51 .
Safety belt height adju stment * -Moving the
safety belt up/down
c:> page 142, c:> .&..
Upper backre st -Moving the ang le of the up
per section of the backrest forward/back
c:> .&,.
Lu mb ar support -Moving the lumbar support
up/down and making it firme r/softer
c:> .&. .
Side bol ster s* -Increasing/reducing the side
support in the seat using the side bolsters on
the seating surface and backrest
c:> .&,.
Seat ing surfa ce -Making the seat ing s urface
longer/shorter
c:> .&. .
A WARNING
-
-Never ad just the driver's or front pas
senger's seat whi le the vehicle is moving.
If you do this while the vehicle is moving,
you will be out of position. A lways adjust
the dr iver's or front passenge r's seat
when the vehicle is not mov ing.
- Be careful when adjusting the seat
he ight . Check to see that no one is in the
way, or serious injury cou ld result!
- Because the seats can be electrically ad
justed with the ignition off, never leave
chi ldren unattended in the veh icle. Unsu
perv ised use of the e lectr ic sea t adj ust
men ts may cause serious injury.
- To reduce the risk of injury in the case of
sudden b raking or acc iden t, front pas
sengers mus t never r ide in a movi ng ve
hicle with the backrest reclined . Safety
be lts and the airbag system only offer
maximum protection when the backrest
is upright and the safety belts are prop
erly positioned on the body . The more
the backrest is reclined, the greater the risk of personal injury from an incorrect
seating position and improperly pos i
tioned safety belts .
@ Tips
-The massage function switches off auto
matically after approximately 10 mi
nutes.
- In vehicles w ith the reclining rear seat,
only the safety belt he igh t and the seat
ing surface can be adjusted on the front
passenge r sea t using the mul tifunc tion
butto n.
Page 61 of 302
Operating the reclining rear seat
App lies to v ehicles: with reclining rea r seat
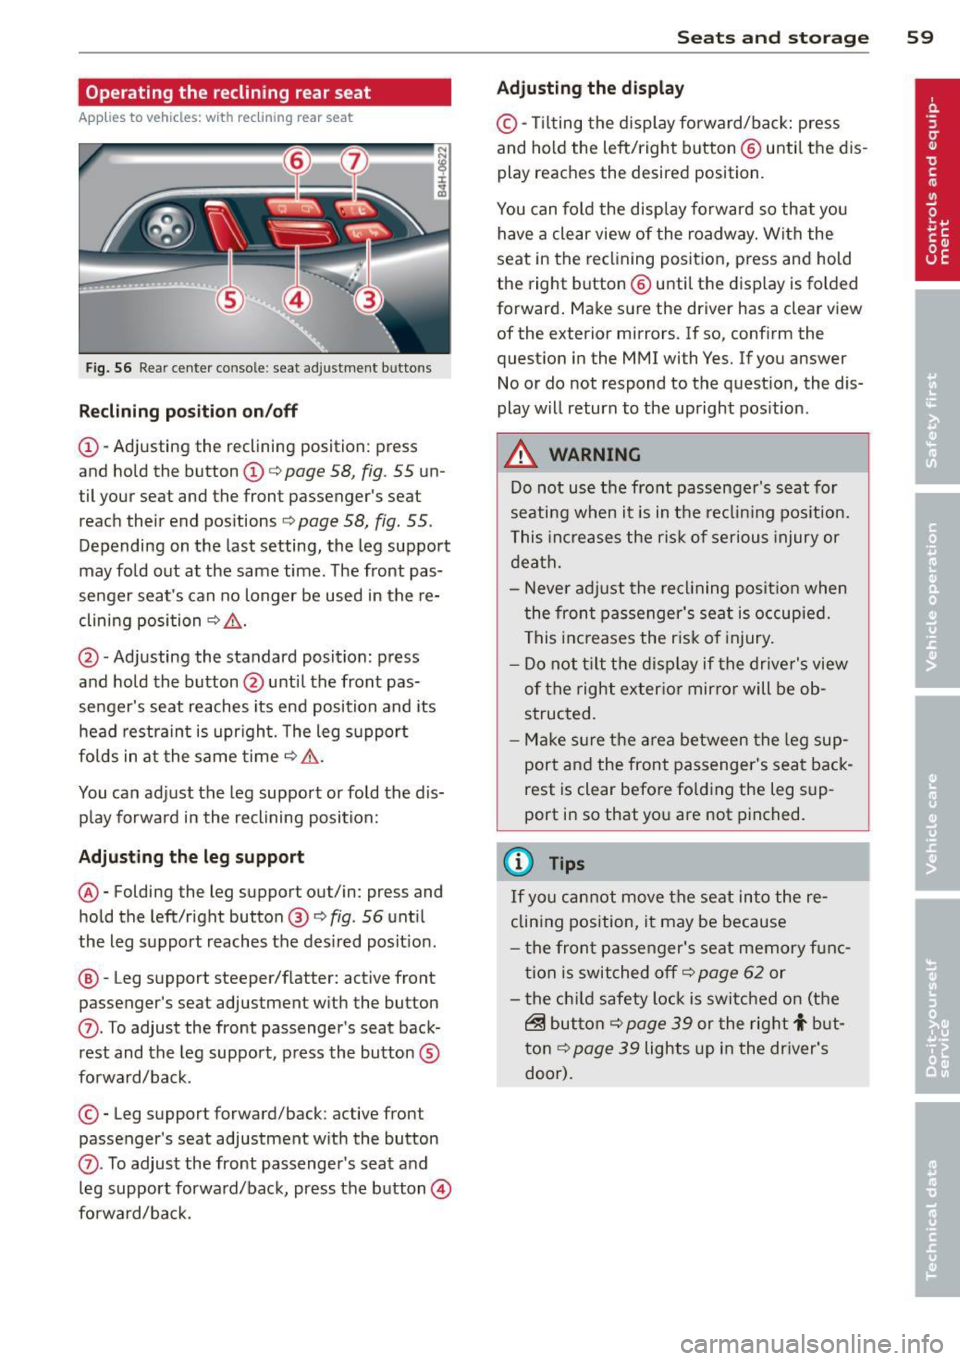
Fig. 56 Rear cente r co nso le : seat adjustment bu tto ns
Reclining position on/off
@-Adjusting the reclining position: press
and hold the button@c:::>
page 58, fig. 55 un
til your seat and the front passenger's seat
reach their end positions
c:::> page 58, fig. 55.
Depending on the last setting, the leg support
may fold out at the same time. The front pas
senger seat's can no longer be used in the re
clining position c:::>
&,.
@ -Adjusting the standard position: press
and hold the button @until the front pas
senger's seat reaches its end position and its
head restraint is upright. The leg support
folds in at the same time c:::>
&,.
You can adjust the leg support or fold the dis
play forward in the reclining position:
Adjusting the leg support
®-Folding the leg support out/in: press and
hold the left/right button ®
c:::>fig . 56 until
the leg support reaches the des ired posit ion .
@ -Leg support steeper/flatter: active front
passenger's seat adjustment with the button
(J) . To adjust the front passenger's seat back
rest and the leg support, press the button ®
forward/back.
© -Leg support forward/back: active front
passenger 's seat adjustment with the button
(J) . To adjust the front passenger's seat and
l eg support forward/back, press the button@
forward/back.
Seats and storage 59
Adjusting the display
©-Tilt ing the display forward/back: press
and hold the left/right b utton @ until the dis
play reaches the desired position.
You can fold the display forward so that you
have a clear view of the roadway. With the
seat in the reclining position, press and hold
the right button@ unti l the display is folded
forward. Make sure the driver has a clear view
of the exterior mirrors. If so, confirm the
question in the MMI with Yes. If you answer
No or do not respond to the question, the dis
play will return to the upright pos ition .
A WARNING
Do not use the front passenger's seat for
seating when it is in the reclin ing position.
This increases the risk of serious injury or
death.
- Never adjust the reclining position when
the front passenger's seat is occupied.
This increases the risk of injury.
- Do not t ilt the display if the driver's view
of the right exterior mirror will be ob
structed.
- Make sure the area between the leg sup
port and the front passenger's seat back
rest is clear before fo lding the leg sup
port in so that you are not pinched.
(!) Tips
If yo u cannot move the seat into the re
clining position, it may be because
- th e front passenger's seat memory func
tion is switched off c:::>
page 62 or
- the child safety lock is switched on (the
~ button c:::> page 39 or the rig ht t but
ton c:::>
page 39 lights up in the driver's
door).