AUDI TT COUPE 2009 Manual PDF
Manufacturer: AUDI, Model Year: 2009, Model line: TT COUPE, Model: AUDI TT COUPE 2009Pages: 316, PDF Size: 71.16 MB
Page 71 of 316
Seats and storage
General recommendations
Why is your seat adjustment so important?
The safety belts and the airbag system can only provide
maximum protection if the front seats are correctly
adjusted.
There are various ways of adjusting the front seats to provide safe
and comfortable support for the driver and the front passenger.
Adjust your seat properly so that:
• you can easily and quickly reach all the switches and controls in
the instrument panel
• your body is properly supported thus reducing physical stress
and fatigue
• the safety belts and airbag system can offer maximum protec
tion
~ page 135.
In the following sections, you will see exactly how you can best
adjust your seats.
There are special regulations and instructions for installing a child safety seat on the front passenger's seat. Always heed the informa
tion regarding child safety provided in~
page 157, "Child Safety".
& WARNING
Incorrect seating position of the driver and all other passengers
can result in serious personal injury.
• Always keep your feet on the floor when the vehicle is in motion
- never put your feet on top of the instrument panel, out of the
window or on top of the seat cushion! This applies especially to
the passengers. If your seating position is incorrect you increase
the risk of injury in the case of sudden braking or an accident. If
Controls and equip
ment
Seats and storage
& WARNING (continued)
the airbag inflates and the seating position is incorrect this could
result in personal injury or even death.
• It is important for both the driver and front passenger to keep
a distance of at least 10 inches (25 cml between themselves and
the steering wheel and/or instrument panel. If you're sitting any closer than this, the airbag system cannot protect you properly. In
addition to this, the front seats and head restraints must be
adjusted to your body height so that they can give you maximum
protection.
• Always try to keep as much distance as possible between your
self and the steering wheel or instrument panel.
• Do not adjust the driver's or front passenger's seat while the
vehicle is moving. Your seat may move unexpectedly, causing
sudden loss of vehicle control and personal injury. If you adjust
your seat while the vehicle is moving, you are out of position. •
Driver's seat
The correct seat position is important for safe and relaxed
driving.
We recommend that you adjust the driver's seat in the
following manner:
- Adjust the seat in fore and aft direction so that you can
easily push the pedals to the floor while keeping your
knee slightly bent:::>
& in "Why is your seat adjustment
so important?".
Adjust the seatback so that when you sit with your back against the seatback, you can still grasp the top of the
steering wheel. _..
I • •
Page 72 of 316
Seats and storage
- Position the head restraint according to the occupant's height ~
page 74. For maximum protection, the top of
the head restraint should be at least at eye level, prefer
ably higher and ideally level with the top of the head
~ page 119, fig. 98.
& WARNING
Never place any objects in the driver's footwell. An object could
get into the pedal area and interfere with pedal function . In case
of sudden braking or an accident, you would not be able to brake
or accelerate! •
Front passenger's seat
Always move the front passenger seat into the rearmost position.
To avoid contact with the airbag while it is deploying, do not
sit any closer to the instrument panel than necessary and
always wear the three-point safety belt provided adjusted
correctly. We recommend that you adjust the passenger's
seat in the following manner :
- Move the front passenger seat into the rearmost position
of t he fore and aft adjustment range~
& in "Why is
your seat adjustment so important?" on
page 69.
- Bring the backrest up to an (a lmost) upright position . Do
not ride with the seat reclined.
- The ideal position for the head restraint is with the upper
edge of the restraint level with the top of your head
~ page 74. You should not lower the top of the restraint
below the level of your eyes. -
Place your feet on the floor in front of the passenger's
seat. •
Adjusting front seats manually
Applies to vehic les: with manua l seat ad justment
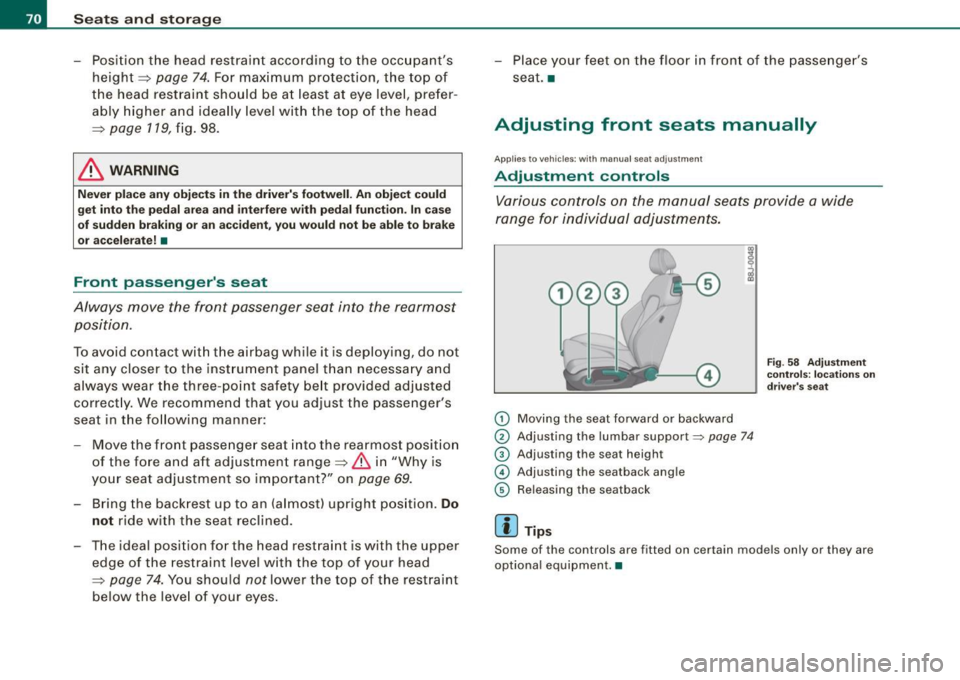
Adjustment controls
Various controls on the manual seats provide a wide
range for individual adjustments.
0 Moving the seat forward or backward
0 Adjusting the lumbar support~ page 74
® Adjusting the seat height
© Adjusting the seatback angle
© Releasing the seatback
[ i ] Tips
Fig. 58 Adjustment
controls: locations on
driver's seat
Some of the controls are fitted on certain models only or they are
optional equipment. •
Page 73 of 316
Applies to vehicles : wit h m anua l seat a djustment
Adjusting the manual seats
Position, angle and shape of the manual seats can be
adjusted to provide safe and comfortable seating.
Reed and heed all WARNINGS=:> & before you adjust your
seat.
Moving the front seats forward or backward
- Lift the lever (D =:> page 70, fig. 58 and slide the seat to
the desired position.
- Release the lever and then move the seat further until
you feel and hear it engage.
Adjusting the seat height
- Pull
the lever 0 up and pump it to raise the seat.
-Push the lever down and pump it to lower the seat.
Adjusting the seatback angle
-Lean forward to take your weight off the seatback.
- Turn the hand wheel© in the direction you want the
seatback to tilt .
Releasing seat back
-Pull the lever ® up.
- Push the seatback forward.
& WARNING
• Never adjust the driver's or front passenger's seat while the
vehicle is moving. If you do this while the vehicle is moving, you
Controls and equip
ment
Seats and storage
& WARNING (continued)
will be out of position . Always adjust the driver's or front
passenger's seat when the vehicle is not moving.
• Be careful when adjusting the seat height. Check to see that no
one is in the way, or serious injury could result!
• To reduce the risk of injury in the case of sudden braking or
accident, front passengers must never ride in a moving vehicle
with the seatback reclined . Safety belts and the airbag system
only offer maximum protection when the seatback is upright and
the safety belts are properly positioned on the body . The more the
seatback is reclined, the greater the risk of personal injury from an
incorrect seating position and improperly positioned safety
belts! •
Power seats
Applies to vehi cles : w it h p ower sea ts
Adjustment switches
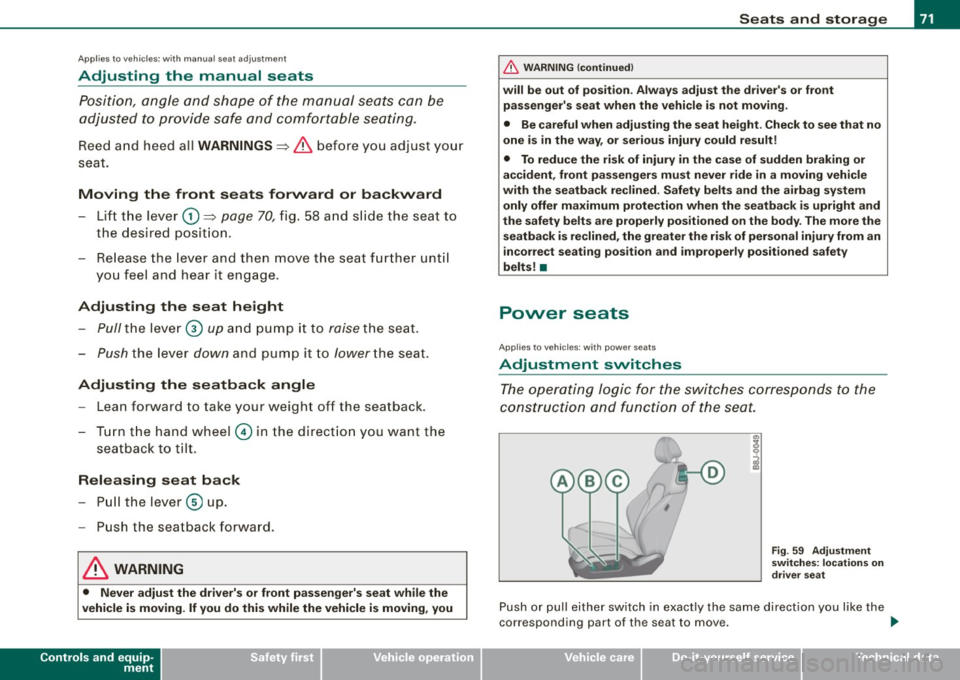
The operating logic for the switches corresponds to the
construction and function of the seat.
Fig. 59 Adjustment
switches: locations on
driver seat
Push or pull either switch in exactly the same direction you like the
corresponding part of the seat to move. ..,
I • •
Page 74 of 316
Seats and storage
© Adjusting the lumbar support=:> page 74
@ Seat adjustment =:> page 72
© Adjusting the angle of the seatback =:> page 73
@ Releasing the seatback
& WARNING
• Never adjust the driver's or front passenger seat while the
vehicle is moving. If you do this while the vehicle is moving, you
will be out of position. Always adjust the driver's or front
passenger seat when the vehicle is not moving.
• Be careful when adjusting the seat height. Check to see that no
one is in the way, or serious injury could result!
• Because the seats can be electrically adjusted with the ignition
key removed, never leave children unattended in the vehicle. Unsu
pervised use of the electric seat adjustments may cause serious
injury. •
Applies to vehi cles: with po wer seats
Power seat adjustment
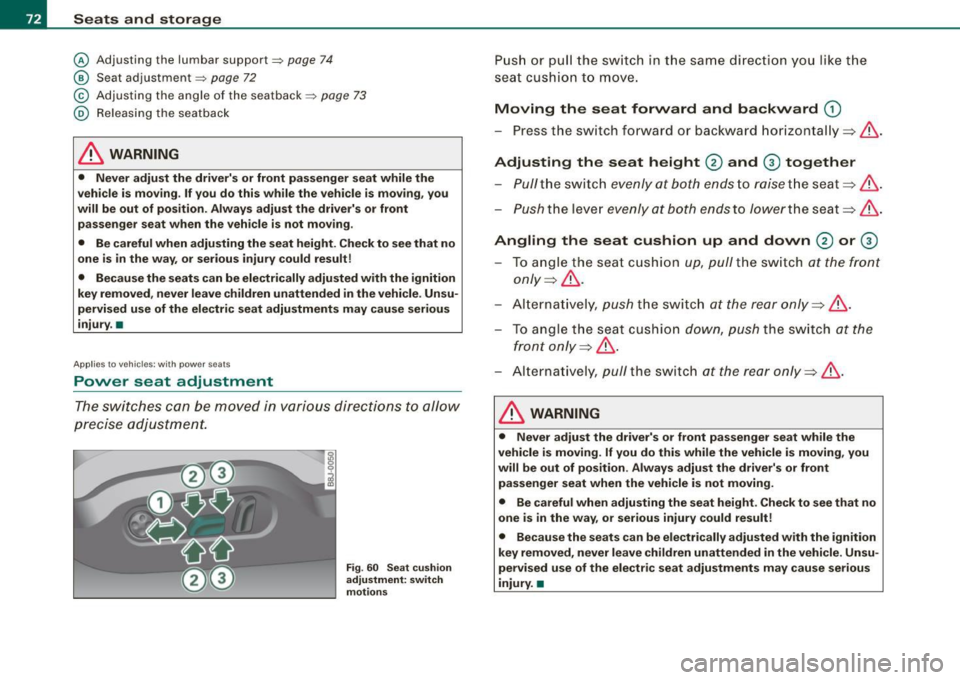
The switches can be moved in various directions to allow
precise adjustment.
Fig . 60 Seat cushion
adjustment: switch
motions
Push or pull the switch in the same direction you like the
seat cushion to move.
Moving the seat forward and backward G)
-Press the switch forward or backward horizontally~& .
Adjusting the seat height 0 and 0 together
Pull the switch evenly at both ends to raise the seat ~& .
-Push the lever evenly at both ends to lower the seat ~& .
Angling the seat cushion up and down 0 or 0
To angle the seat cushion up, pull the switch at the front
only ~& -
Alternatively, push the switch at the rear only ~ &.
To angle the seat cushion
down, push the switch at the
front only~& .
Alternatively, pull the switch at the rear only~& .
& WARNING
• Never adjust the driver's or front passenger seat while the
vehicle is moving. If you do this while the vehicle is moving, you
will be out of position . Always adjust the driver's or front
passenger seat when the vehicle is not moving.
• Be careful when adjusting the seat height. Check to see that no
one is in the way, or serious injury could result!
• Because the seats can be electrically adjusted with the ignition
key removed, never leave children unattended in the vehicle. Unsu
pervised use of the electric seat adjustments may cause serious
injury. •
Page 75 of 316
Applies to vehicles: wi th powe r seats
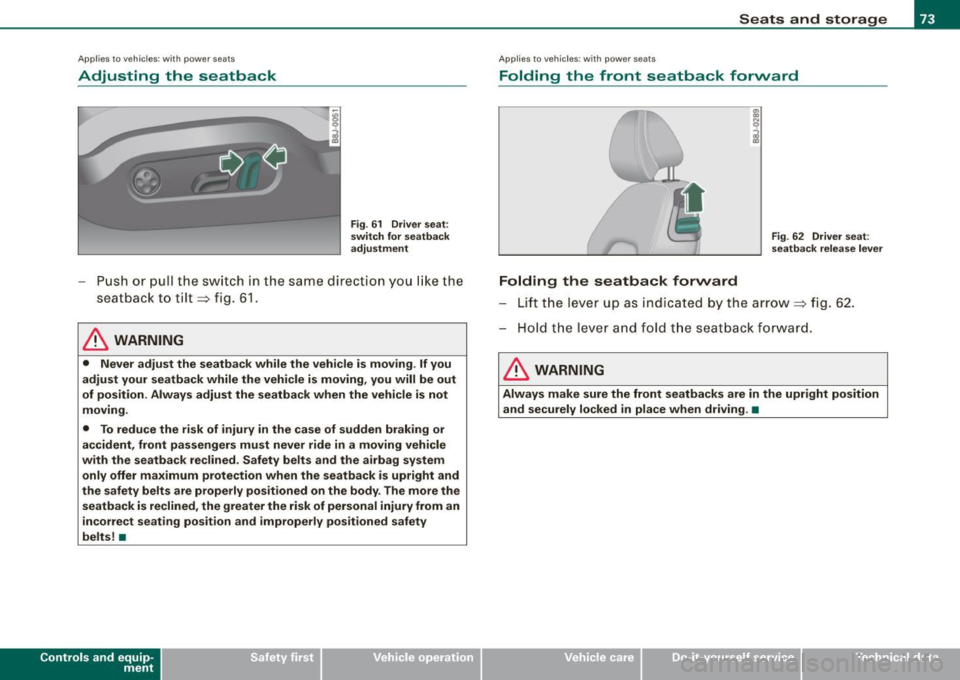
Adjusting the seatback
Fig . 61 Driver seat:
switch for seatback
adjustment
- Push or pull the switch in the same direction you like the
seatback to tilt => fig. 61.
& WARNING
• Never adjust the seatback while the vehicle is moving . If you
adjust your seatback while the vehicle is moving, you will be out
of position . Always adjust the seatback when the vehicle is not
moving.
• To reduce the risk of injury in the case of sudden braking or
accident, front passengers must never ride in a moving vehicle
with the seatback reclined. Safety belts and the airbag system
only offer maximum protection when the seatback is upright and
the safety belts are properly positioned on the body . The more the
seatback is reclined, the greater the risk of personal injury from an
incorrect seating position and improperly positioned safety
belts! •
Con tro ls and eq uip
ment
Seats and storage
A pp lies to vehicles: with power seats
Folding the front seatback forward
Folding the seatback forward
Fig. 62 Driver seat:
seatback release lever
Lift the lever up as indicated by the arrow=> fig. 62 .
Hold the lever and fold the seatback forward.
& WARNING
Always make sure the front seatbacks are in the upright position
and securely locked in place when driving . •
Vehicle care I I irechnical data
Page 76 of 316
Seats and storage
App lies to veh ic les: wi th lumbar suppo rt
Lumbar support
The lumbar support can be adjusted to fit the natural
curvature of the occupant's spine .
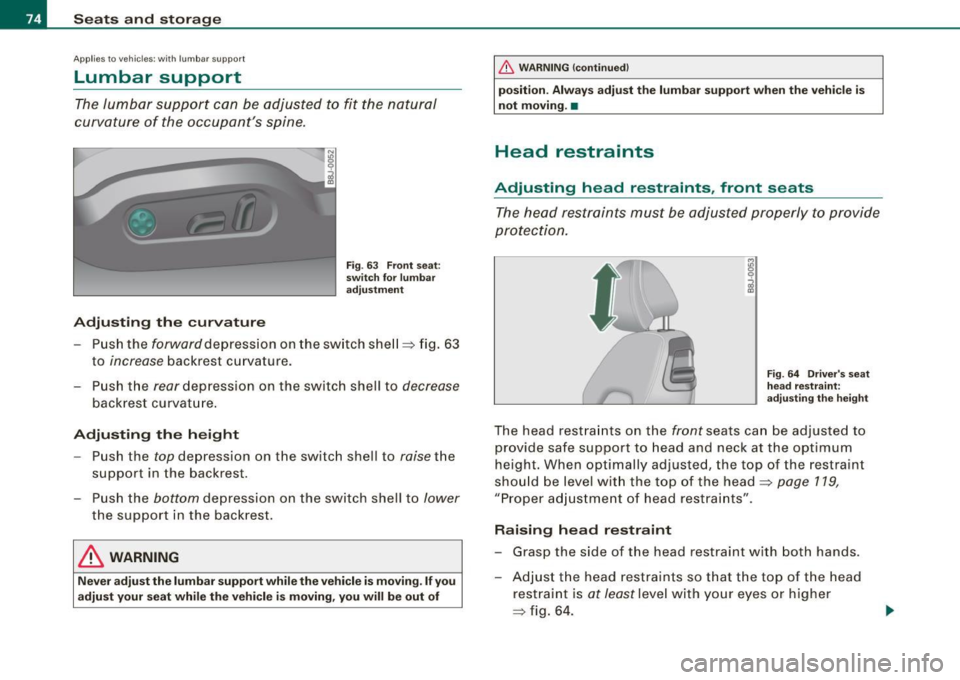
Adjusting the curvature
Fig. 63 Front seat:
switch for lumbar
adjustment
- Push the forward depression on the switch shell~ fig. 63
to
increase backrest curvatu re.
- Push the
rear depression on the switch shell to decrease
backrest curvature.
Adjusting the height
- Push the top depression on the sw itch shell to raise the
support in the backrest .
- Push the
bottom depression on the switch shell to lower
the support in the backrest.
& WARNING
Never adjust the lumbar support while the vehicle is moving. If you
adjust your seat while the vehicle is moving, you will be out of
& WARNING (continued)
position. Always adjust the lumbar support when the vehicle is
not moving. •
Head restraints
Adjusting head restraints , front seats
The head restraints must be adjusted properly to provide
protection.
Fig. 64 Driver's seat
head restraint:
adjusting the height
The head restraints on the front seats can be adjusted to
prov ide safe support to head and neck at the opt imum
height. When optimally adjusted, the top of the restra int
should be level with the top of the head~
page 119 ,
"Proper adjustment of head restraints" .
Raising head restraint
- Grasp the side of the head restraint with both hands .
- Adjust the head restraints so that the top of the head
r estraint is
at least level with your eyes or higher
~ fig. 64 .
Page 77 of 316
Lowering head restraint
- Grasp the sides of the head restraint with both hands.
-Press the button
=:> page 74, fig. 64 an d adjust the hea d
restraint .
- Adj us t the head restraints so tha t t he to p of th e he ad
re straint is
at least le vel with your eyes or higher
=:> page 7 4, fig . 64.
Refer to ~ page 119, "Prope r ad justment of head res traints" for
guide lines on how to ad just the height of the front head restraints
to fit the occupant 's body size.
& WARNING
• Driving without head restraint s or with head restraints that are
not properly adju sted increase s the ri sk of serious or fatal neck
injury dramatically .
• Read and heed all WARNINGS~
page 119.
[ i] Tips
Correctly adjusted head restraints and safety belts are an extremely
effective com bination of safety features. •
Controls and equip
ment
Seats and storage
Rear seats
General information
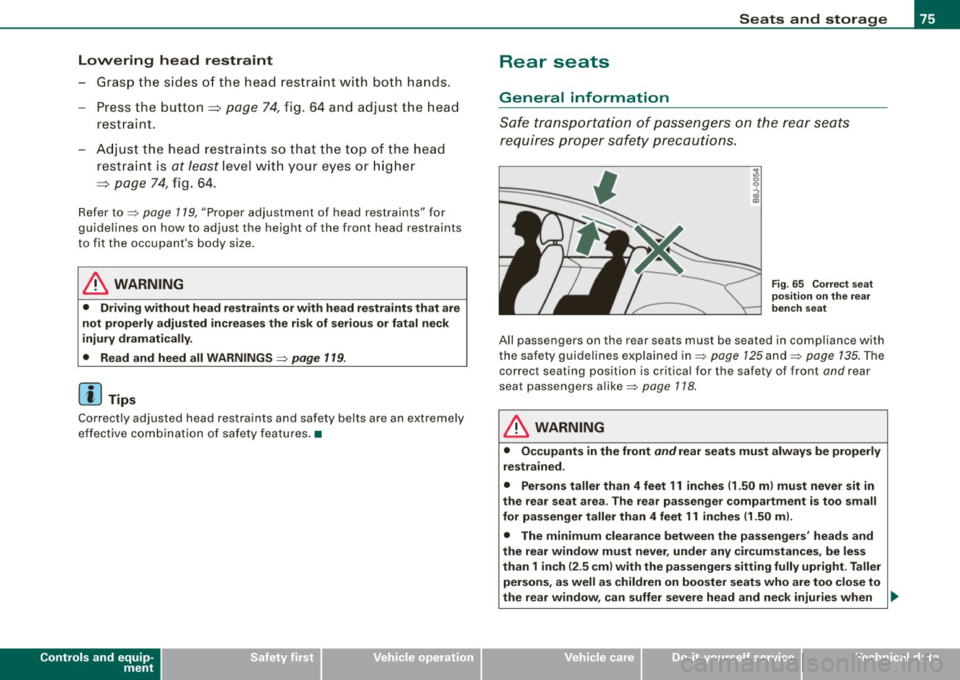
S a fe tr ansp ort atio n of passengers on t he re ar se ats
re quires prope r sa fety p rec autions.
Fig . 6 5 Corre ct se at
po sit ion on the re ar
bench seat
All passengers on the rear seats must be seated in compliance with
the safety guidelines exp lained in~ page 125 and ~ page 135. The
correct seating position is critical for the safety of front and rear
seat passengers alike ~ page
118.
& WARNING
• Occupants in the front and rear seats must always be properly
restrained .
• Per sons taller than 4 feet 11 inche s (1.50
ml must never sit in
the rear seat area . The rear pas senger comp artment is too small
for passenger taller than 4 feet 11 inches (1 .50
ml.
• The min imum clearance between the pas sengers ' head s and
the rear window must never , under any cir cum stance s, be less
than 1 inch (2 .5 cm ) with the pa ssenger s sitting fully upright . Taller
persons , as well a s children on boo ster seats who are too clo se to
the rear windo w, can suffer severe head and neck injurie s when _,,
I • •
Page 78 of 316
Seats and storage
& WARNING (continued)
the rear lid is closed or if a crash occurs. Always make sure that
rear seat passengers cannot be struck when the rear lid is closed.
• When the rear backrest is folded down do not allow passengers
to occupy the load surface available while the vehicle is in motion.
Vehicle occupants must always be properly restrained.
• Never store any heavy, hard objects on the rear lid cover. This
can be hazardous for rear seat occupants if the rear lid is opened
or if the vehicle is braked suddenly or in the event of a crash.
• Loose items inside the passenger compartment, can fly
forward in a crash or sudden maneuver and injure occupants.
Always store articles in the luggage compartment and use the
fastening eyes, especially when the rear seat backs have been
folded down .
• Read and heed all WARNINGS=:>
page 118, "Proper seating
positions for passengers in rear seats". •
Rear window shelf
You can place light articles of clothing on the rear
window shelf behind the seatback.
& WARNING
Whenever you are driving, do not leave any hard objects on the
rear window shelf or allow your pet to sit on the shelf. These could
become a hazard for vehicle occupants in the event of sudden
braking or a crash!
[ i ] Tips
• A vent slot is located between the shelf and the rear window. Do
not block the vent with any items you may place on the rear window
shelf. •
Do not place bulky items on the rear window shelf as they would
restrict or block the driver's vision through the rear view mirror. •
Luggage compartment
Expanding the luggage compartment
You can increase the available luggage space by folding
the rear seatback down.
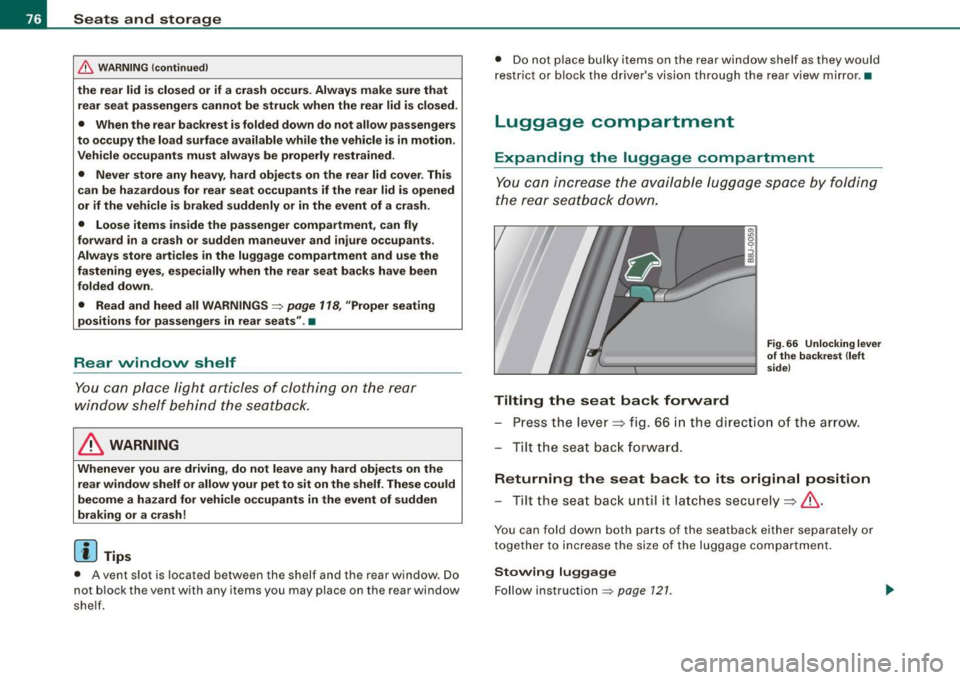
Tilting the seat back forward
Fig. 66 Unlocking lever
of the backrest (left
side)
Press the lever~ fig. 66 in the direction of the arrow.
Tilt the seat back forward.
Returning the seat back to its original position
-Tilt the seat back until it latches securely~&.
You can fold down both parts of the seatback either separately or
together to increase the size of the luggage compartment.
Stowing luggage
Follow instruction =:> page 121.
Page 79 of 316
& WARNING
• The ba ckrest must alw ay s be securely latched so that the
s afety belt can work properly to help protect the occupant .
• The ba ckres t must be se curely lat ched in position so that no
item s contained in the luggage compartment c an slide forward
upon sudden braking .
• Never allow safety belt s to become damaged by being caught
i n door or seat ha rd w are.
• Torn or fr ayed saf ety belt s can tear and da maged belt hardware
c an break in a cra sh . Inspe ct th e belts per iodi cally . Belts showing
dam age to webbing , binding s, buckle s, or retractor s mu st be
replaced .
& WARNING
Always read and heed WARNINGS ~ & in "Loading the luggage
c ompartment " on
page 1 21.
0 Note
When folding the backrest back into place, make sure the safety belt
does not get caught, because it can be damaged. A damaged belt
can fail to provide safe restraint .•
Con tro ls and eq uip
ment
Seats and storag e
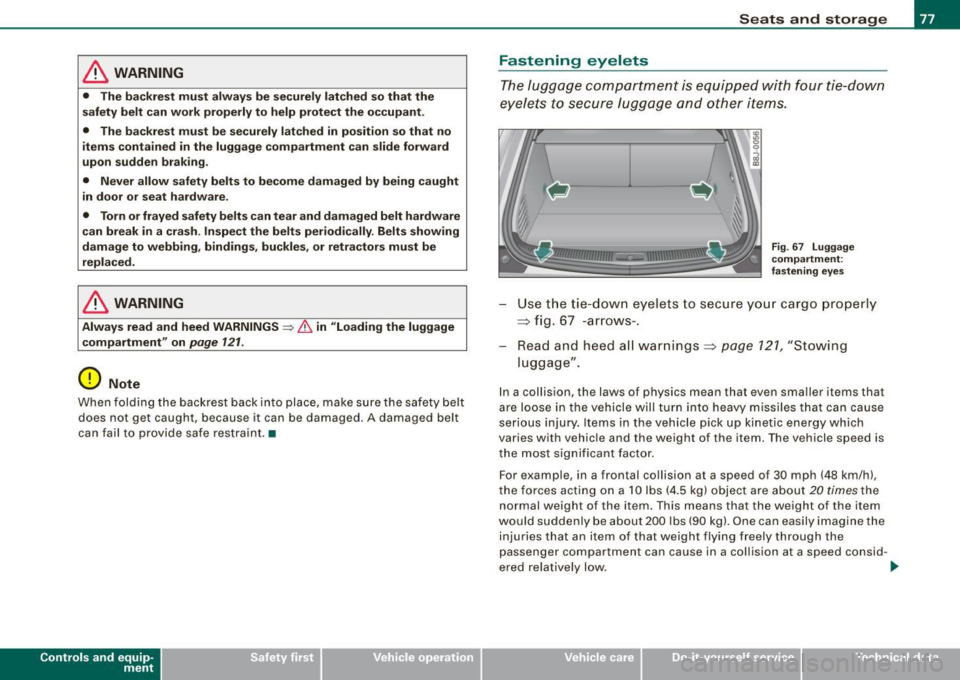
Fastening eyelets
The l ugg age comp artment is equipped with four tie-down
eyelets to secure luggage and other items.
F ig . 67 Lu ggag e
co mpa rt m ent :
fa stening eye s
Use the tie-dow n eyelets to secure your cargo pro perly
~ fig . 67 -arrows- .
Read and heed all warnings~
page 121, "Stowing
luggage".
In a col lision, the laws of physics mean that even sma ller items that
are loose in the vehicle will turn into heavy m issiles that can cause
serious injury. Items in the vehicle pick up kinetic energy which
varies with vehicle and the weight of the item. The vehicle speed is
the most significant factor.
For example, in a frontal collision at a speed of 30 mph (48 km/h),
the fo rces ac ting on a 10 lbs (4.5 kg) object are about
20 times the
normal weight of the item. This means that the weight of the item
wo uld suddenly be about 200 lbs (90 kg) . One can easily imagine the
injuries that an item of that weight flying freely through the
passenger compartment can cause in a col lision at a speed consid -
ered relatively low .
~
Vehicle care I I irechnical data
Page 80 of 316
Seats and storage
& WARNING
Weak, damaged or improper straps used to secure items to tiedowns can fail during hard braking or in a collision and cause
serious personal injury.
• Always use suitable mounting straps and properly secure
items to the tie-downs in the luggage compartment to help
prevent items from shifting or flying forward as dangerous
missiles.
• When the rear seat backrest is folded down, always use suit
able mounting straps and properly secure items to the tie-downs
in the luggage compartment to help prevent items from flying
forward as dangerous missiles into the passenger compartment.
• Never attach a child safety seat tether strap to a tie-down. •
Applies to veh icles : w ith c arg o net
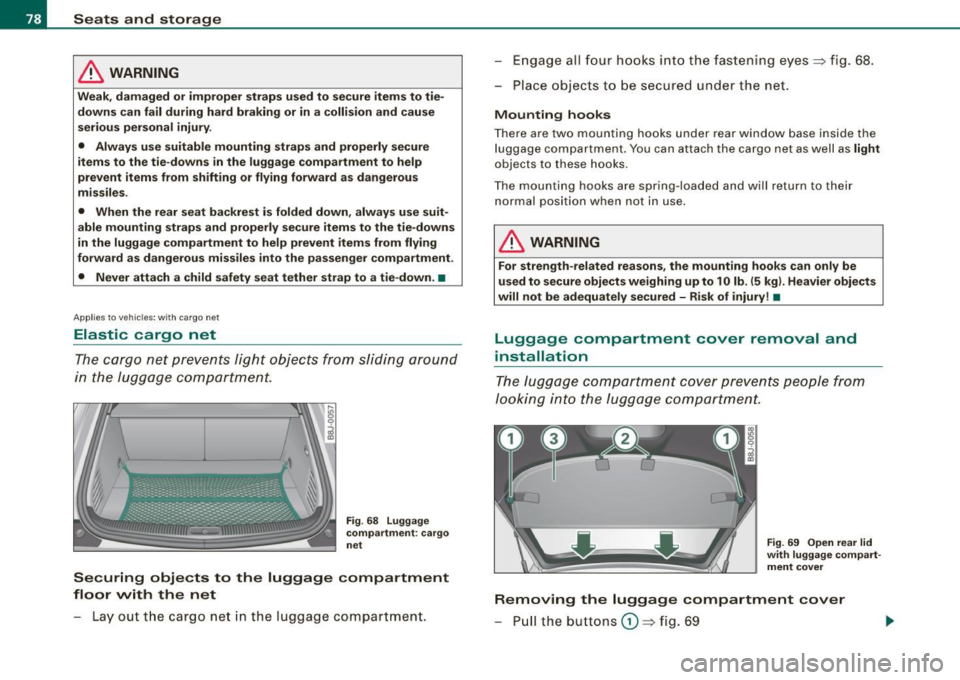
Elastic cargo net
The cargo net prevents light objects from sliding around
in the luggage compartment.
Fig. 68 Luggage
compartment: cargo
net
Securing objects to the luggage compartment
floor with the net
- Lay out the cargo net in the luggage compartment. Engage all
four hooks into the fastening eyes=> fig . 68.
- Place objects to be secured under the net.
Mounting hooks
There are two mounting hooks under rear window base inside the
luggage compartment . You can a ttach the cargo ne t as well as
light
objects to these hooks.
The mounting hooks are spring-loaded and will return to their
normal position wh en not in us e.
& WARNING
For strength-related reasons, the mounting hooks can only be
used to secure objects weighing up to 1 O lb. (5 kg). Heavier objects
will not be adequately secured -Risk of injury! •
Luggage compartment cover removal and
installation
The luggage compartment cover prevents people from
looking into the luggage compartment.
Fig. 69 Open rear lid
with luggage compart
ment cover
Removing the luggage compartment cover
- Pull the buttons G) => fig. 69