display AUDI TT COUPE 2014 Service Manual
[x] Cancel search | Manufacturer: AUDI, Model Year: 2014, Model line: TT COUPE, Model: AUDI TT COUPE 2014Pages: 284, PDF Size: 34.42 MB
Page 112 of 284
Downloaded from www.Manualslib.com manuals search engine Multi
Media Interface
Selecting and confirming a function
.. @To select a function: Turn the rotary push
button to the desired function (e.g. setting a
frequency).
.. @ To confirm the selection: Press the rotary
pushbutton.
Returning to the previous function level
.. Press
the I BACK!
button@ ¢ page 109,
Fig. 113.
Calling up/closing the selection menu
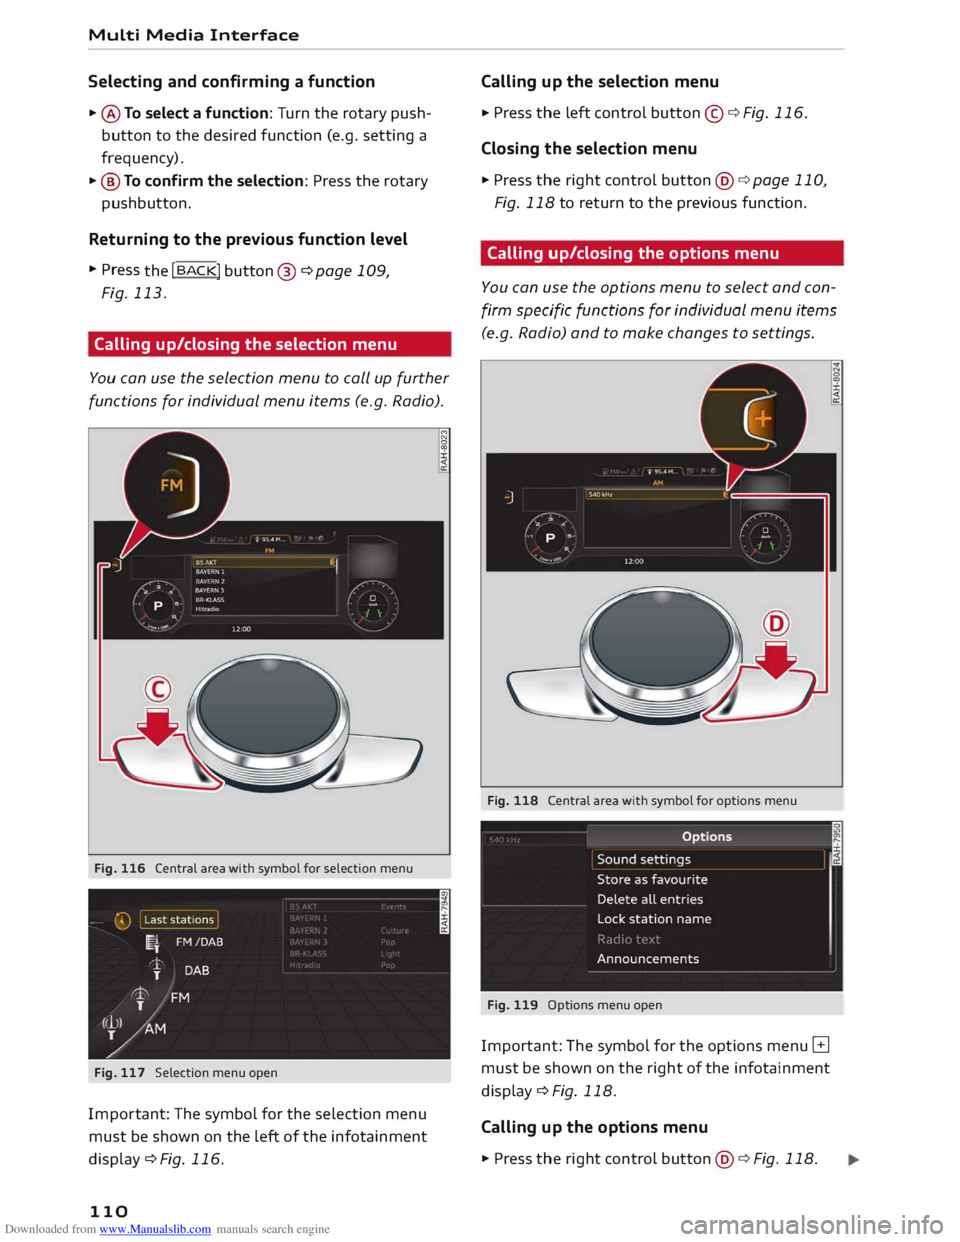
You can use the selection menu to call up further
functions for individual menu items (e.g. Radio).
Fig. 116 Central area with symbol for selection menu
Fig. 117 Selection menu open
Impor tant: The symbol for the selection menu
must be shown on the left of the infotainment
display c:::> Fig. 116.
110 Calling
up the selection menu
.. Press
the Left control button©¢ Fig. 116 .
Closing the selection menu
.. Press the right control button@c:::>page 110,
Fig. 118 to return to the previous function.
Calling up/closing the options menu
You can use the options menu to select and con
firm specific functions for individual menu items
(e.g. Radio) and to make changes to settings.
Fig. 118 Central area with symbol for options menu
Fig. 119 Options menu open
Important: The symbol for the options menu B
must be shown on the right of the infotainment
display¢ Fig. 118.
Calling up the options menu
.. Press the rig ht control button @ ¢ Fig. 118.
Page 113 of 284
Downloaded from www.Manualslib.com manuals search engine 0
N
co
....
\D Lfl
N
Lfl
.... Closing
the options menu
• Press the left control button © ¢ page 110,
Fig. 116 to return to the previous function.
Notes on path descriptions
The path descriptions in this manual show you at
a glance how to call up the menu you require
along with its settings and functions.
Example of a path description: I RADIO! button>
left control button > FM
Using a path description:
.,. Press the I RADIO! button.
.,. Press the left control button.
.,. Tu rn the rotary pushbutton to FM in the menu
to preselect this function.
.,. Press the rotary pushbutton to confirm FM.
MMI touch
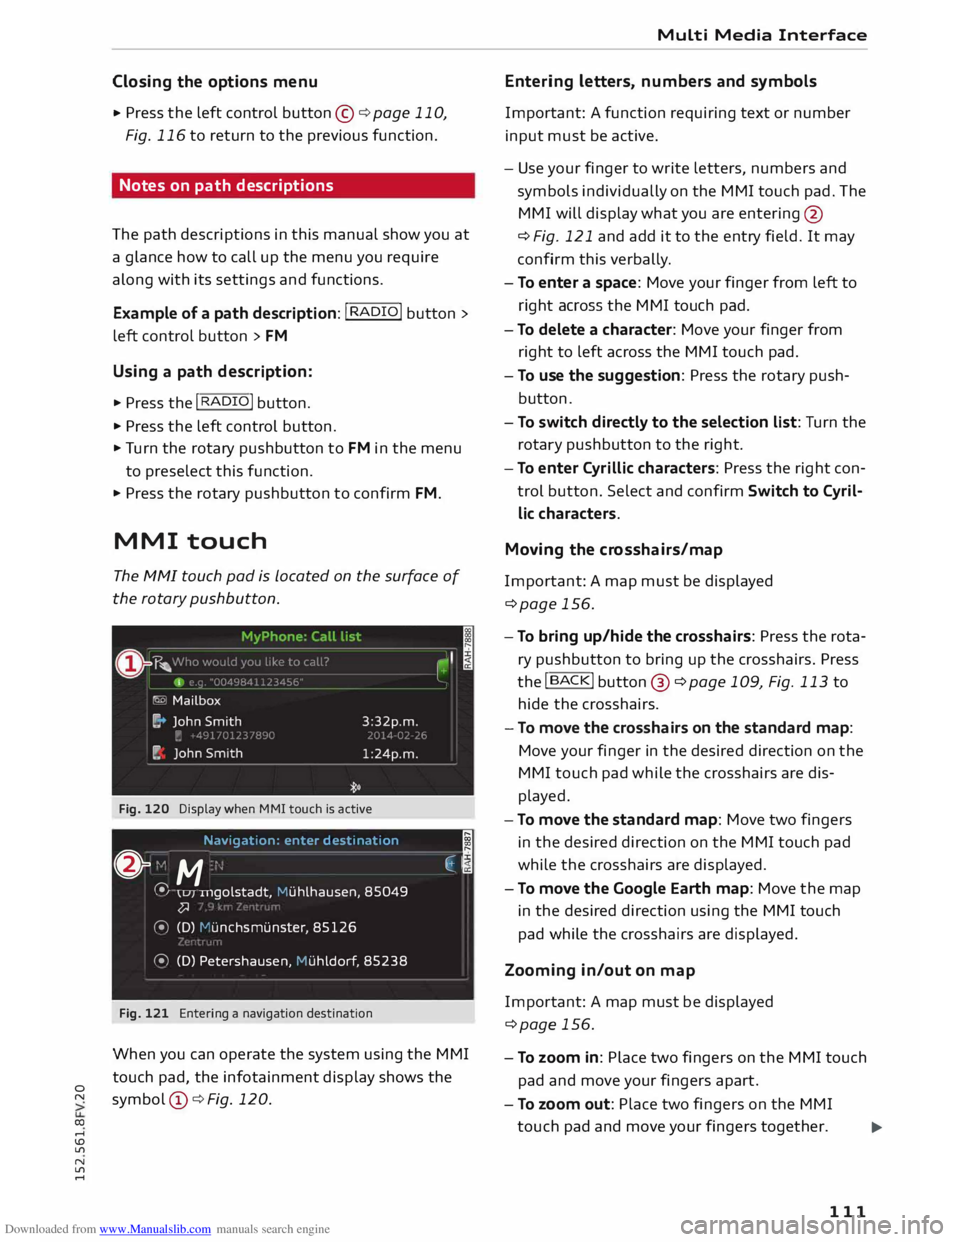
The MMI touch pad is Located on the surface of
the rotary pushbutton.
Fig. 120 Display when MMI touch is active
Navigat ion: enter destinati on
;
& "
M ·
.
�,j
� \u1
u1golstadt,
Muhlhausen , 85049
�
� (D) 1-'unchsmunste r, 85126
� (D) Petershausen, Huhldorf , 85238
Fig. 121 Entering a navigation destination
When you can operate the system using the MMI
touch pad, the infotainment display shows the
symbol @¢ Fig. 120. Multi
Media Interface
Entering letters, numbers and symbols
Important: A function requiring text or number
input must be active.
- Use your finger to write letters, numbers and
symbols individually on the MMI touch pad. The
MMI will display what you are entering @
¢ Fig. 121 and add it to the entry field. It may
confirm this verbally.
- To enter a space: Move your finger from left to
right across the MMI touch pad.
- To delete a character: Move your finger from
right to left across the MMI touch pad.
- To use the suggestion: Press the rotary push
button .
- To switch directly to the selection list: Turn the
rotary pushbutton to the right .
- To enter Cyrillic characters: Press the right con
trol button. Select and confirm Switch to Cyril
lic characters.
Moving the crosshairs/map
Important: A map must be displayed
¢page 156.
- To bring up/hide the crosshairs: Press the rota
ry pushbutton to bring up the crosshairs. Press
the !BACK! button@ ¢page 109, Fig. 113 to
hide the crosshairs.
- To move the crosshairs on the standard map:
Move your finger in the desired direction on the
MMI touch pad while the crosshairs are dis
played.
- To move the standard map: Move two fingers
in the desired direction on the MMI touch pad
while the crosshairs are displayed.
- To move the Google Earth map: Move the map
in the desired direction using the MMI touch
pad while the crosshairs are displayed.
Zooming in/out on map
Important: A map must be displayed
¢page 156.
- To zoom in: Place two fingers on the MMI touch
pad and move your fingers apart.
- To zoom out: Place two fingers on the MMI
touch pad and move your fingers together.
...,_
111
Page 114 of 284
Downloaded from www.Manualslib.com manuals search engine Multi
Media Interface
Adjusting the sound focus
Important: The balance/fader option must be se
lected ¢ page 190.
- To move the crosshairs of the sound focus:
Move your finger in the desired direction on the
MMI touch pad.
Operating the DVD main menu
Important: A video DVD must be playing
¢page 179.
- To select a menu option: Move your finger up/
down or to the left/right on the MMI touch pad.
- To confirm your selection: Press the rotary
pushbutton.
@ Note
You can set the volume of the MMI touch spo
ken cues according to your own preferences
¢page 191.
Rotary pushbutton with
joystick function
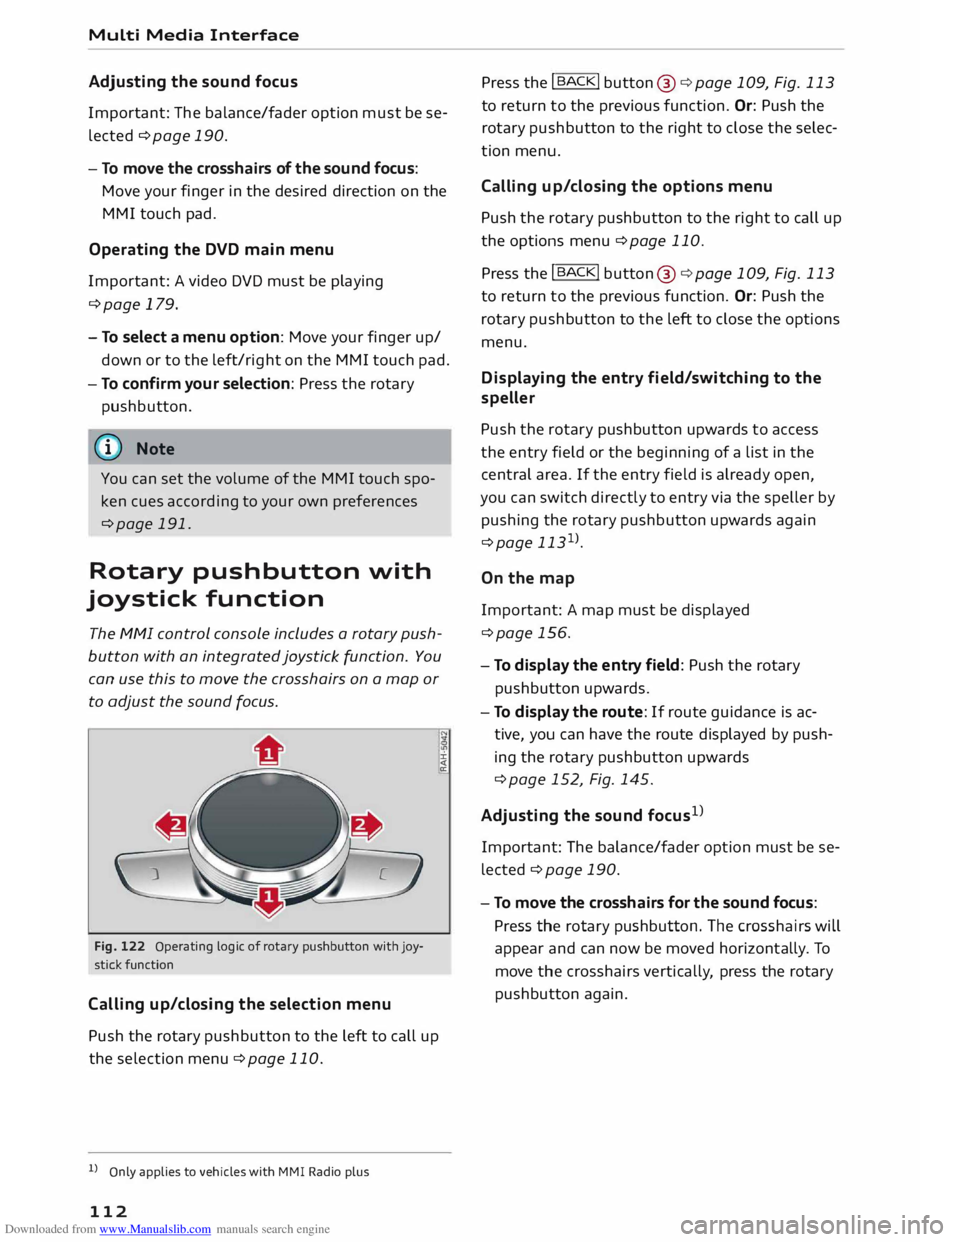
The MMI control console includes a rotary push
button with an integrated joystick function. You
can use this to move the crosshairs on a map or
to adjust the sound focus.
Fig. 122 Operating logic of rotary pushbutton with joy
stick function
Cal ling up/c losing the selection menu
Push the rotary pushbutton to the left to call up
the selection menu ¢page 110.
l l
Only applies to vehicles with MMI Radio plus
112 :i:
<{
a: Press
the I
BACK!
button @¢ page 109, Fig. 113
to return to the previous function. Or: Push the
rotary pushbutton to the right to close the selec
tion menu.
Cal ling up/clos ing the options menu
Push the rotary pushbutton to the right to call up
the options menu ¢page 110.
Press the I
BACK!
button @¢page 109, Fig. 113
to return to the previous function. Or: Push the
rotary pushbutton to the left to close the options
menu.
Displaying the entr y field /switching to the
speller
Push the rotary pushbutton upwards to access
the entry field or the beginning of a list in the
central area. If the entry field is already open,
you can switch directly to entry via the speller by
pushing the rotary pushbutton upwards again
¢page 1131
>.
On the map
Important: A map must be displayed
¢page 156.
- To display the entry field: Push the rotary
pushbutton upwards.
- To display the route: If route guidance is ac
tive, you can have the route displayed by push
ing the rotary pushbutton upwards
¢ page 152, Fig. 145.
Adjusting the sound focus1
>
Important: The balance/fader option must be se
lected ¢ page 190.
- To move the crosshairs for the sound focus:
Press the rotary pushbutton. The crosshairs will
appear and can now be moved horizont ally. To
move the crosshairs vertically, press the rotary
pushbutton again.
Page 115 of 284
Downloaded from www.Manualslib.com manuals search engine 0
N
co
....
\D Lfl
N
Lfl
.... Multi
Media Interface
Speller for letters/numbers
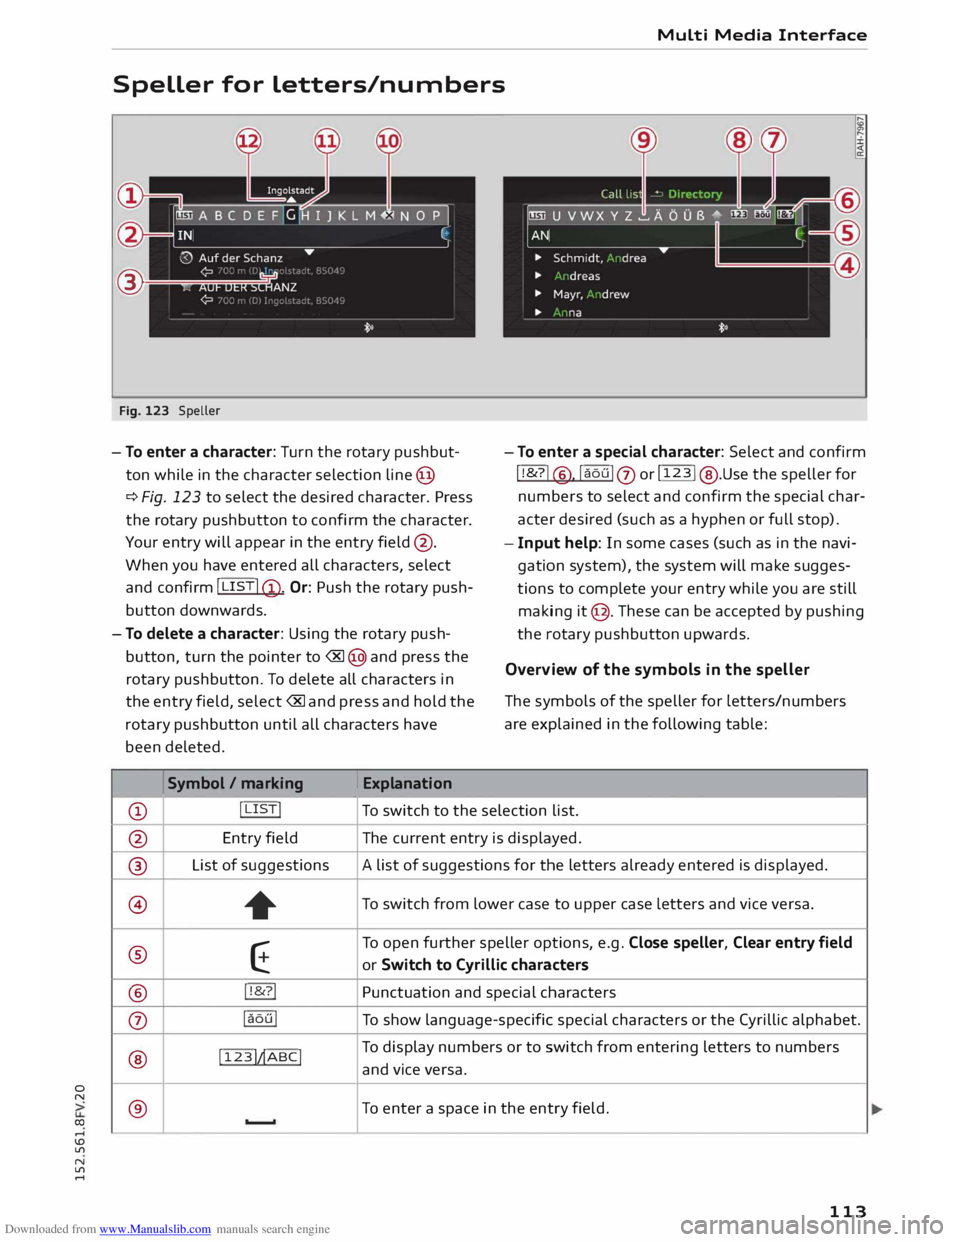
@ Fig. 123 Speller
- To enter a character: Turn the rotary pushbut
ton while in the character selection line@
¢ Fig. 123 to select the desired character. Press
the rotary pushbutton to confirm the character.
Your entry will appear in the entry field@.
When you have entered all characters, select
and confirm
I LIST !@ . Or: Push the rotary push
button downwards.
- To delete a character: Using the rotary push
button, turn the pointer to ® @ and press the
rotary pushbutton. To delete all characters in
the entry field, select®
and press and hold the
rotary pushbutton until all characters have
been deleted.
Symbol/ marking
Explanation -
To enter a special character: Select and confirm
I!&? !
@ , laoul
0 orl
123
!@ .Use the speller for
numbers to select and confirm the special char
acter desired (such as a hyphen or full stop).
- Input help: In some cases (such as in the navi
gation system), the system will make sugges
tions to complete your entry while you are still
making it@ . Th ese can be accepted by pushing
the rotary pushbutton upwards.
Overview of the symbols in the speller
The symbols of the speller for Letters/numbers
are explained in the following table:
CD !
LISTI To switch to the selection list.
@ Entry
field The current entry is displayed.
® List
of suggestions A list of suggestions for the letters already entered is displayed.
@ + To
switch from lower case to upper case Letters and vice versa.
® E To
open further speller options, e.g. Close speller, Clear entry field
or Switch to Cyrillic characters
® !!&?!
Punctuation and special characters
0 !aoul
To show language-specific special characters or the Cyrillic alphabet.
® !
123 !�ABC
! To
display numbers or to switch from entering letters to numbers
and vice versa.
® To
enter a space in the entry field.
113
Page 116 of 284
![AUDI TT COUPE 2014 Service Manual Downloaded from www.Manualslib.com manuals search engine Multi
Media Interface
Symbol / marking Explanation
@ (&] To
delete the character to the left of the cursor.
@ Character
selecti AUDI TT COUPE 2014 Service Manual Downloaded from www.Manualslib.com manuals search engine Multi
Media Interface
Symbol / marking Explanation
@ (&] To
delete the character to the left of the cursor.
@ Character
selecti](/img/6/57662/w960_57662-115.png)
Downloaded from www.Manualslib.com manuals search engine Multi
Media Interface
Symbol / marking Explanation
@ (&] To
delete the character to the left of the cursor.
@ Character
selection The
character selected will be highlighted.
@ � The
entry suggestion can be accepted by pushing the rotary push-
button upwards.
Searching You can use the search function to search for en
tries in the fvf fvfl (e.g. station names).
Fig. 124 Entry suggestion in the radio function
The search function is available in the Vehicle,
Radio, Media, Telephone, Navigation and Audi
connect menus.
Calling up the search function
.,. Select: !MENU! button > desired menu item
(e.g. Radio) .
.,. You
may need to push the rotary pushbutton
upwards to call up the entry field@¢ Fig. 124.
Searching for an entry
.,. Enter one or more search terms in the entry
field. The individual search terms must be sep
arated by spaces.
The system may make suggestions © depending
on what you have entered. Further entries con
taining the search terms entered will be dis
played in the List of results @.
If the desired term is not yet being displayed,
continue entering Letters until it appears.
You can enter search terms in any order using the
search function. The first few Letters of the
search terms will often be sufficient to bring up a
List of results. In the Radio menu, for example,
write the name of a radio station and the initial
Letters of the programme type.
114 Accepting
an entry suggestion
Important: An entry suggestion must be dis
played.
.,. When using MMI touch*: Press the rotary
pushbutton .
.,. When using the speller: Push the rotary push
button upwards.
Using an entry from the results list
.,. When using MMI touch*: Turn the rotary push
button to the right. Select an entry from the
List and confirm it.
.,. When
using the speller: Select and confirm
I LIST!
. Or: Push the rotary pushbutton down
wards. Select an entry from the List and confirm
it.
Page 118 of 284
Downloaded from www.Manualslib.com manuals search engine Speech
dialogue system
Speech dialogue system
How to use the system
Applies to vehicles: with speech dialogue system
You can operate many infotainment functions
conveniently by voice.
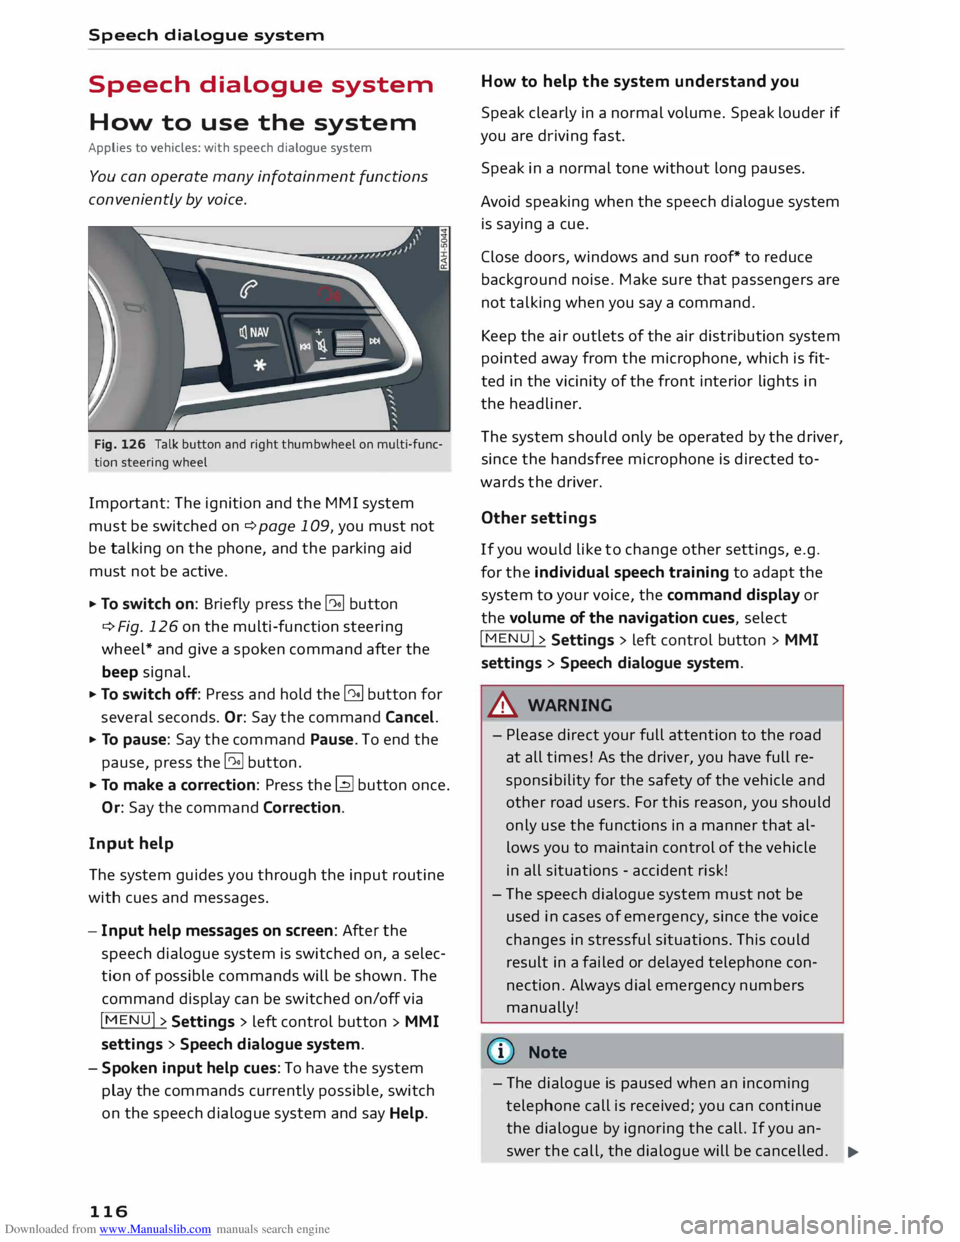
Fig. 126 Talk button and right thumbwheel on multi-func
tion steering wheel
Important: The ignition and the MMI system
must be switched on ¢page 109, you must not
be talking on the phone, and the parking aid
must not be active.
... To switch on: Briefly press the [2!] button
c:::> Fig. 126 on the multi-function steering
wheel* and give a spoken command after the
beep signal.
... To switch off: Press and hold the [2!] button for
several seconds. Or: Say the command Cancel.
... To pause: Say the command Pause. To end the
pause, press the l2!l button.
... To make a correction: Press the� button once.
Or: Say the command Correction.
Input help
The system guides you through the input routine
with cues and messages.
- Input help messages on screen: After the
speech dialogue system is switched on, a selec
tion of possible commands will be shown. The
command display can be switched on/off via
I MENU I>
Settings > left control button >
MMI
settings > Speech dialogue system.
- Spoken input help cues: To have the system
play the commands currently possible, switch
on the speech dialogue system and say Help.
116 How
to help the system understand you
Speak clearly in a normal volume. Speak louder if
you are driving fast.
Speak in a normal tone without long pauses.
Avoid speaking when the speech dialogue system
is saying a cue.
Close doors, windows and sun roof* to reduce
background noise. Make sure that passengers are
not talking when you say a command.
Keep the air outlets of the air distribution system
pointed away from the microphone, which is fit
ted in the vicinity of the front interior lights in
the headliner.
The system should only be operated by the driver,
since the handsfree microphone is directed to
wards the driver.
Other settings
If you would like to change other settings, e.g.
for the individual speech training to adapt the
system to your voice, the command display or
the volume of the navigation cues, select
I MENU I>
Settings > left control button >
MMI
settings > Speech dialogue system.
A WARNING
- Please direct your full attention to the road
at all times! As the driver, you have full re
sponsibility for the safety of the vehicle and
other road users. For this reason, you should
only use the functions in a manner that al
lows you to maintain control of the vehicle
in all situations -accident risk!
- The speech dialogue system must not be
used in cases of emergency, since the voice
changes in stressful situations. This could
result in a failed or delayed telephone con
nection. Always dial emergency numbers
manually!
{tI)) Note
- The dialogue is paused when an incoming
telephone call is received; you can continue
the dialogue by ignoring the call. If you an-
swer the call, the dialogue will be cancelled.
..,.
Page 119 of 284
Downloaded from www.Manualslib.com manuals search engine 0
N
co
....
\D U'l
N
U'l
.... -
No navigation cues* or traffic announce
ments are given when a dialogue is running.
- You can select an entry from a list both via
the speech dialogue system and using the
rotary pushbutton.
- The speech dialogue system does not sup
port commands in Arabic, Norwegian or
Hungarian.
Notes on the command
overviews
Applies to vehicles: with speech dialogue system
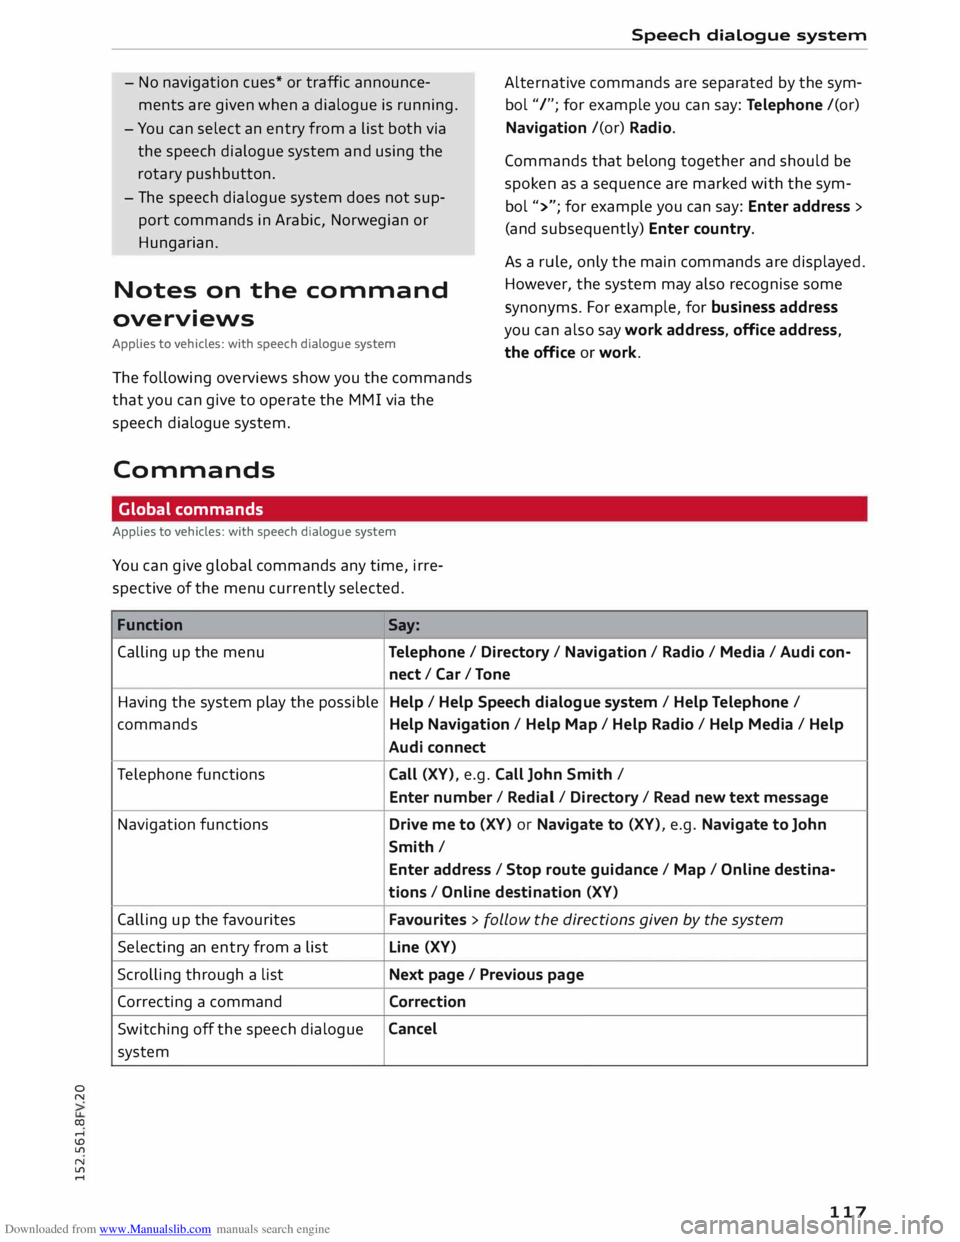
The following overviews show you the commands
that you can give to operate the MMI via the
speech dialogue system.
Commands Global commands
Applies to vehicles: with speech dialogue system
You can give global commands any time, irre
spective of the menu currently selected.
Function Say: Speech
dialogue system
Alternative commands are separated by the sym
bol "/"; for example you can say: Telephone /(or)
Navigation /(or) Radio.
Commands that belong together and should be
spoken as a sequence are marked with the sym
bol ">"; for example you can say: Enter address >
(and subsequently) Enter country.
As a rule, only the main commands are displayed.
However, the system may also recognise some
synonyms. For example, for business address
you can also say work address, office address,
the office or work.
Calling up the menu
Telephone/ Directory / Navigation / Radio / Media / Audi con-
nect /Car/ Tone
Having the system play the possible Help
/ Help Speech dialogue system/ Help Telephone /
commands Help Navigation / Help Map/ Help Radio / Help Media / Help
Audi connect
Telephone functions
Call (XV), e.g. Call John Smith /
Enter number/ Redial/ Directory/ Read new text message
Navigation functions
Drive me to (XV) or Navigate to (XV), e.g. Navigate to John
Smith/ Enter address / Stop route guidance / Map / Online destina-
tions / Online destination (XV)
Calling up the favourites Favourites > follow the directions given by the system
Selecting an entry from a list Line
(XV)
Scrolling through a list Next page / Previous page
Correcting a command
Correction
Switching off the speech dialogue Cancel
system
117
Page 120 of 284
Downloaded from www.Manualslib.com manuals search engine Speech
dialogue system
Telephone
Applies to vehicles: with speech dialogue system and telephone
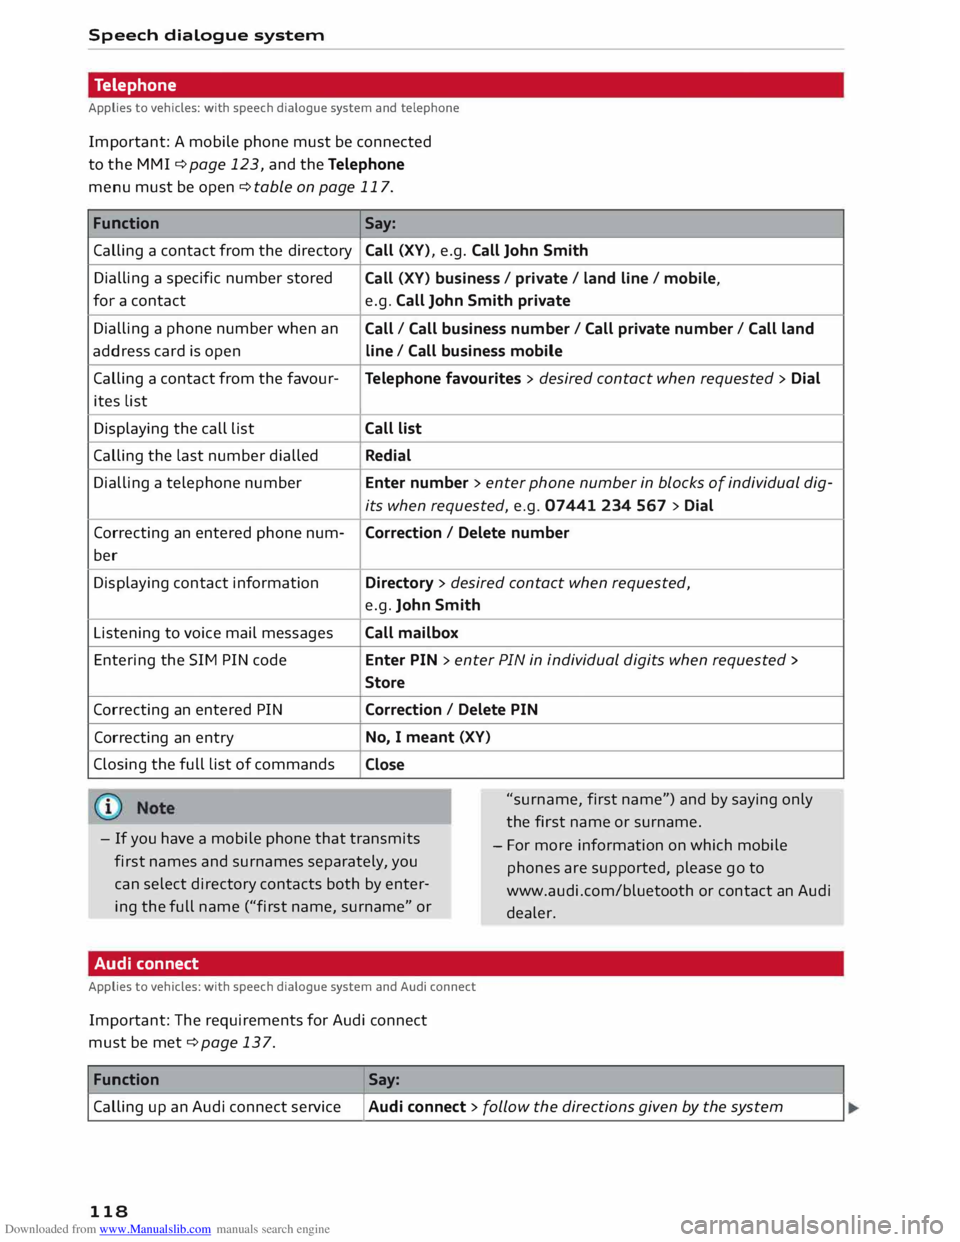
Important: A mobile phone must be connected
to the MMI ¢page 123, and the Telephone
menu must be open ¢ table on page 117.
Function Say:
Calling a contact from the directory Call
(XV), e.g. Call John Smith
Dialling a specific number stored
for a contact
Dialling a phone number when an
address card is open
Calling a contact from the favour-
ites List
Displaying the call List
Calling the Last number dialled
Dialling a telephone number
Correcting an entered phone num-
ber
Displaying contact information
Listening to voice mail messages
Entering the SIM PIN code
Correcting an entered PIN
Correcting an entry
Closing the full List of commands Call
(XV) business / private / land line/ mobile,
e.g. Call John Smith private
Call / Call business number/ Call private number/ Call land
line / Call business mobile
Telephone favourites > desired contact when requested > Dial
Call list
Redial
Enter number > enter phone number in blocks of individual dig-
its when requested, e.g. 07441 234 567 > Dial
Correction / Delete number
Directory > desired contact when requested,
e.g. John Smith
Call mailbox
Enter PIN > enter PIN in individual digits when requested >
Store
Correction / Delete PIN
No, I meant (XV)
Close
"surname, first name") and by saying only
the first name or surname.
- If you have a mobile phone that transmits
first names and surnames separately, you
can select directory contacts both by enter
ing the full name ("first name, surname" or -
For more information on which mobile
phones are supported, please go to
www.audi.com/bluetooth or contact an Audi
dealer.
Audi connect
Applies to vehicles: with speech dialogue system and Audi connect
Important: The requirements for Audi connect
must be met ¢page 137.
Function Say:
Calling up an Audi connect service
I Audi connect > follow the directions given by the system
118
Page 122 of 284
Downloaded from www.Manualslib.com manuals search engine Speech
dialogue system
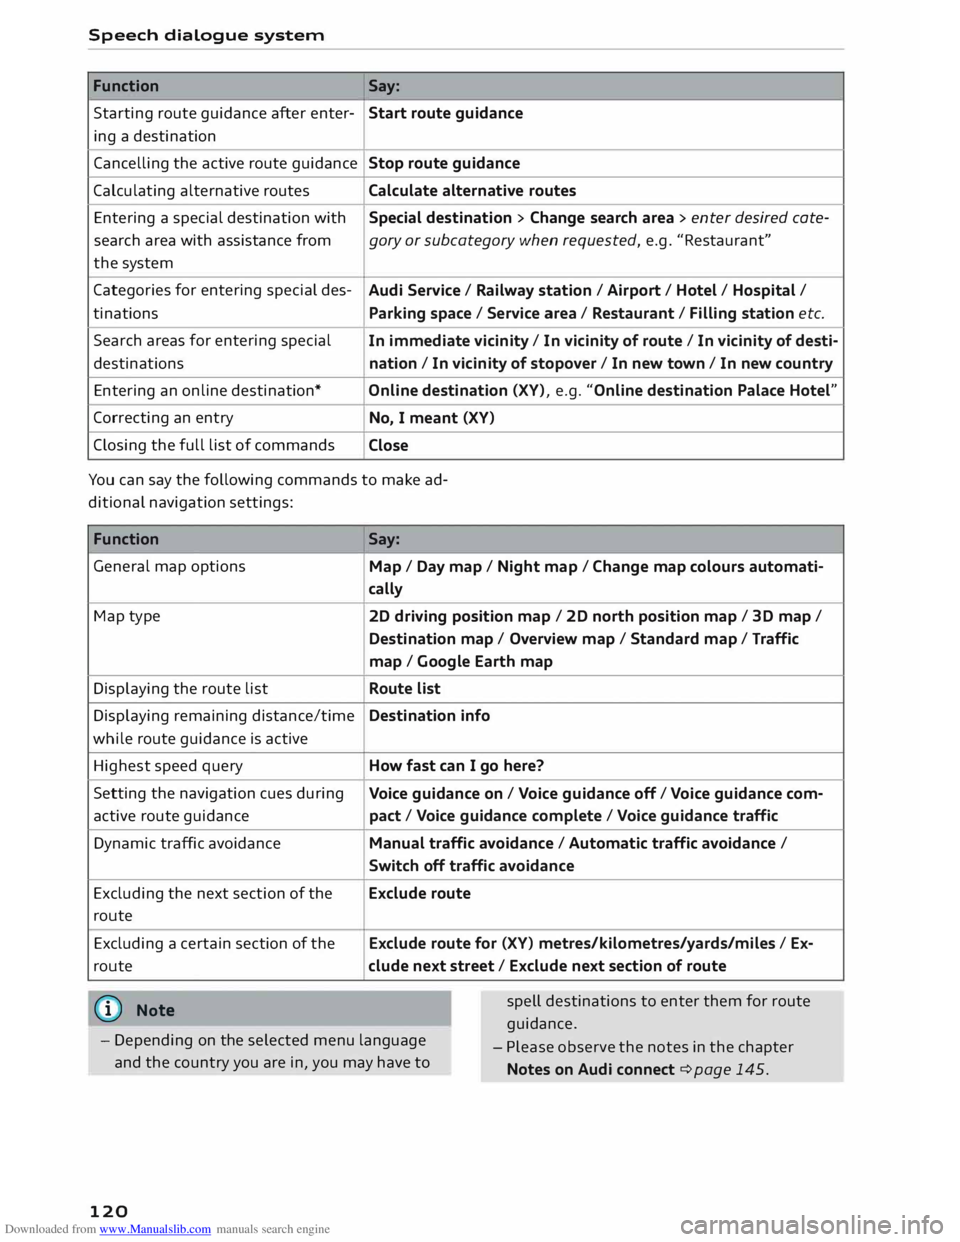
Function Say:
Starting route guidance after enter-
Start route guidance
ing a destination
Cancelling the active route guidance
Stop route guidance
Calculating alternative routes
Calculate alternative routes
Entering a special destination with
Special destination > Change search area > enter desired cote-
search area with assistance from
gory or subcategory when requested, e.g. "Restaurant"
the system
Categories for entering special des-
Audi Service / Railway station/ Airport/ Hotel/ Hospital /
ti nations
Parking space/ Service area/ Restaurant/ Filling station etc.
Search areas for entering special
In immediate vicinity/ In vicinity of route / In vicinity of desti-
destinations nation/ In vicinity of stopover / In new town/ In new country
Entering an online destination* Online destination (XV), e.g. "Online destination Palace Hotel"
Correcting an entry
No, I meant (XV)
Closing the full list of commands
Close
You can say the following commands to make ad
ditional navigation settings:
Function
General map options
Map type
Displaying the route list
Displaying remaining distance/time
while route guidance is active
Highest speed query
Setting the navigation cues during
active route guidance
Dynamic traffic avoidance
Excluding the next section of the
route
Excluding a certain section of the
route
(©) Note Say:
Map / Day map/ Night map/ Change map colours automati-
cally
20 driving position map/ 20 north position map/ 30 map/
Destination map/ Overview map/ Standard map/ Traffic
map / Google Earth map
Route list
Destination info
How fast can I go here?
Voice guidance on/ Voice guidance off/ Voice guidance com-
pact / Voice guidance complete/ Voice guidance traffic
Manual traffic avoidance / Automatic traffic avoidance /
Switch off traffic avoidance
Exclude route
Exclude route for (XV) metres/kilometres/yards/miles / Ex-
elude next street/ Exclude next section of route
spell destinations to enter them for route
guidance.
- Depending on the selected menu language
and the country you are in, you may have to -
Please observe the notes in the chapter
Notes on Audi connect ¢ page 145.
120
Page 126 of 284
Downloaded from www.Manualslib.com manuals search engine Telephone
Your
mobile phone must support the remote SIM
Access Profile (rSAP) and be connected to the
MMI using the Car phone mode in order to use
the online functions of Audi connect*. Alterna
tively, you can use a separate SIM card in the SIM
card reader* ¢ page 126. A data plan1
l
is neces
sary in both cases.
You can use the online functions of Audi connect
¢ page 137 if your mobile phone contract in
cludes a data option 1
l
.
Handsfree
With this type of connection, you can use the
handsfree system to operate the telephone func
tions via the MMI. Your phone calls will be made
via the antenna of your mobile phone.
With the Audi phone box*, you can use the vehi
cle's external aerial to make calls. You can also
charge your phone with a USB adapter.
Connecting a mobile phone using
Bluetooth
Applies to vehicles: with telephone
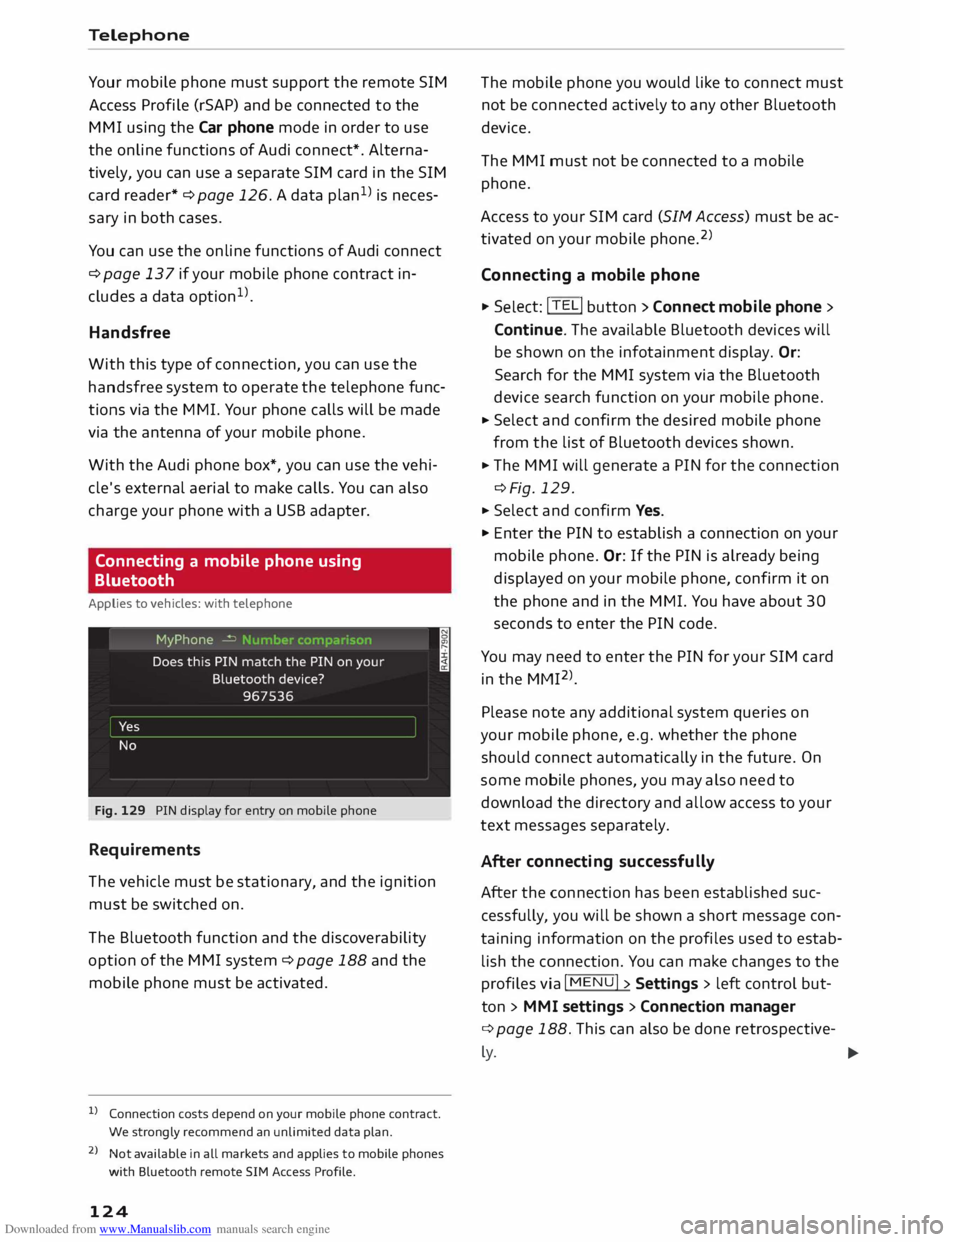
Fig. 129 PIN display for entry on mobile phone
Requirements
The vehicle must be stationary, and the ignition
must be switched on.
The Bluetooth function and the discoverability
option of the MMI system ¢ page 188 and the
mobile phone must be activated.
l) Connection costs depend on your mobile phone contract.
We strongly recommend an unlimited data plan.
2 l
Not available in all markets and applies to mobile phones
with Bluetooth remote SIM Access Profile.
124 The
mobile phone you would like to connect must
not be connected actively to any other Bluetooth
device.
The MMI must not be connected to a mobile
phone.
Access to your SIM card (SIM Access) must be ac
tivated on your mobile phone. 2
)
Connecting a mobile phone ... Sel ect: !TELi button > Connect mobile phone>
Continue. The available Bluetooth devices will
be shown on the infotainment display. Or:
Search for the MMI system via the Bluetooth
device search function on your mobile phone.
... Select and confirm the desired mobile phone
from the list of Bluetooth devices shown.
... The MMI will generate a PIN for the connection
¢Fig. 129 .
... Select and confirm Yes.
"' Enter the PIN to establish a connection on your
mobile phone. Or: If the PIN is already being
displayed on your mobile phone, confirm it on
the phone and in the MMI. You have about 30
seconds to enter the PIN code.
You may need to enter the PIN for your SIM card
in the MMI 2
l
_
Please note any additional system queries on
your mobile phone, e.g. whether the phone
should connect automatically in the future. On
some mobile phones, you may also need to
download the directory and allow access to your
text messages separately.
After connecting successfully
After the connection has been established suc
cessfully, you will be shown a short message con
taining information on the profiles used to estab
lish the connection. You can make changes to the
profiles via I MENU I> Settings > left control but
ton > MMI settings > Conn ection manager
¢ page 188. This can also be done retrospective-
� �