AUDI TT ROADSTER 2011 Owners Manual
Manufacturer: AUDI, Model Year: 2011, Model line: TT ROADSTER, Model: AUDI TT ROADSTER 2011Pages: 260, PDF Size: 64.11 MB
Page 91 of 260
Driving Notes
The forward gears are shifted up or down au
tomatically.
--
-
-
-
-
-
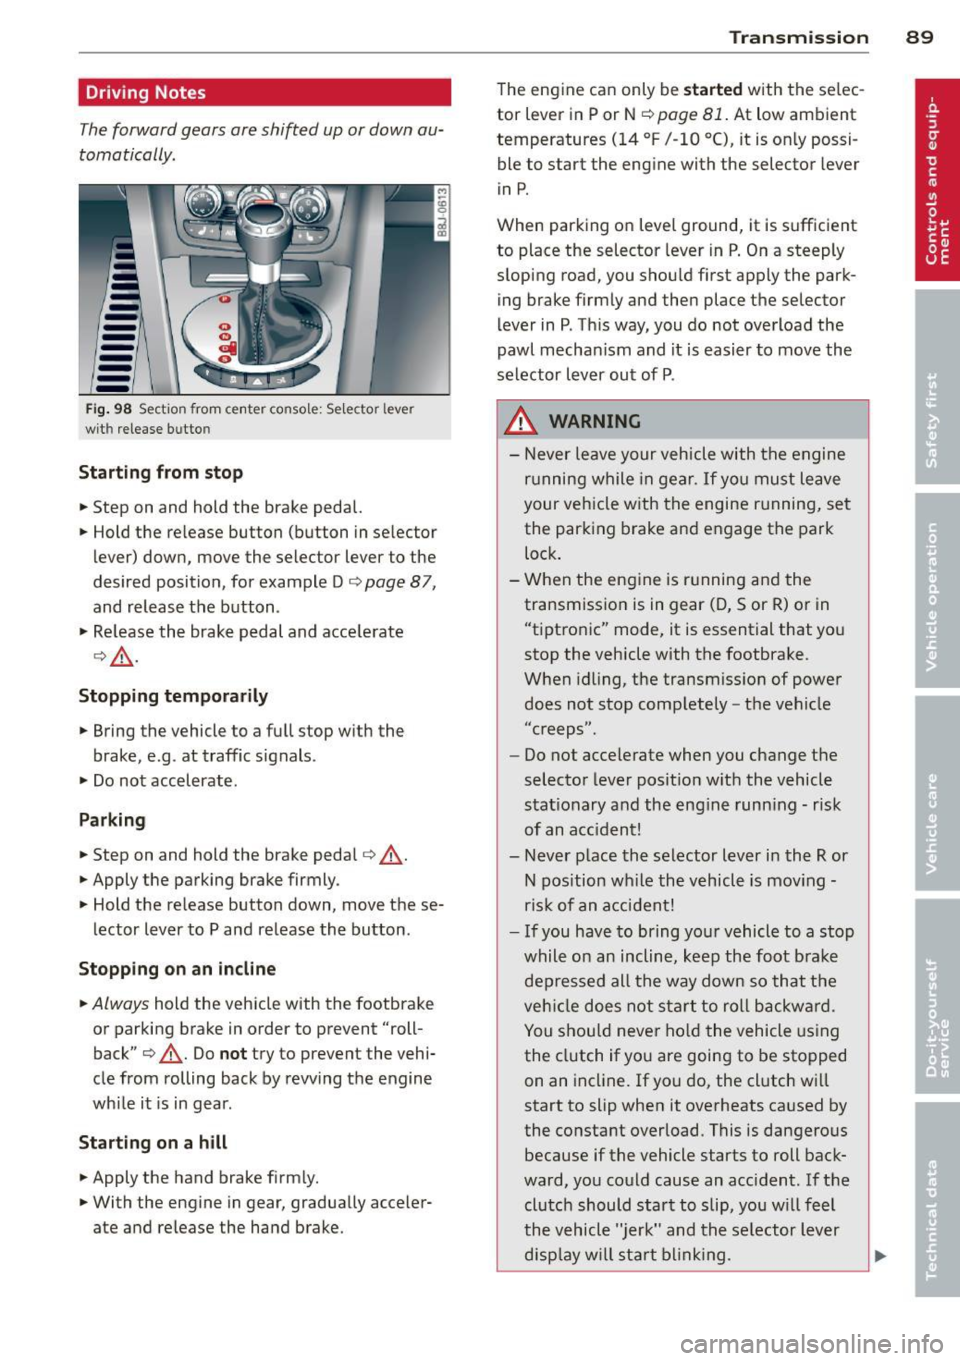
--Fig. 98 Section from cente r console: Selector lever
wit h rele ase butto n
Starting from stop
.. Step on and hold the brake pedal.
.. Hold the release button (button in selector
lever) down, move the selector lever to the
desired position, for example Do
page 87,
and release the button .
.,. Release the brake pedal and accelerate
o,& .
Stopping temporarily
.. Bring the vehicle to a full stop with the
brake, e.g . at traffic signals.
.. Do not accelerate.
Parking
.. Step on and hold the brake pedal o _&.
.. Apply the parking brake firmly.
.. Hold the release button down, move these
lector lever to P and release the button .
Stopping on an incline
.. Always hold the vehicle with the footbrake
or parking brake in order to prevent "roll
back" o
_&. Do not try to prevent the vehi
cle from rolling back by rewing the engine
while it is in gear.
Starting on a hill
.. Apply the hand brake firmly.
.. With the engine in gear, gradually acceler
ate and release the hand brake.
Transmission 89
The engine can only be started with the selec
tor lever in P or N
opage 81. At low ambient
temperatures
(14 °F /-10 °C), it is only possi
ble to start the engine with the selector lever
in P.
When parking on level ground, it is sufficient
to place the selector lever in P. On a steeply
sloping road, you should first apply the park
ing brake firmly and then place the selector
lever in P. This way, you do not overload the
pawl mechanism and it is easier to move the
selector lever out of P .
.&_ WARNING
-Never leave your vehicle with the engine
running while in gear. If you must leave
your vehicle with the engine running, set
the parking brake and engage the park
lock.
- When the engine is running and the
transmission is in gear (D, Sor R) or in
"tiptronic" mode, it is essential that you
stop the vehicle with the footbrake.
When idling, the transmission of power
does not stop completely -the vehicle
"c reeps" .
- Do not accelerate when you change the
selector lever position with the vehicle
stationary and the engine running - risk
of an accident!
- Never place the selector lever in the R or
N position while the vehicle is moving -
risk of an accident!
- If you have to bring your vehicle to a stop
while on an incline, keep the foot brake
depressed all the way down so that the
vehicle does not start to roll backward.
You should never hold the vehicle using
the clutch if you are going to be stopped
on an incline. If you do, the clutch will
start to slip when it overheats caused by
the constant overload . This is dangerous
because if the vehicle starts to roll back
ward, you could cause an accident. If the
clutch should start to slip, you will feel
the vehicle "jerk" and the selector lever
display will start blinking. ..,.
Page 92 of 260
90 Transmi ssion
-Before driv ing down a steep slope, re
duce your speed and shift into a lower
g ear with "tiptronic".
- Do not ride the brakes or app ly the brake
pedal too often or too long. Constant
braking causes the brakes to overheat
and substantially reduces braking per
formance, increases b raking distance or
c a uses comp lete failure of the b rake sys
tem.
Hill Descent Assist
Ap plies to ve hicles : wit h Hill Descen t Ass is t
Hill Descent Assist helps the driver when driv
ing down inclines.
H ill Descent Ass ist is activated by pressing the
brake while descending when the selector lev
e r i s in
D/S . The S tronic transmission auto
mat ica lly shifts down to a gear suitab le for
the incline. H ill Descent Assis t attempts to
maintain the current vehicle speed whe n the
b rak ing occurs, as far as phys ica l and techni
cal limits allow . It may be necessary to adjust
the speed using the brakes .
H ill Descent Ass ist swit ches off when the in
cline levels out or when the gas pedal is press
ed .
On veh icles w ith cru ise contro l* ~
page 84,
H ill Descent Ass ist is a lso activated when the
speed is set .
L!l WARNING
Hill Descent Assist cannot overcome phys i
cal limitations, so it may not be possib le to
ma intain a constant vehicle speed under
all circumstances. Always be ready to ap
ply t he b rakes.
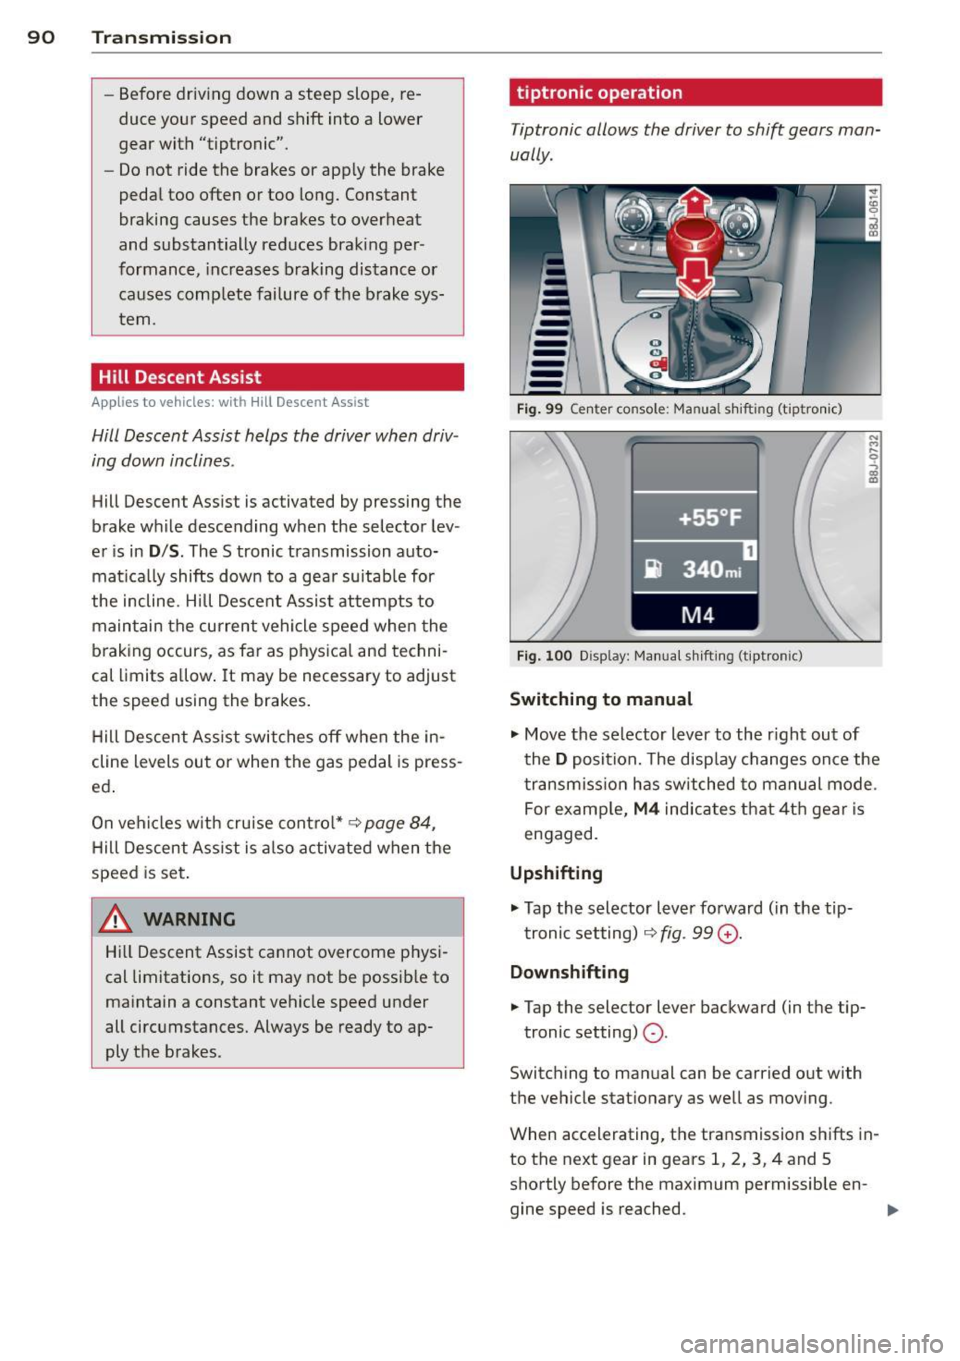
tiptronic operation
Tiptronic allows the driver to shift gears man
ually .
Fig . 99 Ce nter console: Manua l shi fting (tiptro nic)
Fig . 1 00 D isp lay: Ma nua l shifting (tiptron ic)
Switching to manual
.... M .... 0
~
"' Move the selector lever to the r ight out of
t he
D position. The disp lay changes once the
t ra nsm iss ion has sw itched to manual mode .
For examp le,
M4 indica tes that 4th gea r is
engaged.
Upshifting
.., Tap the selector lever fo rward ( in the tip
tronic setting)
~ fig. 99 G) .
Downshifting
... Tap the selector lever backward (in the tip-
tronic setting)
0 -
Switch ing to man ual can be carried out with
the vehicle stationary as we ll as moving .
When accelerating, the transmission sh ifts in
to the next gear in gears 1, 2, 3, 4 and 5
shortly before the maximum permissible en
gine speed is reached.
Page 93 of 260
If you have selected a lower gear than the cur
rent one, the transmission w ill only shift down
when the engine cannot be overspeeded .
If kick-down is actuated, the transmission
shifts into a lower gear independent ly of
speed and engine rpm .
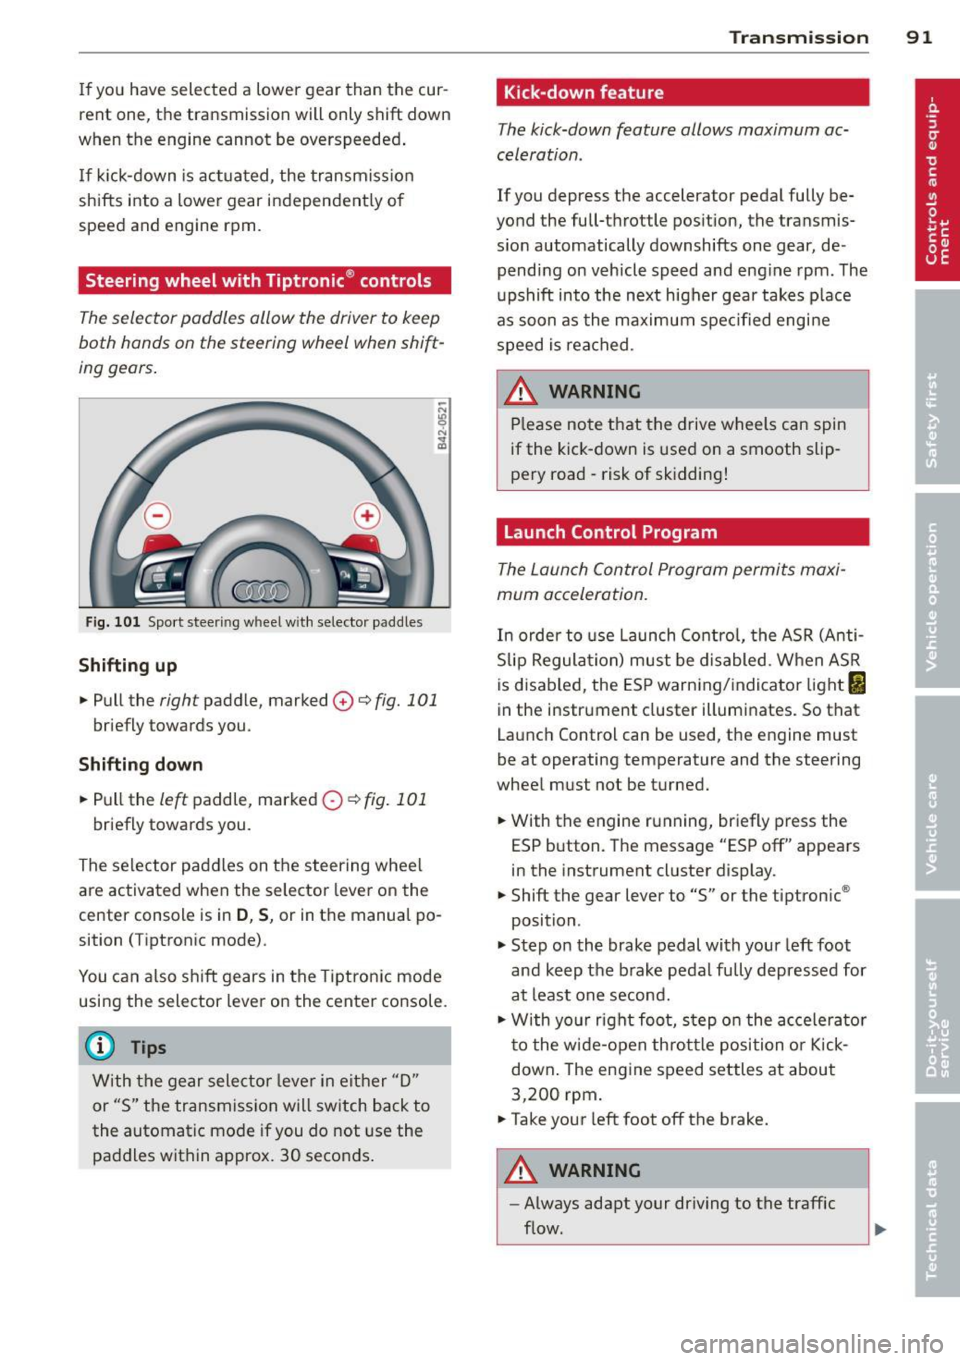
Steering wheel with Tiptronic ® controls
The selector paddl es allow the driver to keep
both hands on the steering wheel when shift
ing gears.
Fig. 101 Sport steer ing wheel w ith selector paddle s
Shifting up
.. Pull the right paddle, marked 0 ¢ fig. 101
briefly towards you .
Shifting down
.. Pull the left paddle, marked 0 ¢fig. 101
briefly towards you.
The selector paddles on the steering wheel
are activated when the selector lever on the
center console is in
D , S, or in the manual po
sition (Tiptronic mode) .
You can also shift gears in the Tiptronic mode
using the selector lever on the center console.
@ Tips
With the gear selector lever in either "D"
or "S" the transmission will switch back to
the automatic mode if you do not use the
paddles within approx. 30 seconds.
Transmission 91
Kick-down feature
The kick-down feature allows maximum ac
celeration .
If you depress the accelerator pedal fully be
yond the full-throttle position, the transmis
s ion automatically downshifts one gear, de
pending on vehicle speed and engine rpm. The
upshift into the next higher gear takes place
as soon as the maximum specified engine
speed is reached.
_&. WARNING
Please note that the drive wheels can spin
if the kick-down is used on a smooth slip
pery road -risk of sk idding!
Launch Control Program
The Launch Control Program permits maxi
mum acceleration.
In order to use Launch Control, the ASR (Anti
Slip Regulation) must be disabled. When ASR
is disabled, the ESP warning/indicator light
I
in the instrument cluster illuminates. So that
Launch Control can be used, the engine must
be at operating temperature and the steering
wheel must not be turned .
.. With the engine running, briefly press the
ESP button. The message "ESP off" appears
in the instrument cluster display.
.. Shift the gear lever to "S" or the tiptronic ®
position.
.. Step on the brake pedal with your left foot
and keep the brake pedal fully depressed for
at least one second.
.. W ith your right foot, step on the accelerator
to the wide-open throttle position or Kick
down. The engine speed settles at about
3,200 rpm.
.. Take your left foot off the brake.
&_ WARNING
-
-Always adapt your driving to the traffic
flow.
Page 94 of 260
92 Transmission
-Only use Launch Control when road and
traffic conditions allow it and other driv
ers will not be endangered or annoyed by
your driving and the acceleration of the
vehicle.
- Make sure that ESP remains enabled.
With the ESP disabled, the vehicle could
brake away, particularly on a slick and
slippery road -risk of skidding!
- Once acceleration is finished, switch ASR
on again by briefly pushing the ESP but
ton.
Back -up program
In the event of a system malfunction, there is
an back-up program .
In the event of system malfunction, the auto
matic transmission switches to the fail-safe
mode . All of the selector lever position dis
plays for the automatic transmission are high
lighted with a light background in the instru
ment cluster display . In some cases you can
not use reverse gear any more.
If the transmission switches to fail-safe
mode, you should take the vehicle to an au
thorized Audi dealership as soon as possible
to have the condition corrected.
Clutch is overheating
• Clutch is overheating! Please stop vehi
cle!
If the symbols are illuminated, the clutch is
overheating and could be damaged if you con
tinue to drive . Stop the vehicle and allow the
transmission to cool with the selector lever in
the
P position while the engine runs at idle. If
the warning does not turn off, do not continue
driving. See your authorized Audi dealer or
qualified repair facility for assistance. Other
wise serious transmission damage could re
sult. Once the indicator light has turned off,
drive to your authorized Audi dealer or quali
fied repair facility immediately to have the
malfunction corrected.
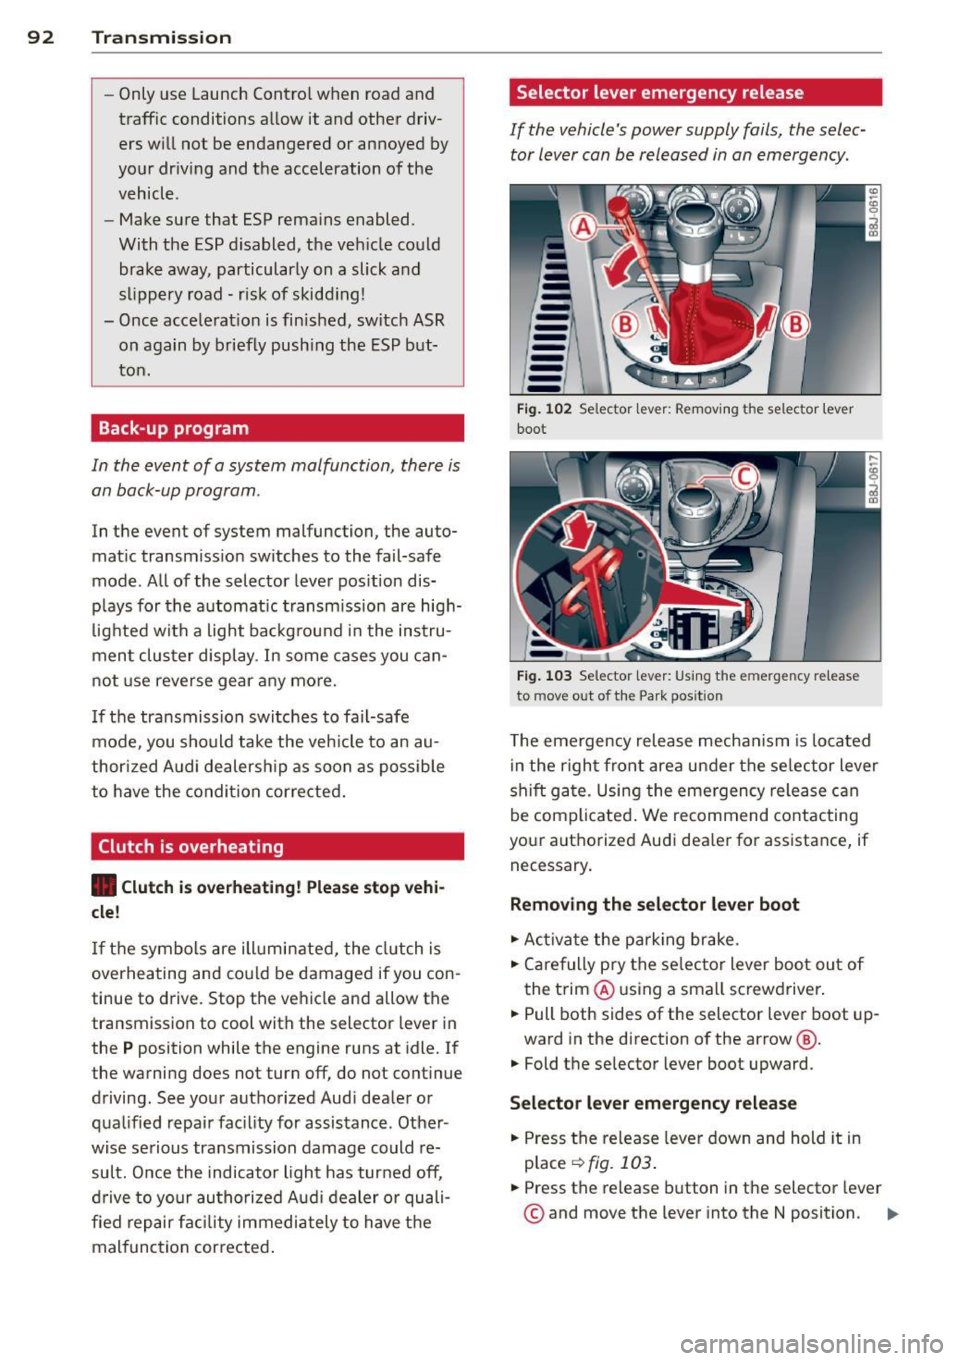
Selector lever emergency release
If the vehicle 's power supply fails, the selec
tor lever can be released in an emergency.
-
-
-
-
-
-
---Fig. 102 Selector lever: Removing t he selector lever
boot
Fig. 103 Selector lever: Using the e merge ncy release
to move o ut of the Park pos it ion
The emergency release mechanism is located
in the right front area under the selector lever
shift gate. Using the emergency release can
be complicated. We recommend contacting
your authorized Audi dealer for assistance, if necessary .
Removing the selector lever boot
.. Activate the parking brake.
.. Carefully pry the selector lever boot out of
the trim @ using a small screwdriver .
.. Pull both sides of the selector lever boot up-
ward in the direction of the arrow @.
.. Fold the selector lever boot upward.
Selector lever emergency release
.. Press the release lever down and hold it in
place
~ fig . 103 .
.. Press the release button in the selector lever
© and move the lever into the N position. Iii>
Page 95 of 260
~ Clip the selector lever boot back into the
shift gate after using the emergency re
lease .
I f the vehicle m ust be pushed or towed due to
a power failure (for example, the battery is
discharged), the selector lever must first be
moved to the N position using the emergency
re lease mechanism.
A WARNING
Only move the selector lever out of the P
position when the parking brake is activat
ed. Otherw ise, the vehicle could sta rt to
move unintentiona lly when the selector
lever is moved out of the P position.
Tran sm iss ion 93
Page 96 of 260
94 Homelin k®
Homelink ®
Universal remote
control
General information
The Homelink ® feature can learn up to three
radio frequency codes for most current trans
mitters used for operating garage doors, es tate gates, home or outdoor lighting sys
tems , and other devices.
You must first program the Homelink ® trans
mitter before you can use the system
¢ page 95, Programming the HomeLink ®
transmitter.
In order to program the Home Link ® transmit
ter for devices utilizing rolling code, a second person on a ladder who can safely reach the
garage door opener motor is recommended.
It is also necessary to locate the "learn" but
ton on your garage door opener motor . Refer
to the operating instructions for the opener,
as the location and color of this button may
vary by manufacturer .
You can still use the original remote control
for the device at any time.
A WARNING -
- Never use the Homelink® transmitter
with any garage door opener that does
have not the safety stop and reverse fea
ture as requ ired by federal safety stand
ards. This includes any garage door open
er mode l manufactured before April 1,
1982.
- A garage door opener which cannot de
tect an object, signaling the door to stop
and reverse does not meet current feder
al safety standards. Using a garage door
opener without these features increases
risk of serious injury or death.
- For safety reasons never release the
parking brake or start the engine while
anyone is standing in front of the vehicle .
- A garage door or an estate gate may
sometimes be set in motion when the Homelink
® remote control is being pro
grammed. If the device is repeatedly ac
tivated, this can overstrain motor and
damage its electrical components -an
overheated motor is a fire hazard!
- To avoid possible injuries or property
damage, please always make absolutely
certain that no persons or objects are lo
cated in the range of motion of any
equ ipment being operated.
0) Tips
- If you would like more information on
Homelink®, where to purchase the
Homelink ® compatible products, or
would like to purchase the Homelink ®
Home Lighting Package, please call toll
free: 1-800-355-3515.
- For Declaration of Comp liance to United
States FCC and Industry Canada regula
tions ¢
page 244.
Page 97 of 260
Programming the Homelink®
transmitter
The transmitter is programmed in two phas
es. For rolling code transmitters, a third
phase is also necessary.
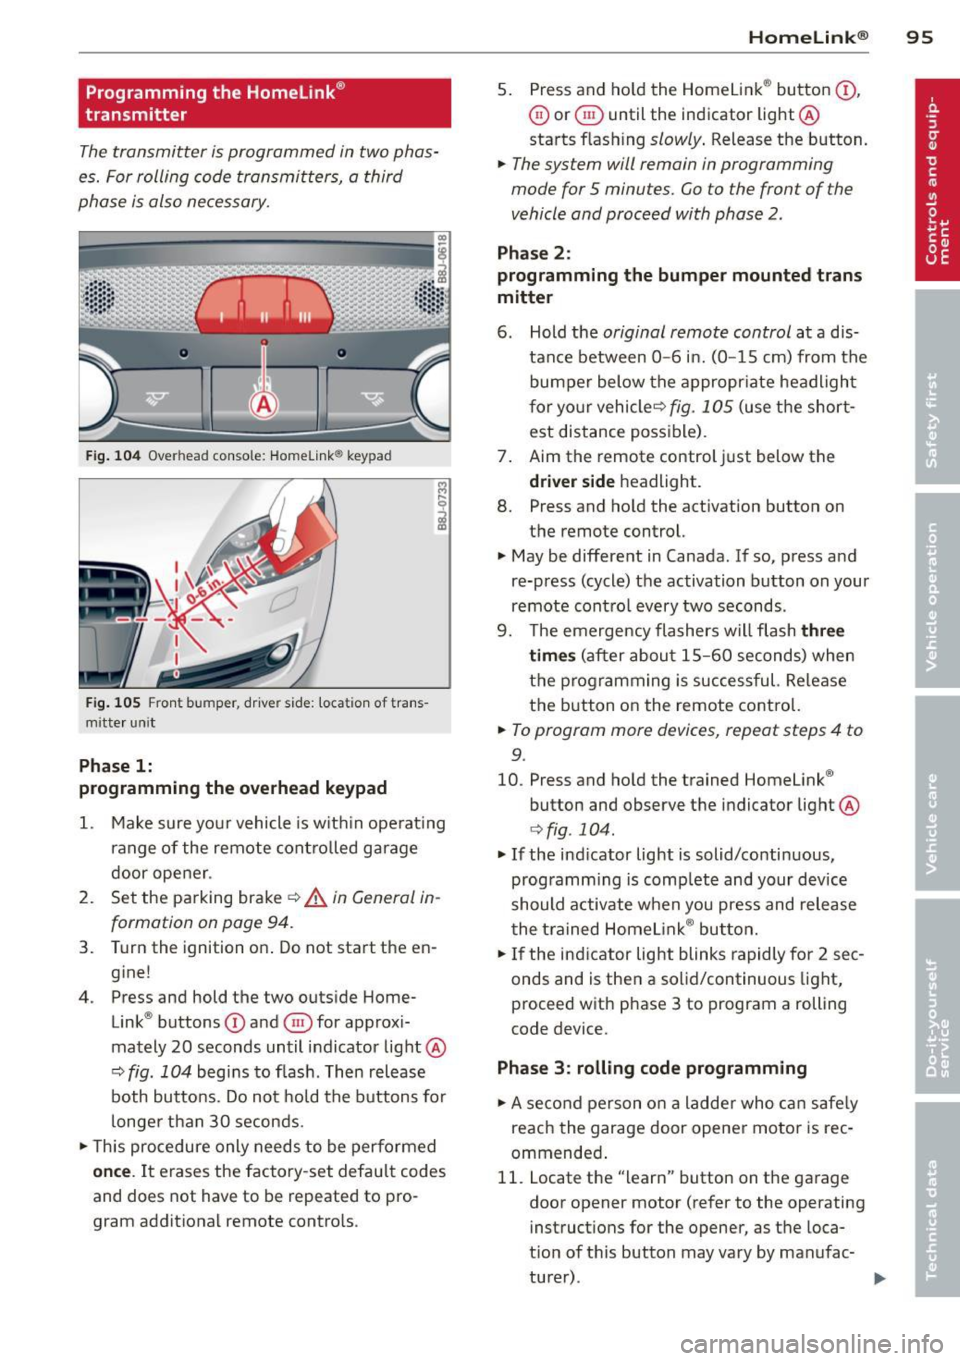
F ig . 104 Overhead console: Homelink ® keypad
Fig. 105 Front bumper, driver side: locat ion of trans
mitte r unit
Phase 1:
programming the overhead keypad
1. Make sure your vehicle is w ith in operat ing
ra nge of the remote controlled garage
door opener .
2. Set the parking brake~&.
in General in
formation on page 94.
3. Turn the ignition on . Do not start the en
g ine!
4 . Press and hold the two outside Home
Link ® buttons
(D and @for approxi
mately 20 seconds until indicator light@
~ fig. 104 begins to flash . Then release
both buttons . Do not hold the buttons for
longer than 30 seconds.
.. This procedure only needs to be performed
once. It erases the factory-set default codes
and does not have to be repeated to pro
gram additional remote controls .
Homelin k® 95
5. Press and ho ld the Homelink ® button (D ,
@ or§ until the indicator light@
starts flashing
slowly . Release the button.
.. The system will remain in programming
mode for 5 minutes.
Go to the front of the
vehicle and proceed with phase 2 .
Phase 2:
programming the bumper mounted trans
mitter
6. Hold the original remote control at a d is
tance between
0 -6 in. (0 -15 cm) from the
bumper below the appropr iate headlight
for your vehicleQ
fig . 105 (use the short
est distance possible) .
7. Aim the remote control just below the
driver side headligh t.
8. Press and hold the activation button on
the remote control.
.. May be different in Canada . If so, press and
re-press (cycle) the activation button on your
remote control every two seconds .
9. The emergency flashers will flash
three
times
(after about 15-60 seconds) when
the programming is successful. Re lease
the button on the remote control.
.. To program more devices, repeat steps 4 to
9.
10. Press and hold the trained Homelink ®
button and observe the indicator light @
Qfig . 104.
.. If the indicator light is solid/continuous,
programm ing is complete and your device
should activate when you press and release
the trained Homelink ® button.
.. If the indicator light blinks rapidly for 2 sec
onds and is then a solid/continuous light,
proceed w ith phase 3 to program a rolling
code device.
Phase 3: rolling code programming
.. A second person on a ladder who can safely
reach the garage door opener motor is rec
ommended .
11. Locate the "learn" button on the garage
door opener motor (refer to the operating
instructions for the opener, as the loca
tion of this button may vary by manufac
turer) .
Page 98 of 260
96 Homelink®
12. Press and release the learn button on the
garage door opener motor.
• Note: once the button is pressed, there are
30 seconds in which to initiate the next
step.
13 . On the Homel ink ® keypad inside the vehi
cle, firmly press and hold the Homelink ®
button previously programmed in phases
1 and 2 for two seconds and release. Re
peat this sequence
twice .
• Some vehicles may require the press/hold/
release sequence up to t hree times to com
plete the training process.
• HomeLink ® should now activate your rolling
code equipped device.
If the 5 minute time limit is exceeded, the
emergency flashers will flash one time to in
d icate that the process has been terminated.
In this case, repeat steps 4 through 9 .
If the emergency flashers do not flas h
three
times (after about 15-60 seconds), program
ming was not successful. In this case, repeat
steps 4 through 9.
Remote control units for garage door openers
i n Canada are set to stop transmitting radio
frequency signals after two seconds. This time
may not be sufficient for the Homelink ® sys
tem to learn the radio frequency s ignal. Per
form all other steps as described above .
Operating the Homelink® transmitter
The HomeLink ® transmitter works in the
same manner as the original handheld re
mote control that came with the system .
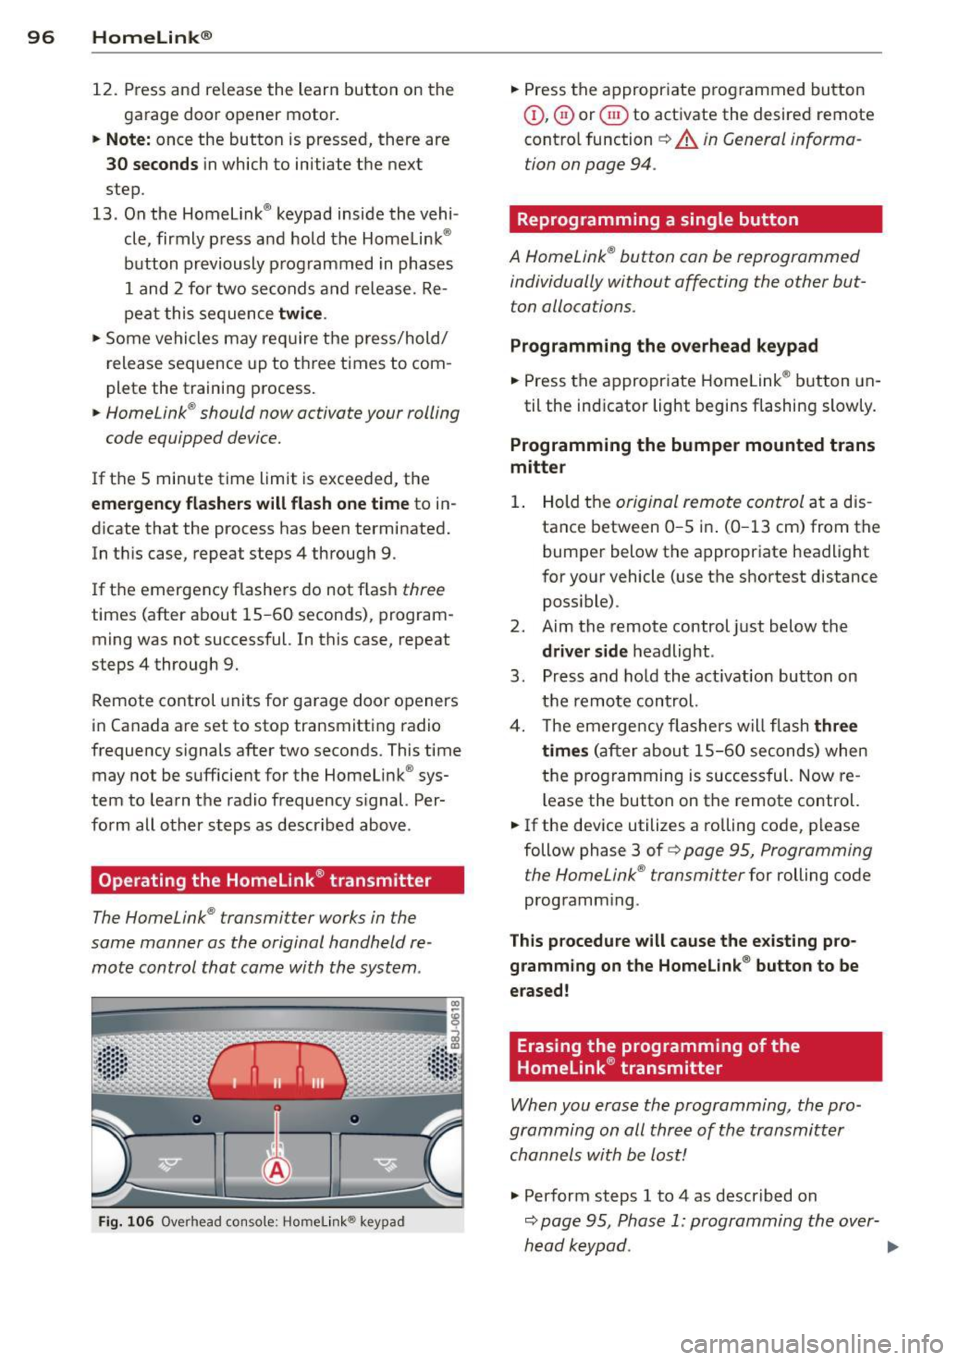
Fig. 106 Overhead console: Homelin k® keypad
• Press the appropr iate p rogrammed button
(D, ® or@ to activate the desired remote
contro l function
~ A in General informa
tion on page 94.
Reprogramming a single button
A HomeLink ® button can be reprogrammed
individually without affecting the other but
ton allocations.
Programming the overhead keypad
• Press the appropriate Homelink ® button un-
til the indicator light begins flashing slowly.
Programming the bumper mounted trans
mitter
1. Hold the original remote control at a dis
tance between
0-5 i n. (0 -13 cm) from the
bumper below the appropriate headlight
for your vehicle (use the shortest distance
possible) .
2. Aim the remote control just below the
driver side headlight .
3 . Press and hold the act ivation button on
the remote control.
4. The emerge ncy flashers will flash
three
times
(after about 15-60 seconds) when
the programming is successful. Now re
l ease the button on the remote control.
• If the device utilizes a rolling code, please
follow phase 3 of
c:> page 95, Programming
the HomeLink ® transmitter
for rolling code
programm ing .
This procedure will cause the existing pro
gramming on the Homelink ® button to be
erased!
Erasing the programming of the
Homelink ® transmitter
When you erase the programming, the pro
gramming on all three of the transmitter
channels with be lost!
.,. Perform steps 1 to 4 as described on
c:> page 95, Phase 1: programming the over-
head keypad . ..,.
Page 99 of 260
When completed, the Homelink® system will
be in the programming mode and is then
ready to learn the codes for remote contro lled
devices.
@ Tips
- Programmed buttons cannot be erased
individually.
- For security reasons you are advised to
erase the programming of the Home
Link ® system before you sell your vehicle. H
om elin k® 97
Page 100 of 260
98 Driving Safel y
Driving Safely
General notes
Safe driving habits
Please remember -safety first!
This chapter contains important information,
tips, instructions and warnings that you need
to read and observe for your own safety, the
safety of your passengers and others . We have
summarized here what you need to know
about safety belts, a irbags, ch ild restra ints as
well as child safety. Your safety is for us
priori
ty number 1.
Always observe the info rmat ion
and warn ings in th is sect ion -fo r yo ur own
safety as well as for that of your passengers.
The information in this se ction app lies to all
model ve rsions of your veh icle . Some of the
feat ures desc ribed in this sec tions may be
standa rd equipment on some models, or may
be optional equipment on others . If you are
not sure, ask your authorized Aud i dealer.
A WARNING
- Make certain that you follow the instruc
t ions and heed the WARNINGS in this
Manual. It is in your interest and in the
interest of your passengers .
- Always keep the complete Owner's Liter
ature in your Audi when you lend or sell
yo ur vehicle so that this important info r
mation will a lways be ava ilable to the
dr iver and passenge rs.
- Always keep the Owner's literature handy
so that you can find i t eas ily if yo u have
ques tions.
Safety equipment
The safety features are part of the occupant
restraint system and work together to help
reduce the risk of injury in a wide variety of
accident situations.
Your safety and the safety of your passenge rs
should not be left to chance. Advances in
technology have made a varie ty o f fea tures
avai la bl e to he lp re duce the risk of injury in an accident
. The following is a lis ting o f just a
few of the safety features in your Audi:
- sophis tic ated s afety be lts fo r drive r and a ll
passenger sea ting pos it ions,
- safety belt pre-tensione rs,
- fro nt airbags,
- knee airbags for the front seats,
- side airbags in the front seats,
- LATCH anchorages for child restraints,
- ad justab le steering column .
T hese ind iv idual safety features can wor k to
ge ther as a sys tem to he lp p rotec t you and
you r passengers in a wide range of accidents.
These features cannot wo rk as a system if
they are not always p roper ly adjusted and
properly used!
Safet y is everybody's re sponsibilit y!
Important things to do before driving
Safety is everybody's job! Vehicle and occu
pant safety always depends on the informed and careful driver.
For yo ur safe ty and the safety of you r passen
gers,
befor e driving alwa ys:
"' Make s ure that all lights and signa ls are op
erati ng correctly .
"' Ma ke su re t hat the t ire p ressu re is co rrec t.
"' Mak e su re that all windows are clean and a f
ford good vis ibility to the outs ide.
"' Sec ure all luggage and other items caref ully
I:!) page 7 3.
"'Make sure that nothing can interfere with
the pedals.
"' Adjust front seat, head restraint and mirrors
correctly for your height .
"' Inst ruct passe ngers to adjust the head re
st raints accord ing to the ir height .
"' Ma ke sur e to use the r igh t chi ld restraint
correc tly to protect c hild ren
¢ page 136,
Child Safety .
"'Sit properly in your seat and make sure that
your passengers do the same
I:!) page 66,
General recommendations. .,_