air condition AUDI TT ROADSTER 2016 User Guide
[x] Cancel search | Manufacturer: AUDI, Model Year: 2016, Model line: TT ROADSTER, Model: AUDI TT ROADSTER 2016Pages: 306, PDF Size: 31.82 MB
Page 101 of 306
Downloaded from www.Manualslib.com manuals search engine 0
N
,.....
N
......
0
,.....
Vl
CX) -
In certain situations, the system may not
function properly, or the functionality of the
system may be restricted. For example:
- If other vehicles are approaching very
quickly, or if you are overtaking other
vehicles quickly. The warning lamp may
not light up in time.
- In poor weather conditions, such as heavy
rain, snow or road spray.
- If you are travelling in very wide lanes, in
tight bends or over crests. The system
may not detect vehicles in the adjacent
lane because they are outside the area
covered by the sensors.
CD CAUTION
Impacts or damage to the bumper, wheel
arches or underbody can cause misalignment
of the sensors. This can impair the functional
ity of the system. Have the systems checked
by a qualified workshop.
(D} Note
The warning lamps on the exterior mirrors
may not be properly visible if tinted foil is af
fixed to the side windows on the driver's or
passenger's side.
Switching on and off
Applies to: vehicles with Audi side assist
The system can be switched on and off on the in
fotainment system.
"' Select the following on the infotainment sys
tem: I MENU I button >Car> left control button
> Driver assist> Audi side assist.
The warning lamps in the exterior mirrors light
up briefly each time the ignition is switched on to
indicate that the system is activated. Driver
assist systems
Adjusting brightness of warning lamp
Applies to: vehicles with Audi side assist
The brightness of the warning lamp can be ad
justed on the infotainment system.
"' Select the following on the infotainment sys
tem: I MENU I button >Car> left control button
> Driver assist> Audi side assist.
The brightness of the warning lamp in both the
information and warning modes is regulated au
tomatically according to the ambient light level.
If you are in very dark or very light surroundings
when you adjust the brightness of the warning
lamp, the automatic brightness control may al
ready have reached the lowest or the brightest
setting. In such a case it is possible that you
won't notice a difference while you are adjusting
the brightness or that you will only notice it once
the light surroundings have changed.
Please adjust the brightness of the warning lamp
for the information mode so that it does not dis
tract you while you are looking at the road in
front. When you change the brightness, the
warning lamp on the exterior mirror will light up
briefly with the intensity set for the information
mode. The intensity of the lamp in the warning
mode is linked to the intensity in the information
mode and is adjusted automatically.
(CD) Note
- The side assist is not active while the set
tings are being adjusted.
- Your personal settings are stored automati
cally and assigned to the remote control key
which is being used.
Driver messages
Applies to: vehicles with Audi side assist
Should the side assist be deactivated automati
cally, a driver message will appear on the info
tainment display.
@j Audi
side assist: currently unavailable.
Sensor view restricted due to surroundi ngs.
See owner's manual
The radar sensors are blocked. The area in front
of the sensors must not be obstructed by bicycle
..,..
99
Page 102 of 306
Downloaded from www.Manualslib.com manuals search engine Driver
assist systems
racks, stickers, deposits or any other substances.
If necessary, clean the area in front of the sen
sors ¢ page 98, Fig. 103.
@j Audi side
assist: currently unavailable.
See owner's manual
The side assist is temporarily inoperative and
cannot be switched on (for instance if the battery
is not sufficiently charged).
@j Audi
side assist: fault. Please contact
workshop
The system cannot detect vehicles reliably and
will be deactivated. The sensors are out of align
ment or defective. Have the system checked by a
qualified workshop soon.
Audi drive select (vehicle
set-up functions)
Introduction
Applies to: vehicles with Audi drive select
Drive select allows you to use different set-ups
on your vehicle. The four modes efficiency*, com
fort, auto and dynamic allow the driver, for ex
ample, to change from a sporty mode to a more
comfortable one via the �.:i.l\:'I button in the centre
console or via the infotainment system. In addi
tion, the individual mode allows you to adapt the
vehicle set-up to suit your personal driving style.
For example, you might choose to combine a
more dynamic engine set-up with a lighter steer
ing response.
Description
Applies to: vehicles with Audi drive select
The possible vehicle set-up in each mode de
pends on which equipment is installed on your
vehicle.
Engine and automatic gearbox*
The response of the engine and automatic gear
box* to accelerator pedal movements will be
more spontaneous or balanced, depending on
which mode you select. In efficiency* mode the
automatic gearbox* selects the next gear at low
er engine speeds and the coasting mode is activa-
100 ted
¢ page 82. This helps to reduce fuel con
sumption.
Suspension control (Audi magnetic ride)*
The suspension control uses sensors to collect in
formation on steering movements, braking and
acceleration input by the driver, road surface
quality, road speed and vehicle loading. With
drive select you can choose between dynamic and
comfort-oriented suspension set-ups (dynamic
and comfort modes), or opt for a more balanced
set-up (auto mode).
Steering
The degree of power assistance can be varied.
The light, indirect steering response in comfort
mode is particularly suitable on long motorway
trips, for instance. The steering has a tighter,
more direct feel in dynamic mode.
Air conditioner*
The air conditioner runs in a particularly econom
ical mode when the efficiency* setting is selec
ted. When this function is selected, eco* is shown
in the display of the automatic air conditioner.
Cruise control system*
The acceleration response is particularly econom
ical in efficiency* mode.
Engine sound*
The sound of the engine is matched to the selec
ted mode and ranges from subdued to dynamic.
(QJ} Note
- On some models the vehicle's maximum
speed can only be obtained in the auto and
dynamic modes.
- On vehicles with manual gearbox, an E ap
pears in the gear-change indicator when ef
ficiency* mode is activated.
-Applies to vehicles with manual gearbox: If
you press the accelerator right down past
the point of resistance in efficiency* mode,
the engine power is automatically control
led to give your vehicle maximum accelera-
tion. ..,.
Page 105 of 306
Downloaded from www.Manualslib.com manuals search engine 0
N
,.....
N
......
0
,.....
Vl
CX) Parking
aids
General notes
Applies to: vehicles with rear parking aid/parking system
plus/park assist
Various systems are available to help you when
parking or manoeuvring in tight spaces, depend
ing on the equipment fitted on your vehicle.
The rear parking aid gives an acoustic warning if
there are any obstacles behind the car
¢page 104.
When you are parking, the parking system plus
warns you acoustically and optically about obsta
cles detected in front of and behind the vehicle
¢page 104. On vehicles with park assist, the
area detected at the side of the vehicle ®
¢page 104, Fig. 106 is also monitored.
The reversing camera uses the infotainment sys
tem display to show a picture of the area behind
the vehicle captured by the camera. Orientation
lines in the image from the reversing camera as
sist you when parking or manoeuvring
¢ page 106. In addition, you are assisted by the
functions of the parking system plus
¢page 104.
The park assist helps you to find suitable parking
spaces, to manoeuvre the vehicle into spaces par
allel or perpendicular to the roadside and to drive
out of spaces parallel to the kerb ¢ page 108.
A WARNING
-Always watch the road and the area sur
rounding the vehicle. The electronic systems
cannot replace the full concentration of the
driver. The driver is always responsible for
safety during parking and all other manoeu
vres.
- Please note that certain surfaces, such as
clothing fabrics, cannot be detected or dis
played by the system -risk of accident!
- The sensors and cameras have blind spots in
which neither people nor objects are regis
tered. It is particularly important to ensure
that there are no small children or animals
near the vehicle -risk of accident! Parking
aids
- Impacts or damage to the radiator grille,
bumper, wheel arches or underbody can
cause misalignment of the sensors. This can
impair the effectiveness of the parking aids.
Have the systems checked by a qualified
workshop.
CD CAUTION
- The system may not always be able to de
tect objects such as the following:
- Chains, trailer draw bars, posts or fences
- Objects above the sensors, such as wall
protrusions, etc.
- Objects with certain surfaces or struc
tures, such as wire fences or powder snow
- As your car moves closer to low obstacles,
they may disappear from the sensors' field
of vision. Please note that you will no longer
be warned about these obstacles.
- Remember to maintain sufficient clearance
from the kerb to avoid damaging the wheel
rims.
(@ Note
- In certain situations, a warning may be giv
en by the system even if there is no obstacle
within range of the sensors. This can be
caused by the following, for instance:
- Certain road surfaces or long grass
- External ultrasound sources, e.g. from
street cleaning vehicles
- Heavy rain or snow or dense exhaust
fumes
- To familiarise yourself with the system, we
recommend that you practise parking in a
quiet location or a car park. The weather
and light conditions should be good.
- You can adjust the volume of the beeps.
- There is a slight delay in the picture display.
- To ensure that the acoustic parking aid
works properly, the sensors must be kept
clean and free of snow and ice.
103
Page 110 of 306
Downloaded from www.Manualslib.com manuals search engine Parking
aids
Park assist with 360°
display
Description
Applies to: vehicles with park assist
The park assist helps the driver to manoeuvre
the vehicle into and out of parking spaces.
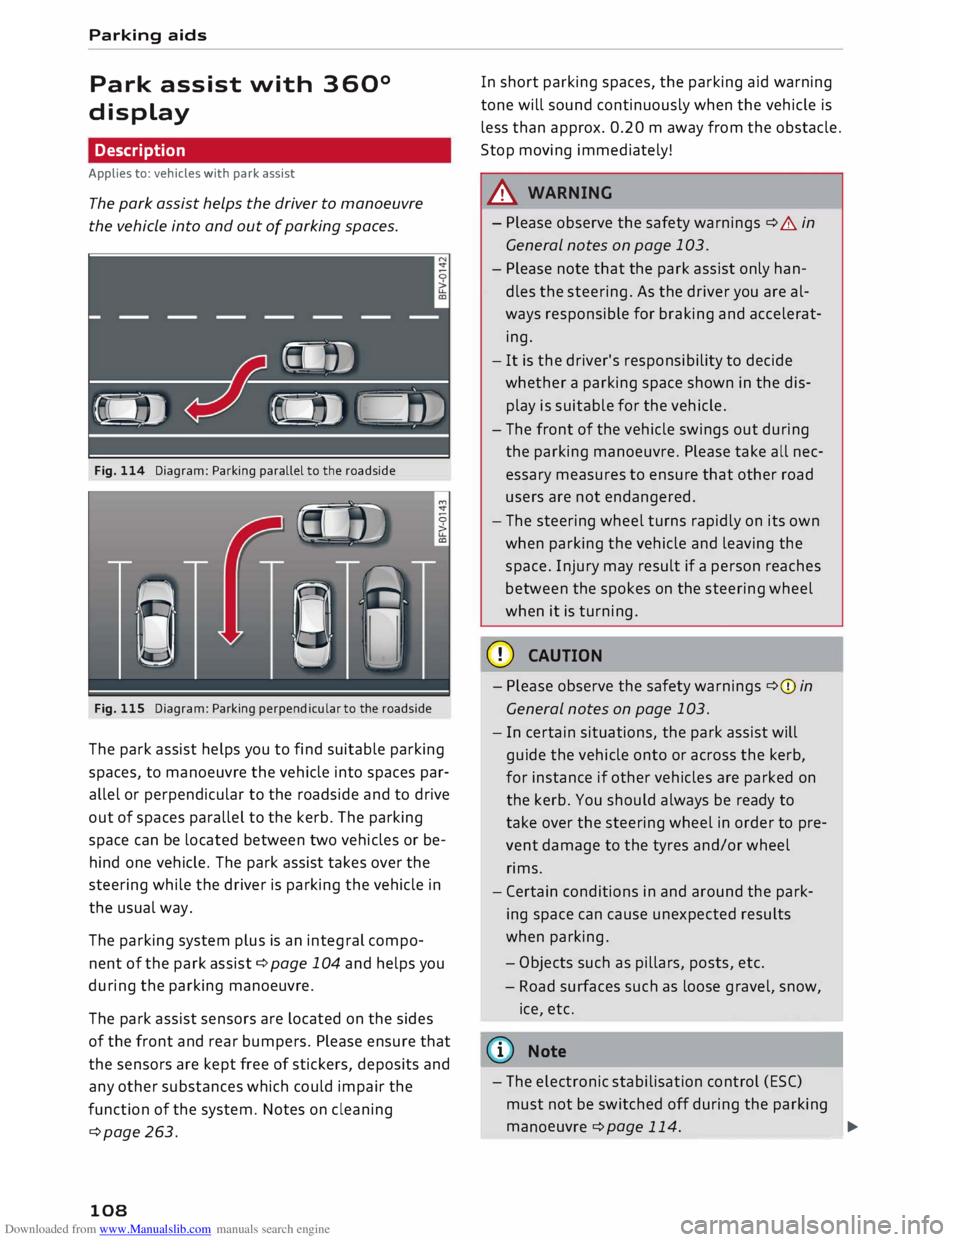
Fig. 114 Diagram: Parking parallel to the roadside
Fig. 115 Diagram: Parking perpendicular to the roadside
The park assist helps you to find suitable parking
spaces, to manoeuvre the vehicle into spaces par
allel or perpendicular to the roadside and to drive
out of spaces parallel to the kerb. The parking
space can be located between two vehicles or be
hind one vehicle. The park assist takes over the
steering while the driver is parking the vehicle in
the usual way.
The parking system plus is an integral compo
nent of the park assist c:::> page 10
4 and
helps you
during the parking manoeuvre.
The park assist sensors are located on the sides
of the front and rear bumpers. Please ensure that
the sensors are kept free of stickers, deposits and
any other substances which could impair the
function of the system. Notes on cleaning
c:::>page 263.
108 In
short parking spaces, the parking aid warning
tone will sound continuously when the vehicle is
less than approx. 0.20 m away from the obstacle.
Stop moving immediately!
A WARNING
- Please observe the safety warnings c:::> &. in
General notes on page 103.
- Please note that the park assist only han
dles the steering. As the driver you are al
ways responsible for braking and accelerat
ing.
- It is the driver's responsibility to decide
whether a parking space shown in the dis
play is suitable for the vehicle.
- The front of the vehicle swings out during
the parking manoeuvre. Please take all nec
essary measures to ensure that other road
users are not endangered.
- The steering wheel turns rapidly on its own
when parking the vehicle and leaving the
space. Injury may result if a person reaches
between the spokes on the steering wheel
when it is turning.
CD CAUTION
- Please observe the safety warnings c:::>(j) in
General notes on page 103.
- In certain situations, the park assist will
guide the vehicle onto or across the kerb,
for instance if other vehicles are parked on
the kerb. You should always be ready to
take over the steering wheel in order to pre
vent damage to the tyres and/or wheel
rims.
- Certain conditions in and around the park
ing space can cause unexpected results
when parking.
- Ob j
ects such as pillars, posts, etc.
- Road surfaces such as loose gravel, snow,
ice, etc.
ijJ} Note
- The electronic stabilisation control (ESC)
must not be switched off during the parkingmano euvre
c:::>page
11
4
.
--
-- ---
-�
Page 115 of 306
Downloaded from www.Manualslib.com manuals search engine Intelligent
technology
Electronic stabilisation
control (ESC)
Description
The electronic stabilisation control (ESC) increa
ses the car's stability. It reduces the tendency to
skid and improves the stability and road holding
of the vehicle. The ESC detects critical handling
situations, such as understeer, oversteer and
wheelspin on the driven wheels. It stabilises the
vehicle by braking individual wheels or by reduc
ing the engine torque. The indicator lamp DJ in
the instrument cluster starts flashing as soon as
the ESC intervenes.
The following systems are integrated in the ESC:
Anti-lock brake system (ABS)
ABS prevents the wheels from locking up under
braking until the vehicle has reached a virtual
standstill. You can continue to steer the vehicle
even when the brakes are on full. Keep your foot
on the brake pedal and do not pump the brakes.
You will feel the brake pedal pulsate while the
anti-lock brake system is working.
Brake assist system
The brake assist system can shorten the braking
distance. The braking force is automatically boos
ted if you press the brake pedal quickly in an
emergency. You must keep pressing the brake
pedal until the danger has passed.
Traction control system (ASR)
In the event of wheelspin, the traction control
system reduces the engine torque to match the
amount of grip available. This helps the car to
start moving, accelerate or climb a gradient.
Electronic differential lock (EDL)
When the EDL detects wheelspin, it brakes the
spinning wheel and directs the power to the oth
er driven wheel (or wheels on quattro* versions).
0 This
function is not available at high speeds.
� To
prevent the disc brake of the braked wheel
8 from
overheating, the EDL cuts out automatically
"
Vl Intelligent
technology
if subjected to excessive loads. The vehicle can
still be driven. The EDL will switch on again auto
matically when the brake has cooled down.
Steering recommendation
The ESC helps to stabilise the vehicle by changing
the steering wheel torque.
Selective wheel torque control
Selective wheel torque control intervenes when
cornering by braking the wheel(s) on the inside of
the bend individually as required. This enables
precision cornering. The relevant system may not
intervene in the wet or snow.
Multicollision brake assist system
The "multicollision brake assist system" can help
to reduce the risk of skidding and further colli
sions during an accident. If the airbag control
unit detects that a collision has taken place up
wards of a certain speed, the vehicle is braked by
the ESC.
The vehicle will not be braked automatically if:
- the driver presses the accelerator,
- the brake pressure applied by pressing the
brake pedal is higher than the brake pressure
initiated by the system,
- or the ESC, the brake system or the vehicle's
electrical system are not fully functional.
A WARNING
- The grip provided by the ESC and the inte
grated systems is still subject to the physi
cal limits of adhesion. Always bear this in
mind, especially on wet or slippery roads. If
you notice the systems cutting in, you
should reduce your speed immediately to
suit the road and traffic conditions. Do not
let the extra safety provided tempt you into
taking any risks when driving -this can
cause accidents.
- Remember that the accident risk always in
creases if you drive fast, especially in cor
ners or on a wet or slippery road, or if you
follow too close behind the vehicle in front
of you. Please bear in mind that even the
113
Page 118 of 306
Downloaded from www.Manualslib.com manuals search engine Intelligent
technology
Brake servo
The brake servo amplifies the pressure you apply
to the brake pedal.
A WARNING
- When applying the brakes to clean off de
posits on the pads and discs, select a clear,
dry road. Be sure not to inconvenience or en
danger other road users; do not risk an acci
dent.
- Never let the car coast with the engine
switched off (this can cause accidents).
CD CAUTION
- Never let the brakes "drag" by leaving your
foot on the pedal
when
you do not really in
tend to brake. This overheats the brakes, re
sulting in longer stopping distances and
greater wear.
- Before driving down a long, steep gradient,
it is advisable to reduce speed and select a
lower gear. In this way you will make use of
the engine braking effect and relieve the
load on the brakes. If you still have to use
the brakes, it is better to brake firmly at in
tervals than to apply the brakes continuous
ly.
� Note
-If the brake servo is out of action, you must
apply considerably more pressure to the
brake pedal than you normally would.
- If you wish to equip the car with accessories
such as a front spoiler or wheel covers, it is
important that the flow of air to the front
wheels is not obstructed, otherwise the
brakes can overheat.
Electro-mechanical
power steering
Electro-mechanical power steering assists the
driver when steering.
The degree of power assistance is adapted elec
tronically, depending on the speed.
116 Warning/indicator
lamps and driver
messages
• Steering: fault. Please stop vehicle
If the warning lamp Lights up permanently and
the message appears, there may be a power
steering failure.
Stop the vehicle in a safe place as soon as possi
ble. Do NOT drive on. Obtain professional assis
tance.
� Steering: fault. You can continue driving
If the indicator lamp lights up, the steering re
sponse may be heavier or Lighter than usual. In
addition, it is possible that the steering wheel
will be off centre when driving in a straight Line.
Drive slowly to a qualified workshop and have the
fault rectified.
('!)) Note
You can drive on if the warning/indicator
lamp . or� Lights up only briefly.
Four-wheel drive
(quattro)
Applies to: vehicles with four-wheel drive
On quattro models the engine power is distrib
uted to all four wheels.
General notes
On four-wheel drive vehicles, the engine power is
distributed to all four wheels. The distribution of
power is controlled automatically according to
your driving style and the road conditions. Also
refer to¢ page 113, Electronic stabilisation con
trol (ESC).
The four-wheel drive is specially designed to
complement the superior engine power of your
Audi. This combination gives the car exceptional
handling and performance capabilities -both on
normal roads and in more difficult conditions,
such as snow and ice. Even so (or perhaps espe
cially for this reason), it is important to observe
certain safety points¢&.
�
Page 120 of 306
Downloaded from www.Manualslib.com manuals search engine Intelligent
technology
A WARNING
When extending or retracting the rear spoiler,
please make sure that no persons or objects
are close to the moving spoiler -risk of injury!
CD CAUTION
- If you need to push the vehicle, never put
your weight on the rear spoiler -Risk of
damage!
- To avoid damage to the rear spoiler, you
should not lean on it or apply any other type
of pressure.
- Do not operate the rear spoiler manually
when the boot lid is open or any moving
parts of the automatic rear spoiler are ob
structed -risk of damage!
Note
Clean the rear spoiler housing every 2 to 3
months. The rear spoiler housing must be
free of ice, snow and leaves in order to oper
ate correctly.
Power management
This system helps to ensure reliable
starting
The power management controls the distribu
tion of electrical energy and thus helps to ensure
that there is always enough power available to
start the engine.
If a vehicle with a conventional electrical system
is left parked for a long time, the vehicle battery
will gradually lose its charge because certain
electrical equipment (such as the immobiliser)
continues to draw current even when the ignition
is off. In some cases there may not be enough
power available to start the engine.
Your vehicle is equipped with an intelligent pow
er management system to control the distribu
tion of electrical energy. This significantly im
proves reliability when starting the engine, and
also prolongs the life of the vehicle battery.
The main functions incorporated in the power
management system are battery diagnosis, re-
118 sidual
current management and dynamic power
management.
Battery diagnosis
The battery diagnosis function constantly regis
ters the condition of the vehicle battery. Sensors
detect the battery voltage, battery current and
battery temperature. This enables the system to
calculate the current power level and charge con
dition of the vehicle battery.
Residu al current management
The residual current management reduces power
consumption while the vehicle is parked. It con
trols the supply of power to the various electrical
components while the ignition is switched off.
The system takes the battery diagnosis data into
consideration.
Depending on the power level of the vehicle bat
tery, the individual electrical components are
switched off one after the other to prevent the
vehicle battery from losing too much charge and
to ensure that the engine can be started reliably.
Dynamic power management
While the vehicle is moving, this function distrib
utes the available power to the various electrical
components and systems according to their re
quirements. It ensures that on-board systems do
not consume more electrical power than is being
generated, and thus maintains the maximum
possible vehicle battery power level.
.
1 Note
- The power management system is not able
to overcome the given physical limits.
Please remember that the power and life of
the vehicle battery are limited.
- If the indicator lamp ri'.J ¢ page 15 appears,
the starting ability may be impaired.
Points to remember
Starting ability has first priority.
Short trips, city traffic and low temperatures all
place a heavy load on the vehicle battery. In
these conditions a large amount of power is
Page 143 of 306
Downloaded from www.Manualslib.com manuals search engine 0
N
,.....
N
......
0
,.....
Vl
CX) Telephone
Introduction
Applies to: vehicles with telephone
You have different options for making calls in
your vehicle via the MMI; this depends on your
vehicle's equipment and the features of your mo
bile phone.
Handsfree operation
After connecting your mobile phone to the MMI
system via Bluetooth, you can operate the hands
free system and the telephone functions conven
iently via the MMI. Your phone calls will be made
via the antenna of your mobile phone.
With the Audi phone box*, you can use the vehi
cle's external aerial to make calls. The use of the
external aerial reduces radiation in the vehicle
and also ensures better reception quality
¢page 146.
Car phone d
)
As part of Audi connect*, the Audi phone box* in
cludes a car telephone function which can be
used via a separate mini SIM card in the SIM card
reader* or an rSAP 2
>-enabled mobile phone. With
the car telephone function, you can use the vehi
cle's external aerial to make calls. The use of the
external aerial reduces radiation in the vehicle
and also ensures better reception quality
¢page 146.
Once a connection has been established success
fully, you can also change the profiles at a later
time. Refer to¢ page 213, Connection manag
er.
A WARNING
- According to health organisations, mobile
phones may interfere with the function of
pacemakers. A minimum distance of 20 cm
should be kept between the mobile phone
aerial and the pacemaker.
l) Not available in all markets. On vehicles with Audi con
nect* and Audi phone box*
2 > Remote SIM Access Profile Telephone
- Do not carry a mobile phone in your breast
pocket directly over the pacemaker when
the phone is switched on.
- If you suspect interference, switch the
mobile phone off immediately.
- The speech dialogue system*¢ page 133
must not be used in cases of emergency,
since the voice changes in stressful situa
tions. This could result in a failed or delayed
telephone connection. Always dial emergen
cy numbers manually!
- Switch off your mobile phones in all areas
where there may be a risk of explosion. Re
member that these areas may not always be
adequately marked. Such places are filling
stations, fuel and chemical storage facilities
or transport vehicles and other places where
fumes, chemicals (e.g. from leaking pro
pane or fuel vapours in vehicles or build
ings) or large quantities of dust particles
(e.g. from flour, wood or metal) could accu
mulate in the air. This warning also applies
to all other places where you would normal
ly switch off your engine.
- Today's driving conditions require the full
attention of drivers. Please always note the
information in the chapter ¢page 121,
Notes on traffic safety.
CD CAUTION
Please always observe the information ¢(Din
Wi-Fi hotspot on page 166.
- For information regarding which Bluetooth
connections and functions your mobile
phone supports, contact your mobile net
work
service
provider or consult the mobile
device database at www.audi.com/blue
tooth.
- The maximum range of the Bluetooth con
nection is limited to the interior of the vehi
cle. The connection can be susceptible to in-
terference from other electronic devices.
..,.
141
Page 200 of 306
Downloaded from www.Manualslib.com manuals search engine Media
Audi music interface
Applies to: vehicles with Audi music interface
You can connect your mobile devices via the Audi
music interface in order to charge the battery
and operate the devices via the MMI.
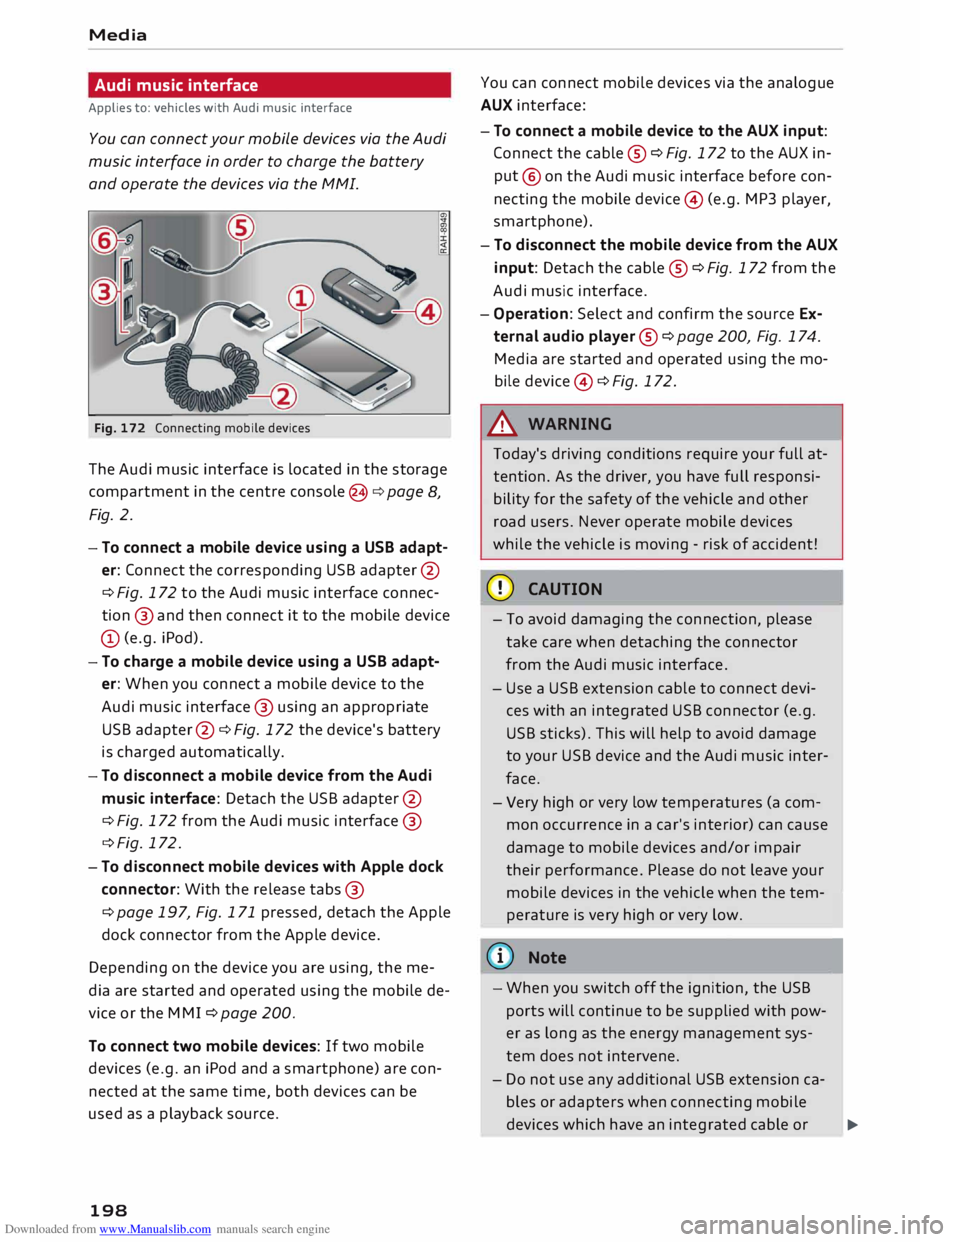
Fig. 172 Connecting mobile devices
The Audi music interface is Located in the storage
compartment in the centre console @c:> page 8,
Fig. 2.
- To connect a mobile device using a USB adapt
er: Connect the corresponding USB adapter @
c> Fig. 172 to the Audi music interface connec
tion @ and then connect it to the mobile device
(D (e.g. iPod).
- To charge a mobile device using a USB adapt
er: When you connect a mobile device to the
Audi music interface @ using an appropriate
USB adapter @ c:> Fig. 172 the device's battery
is charged automatically.
- To disconnect a mobile device from the Audi
music interface: Detach the USB adapter @
c> Fig. 172 from the Audi music interface @
c> Fig. 172.
- To disconnect mobile devices with Apple dock
connector: With the release tabs@
c> page 197, Fig. 171 pressed, detach the Apple
dock connector from the Apple device.
Depending on the device you are using, the me
dia are started and operated using the mobile de
vice or the MM I c:> page 200.
To connect two mobile devices: If two mobile
devices (e.g. an iPod and a smartphone) are con
nected at the same time, both devices can be
used as a playback source.
198 You
can connect mobile devices via the analogue
AUX interface:
- To connect a mobile device to the AUX input:
Connect the cable ® c:> Fig. 172 to the AUX in
put @ on the Audi music interface before con
necting the mobile device@ (e.g. MP3 player,
smartphone).
- To disconnect the mobile device from the AUX
input: Detach the cable ® c:> Fig. 172 from the
Audi music interface.
- Operation: Select and confirm the source Ex
ternal audio player @ c:> page 200, Fig. 174.
Media are started and operated using the mo
bile device @ c:> Fig. 172.
A WARNING
Today's driving conditions require your full at
tention. As the driver, you have full responsi
bility for the safety of the vehicle and other
road users. Never operate mobile devices
while the vehicle is moving -risk of accident!
CD CAUTION
- To avoid damaging the connection, please
take care when detaching the connector
from the Audi music interface.
- Use a USB extension cable to connect devi
ces with an integrated USB connector (e.g.
USB sticks). This will help to avoid damage
to your USB device and the Audi music inter
face.
- Very high or very Low temperatures (a com
mon occurrence in a car's interior) can cause
damage to mobile devices and/or impair
their performance. Please do not Leave your
mobile devices in the vehicle when the tem
perature is very high or very Low.
@ Note
-When you switch off the ignition, the USB
ports will continue to be supplied with pow-
er as long as the energy management sys-
tem does not intervene.
- Do not use any additional USB extension ca
bles or adapters when connecting mobile
devices which have an integrated cable or
�
Page 202 of 306
Downloaded from www.Manualslib.com manuals search engine Media
- To disconnect mobile devices with Apple dock
connector: With the release tabs®
¢ page 197, Fig. 171 pressed, detach the Apple
dock connector from the Apple device.
A WARNING
Today's driving conditions require your full at
tention. As the driver, you have full responsi
bility for the safety of the vehicle and other
road users. Never use mobile devices while
the vehicle is moving -risk of accident!
CD CAUTION
- To avoid damaging the connection on the
Audi music interface, please take care when
unplugging the connector from the AUX in
put or the USB charging socket.
- Very
high or very low temperatures (a com
mon occurrence in a car's interior) can cause
damage to mobile devices and/or impair
their performance. Please do not leave your
mobile devices in the vehicle when the tem
perature is very high or very low.
({D Note
-When you switch off the ignition, the USB
ports will continue to be supplied with pow
er as long as the energy management sys
tem does not intervene.
- USB charging sockets marked
I CHARGE
ONL vi
cannot transfer data and
are intended for charging only.
- Do not use any additional USB extension ca
bles or adapters when connecting mobile
devices which must be connected to the USB
charging socket®¢ Fig. 173 via a USB
adapter (¢ page 197); this could cause per
formance issues.
- The AUX adapter cable is available from
Audi dealers or specialist retailers.
- USB hubs are not supported.
- Please refer to the operating instructions of
your mobile device for important informa
tion on its operation.
- It
cannot be guaranteed that all mobile de
vices will function without any problems.
200 -
Using a mobile device with the engine
switched off will drain the vehicle's battery.
-Audi recommends setting the volume of a
mobile device connected to the AUX input to
about 70 % of maximum.
Playing media
Calling up media
You can start and operate various types of media
via the MMI control console.
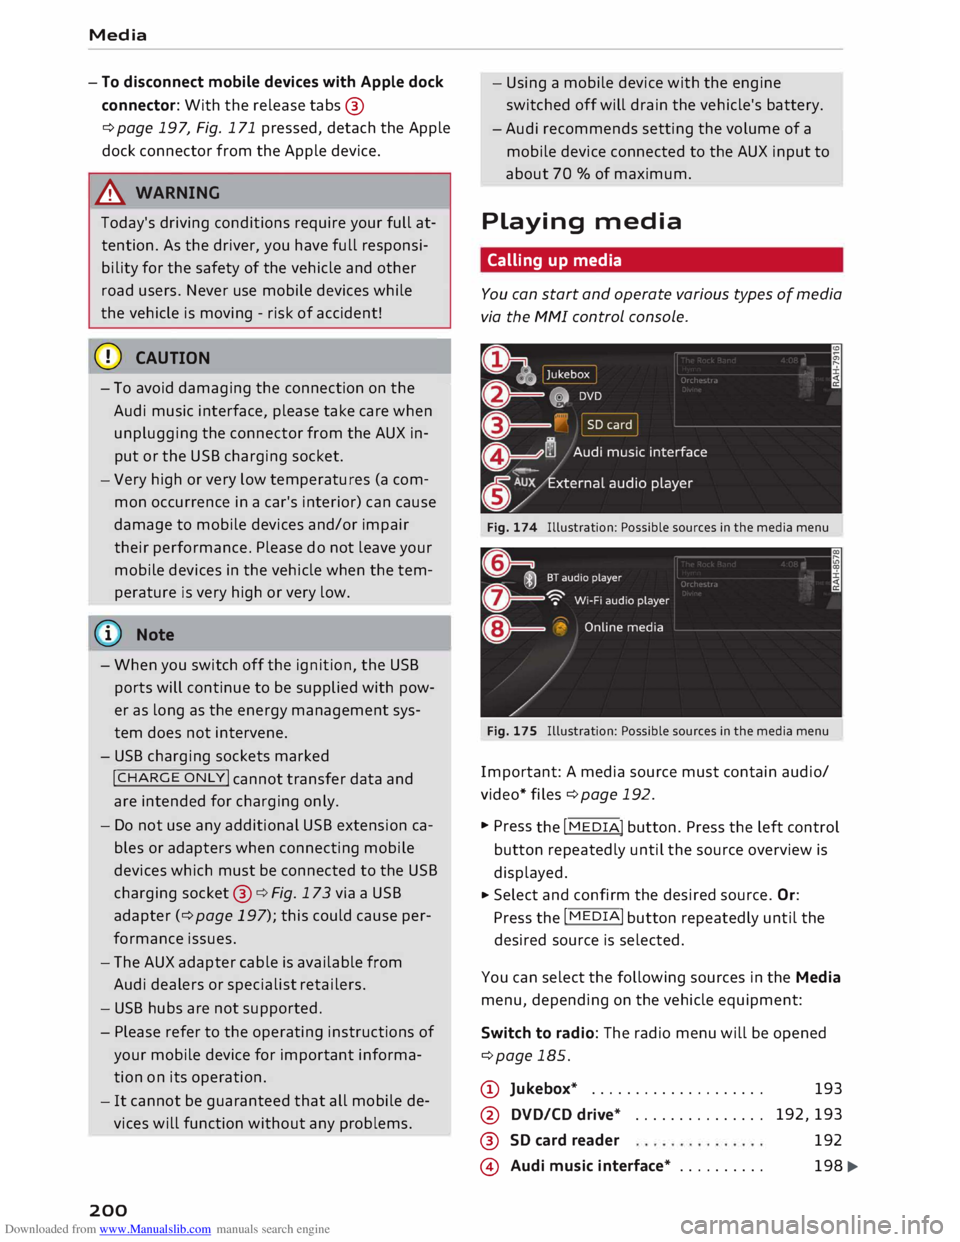
Fig. 174 Illustration: Possible sources in the media menu
Fig. 175 Illustration: Possible sources in the media menu
Important: A media source must contain audio/
video* files ¢page 192.
... Press
the I
ME
DIA !
button. Press the left control
button repeatedly until the source overview is
displayed.
... Select
and confirm the desired source. Or:
Press the I
MEDI Ai
button repeatedly until the
desired source is selected.
You can select the following sources in the Media
menu, depending on the vehicle equipment:
Switch to radio: The radio menu will be opened
¢page 185.
(D Jukebox* ................... .
@ DVD/CD drive* .............. .
®
@ SD
card reader
Audi music interface* ......... . 193
192,193 192
198 �