sensor AUDI TT ROADSTER 2016 Owner's Manual
[x] Cancel search | Manufacturer: AUDI, Model Year: 2016, Model line: TT ROADSTER, Model: AUDI TT ROADSTER 2016Pages: 306, PDF Size: 31.82 MB
Page 110 of 306
Downloaded from www.Manualslib.com manuals search engine Parking
aids
Park assist with 360°
display
Description
Applies to: vehicles with park assist
The park assist helps the driver to manoeuvre
the vehicle into and out of parking spaces.
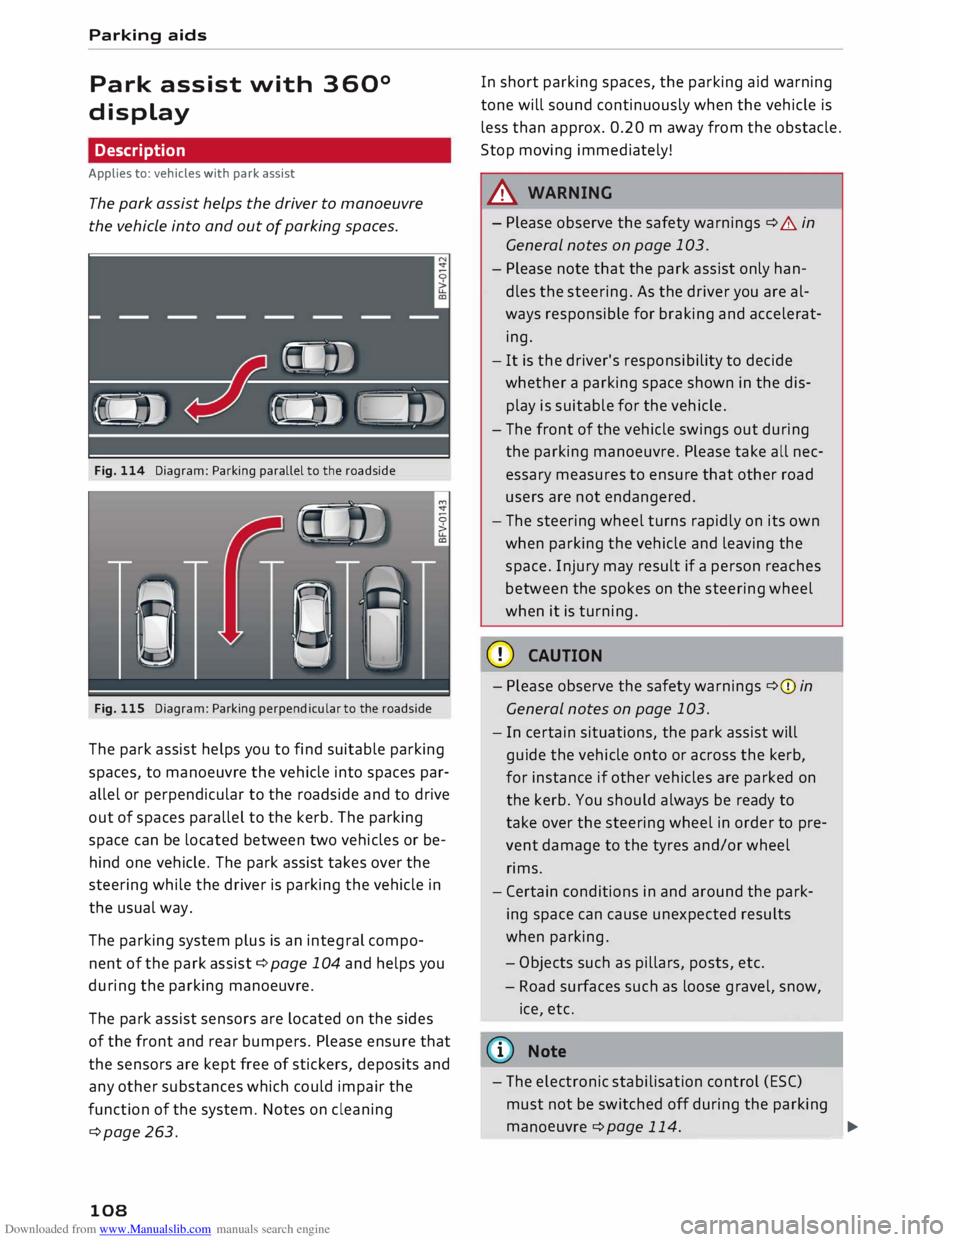
Fig. 114 Diagram: Parking parallel to the roadside
Fig. 115 Diagram: Parking perpendicular to the roadside
The park assist helps you to find suitable parking
spaces, to manoeuvre the vehicle into spaces par
allel or perpendicular to the roadside and to drive
out of spaces parallel to the kerb. The parking
space can be located between two vehicles or be
hind one vehicle. The park assist takes over the
steering while the driver is parking the vehicle in
the usual way.
The parking system plus is an integral compo
nent of the park assist c:::> page 10
4 and
helps you
during the parking manoeuvre.
The park assist sensors are located on the sides
of the front and rear bumpers. Please ensure that
the sensors are kept free of stickers, deposits and
any other substances which could impair the
function of the system. Notes on cleaning
c:::>page 263.
108 In
short parking spaces, the parking aid warning
tone will sound continuously when the vehicle is
less than approx. 0.20 m away from the obstacle.
Stop moving immediately!
A WARNING
- Please observe the safety warnings c:::> &. in
General notes on page 103.
- Please note that the park assist only han
dles the steering. As the driver you are al
ways responsible for braking and accelerat
ing.
- It is the driver's responsibility to decide
whether a parking space shown in the dis
play is suitable for the vehicle.
- The front of the vehicle swings out during
the parking manoeuvre. Please take all nec
essary measures to ensure that other road
users are not endangered.
- The steering wheel turns rapidly on its own
when parking the vehicle and leaving the
space. Injury may result if a person reaches
between the spokes on the steering wheel
when it is turning.
CD CAUTION
- Please observe the safety warnings c:::>(j) in
General notes on page 103.
- In certain situations, the park assist will
guide the vehicle onto or across the kerb,
for instance if other vehicles are parked on
the kerb. You should always be ready to
take over the steering wheel in order to pre
vent damage to the tyres and/or wheel
rims.
- Certain conditions in and around the park
ing space can cause unexpected results
when parking.
- Ob j
ects such as pillars, posts, etc.
- Road surfaces such as loose gravel, snow,
ice, etc.
ijJ} Note
- The electronic stabilisation control (ESC)
must not be switched off during the parkingmano euvre
c:::>page
11
4
.
--
-- ---
-�
Page 114 of 306
Downloaded from www.Manualslib.com manuals search engine Parking
aids
After you select reverse gear, the vehicle has to
remain stationary for a moment so that the park
assist can activate the steering. Follow the direc
tions given in the display.
II Park assist: fault. Please contact workshop
Ill Park assist: fault. Continue steering vehicle!
Please contact workshop
Please contact a qualified workshop. The park as
sist cannot be used to park the vehicle if a system
fault occurs.
II Park assist: cancelled. Space too small. Con
tinue steering vehicle!
The park assist cannot be used to park the vehicle
in this space. Park the vehicle without using the
park assist or look for a bigger space.
Adjusting graphic display
and warning beeps
Applies to: vehicles with parking system plus/park assist
The settings for the graphic display and acoustic
signals are controlled via the infotainment sys
tem.
.. Select the following on the infotainment sys
tem: I MENU I button > Car > left control button
> Driver assist> Parking aid.
Warning beeps
Front volume -Volume for the front and side*
zones
Rear volume -Volume for the rear zone
In-car entertainment fader -The volume of the
current audio or video source is reduced when the
parking aid is switched on.
You will hear a short test tone each time you
make a new setting.
� Note
The settings will be automatically stored and
assigned to the remote control key in use.
112 Fault
warnings
Applies to: vehicles with rear parking aid/parking system
plus/park assist
Rear parking aid: fault. Obstacles cannot be de
tected
Parking aid: fault. Obstacles cannot be detected
If the LED in the P,J1A button starts flashing when
you switch the system on, a system fault has oc
curred. If the fault is not corrected before you
switch off the ignition, it will only be indicated by
the flashing LED in the P'),IA button the next time
you switch on the parking aid by engaging re
verse gear. The fault warning can be displayed in
the second tab of the driver information system
as long as the fault is active.
Parking system plus*/parking system plus
and park assist*
If a sensor or loudspeaker malfunctions, the�
symbol will be shown on the infotainment sys
tem in front of or behind the vehicle. If a rear
sensor malfunctions, obstacles will only be dis
played in zones (D and @ ¢page 104, Fig. 106.
If a front sensor malfunctions, obstacles will only
be displayed in zones @ and @ .
Drive to a qualified workshop soon and have the
fault rectified.
Page 120 of 306
Downloaded from www.Manualslib.com manuals search engine Intelligent
technology
A WARNING
When extending or retracting the rear spoiler,
please make sure that no persons or objects
are close to the moving spoiler -risk of injury!
CD CAUTION
- If you need to push the vehicle, never put
your weight on the rear spoiler -Risk of
damage!
- To avoid damage to the rear spoiler, you
should not lean on it or apply any other type
of pressure.
- Do not operate the rear spoiler manually
when the boot lid is open or any moving
parts of the automatic rear spoiler are ob
structed -risk of damage!
Note
Clean the rear spoiler housing every 2 to 3
months. The rear spoiler housing must be
free of ice, snow and leaves in order to oper
ate correctly.
Power management
This system helps to ensure reliable
starting
The power management controls the distribu
tion of electrical energy and thus helps to ensure
that there is always enough power available to
start the engine.
If a vehicle with a conventional electrical system
is left parked for a long time, the vehicle battery
will gradually lose its charge because certain
electrical equipment (such as the immobiliser)
continues to draw current even when the ignition
is off. In some cases there may not be enough
power available to start the engine.
Your vehicle is equipped with an intelligent pow
er management system to control the distribu
tion of electrical energy. This significantly im
proves reliability when starting the engine, and
also prolongs the life of the vehicle battery.
The main functions incorporated in the power
management system are battery diagnosis, re-
118 sidual
current management and dynamic power
management.
Battery diagnosis
The battery diagnosis function constantly regis
ters the condition of the vehicle battery. Sensors
detect the battery voltage, battery current and
battery temperature. This enables the system to
calculate the current power level and charge con
dition of the vehicle battery.
Residu al current management
The residual current management reduces power
consumption while the vehicle is parked. It con
trols the supply of power to the various electrical
components while the ignition is switched off.
The system takes the battery diagnosis data into
consideration.
Depending on the power level of the vehicle bat
tery, the individual electrical components are
switched off one after the other to prevent the
vehicle battery from losing too much charge and
to ensure that the engine can be started reliably.
Dynamic power management
While the vehicle is moving, this function distrib
utes the available power to the various electrical
components and systems according to their re
quirements. It ensures that on-board systems do
not consume more electrical power than is being
generated, and thus maintains the maximum
possible vehicle battery power level.
.
1 Note
- The power management system is not able
to overcome the given physical limits.
Please remember that the power and life of
the vehicle battery are limited.
- If the indicator lamp ri'.J ¢ page 15 appears,
the starting ability may be impaired.
Points to remember
Starting ability has first priority.
Short trips, city traffic and low temperatures all
place a heavy load on the vehicle battery. In
these conditions a large amount of power is
Page 230 of 306
Downloaded from www.Manualslib.com manuals search engine Safe
driving
� Note
- The tyre pressure must be adjusted accord
ing to the Load the vehicle is carrying
¢page 256.
-Air circulation in the vehicle helps reduce
fogging of the windows. Used air escapes
through ventilation slots in the rear of the
vehicle. Make sure that these ventilation
slots are not obstructed.
- Suitable belts for securing Loads to the fas
tening rings* are commercially available.
Fastening rings
Unsecured Loads are a hazard to all vehicle occu
pants.
AUDI
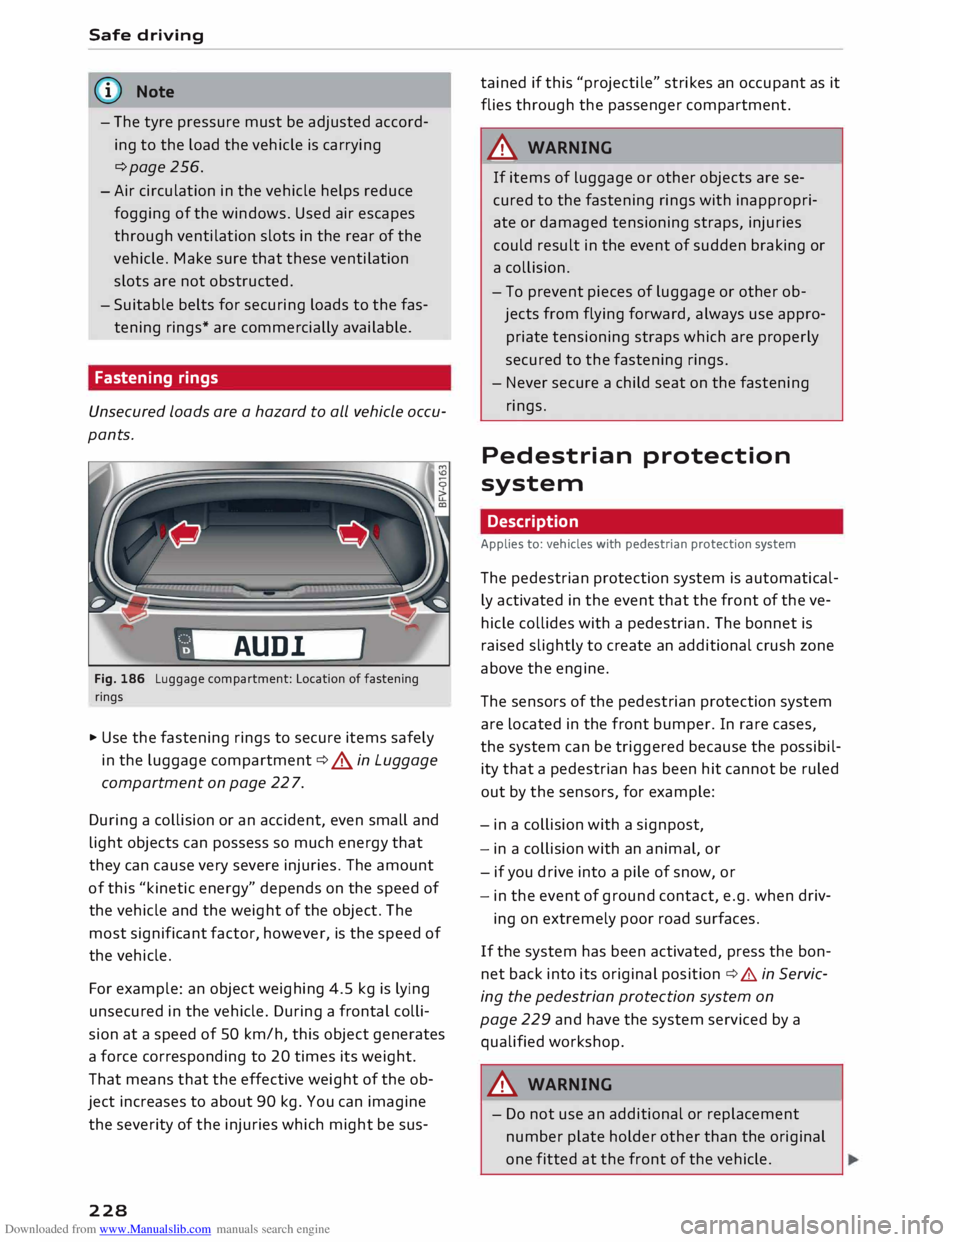
Fig. 186 Luggage compartment: Location of fastening
rings
� Use the fastening rings to secure items safely
in the Luggage compartment ¢.&. in Luggage
compartment on page 22 7.
During a collision or an accident, even small and
Light objects can possess so much energy that
they can cause very severe injuries. The amount
of this "kinetic energy" depends on the speed of
the vehicle and the weight of the object. The
most significant factor, however, is the speed of
the vehicle.
For example: an object weighing 4.5 kg is Lying
unsecured in the vehicle. During a frontal colli
sion at a speed of 50 km/h, this object generates
a force corresponding to 20 times its weight.
That means that the effective weight of the ob
ject increases to about 90 kg. You can imagine
the severity of the injuries which might be sus-
228 tained
if this "projectile" strikes an occupant as it
flies through the passenger compartment.
A WARNING
If items of Luggage or other objects are se
cured to the fastening rings with inappropri
ate or damaged tensioning straps, injuries
could result in the event of sudden braking or
a collision.
- To prevent pieces of Luggage or other ob
jects from flying forward, always use appro
priate tensioning straps which are properly
secured to the fastening rings.
- Never secure a child seat on the fastening
rings.
Pedestrian protection
system
Description
Applies to: vehicles with pedestrian protection system
The pedestrian protection system is automatical
ly activated in the event that the front of the ve
hicle collides with a pedestrian. The bonnet is
raised slightly to create an additional crush zone
above the engine.
The sensors of the pedestrian protection system
are Located in the front bumper. In rare cases,
the system can be triggered because the possibil
ity that a pedestrian has been hit cannot be ruled
out by the sensors, for example:
- in a collision with a signpost,
- in a collision with an animal, or
- if you drive into a pile of snow, or
- in the event of ground contact, e.g. when driv-
ing on extremely poor road surfaces.
If the system has been activated, press the bon
net back into its original position ¢.&. in Servic
ing the pedestrian protection system on
page 229 and have the system serviced by a
qualified workshop.
A WARNING
- Do not use an additional or replacement
number plate holder other than the original
one fitted at the front of the vehicle.
Page 237 of 306
Downloaded from www.Manualslib.com manuals search engine 0
N
,.....
N
......
0
,.....
Vl
CX) Airbag
system
Description of airbag
system
General notes on airbag system
The airbag is an integral part of the car's passive
safety system.
In conjunction with the seat belts, the airbag sys
tem gives the front occupants additional protec
tion for the head and chest in the event of a se
vere frontal collision.
In a severe side collision the side airbags reduce
the risk of injury to the occupants ¢,&..
In addition to their normal function of protecting
the occupants in a collision, the seat belts also
hold them in a position where the airbags can in
flate properly and provide maximum protection.
The airbag system will only work with the igni
tion on. The airbag system is monitored electron
ically; the indicator lamp m indicates whether
the system is functioning properly.
The main parts of the airbag system are:
- The electronic monitoring system (control unit
and sensors)
- The two front airbags
- The two side airbags
- The indicator lamp El in the instrument cluster
There is a fault in the airbag system if the
warning lamp
- does not come on when the ignition is switched
on.
- does not go out about 4 seconds after the igni
tion is switched on.
- goes out and then comes on again after the ig
nition is switched on.
- comes on or flickers while the car is moving.
A WARNING
- The airbags are not a substitute for the seat
belts; they are an integral part of the car's
overall passive safety system. The airbags
can only offer effective protection if the oc
cupants are wearing their seat belts. For Airbag
system
this reason it is very important to wear the
seat belts at all times ¢ page 230, Why is it
so important to use seat belts?.
- The seat belts and airbags can only provide
maximum protection if the occupants are
seated correctly ¢ page 54, Front seats.
- If you do not wear a seat belt, if you lean
forward, or are not seated correctly while
the vehicle is in motion, you are at greater
risk of injury should the airbag system be
triggered in an accident.
- Components of the airbag system are loca
ted in various parts of the vehicle. If repairs
to other vehicle components make it neces
sary to perform work on the airbag system
or to remove or install parts of the airbag
system, this may cause damage to the air
bag system. As a result, the airbags may not
inflate correctly or may not be triggered at
all in an accident situation. For this reason,
you should always have the work carried out
by a qualified workshop.
- If a fault should occur in the airbag system,
have the system checked immediately by a
qualified workshop. Otherwise the system
may fail to trigger in an accident.
- Do not attempt to modify components of
the airbag system in any way.
- Never make any alterations to the front
bumper or the body.
- Do not remove the seats.
- The airbag system can only be activated
once; if the airbag has been triggered, the
system must be replaced. Should the airbag
system or airbag modules have to be re
placed, the qualified workshop carrying out
the replacement will document all details.
- If any repair work is required or the airbag
and restraint systems have to be replaced,
have the work carried out by your authorised
Audi dealer or a qualified workshop which
adheres to the Audi factory standards. This
will minimise the risk of injury.
- If you sell the vehicle, remember to pass on
the complete Service Wallet to the new
owner. If any of the airbags have been deac
tivated, it is important that the new owner
is also given the relevant documents.
..,.
235
Page 238 of 306
Downloaded from www.Manualslib.com manuals search engine Airbag
system
- The relevant safety requirements must be
observed when the vehicle or components
of the airbag or belt tensioner systems are
scrapped.
- For safety reasons, the alternator and the
starter are both disconnected from the bat
tery via a pyrotechnic circuit breaker in se
vere accidents.
- Any repairs to the pyrotechnic circuit
breaker must always be performed by a
qualified workshop -risk of accident!
- The relevant safety requirements must be
observed when the vehicle or the circuit
breaker are scrapped.
When are the airbags triggered?
One or more airbag systems are triggered in se
vere collisions, depending on the circumstances.
Factors determining the triggering response
It is not possible to define the exact triggering
response of the airbag system in all possible sit
uations, since the circumstances in different
types of accident will vary considerably. Impor
tant factors
include,
for example, the nature
(hard or soft) of the object which the car hits, the
angle of impact, vehicle speed and so on.
Whether the airbags are triggered depends pri
marily on the vehicle deceleration rate resulting
from the collision. By processing the signals from
the sensors located in the vehicle, the electronic
control unit is immediately able to evaluate the
severity of the collision and activate the restraint
systems accordingly. If the deceleration rate is
below the predefined reference value in the con
trol unit the airbags will not be triggered, even
though the accident may cause extensive damage
to the car. In these situations, the occupants are
protected by wearing the seat belts.
({D Note
The airbag may release a fine dust when it in
flates. This is quite normal and does not
mean there is a fire in the vehicle.
1 1
Not available in all export vehicles.
236 Front
airbags
Important notes on passenger's airbag
A AIRBAG
t '�
'\34 CII)
c:::::J
®
ClO
ClO
\t'� J�
a
-� �:&
Fig. 197 Version 1, passenger's sun visor: Airbag sticker
AIRBAG
Fig. 198 Version 2, passenger's sun visor: Airbag sticker "'
M
....
c.o 0
"
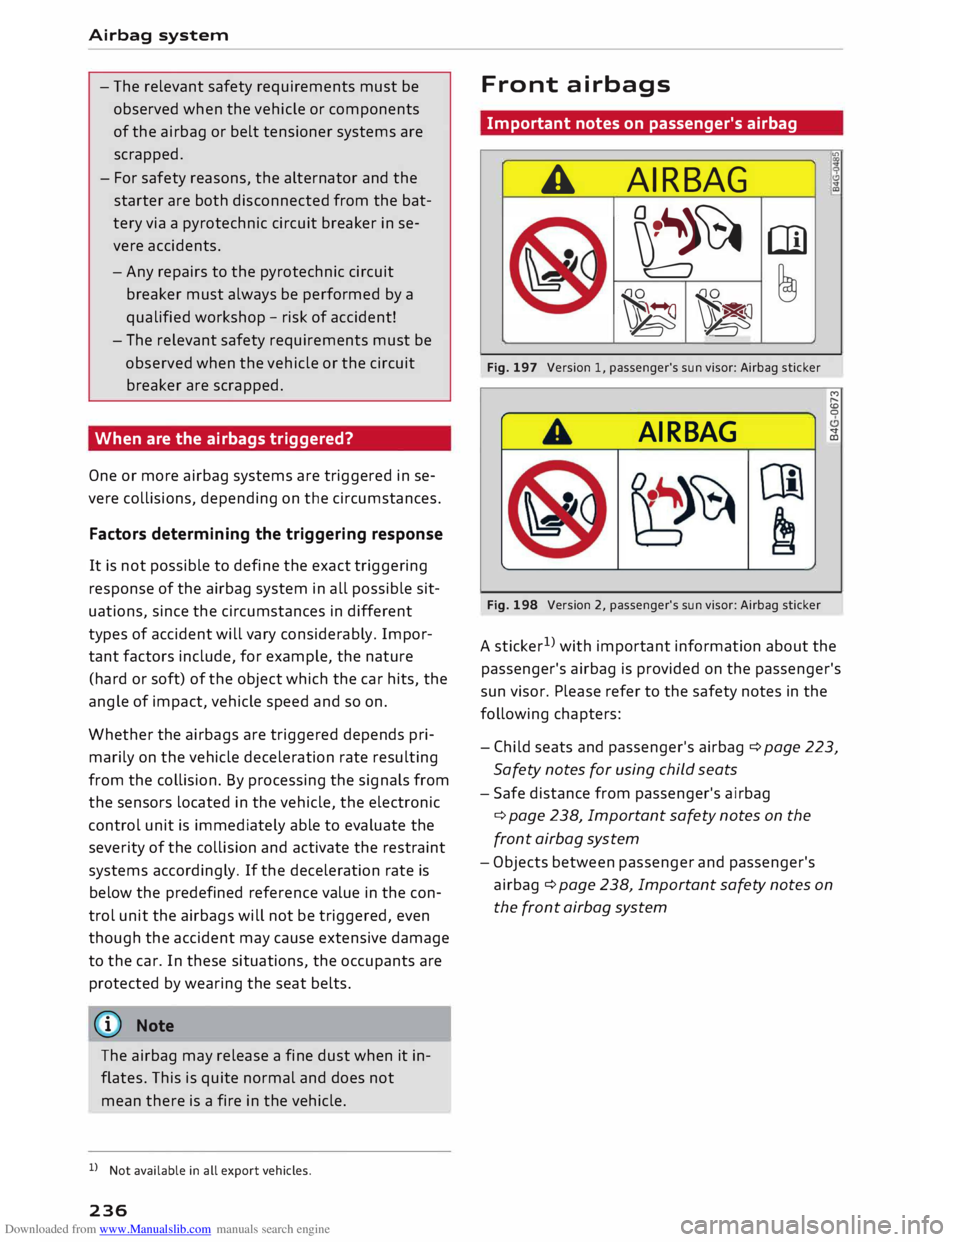
A sticker 1
>
with important information about the
passenger's airbag is provided on the passenger's
sun visor. Please refer to the safety notes in the
following chapters:
- Child seats and passenger's airbag c:::> page 223,
Safety notes for using child seats
- Safe distance from passenger's airbag
c:::> page 238, Important safety notes on the
front airbag system
- Objects between passenger and passenger's
airbag c:::> page 238, Important safety notes on
the front airbag system
Page 242 of 306
Downloaded from www.Manualslib.com manuals search engine Airbag
system
¢ Fig. 206. Further airbag systems may also be
triggered, depending on the circumstances.
When the system is triggered, the airbag is filled
with propellant gas.
In order to provide the desired extra protection in
an accident, the airbags have to inflate extremely
rapidly (within fractions of a second).
The fully deployed airbags cushion the impact for
the occupants and help to reduce the risk of in
jury to the upper part of the body on the side fac
ing the door.
Important safety notes on the side airbag
system
Applies to: vehicles with side airbags
There are a number of safety points concerning
the airbag system which you should remember.
This will help to reduce the risk of injury in an ac
cident.
A WARNING
- If you do not wear a seat belt, if you lean
forward, or are not seated correctly while
the vehicle is in motion, you are at greater
risk of injury should the side airbags be trig
gered in an accident.
- If children are not seated correctly, they are
at greater risk of injury in an accident. This
could result in serious or potentially fatal in
jury ¢page 223, Child seats.
- It is also important not to attach any acces
sories (such as cup holders) to the doors.
This would impair the protection offered by
the side airbags.
- The sensors for the airbags are located in
the doors. You must therefore not make any
modifications to the doors or door trim (e.g.
retrofitting loudspeakers), as this could im
pair the function of the side airbags. Any
damage to the doors could lead to faults in
the system. Repairs or any other work on
the doors must therefore always be carried
out by a qualified workshop.
- Do not apply excessive force to the sides of
the backrests (such as hard knocks or kicks),
as this could damage parts of the system.
240 The
side airbags could then fail to operate
when required.
- If you intend to fit protective covers over
the seats, these must be of the specific type
approved for use on Audi seats with side air
bags. Conventional seat covers would ob
struct the side airbag when it inflates out of
the backrest, and seriously reduce the air
bag's effectiveness.
- Any damage to the original seat upholstery
or around the seams of the side airbag units
must be repaired immediately by a qualified
workshop.
- Any work involving the side airbag system or
removal and installation of the airbag com
ponents for other repairs (such as repairs to
the seats) must always be performed by a
qualified workshop. Otherwise the airbag
system may fail to work properly.
Page 260 of 306
Downloaded from www.Manualslib.com manuals search engine Wheels
... Check that the snow chains are correctly seated
after driving for a few yards; follow the instruc
tions given by the manufacturer.
... Keep your speed below 50 km/h. Please ob-
serve the applicable local regulations.
For technical reasons snow chains may only be
used on tyres with certain wheel rim/tyre combi
nations.
Rim size Rim offset Tyre size
7Jx17 47 mm 225/50
8Jx19 52
mm
225/40
You must remove the snow chains on roads which
are free of snow; otherwise the vehicle handling
may be impaired and the tyres may be damaged.
A WARNING
Unsuitable or incorrectly mounted snow
chains can cause you to lose control of the ve
hicle -risk of accident!
CD CAUTION
- Snow chains can damage the rim/hubcap* if
they make direct contact with it. Remove
the hubcaps* beforehand. Use snow chains
which have a protective coating.
- If you use snow chains with links that pro
trude more than 13.5 mm, this could cause
severe damage to the wheel housings and
other parts of the vehicle.
({D Note
When driving with snow chains, it may help to
switch on sport mode ¢ page 114.
Low-profile tyres
Applies to: vehicles with low-profile tyres
Your vehicle is fitted with low-profile tyres* as
standard equipment. Low-profile tyres have a
lower sidewall and provide a wider tread surface
and rim diameter than other wheel/tyre combi
nations. This makes the car's handling more
agile. However, the ride may be less comfortable
on poor-quality roads and tracks, and rolling
noise may be louder.
258 Low-profile
tyres can be damaged more quickly
than standard tyres, for example by heavy jolts,
potholes, manhole covers, speed humps and
kerbs. It is therefore particularly important to
ensure that they are inflated to the correct pres
sure c:>page 256.
Drive with particular care on poor-quality roads
to ensure that you do not damage the rims and
tyres.
Make sure to check your wheels regularly (every
3,000 km) for damage such as blisters/tears on
the tyre sidewalls or deformations/cracks on the
rims.
After a heavy jolt, or if any damage occurs, you
should have the rims and tyres checked and if
necessary replaced by a qualified workshop.
Tyre wear occurs more quickly on low-profile
tyres than on standard tyres.
Summer tyres are not suitable for cold condi
tions, snow or ice. Use winter or all-season tyres
when driving in these conditions c:::> page 257.
Tyre pressure Loss
indicator
Tyre pressure loss indicator in instrument
cluster
Applies to: vehicles with tyre pressure loss indicator
The tyre pressure Loss indicator in the instrument
cluster informs the driver if the tyre pressure is
too Low or a system malfunction has occurred.
The tyre pressure loss indicator makes use of the
ABS sensors to compare the rolling circumfer
ence and the vibration of the tyres. If changes in
the inflation pressure are detected on one or
more tyres, the driver is alerted by an indicator
lamp [tE and a message on the infotainment dis
play. If only one tyre is affected, the display will
indicate its position.
Each time you change a tyre, change the wheels
round or change the tyre pressures on your vehi
cle (e.g. when switching from partial load to full
load and vice-versa), you must store the new tyre
pressures on the infotainment system
c:::> page 259. Monitoring of the tyre pressures is
�
Page 262 of 306
Downloaded from www.Manualslib.com manuals search engine Wheels
Tyre pressure
monitoring system
General notes
Applies to: vehicles with tyre pressure monitoring system
The tyre pressure monitoring system keeps a
check on the tyre pressures of the four road
wheels while you are driving.
The system uses sensors to measure tempera
tures and pressures in the tyres. The sensors
transmit the data to the control unit by radio.
The tyre pressure monitoring system displays the
current pressures and temperatures of the tyres
on the infotainment system while the vehicle is
moving ¢ page 260. In addition, it compares the
current tyre pressures with the stored tyre pres
sures and warns you if it detects a discrepancy
¢page 261.
The system cannot check if the stored tyre pres
sures correspond to the recommended tyre pres
sures for your vehicle. You must store the new
tyre pressures ¢ page 261:
- after every adjustment to the tyre pressures,
e.g. after changing the laden weight of your ve
hicle,
- after changing a wheel, or
- when using wheels with new wheel sensors.
.&_ WARNING
- The tyre pressure monitoring system helps
the driver to monitor the tyre pressures.
However, it is always the driver's responsi
bility to ensure that the tyres are at the cor
rect pressure.
- Never re-adjust the tyre inflation pressure
when the tyre is hot. This can cause serious
damage to the tyre or even a blow-out,
which could result in an accident.
- Under-inflated tyres flex more than they
should. This causes them to overheat. This
can cause tread separation and tyre blow
out, which could result in an accident.
- The tyre pressure monitoring system cannot
warn you of tyre damage or defects that
could lead, for example, to a tyre blow-out.
Perform a regular visual check of your tyres.
260 (I))
Note
- The sensors and valves do not have to be de
tached or changed round when fitting new
tyres. Only the valve core needs to be re
placed, and if necessary the valve and the
electronic components in the wheel. Please
contact a qualified workshop if you have any
questions.
-After using the tyre repair kit, the tyre pres
sure monitoring system may malfunction.
Have the sensors renewed by a qualified
workshop.
Displaying tyre pressures and temperatures
Applies to: vehicles with tyre pressure monitoring system
Important: The vehicle must be moving.
.. Select the following on the infotainment sys
tem: !MENU! button> Servicing & checks >
Tyre pressure loss indicator > Display tyre
pressures.
The current tyre pressures are displayed in green,
yellow or red on the infotainment system:
- Green: The tyre pressure is roughly the same as
the reference value.
- Yellow: The tyre pressure is too low compared
with the reference value.
- Red: The tyre pressure is much too low com-
pared with the reference value.
The reference value is the last stored tyre pres
sure value ¢ page 261.
Bear in mind that the tyre inflation pressure is al
so influenced by the temperature of the tyre. The
tyre heats up while the vehicle is being driven
and the tyre pressure will rise accordingly.
.&_ WARNING
Please observe the important safety informa-
tion and notes ¢ page 260.
�
Page 263 of 306
Downloaded from www.Manualslib.com manuals search engine 0
N
,.....
N
......
0
,.....
Vl
CX) (D)
Note
The tyre pressures and temperatures are not
shown in the display when the vehicle is sta
tionary or during the initialisation phase. Hor
izontal dashes--.--will appear instead of the
pressure and temperature figures.
(1) Loss of tyre pressure
Applies to: vehicles with tyre pressure monitoring system
If the indicator lamp RE appears, the tyre pres
sure on at least one of the wheels is too low or
new sensors have not yet been initialised.
Indicator lamp [Bl lights up after switching
on the ignition
The tyre pressure is too low compared with the
reference value.
... Adjust the pressure of the relevant tyre(s) at
the next opportunity and store the pressures
¢page 261.
Indicator lamp [Bl lights up during a journey
Wheels with new sensors have not yet been ini
tialised or the tyre pressure has reached a critical
level compared with the reference value.
... Avoid unnecessary braking and steering ma
noeuvres.
... Adapt your driving style to the prevailing condi
tions.
... As soon as you can do so safely, stop and check
the tyre(s).
... If it is possible to continue driving, you should
take the vehicle to a qualified workshop and
have the defective tyre(s) repaired or replaced
immediately.
A WARNING
Please observe the important safety informa
tion and notes ¢page 260. Wheels
Storing new tyre pressures
Applies to: vehicles with tyre pressure monitoring system
To enable the tyre pressure monitoring system
to work reliably, it is important to store the cor
rect pressure settings.
You should always store the tyre pressures if new
sensors are fitted or after changing the pressures
when carrying a different amount of passengers
or luggage.
... Before storing the new tyre pressures, check
that the current pressures on all four wheels
correspond to the specified values and adapt
the pressures to the current load ¢ page 256,
Fig. 222. Only adjust and store the inflation
pressure of the tyres when they are at approxi
mately ambient temperature. If the tyre tem
peratures are higher than the ambient temper
ature, the inflation pressures should be in
creased by approx. 0.2 bar above the pressures
specified on the tyre pressure sticker.
... Switch on the ignition.
... Select the following on the infotainment sys
tem: I MENU I button > Servicing & checks >
Tyre pressure loss indicator > Store tyre pres
sures > Yes, store now. The tyre pressure moni
toring system will then measure the current
tyre pressures when you drive the vehicle and
store them as the new reference values .
... If the new tyre pressures do not appear on the
infotainment display, you will need to drive for
about 10 minutes so that the sensor signal
from the wheels can be received again .
During this initialisation phase,--.--will be
shown on the pressure and temperature display
and some functions of the tyre pressure monitor
ing system will not be available. The system will
warn you only if the pressure of one or more tyres
is below the minimum reference pressure.
If the indicator lamp RE lights up and the mes
sage Tyre pressure: wheel change detected.
Please check all tyres and store pressures in
MMI appears, the system has detected that the
sensor positions have changed because of a
wheel change or that new sensors have been fit-
ted. Store the new tyre pressures.
llll-
261