fuel AUDI TT ROADSTER 2016 Owners Manual
[x] Cancel search | Manufacturer: AUDI, Model Year: 2016, Model line: TT ROADSTER, Model: AUDI TT ROADSTER 2016Pages: 306, PDF Size: 31.82 MB
Page 6 of 306
Downloaded from www.Manualslib.com manuals search engine Table
of Contents
Audi smartphone interface . . . . . . 210
Setting up.......................... 210
How to use . . . . . . . . . . . . . . . . . . . . . . . . . 211
Troubleshooting..................... 211
System settings .................. 212
Setting the time and date . . . . . . . . . . . . .
212
MMI settings . . . . . . . . . . . . . . . . . . . . . . .
212
Connection manager . . . . . . . . . . . . . . . . .
213
System update . . . . . . . . . . . . . . . . . . . . . .
216
On-board Handbook.................. 216
Sound settings . . . . . . . . . . . . . . . . . . . . . .
217
Volume settings ..................... 217
Restarting the MMI system (Reset) . . . . . 218
Notes on software licences 218
Safety ............................ 220
Safe driving . . . . . . . . . . . . . . . . . . . . . . 220
General notes . . . . . . . . . . . . . . . . . . . . . . .
220
Correct sitting positions . . . . . . . . . . . . . . 221
Child seats . . . . . . . . . . . . . . . . . . . . . . . . .
223
Securing a child seat . . . . . . . . . . . . . . . . .
225
Pedal area . . . . . . . . . . . . . . . . . . . . . . . . . . 226
Stowing luggage safely . . . . . . . . . . . . . . .
227
Pedestrian protection system . . . . . . . . . . 228
Seat belts . . . . . . . . . . . . . . . . . . . . . . . .
230
Why is it so important to use seat belts? . 230
Forces acting in a collision . . . . . . . . . . . . .
231
How to wear seat belts properly . . . . . . . .
232
Belt tensioners . . . . . . . . . . . . . . . . . . . . . .
234
Airbag system . . . . . . . . . . . . . . . . . . . . 235
Description of airbag system . . . . . . . . . . .
235
Front airbags . . . . . . . . . . . . . . . . . . . . . . .
236
Side airbags . . . . . . . . . . . . . . . . . . . . . . . .
239
Service and care . . . . . . . . . . . . . . . . . . 241
Checking and topping up fluids . 241
Fuel . . . . . . . . . . . . . . . . . . . . . . . . . . . . . . . 241
Filling the tank . . . . . . . . . . . . . . . . . . . . . . 242
Emission control systems . . . . . . . . . . . . . 244
Engine compartment . . . . . . . . . . . . . . . . . 244
Engine oil . . . . . . . . . . . . . . . . . . . . . . . . . .
247
Cooling system . . . . . . . . . . . . . . . . . . . . . .
249
Brake fluid . . . . . . . . . . . . . . . . . . . . . . . . .
250
Battery . . . . . . . . . . . . . . . . . . . . . . . . . . . .
250
4 Windscreen
washer . . . . . . . . . . . . . . . . . .
252
Service interval display . . . . . . . . . . . . . . .
252
Wheels ........................... 254
Tyres and rims . . . . . . . . . . . . . . . . . . . . . .
254
Tyre pressure loss indicator . . . . . . . . . . . . 258
Tyre pressure monitoring system . . . . . . .
260
Care of vehicle and cleaning . . . . .
263
General notes . . . . . . . . . . . . . . . . . . . . . . .
263
Washing the vehicle . . . . . . . . . . . . . . . . . .
263
Notes on cleaning and care . . . . . . . . . . . . 264
Taking the vehicle out of service . . . . . . . . 268
Self-help . . . . . . . . . . . . . . . . . . . . . . . . .
269
Mobility . . . . . . . . . . . . . . . . . . . . . . . . . . 269
General notes . . . . . . . . . . . . . . . . . . . . . . .
269
Equipment . . . . . . . . . . . . . . . . . . . . . . . . .
269
Tyre repair kit . . . . . . . . . . . . . . . . . . . . . . .
270
Changing a wheel . . . . . . . . . . . . . . . . . . . .
272
Spare wheel . . . . . . . . . . . . . . . . . . . . . . . .
276
Jump-starting . . . . . . . . . . . . . . . . . . . . . . .
277
Tow-starting / towing away. . . . . . . . . . . . 278
Fuses and bulbs . . . . . . . . . . . . . . . . . .
282
Fuses.............................. 282
Bulbs.............................. 284
Accessories and technical data . . 285
Accessories and modifications
to the vehicle . . . . . . . . . . . . . . . . . . . . . 285
Accessories, replacement parts and
repairs . . . . . . . . . . . . . . . . . . . . . . . . . . . . 285
Modifications . . . . . . . . . . . . . . . . . . . . . . . 285
Radio transmitters and business
equipment . . . . . . . . . . . . . . . . . . . . . . . . . 286
Technical data . . . . . . . . . . . . . . . . . . . . 287
Vehicle identification
data . . . . . . . . . . . . . 287
Explanation of technical data . . . . . . . . . . 287
Dimensions . . . . . . . . . . . . . . . . . . . . . . . . . 288
Capacities . . . . . . . . . . . . . . . . . . . . . . . . . . 288
Weights . . . . . . . . . . . . . . . . . . . . . . . . . . .
288
Engine data . . . . . . . . . . . . . . . . . . . . . . . .
289
Index ............................. 290
Page 8 of 306
Downloaded from www.Manualslib.com manuals search engine FAQs
FAQs
Before you set off
- How do I adjust the seats? ¢ page 54.
- How do I adjust the steering wheel?
¢page 68.
- How does the selector lever for the automatic
gearbox work? ¢ page 77.
- How does the electro-mechanical parking brake
work? ¢page 74.
- How do I adjust the exterior mirrors?
¢page 48.
- How do I refuel my vehicle? ¢ page 242.
- How do
I operate
the windscreen wipers on
vehicles with rain sensor? ¢ page 50.
- Where is the windscreen washer container?
¢page 246.
- How can I store the tyre pressures?
¢page 259 or ¢page 261.
Breakdowns and
emergencies
- How do I jump-start the vehicle? ¢page 277.
- Where can I find the warning triangle?
¢page 269.
- Where can I find the first-aid kit? ¢ page 269.
- Where can I find the recommended tyre pres-
sures? ¢ page 256.
- Which airbags are installed in my vehicle?
¢page 235.
- Where are the towline anchorages on the vehi
cle? ¢page 278.
- How can I release the tank flap manually?
¢page 244.
Useful functions
- How can I use the parking aid?¢ page 103.
- How do I operate the main beam assist for the
headlights? ¢ page 46.
- How can I drive off more easily? ¢ page 76,
Driving off with the hold assist.
- How can I stay in my lane more easily?
6 ¢
page 92, Audi active lane assist (lane de
parture warning feature). -
How can I check the blind spot more easily
when changing lanes? ¢page 97, Audi side
assist (lane change assist feature).
- How can I adjust the brightness of the instru
ment and display lighting? ¢ page 48.
- How can I change the vehicle set-up in different
driving situations depending on my personal
mood and driving style? ¢page 100, Audi
drive select (vehicle set-up functions).
Using the infotainment
system
- How do I switch on the infotainment system
and adjust the volume? ¢ page 121.
- How do
I navigate
through the infotainment
menus? ¢ page 122, How to use the MMI.
- How can I enter letters and numbers by hand
writing? ¢ page 124, MMI touch.
- How do I use the search function on the info
tainment system?¢ page 129, Search func
tion.
- How do I operate the infotainment system by
voice? ¢ page 133.
- Which functions can I control using the buttons
on the steering wheel?¢ page 21, Multi
function steering wheel plus.
- How do I set the date and time? ¢ page 212.
Communication
- How can I connect my mobile phone to the
handsfree telephone system? ¢ page 142.
- How can I charge my mobile phone battery
without a cable? ¢ page 146, Using the Audi
phone box.
- How can I control certain apps on my smart
phone via the infotainment system?
¢ page 210, Audi smartphone interface.
- How can I call up information online?
¢ page 159, Audi connect.
- How can I use the Wi-Fi hotspot?¢ page 165.
Navigation
- What ways are there to enter a navigation des-
tination? ¢ page 170.
�
Page 12 of 306
Downloaded from www.Manualslib.com manuals search engine Instruments
and warning/indicator Lamps
Instruments and warning/indicator Lamps
Instruments Audi virtual cockpit (instrument cluster)
The instrument cluster is the driver's information centre.
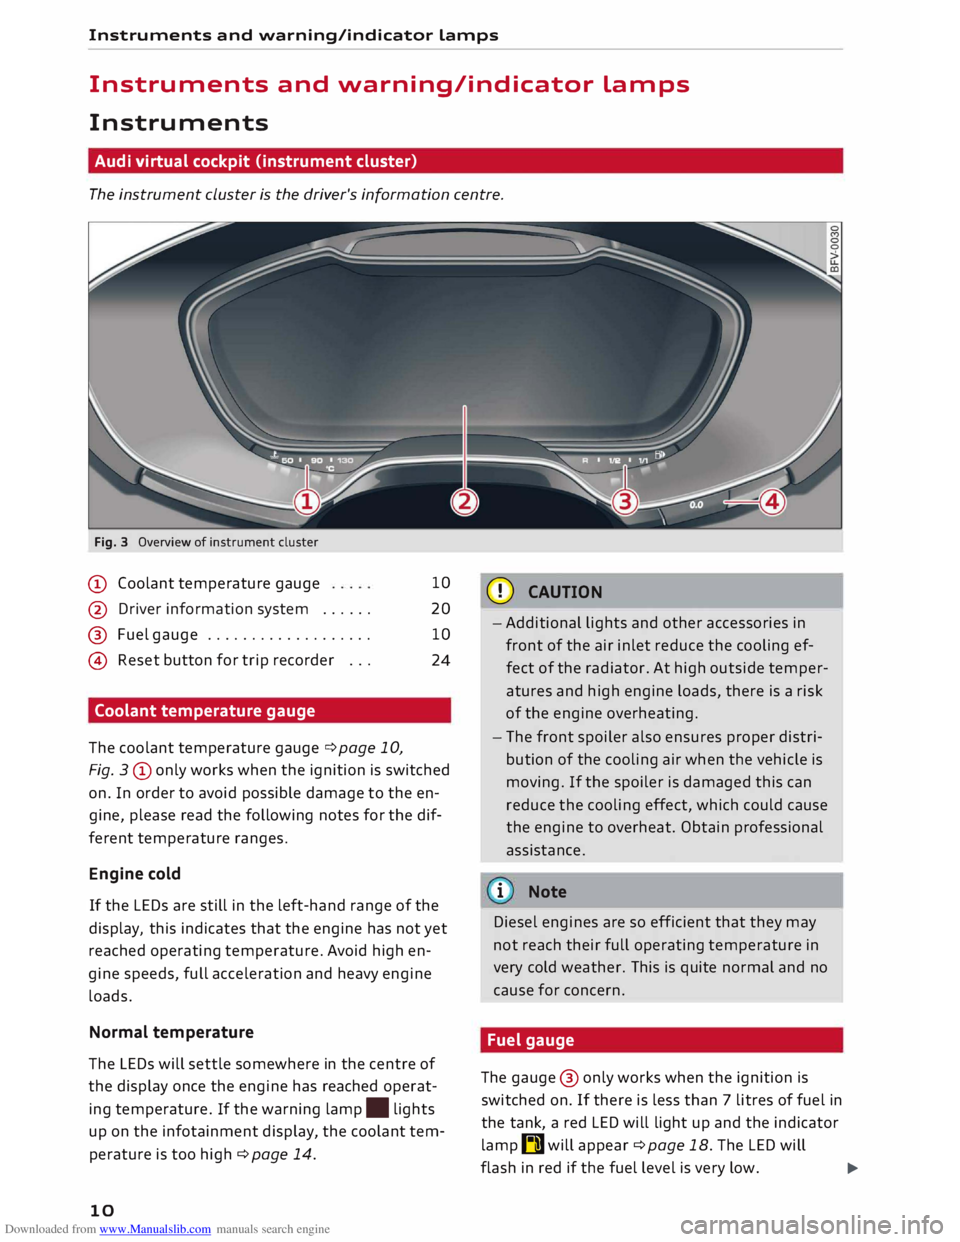
Fig. 3 Overview of instrument cluster
(D Coolant temperature gauge 10
@ Driver information system . . . . . . 20
@ Fuel gauge . . . . . . . . . . . . . . . . . . . 10
@ Reset button for trip recorder . . .
24
Coolant temperature gauge
The coolant temperature gauger=> page 10,
Fig. 3@ only works when the ignition is switched
on. In order to avoid possible damage to the en
gine, please read the following notes for the dif
ferent temperature ranges.
Engine cold
If the LEDs are still in the left-hand range of the
display, this indicates that the engine has not yet
reached operating temperature. Avoid high en
gine speeds, full acceleration and heavy engine
loads.
Normal temperature
The LEDs will settle somewhere in the centre of
the display once the engine has reached operat
ing temperature. If the warning lamp. lights
up on the infotainment display, the coolant tem
perature is too high r=> page 14.
10 CD
CAUTION
-Additional lights and other accessories in
front of the air inlet reduce the cooling ef
fect of the radiator. At high outside temper
atures and high engine loads, there is a risk
of the engine overheating.
- The front spoiler also ensures proper distri
bution of the cooling air when the vehicle is
moving. If the spoiler is damaged this can
reduce the cooling effect, which could cause
the engine to overheat. Obtain professional
assista nee.
i Note
Diesel engines are so efficient that they may
not reach their full operating temperature in
very cold weather. This is quite normal and no
cause for concern.
Fuel gauge
The gauge @only works when the ignition is
switched on. If there is less than 7 litres of fuel in
the tank, a red LED will light up and the indicator
lamp I]] will appear r=> page 18. The LED will
flash in red if the fuel level is very low.
�
Page 13 of 306
Downloaded from www.Manualslib.com manuals search engine 0
N
,.....
N
......
0
,.....
Vl
CX) Instruments
and warning/indicator lamps
The tank capacity of your vehicle is given in the
Technical data section ¢ page 288.
CD CAUTION
Never run the tank completely dry. If there is
an irregular fuel supply, misfiring can occur.
Unburnt fuel can then enter the exhaust sys
tem. This can lead to overheating and dam
age to the catalytic converter.
Warning and indicator
Lamps
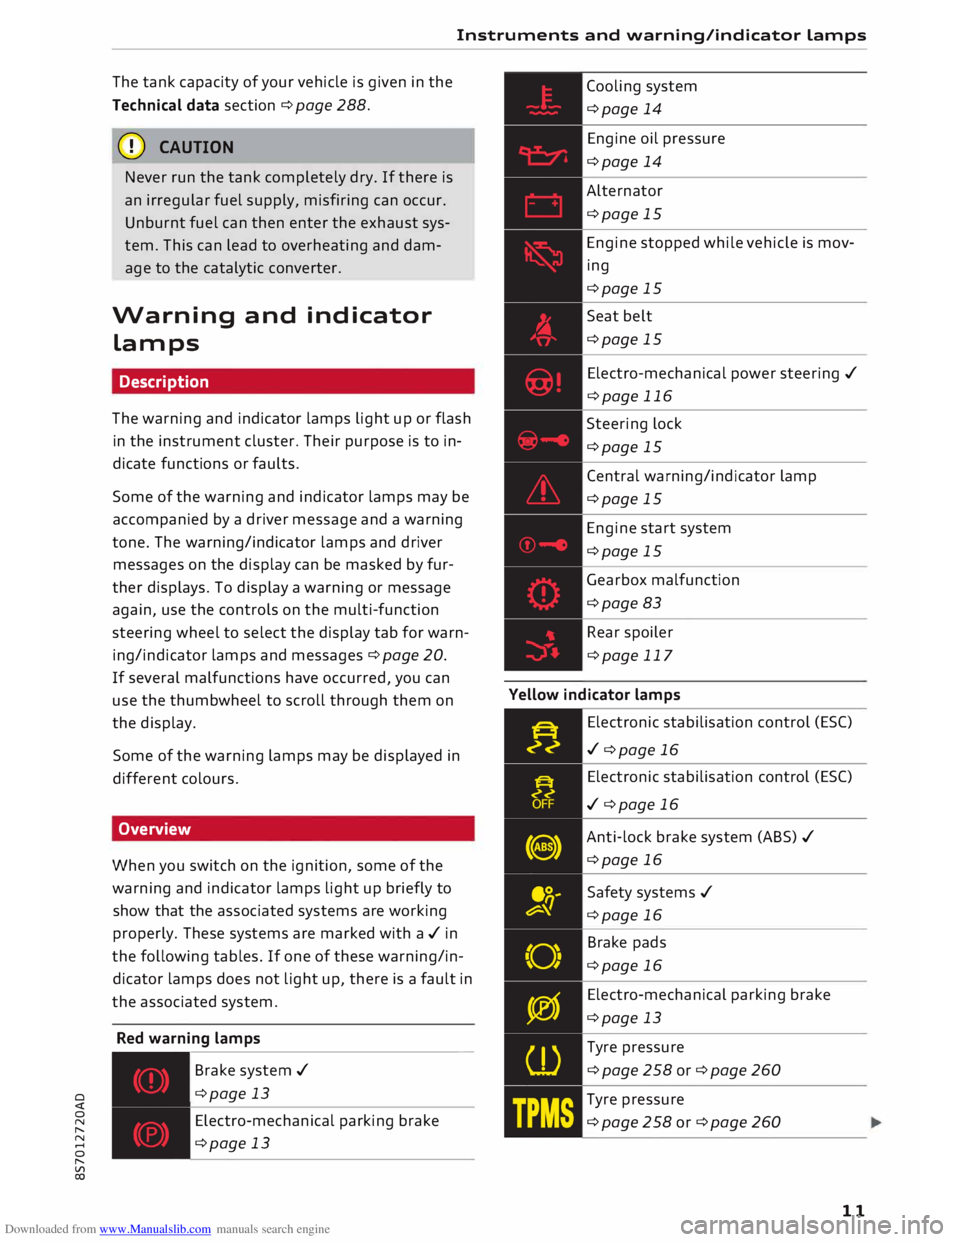
Description
The warning and indicator lamps light up or flash
in the instrument cluster. Their purpose is to in
dicate functions or faults.
Some of the warning and indicator lamps may be
accompanied by a driver message and a warning
tone. The warning/indicator lamps and driver
messages on the display can be masked by fur
ther displays. To display a warning or message
again, use the controls on the multi-function
steering wheel to select the display tab for warn
ing/indicator lamps and messages ¢ page 20.
If several malfunctions have occurred, you can
use the thumbwheel to scroll through them on
the display.
Some of the warning lamps may be displayed in
different colours.
Overview
When you switch on the ignition, some of the
warning and indicator lamps light up briefly to
show that the associated systems are working
properly. These systems are marked with a../ in
the following tables. If one of these warning/in
dicator lamps does not light up, there is a fault in
the associated system.
Red warning lamps
---------------
Br a k e system ../
¢page 13
Electro-mechanical parking brake
¢page 13 Cooling
system
¢page 14
Engine oil pressure
¢page 14
Alternator
¢page 15
Engine stopped while vehicle is mov
ing
¢page 15
Seat belt
¢page 15
Electro-mechanical power steering ../
¢page 116
Steering lock
¢page 15
Central warning/indicator lamp
¢page 15
Engine start system
¢page 15
Gearbox malfunction
¢page 83
Rear spoiler
¢page 117
Yellow indicator lamps
Electronic stabilisation control (ES()
../ ¢page 16
Electronic stabilisation control (ES()
../ ¢page 16
Anti-lock brake system (ABS) ../
¢page 16
Safety systems ../
¢page 16
Brake pads
¢page 16
Electro-mechanical parking brake
¢page 13
Tyre pressure
¢page258or¢page260
Tyre pressure
¢page258or¢page260
11
Page 14 of 306
Downloaded from www.Manualslib.com manuals search engine Instruments
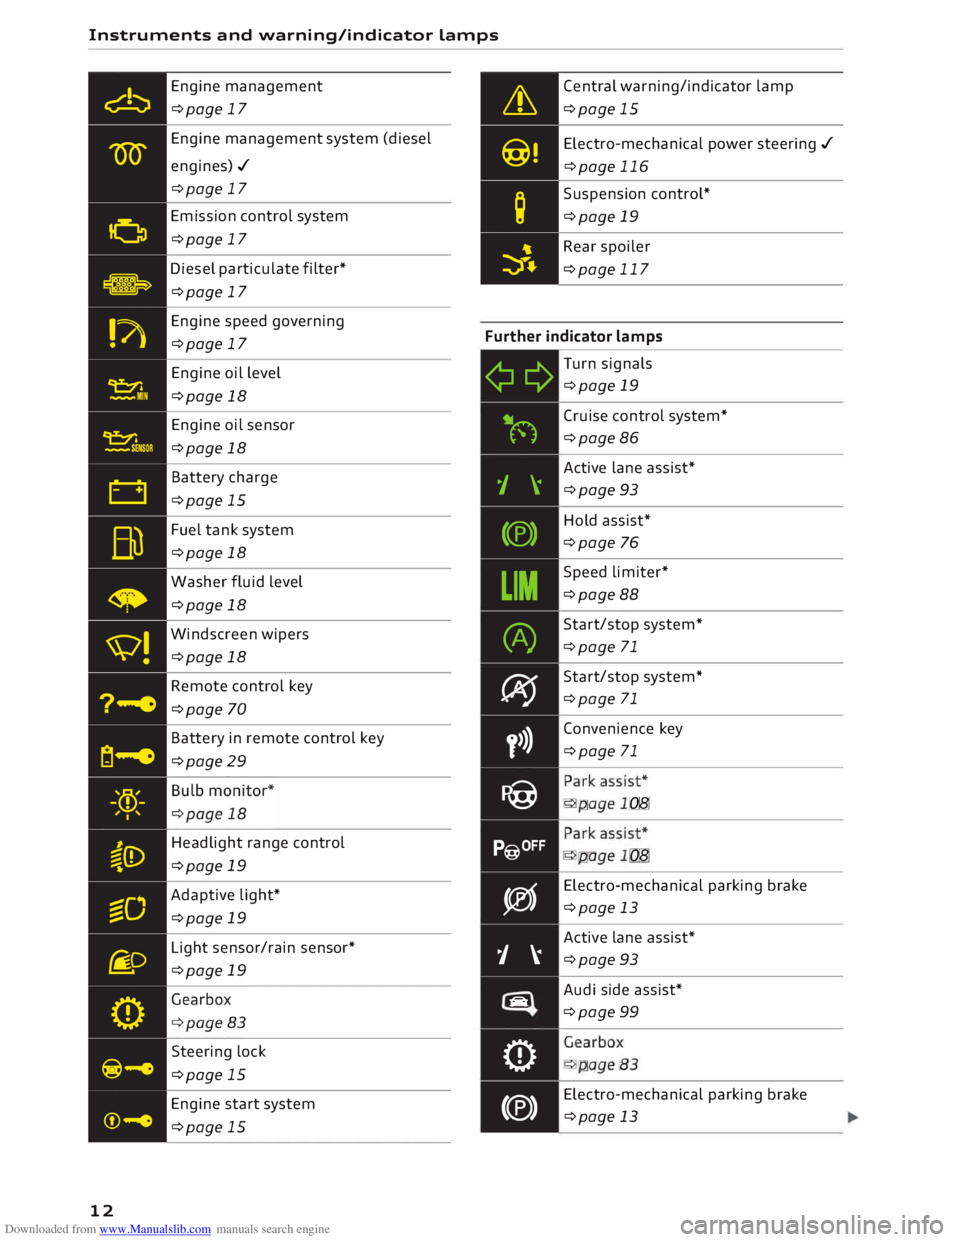
and warning/indicator Lamps
Engine management
¢page 17
Engine management system (diesel
engines)./ ¢page 17
Emission control system
¢page 17
Diesel particulate filter*
¢page 17 Central
warning/indicator lamp
¢page 15
Electro -mechanical power steering ./
¢page 116
Suspension control*
¢page 19
Rear spoiler
¢page 117
Engine speed governing
¢page 17 Further
indicator lamps
12 Engine
oil level
¢page 18
Engine oil sensor
¢page 18
Battery charge
¢page 15
Fuel tank system
¢page 18
Washer fluid level
¢page 18
Windscreen wipers
¢page 18
Remote control key
¢page 70
Battery in remote control key
¢page 29
Headlight range control
¢page 19
Adaptive light*
¢page 19
Light sensor/rain sensor*
¢page 19
Steering lock
¢page 15
Engine start system
¢page 15 ¢¢
iljN
1 \
(®)
LIM (A)
� y>)}
P@
P@OFF
�
j �
tiiiq
0
(®) Turn
signals
¢page 19
Cruise control system*
¢page 86
Active lane assist*
¢page 93
Hold assist*
¢page 76
Speed limiter*
¢page 88
Start/stop system*
¢page 71
Start/stop system*
¢page 71
Convenience key
¢page 71
•
... ,,,. ,:
•
... ,,,. ,:
Electro -mechanical parking brake
¢page 13
Active lane assist*
¢page 93
Audi side assist*
¢page 99
. . . .
.
- '... .
Electro -mechanical parking brake
¢page 13
Page 17 of 306
Downloaded from www.Manualslib.com manuals search engine 0
N
,.....
N
......
0
,.....
Vl
CX) Instruments
and warning/indicator lamps
(D) Note
The oil pressure warning lamp is not an indi
cator for the oil level. The oil level should
therefore be checked regularly.
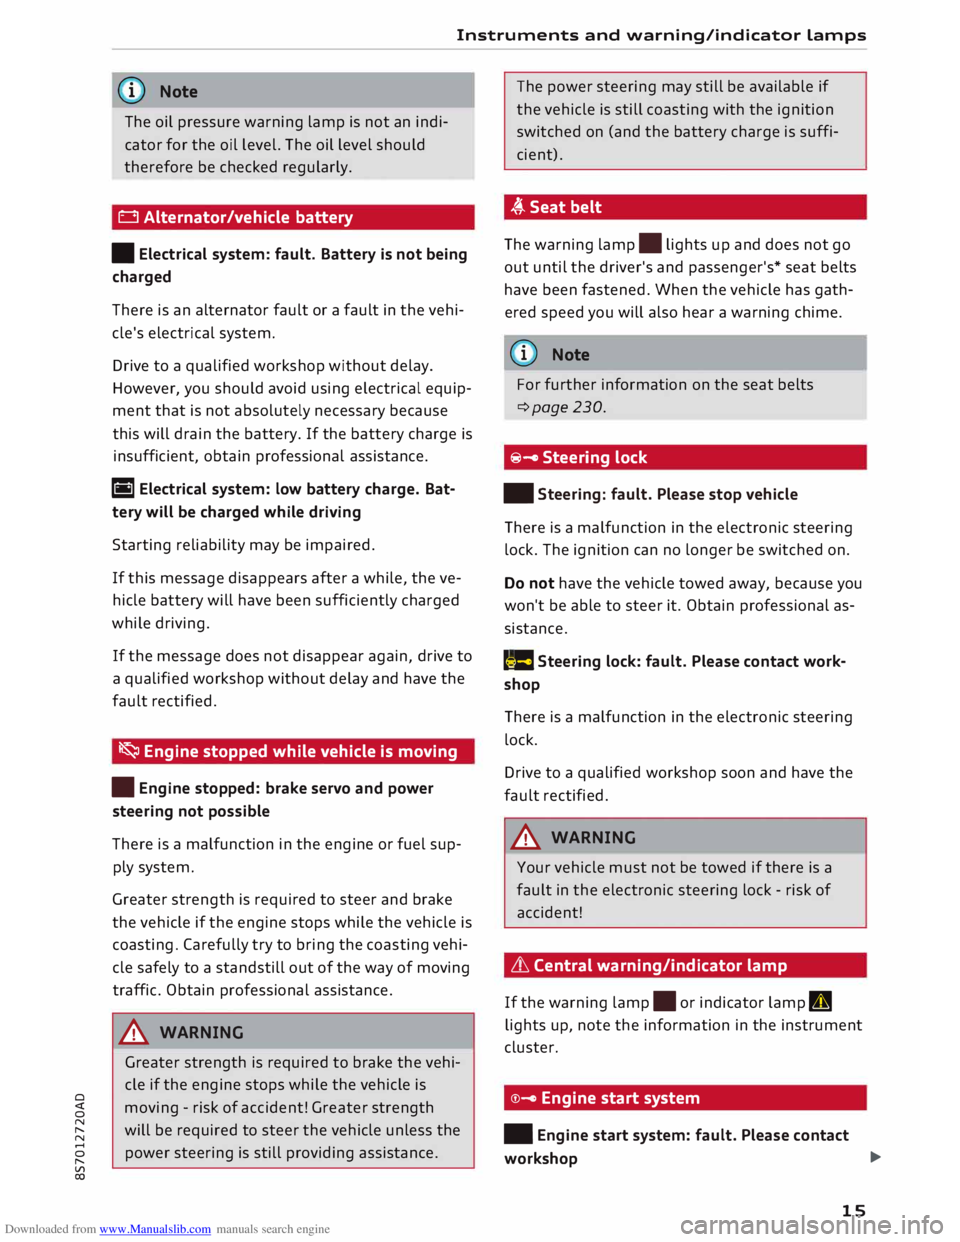
0 Alternator/vehicle battery
• Electrical system: fault. Battery is not being
charged
There is an alternator fault or a fault in the vehi
cle's electrical system.
Drive to a qualified workshop without delay.
However, you should avoid using electrical equip
ment that is not absolutely necessary because
this will drain the battery. If the battery charge is
insufficient, obtain professional assistance.
ri1 Electrical system: low battery charge. Bat
tery will be charged while driving
Starting reliability may be impaired.
If this message disappears after a while, the ve
hicle battery will have been sufficiently charged
while driving.
If the message does not disappear again, drive to
a qualified workshop without delay and have the
fault rectified.
� Engine stopped while vehicle is moving
• Engine stopped: brake servo and power
steering not possible
There is a malfunction in the engine or fuel sup
ply system.
Greater strength is required to steer and brake
the vehicle if the engine stops while the vehicle is
coasting. Carefully try to bring the coasting vehi
cle safely to a standstill out of the way of moving
traffic. Obtain professional assistance.
_& WARNING
Greater strength is required to brake the vehi
cle if the engine stops while the vehicle is
moving -risk of accident! Greater strength
will be required to steer the vehicle unless the
power steering is still providing assistance. The
power steering may still be available if
the vehicle is still coasting with the ignition
switched on (and the battery charge is suffi
cient).
,(,.Seatbelt
The warning lamp.
lights up and does not go
out until the driver's and passenger's* seat belts
have been fastened. When the vehicle has gath
ered speed you will also hear a warning chime.
(Q)) Note
For further information on the seat belts
¢page 230.
@- Steering lock
• Steering: fault. Please stop vehicle
There is a malfunction in the electronic steering
lock. The ignition can no longer be switched on.
Do not have the vehicle towed away, because you
won't be able to steer it. Obtain professional as
sistance.
(::$ Steering
lock: fault. Please contact work
shop
There is a malfunction in the electronic steering
lock.
Drive to a qualified workshop soon and have the
fault rectified.
_& WARNING
Your vehicle must not be towed if there is a
fault in the electronic steering lock -risk of
accident!
& Central warning/indicator lamp
If the warning lamp.
or indicator lamp II
lights up, note the information in the instrument
cluster.
©- Engine start system
• Engine start system: fault. Please contact
workshop ..,.
15
Page 20 of 306
Downloaded from www.Manualslib.com manuals search engine Instruments
and warning/indicator Lamps
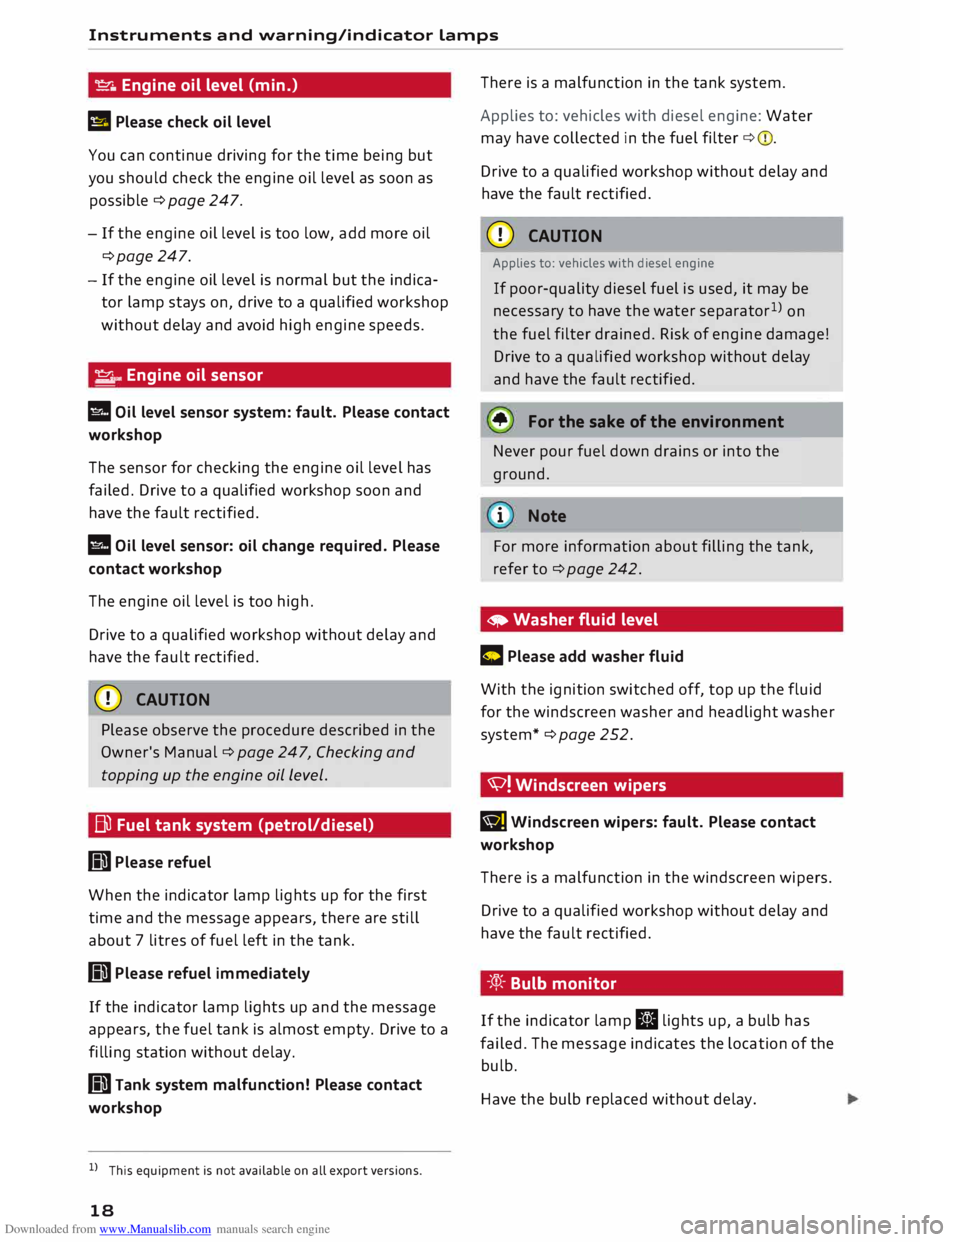
� Engine oil level (min.)
II Please check oil level
You can continue driving for the time being but
you should check the engine oil level as soon as
possible ¢ page 247.
- If the engine oil level is too low, add more oil
¢page 247.
- If the engine oil level is normal but the indica
tor lamp stays on, drive to a qualified workshop
without delay and avoid high engine speeds.
� ..
Engine oil sensor
l!I Oil level sensor system: fault. Please contact
workshop
The sensor for checking the engine oil level has
failed. Drive to a qualified workshop soon and
have the fault rectified.
l!I Oil level sensor: oil change required. Please
contact workshop
The engine oil level is too high.
Drive to a qualified workshop without delay and
have the fault rectified.
CD CAUTION
Please observe the procedure described in the
Owner's Manual¢ page 247, Checking and
topping up the engine oil Level.
Bi) Fuel tank system (petrol/diesel)
GD Please refuel
When the indicator lamp lights up for the first
time and the message appears, there are still
about 7 litres of fuel left in the tank.
GD Please refuel immediately
If the indicator lamp lights up and the message
appears, the fuel tank is almost empty. Drive to a
filling station without delay.
GD Tank system malfunction! Please contact
workshop
l l
This equipment is not available on all export versions.
18 There
is a malfunction in the tank system.
Applies to: vehicles with diesel engine: Water
may have collected in the fuel filter ¢(D.
Drive to a qualified workshop without delay and
have the fault rectified.
CD CAUTION
Applies to: vehicles with diesel engine
If poor-quality diesel fuel is used, it may be
necessary to have the water separator 1
)
on
the fuel filter drained. Risk of engine damage!
Drive to a qualified workshop without delay
and have the fault rectified.
• For the sake of the environment
Never pour fuel down drains or into the
ground.
.
1 Note
For more information about filling the tank,
refer to ¢page 242.
• Washer fluid level
C Please add washer fluid
With the ignition switched off, top up the fluid
for the windscreen washer and headlight washer
system* ¢page 252.
'V! Windscreen wipers
BJ Windscreen
wipers: fault. Please contact
workshop
There is a malfunction in the windscreen wipers.
Drive to a qualified workshop without delay and
have the fault rectified.
-'.q):- Bulb monitor
If the indicator lamp II lights up, a bulb has
failed. The message indicates the location of the
bulb.
Have the bulb replaced without delay.
Page 26 of 306
Downloaded from www.Manualslib.com manuals search engine Driver
information system
The equipment installed on your vehicle deter
mines which of the following tabs are available:
1st tab
Car ¢page 25
2nd taba)
Warnings
3rd tab Radio
¢ page 185
Media ¢ page 191
4th tabb)
Sound ¢page 212
Settings ¢page 212
a) This tab is only visible if one or more warning/indicator
lamps or driver messages are displayed or if the relevant
system is switched on.
b) The tab contents depend on which menu you used last.
- To switch between tabs: Press the
I MOD
E
! but
ton on the multi-function steering wheel until
the desired tab is displayed.
- To select a function in a menu/list: Scroll the
left thumbwheel on the multi-function steering
wheel to the desired function.
- To confirm the selection: Press the left thumb
wheel on the multi-function steering wheel to
confirm your selection.
- To scroll within the lists: Scroll the left thumb
wheel on the multi-function steering wheel
rapidly to scroll within the lists.
@!VIEW! button
- To change views: Press the !VIE
W! button to
switch from the classic view¢ page 20, Fig. 4
to the extended view¢ page 20, Fig. 5.
@ Right thumbwheel
You can adjust the volume of an audio source or
system message (e.g. during a traffic announce
ment) directly while it is being played.
- Volume up/down: Scroll the right thumbwheel
up/down.
- Mute/pause: Scroll the right thumbwheel
down. Or: Press the right thumbwheel.
- Unmute/resume: Scroll the right thumbwheel
upwards. Or: Press the right thumbwheel.
24 Rev
counter
The rev counter indicates the number of engine
revolutions per minute.
The start of the red zone on the dial indicates the
maximum engine speed which may be used brief
ly in all gears when the engine is warm and after
it has been run in properly. However, it is advisa
ble to change up a gear or move the selector lev
er to D/S (or lift your foot off the accelerator) be
fore the needle reaches the red zone.
Shift light display in the rev counter
Applies to: vehicles with Audi virtual cockpit and shift light
display
The shift light display is only visible in the sport
view* ¢ page 25 when shifting gears in tiptron
ic mode. Green, yellow and red zones are dis
played in the high-rev area of the dial. The entire
rev counter flashes in red at engine speeds near
the limit. Remember to shift to the next gear in
good time.
CD CAUTION
The rev counter needle must only ever briefly
go into the red zone on the scale; otherwise
there is a risk of engine damage. The start of
the red zone on the dial is different for some
engine versions.
@ For the sake of the environment
Changing up a gear early will help you to save
fuel and minimise engine noise.
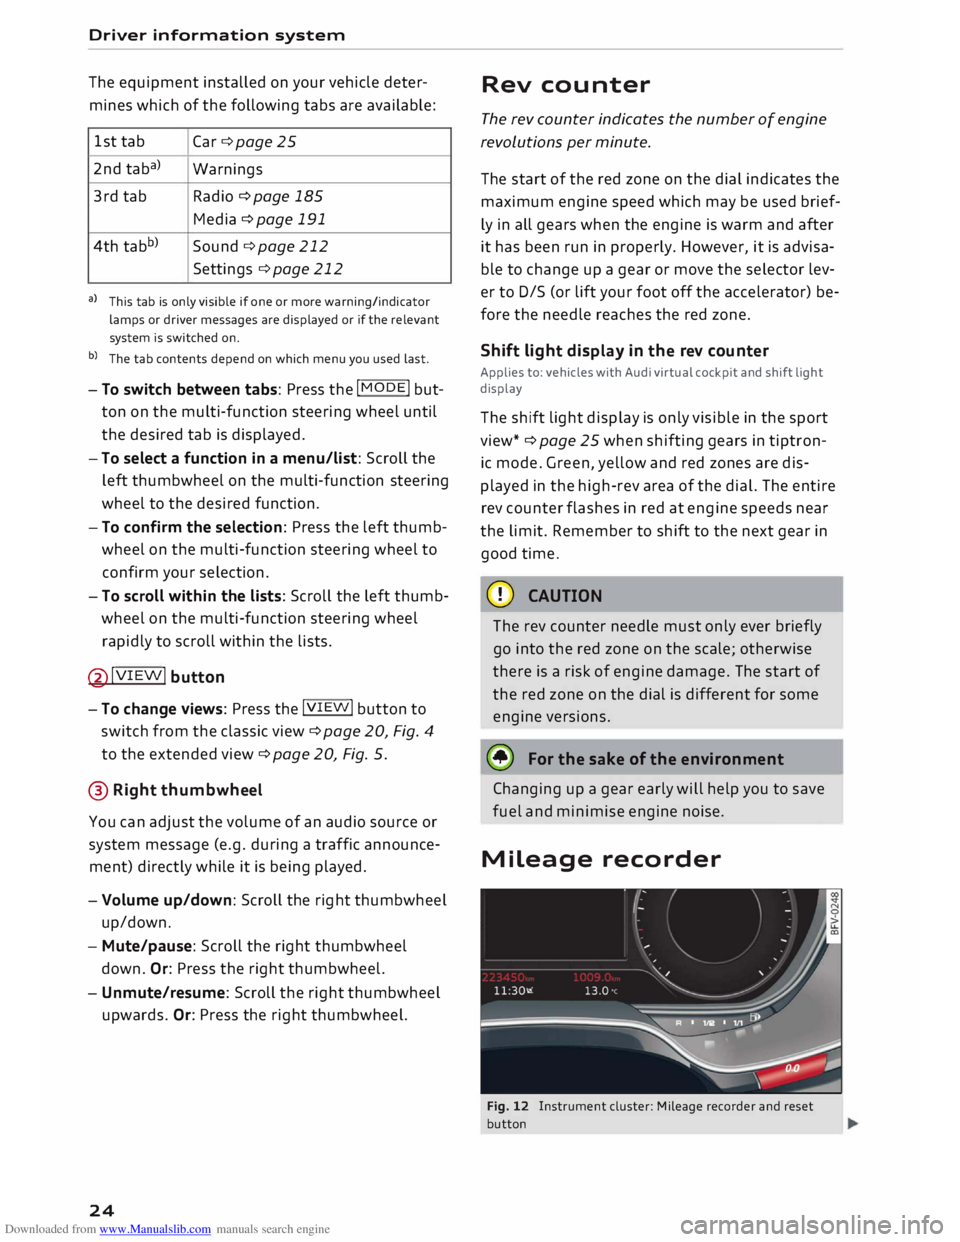
Mileage recorder
Fig. 12 Instrument cluster: Mileage recorder and reset
button
Page 27 of 306
Downloaded from www.Manualslib.com manuals search engine 0
N
,.....
N
....
0
,.....
Vl
CX) Trip
recorder/odometer
The trip recorder shows the distance that has
been travelled since it was last reset. It is used to
measure individual journeys.
The trip recorder can be reset to zero by pressing
the reset button lo.al ¢Fig. 12.
The odometer records the vehicle's total mileage.
Fault display
If there is a fault in the instruments, the letters
DEF appear in the trip recorder display. Have the
fault rectified as soon as possible.
On-board computer
You can call up the following information se
quentially on the on-board computer ¢ page 20,
Fig. 4@ :
-Time & date ¢page 212
-Average consumption
- Fuel range
- Single journey memory summary
- Total journey memory summary
The single journey memory processes the infor
mation on a journey from the time the ignition is
Sport view Driver
information system
switched on until it is switched off. If the journey
is resumed within two hours after the ignition is
switched off, the new figures are automatically
included in the calculation.
Unlike the single journey memory, the total jour
ney memory is not erased automatically. In this
way, you can determine the period for which you
wish the on-board computer to supply driving in
formation.
Fuel consumption
The current fuel consumption can be shown in a
bar display. The average fuel consumption from
the single journey memory can also be displayed.
If the bar turns green, your vehicle is saving fuel
using one of the following functions:
- Recuperation: Electrical energy can be stored in
the vehicle battery (recuperation) if the vehicle
is travelling downhill or coasting in gear (over
run). In this case, the bar will move towards the
t:::3 symbol.
- Coasting mode* ¢ page 82.
@ Note
The date, time and display format can be
changed via the infotainment system.
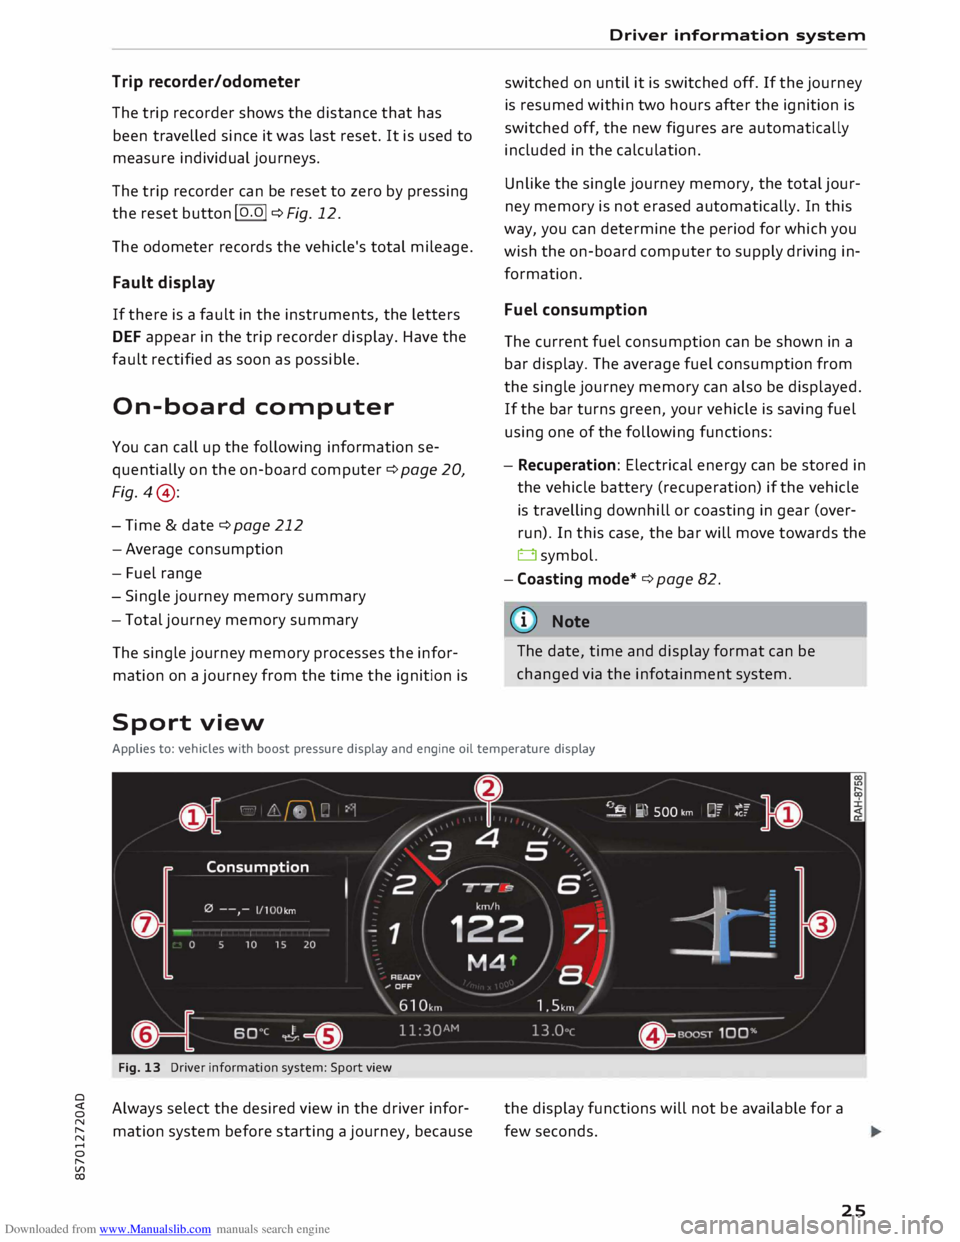
Applies to: vehicles with boost pressure display and engine oil temperature display
Fig. 13 Driver information system: Sport view
Always select the desired view in the driver infor
mation system before starting a journey, because the
display functions will not be available for a
few seconds.
25
Page 62 of 306
Downloaded from www.Manualslib.com manuals search engine Heating
and cooling
Heating and cooling
Air conditioner
Description
The air conditioner heats, cools and dehumidifies
the air inside the vehicle. It operates most effec
tively with the windows closed. If the vehicle has
been standing in the sun, it may cool down faster
if you open the windows briefly to let the hot air
escape.
Pollution filter
The pollution filter removes impurities, such as
dust and pollen, from the air.
Key-coded settings
Certain settings will be automatically stored and
assigned to the remote control key in use.
® For the sake of the environment
If you wish to save fuel, switch off the cooling
mode on the air conditioner by pressing the
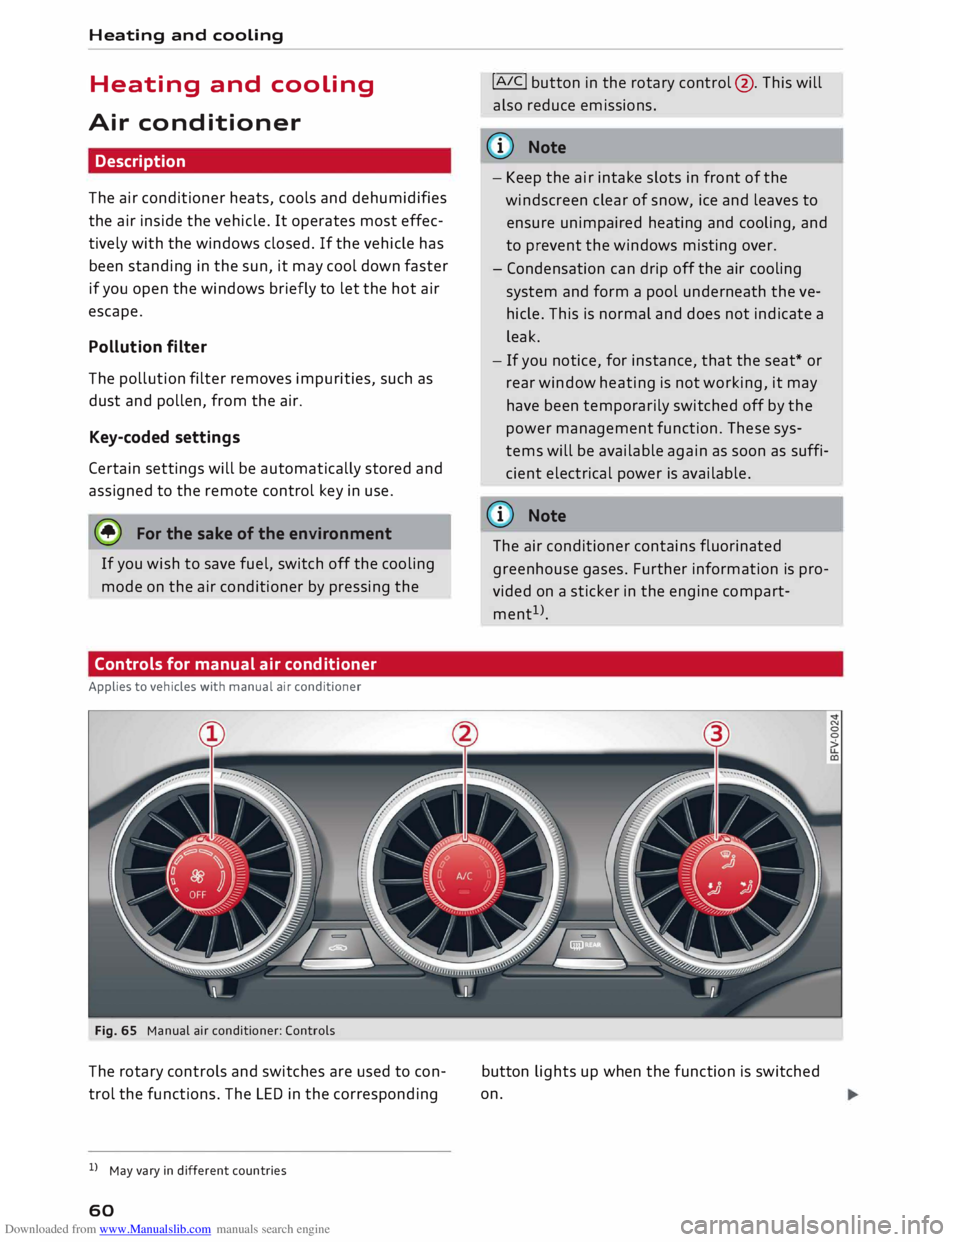
Controls for manual air conditioner
Applies to vehicles with manual air conditioner
Fig. 65 Manual air conditioner: Controls
The rotary controls and switches are used to con
trol the functions. The LED in the corresponding
l l
May vary in different countries
60 !AIC!
button in the rotary control@. This will
also reduce emissions.
@ Note
- Keep the air intake slots in front of the
windscreen clear of snow, ice and leaves to
ensure unimpaired heating and cooling, and
to prevent the windows misting over.
- Condensation can drip off the air cooling
system and form a pool underneath the ve
hicle. This is normal and does not indicate a
leak.
- If you notice, for instance, that the seat* or
rear window heating is not working, it may
have been temporarily switched off by the
power management function. These sys
tems will be available again as soon as suffi
cient electrical power is available.
@ Note
The air conditioner contains fluorinated
greenhouse gases. Further information is pro
vided on a sticker in the engine compart
ment 1
>.
button lights up when the function is switched
on.