turn signal AUDI TT ROADSTER 2017 Owners Manual
[x] Cancel search | Manufacturer: AUDI, Model Year: 2017, Model line: TT ROADSTER, Model: AUDI TT ROADSTER 2017Pages: 314, PDF Size: 76.54 MB
Page 11 of 314
co
co
.... N
" N .... 0
" "' c:o
(D Note
Never drive until the tank is completely emp
ty. The irregular supply of fuel that results
from that can cause engine misfires . Uncom
busted fuel will then enter the exhaust sys
tem. This can cause overheating and damage
to the catalytic converter .
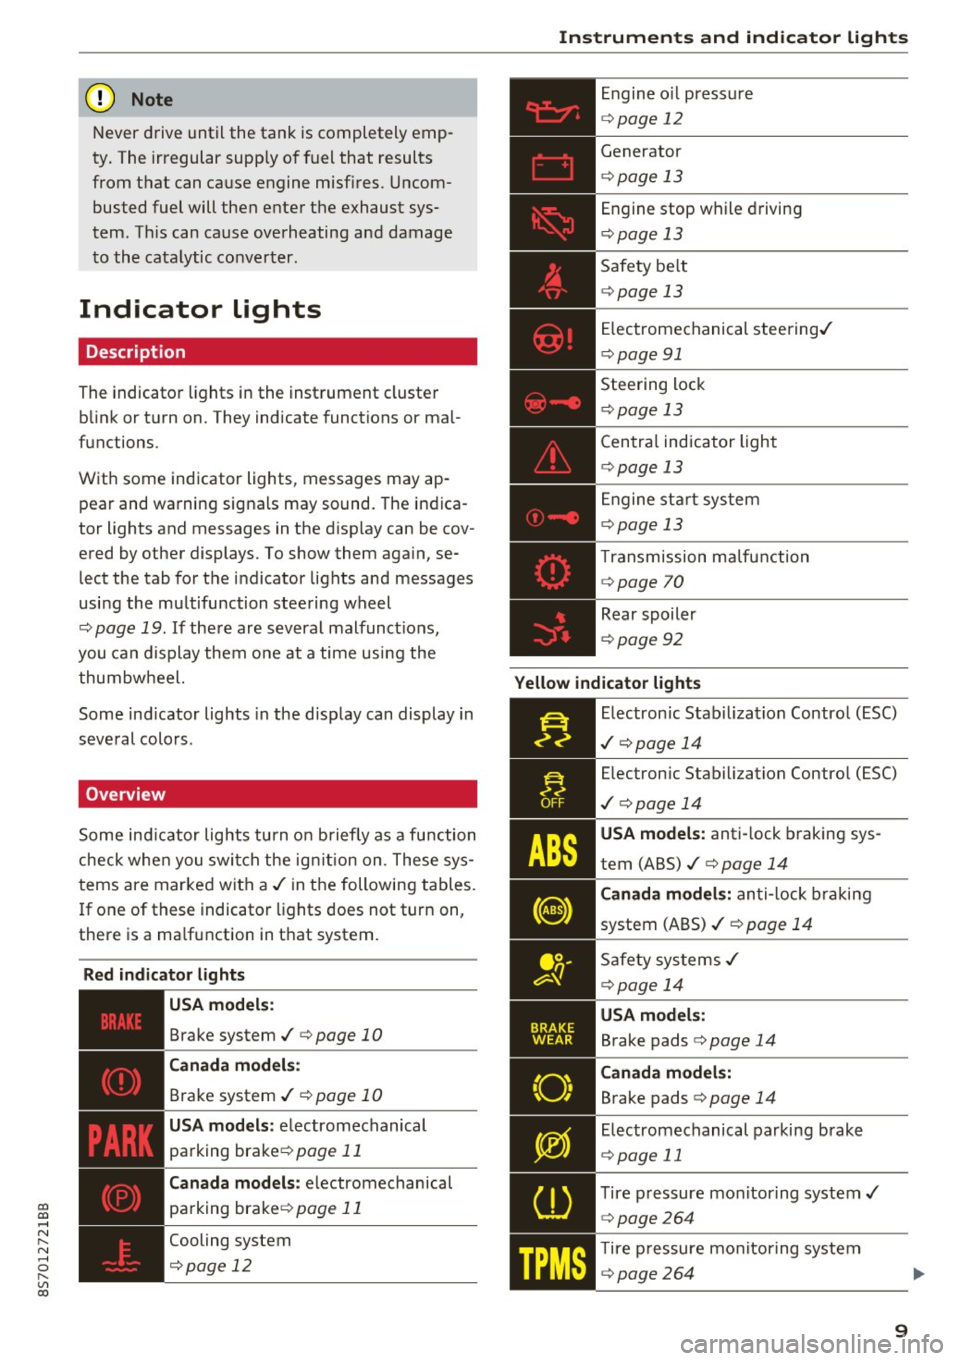
Indicator lights
Description
The indicator lights in the instrument cluster
blink or turn on. They indicate functions or mal
functions.
With some indicator lights, messages may appear and warning signals may sound. The indica
tor lights and messages in the display can be cov
ered by other displays. To show them again, se lect the tab for the indicator lights and messages
using the multifunction steering wheel
c;, page 19. If there are several malfunct ions,
you can display them one at a time using the
thumbwheel.
Some ind icator lights in the display can display in
several colors .
Overview
Some indicator lights turn on briefly as a function
check whe n you switch the ign ition on . These sys
tems are marked with a
,I in the following tables.
If one of these indicator lights does not turn on,
there is a ma lfunction in that system.
Red indicator lights
---------------
US A models :
Brake system ./ c;, page 10
Canada models:
Brake system ./ c;, page 10
USA models : electromechanical
parking brake¢
page 11
Canada models: electromechanical
parking brake¢
page 11
Cooling system
<=>page 12
Instruments and indicator lights
Engine oil pressure
c;,page 12
Generator
¢page 13
Engine stop while driving
¢page 13
Safety be lt
c;, page 13
Electromechanical steering./
c;,page 91
Steering lock
¢page 13
Central indicator light
c;,page 13
Engine start system
c;,page 13
Transmission malfunction
c;, page 70
Rear spoiler
c;,page 92
Yellow indicator lights
Electronic Stabilization Contro l (ESC)
,I c;, page 14
Electronic Stabilization Control (ESC)
./ c;, page 14
USA models: anti-lock braking sys
tem (ABS)./
c;, page 14
Canada models: anti-lock braking
system (ABS) ./
c;, page 14
Safety systems ,I
c;,page 14
USA models:
Brake pads c;, page 14
Canada models:
Brake pads c;, page 14
Electromechanical parking brake
c;,page 11
Tire pressure monitoring system../
c>page264
Tire pressure monitoring system
<=>page 264
9
Page 12 of 314
Instruments and indicator lights
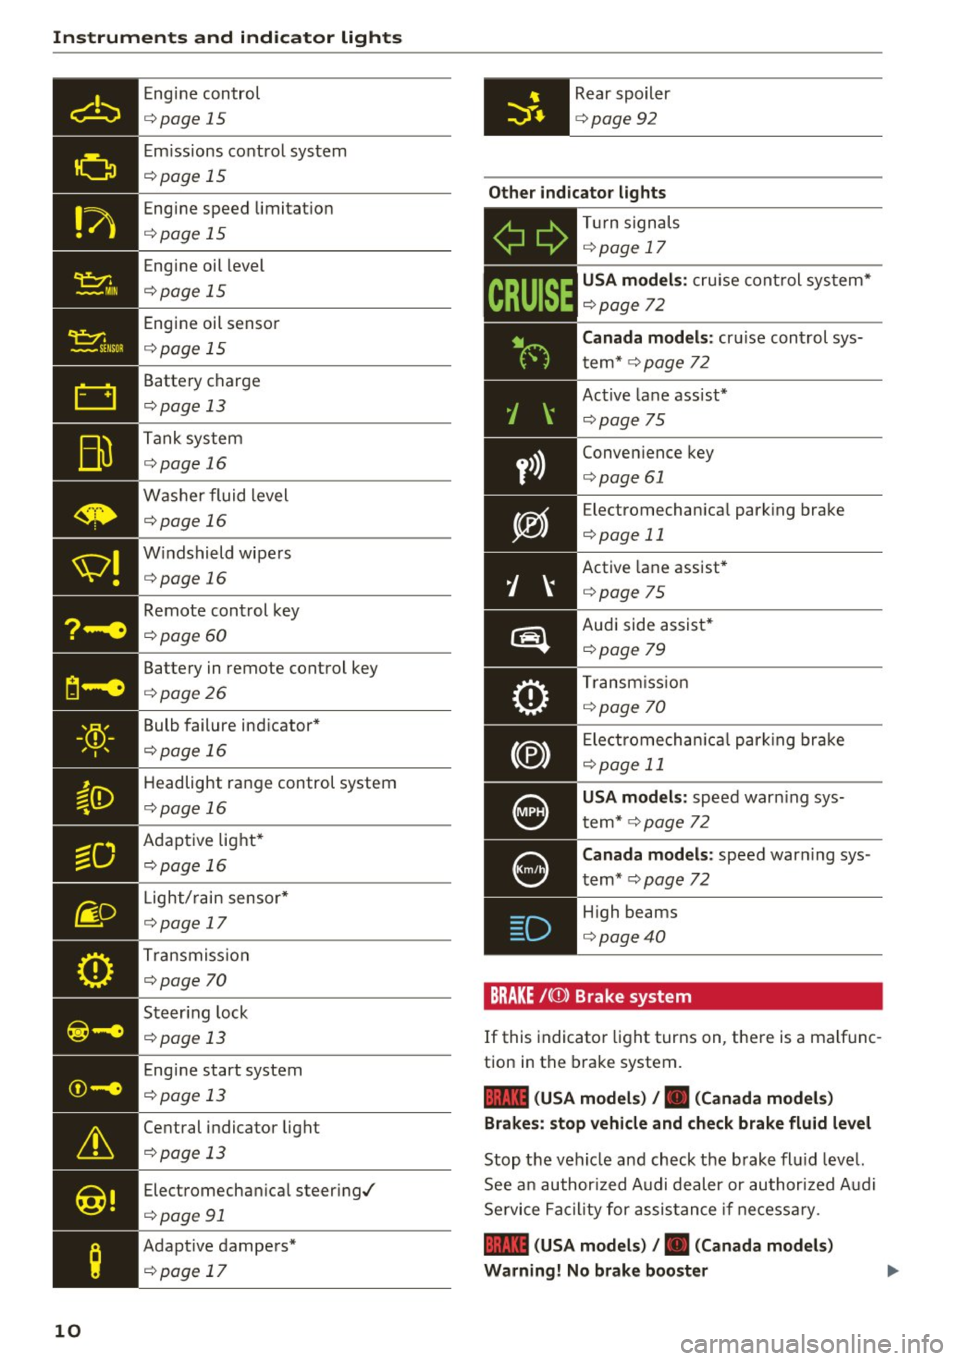
Engine control
c::> page 15
Emi ssions control system
c::> page 15
Engine speed limitat io n
c::> page 15
Engine oil level
c::> page 15
Engine oil senso r
c::> page 15
Battery charge
c::> page 13
Tank system
c::> page 16
Washer fluid level
c::> page 16
W indshield wipe rs
c::> page 16
Remote control key
c::> page 60
Battery in remote control key
c::> page 26
Bulb failure ind icator *
c::> page 16
Headlight range control system
c::> page 16
Adaptive light*
c::> page 16
- •
Light/ rain sensor*
c::> page 17
T ransmiss ion
c::> page 70
- Steer ing lock
liliil c::> page 13
10
Engine start system
c::> page 13
Central indicator light
c::> page 13
Electromechan ical steer ing/
c::> page 91
Adapt ive dampers*
c::> page 17
Rear spoiler
c::> page 92
Other indicator lights
- ii
T
ur n signals
c::> page 17
CRUISE
USA model s: cruise control sys tem*
c::> page 72
Canada models :
cruise cont rol sys
t em*
c::> page 72
Active lane ass ist*
c::> page 75
Conven ience key
c::> page 61
E lectromechan ica l park ing brake
c::> page 11
Active lane assist*
c::> page 75
Audi side assist *
c::>page 79
Transm iss io n
c::> page 70
Electromechan ica l par king brake
c::> page 11
USA models: speed warn ing sys
tem*
c::> page 72
C anada models :
speed warning sys
tem*
c::> page 72
- H
igh beams
. c::> page 40
BRAKE / ((J)) Brake sy stem
If this indicato r light turns on, there is a malfunc
tion in the brake system.
1111 (USA mo del s) I. ( Canad a mode ls)
Brake s: stop vehicle and ch eck brake fluid level
Stop the vehicle and check the brake fl uid leve l.
See a n author ized Audi dealer or au thor ized Audi
Se rvice Facil ity for assis tance if necessary .
1111 (USA model s) /. (C anad a mode ls)
Warning! No brake boo ster
Page 19 of 314
CD
CD
.... N
" N .... 0 r--. V, co
@:.D Light/rain sensor
l!I Automatic headlights: malfunction! See
owner' s manual
El Automatic wipers : malfun ction! See owner 's
manual
The light/ra in sensor is malf unct ion ing.
The low beams remain switched on at all times
for safety reasons when the light switch is in the
AUTO position. You can continue to turn the
lights on and off using the light switch . You can
still cont rol a ll wipe r functions that a re inde
pendent of the ra in se nsor.
Drive to an authorized Aud i dea ler or a ut horized
Audi Service Facility immediately to have t he
malfunction corrected .
; Adaptive dampers
Applies to: vehicles with Audi drive select
B Suspension : malfunction! You may continue
driving
There is an adaptive damper malf unct ion.
Drive to an aut horize d Aud i dea le r or a uthorized
Aud i Service Facility immediately to have t he
malfunct ion corrected.
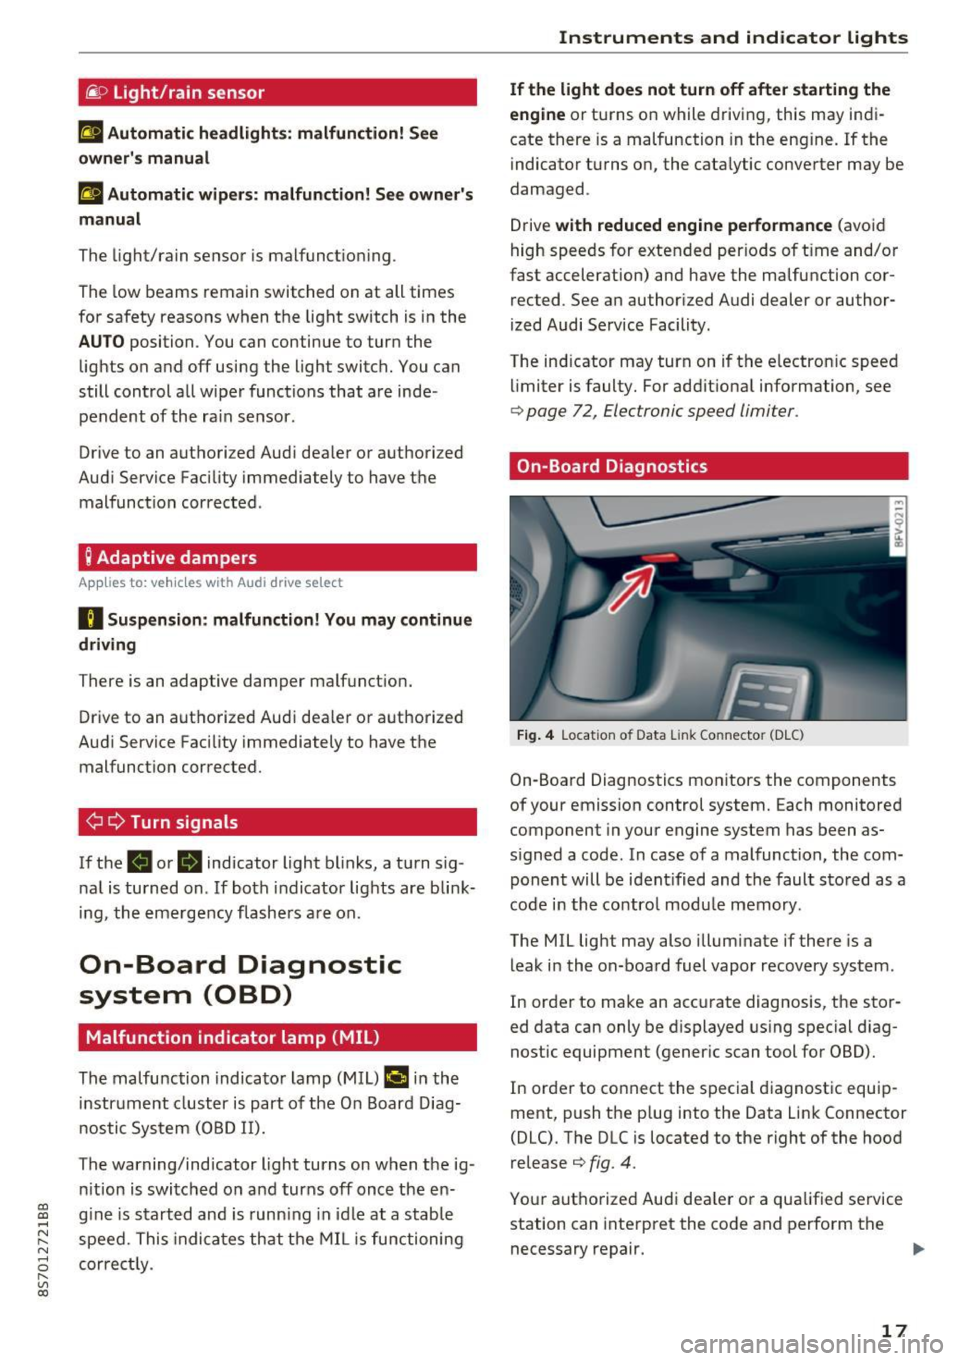
¢i ¢ Turn signals
If t he B or Ill indicator light b links, a t urn sig
n a l is turned on. If both indicator lig hts are blink
i ng, the eme rgency flash ers a re on .
On-Board Diagnostic
system (OBD)
Malfunction indicator lamp (MIL)
The malfunction indica to r l amp (MIL) ¢.j in the
in str ument cluster is part of the O n Board Diag
n os tic Sys tem ( OBD II).
The warning/indicator light turns on w hen the ig
ni tion is switched o n and turns off once the e n
g ine is s tarted an d is runn ing in id le at a stab le
speed. This indica tes th at the MIL is functioning
cor re ct ly.
Instruments and indicator lights
If the light does not turn off after starting the
engine
or turns on while driving, this may in di
cate there is a malfunction in the engine.
If the
indicato r turns on, the cata lytic conve rter may be
damaged .
Drive
with reduced engine performan ce (avo id
high speeds for extended per io d s of t ime and/o r
fast acceleration) and have the ma lfunction cor
rected. See an author ized Audi dealer or author
ized Audi Service Facility.
The in dicator may turn on if the e lectron ic speed
li miter is faulty. For add it iona l information, see
¢ page 72, Electronic speed limiter.
On-Board Diagnostics
Fig. 4 Location of Data Link Connector (DLC)
On-Boa rd Diagnostics mo nitors the components
of your emission control system. Each monitored
component in your engine system has been as
s igned a code. In case o f a malfunction, the com
ponent will be i dent ified and the faul t st o red as a
co de i n t he co ntro l mo dule mem ory.
The MIL lig ht may also illum inate if there is a
leak in the on-boa rd fuel vapor recovery system .
In or de r to ma ke an acc urate diagnosis, the sto r
ed data can only be d isplayed using special d iag
nostic equipment (gener ic scan to ol for OBD).
In order to co nnect the s pecial diagnost ic equi p
ment, push the p lug into the Data Link Connector
(DLC). T he DLC is located to the right of the hood
re lease
¢ fig. 4.
You r aut horize d Aud i dea le r or a qua lified se rvice
station can inte rpret the code and perform the
necessary repair.
IJJI,
17
Page 26 of 314
Opening and clo sin g
Opening and closing
Central locking
Description
You can lock and u nlock the veh icle centrally. You
have the following options:
- Remote control key
c::> page 26,
-Sensors in the door handles* c::> page 27,
- Lock cylinder on the driver 's door c::> page 29,
o r
- Central locking switch inside
c::> page 28.
Auto Lo ck
The A uto Lock f unct ion locks all doors and the
luggage compartment lid once the speed has ex
ceeded approx imately 9 mph (1S km/h) .
The vehicle can be unlocked if the openi ng func
tion in the centra l locking system sw itch is used
or one of the door handles is pulled. The A uto
L ock function can be switched on and off in the
Infotainment system
c::> page 28.
I n t he event of a crash with a irbag deployment ,
t he doors will a lso automat ically unlock to allow
access to the veh icle .
Selective unlocking
The doors and luggage compartment lid w ill lock
when they close. You can set in the Infotainment
system whether
only the driver's door or the en
tire veh icle should be unlocked when unlocking
c::> page 28 .
Turn signals
The turn s ignals flash tw ice when you unlock the
veh icle and flash once when you lock the vehicle .
I f the bli nking continues, one of the doo rs or the
luggage compartment lid is not closed or the ig
nition is still switched on .
Unintentionally locking yourself out
The follow ing cond itions prevent you from lock
ing your remo te contro l key in the vehicle :
- If the driver's door is open, the vehicle cannot
be locked by pressing the
I@ button on the re-
24
mote contro l key or touching the locking sen
sor* on a door.
- When lock ing using the
Im button in the central
locking switch, the vehicle will not lock if a door
is open
c::> page 28 .
-On veh icles with a convenience key *, the lug
gage compartment lid unlocks again after clos
ing if the most recent ly used key is in the lug
gage compartment. The emergency f lashers
blink four times.
Do not lock your vehicle with the remote cont rol
key or convenience key* until all doors and the
l uggage compartment lid are closed. This helps
to prevent you from locking yourself out acciden
tally .
¢j) Tips
- Do not leave va luables unattended in the ve
hicle. A locked veh icle is not a safe!
- The LED in the driver's door rail blinks when
you lock the vehicle. If the LED lights up for
approximate ly 30 seconds after locking,
there is a malfunction in the centra l locking
system . Have the problem corrected by an
authorized Audi dealer or au tho rized Aud i
Service Facili ty.
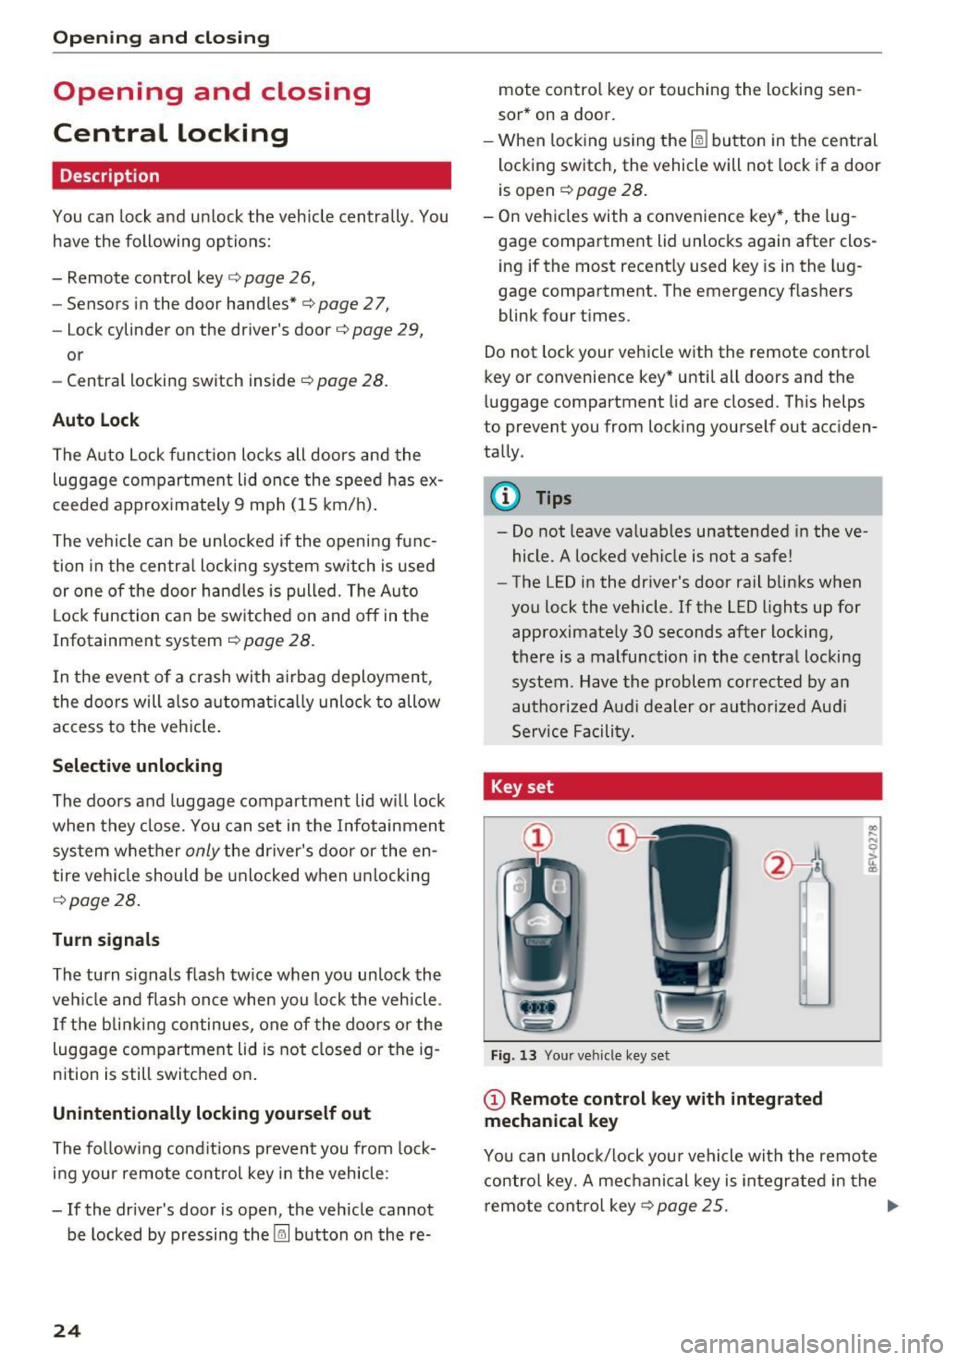
Key set
• J
-- --
Fig. 13 Your ve hicle key set
(D Remote control key with integrated
mechanical key
.. .... N 0 :l, u. CD
You can unloc k/lock you r vehicle with the remo te
contro l key. A mechanical key is integr ated in the
remote cont rol key
c::>page 25 . ..,.
Page 34 of 314
Opening and closing
the equipment. Peop le can be injured or prop
erty can be damaged if struck when closing.
(D Tips
- For secu rity reasons, we recommend that
you clear the programmed buttons before
selling the vehicle.
- For additional information about Homelink,
v is it
www .homelink .com.
- For the Declaration of Conformity with the
provisions from the FCC in the United States
and Industry Canada, see¢
page 296 .
Operation
Applies to: ve hicles w ith garage doo r opener (Homeli nk)
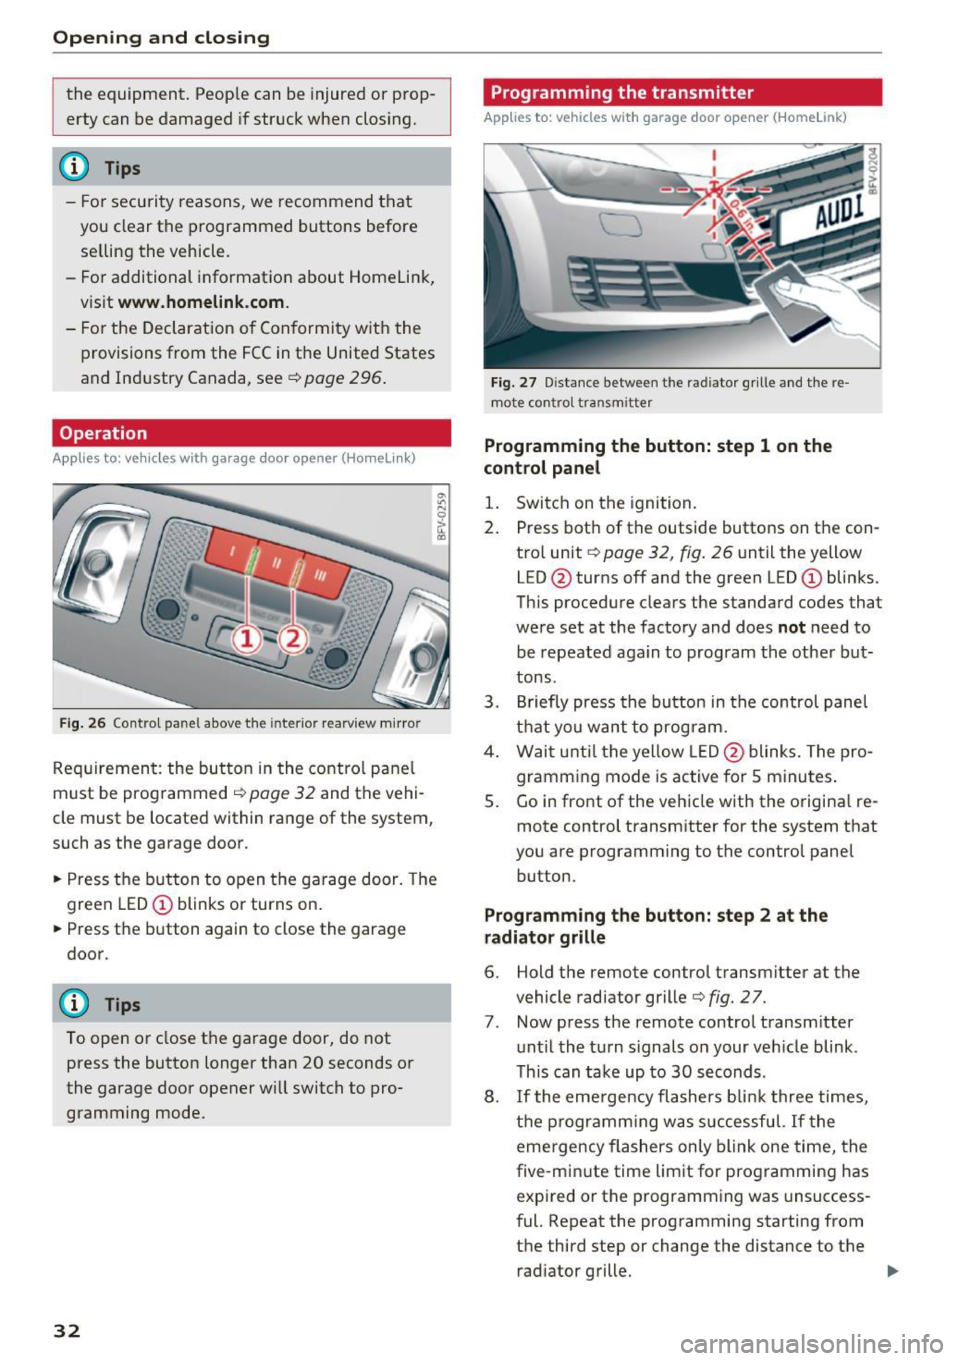
Fig. 26 Contro l pa nel above the inter io r rearview mirror
Requirement: the but ton in the control panel
m ust be programmed
i:!> page 32 and the vehi
cle must be located within range of the system,
such as the garage door .
.. Press the button to open the garage door. The
green LED
CD blinks or turns on.
.. Press the button again to close the garage
door.
(D} Tips
To open or close the garage door, do not
press the button longer than 20 seconds or
the garage door opener w ill switch to pro
gramming mode.
32
Programming the transmitter
App lies to : vehicles wit h garage door o pener (Horne link)
Fig. 27 D istance between the rad iator g rille and the re
mote contro l transm itter
Programming the button: step 1 on the
control panel
1. Switch on the ignition.
2. Press both of the outside buttons on the con
trol unit ¢
page 32, fig. 26 until the yellow
LED @turns off and the green LED
CD blinks.
This procedure clears the standard codes that
were set at the factory and does
not need to
be repeated again to program the other but
tons.
3. Briefly press the button in the control panel
that you want to program.
4. Wait until the yellow LED@blinks. The pro
gramming mode is active for S minutes.
5. Go in front of the vehicle w ith the origina l re
mote control transmitter for the system that
you are programming to the control panel button .
Programming the button: step 2 at the
radiator grille
6. Hold the remote control transmitter at the
vehicle radiator grille¢
fig. 27.
7 . Now press the remote control transm itter
until the turn signals on your veh icle blink .
This can take up to 30 seconds .
8. If the eme rgency flashers blink three times,
the programming was successful. If the
emergency flashers only blink one time, the
five -min ute time limit for programming has
expired or the programming was unsuccess
ful. Repeat the programming starting from
the third step or change the distance to the radiator grille.
Page 35 of 314
co
co
.... N
" N .... 0
" "' c:o
9. If the garage door or other systems do not
open with the Home link buttons even if the programm ing was successfu l, the system
may use a rolling code instead of a fixed
code. You must also then perform
ro lling
c o de progr amm ing
c:> page 33 .
The other two buttons in the contro l pane l can be
programmed using the instructions given above.
Star t wi th step 3 .
Dele ting button prog ramm ing
The programmed buttons cannot be de leted indi
vidually. They must be deleted all at once . Repro
gram the buttons if necessary.
"' Switch on the ignition.
.. Press both of the outside buttons on the con
trol unit until the yellow LED @turns off and
the green LED@ blinks.
Reprogramming button s
"'Switch on the ignition.
"'T o reprogram an individua l button, press the
desired b utton until the green LED(!) turns off
and the ye llow LED @star ts to blink (after ap
proximately 20 seconds). Release the button
immediately. The programming mode is active
for S m inutes.
"' Cont inue with step 5 .
@ Tips
-The distance needed between the remote
control transm itter and the Homelink mod
ule in the rad iator grille c:>
fig. 27 depends
on the system you are programm ing .
- Depending on the system model, you may need to release the button on the remote
control t ransm itter while it is programming
and press it again. Hold every posit ion you
try when programming for at least 15 sec
onds befo re trying a new posi tion. Keep an
eye on the vehicle turn signals while doing
this .
Op ening and cl osing
Rolling code programming
Applies to: vehicles with garage door opener (Home link)
On some systems, programming a rolling code is
also necessary.
Id enti fying a rolling c ode
"' Press the button in the control unit that is a l
ready programmed again and hold it down.
"' Watch the green LED (!)c:>
page 32 , fig. 26. If
the green L ED bl inks quickly, the system (such
as a garage door) has a roll ing code .
"' Program the rolling code as follows:
Acti vating the sys tem moto r unit
.. Locate the programming button on the system
motor unit. The exact location and color of the
button may vary depending on the system man
ufacturer 's brand .
"' Press the programming button on the system
motor unit (usua lly this will activa te a "display "
on the motor un it) . You now have approx ima te
ly
30 se cond s to prog ram the button in the
control panel.
Programming the button in the control
pan el
.. Press the previous ly programmed button in the
control panel for 2 seconds .
.. To complet e rolling code programming, press
the button again for 2 seconds.
.. On some systems, the button might need to be
pressed a third time to end the programm ing
procedure .
After programming, the system should recogni ze
the signal and operate when the button in the
control panel is pressed . Now you may program
the other buttons as needed .
(D Tips
-The ro lling code can be programmed more
quickly and more easily with the help of a
second person .
- If any d ifficult ies occur when programm ing
the roll ing code, it may be helpful to read
the system operating manual.
33
Page 41 of 314
CD
CD
.... N
" N ...... 0
" V, co
Lights and Vision
Exterior Lighting
Switching lights on and off
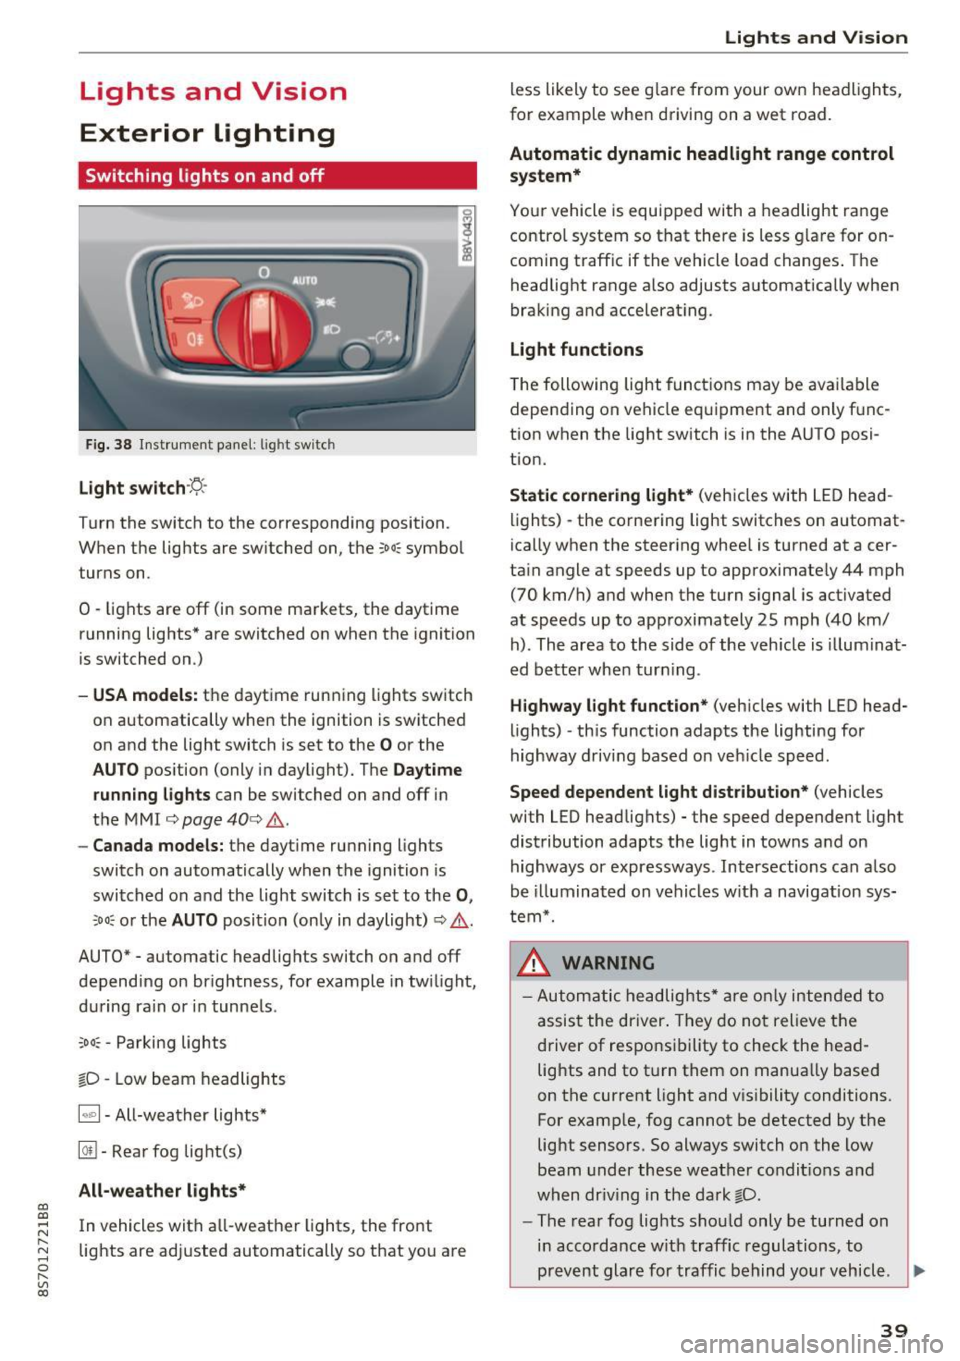
Fig. 38 Instrument panel: l ig ht switc h
Light switch ·:<'>'.·
Turn the switch to the corresponding position.
When the lights are switched on, the
;oo: symbol
turns on.
0 · lights are off (in some markets, the daytime
running lights* are switched on when the ignition
is switched on.)
-USA model s: the daytime running lights sw itch
on automatically when the ignition is switched
on and the light switch is set to the
O or the
AUTO pos ition (only in daylight). The D aytime
runn ing lights
can be switched on and off i n
the MMI
¢ page 40 ¢ &.
- Canada models: the dayt ime running lights
switch on automatically when the ignition is
switched on and the light switch is set to the
0 ,
;oo: or the AUTO posit ion (only in daylight) ¢ & .
AUTO* - automatic headlig hts switch on and off
depending on brightness, for example in tw ilight,
during ra in or in tunne ls .
~oo: -Parking lights
gD -Low beam headlights
IQ., 1-All-weather lights*
@il -Rear fog lig ht(s)
All-weather light s*
In vehicles with all-weather lights, the front
lights are adjusted automatically so that yo u are
Lights and V ision
less likely to see g lare from your own headlights,
for example when driving on a wet road.
Automatic dynamic headlight range control
system*
Your vehicle is equipped with a headlight range
contro l system so that there is less g lare for on
coming traff ic if the vehicle load changes . The
headlight range also adjusts automatically when
braking and accelerat ing .
Light function s
The following light funct ions may be avai lable
depending on vehicle eq uipment and only f unc
tion when the lig ht switch is in the AUTO posi
tion.
Static cornering light * (vehicles with LED head
li ghts) - the cornering light switches on automat
ica lly when the steer ing whee l is turned at acer
ta in angle at speeds up to approximate ly 44 mph
(70 km/h) and when the turn signal is activated
at speeds up to approximately 25 mph (40 km/
h) . The area to the side of the veh icle is illumina t
ed bette r when turn ing .
Highway l ight function * (vehicles with LED head
lights) -th is function adapts the lighting for
highway driving based o n veh icle speed.
Speed dependent light distribution* (vehicles
with LED headlights) - the speed dependent l ight
distribution adapts the lig ht in towns a nd on
highways or expressways . Intersections can a lso
be illuminated on vehicles w ith a navigation sys
tem*.
_& WARNING
- Autom atic headlights * are only inten ded to
a ssis t the driver . They do no t relieve t he
d river of respo nsibility to check the head
lig hts and to t urn them on manua lly based
on the current light and v is ibility conditions.
For example, fog cannot be detected by the
light sensors . So always switch on the low
beam under these weather condit ions a nd
when dr iv ing in the da rk
gD .
-The rear fog lights shou ld only be turned on
i n acco rdanc e w ith traffic regulations, to
prevent glare for traffic behind yo ur v ehicl e.
~
39
Page 42 of 314
Lights and Vision
-If the battery has been discharging for a
wh ile, the parking light may switch off auto
matically. Always make sure your vehicle is
parked and adequately lit according to the
laws. Avo id using the parking lights for sev
era l hours.
- Always observe legal regulations when us ing the light ing systems described.
(D Tips
- The light sensor for the automatic head
lights* is in the rearview m irror mount. Do
not place any stickers in th is area on the
windsh ield.
- Some exterior lighting functions can be ad
ju sted
c:::;, page 40.
-If you turn off the ignition wh ile the exter ior
lights are on and open the-door, a warning
tone so unds.
- In some markets, the tail lights will sw itch
on when the daytime runn ing lights sw itch
on .
- In cool or damp weather, the inside of the
headlights, turn s ignals and tail lights can
fog over due to the tempe rature d ifference
betwee n the inside and ou ts ide. They will
clea r short ly after sw itch ing them on. This
does not affect the service life o f the light
i ng.
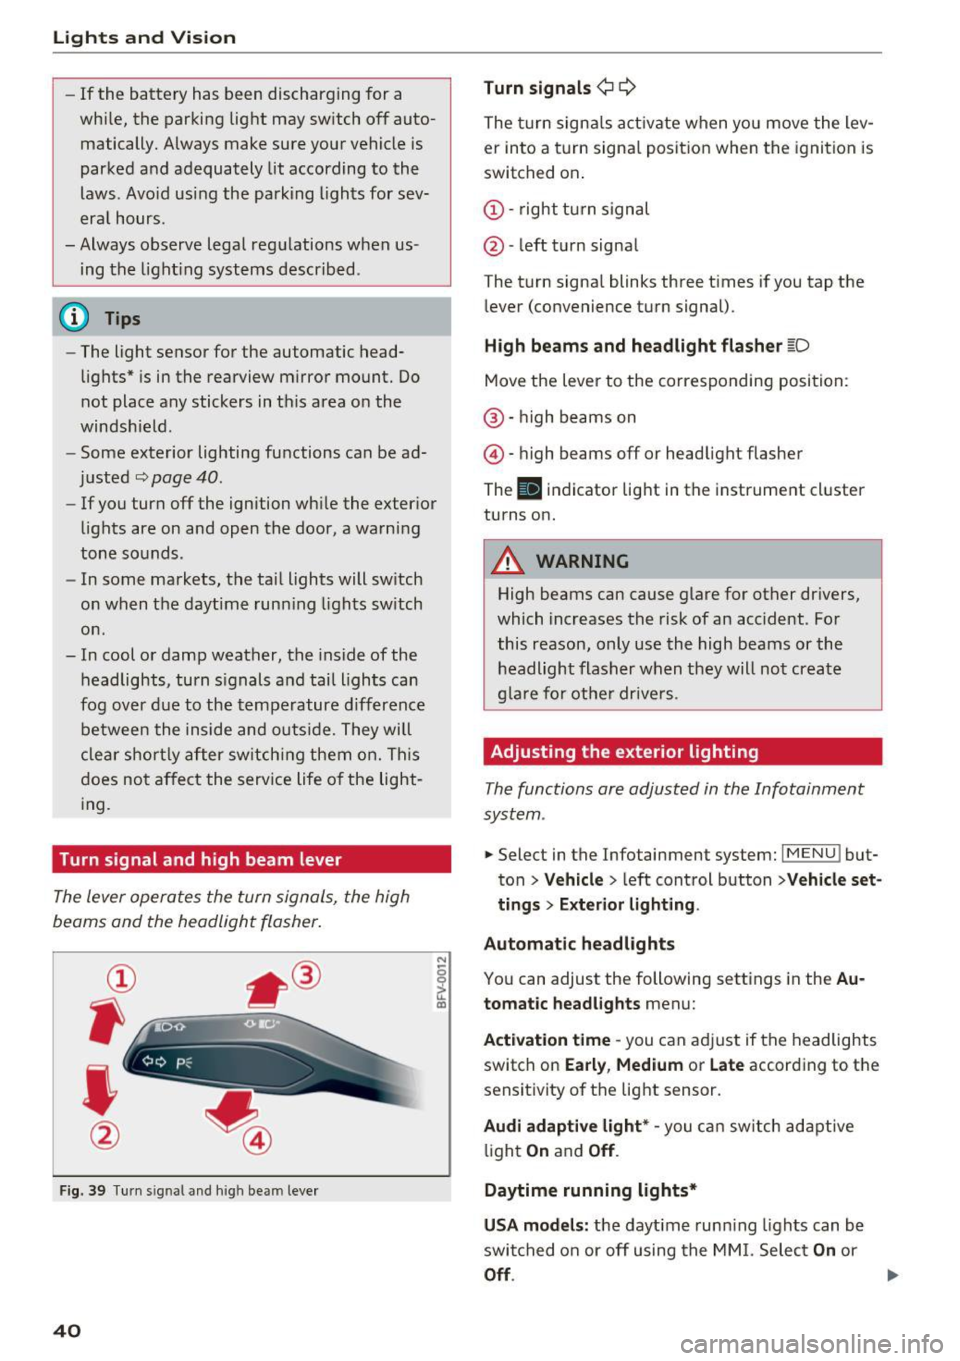
Turn signal and high beam lever
The lever operates the turn signals, the high
beams and the headlight flasher.
®
,
I
@
F ig . 39 Tu rn sig nal a nd high beam lever
40
N
c 0
ct a,
Turn signals ¢ Q
The turn sign als act ivate when yo u move the lev
er into a turn signa l posit ion when the igni tion is
switched on.
(D -right tu rn signal
@ -left t urn signa l
The tu rn signa l blinks three t imes i f you tap the
l ever (convenience t urn signal).
High beams and headlight fla sher l[D
Move the lever to the correspondin g position:
@ · high beams on
@ · high beams off or head light flasher
The
El i ndicator lig ht in the instrume nt cl uster
turns on.
_8 WARNING
High beams can cause glare for other dr ivers,
which inc reases the risk of an accident . Fo r
this reason, only use the high beams or the headlight flasher when t hey will no t create
g la re for ot he r drive rs.
Adjusting the exterior lighting
The functions are adjusted in the Infotainment
system .
.. Select in the Infotainment system: IMENU! but
ton>
Veh icle > left control button >Vehicle set
tings > Exterior light ing.
Automatic headlights
You can adjust the following sett ings in the Au
tomatic headlights
menu:
Act ivation time -you can a dju st if the headlights
switch on
Early , Medium or Late according to the
sensit ivity of th e lig ht sensor.
Audi adaptive light* -you c an switch adapt ive
li ght
On an d Off .
Daytime running lights*
USA models: the daytime runn ing lights can be
swi tched on or off using the MM I. Selec t
On or
Off.
Page 43 of 314
CD
CD
.... N
" N .... 0 r--. V, co
Canada models: this function cannot be switched
off . They activate automatically each time the ig
n ition is switched on . This menu item is shown
with a "gray background".
Coming home, Leaving home
The coming home function illuminates the area
outside the vehicle when you turn the ignition off
and open the driver's door. To switch on the func
tion, se lect
Entry/exit lighting.
The leaving home illumi nates the area outs ide
the vehicle when you unlock the vehicle . To
switch on the function, select
Entry/exit light
ing .
The coming home and leaving home funct ions
only operate when it is dark and the light switch
is in the
AUTO position.
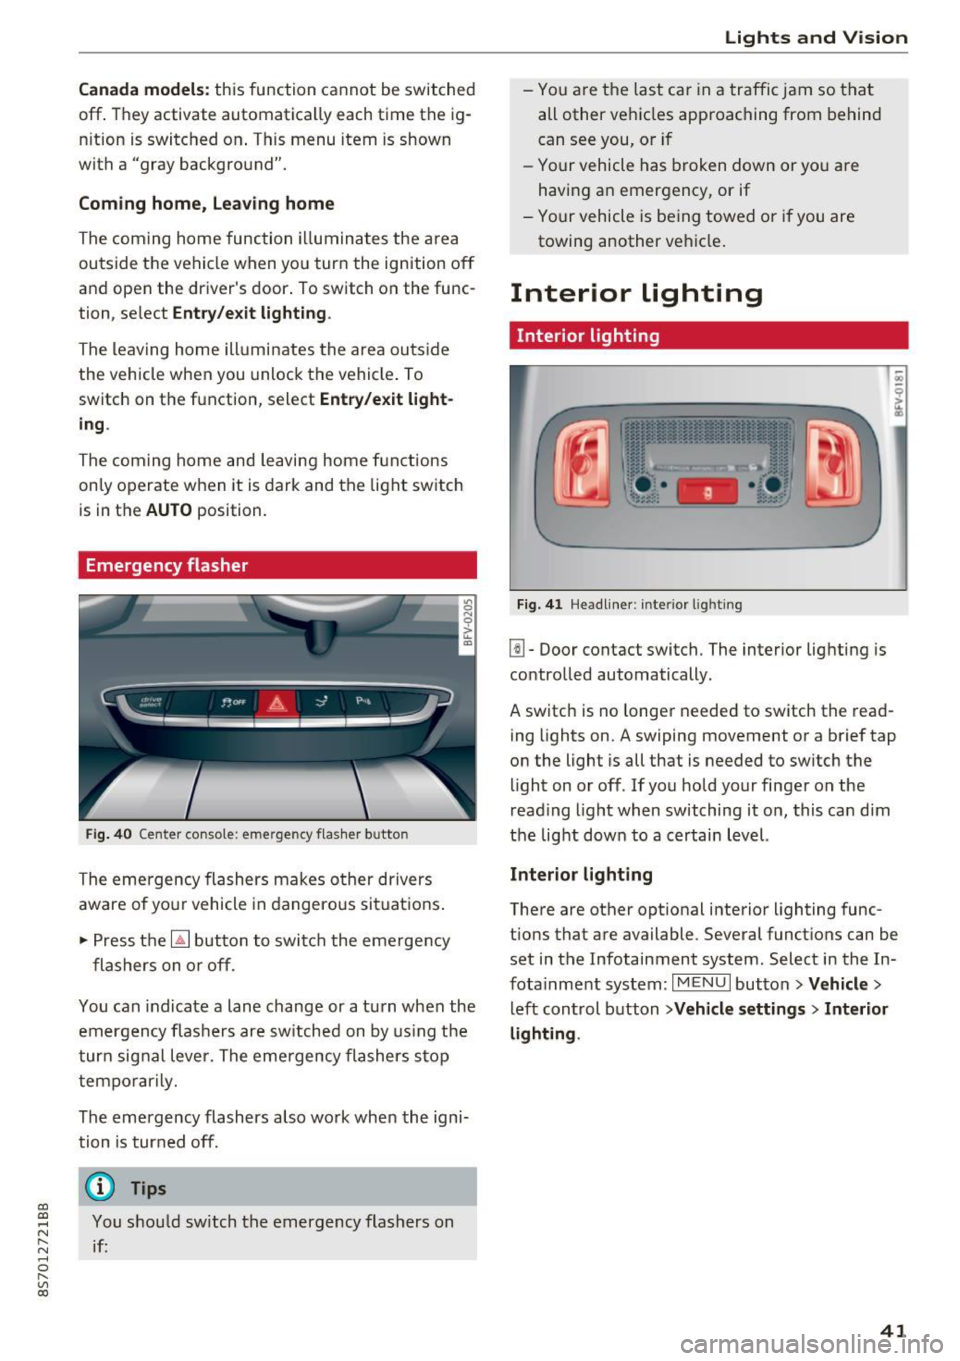
Emergency flasher
Fig. 40 Center conso le: emergency f las her button
The emergency flashers makes other drivers
aware of yo ur vehicle in dangerous situations .
.. Press the
[!J button to switch the emergency
flashers on or off.
You can indicate a lane change or a turn when the
emergency flas hers are switched on by using the
turn signal lever. The eme rgency flashers s top
temporarily.
The emergency flashers also wo rk when the igni
tion is turned off.
(D} Tips
You should sw itch the emergency flashers on
if:
Lights and V ision
-You are the last ca r in a traffic jam so that
all other vehicles approaching from behind
can see you, or i f
- Your vehicle has broken down or yo u are
having an emergency, or if
- Your vehicle is be ing towed o r if you are
towing another vehicle .
Interior lighting
Interior lighting
Fig. 41 Headliner: interior lighti ng
[!l-Door contact switch. The interior lighting is
controlled automatically.
A switch is no longer needed to switch the read
ing lights on.
A swiping movement or a brief tap
on the light is all that is needed to switch the
light on or off. If you hold your finger on the
read ing light when switching it on, this can d im
the light down to a certain level.
Interior lighting
There are other opt ional interior lighting func
tions that are available . Several functions can be
set in the Infotainment system. Select in the In
fotainment system:
I MENU I button> Vehicle>
left control button >Vehicle settings > Interior
lighting .
41
Page 63 of 314
CD
CD
.... N
" N ...... 0 r--. V, co
have the malfunction corrected. To start the en
gine, press and hold the
! START ENGINE STOPI
button.
DJ R emot e control key : hold b ack of key
again st the d esignated are a. See owner's man
ual
This message appea rs if the re is no convenie nce
key inside the vehicle or if the system does not
recognize the key . The conven ience key may not
be recognized, for example, if it is cove red by an
object that
disrupts the signal (such as a brief
case), or if the key battery is weak. Electronic de
vices such as cell phones can also interfere with
the signal.
To still be able to start or stop the eng ine, see
c:::> page 61, Starting the engine when there is a
malfunction .
Ill Remote control key : key not recogn ized . Is
the ke y still in th e vehi cle?
The Ill ind icator light turns on and this message
appears if the conve nience key was removed from
the vehicle when the engine was running.
If the
conven ience key is no longer in the vehicle, you
cannot switch the ign ition on or start the engine
once you stop it. You a lso cannot lock the vehicle
from the outside .
Please press brake p edal
This message appears if you do not press the
brake pedal when starting the eng ine.
Please pr ess clut ch p edal
This message appea rs in vehicles w it h manual
transmissions if you do not press the clutch pedal
when sta rting the engine . The engine can on ly be
started when t he clu tch pedal is pressed.
Pl ease select N or P
This message appea rs when starting or stopping
the eng ine if the selector lever is not in the Nor P
position . The engine will not start/stop.
Shift to P , otherw ise vehi cle can roll awa y.
Doors can be lo cked i n P only
This message appears for safety reasons a long
with a warning tone. It appears if the selector
lever for the automatic transmission is not in the
D rivi ng
P position when switch ing the ignit ion off w ith
the
I START ENGINE STOPI b utton. P lace these
l ector lever in the P position. The veh icle cou ld
roll if the lever is not in P. You also cannot lock
the vehicle using the locking sensor on the door handle or using the conven ience key .
Starting the engine when there is a
malfunction
It may not be possible to start the engine under
certain circumstances, for example if th e battery
in the vehicle key is drained, if interference is af
fected the key or if there is a system malfunc
tion.
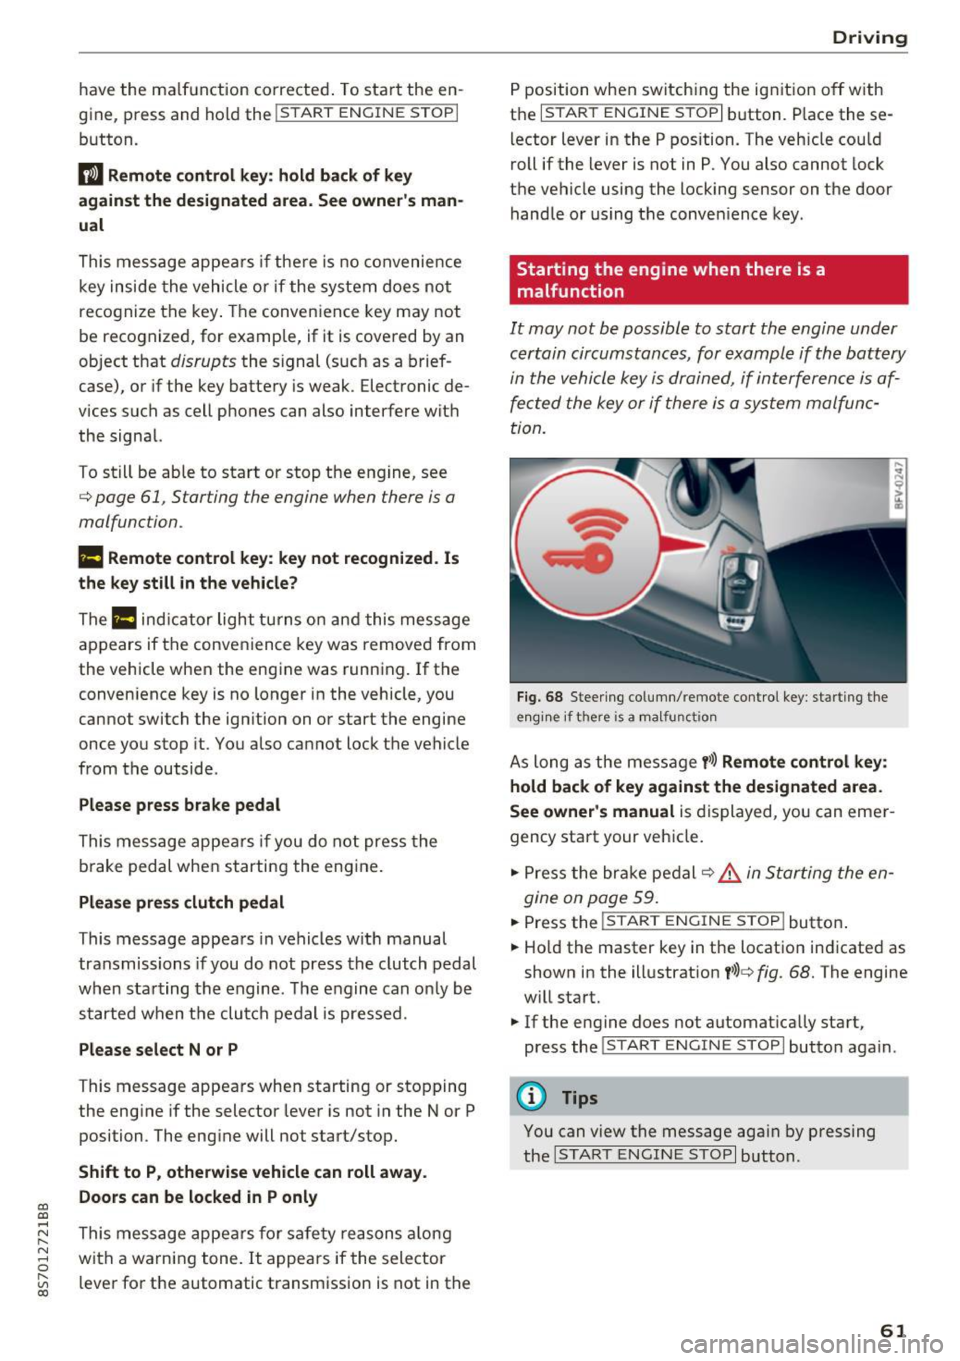
F ig. 68 Steering column/ remote control key: starting the
e n g in e if there is
a m alfunct ion
As long as the message y >l) Remote control key :
hold back of key against the designated are a.
See owner's manual
is displayed, you can emer
gency start your vehicle.
.. Press the brake pedal
c:::> .&. in Starting the en
gine on page 59.
... Press the ~I s=T ~A ~ R~ T~ E_N _G _I _N =E - S~ T= o- P~I button .
.,. Ho ld the master key in the location ind icated as
shown in the illustrat ion
y >l) c:::, fig. 68. The engine
w ill start.
.. If the engine does not automat ica lly start,
press the
! S TART ENGINE STOPI butto n again .
(D Tips
You can view the message aga in by pressing
the
I S TA RT ENGINE S TOP I button.
61