AUDI TT ROADSTER 2018 Owners Manual
Manufacturer: AUDI, Model Year: 2018, Model line: TT ROADSTER, Model: AUDI TT ROADSTER 2018Pages: 310, PDF Size: 46.95 MB
Page 91 of 310
Cl 00 .-< N r-N .-< 0 r-Vl 00
-The efficiency of the brakes can also be im
paired by driving for long stretches on roads
covered with salt without using the brakes .
You can remove salt deposits from the
brake rotors and pads by carefully applying
the brakes severa l t imes .
- If the front spoiler is damaged or you install
another spoiler, make sure the front wheel
brakes are vent ilated proper ly . Otherwise,
the b rake system could overheat, w hich re
duces the ir effectiveness.
- Failure of a brake c ircuit impa irs b raking
perfo rman ce , which increases brak ing dis
tan ce. Avoid d riving the vehicle and have it
towed it to the nearest authorized Audi
dealer or authorized Audi Service Facility .
- Never let the vehicle roll while t he engine is
stopped because this increases the risk of an
accident.
- If the brake booster is not working, you will
have to press much harder on the brake
peda l to compensate for the lack of the
booster.
@ Note
- Never let the brakes "rub" by pressing the
pedal light ly when braking is not actually
necessary. This causes the brakes to over
heat and increases braking d istance and
causes wear.
- Before driving downhi ll a long distance on a
steep h ill, decrease your speed and select a
lower gear. This makes use of the engine
braking effect and relieves the brakes . If
you need to brake additionally, brake in in
tervals and not conti nuous ly .
0) Tips
- If the brake booster is not working, you
must press the brake pedal with much more
fo rce t han normal.
- If you retrofit your vehicle with a front spoil
er, whee l covers o r similar items, make sure
t h at the a ir flow to the front whee ls is not
i nte rru pted. Ot herw ise the brake system
ca n become too ho t.
In tellig ent T echn olo gy
Electromechanical
steering
The electromechanical steering supports the
driver 's steering movements .
Power steering adap ts elec troni cally based on
the vehicle speed .
Indicator li ghts and me ssages
• Stee ring: m alfun ction! Ple ase stop vehicle
If this indica to r li ght tur ns on and stays on and
this message appears, the powe r steering may
have failed.
Stop the veh icle in a safe location as soon as pos
s ible. Do
n o t cont inue d riving. See an autho rized
Audi dealer or authorized A udi Service Facility for
assistance .
(;r,ij Ste ering : malfun cti on! You may con tinu e
dri vin g
If the indicator l ight turns on, the steering wheel
may be more d ifficult to move or more sensit ive
t h an usual. The steer ing whee l may also be at an
angle when d riving stra ight.
Drive slowly to an authorized Aud i dealer or au
thorized Aud i Serv ice Facility to have the mal
funct ion corrected.
(D Tips
If the . or (;r,ij ind icator light only stays on
fo r a short t ime, yo u may continue d riving.
All wheel drive (quattro)
In all wheel drive, all four wheels are powered.
Gener al informat ion
In all wheel dr ive, the dr iving power is divided be
tween all four wheels . This happens automatical
ly depending on your dr iv ing behavior as well as
t h e cur rent road condit ions. A lso
see ~ page 86,
Electronic stabilization control (ESC).
The all wheel dr ive concept is des igned for high
engine power . You r vehicle is except ionally pow
erfu l and has excellent driv ing cha racter istics
bot h unde r normal d riving conditions and o n
89
Page 92 of 310
Intelligent Technology
snow and ice. Always read and follow safety pre
cautions
¢ .&. .
Winter tires
By using all wheel drive, your vehicle has good
forward motion with standard tires in winter con
ditions. However, in winter we recommend using
winter or all season tires on
all four wheels, be
cause this will improve the
broking effect.
Snow chains
If there are snow chain laws, snow chains must
also be used on vehicles with all wheel drive
c::> page 259, Snow chains.
Replacing tires
For vehicles with all wheel drive, only wheels with
the same rolling circumference should be used .
Avoid using tires with different tread depths
c::> page 251, New tires or wheels.
Offroad vehicle?
Your Aud i is not an offroad vehicle - there is not
enough ground clearance. For this reason, avoid
difficult terrain.
,& WARNING
- Also, in vehicles with all wheel drive, adapt
your driv ing style to the current road and
t ra ffic conditions. Do not let the increased
safety provided tempt you into taking risks,
because this increases the r isk of an acci
dent.
- The braking ability of your vehicle is limited
to the traction of the wheels. In this way, it
is not different from a two wheel drive vehi
cle. Do not be tempted to accelerate to a
high speed when the road is slippery, be
cause this increases the risk of an accident.
- Note that on wet streets, the front wheels
can "hydroplane" if driving at speeds that
are too high. Unlike front whee l drive
vehicles, the engine does not rev higher sud
denly when the vehicle begins hydroplaning.
For this reason, adapt your speed to the
road conditions to reduce the risk of an acci
dent.
90
Rear spoiler
Applies to: vehicles with retractable rear spoile r
The extendoble rear spoiler increases driving sta
bility.
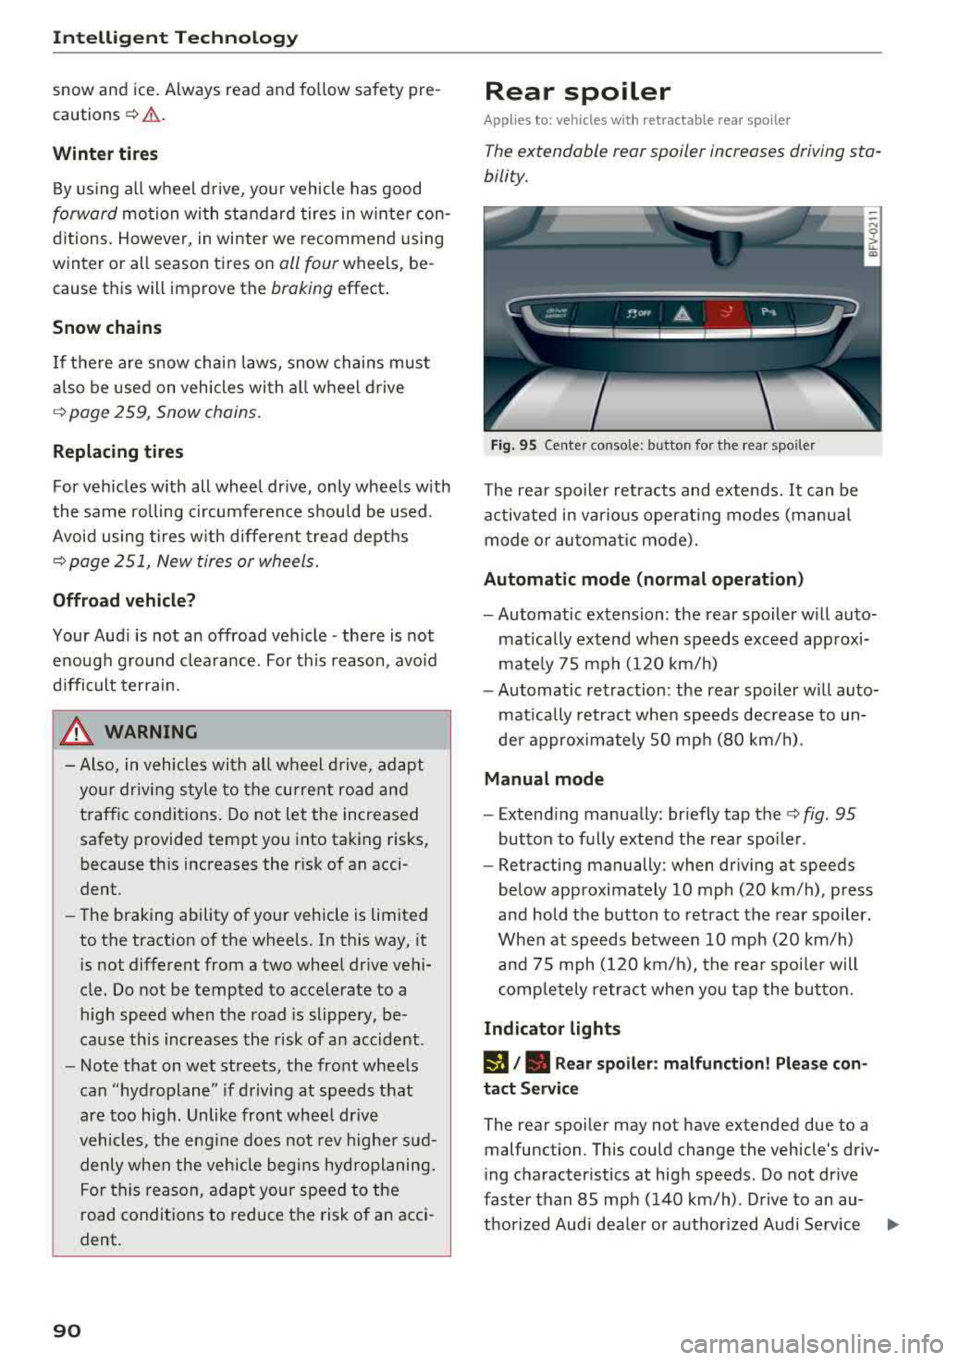
Fig. 95 Center conso le: button for the rear spoiler
The rear spoiler retracts and extends. It can be
activated in various operat ing modes (manua l
mode or automatic mode).
Automatic mode (normal operation)
- Automatic extension: the rear spoiler w ill auto
matically extend when speeds exceed approxi
mately 75 mph (120 km/h)
- Automatic retraction: the rear spoiler w ill auto
matically retract when speeds decrease to un
der approximately 50 mph (80 km/h).
Manual mode
- Extend ing manually : briefly tap the
c::> fig. 95
button to fully extend the rear spoiler .
- Retracting manually: when driving at speeds
below approximately 10 mph (20 km/h), press
and hold the b utton to retract the rear spoiler.
When at speeds between 10 mph (20 km/h)
and 75 mph (120 km/h), the rear spoiler will
completely retract when you tap the button.
Indicator lights
I), . Rear spoiler: malfunction! Please con
tact Service
The rear spoiler may not have extended due to a
malfunction . This could change the vehicle's driv
ing characteristics at high speeds . Do not drive
faster than 85 mph (140 km/h) . Drive to an au-
thorized Audi dea ler or authorized Audi Service
..,.
Page 93 of 310
Cl 00 .-< N r-N .-< 0 r-Vl 00
Facility immediately to have the malfunction cor
rected. The color of the indicator light depends
on the vehicle speed.
A WARNING
-
Driving at higher speeds without the rear
spoiler deployed can impair handling charac
teristics, making the vehicle harder to con
trol.
- Always make sure that the spoiler is de
ployed when driving at speeds over 85 mph
(140 km/h) . If the rear spoiler warning/ind i
cator lig ht in the instrument cluste r comes
on, the rear spoiler may not have deployed.
- Never drive at speeds higher than 85 mph
(140 km/h) if the spoile r is not deployed.
Have the spo iler inspected as soon as possi
ble by an author ized Audi dealer or qua lified
works hop .
- Always obey speed l imits and othe r traffic
laws .
A WARNING
Improper operation of t he rear spoiler can
cause crushing injuries.
- Always make sure that nobody, especia lly
children, is in the way when the rear spoi ler
is deployed or retracted .
(Llj) Note
-Never push on the vehicle on the rear spo il
er. This cou ld cause damage.
- To p reve nt damage to the rear spoiler do
not lean o r place anyt hing on it.
-
- Only ope rate the rear spoiler manually when
the luggage compartment lid is close and
the rear spoiler mov ing parts are not
blocked. Otherwise, damage could occur .
(j) Tips
Clean the rear spoiler compartment eve ry 2 to
3 months . To function co rrectly, the rear
spoiler must be free of ice, snow and leaves .
Intellig ent T echn olo gy
Energy management
Your vehicle is equipped with an intelligent ener
gy management system for distributing electrici
ty. This significantly improves the starting ability
and increases the vehicle battery life.
(D Tips
- If you drive short distances frequent ly, the
vehicle battery may not charge enough
wh ile driving. As a result, convenience func
tions for electr ical equipment may be tem
pera rily unavailable .
- The vehicle battery w ill gradually drain if
the vehicle is not driven for long per iods of
t ime, or if electr ical equ ipment is used
when the engine is not runn ing. To ensure
that the veh icle can still be started, the
elect rical eq uipment w ill be red uced or
sw itched
off.
Information about data
recorded by vehicle
control modules
Your vehicle is not equipped with a crash data re
corder . This dev ice is installed by some veh icle
manufacturers to record data about crashes so
t h at it can be ana lyzed later. Crash data reco rd
ers are also called " Event Data Recorders (EDR)".
In some legal jurisdictions, it is not permitted to
access or down load data recorded by pre-instal
led crash data recorders in orde r to evaluate a
crash without clear consent of the vehicle owner.
Your vehicle is not equ ipped w ith a crash data re
corder . However it does contain a variety of e lec
tronic control modules for various vehicle sys
tems such as engine function, exha ust treatment
or airbags and safety belts.
T hese electronic contro l modu les record veh icle
data du ring normal driv ing fo r diagnosis and re
pair purposes. The record ing capability of the
electronic control modules is limited to data only
-no sound is recorded . If the contro l module de
tects a system ma lfunction or other change in
status, a very limited amount of data is recorded
for an extremely small period of time. Data that
..,.
9 1
Page 94 of 310

Intelligent Technology
is recorded in such a case may include vehicle
speed, driving direction, the load on the brakes
and head restraints and performance in the event
of an accident or other change in status. The
stored data can on ly be read or downloaded with
special devices .
92
Page 95 of 310
Cl co .... N ,....
N .... 0 ,....
Vl co
Multi Media Interface
Traffic safety information
Aud i recommends performing certa in Infotain
ment system functions, such as enteri ng a desti
n ation, only when the vehicle is stat ionary . Al
ways be p repa red to stop operat ing the Info tain
ment system in the interest of your safety and
t he safety of o ther ro ad use rs.
_& WARNING
O nly use the In fo tainme nt sys tem when tra f
fic con ditio ns permit and alw ays in a way t hat
allows you to maintain complete control over
your vehicle.
@ Tips
Ce rtain functi ons are not av ailable wh ile driv
ing .
Introduction
The Multi Media Interface, or MMI for short,
combines various systems for communication,
navigation* and entertainment in your Audi. You
can opera te the MMI using the MMI control pan
el , the multifunction steering wheel or the voice
recognition system*.
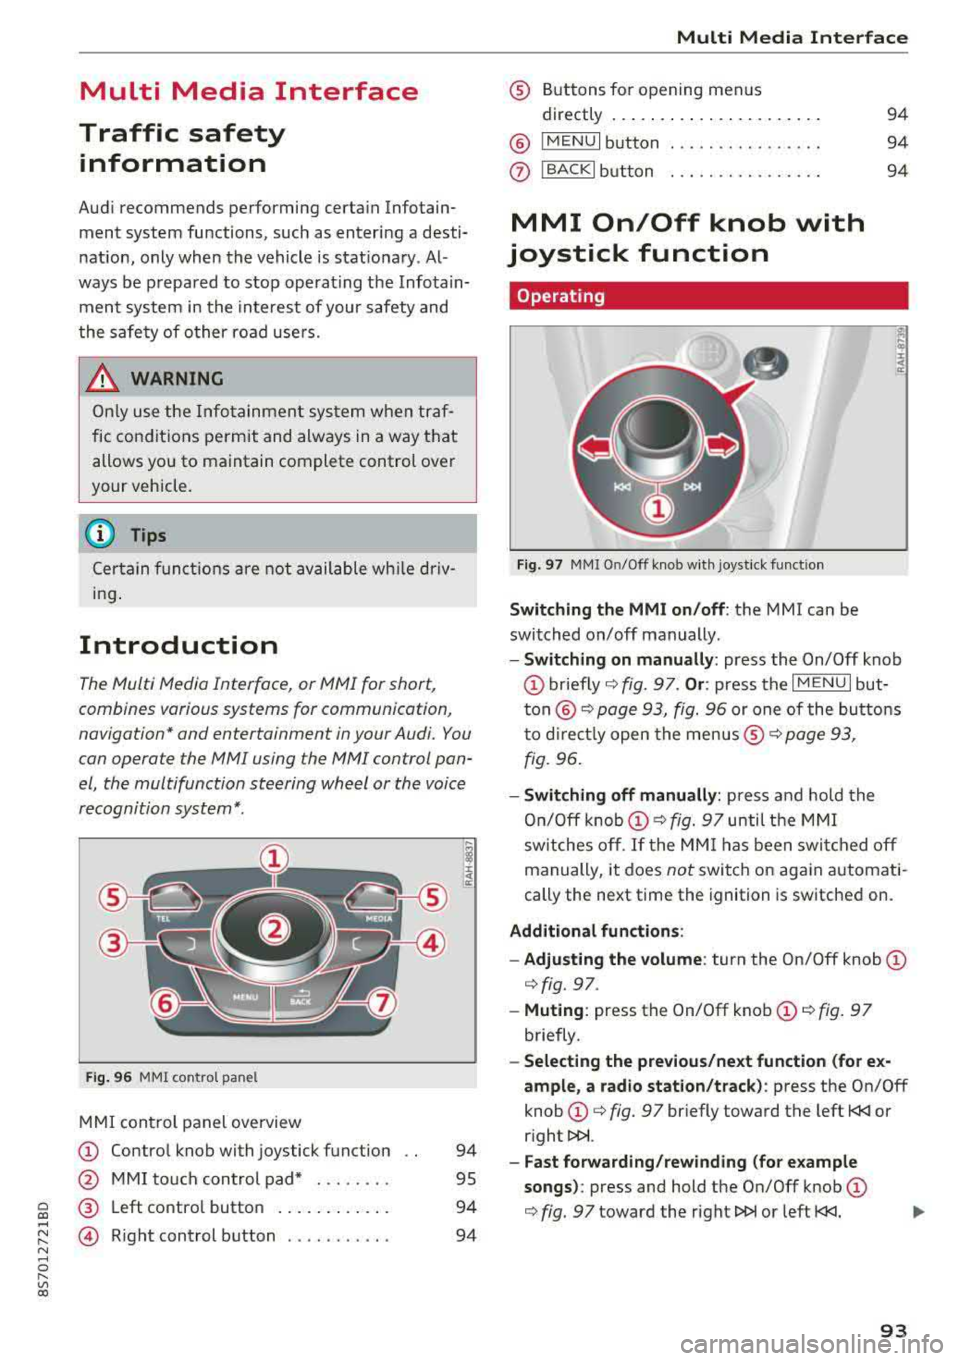
F ig. 96 MMI co ntrol pa nel
M MI con trol panel overview
(D Contro l knob with joystick f unction
@ M MI to uch con trol pad* . .... .. .
® Left co ntro l butto n .... .. . ... . .
© R ight control b utton .......... .
94
95
94
94
Multi Media Inte rface
® Buttons fo r opening menus
directly .... ... .. .. .. .. .... .. .
@ IM ENU I button
0 IBACKI bu tton . .. .. .. .... .... .
MMI On/Off knob with
joystick function
Operating
Fig . 97 MMI O n/Off k nob w it h joys tick funct io n
Switching the MMI on/off : the MMI can be
switched on/off manually .
94
94
94
E
" ~ .. a:
- Switching on manually : press the On/Off knob
(D briefly c::> fig. 9 7. Or : press the IM ENU I but
t o n
@ c::> page 93, fig. 96 or one of the bu tton s
t o dir ect ly open the menus ®
r=.> page 93,
fig. 96.
- Switching off manually : press and ho ld the
O n/O ff k nob
(D r=.> fig. 97 until t he MMI
sw itches o ff.
If the MM I has been swi tc h ed off
manually, it does
not switch o n again automati
cally the next time the ignition is sw itche d on.
Additional fun ctions :
- Adjusting the volume :
turn the On/Off knob (D
c::> fig. 97.
-Muting : press the On/Off knob (D c::> fig. 97
briefly .
-Selecting the previous/next function (for e x
ample , a radio station/track ):
p ress the On/Off
knob
(D c::> fig. 97 br iefly toward the left t
l>!>i.
- Fast forwarding/rew inding (for e xample
songs) :
press and hold the On/Off knob (D
c::> fig. 97 toward the right l>!>i or left t
Page 96 of 310
Multi Media Interface
A WARNING
Adjust the volume of the audio system so that signals from outside the vehicle, such as po
lice and fire sirens, can be heard easily at all
times .
(j) Tips
The MMI switches off automatically if the en
gine is not running and the vehicle battery is
low .
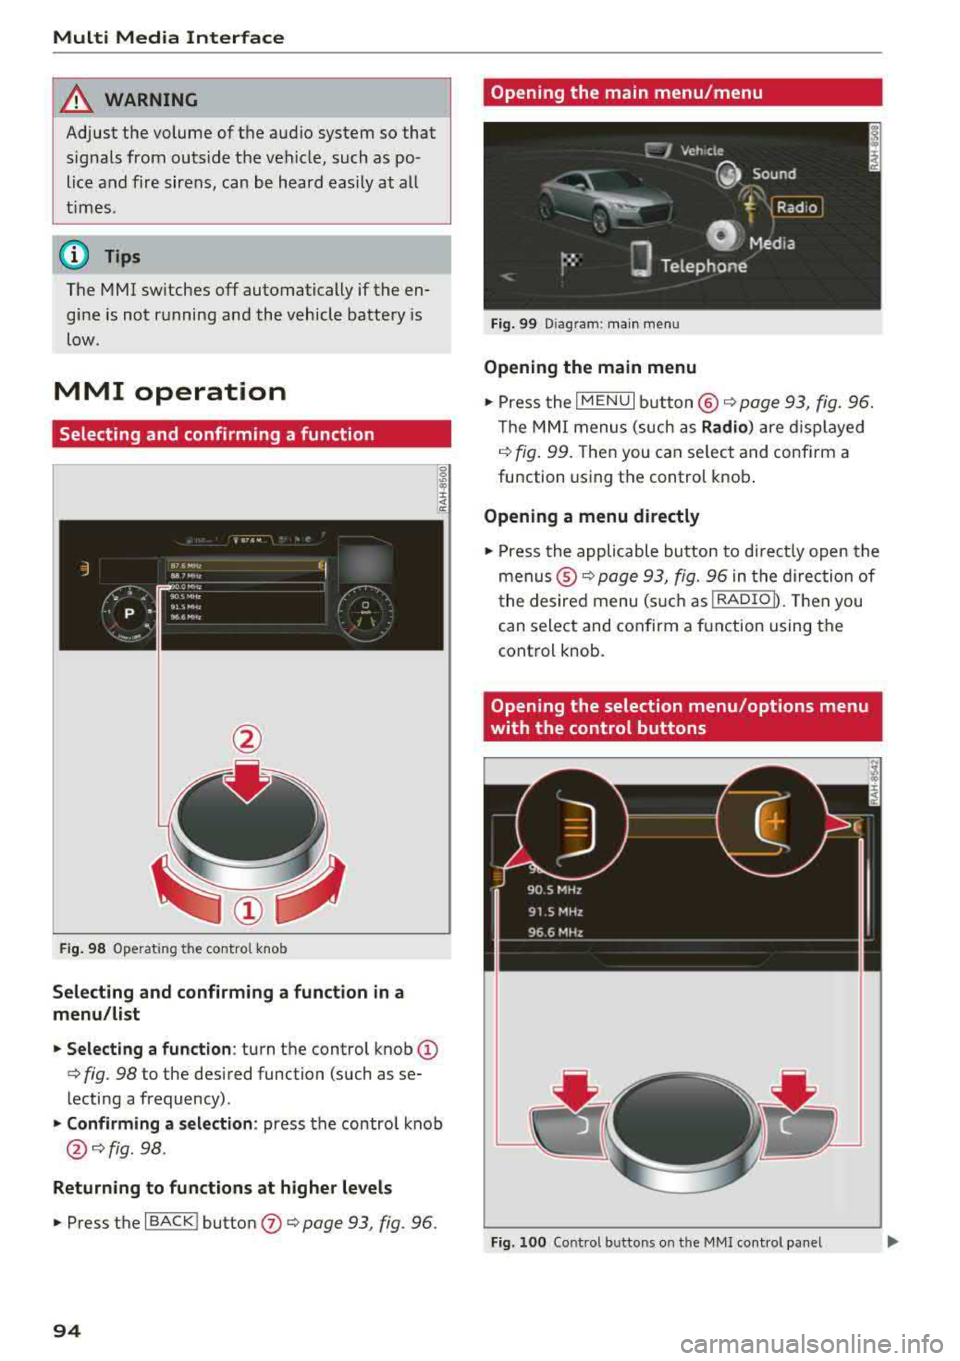
MMI operation
Selecting and confirming a function
Fig . 98 Operat ing the control knob
Selecting and confirming a function in a
menu/list
.. Selecting a function : turn the control knob (D
c> fig. 98 to the desired function (such as se
lecting a frequency) .
.. Confirming a selection : press the contro l knob
@ c>fig . 98.
Returning to functions at higher levels
.. Press the I BACK ! button (J) c> page 93, fig. 96.
94
Opening the main menu/menu
Fig. 99 Diagram: main menu
Opening the main menu
.,. Press the I MENU I button @ c> page 93, fig. 96.
Th e MMI menus (such as
Radio) are displayed
c>fig. 99. Then you can select and conf irm a
function using the control knob.
Opening a menu directly
.. Press the applicable button to directly open the
menus ®
c> page 93, fig. 96 in the direction of
the desired menu (such as
!RADIOD. Th en you
can select and confirm a function using the
control knob.
Opening the selection menu/options menu
with the control buttons
Fig. 100 Control butto ns on the MMI cont rol panel
Page 97 of 310
Cl co .... N ,-... N ...... 0 ,-... Vl co
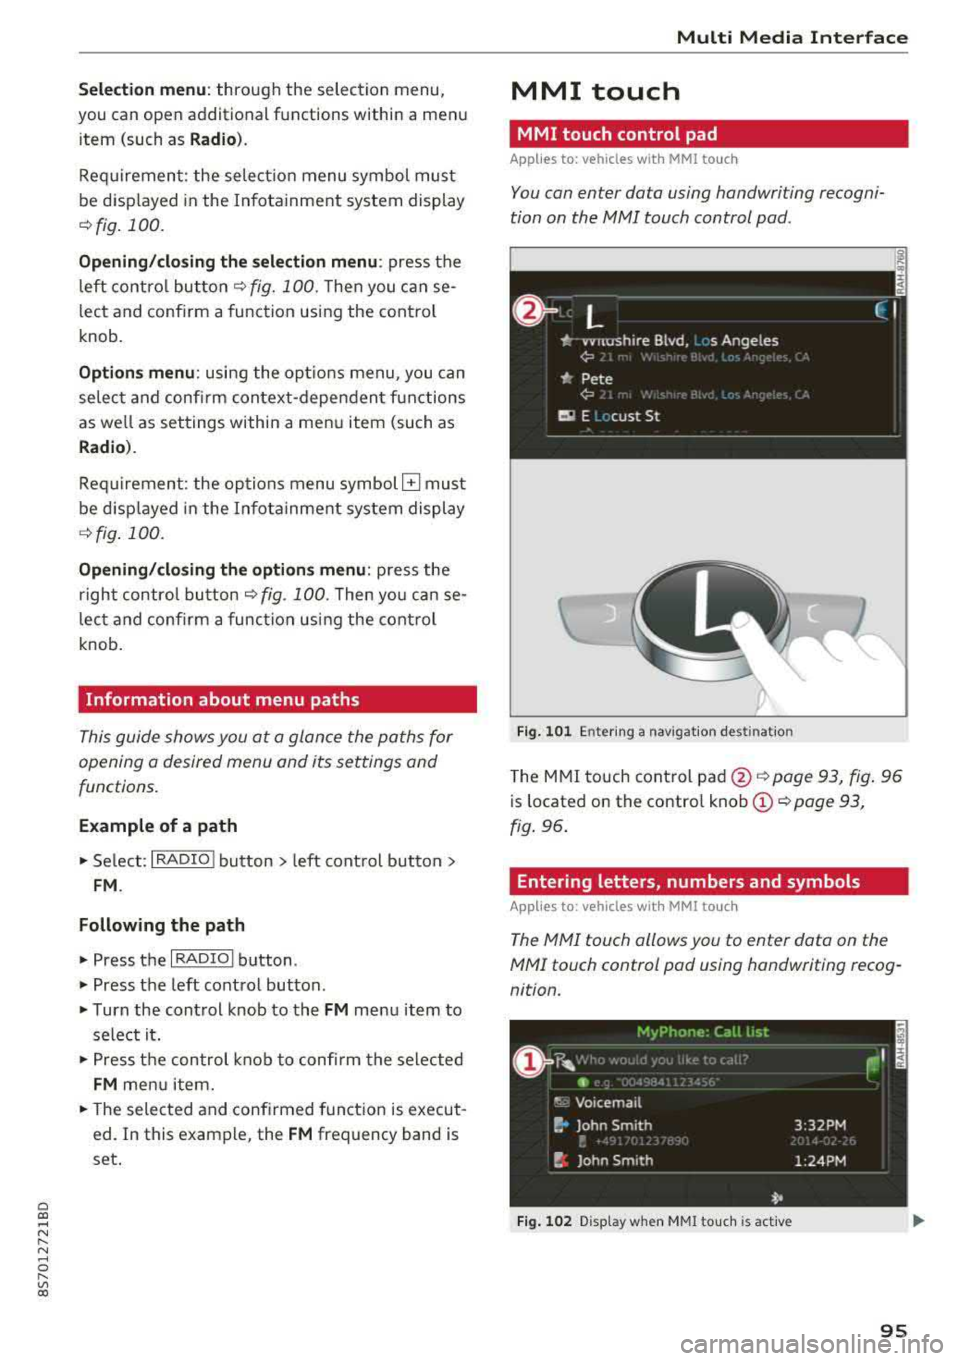
Selection menu: through the selection menu,
you can open additional functions within a men u
i tem (such as
Radio ).
Req uireme nt: the select io n menu symbol mus t
be disp layed in the In fota inment system display
¢ fig . 100 .
Opening /closing the selection menu : press the
l eft contro l bu tton
¢ fig. 100 . Then you c an se
lect and conf irm a function usi ng the control
knob.
Options menu : using the opt io ns menu, you can
se lec t a nd con firm con tex t-depen den t fu nct ions
as we ll as settings within a men u item (such as
Radio ).
Re qui rement : the options menu symbol G must
be disp layed in the In fota inme nt system di splay
¢ fig . 100 .
Opening /closing the options menu : press the
right contr ol
bu tton ¢ fig. 100. Then yo u can se
lec t an d con firm a func tion usi ng the cont rol
knob.
Information about menu paths
T his guide shows you a t a glan ce the path s for
opening a desired menu and its se ttings and
functions.
Example of a path
"' Se lect : I RADIO ! bu tton> left cont rol bu tton>
FM .
Following the path
"'Press th e I RADIO I button .
"' Press the left control button .
"'Turn the con trol knob to the FM menu item to
sele ct i t.
"'P ress th e c ont rol knob to confi rm the se le cte d
FM me nu item .
"'The selected and conf irmed funct ion is execut
ed . In this e xam ple, the
FM frequency band is
set .
Multi Media Inte rface
MMI touch
MMI touch control pad
App lies to: vehicles wi th MMI to uch
You can enter data using handwri ting recogni
tion on the
MMI touch control pad .
Fig . 10 1 En ter ing a nav igatio n destin atio n
The M MI touch cont rol pa d@ ¢ page 93, fig . 96
is located on the contro l kno b (D ¢ page 93,
fig . 96 .
Entering letters, numbers and symbols
App lies to : vehicles wit h MMI to uch
The MMI touch allows you to enter data on the
MMI touch control pad using handwriting recog
nition.
Fig. 102 Disp la y when MMI to uch is act ive
95
Page 98 of 310
Multi Media Interface
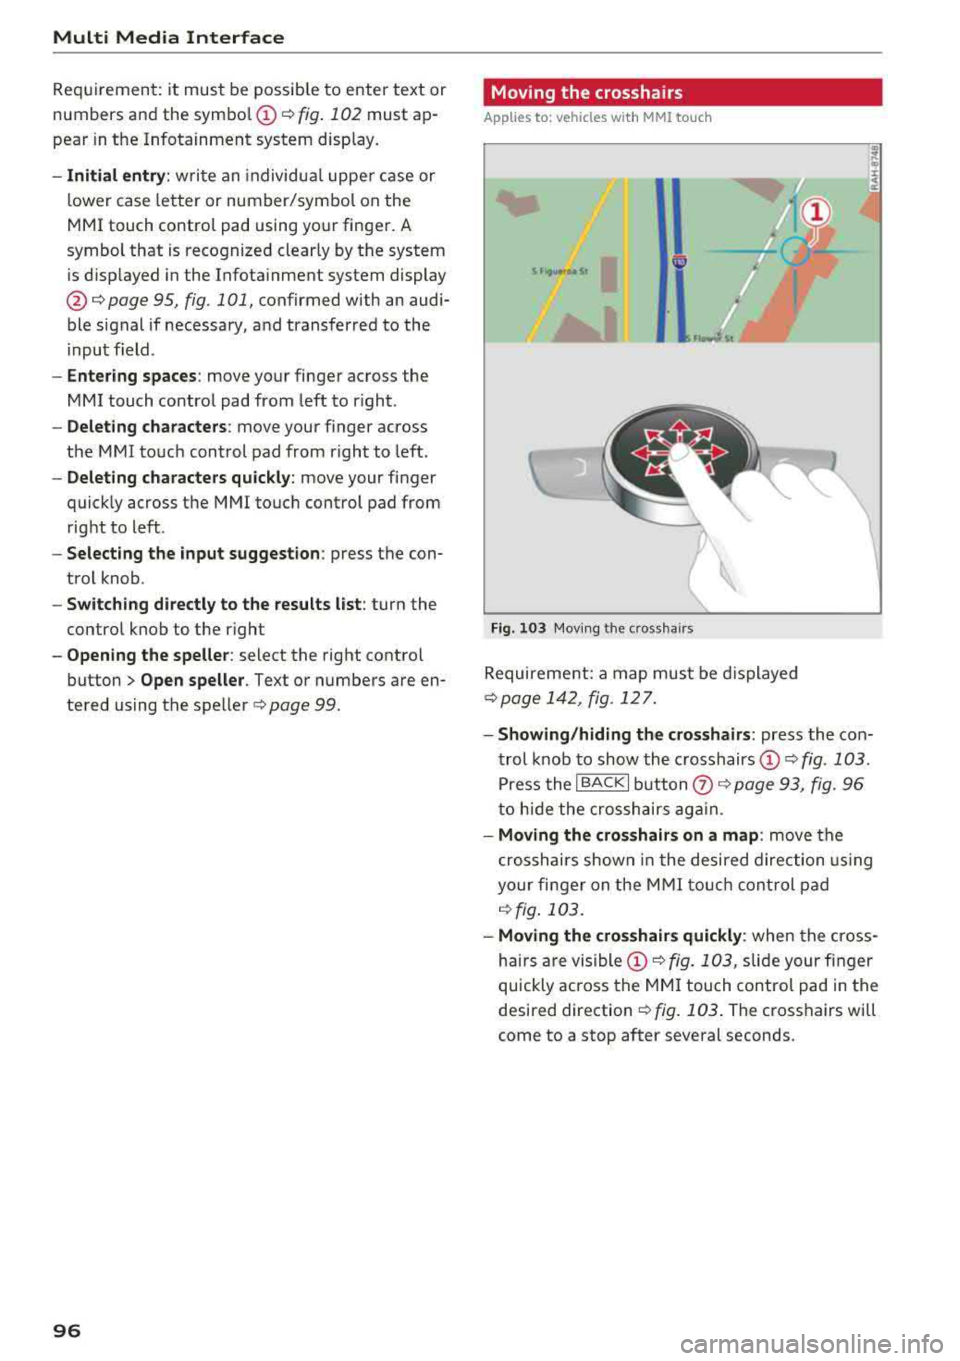
Requirement: it must be possible to enter text or
numbers and the
symbol @<=:> fig. 102 must ap
pear in the Infotainment system display.
-Initial entry: write an individua l upper case or
lower case letter or number/symbol on the
MMI touch control pad using your finger . A
symbol that is recognized clearly by the system
is displayed in the Infotainment system display
@ c:::> page 95, fig. 101, confirmed with an audi
ble signal if necessary, and transferred to the
input field.
-Entering spaces : move your finger across the
MMI touch control pad from left to right .
-Deleting characters: move your finger across
the MMI touch control pad from right to left.
-Deleting characters quickly: move your finger
quick ly across the MMI touch control pad from
right to left .
-Selecting the input suggestion : press the con
trol knob .
-Switching directly to the results list: turn the
control knob to the right
- Opening the speller: select the right control
button>
Open speller . Text or numbers are en
tered using the speller
c:::> page 99 .
96
Moving the crosshairs
Applies to: vehicles with MMI touch
l.
Fig. 103 Moving the cro ssha irs
Requirement: a map must be displayed
c:::> page 142, fig. 12 7.
-Showing/hiding the crosshairs: press the con
trol knob to show the crosshairs
©¢fig . 103 .
Press the I BACKI button (!) c:::> page 93, fig. 96
to hide the crosshairs again .
-Moving the crosshairs on a map : move the
crosshairs shown in the desired direction using
your finger on the MMI touch control pad
c:::> fig. 103.
-Moving the crosshairs quickly : when the cross
ha irs are
visible © c:::> fig. 103, slide your finger
quickly ac ross the
MMI touch control pad in the
desired direction
c:::> fig. 103. The crosshairs will
come to a stop after several seconds .
Page 99 of 310
Cl co .... N ,....
N ...... 0 ,....
Vl co
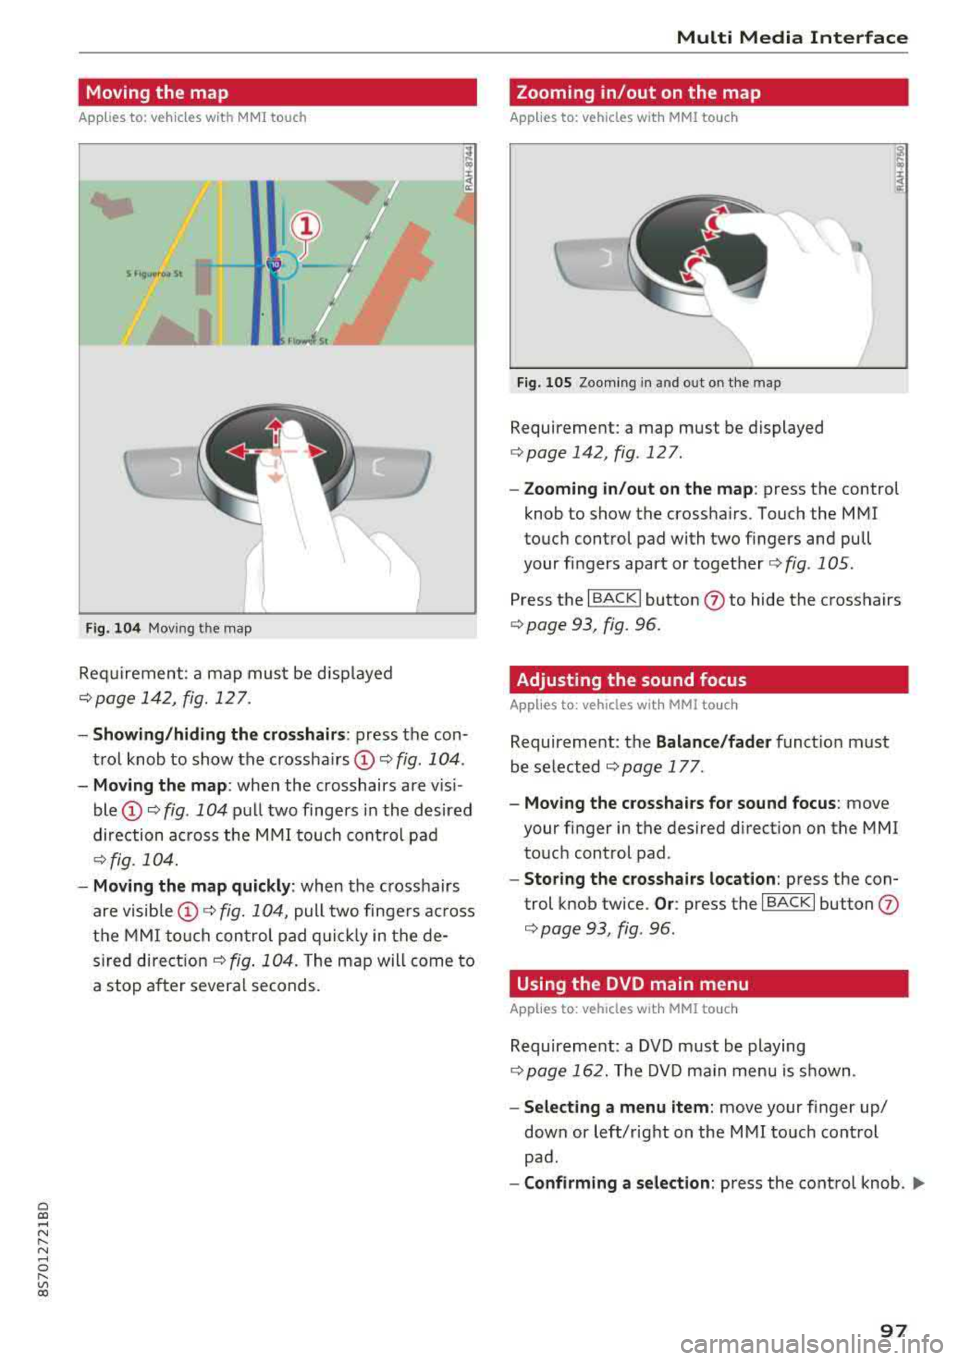
Moving the map
Applies to: vehicles with MMI touch
Fig . 104 Mov ing th e map
Req uirement: a map must be d isp layed
¢ page 142, fig. 127 .
-Showing /hiding the cro sshair s: press the con
t rol knob to show the crossha irs
CD ¢ fig. 104 .
-Moving the map : when the crosshairs are v is i
ble
CD ¢ fig. 104 pull two fingers in the desired
direction ac ross the
M MI touch cont rol pad
¢ fig. 104.
- Moving the map quickly : when the crosshairs
are visible
CD ¢ fig. 10 4, pull two finge rs ac ross
the
M MI to uc h con trol pad q uic kly in the de
s ired
dire ct io n ¢ fig . 104. The ma p will come to
a stop a fter severa l seconds.
Multi Media Inte rface
Zooming in/out on the map
Applies to: vehicles with MMI touch
Fig . 105 Zoo ming in and out o n th e ma p
Requirement: a map must be displayed
¢page 142 , fig. 127 .
-Zooming in /out on the map : press the control
knob to show the crossha irs . Touch the
MMI
touc h cont rol pad with two f ingers and pull
your fi ngers apart or
together ¢ fig. 105 .
Press t he I BA CK I button (J) to hide the crosshairs
¢ page 93, fig. 96.
Adjusting the sound focus
Applies to : vehicles with MMI to uch
Requireme nt: the Balance /fader funct io n must
be se lected
¢ page 177 .
-Moving the crosshairs for sound focus : move
your finger in the desired di rect ion on t he
MMI
to uch control pad .
-Storing the crosshairs location : press the con
trol knob tw ice.
Or : press the I BACK I button (J)
¢ page 93, fig . 96 .
Using the DVD main menu
Applies to : vehicles with MMI touch
Requireme nt: a DVD m ust be playing
¢ page 162. The DV D main menu is s hown .
-Selecting a menu item: move your finger up/
down or left/rig ht on the
M MI touch cont rol
pad .
-Confirming a selection : press the contro l knob . ..,.
97
Page 100 of 310
Multi Media Int erface
(D Tips
The volume of the prompts for the MMI touch
can be adjusted
separate ly ¢ page 178.
Control knob with
joystick function
Operating
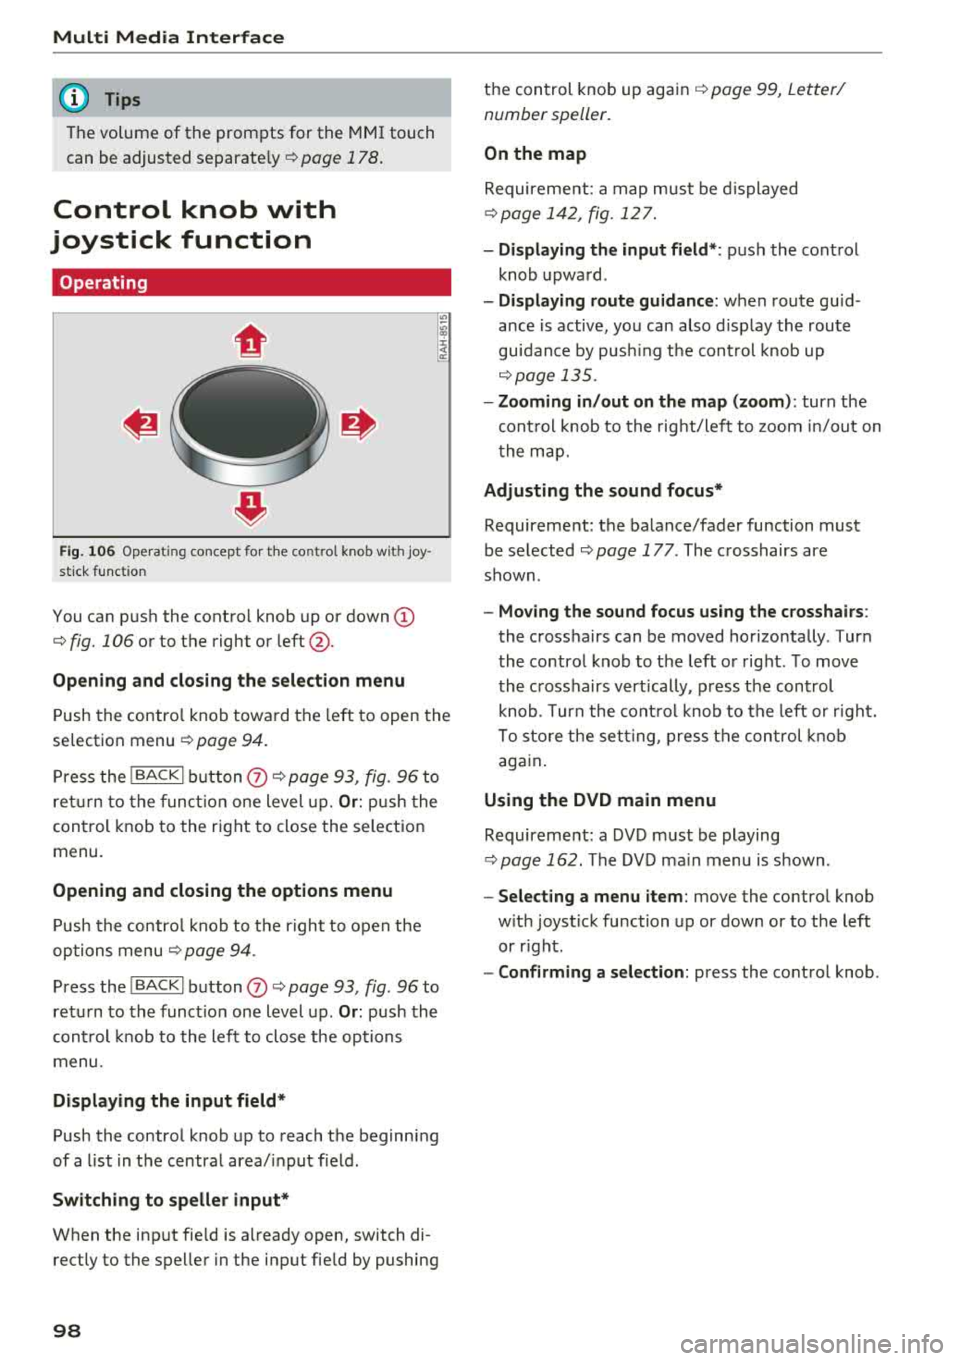
F ig . 106 Ope rat ing concept fo r th e co ntrol knob w ith joy
s ti ck f unct ion
You can push the contro l knob up or down (D
¢ fig. 106 or to the right or left @.
Opening and closing the selection menu
Push the contro l knob toward the left to open the
selection menu
¢ page 94.
P ress the I BACKI b utton (J) ¢ page 93, fig. 96 to
ret urn to the funct io n one level up.
Or : push the
control knob to the right to close the selection
menu.
Opening and closing the options menu
P ush the contro l knob to t he r ight to open the
options menu
¢ page 94 .
Press the I BACKI button (J) ¢ page 93, fig . 96 to
ret urn to the funct io n one level up .
Or: push the
cont rol knob to the left to close the op tions
menu .
Displaying the input field *
Push the control knob up to reach the beginn ing
of a list in t he central area/ input f ield .
Switching to speller input*
When the inp ut fie ld is a lready open, switch di
rectly to the spelle r in the input fie ld by pushing
98
t h e control knob up again ¢ page 99, Letter/
number speller.
On the map
Requireme nt: a map must be d isplayed
¢ page 142 , fig. 127.
- Di splaying the input field* :
push the control
knob upwa rd .
- Displaying route guidanc e: when route guid
ance is active, you can also d isplay the route
guidance by pus hing t he cont rol knob up
¢ page 135 .
- Zooming in /out on the map (zoom) :
turn the
cont rol knob to the right/le ft to zoom in/out on
t he map.
Adjusting the sound focus*
Requirement: the balance/fader function must
be se lected ¢
page 177 . The crosshairs are
shown .
-Moving the sound focus using the crosshairs :
the crosshairs can be moved horizontally. T ur n
the co ntro l knob to t he left o r right . T o move
the c rosshairs vert ically , p ress the control
knob . Turn the cont ro l knob to the left or r ight.
To sto re the set ting, press the co ntrol knob
aga in .
Using the DVD main menu
Requireme nt: a DVD must be playing
¢ page 162. The DVD ma in menu is s hown .
-Select ing a menu item : move the contro l knob
w ith joys tick function up or down or to the left
or r ight.
- Confirming a selection: press the control knob .