check engine BMW 3 SERIES 1983 E30 Owner's Guide
[x] Cancel search | Manufacturer: BMW, Model Year: 1983, Model line: 3 SERIES, Model: BMW 3 SERIES 1983 E30Pages: 228, PDF Size: 7.04 MB
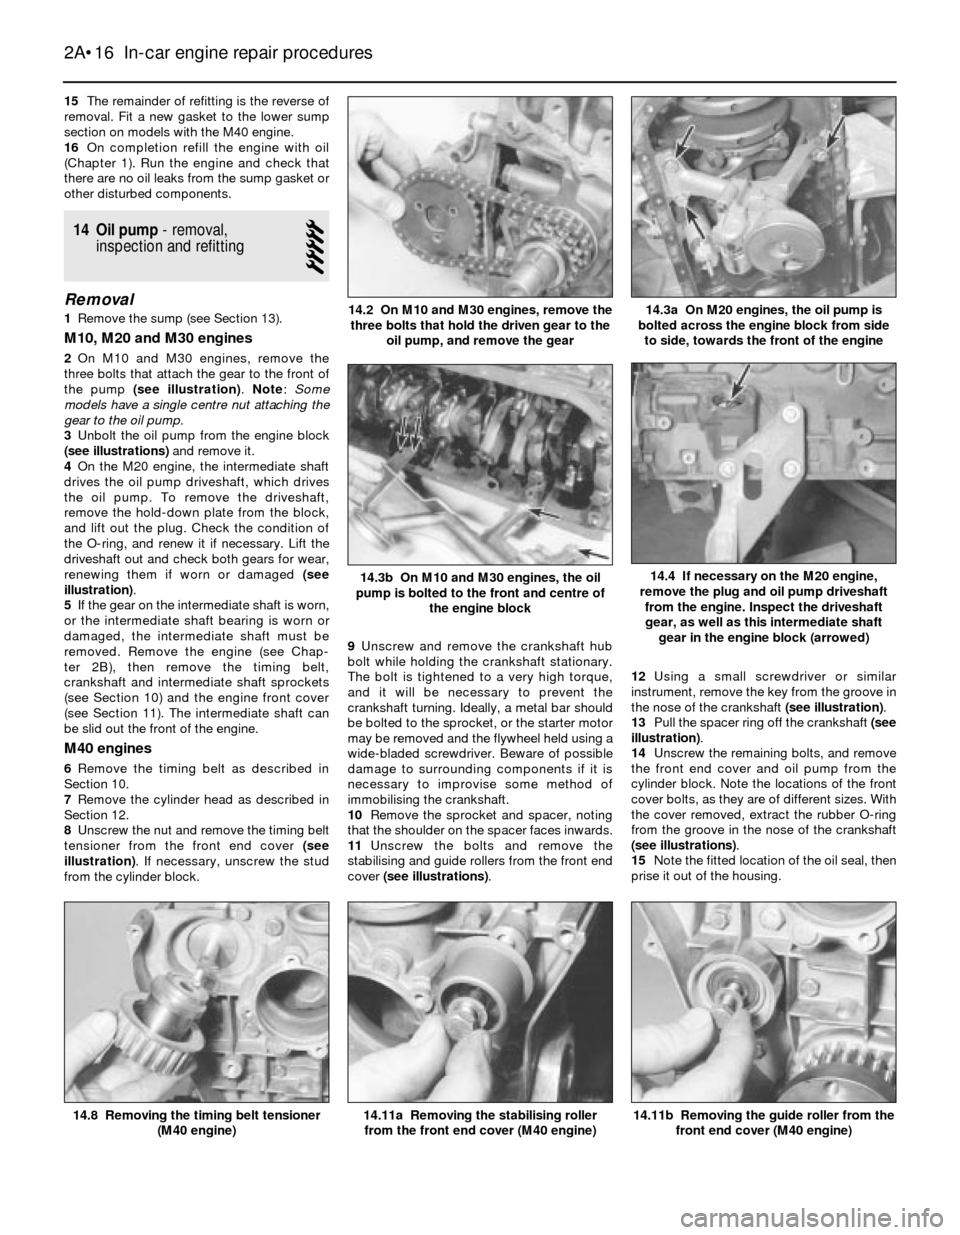
Page 46 of 228
alignment mark on the camshaft sprocket and
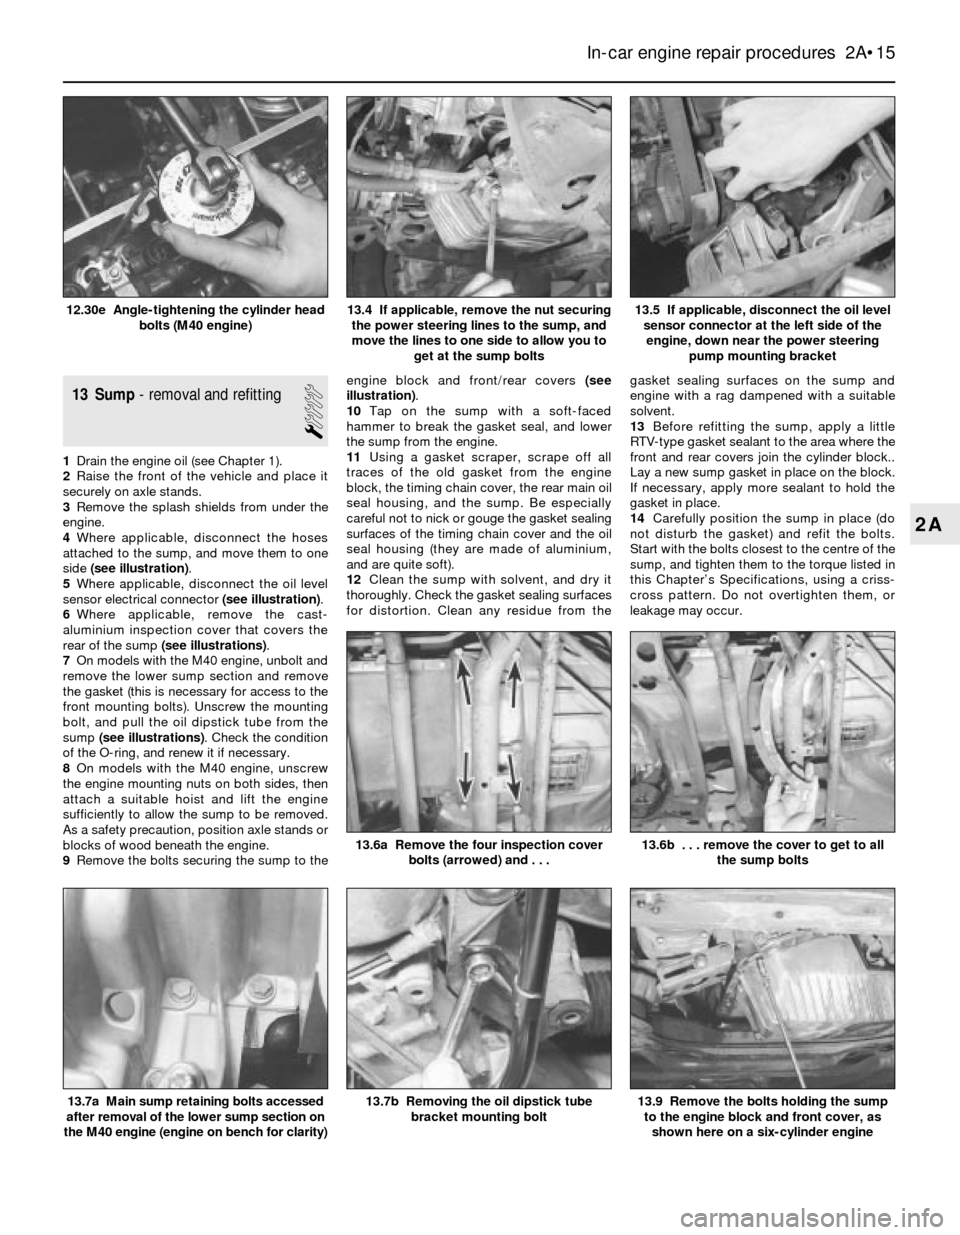
rear timing cover to ensure correct refitting.
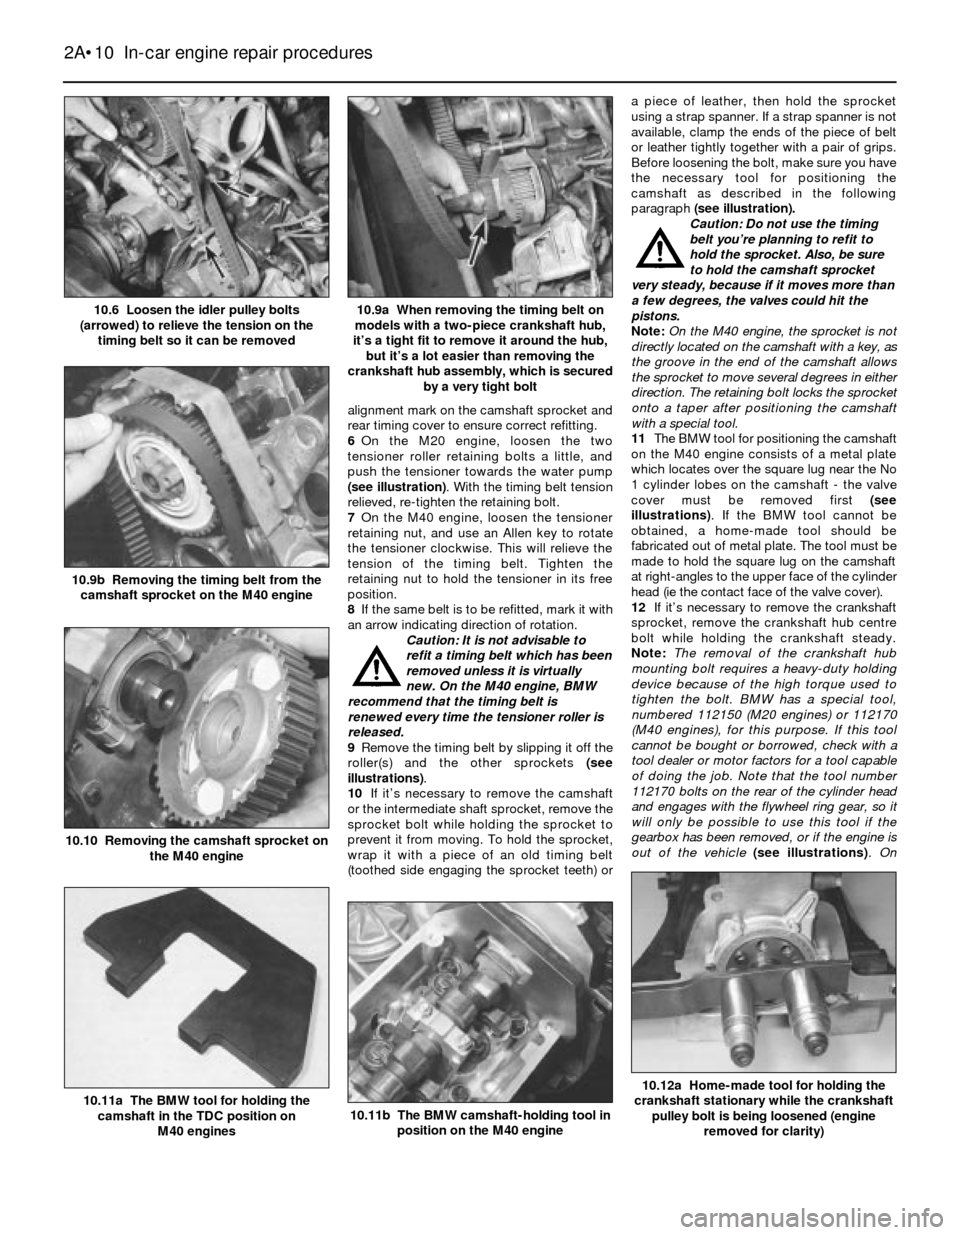
6On the M20 engine, loosen the two
tensioner roller retaining bolts a little, and
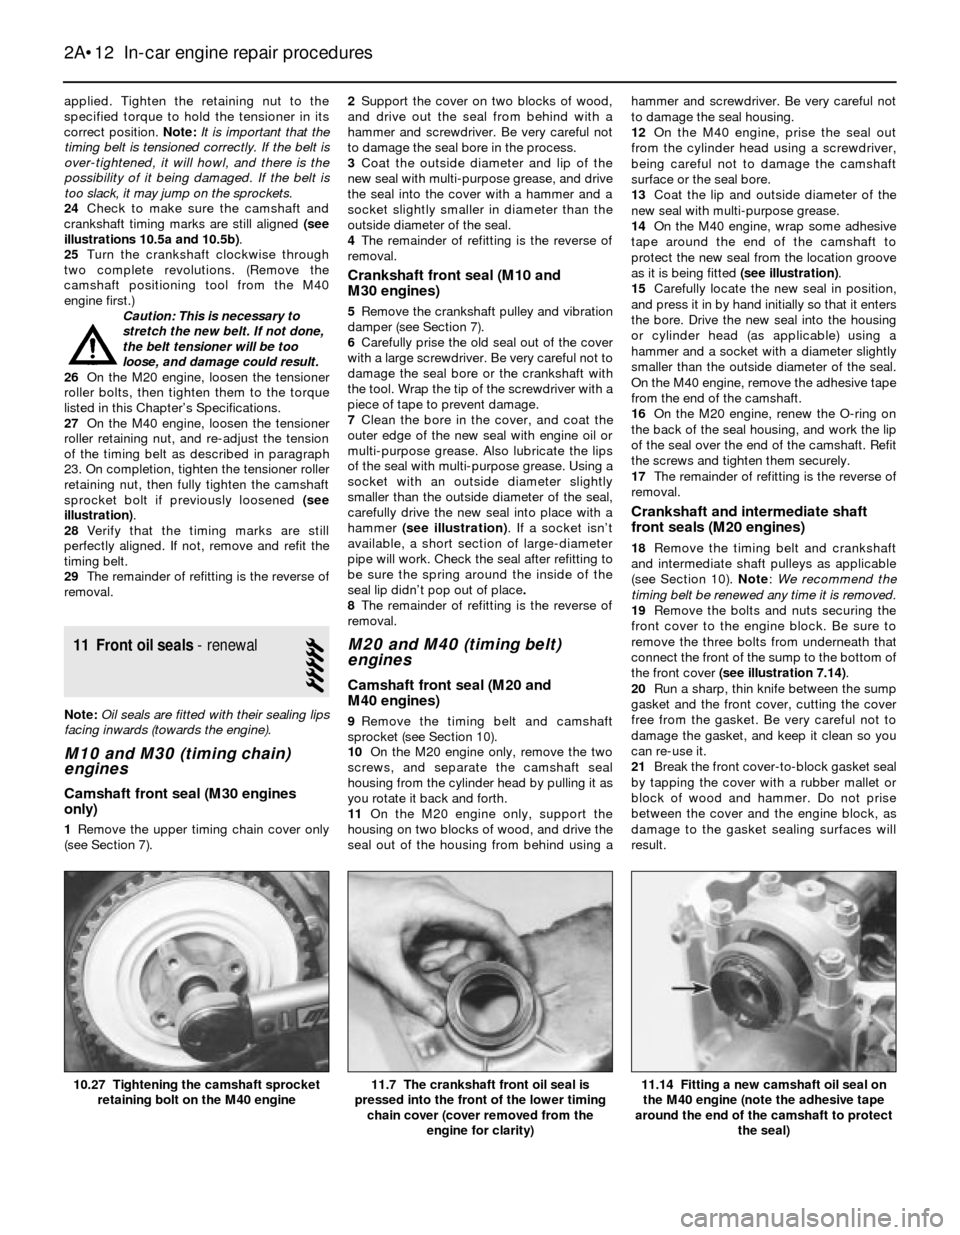
push the tensioner towards the water pump
(see illustration). With the timing belt tension
relieved, re-tighten the retaining bolt.
7On the M40 engine, loosen the tensioner
retaining nut, and use an Allen key to rotate
the tensioner clockwise. This will relieve the
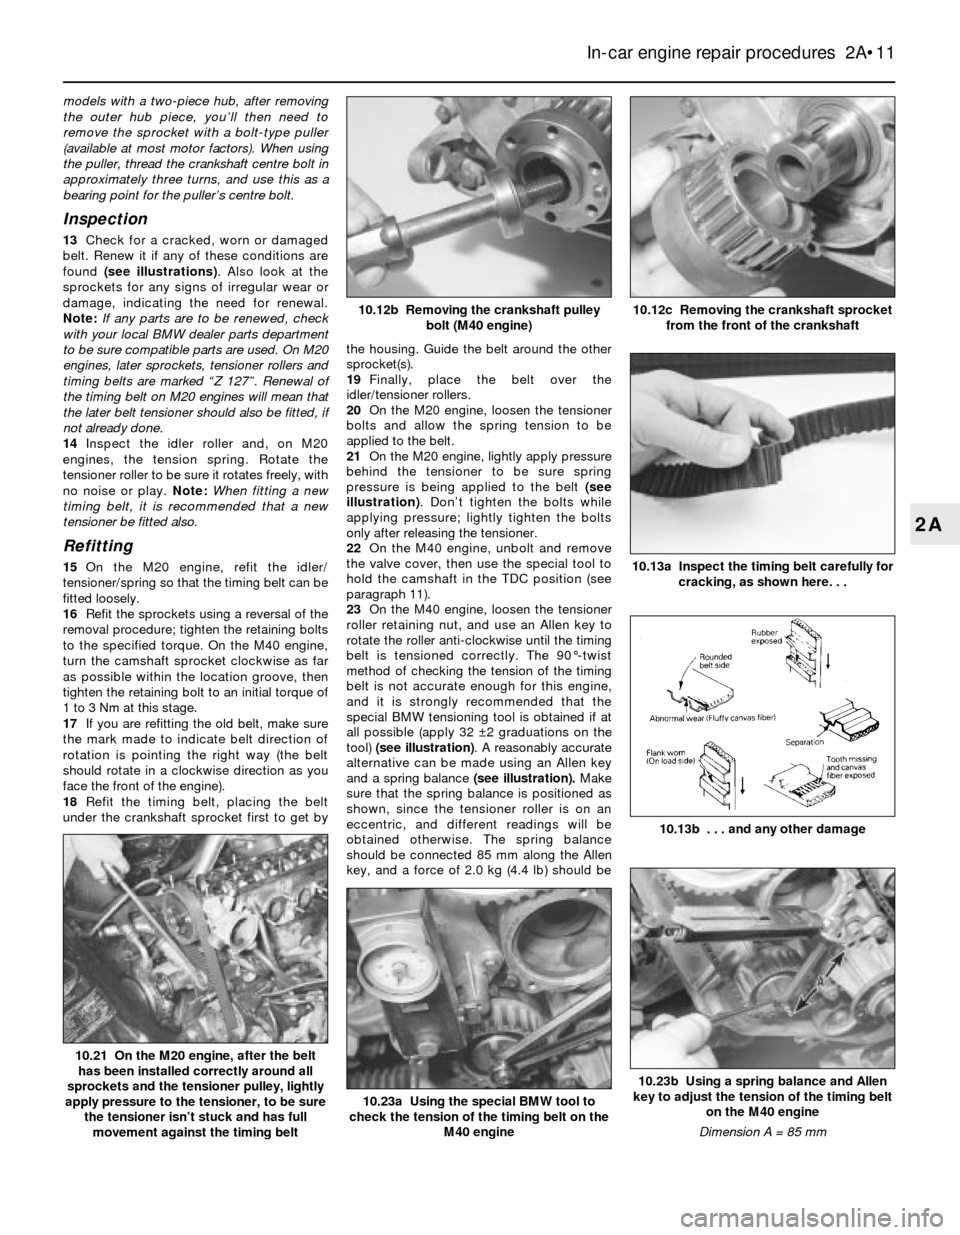
tension of the timing belt. Tighten the
retaining nut to hold the tensioner in its free
position.
8If the same belt is to be refitted, mark it with
an arrow indicating direction of rotation.
Caution: It is not advisable to
refit a timing belt which has been
removed unless it is virtually
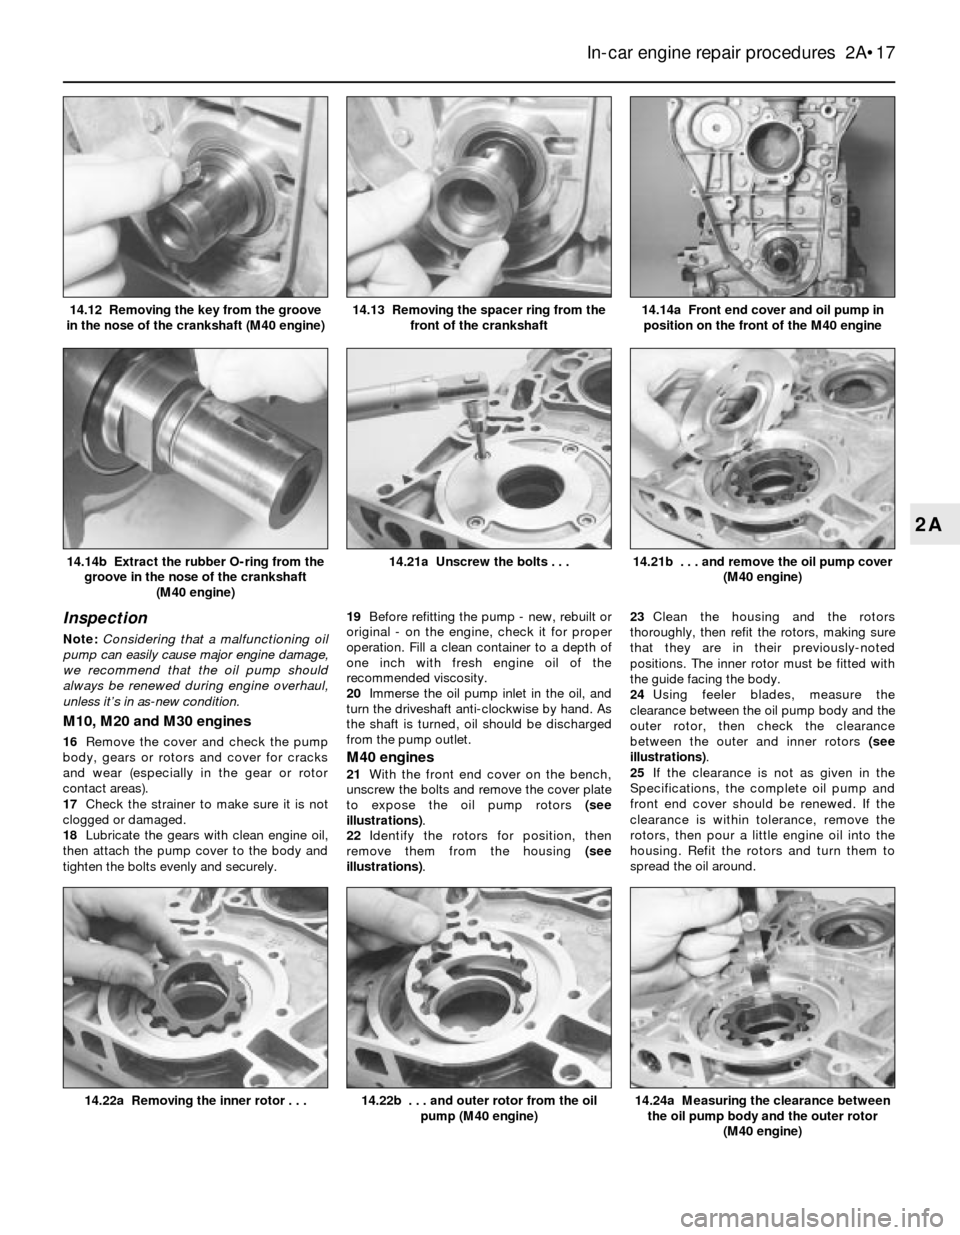
new. On the M40 engine, BMW
recommend that the timing belt is
renewed every time the tensioner roller is
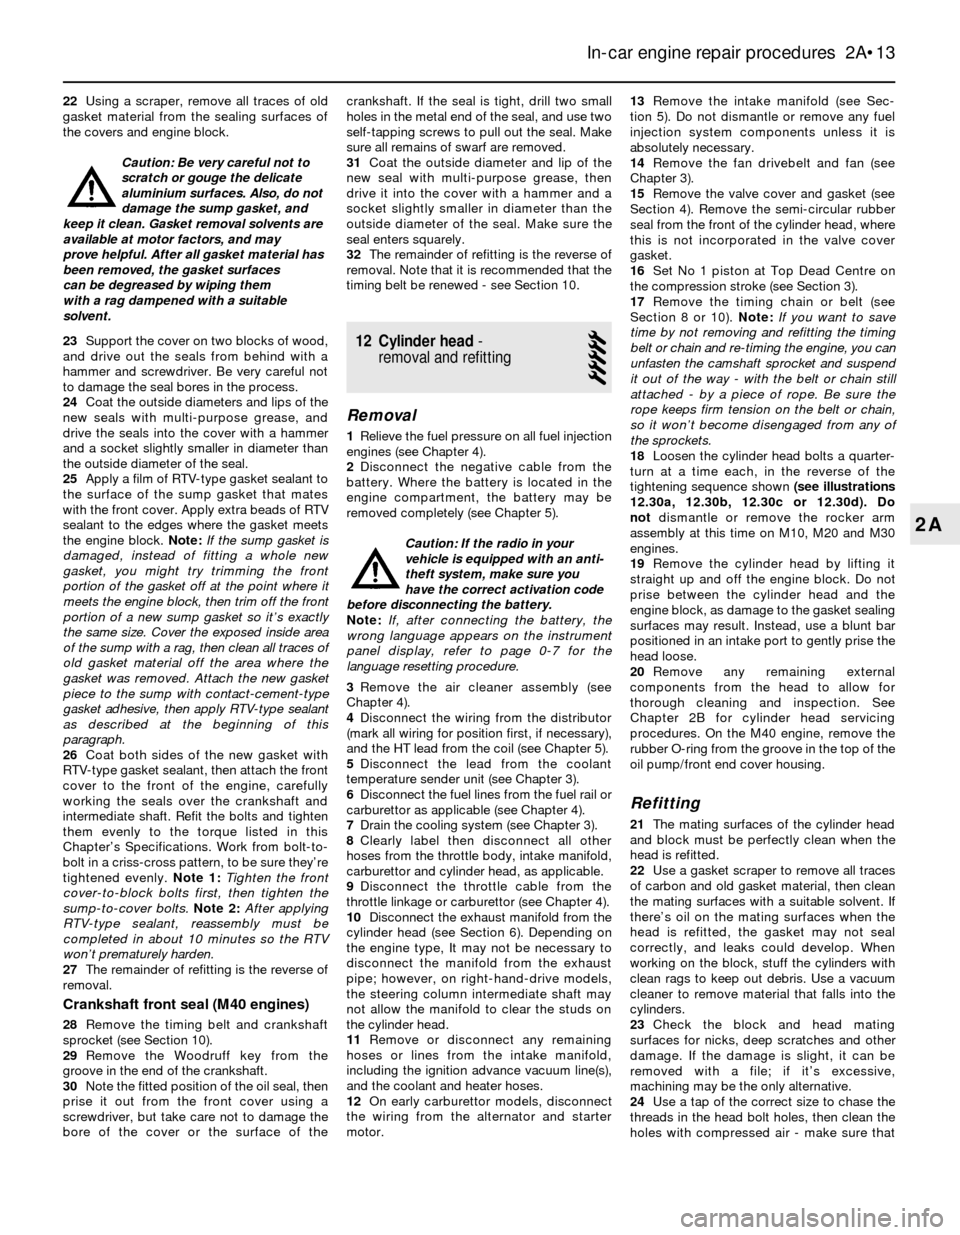
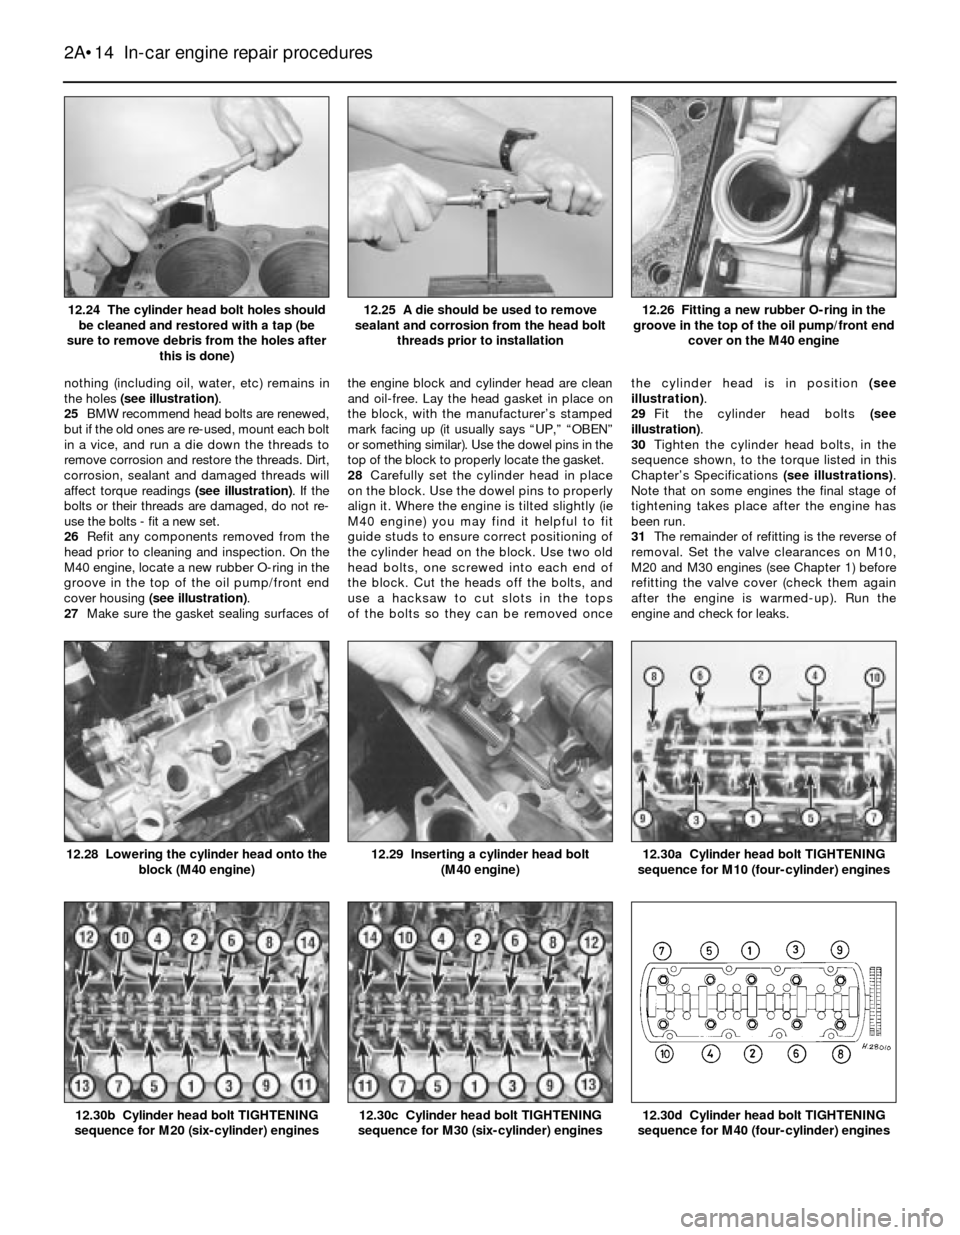
released.
9Remove the timing belt by slipping it off the
roller(s) and the other sprockets (see
illustrations).
10If it’s necessary to remove the camshaft
or the intermediate shaft sprocket, remove the
sprocket bolt while holding the sprocket to
prevent it from moving. To hold the sprocket,
wrap it with a piece of an old timing belt
(toothed side engaging the sprocket teeth) ora piece of leather, then hold the sprocket
using a strap spanner. If a strap spanner is not
available, clamp the ends of the piece of belt
or leather tightly together with a pair of grips.
Before loosening the bolt, make sure you have
the necessary tool for positioning the
camshaft as described in the following
paragraph (see illustration).
Caution: Do not use the timing
belt you’re planning to refit to
hold the sprocket. Also, be sure
to hold the camshaft sprocket
very steady, because if it moves more than
a few degrees, the valves could hit the
pistons.
Note: On the M40 engine, the sprocket is not
directly located on the camshaft with a key, as
the groove in the end of the camshaft allows
the sprocket to move several degrees in either
direction. The retaining bolt locks the sprocket
onto a taper after positioning the camshaft
with a special tool.
11The BMW tool for positioning the camshaft
on the M40 engine consists of a metal plate
which locates over the square lug near the No
1 cylinder lobes on the camshaft - the valve
cover must be removed first (see
illustrations). If the BMW tool cannot be
obtained, a home-made tool should be
fabricated out of metal plate. The tool must be
made to hold the square lug on the camshaft
at right-angles to the upper face of the cylinder
head (ie the contact face of the valve cover).
12If it’s necessary to remove the crankshaft
sprocket, remove the crankshaft hub centre
bolt while holding the crankshaft steady.
Note:The removal of the crankshaft hub
mounting bolt requires a heavy-duty holding
device because of the high torque used to
tighten the bolt. BMW has a special tool,
numbered 112150 (M20 engines) or 112170
(M40 engines), for this purpose. If this tool
cannot be bought or borrowed, check with a
tool dealer or motor factors for a tool capable
of doing the job. Note that the tool number
112170 bolts on the rear of the cylinder head
and engages with the flywheel ring gear, so it
will only be possible to use this tool if the
gearbox has been removed, or if the engine is
out of the vehicle (see illustrations). On
2A•10 In-car engine repair procedures
10.12a Home-made tool for holding the
crankshaft stationary while the crankshaft
pulley bolt is being loosened (engine
removed for clarity)
10.11b The BMW camshaft-holding tool in
position on the M40 engine10.11a The BMW tool for holding the
camshaft in the TDC position on
M40 engines
10.10 Removing the camshaft sprocket on
the M40 engine
10.9b Removing the timing belt from the
camshaft sprocket on the M40 engine
10.9a When removing the timing belt on
models with a two-piece crankshaft hub,
it’s a tight fit to remove it around the hub,
but it’s a lot easier than removing the
crankshaft hub assembly, which is secured
by a very tight bolt10.6 Loosen the idler pulley bolts
(arrowed) to relieve the tension on the
timing belt so it can be removed
Page 47 of 228
models with a two-piece hub, after removing
the outer hub piece, you’ll then need to
remove the sprocket with a bolt-type puller
(available at most motor factors). When using
the puller, thread the crankshaft centre bolt in
approximately three turns, and use this as a
bearing point for the puller’s centre bolt.
Inspection
13Check for a cracked, worn or damaged
belt. Renew it if any of these conditions are
found (see illustrations). Also look at the
sprockets for any signs of irregular wear or
damage, indicating the need for renewal.
Note:If any parts are to be renewed, check
with your local BMW dealer parts department
to be sure compatible parts are used. On M20
engines, later sprockets, tensioner rollers and
timing belts are marked “Z 127”. Renewal of
the timing belt on M20 engines will mean that
the later belt tensioner should also be fitted, if
not already done.
14Inspect the idler roller and, on M20
engines, the tension spring. Rotate the
tensioner roller to be sure it rotates freely, with
no noise or play. Note:When fitting a new
timing belt, it is recommended that a new
tensioner be fitted also.
Refitting
15On the M20 engine, refit the idler/
tensioner/spring so that the timing belt can be
fitted loosely.
16Refit the sprockets using a reversal of the
removal procedure; tighten the retaining bolts
to the specified torque. On the M40 engine,
turn the camshaft sprocket clockwise as far
as possible within the location groove, then
tighten the retaining bolt to an initial torque of
1 to 3 Nm at this stage.
17If you are refitting the old belt, make sure
the mark made to indicate belt direction of
rotation is pointing the right way (the belt
should rotate in a clockwise direction as you
face the front of the engine).
18Refit the timing belt, placing the belt
under the crankshaft sprocket first to get bythe housing. Guide the belt around the other
sprocket(s).
19Finally, place the belt over the
idler/tensioner rollers.
20On the M20 engine, loosen the tensioner
bolts and allow the spring tension to be
applied to the belt.
21On the M20 engine, lightly apply pressure
behind the tensioner to be sure spring
pressure is being applied to the belt (see
illustration). Don’t tighten the bolts while
applying pressure; lightly tighten the bolts
only after releasing the tensioner.
22On the M40 engine, unbolt and remove
the valve cover, then use the special tool to
hold the camshaft in the TDC position (see
paragraph 11).
23On the M40 engine, loosen the tensioner
roller retaining nut, and use an Allen key to
rotate the roller anti-clockwise until the timing
belt is tensioned correctly. The 90°-twist
method of checking the tension of the timing
belt is not accurate enough for this engine,
and it is strongly recommended that the
special BMW tensioning tool is obtained if at
all possible (apply 32 ±2 graduations on the
tool) (see illustration). A reasonably accurate
alternative can be made using an Allen key
and a spring balance (see illustration).Make
sure that the spring balance is positioned as
shown, since the tensioner roller is on an
eccentric, and different readings will be
obtained otherwise. The spring balance
should be connected 85 mm along the Allen
key, and a force of 2.0 kg (4.4 lb) should be
In-car engine repair procedures 2A•11
10.13a Inspect the timing belt carefully for
cracking, as shown here. . .
10.13b . . . and any other damage
10.12c Removing the crankshaft sprocket
from the front of the crankshaft10.12b Removing the crankshaft pulley
bolt (M40 engine)
10.23b Using a spring balance and Allen
key to adjust the tension of the timing belt
on the M40 engine
Dimension A = 85 mm
10.23a Using the special BMW tool to
check the tension of the timing belt on the
M40 engine
10.21 On the M20 engine, after the belt
has been installed correctly around all
sprockets and the tensioner pulley, lightly
apply pressure to the tensioner, to be sure
the tensioner isn’t stuck and has full
movement against the timing belt
2A
Page 48 of 228
applied. Tighten the retaining nut to the
specified torque to hold the tensioner in its
correct position. Note:It is important that the
timing belt is tensioned correctly. If the belt is
over-tightened, it will howl, and there is the
possibility of it being damaged. If the belt is
too slack, it may jump on the sprockets.
24Check to make sure the camshaft and
crankshaft timing marks are still aligned(see
illustrations 10.5a and 10.5b).
25Turn the crankshaft clockwise through
two complete revolutions. (Remove the
camshaft positioning tool from the M40
engine first.)
Caution: This is necessary to
stretch the new belt. If not done,
the belt tensioner will be too
loose, and damage could result.
26On the M20 engine, loosen the tensioner
roller bolts, then tighten them to the torque
listed in this Chapter’s Specifications.
27On the M40 engine, loosen the tensioner
roller retaining nut, and re-adjust the tension
of the timing belt as described in paragraph
23. On completion, tighten the tensioner roller
retaining nut, then fully tighten the camshaft
sprocket bolt if previously loosened (see
illustration).
28Verify that the timing marks are still
perfectly aligned. If not, remove and refit the
timing belt.
29The remainder of refitting is the reverse of
removal.
11 Front oil seals- renewal
5
Note:Oil seals are fitted with their sealing lips
facing inwards (towards the engine).
M10 and M30 (timing chain)
engines
Camshaft front seal (M30 engines
only)
1Remove the upper timing chain cover only
(see Section 7).2Support the cover on two blocks of wood,
and drive out the seal from behind with a
hammer and screwdriver. Be very careful not
to damage the seal bore in the process.
3Coat the outside diameter and lip of the
new seal with multi-purpose grease, and drive
the seal into the cover with a hammer and a
socket slightly smaller in diameter than the
outside diameter of the seal.
4The remainder of refitting is the reverse of
removal.
Crankshaft front seal (M10 and
M30 engines)
5Remove the crankshaft pulley and vibration
damper (see Section 7).
6Carefully prise the old seal out of the cover
with a large screwdriver. Be very careful not to
damage the seal bore or the crankshaft with
the tool. Wrap the tip of the screwdriver with a
piece of tape to prevent damage.
7Clean the bore in the cover, and coat the
outer edge of the new seal with engine oil or
multi-purpose grease. Also lubricate the lips
of the seal with multi-purpose grease. Using a
socket with an outside diameter slightly
smaller than the outside diameter of the seal,
carefully drive the new seal into place with a
hammer (see illustration). If a socket isn’t
available, a short section of large-diameter
pipe will work. Check the seal after refitting to
be sure the spring around the inside of the
seal lip didn’t pop out of place.
8The remainder of refitting is the reverse of
removal.
M20 and M40 (timing belt)
engines
Camshaft front seal (M20 and
M40 engines)
9Remove the timing belt and camshaft
sprocket (see Section 10).
10On the M20 engine only, remove the two
screws, and separate the camshaft seal
housing from the cylinder head by pulling it as
you rotate it back and forth.
11On the M20 engine only, support the
housing on two blocks of wood, and drive the
seal out of the housing from behind using ahammer and screwdriver. Be very careful not
to damage the seal housing.
12On the M40 engine, prise the seal out
from the cylinder head using a screwdriver,
being careful not to damage the camshaft
surface or the seal bore.
13Coat the lip and outside diameter of the
new seal with multi-purpose grease.
14On the M40 engine, wrap some adhesive
tape around the end of the camshaft to
protect the new seal from the location groove
as it is being fitted (see illustration).
15Carefully locate the new seal in position,
and press it in by hand initially so that it enters
the bore. Drive the new seal into the housing
or cylinder head (as applicable) using a
hammer and a socket with a diameter slightly
smaller than the outside diameter of the seal.
On the M40 engine, remove the adhesive tape
from the end of the camshaft.
16On the M20 engine, renew the O-ring on
the back of the seal housing, and work the lip
of the seal over the end of the camshaft. Refit
the screws and tighten them securely.
17The remainder of refitting is the reverse of
removal.
Crankshaft and intermediate shaft
front seals (M20 engines)
18Remove the timing belt and crankshaft
and intermediate shaft pulleys as applicable
(see Section 10). Note:We recommend the
timing belt be renewed any time it is removed.
19Remove the bolts and nuts securing the
front cover to the engine block. Be sure to
remove the three bolts from underneath that
connect the front of the sump to the bottom of
the front cover (see illustration 7.14).
20Run a sharp, thin knife between the sump
gasket and the front cover, cutting the cover
free from the gasket. Be very careful not to
damage the gasket, and keep it clean so you
can re-use it.
21Break the front cover-to-block gasket seal
by tapping the cover with a rubber mallet or
block of wood and hammer. Do not prise
between the cover and the engine block, as
damage to the gasket sealing surfaces will
result.
2A•12 In-car engine repair procedures
11.14 Fitting a new camshaft oil seal on
the M40 engine (note the adhesive tape
around the end of the camshaft to protect
the seal)11.7 The crankshaft front oil seal is
pressed into the front of the lower timing
chain cover (cover removed from the
engine for clarity)10.27 Tightening the camshaft sprocket
retaining bolt on the M40 engine
Page 49 of 228
22Using a scraper, remove all traces of old
gasket material from the sealing surfaces of
the covers and engine block.
Caution: Be very careful not to
scratch or gouge the delicate
aluminium surfaces. Also, do not
damage the sump gasket, and
keep it clean. Gasket removal solvents are
available at motor factors, and may
prove helpful. After all gasket material has
been removed, the gasket surfaces
can be degreased by wiping them
with a rag dampened with a suitable
solvent.
23Support the cover on two blocks of wood,
and drive out the seals from behind with a
hammer and screwdriver. Be very careful not
to damage the seal bores in the process.
24Coat the outside diameters and lips of the
new seals with multi-purpose grease, and
drive the seals into the cover with a hammer
and a socket slightly smaller in diameter than
the outside diameter of the seal.
25Apply a film of RTV-type gasket sealant to
the surface of the sump gasket that mates
with the front cover. Apply extra beads of RTV
sealant to the edges where the gasket meets
the engine block. Note:If the sump gasket is
damaged, instead of fitting a whole new
gasket, you might try trimming the front
portion of the gasket off at the point where it
meets the engine block, then trim off the front
portion of a new sump gasket so it’s exactly
the same size. Cover the exposed inside area
of the sump with a rag, then clean all traces of
old gasket material off the area where the
gasket was removed. Attach the new gasket
piece to the sump with contact-cement-type
gasket adhesive, then apply RTV-type sealant
as described at the beginning of this
paragraph.
26Coat both sides of the new gasket with
RTV-type gasket sealant, then attach the front
cover to the front of the engine, carefully
working the seals over the crankshaft and
intermediate shaft. Refit the bolts and tighten
them evenly to the torque listed in this
Chapter’s Specifications. Work from bolt-to-
bolt in a criss-cross pattern, to be sure they’re
tightened evenly.Note 1:Tighten the front
cover-to-block bolts first, then tighten the
sump-to-cover bolts. Note 2:After applying
RTV-type sealant, reassembly must be
completed in about 10 minutes so the RTV
won’t prematurely harden.
27The remainder of refitting is the reverse of
removal.
Crankshaft front seal (M40 engines)
28Remove the timing belt and crankshaft
sprocket (see Section 10).
29Remove the Woodruff key from the
groove in the end of the crankshaft.
30Note the fitted position of the oil seal, then
prise it out from the front cover using a
screwdriver, but take care not to damage the
bore of the cover or the surface of thecrankshaft. If the seal is tight, drill two small
holes in the metal end of the seal, and use two
self-tapping screws to pull out the seal. Make
sure all remains of swarf are removed.
31Coat the outside diameter and lip of the
new seal with multi-purpose grease, then
drive it into the cover with a hammer and a
socket slightly smaller in diameter than the
outside diameter of the seal. Make sure the
seal enters squarely.
32The remainder of refitting is the reverse of
removal. Note that it is recommended that the
timing belt be renewed - see Section 10.
12 Cylinder head-
removal and refitting
5
Removal
1Relieve the fuel pressure on all fuel injection
engines (see Chapter 4).
2Disconnect the negative cable from the
battery. Where the battery is located in the
engine compartment, the battery may be
removed completely (see Chapter 5).
Caution: If the radio in your
vehicle is equipped with an anti-
theft system, make sure you
have the correct activation code
before disconnecting the battery.
Note: If, after connecting the battery, the
wrong language appears on the instrument
panel display, refer to page 0-7 for the
language resetting procedure.
3Remove the air cleaner assembly (see
Chapter 4).
4Disconnect the wiring from the distributor
(mark all wiring for position first, if necessary),
and the HT lead from the coil (see Chapter 5).
5Disconnect the lead from the coolant
temperature sender unit (see Chapter 3).
6Disconnect the fuel lines from the fuel rail or
carburettor as applicable (see Chapter 4).
7Drain the cooling system (see Chapter 3).
8Clearly label then disconnect all other
hoses from the throttle body, intake manifold,
carburettor and cylinder head, as applicable.
9Disconnect the throttle cable from the
throttle linkage or carburettor (see Chapter 4).
10Disconnect the exhaust manifold from the
cylinder head (see Section 6). Depending on
the engine type, It may not be necessary to
disconnect the manifold from the exhaust
pipe; however, on right-hand-drive models,
the steering column intermediate shaft may
not allow the manifold to clear the studs on
the cylinder head.
11Remove or disconnect any remaining
hoses or lines from the intake manifold,
including the ignition advance vacuum line(s),
and the coolant and heater hoses.
12On early carburettor models, disconnect
the wiring from the alternator and starter
motor.13Remove the intake manifold (see Sec-
tion 5). Do not dismantle or remove any fuel
injection system components unless it is
absolutely necessary.
14Remove the fan drivebelt and fan (see
Chapter 3).
15Remove the valve cover and gasket (see
Section 4). Remove the semi-circular rubber
seal from the front of the cylinder head, where
this is not incorporated in the valve cover
gasket.
16Set No 1 piston at Top Dead Centre on
the compression stroke (see Section 3).
17Remove the timing chain or belt (see
Section 8 or 10). Note:If you want to save
time by not removing and refitting the timing
belt or chain and re-timing the engine, you can
unfasten the camshaft sprocket and suspend
it out of the way - with the belt or chain still
attached - by a piece of rope. Be sure the
rope keeps firm tension on the belt or chain,
so it won’t become disengaged from any of
the sprockets.
18Loosen the cylinder head bolts a quarter-
turn at a time each, in the reverse of the
tightening sequence shown (see illustrations
12.30a, 12.30b, 12.30c or 12.30d). Do
notdismantle or remove the rocker arm
assembly at this time on M10, M20 and M30
engines.
19Remove the cylinder head by lifting it
straight up and off the engine block. Do not
prise between the cylinder head and the
engine block, as damage to the gasket sealing
surfaces may result. Instead, use a blunt bar
positioned in an intake port to gently prise the
head loose.
20Remove any remaining external
components from the head to allow for
thorough cleaning and inspection. See
Chapter 2B for cylinder head servicing
procedures. On the M40 engine, remove the
rubber O-ring from the groove in the top of the
oil pump/front end cover housing.
Refitting
21The mating surfaces of the cylinder head
and block must be perfectly clean when the
head is refitted.
22Use a gasket scraper to remove all traces
of carbon and old gasket material, then clean
the mating surfaces with a suitable solvent. If
there’s oil on the mating surfaces when the
head is refitted, the gasket may not seal
correctly, and leaks could develop. When
working on the block, stuff the cylinders with
clean rags to keep out debris. Use a vacuum
cleaner to remove material that falls into the
cylinders.
23Check the block and head mating
surfaces for nicks, deep scratches and other
damage. If the damage is slight, it can be
removed with a file; if it’s excessive,
machining may be the only alternative.
24Use a tap of the correct size to chase the
threads in the head bolt holes, then clean the
holes with compressed air - make sure that
In-car engine repair procedures 2A•13
2A
Page 50 of 228
nothing (including oil, water, etc) remains in
the holes (see illustration).
25BMW recommend head bolts are renewed,
but if the old ones are re-used, mount each bolt
in a vice, and run a die down the threads to
remove corrosion and restore the threads. Dirt,
corrosion, sealant and damaged threads will
affect torque readings (see illustration). If the
bolts or their threads are damaged, do not re-
use the bolts - fit a new set.
26Refit any components removed from the
head prior to cleaning and inspection. On the
M40 engine, locate a new rubber O-ring in the
groove in the top of the oil pump/front end
cover housing (see illustration).
27Make sure the gasket sealing surfaces ofthe engine block and cylinder head are clean
and oil-free. Lay the head gasket in place on
the block, with the manufacturer’s stamped
mark facing up (it usually says “UP,” “OBEN”
or something similar). Use the dowel pins in the
top of the block to properly locate the gasket.
28Carefully set the cylinder head in place
on the block. Use the dowel pins to properly
align it. Where the engine is tilted slightly (ie
M40 engine) you may find it helpful to fit
guide studs to ensure correct positioning of
the cylinder head on the block. Use two old
head bolts, one screwed into each end of
the block. Cut the heads off the bolts, and
use a hacksaw to cut slots in the tops
of the bolts so they can be removed oncethe cylinder head is in position (see
illustration).
29Fit the cylinder head bolts (see
illustration).
30Tighten the cylinder head bolts, in the
sequence shown, to the torque listed in this
Chapter’s Specifications (see illustrations).
Note that on some engines the final stage of
tightening takes place after the engine has
been run.
31The remainder of refitting is the reverse of
removal. Set the valve clearances on M10,
M20 and M30 engines (see Chapter 1) before
refitting the valve cover (check them again
after the engine is warmed-up). Run the
engine and check for leaks.
2A•14 In-car engine repair procedures
12.30d Cylinder head bolt TIGHTENING
sequence for M40 (four-cylinder) engines12.30c Cylinder head bolt TIGHTENING
sequence for M30 (six-cylinder) engines12.30b Cylinder head bolt TIGHTENING
sequence for M20 (six-cylinder) engines
12.30a Cylinder head bolt TIGHTENING
sequence for M10 (four-cylinder) engines12.29 Inserting a cylinder head bolt
(M40 engine)12.28 Lowering the cylinder head onto the
block (M40 engine)
12.26 Fitting a new rubber O-ring in the
groove in the top of the oil pump/front end
cover on the M40 engine12.25 A die should be used to remove
sealant and corrosion from the head bolt
threads prior to installation12.24 The cylinder head bolt holes should
be cleaned and restored with a tap (be
sure to remove debris from the holes after
this is done)
Page 51 of 228
13 Sump- removal and refitting
1
1Drain the engine oil (see Chapter 1).
2Raise the front of the vehicle and place it
securely on axle stands.
3Remove the splash shields from under the
engine.
4Where applicable, disconnect the hoses
attached to the sump, and move them to one
side (see illustration).
5Where applicable, disconnect the oil level
sensor electrical connector (see illustration).
6Where applicable, remove the cast-
aluminium inspection cover that covers the
rear of the sump (see illustrations).
7On models with the M40 engine, unbolt and
remove the lower sump section and remove
the gasket (this is necessary for access to the
front mounting bolts). Unscrew the mounting
bolt, and pull the oil dipstick tube from the
sump (see illustrations). Check the condition
of the O-ring, and renew it if necessary.
8On models with the M40 engine, unscrew
the engine mounting nuts on both sides, then
attach a suitable hoist and lift the engine
sufficiently to allow the sump to be removed.
As a safety precaution, position axle stands or
blocks of wood beneath the engine.
9Remove the bolts securing the sump to theengine block and front/rear covers (see
illustration).
10Tap on the sump with a soft-faced
hammer to break the gasket seal, and lower
the sump from the engine.
11Using a gasket scraper, scrape off all
traces of the old gasket from the engine
block, the timing chain cover, the rear main oil
seal housing, and the sump. Be especially
careful not to nick or gouge the gasket sealing
surfaces of the timing chain cover and the oil
seal housing (they are made of aluminium,
and are quite soft).
12Clean the sump with solvent, and dry it
thoroughly. Check the gasket sealing surfaces
for distortion. Clean any residue from thegasket sealing surfaces on the sump and
engine with a rag dampened with a suitable
solvent.
13Before refitting the sump, apply a little
RTV-type gasket sealant to the area where the
front and rear covers join the cylinder block..
Lay a new sump gasket in place on the block.
If necessary, apply more sealant to hold the
gasket in place.
14Carefully position the sump in place (do
not disturb the gasket) and refit the bolts.
Start with the bolts closest to the centre of the
sump, and tighten them to the torque listed in
this Chapter’s Specifications, using a criss-
cross pattern. Do not overtighten them, or
leakage may occur.
In-car engine repair procedures 2A•15
13.5 If applicable, disconnect the oil level
sensor connector at the left side of the
engine, down near the power steering
pump mounting bracket13.4 If applicable, remove the nut securing
the power steering lines to the sump, and
move the lines to one side to allow you to
get at the sump bolts12.30e Angle-tightening the cylinder head
bolts (M40 engine)
13.9 Remove the bolts holding the sump
to the engine block and front cover, as
shown here on a six-cylinder engine13.7b Removing the oil dipstick tube
bracket mounting bolt
13.6b . . . remove the cover to get to all
the sump bolts13.6a Remove the four inspection cover
bolts (arrowed) and . . .
13.7a Main sump retaining bolts accessed
after removal of the lower sump section on
the M40 engine (engine on bench for clarity)
2A
Page 52 of 228
15The remainder of refitting is the reverse of
removal. Fit a new gasket to the lower sump
section on models with the M40 engine.
16On completion refill the engine with oil
(Chapter 1). Run the engine and check that
there are no oil leaks from the sump gasket or
other disturbed components.
14 Oil pump- removal,
inspection and refitting
5
Removal
1Remove the sump (see Section 13).
M10, M20 and M30 engines
2On M10 and M30 engines, remove the
three bolts that attach the gear to the front of
the pump (see illustration). Note: Some
models have a single centre nut attaching the
gear to the oil pump.
3Unbolt the oil pump from the engine block
(see illustrations)and remove it.
4On the M20 engine, the intermediate shaft
drives the oil pump driveshaft, which drives
the oil pump. To remove the driveshaft,
remove the hold-down plate from the block,
and lift out the plug. Check the condition of
the O-ring, and renew it if necessary. Lift the
driveshaft out and check both gears for wear,
renewing them if worn or damaged (see
illustration).
5If the gear on the intermediate shaft is worn,
or the intermediate shaft bearing is worn or
damaged, the intermediate shaft must be
removed. Remove the engine (see Chap-
ter 2B), then remove the timing belt,
crankshaft and intermediate shaft sprockets
(see Section 10) and the engine front cover
(see Section 11). The intermediate shaft can
be slid out the front of the engine.
M40 engines
6Remove the timing belt as described in
Section 10.
7Remove the cylinder head as described in
Section 12.
8Unscrew the nut and remove the timing belt
tensioner from the front end cover (see
illustration). If necessary, unscrew the stud
from the cylinder block.9Unscrew and remove the crankshaft hub
bolt while holding the crankshaft stationary.
The bolt is tightened to a very high torque,
and it will be necessary to prevent the
crankshaft turning. Ideally, a metal bar should
be bolted to the sprocket, or the starter motor
may be removed and the flywheel held using a
wide-bladed screwdriver. Beware of possible
damage to surrounding components if it is
necessary to improvise some method of
immobilising the crankshaft.
10Remove the sprocket and spacer, noting
that the shoulder on the spacer faces inwards.
11Unscrew the bolts and remove the
stabilising and guide rollers from the front end
cover (see illustrations).12Using a small screwdriver or similar
instrument, remove the key from the groove in
the nose of the crankshaft (see illustration).
13Pull the spacer ring off the crankshaft (see
illustration).
14Unscrew the remaining bolts, and remove
the front end cover and oil pump from the
cylinder block. Note the locations of the front
cover bolts, as they are of different sizes. With
the cover removed, extract the rubber O-ring
from the groove in the nose of the crankshaft
(see illustrations).
15Note the fitted location of the oil seal, then
prise it out of the housing.
2A•16 In-car engine repair procedures
14.11b Removing the guide roller from the
front end cover (M40 engine)14.11a Removing the stabilising roller
from the front end cover (M40 engine)14.8 Removing the timing belt tensioner
(M40 engine)
14.3b On M10 and M30 engines, the oil
pump is bolted to the front and centre of
the engine block14.4 If necessary on the M20 engine,
remove the plug and oil pump driveshaft
from the engine. Inspect the driveshaft
gear, as well as this intermediate shaft
gear in the engine block (arrowed)
14.3a On M20 engines, the oil pump is
bolted across the engine block from side
to side, towards the front of the engine14.2 On M10 and M30 engines, remove the
three bolts that hold the driven gear to the
oil pump, and remove the gear
Page 53 of 228
Inspection
Note:Considering that a malfunctioning oil
pump can easily cause major engine damage,
we recommend that the oil pump should
always be renewed during engine overhaul,
unless it’s in as-new condition.
M10, M20 and M30 engines
16Remove the cover and check the pump
body, gears or rotors and cover for cracks
and wear (especially in the gear or rotor
contact areas).
17Check the strainer to make sure it is not
clogged or damaged.
18Lubricate the gears with clean engine oil,
then attach the pump cover to the body and
tighten the bolts evenly and securely.19Before refitting the pump - new, rebuilt or
original - on the engine, check it for proper
operation. Fill a clean container to a depth of
one inch with fresh engine oil of the
recommended viscosity.
20Immerse the oil pump inlet in the oil, and
turn the driveshaft anti-clockwise by hand. As
the shaft is turned, oil should be discharged
from the pump outlet.M40 engines
21With the front end cover on the bench,
unscrew the bolts and remove the cover plate
to expose the oil pump rotors (see
illustrations).
22Identify the rotors for position, then
remove them from the housing (see
illustrations).23Clean the housing and the rotors
thoroughly, then refit the rotors, making sure
that they are in their previously-noted
positions. The inner rotor must be fitted with
the guide facing the body.
24Using feeler blades, measure the
clearance between the oil pump body and the
outer rotor, then check the clearance
between the outer and inner rotors (see
illustrations).
25If the clearance is not as given in the
Specifications, the complete oil pump and
front end cover should be renewed. If the
clearance is within tolerance, remove the
rotors, then pour a little engine oil into the
housing. Refit the rotors and turn them to
spread the oil around.
In-car engine repair procedures 2A•17
14.14a Front end cover and oil pump in
position on the front of the M40 engine14.13 Removing the spacer ring from the
front of the crankshaft14.12 Removing the key from the groove
in the nose of the crankshaft (M40 engine)
14.24a Measuring the clearance between
the oil pump body and the outer rotor
(M40 engine)14.22b . . . and outer rotor from the oil
pump (M40 engine)14.22a Removing the inner rotor . . .
14.21b . . . and remove the oil pump cover
(M40 engine)14.21a Unscrew the bolts . . .14.14b Extract the rubber O-ring from the
groove in the nose of the crankshaft
(M40 engine)
2A
Page 54 of 228
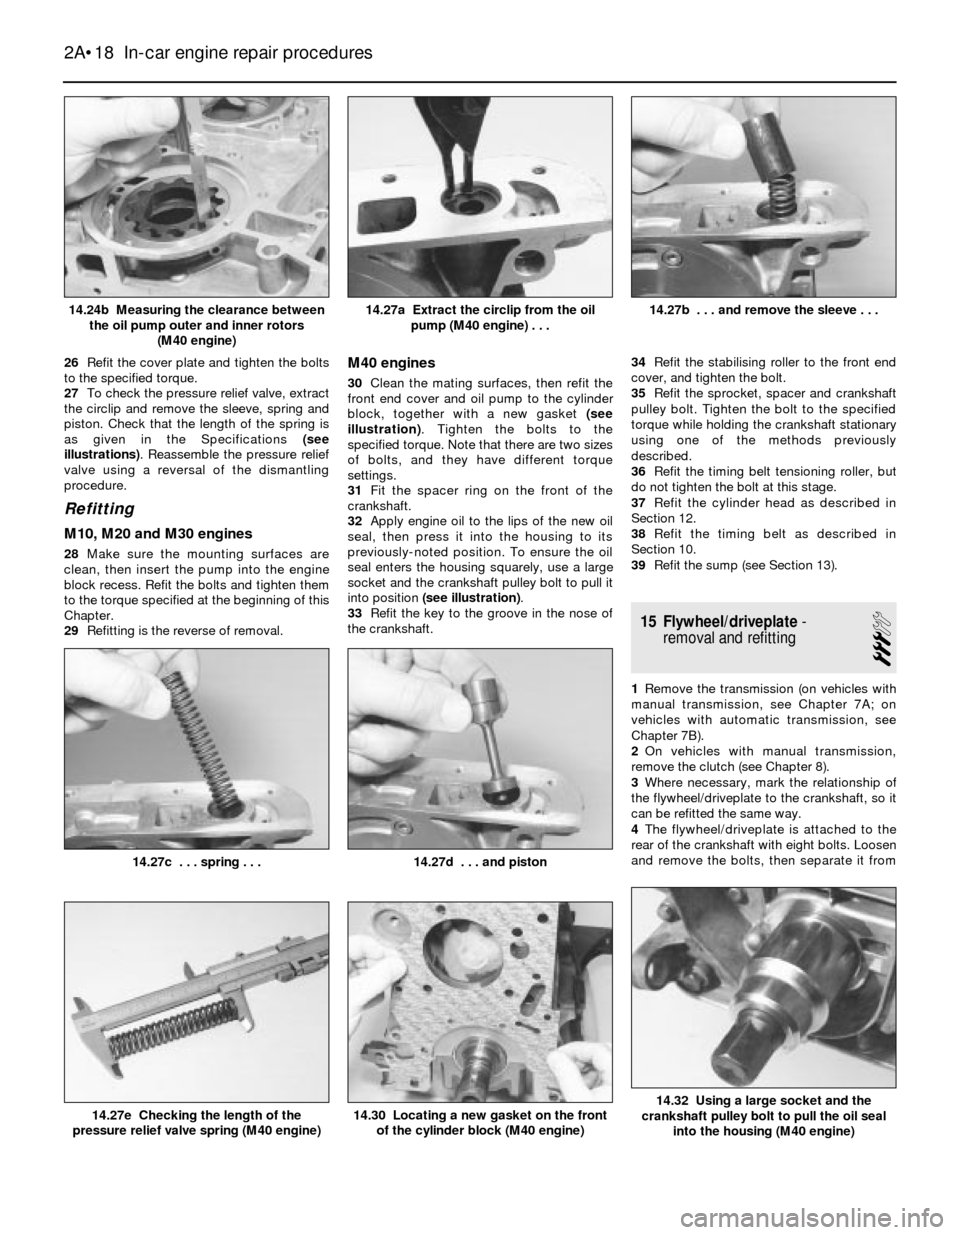
26Refit the cover plate and tighten the bolts
to the specified torque.
27To check the pressure relief valve, extract
the circlip and remove the sleeve, spring and
piston. Check that the length of the spring is
as given in the Specifications (see
illustrations). Reassemble the pressure relief
valve using a reversal of the dismantling
procedure.
Refitting
M10, M20 and M30 engines
28Make sure the mounting surfaces are
clean, then insert the pump into the engine
block recess. Refit the bolts and tighten them
to the torque specified at the beginning of this
Chapter.
29Refitting is the reverse of removal.
M40 engines
30Clean the mating surfaces, then refit the
front end cover and oil pump to the cylinder
block, together with a new gasket (see
illustration). Tighten the bolts to the
specified torque. Note that there are two sizes
of bolts, and they have different torque
settings.
31Fit the spacer ring on the front of the
crankshaft.
32Apply engine oil to the lips of the new oil
seal, then press it into the housing to its
previously-noted position. To ensure the oil
seal enters the housing squarely, use a large
socket and the crankshaft pulley bolt to pull it
into position (see illustration).
33Refit the key to the groove in the nose of
the crankshaft.34Refit the stabilising roller to the front end
cover, and tighten the bolt.
35Refit the sprocket, spacer and crankshaft
pulley bolt. Tighten the bolt to the specified
torque while holding the crankshaft stationary
using one of the methods previously
described.
36Refit the timing belt tensioning roller, but
do not tighten the bolt at this stage.
37Refit the cylinder head as described in
Section 12.
38Refit the timing belt as described in
Section 10.
39Refit the sump (see Section 13).
15 Flywheel/driveplate-
removal and refitting
3
1Remove the transmission (on vehicles with
manual transmission, see Chapter 7A; on
vehicles with automatic transmission, see
Chapter 7B).
2On vehicles with manual transmission,
remove the clutch (see Chapter 8).
3Where necessary, mark the relationship of
the flywheel/driveplate to the crankshaft, so it
can be refitted the same way.
4The flywheel/driveplate is attached to the
rear of the crankshaft with eight bolts. Loosen
and remove the bolts, then separate it from
2A•18 In-car engine repair procedures
14.32 Using a large socket and the
crankshaft pulley bolt to pull the oil seal
into the housing (M40 engine)14.30 Locating a new gasket on the front
of the cylinder block (M40 engine)14.27e Checking the length of the
pressure relief valve spring (M40 engine)
14.27d . . . and piston14.27c . . . spring . . .
14.27b . . . and remove the sleeve . . .14.27a Extract the circlip from the oil
pump (M40 engine) . . .14.24b Measuring the clearance between
the oil pump outer and inner rotors
(M40 engine)
Page 55 of 228
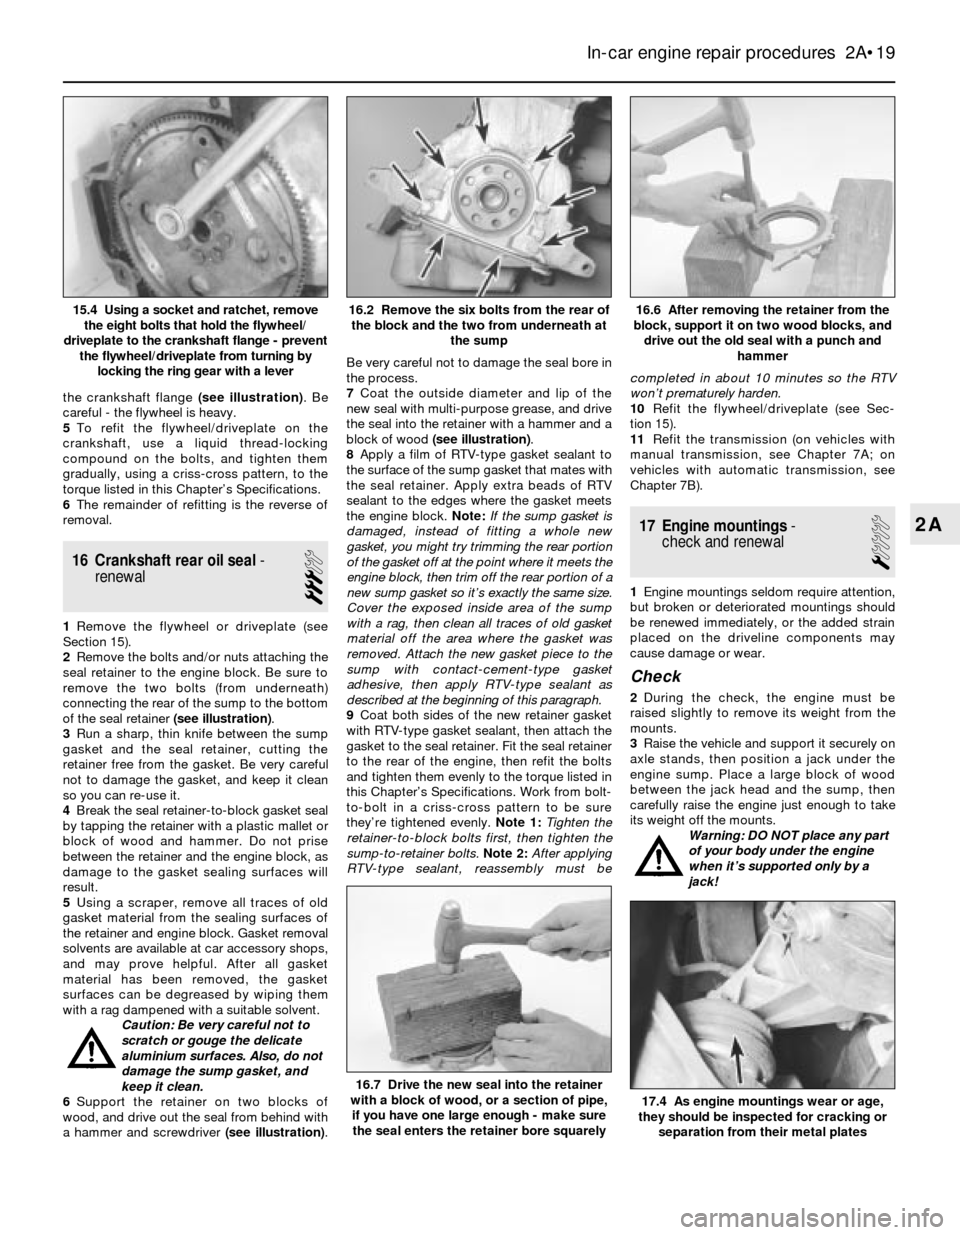
the crankshaft flange (see illustration). Be
careful - the flywheel is heavy.
5To refit the flywheel/driveplate on the
crankshaft, use a liquid thread-locking
compound on the bolts, and tighten them
gradually, using a criss-cross pattern, to the
torque listed in this Chapter’s Specifications.
6The remainder of refitting is the reverse of
removal.
16 Crankshaft rear oil seal-
renewal
3
1Remove the flywheel or driveplate (see
Section 15).
2Remove the bolts and/or nuts attaching the
seal retainer to the engine block. Be sure to
remove the two bolts (from underneath)
connecting the rear of the sump to the bottom
of the seal retainer (see illustration).
3Run a sharp, thin knife between the sump
gasket and the seal retainer, cutting the
retainer free from the gasket. Be very careful
not to damage the gasket, and keep it clean
so you can re-use it.
4Break the seal retainer-to-block gasket seal
by tapping the retainer with a plastic mallet or
block of wood and hammer. Do not prise
between the retainer and the engine block, as
damage to the gasket sealing surfaces will
result.
5Using a scraper, remove all traces of old
gasket material from the sealing surfaces of
the retainer and engine block. Gasket removal
solvents are available at car accessory shops,
and may prove helpful. After all gasket
material has been removed, the gasket
surfaces can be degreased by wiping them
with a rag dampened with a suitable solvent.
Caution: Be very careful not to
scratch or gouge the delicate
aluminium surfaces. Also, do not
damage the sump gasket, and
keep it clean.
6Support the retainer on two blocks of
wood, and drive out the seal from behind with
a hammer and screwdriver (see illustration).Be very careful not to damage the seal bore in
the process.
7Coat the outside diameter and lip of the
new seal with multi-purpose grease, and drive
the seal into the retainer with a hammer and a
block of wood (see illustration).
8Apply a film of RTV-type gasket sealant to
the surface of the sump gasket that mates with
the seal retainer. Apply extra beads of RTV
sealant to the edges where the gasket meets
the engine block. Note:If the sump gasket is
damaged, instead of fitting a whole new
gasket, you might try trimming the rear portion
of the gasket off at the point where it meets the
engine block, then trim off the rear portion of a
new sump gasket so it’s exactly the same size.
Cover the exposed inside area of the sump
with a rag, then clean all traces of old gasket
material off the area where the gasket was
removed. Attach the new gasket piece to the
sump with contact-cement-type gasket
adhesive, then apply RTV-type sealant as
described at the beginning of this paragraph.
9Coat both sides of the new retainer gasket
with RTV-type gasket sealant, then attach the
gasket to the seal retainer. Fit the seal retainer
to the rear of the engine, then refit the bolts
and tighten them evenly to the torque listed in
this Chapter’s Specifications. Work from bolt-
to-bolt in a criss-cross pattern to be sure
they’re tightened evenly.Note 1:Tighten the
retainer-to-block bolts first, then tighten the
sump-to-retainer bolts.Note 2:After applying
RTV-type sealant, reassembly must becompleted in about 10 minutes so the RTV
won’t prematurely harden.
10Refit the flywheel/driveplate (see Sec-
tion 15).
11Refit the transmission (on vehicles with
manual transmission, see Chapter 7A; on
vehicles with automatic transmission, see
Chapter 7B).
17 Engine mountings-
check and renewal
1
1Engine mountings seldom require attention,
but broken or deteriorated mountings should
be renewed immediately, or the added strain
placed on the driveline components may
cause damage or wear.
Check
2During the check, the engine must be
raised slightly to remove its weight from the
mounts.
3Raise the vehicle and support it securely on
axle stands, then position a jack under the
engine sump. Place a large block of wood
between the jack head and the sump, then
carefully raise the engine just enough to take
its weight off the mounts.
Warning: DO NOT place any part
of your body under the engine
when it’s supported only by a
jack!
In-car engine repair procedures 2A•19
16.6 After removing the retainer from the
block, support it on two wood blocks, and
drive out the old seal with a punch and
hammer16.2 Remove the six bolts from the rear of
the block and the two from underneath at
the sump15.4 Using a socket and ratchet, remove
the eight bolts that hold the flywheel/
driveplate to the crankshaft flange - prevent
the flywheel/driveplate from turning by
locking the ring gear with a lever
17.4 As engine mountings wear or age,
they should be inspected for cracking or
separation from their metal plates
16.7 Drive the new seal into the retainer
with a block of wood, or a section of pipe,
if you have one large enough - make sure
the seal enters the retainer bore squarely
2A