check engine BMW 3 SERIES 1983 E30 Repair Manual
[x] Cancel search | Manufacturer: BMW, Model Year: 1983, Model line: 3 SERIES, Model: BMW 3 SERIES 1983 E30Pages: 228, PDF Size: 7.04 MB
Page 69 of 228
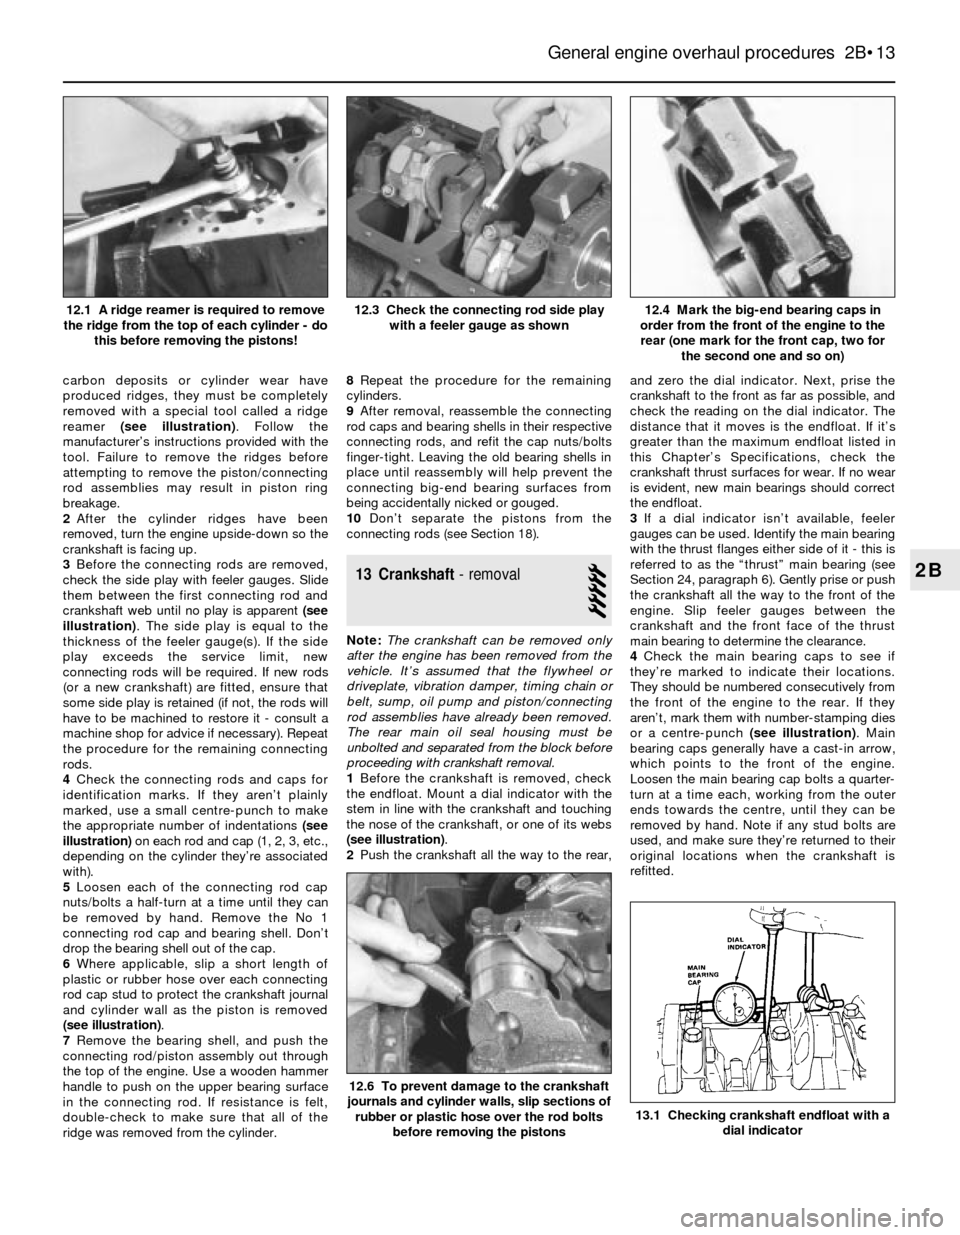
carbon deposits or cylinder wear have
produced ridges, they must be completely
removed with a special tool called a ridge
reamer (see illustration). Follow the
manufacturer’s instructions provided with the
tool. Failure to remove the ridges before
attempting to remove the piston/connecting
rod assemblies may result in piston ring
breakage.
2After the cylinder ridges have been
removed, turn the engine upside-down so the
crankshaft is facing up.
3Before the connecting rods are removed,
check the side play with feeler gauges. Slide
them between the first connecting rod and
crankshaft web until no play is apparent (see
illustration). The side play is equal to the
thickness of the feeler gauge(s). If the side
play exceeds the service limit, new
connecting rods will be required. If new rods
(or a new crankshaft) are fitted, ensure that
some side play is retained (if not, the rods will
have to be machined to restore it - consult a
machine shop for advice if necessary). Repeat
the procedure for the remaining connecting
rods.
4Check the connecting rods and caps for
identification marks. If they aren’t plainly
marked, use a small centre-punch to make
the appropriate number of indentations (see
illustration)on each rod and cap (1, 2, 3, etc.,
depending on the cylinder they’re associated
with).
5Loosen each of the connecting rod cap
nuts/bolts a half-turn at a time until they can
be removed by hand. Remove the No 1
connecting rod cap and bearing shell. Don’t
drop the bearing shell out of the cap.
6Where applicable, slip a short length of
plastic or rubber hose over each connecting
rod cap stud to protect the crankshaft journal
and cylinder wall as the piston is removed
(see illustration).
7Remove the bearing shell, and push the
connecting rod/piston assembly out through
the top of the engine. Use a wooden hammer
handle to push on the upper bearing surface
in the connecting rod. If resistance is felt,
double-check to make sure that all of the
ridge was removed from the cylinder.8Repeat the procedure for the remaining
cylinders.
9After removal, reassemble the connecting
rod caps and bearing shells in their respective
connecting rods, and refit the cap nuts/bolts
finger-tight. Leaving the old bearing shells in
place until reassembly will help prevent the
connecting big-end bearing surfaces from
being accidentally nicked or gouged.
10Don’t separate the pistons from the
connecting rods (see Section 18).
13 Crankshaft- removal
5
Note: The crankshaft can be removed only
after the engine has been removed from the
vehicle. It’s assumed that the flywheel or
driveplate, vibration damper, timing chain or
belt, sump, oil pump and piston/connecting
rod assemblies have already been removed.
The rear main oil seal housing must be
unbolted and separated from the block before
proceeding with crankshaft removal.
1Before the crankshaft is removed, check
the endfloat. Mount a dial indicator with the
stem in line with the crankshaft and touching
the nose of the crankshaft, or one of its webs
(see illustration).
2Push the crankshaft all the way to the rear,and zero the dial indicator. Next, prise the
crankshaft to the front as far as possible, and
check the reading on the dial indicator. The
distance that it moves is the endfloat. If it’s
greater than the maximum endfloat listed in
this Chapter’s Specifications, check the
crankshaft thrust surfaces for wear. If no wear
is evident, new main bearings should correct
the endfloat.
3If a dial indicator isn’t available, feeler
gauges can be used. Identify the main bearing
with the thrust flanges either side of it - this is
referred to as the “thrust” main bearing (see
Section 24, paragraph 6). Gently prise or push
the crankshaft all the way to the front of the
engine. Slip feeler gauges between the
crankshaft and the front face of the thrust
main bearing to determine the clearance.
4Check the main bearing caps to see if
they’re marked to indicate their locations.
They should be numbered consecutively from
the front of the engine to the rear. If they
aren’t, mark them with number-stamping dies
or a centre-punch (see illustration). Main
bearing caps generally have a cast-in arrow,
which points to the front of the engine.
Loosen the main bearing cap bolts a quarter-
turn at a time each, working from the outer
ends towards the centre, until they can be
removed by hand. Note if any stud bolts are
used, and make sure they’re returned to their
original locations when the crankshaft is
refitted.
General engine overhaul procedures 2B•13
12.4 Mark the big-end bearing caps in
order from the front of the engine to the
rear (one mark for the front cap, two for
the second one and so on)12.3 Check the connecting rod side play
with a feeler gauge as shown12.1 A ridge reamer is required to remove
the ridge from the top of each cylinder - do
this before removing the pistons!
13.1 Checking crankshaft endfloat with a
dial indicator
12.6 To prevent damage to the crankshaft
journals and cylinder walls, slip sections of
rubber or plastic hose over the rod bolts
before removing the pistons
2B
Page 71 of 228
16 Engine block- inspection
3
1Before the block is inspected, it should be
cleaned (see Section 15).
2Visually check the block for cracks, rust
and corrosion. Look for stripped threads in
the threaded holes. It’s also a good idea to
have the block checked for hidden cracks by
a machine shop that has the special
equipment to do this type of work. If defects
are found, have the block repaired, if possible;
otherwise, a new block will be required.
3Check the cylinder bores for scuffing and
scoring.
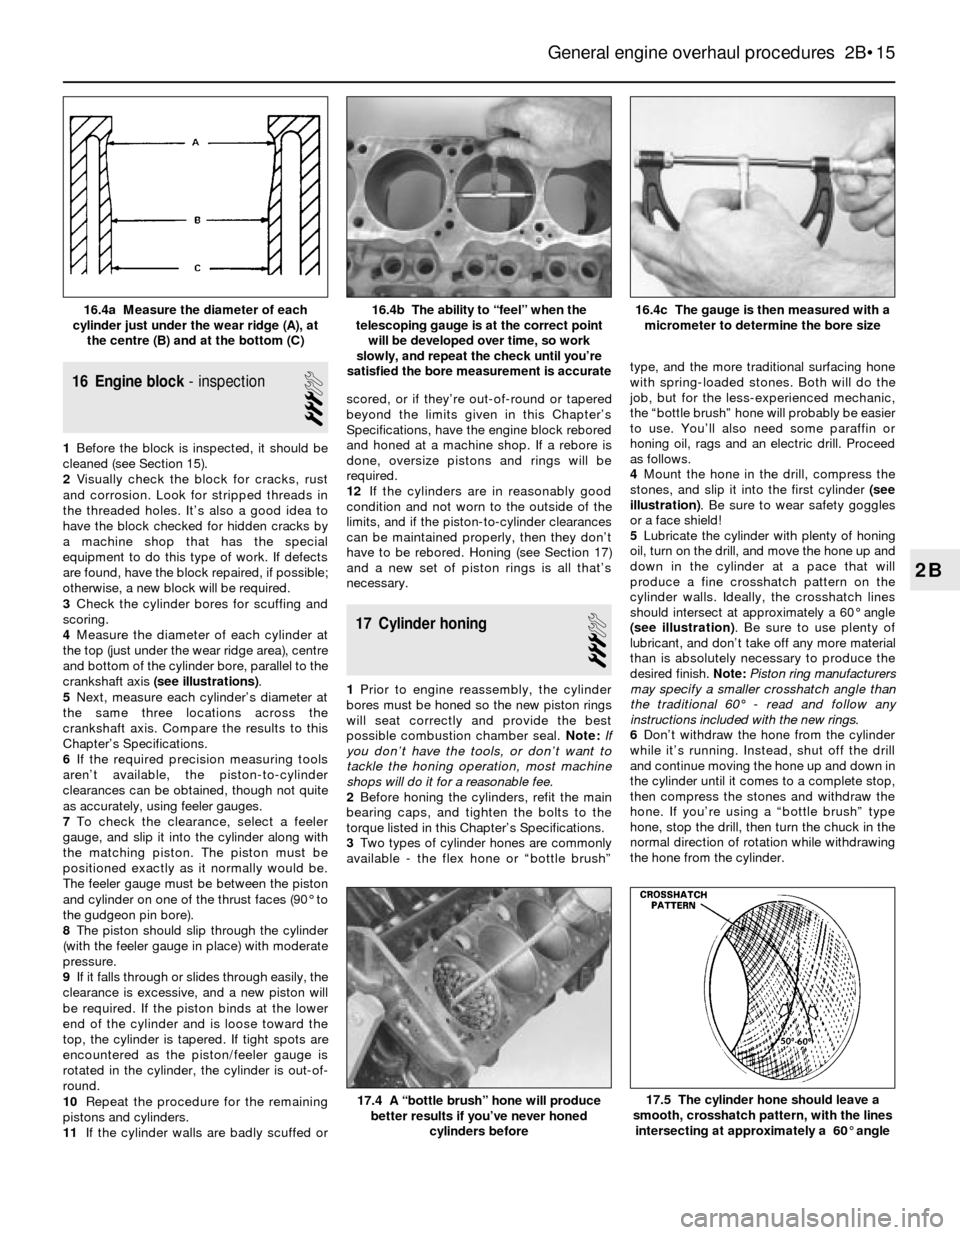
4Measure the diameter of each cylinder at
the top (just under the wear ridge area), centre
and bottom of the cylinder bore, parallel to the
crankshaft axis (see illustrations).
5Next, measure each cylinder’s diameter at
the same three locations across the
crankshaft axis. Compare the results to this
Chapter’s Specifications.
6If the required precision measuring tools
aren’t available, the piston-to-cylinder
clearances can be obtained, though not quite
as accurately, using feeler gauges.
7To check the clearance, select a feeler
gauge, and slip it into the cylinder along with
the matching piston. The piston must be
positioned exactly as it normally would be.
The feeler gauge must be between the piston
and cylinder on one of the thrust faces (90° to
the gudgeon pin bore).
8The piston should slip through the cylinder
(with the feeler gauge in place) with moderate
pressure.
9If it falls through or slides through easily, the
clearance is excessive, and a new piston will
be required. If the piston binds at the lower
end of the cylinder and is loose toward the
top, the cylinder is tapered. If tight spots are
encountered as the piston/feeler gauge is
rotated in the cylinder, the cylinder is out-of-
round.
10Repeat the procedure for the remaining
pistons and cylinders.
11If the cylinder walls are badly scuffed orscored, or if they’re out-of-round or tapered
beyond the limits given in this Chapter’s
Specifications, have the engine block rebored
and honed at a machine shop. If a rebore is
done, oversize pistons and rings will be
required.
12If the cylinders are in reasonably good
condition and not worn to the outside of the
limits, and if the piston-to-cylinder clearances
can be maintained properly, then they don’t
have to be rebored. Honing (see Section 17)
and a new set of piston rings is all that’s
necessary.
17 Cylinder honing
3
1Prior to engine reassembly, the cylinder
bores must be honed so the new piston rings
will seat correctly and provide the best
possible combustion chamber seal. Note:If
you don’t have the tools, or don’t want to
tackle the honing operation, most machine
shops will do it for a reasonable fee.
2Before honing the cylinders, refit the main
bearing caps, and tighten the bolts to the
torque listed in this Chapter’s Specifications.
3Two types of cylinder hones are commonly
available - the flex hone or “bottle brush”type, and the more traditional surfacing hone
with spring-loaded stones. Both will do the
job, but for the less-experienced mechanic,
the “bottle brush” hone will probably be easier
to use. You’ll also need some paraffin or
honing oil, rags and an electric drill. Proceed
as follows.
4Mount the hone in the drill, compress the
stones, and slip it into the first cylinder (see
illustration). Be sure to wear safety goggles
or a face shield!
5Lubricate the cylinder with plenty of honing
oil, turn on the drill, and move the hone up and
down in the cylinder at a pace that will
produce a fine crosshatch pattern on the
cylinder walls. Ideally, the crosshatch lines
should intersect at approximately a 60° angle
(see illustration). Be sure to use plenty of
lubricant, and don’t take off any more material
than is absolutely necessary to produce the
desired finish. Note:Piston ring manufacturers
may specify a smaller crosshatch angle than
the traditional 60°- read and follow any
instructions included with the new rings.
6Don’t withdraw the hone from the cylinder
while it’s running. Instead, shut off the drill
and continue moving the hone up and down in
the cylinder until it comes to a complete stop,
then compress the stones and withdraw the
hone. If you’re using a “bottle brush” type
hone, stop the drill, then turn the chuck in the
normal direction of rotation while withdrawing
the hone from the cylinder.
General engine overhaul procedures 2B•15
16.4c The gauge is then measured with a
micrometer to determine the bore size16.4b The ability to “feel” when the
telescoping gauge is at the correct point
will be developed over time, so work
slowly, and repeat the check until you’re
satisfied the bore measurement is accurate16.4a Measure the diameter of each
cylinder just under the wear ridge (A), at
the centre (B) and at the bottom (C)
17.5 The cylinder hone should leave a
smooth, crosshatch pattern, with the lines
intersecting at approximately a 60° angle17.4 A “bottle brush” hone will produce
better results if you’ve never honed
cylinders before
2B
Page 72 of 228
7Wipe the oil out of the cylinder, and repeat
the procedure for the remaining cylinders.
8After the honing job is complete, chamfer
the top edges of the cylinder bores with a
small file, so the rings won’t catch when the
pistons are refitted. Be very careful not to nick
the cylinder walls with the end of the file.
9The entire engine block must be washed
again very thoroughly with warm, soapy
water, to remove all traces of the abrasive grit
produced during the honing operation. Note:
The bores can be considered clean when a
lint-free white cloth - dampened with clean
engine oil - used to wipe them out doesn’t
pick up any more honing residue, which will
show up as grey areas on the cloth.Be sure to
run a brush through all oil holes and galleries,
and flush them with running water.
10After rinsing, dry the block, and apply a
coat of light rust-preventive oil to all machined
surfaces. Wrap the block in a plastic bag to
keep it clean, and set it aside until
reassembly.
18 Pistons/connecting rods-
inspection
3
1Before the inspection process can be
carried out, the piston/connecting rod
assemblies must be cleaned and the original
piston rings removed from the pistons.Note:
Always use new piston rings when the engine
is reassembled.
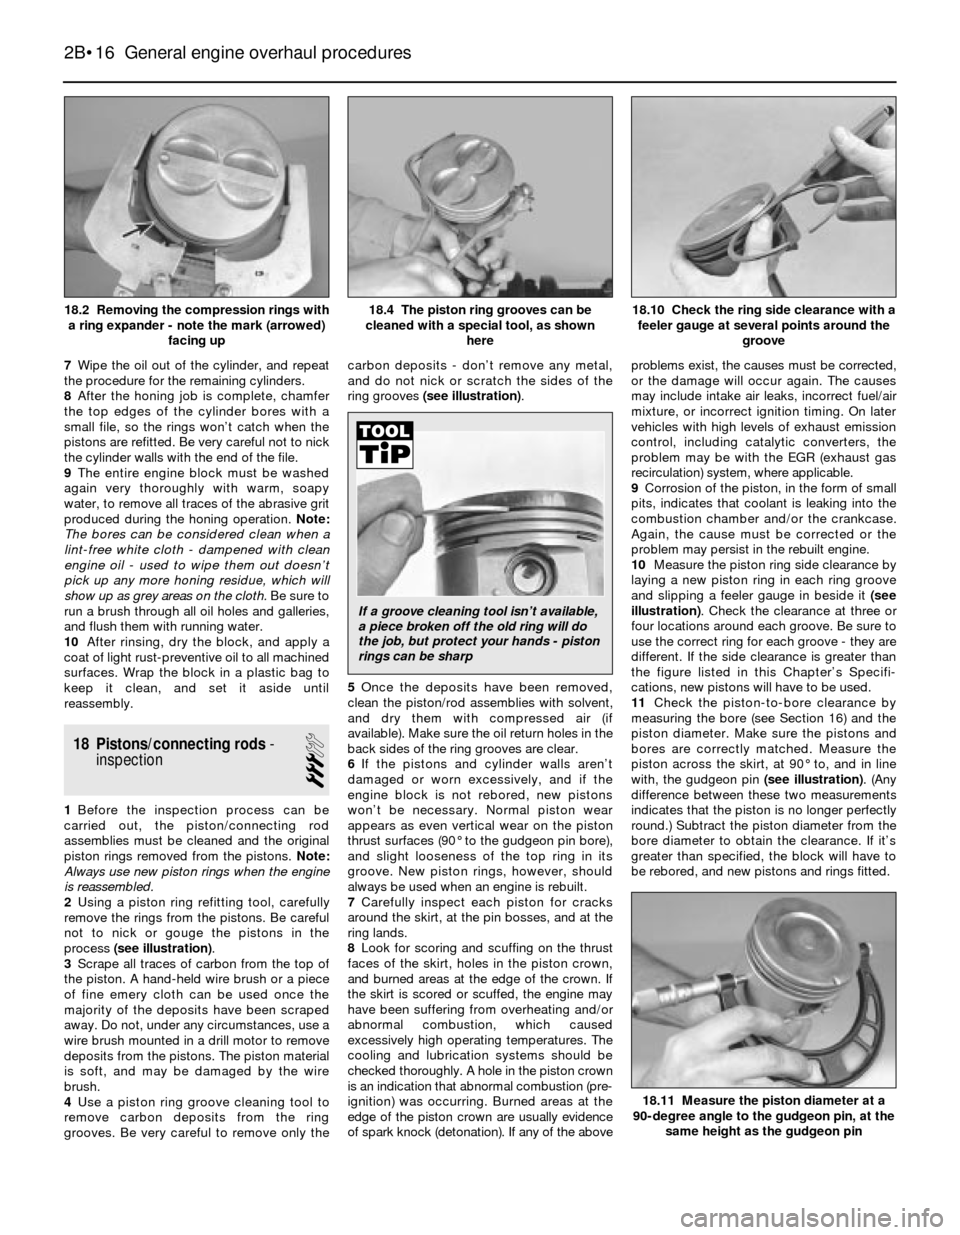
2Using a piston ring refitting tool, carefully
remove the rings from the pistons. Be careful
not to nick or gouge the pistons in the
process (see illustration).
3Scrape all traces of carbon from the top of
the piston. A hand-held wire brush or a piece
of fine emery cloth can be used once the
majority of the deposits have been scraped
away. Do not, under any circumstances, use a
wire brush mounted in a drill motor to remove
deposits from the pistons. The piston material
is soft, and may be damaged by the wire
brush.
4Use a piston ring groove cleaning tool to
remove carbon deposits from the ring
grooves. Be very careful to remove only thecarbon deposits - don’t remove any metal,
and do not nick or scratch the sides of the
ring grooves (see illustration).
5Once the deposits have been removed,
clean the piston/rod assemblies with solvent,
and dry them with compressed air (if
available). Make sure the oil return holes in the
back sides of the ring grooves are clear.
6If the pistons and cylinder walls aren’t
damaged or worn excessively, and if the
engine block is not rebored, new pistons
won’t be necessary. Normal piston wear
appears as even vertical wear on the piston
thrust surfaces (90° to the gudgeon pin bore),
and slight looseness of the top ring in its
groove. New piston rings, however, should
always be used when an engine is rebuilt.
7Carefully inspect each piston for cracks
around the skirt, at the pin bosses, and at the
ring lands.
8Look for scoring and scuffing on the thrust
faces of the skirt, holes in the piston crown,
and burned areas at the edge of the crown. If
the skirt is scored or scuffed, the engine may
have been suffering from overheating and/or
abnormal combustion, which caused
excessively high operating temperatures. The
cooling and lubrication systems should be
checked thoroughly. A hole in the piston crown
is an indication that abnormal combustion (pre-
ignition) was occurring. Burned areas at the
edge of the piston crown are usually evidence
of spark knock (detonation). If any of the aboveproblems exist, the causes must be corrected,
or the damage will occur again. The causes
may include intake air leaks, incorrect fuel/air
mixture, or incorrect ignition timing. On later
vehicles with high levels of exhaust emission
control, including catalytic converters, the
problem may be with the EGR (exhaust gas
recirculation) system, where applicable.
9Corrosion of the piston, in the form of small
pits, indicates that coolant is leaking into the
combustion chamber and/or the crankcase.
Again, the cause must be corrected or the
problem may persist in the rebuilt engine.
10Measure the piston ring side clearance by
laying a new piston ring in each ring groove
and slipping a feeler gauge in beside it(see
illustration). Check the clearance at three or
four locations around each groove. Be sure to
use the correct ring for each groove - they are
different. If the side clearance is greater than
the figure listed in this Chapter’s Specifi-
cations, new pistons will have to be used.
11Check the piston-to-bore clearance by
measuring the bore (see Section 16) and the
piston diameter. Make sure the pistons and
bores are correctly matched. Measure the
piston across the skirt, at 90° to, and in line
with, the gudgeon pin (see illustration). (Any
difference between these two measurements
indicates that the piston is no longer perfectly
round.) Subtract the piston diameter from the
bore diameter to obtain the clearance. If it’s
greater than specified, the block will have to
be rebored, and new pistons and rings fitted.
2B•16 General engine overhaul procedures
18.11 Measure the piston diameter at a
90-degree angle to the gudgeon pin, at the
same height as the gudgeon pin
18.10 Check the ring side clearance with a
feeler gauge at several points around the
groove18.4 The piston ring grooves can be
cleaned with a special tool, as shown
here18.2 Removing the compression rings with
a ring expander - note the mark (arrowed)
facing up
If a groove cleaning tool isn’t available,
a piece broken off the old ring will do
the job, but protect your hands - piston
rings can be sharp
Page 73 of 228
12Check the piston-to-rod clearance by
twisting the piston and rod in opposite
directions. Any noticeable play indicates
excessive wear, which must be corrected. The
piston/connecting rod assemblies should be
taken to a machine shop for attention.
13If the pistons must be removed from the
connecting rods for any reason, they should
be taken to a machine shop. When this is
done, have the connecting rods checked for
bend and twist, since most machine shops
have special equipment for this purpose.
Note:Unless new pistons and/or connecting
rods must be fitted, do not dismantle the
pistons and connecting rods.
14Check the connecting rods for cracks and
other damage. Temporarily remove the rod
caps, lift out the old bearing shells, wipe the rod
and cap bearing surfaces clean, and inspect
them for nicks, gouges and scratches. After
checking the rods, fit new bearing shells, slip the
caps into place, and tighten the nuts finger-tight.
19 Crankshaft- inspection
3
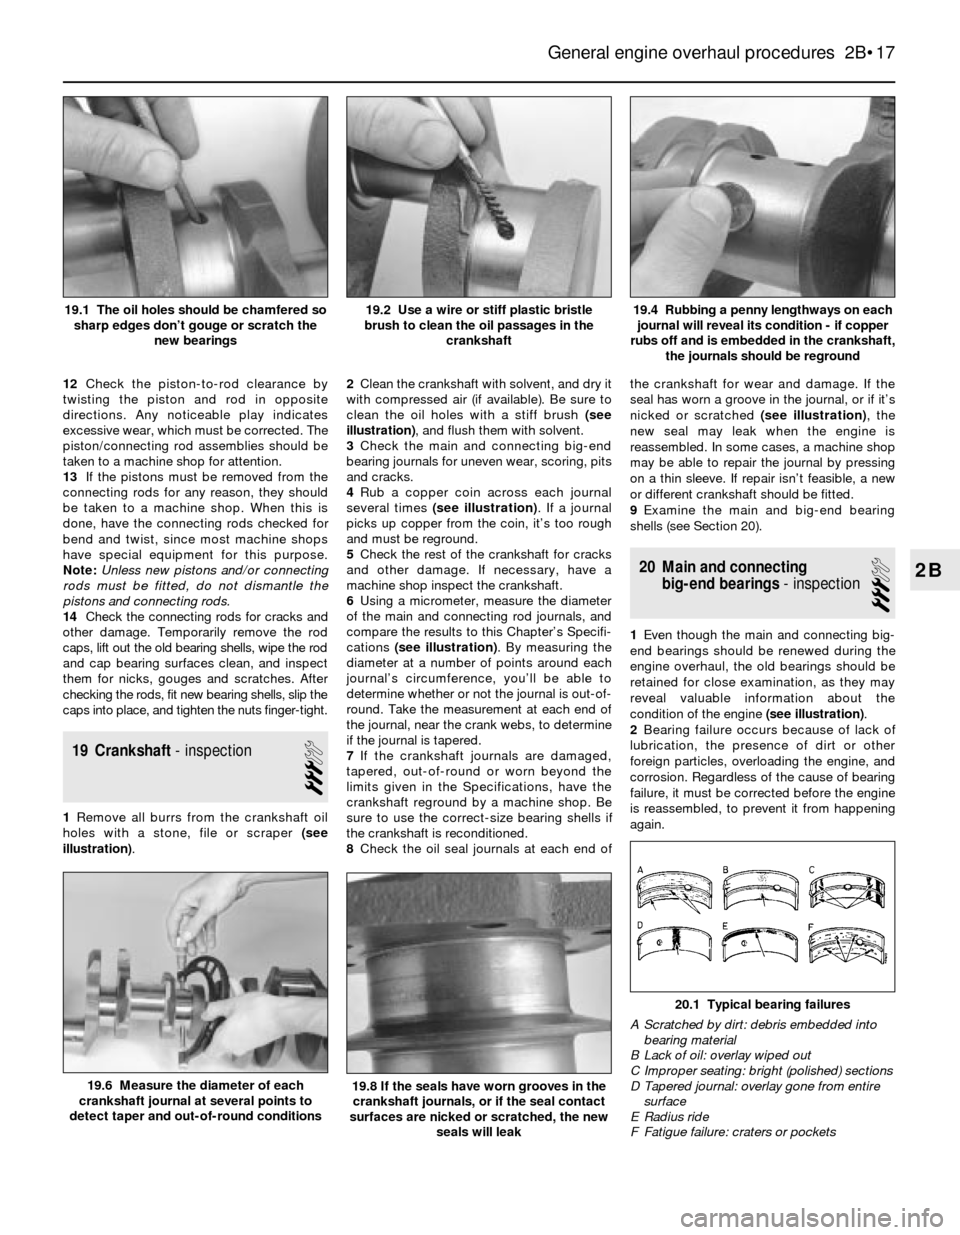
1Remove all burrs from the crankshaft oil
holes with a stone, file or scraper (see
illustration).2Clean the crankshaft with solvent, and dry it
with compressed air (if available). Be sure to
clean the oil holes with a stiff brush (see
illustration), and flush them with solvent.
3Check the main and connecting big-end
bearing journals for uneven wear, scoring, pits
and cracks.
4Rub a copper coin across each journal
several times (see illustration). If a journal
picks up copper from the coin, it’s too rough
and must be reground.
5Check the rest of the crankshaft for cracks
and other damage. If necessary, have a
machine shop inspect the crankshaft.
6Using a micrometer, measure the diameter
of the main and connecting rod journals, and
compare the results to this Chapter’s Specifi-
cations (see illustration). By measuring the
diameter at a number of points around each
journal’s circumference, you’ll be able to
determine whether or not the journal is out-of-
round. Take the measurement at each end of
the journal, near the crank webs, to determine
if the journal is tapered.
7If the crankshaft journals are damaged,
tapered, out-of-round or worn beyond the
limits given in the Specifications, have the
crankshaft reground by a machine shop. Be
sure to use the correct-size bearing shells if
the crankshaft is reconditioned.
8Check the oil seal journals at each end ofthe crankshaft for wear and damage. If the
seal has worn a groove in the journal, or if it’s
nicked or scratched (see illustration), the
new seal may leak when the engine is
reassembled. In some cases, a machine shop
may be able to repair the journal by pressing
on a thin sleeve. If repair isn’t feasible, a new
or different crankshaft should be fitted.
9Examine the main and big-end bearing
shells (see Section 20).
20 Main and connecting
big-end bearings- inspection
3
1Even though the main and connecting big-
end bearings should be renewed during the
engine overhaul, the old bearings should be
retained for close examination, as they may
reveal valuable information about the
condition of the engine (see illustration).
2Bearing failure occurs because of lack of
lubrication, the presence of dirt or other
foreign particles, overloading the engine, and
corrosion. Regardless of the cause of bearing
failure, it must be corrected before the engine
is reassembled, to prevent it from happening
again.
General engine overhaul procedures 2B•17
19.4 Rubbing a penny lengthways on each
journal will reveal its condition - if copper
rubs off and is embedded in the crankshaft,
the journals should be reground19.2 Use a wire or stiff plastic bristle
brush to clean the oil passages in the
crankshaft19.1 The oil holes should be chamfered so
sharp edges don’t gouge or scratch the
new bearings
20.1 Typical bearing failures
A Scratched by dirt: debris embedded into
bearing material
B Lack of oil: overlay wiped out
C Improper seating: bright (polished) sections
D Tapered journal: overlay gone from entire
surface
E Radius ride
F Fatigue failure: craters or pockets
19.8 If the seals have worn grooves in the
crankshaft journals, or if the seal contact
surfaces are nicked or scratched, the new
seals will leak19.6 Measure the diameter of each
crankshaft journal at several points to
detect taper and out-of-round conditions
2B
Page 74 of 228
3When examining the bearings, remove
them from the engine block, the main bearing
caps, the connecting rods and the rod caps,
and lay them out on a clean surface in the
same general position as their location in the
engine. This will enable you to match any
bearing problems with the corresponding
crankshaft journal.
4Dirt and other foreign particles get into the
engine in a variety of ways. It may be left in
the engine during assembly, or it may pass
through filters or the crankcase ventilation
(PCV) system. It may get into the oil, and from
there into the bearings. Metal chips from
machining operations and normal engine wear
are often present. Abrasives are sometimes
left in engine components after recondi-
tioning, especially when parts are not
thoroughly cleaned using the proper cleaning
methods. Whatever the source, these foreign
objects often end up embedded in the soft
bearing material, and are easily recognised.
Large particles will not embed in the bearing,
and will score or gouge the bearing and
journal. The best prevention for this cause of
bearing failure is to clean all parts thoroughly,
and to keep everything spotlessly-clean
during engine assembly. Frequent and regular
engine oil and filter changes are also
recommended.
5Lack of lubrication (or lubrication
breakdown) has a number of interrelated
causes. Excessive heat (which thins the oil),
overloading (which squeezes the oil from the
bearing face) and oil “leakage” or “throw off”
(from excessive bearing clearances, worn oil
pump, or high engine speeds) all contribute to
lubrication breakdown. Blocked oil passages,
which usually are the result of misaligned oil
holes in a bearing shell, will also oil-starve a
bearing and destroy it. When lack of
lubrication is the cause of bearing failure, the
bearing material is wiped or extruded from the
steel backing of the bearing. Temperatures
may increase to the point where the steel
backing turns blue from overheating.
6Driving habits can have a definite effect on
bearing life. Full-throttle, low-speed operation
(labouring the engine) puts very high loads onbearings, which tends to squeeze out the oil
film. These loads cause the bearings to flex,
which produces fine cracks in the bearing
face (fatigue failure). Eventually, the bearing
material will loosen in places, and tear away
from the steel backing. Short-trip driving
leads to corrosion of bearings, because
insufficient engine heat is produced to drive
off the condensation and corrosive gases.
These products collect in the engine oil,
forming acid and sludge. As the oil is carried
to the engine bearings, the acid attacks and
corrodes the bearing material.
7Incorrect bearing refitting during engine
assembly will lead to bearing failure as well.
Tight-fitting bearings leave insufficient bearing
oil clearance, and will result in oil starvation.
Dirt or foreign particles trapped behind a
bearing shell result in high spots on the
bearing, which will lead to failure.
21 Engine overhaul-
reassembly sequence
1Before beginning engine reassembly, make
sure you have all the necessary new parts,
gaskets and seals, as well as the following
items on hand:
Common hand tools
A torque wrench
Piston ring refitting tool
Piston ring compressor
Vibration damper refitting tool
Short lengths of rubber or plastic hose to fit
over connecting rod bolts (where
applicable)
Plastigage
Feeler gauges
A fine-tooth file
New engine oil
Engine assembly oil or molybdenum
disulphide (“moly”) grease
Gasket sealant
Thread-locking compound
2In order to save time and avoid problems,
engine reassembly should be done in the
following general order:Piston rings
Crankshaft and main bearings
Piston/connecting rod assemblies
Oil pump
Sump
Cylinder head assembly
Timing belt or chain and tensioner
assemblies
Water pump
Timing belt or chain covers
Intake and exhaust manifolds
Valve cover
Engine rear plate
Flywheel/driveplate
22 Piston rings- refitting
2
1Before fitting the new piston rings, the ring
end gaps must be checked. It’s assumed that
the piston ring side clearance has been
checked and verified (see Section 18).
2Lay out the piston/connecting rod
assemblies and the new ring sets, so that the
ring sets will be matched with the same piston
and cylinder during the end gap measurement
and engine assembly.
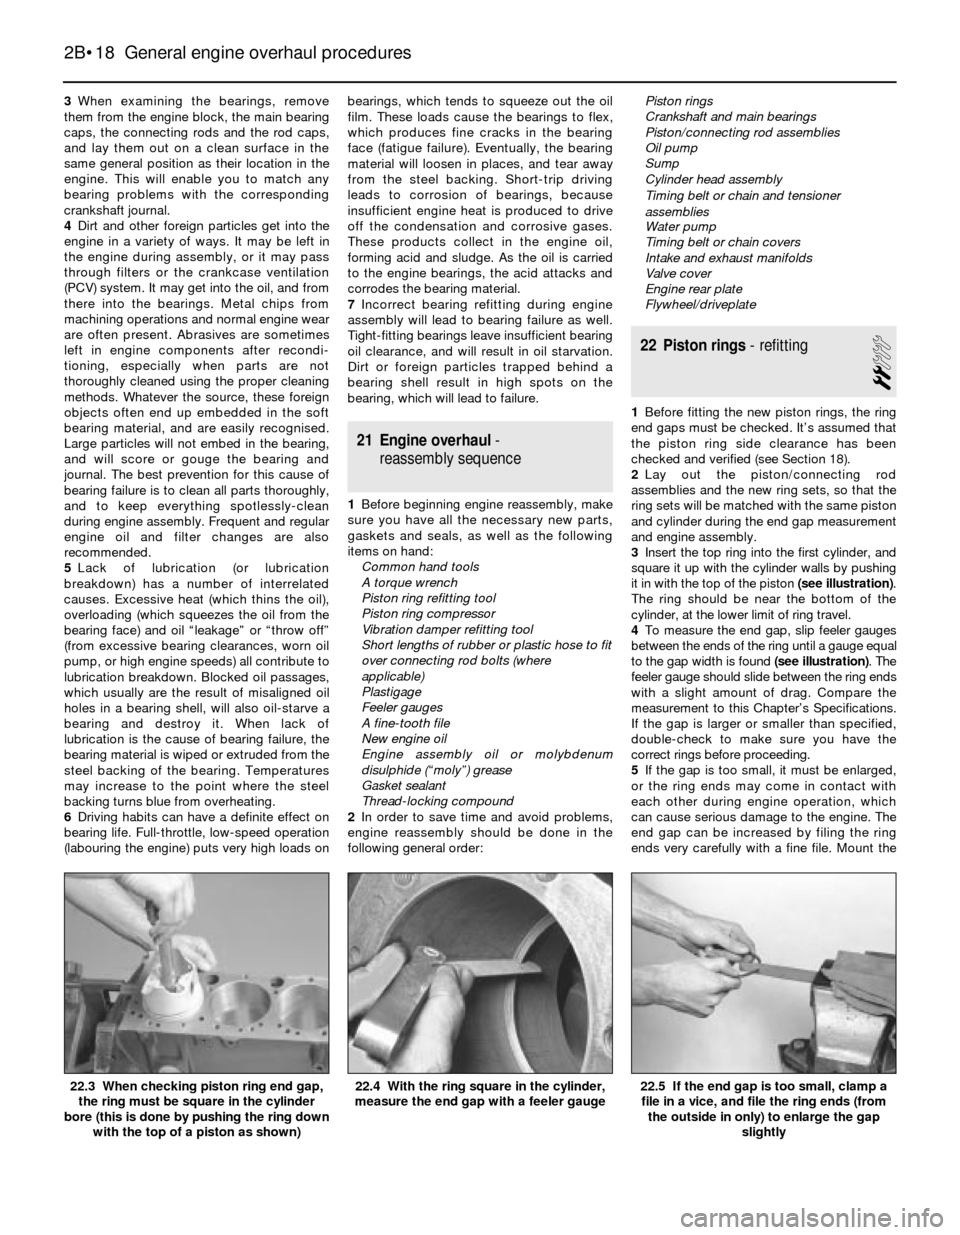
3Insert the top ring into the first cylinder, and
square it up with the cylinder walls by pushing
it in with the top of the piston (see illustration).
The ring should be near the bottom of the
cylinder, at the lower limit of ring travel.
4To measure the end gap, slip feeler gauges
between the ends of the ring until a gauge equal
to the gap width is found(see illustration). The
feeler gauge should slide between the ring ends
with a slight amount of drag. Compare the
measurement to this Chapter’s Specifications.
If the gap is larger or smaller than specified,
double-check to make sure you have the
correct rings before proceeding.
5If the gap is too small, it must be enlarged,
or the ring ends may come in contact with
each other during engine operation, which
can cause serious damage to the engine. The
end gap can be increased by filing the ring
ends very carefully with a fine file. Mount the
2B•18 General engine overhaul procedures
22.5 If the end gap is too small, clamp a
file in a vice, and file the ring ends (from
the outside in only) to enlarge the gap
slightly22.4 With the ring square in the cylinder,
measure the end gap with a feeler gauge22.3 When checking piston ring end gap,
the ring must be square in the cylinder
bore (this is done by pushing the ring down
with the top of a piston as shown)
Page 75 of 228
file in a vice equipped with soft jaws, slip the
ring over the file, with the ends contacting the
file face, and slowly move the ring to remove
material from the ends. When performing this
operation, file only from the outside in(see
illustration).
6Excess end gap isn’t critical unless it’s
greater than 1.0 mm. Again, double-check to
make sure you have the correct rings for your
engine.
7Repeat the procedure for each ring that will
be fitted in the first cylinder and for each ring
in the remaining cylinders. Remember to keep
rings, pistons and cylinders matched up.
8Once the ring end gaps have been
checked/corrected, the rings can be fitted on
the pistons.
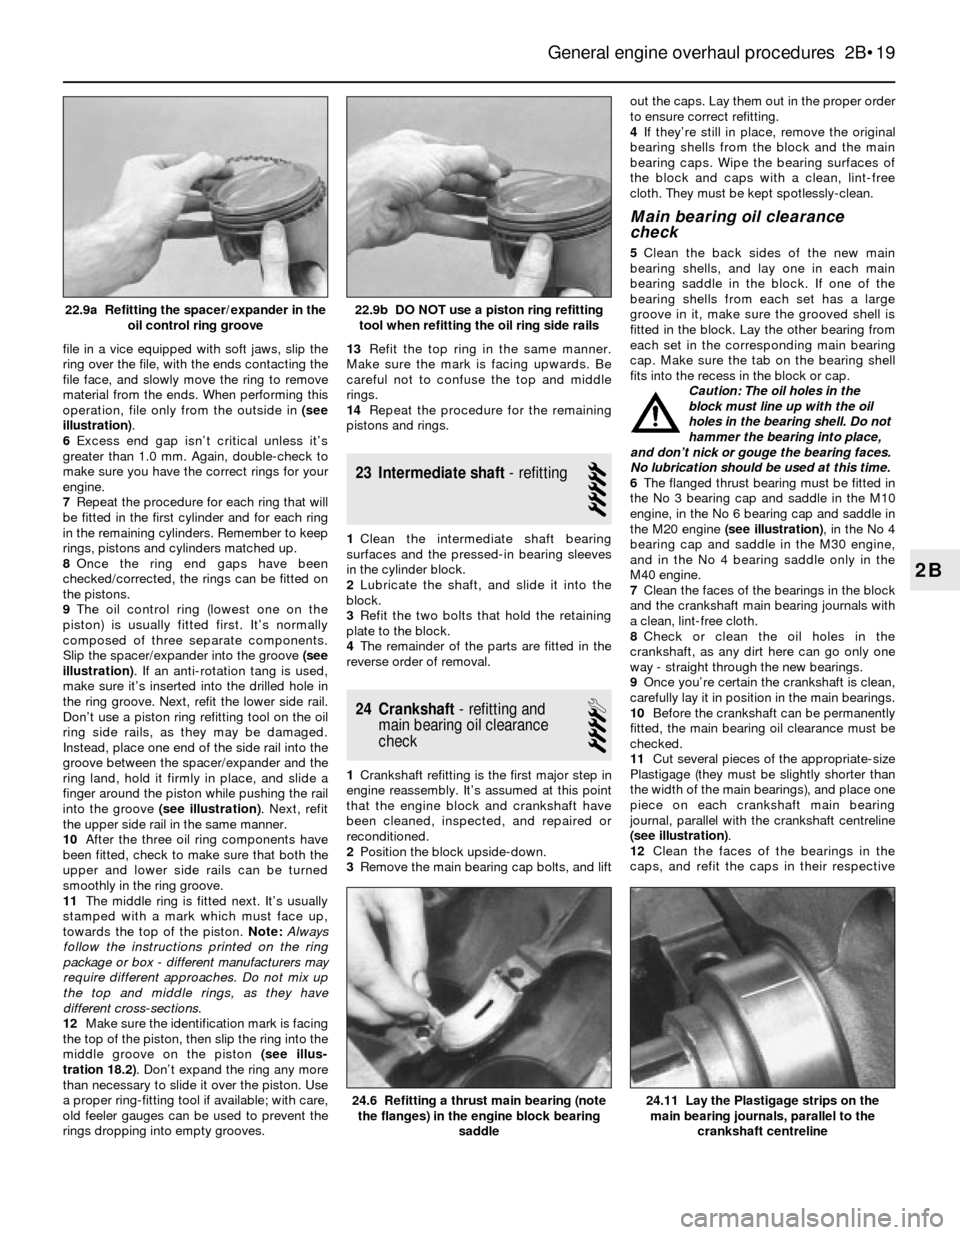
9The oil control ring (lowest one on the
piston) is usually fitted first. It’s normally
composed of three separate components.
Slip the spacer/expander into the groove(see
illustration). If an anti-rotation tang is used,
make sure it’s inserted into the drilled hole in
the ring groove. Next, refit the lower side rail.
Don’t use a piston ring refitting tool on the oil
ring side rails, as they may be damaged.
Instead, place one end of the side rail into the
groove between the spacer/expander and the
ring land, hold it firmly in place, and slide a
finger around the piston while pushing the rail
into the groove(see illustration). Next, refit
the upper side rail in the same manner.
10After the three oil ring components have
been fitted, check to make sure that both the
upper and lower side rails can be turned
smoothly in the ring groove.
11The middle ring is fitted next. It’s usually
stamped with a mark which must face up,
towards the top of the piston. Note:Always
follow the instructions printed on the ring
package or box - different manufacturers may
require different approaches. Do not mix up
the top and middle rings, as they have
different cross-sections.
12Make sure the identification mark is facing
the top of the piston, then slip the ring into the
middle groove on the piston (see illus-
tration 18.2). Don’t expand the ring any more
than necessary to slide it over the piston. Use
a proper ring-fitting tool if available; with care,
old feeler gauges can be used to prevent the
rings dropping into empty grooves.13Refit the top ring in the same manner.
Make sure the mark is facing upwards. Be
careful not to confuse the top and middle
rings.
14Repeat the procedure for the remaining
pistons and rings.
23 Intermediate shaft- refitting
5
1Clean the intermediate shaft bearing
surfaces and the pressed-in bearing sleeves
in the cylinder block.
2Lubricate the shaft, and slide it into the
block.
3Refit the two bolts that hold the retaining
plate to the block.
4The remainder of the parts are fitted in the
reverse order of removal.
24 Crankshaft- refitting and
main bearing oil clearance
check
4
1Crankshaft refitting is the first major step in
engine reassembly. It’s assumed at this point
that the engine block and crankshaft have
been cleaned, inspected, and repaired or
reconditioned.
2Position the block upside-down.
3Remove the main bearing cap bolts, and liftout the caps. Lay them out in the proper order
to ensure correct refitting.
4If they’re still in place, remove the original
bearing shells from the block and the main
bearing caps. Wipe the bearing surfaces of
the block and caps with a clean, lint-free
cloth. They must be kept spotlessly-clean.
Main bearing oil clearance
check
5Clean the back sides of the new main
bearing shells, and lay one in each main
bearing saddle in the block. If one of the
bearing shells from each set has a large
groove in it, make sure the grooved shell is
fitted in the block. Lay the other bearing from
each set in the corresponding main bearing
cap. Make sure the tab on the bearing shell
fits into the recess in the block or cap.
Caution: The oil holes in the
block must line up with the oil
holes in the bearing shell. Do not
hammer the bearing into place,
and don’t nick or gouge the bearing faces.
No lubrication should be used at this time.
6The flanged thrust bearing must be fitted in
the No 3 bearing cap and saddle in the M10
engine, in the No 6 bearing cap and saddle in
the M20 engine (see illustration), in the No 4
bearing cap and saddle in the M30 engine,
and in the No 4 bearing saddle only in the
M40 engine.
7Clean the faces of the bearings in the block
and the crankshaft main bearing journals with
a clean, lint-free cloth.
8Check or clean the oil holes in the
crankshaft, as any dirt here can go only one
way - straight through the new bearings.
9Once you’re certain the crankshaft is clean,
carefully lay it in position in the main bearings.
10Before the crankshaft can be permanently
fitted, the main bearing oil clearance must be
checked.
11Cut several pieces of the appropriate-size
Plastigage (they must be slightly shorter than
the width of the main bearings), and place one
piece on each crankshaft main bearing
journal, parallel with the crankshaft centreline
(see illustration).
12Clean the faces of the bearings in the
caps, and refit the caps in their respective
General engine overhaul procedures 2B•19
22.9b DO NOT use a piston ring refitting
tool when refitting the oil ring side rails22.9a Refitting the spacer/expander in the
oil control ring groove
24.11 Lay the Plastigage strips on the
main bearing journals, parallel to the
crankshaft centreline24.6 Refitting a thrust main bearing (note
the flanges) in the engine block bearing
saddle
2B
Page 76 of 228
positions (don’t mix them up) with the arrows
pointing towards the front of the engine. Don’t
disturb the Plastigage.
13Starting with the centre main bearing and
working out toward the ends, progressively
tighten the main bearing cap bolts to the
torque listed in this Chapter’s Specifications.
On M10, M20 and M30 engines, tighten the
bolts in three stages. On the M40 engine,
tighten all the bolts initially to the Stage 1
torque, then angle-tighten them by the angle
given in the Specifications. Carry out the
angle-tightening on each bolt in one
controlled movement. Don’t rotate the
crankshaft at any time during the tightening
operation.
14Remove the bolts and carefully lift off the
main bearing caps. Keep them in order. Don’t
disturb the Plastigage or rotate the
crankshaft. If any of the main bearing caps are
difficult to remove, tap them gently from side-
to-side with a soft-face hammer to loosen
them.
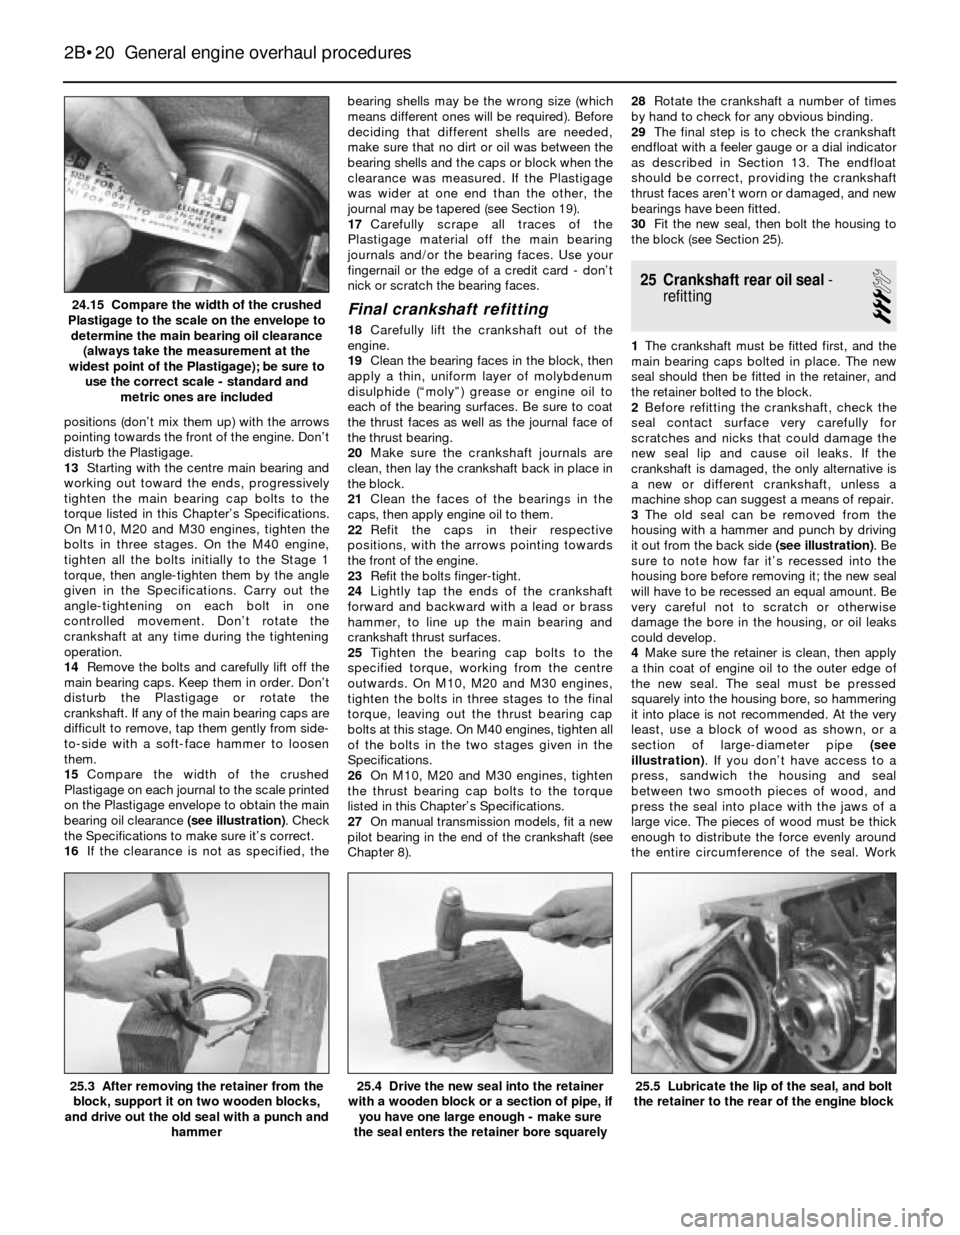
15Compare the width of the crushed
Plastigage on each journal to the scale printed
on the Plastigage envelope to obtain the main
bearing oil clearance (see illustration). Check
the Specifications to make sure it’s correct.
16If the clearance is not as specified, thebearing shells may be the wrong size (which
means different ones will be required). Before
deciding that different shells are needed,
make sure that no dirt or oil was between the
bearing shells and the caps or block when the
clearance was measured. If the Plastigage
was wider at one end than the other, the
journal may be tapered (see Section 19).
17Carefully scrape all traces of the
Plastigage material off the main bearing
journals and/or the bearing faces. Use your
fingernail or the edge of a credit card - don’t
nick or scratch the bearing faces.
Final crankshaft refitting
18Carefully lift the crankshaft out of the
engine.
19Clean the bearing faces in the block, then
apply a thin, uniform layer of molybdenum
disulphide (“moly”) grease or engine oil to
each of the bearing surfaces. Be sure to coat
the thrust faces as well as the journal face of
the thrust bearing.
20Make sure the crankshaft journals are
clean, then lay the crankshaft back in place in
the block.
21Clean the faces of the bearings in the
caps, then apply engine oil to them.
22Refit the caps in their respective
positions, with the arrows pointing towards
the front of the engine.
23Refit the bolts finger-tight.
24Lightly tap the ends of the crankshaft
forward and backward with a lead or brass
hammer, to line up the main bearing and
crankshaft thrust surfaces.
25Tighten the bearing cap bolts to the
specified torque, working from the centre
outwards. On M10, M20 and M30 engines,
tighten the bolts in three stages to the final
torque, leaving out the thrust bearing cap
bolts at this stage. On M40 engines, tighten all
of the bolts in the two stages given in the
Specifications.
26On M10, M20 and M30 engines, tighten
the thrust bearing cap bolts to the torque
listed in this Chapter’s Specifications.
27On manual transmission models, fit a new
pilot bearing in the end of the crankshaft (see
Chapter 8).28Rotate the crankshaft a number of times
by hand to check for any obvious binding.
29The final step is to check the crankshaft
endfloat with a feeler gauge or a dial indicator
as described in Section 13. The endfloat
should be correct, providing the crankshaft
thrust faces aren’t worn or damaged, and new
bearings have been fitted.
30Fit the new seal, then bolt the housing to
the block (see Section 25).
25 Crankshaft rear oil seal-
refitting
3
1The crankshaft must be fitted first, and the
main bearing caps bolted in place. The new
seal should then be fitted in the retainer, and
the retainer bolted to the block.
2Before refitting the crankshaft, check the
seal contact surface very carefully for
scratches and nicks that could damage the
new seal lip and cause oil leaks. If the
crankshaft is damaged, the only alternative is
a new or different crankshaft, unless a
machine shop can suggest a means of repair.
3The old seal can be removed from the
housing with a hammer and punch by driving
it out from the back side (see illustration). Be
sure to note how far it’s recessed into the
housing bore before removing it; the new seal
will have to be recessed an equal amount. Be
very careful not to scratch or otherwise
damage the bore in the housing, or oil leaks
could develop.
4Make sure the retainer is clean, then apply
a thin coat of engine oil to the outer edge of
the new seal. The seal must be pressed
squarely into the housing bore, so hammering
it into place is not recommended. At the very
least, use a block of wood as shown, or a
section of large-diameter pipe (see
illustration). If you don’t have access to a
press, sandwich the housing and seal
between two smooth pieces of wood, and
press the seal into place with the jaws of a
large vice. The pieces of wood must be thick
enough to distribute the force evenly around
the entire circumference of the seal. Work
2B•20 General engine overhaul procedures
25.5 Lubricate the lip of the seal, and bolt
the retainer to the rear of the engine block25.4 Drive the new seal into the retainer
with a wooden block or a section of pipe, if
you have one large enough - make sure
the seal enters the retainer bore squarely25.3 After removing the retainer from the
block, support it on two wooden blocks,
and drive out the old seal with a punch and
hammer
24.15 Compare the width of the crushed
Plastigage to the scale on the envelope to
determine the main bearing oil clearance
(always take the measurement at the
widest point of the Plastigage); be sure to
use the correct scale - standard and
metric ones are included
Page 77 of 228
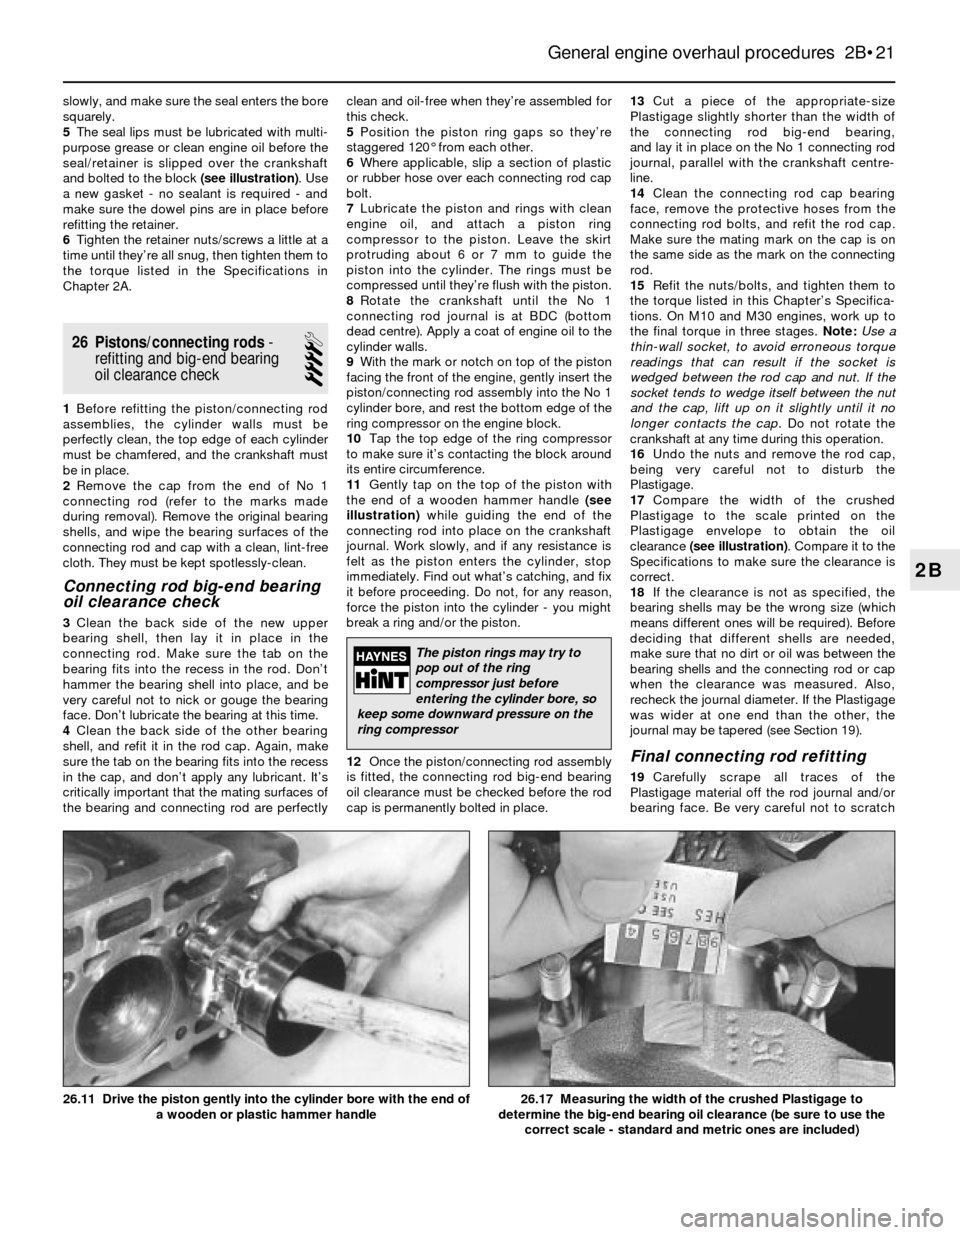
slowly, and make sure the seal enters the bore
squarely.
5The seal lips must be lubricated with multi-
purpose grease or clean engine oil before the
seal/retainer is slipped over the crankshaft
and bolted to the block (see illustration). Use
a new gasket - no sealant is required - and
make sure the dowel pins are in place before
refitting the retainer.
6Tighten the retainer nuts/screws a little at a
time until they’re all snug, then tighten them to
the torque listed in the Specifications in
Chapter 2A.
26 Pistons/connecting rods-
refitting and big-end bearing
oil clearance check
4
1Before refitting the piston/connecting rod
assemblies, the cylinder walls must be
perfectly clean, the top edge of each cylinder
must be chamfered, and the crankshaft must
be in place.
2Remove the cap from the end of No 1
connecting rod (refer to the marks made
during removal). Remove the original bearing
shells, and wipe the bearing surfaces of the
connecting rod and cap with a clean, lint-free
cloth. They must be kept spotlessly-clean.
Connecting rod big-end bearing
oil clearance check
3Clean the back side of the new upper
bearing shell, then lay it in place in the
connecting rod. Make sure the tab on the
bearing fits into the recess in the rod. Don’t
hammer the bearing shell into place, and be
very careful not to nick or gouge the bearing
face. Don’t lubricate the bearing at this time.
4Clean the back side of the other bearing
shell, and refit it in the rod cap. Again, make
sure the tab on the bearing fits into the recess
in the cap, and don’t apply any lubricant. It’s
critically important that the mating surfaces of
the bearing and connecting rod are perfectlyclean and oil-free when they’re assembled for
this check.
5Position the piston ring gaps so they’re
staggered 120° from each other.
6Where applicable, slip a section of plastic
or rubber hose over each connecting rod cap
bolt.
7Lubricate the piston and rings with clean
engine oil, and attach a piston ring
compressor to the piston. Leave the skirt
protruding about 6 or 7 mm to guide the
piston into the cylinder. The rings must be
compressed until they’re flush with the piston.
8Rotate the crankshaft until the No 1
connecting rod journal is at BDC (bottom
dead centre). Apply a coat of engine oil to the
cylinder walls.
9With the mark or notch on top of the piston
facing the front of the engine, gently insert the
piston/connecting rod assembly into the No 1
cylinder bore, and rest the bottom edge of the
ring compressor on the engine block.
10Tap the top edge of the ring compressor
to make sure it’s contacting the block around
its entire circumference.
11Gently tap on the top of the piston with
the end of a wooden hammer handle (see
illustration)while guiding the end of the
connecting rod into place on the crankshaft
journal. Work slowly, and if any resistance is
felt as the piston enters the cylinder, stop
immediately. Find out what’s catching, and fix
it before proceeding. Do not, for any reason,
force the piston into the cylinder - you might
break a ring and/or the piston.
12Once the piston/connecting rod assembly
is fitted, the connecting rod big-end bearing
oil clearance must be checked before the rod
cap is permanently bolted in place.13Cut a piece of the appropriate-size
Plastigage slightly shorter than the width of
the connecting rod big-end bearing,
and lay it in place on the No 1 connecting rod
journal, parallel with the crankshaft centre-
line.
14Clean the connecting rod cap bearing
face, remove the protective hoses from the
connecting rod bolts, and refit the rod cap.
Make sure the mating mark on the cap is on
the same side as the mark on the connecting
rod.
15Refit the nuts/bolts, and tighten them to
the torque listed in this Chapter’s Specifica-
tions. On M10 and M30 engines, work up to
the final torque in three stages. Note:Use a
thin-wall socket, to avoid erroneous torque
readings that can result if the socket is
wedged between the rod cap and nut. If the
socket tends to wedge itself between the nut
and the cap, lift up on it slightly until it no
longer contacts the cap. Do not rotate the
crankshaft at any time during this operation.
16Undo the nuts and remove the rod cap,
being very careful not to disturb the
Plastigage.
17Compare the width of the crushed
Plastigage to the scale printed on the
Plastigage envelope to obtain the oil
clearance (see illustration). Compare it to the
Specifications to make sure the clearance is
correct.
18If the clearance is not as specified, the
bearing shells may be the wrong size (which
means different ones will be required). Before
deciding that different shells are needed,
make sure that no dirt or oil was between the
bearing shells and the connecting rod or cap
when the clearance was measured. Also,
recheck the journal diameter. If the Plastigage
was wider at one end than the other, the
journal may be tapered (see Section 19).
Final connecting rod refitting
19Carefully scrape all traces of the
Plastigage material off the rod journal and/or
bearing face. Be very careful not to scratch
General engine overhaul procedures 2B•21
26.17 Measuring the width of the crushed Plastigage to
determine the big-end bearing oil clearance (be sure to use the
correct scale - standard and metric ones are included)26.11 Drive the piston gently into the cylinder bore with the end of
a wooden or plastic hammer handle
2B
The piston rings may try to
pop out of the ring
compressor just before
entering the cylinder bore, so
keep some downward pressure on the
ring compressor
Page 78 of 228
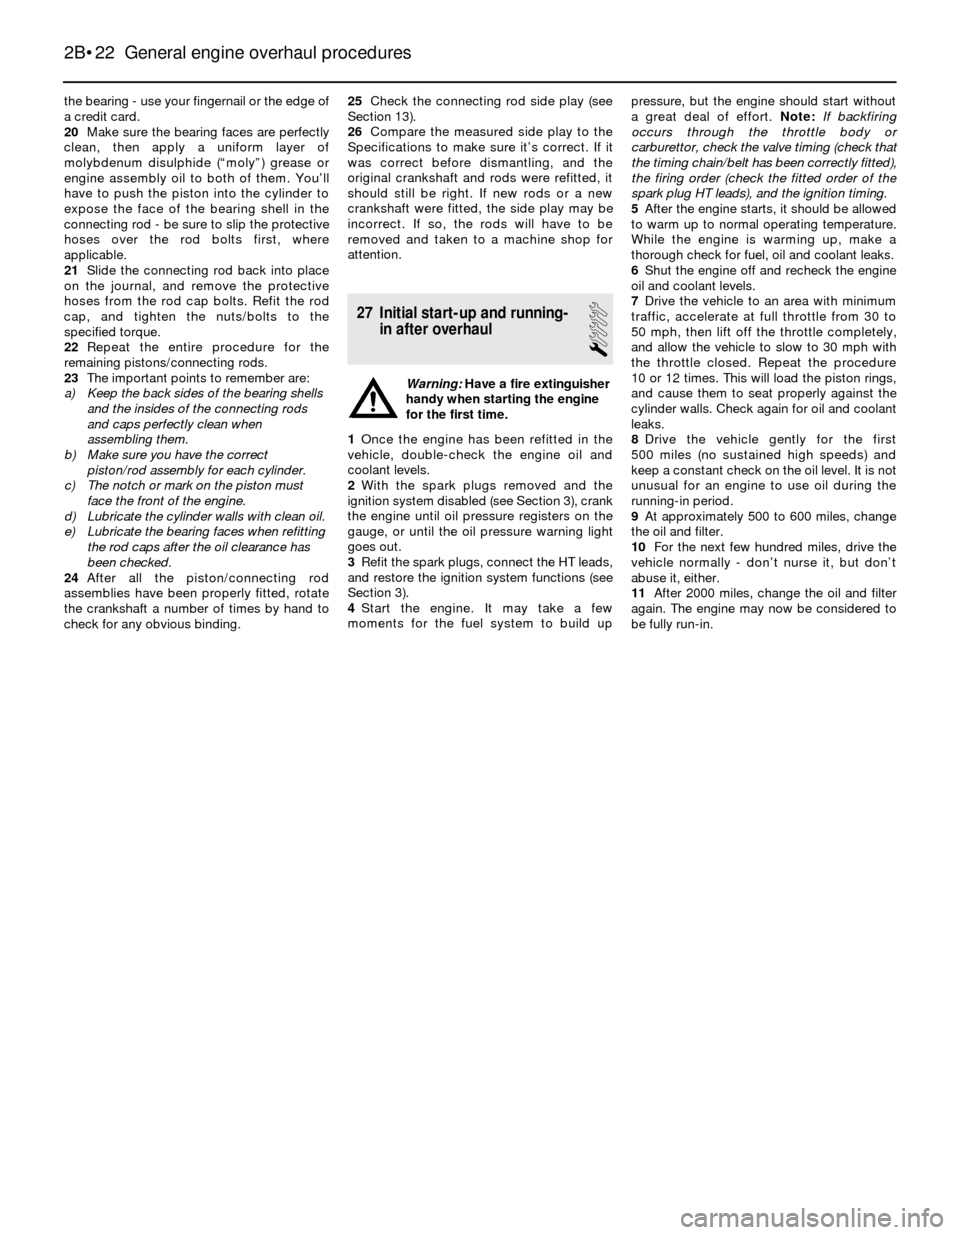
the bearing - use your fingernail or the edge of
a credit card.
20Make sure the bearing faces are perfectly
clean, then apply a uniform layer of
molybdenum disulphide (“moly”) grease or
engine assembly oil to both of them. You’ll
have to push the piston into the cylinder to
expose the face of the bearing shell in the
connecting rod - be sure to slip the protective
hoses over the rod bolts first, where
applicable.
21Slide the connecting rod back into place
on the journal, and remove the protective
hoses from the rod cap bolts. Refit the rod
cap, and tighten the nuts/bolts to the
specified torque.
22Repeat the entire procedure for the
remaining pistons/connecting rods.
23The important points to remember are:
a) Keep the back sides of the bearing shells
and the insides of the connecting rods
and caps perfectly clean when
assembling them.
b) Make sure you have the correct
piston/rod assembly for each cylinder.
c) The notch or mark on the piston must
face the front of the engine.
d) Lubricate the cylinder walls with clean oil.
e) Lubricate the bearing faces when refitting
the rod caps after the oil clearance has
been checked.
24After all the piston/connecting rod
assemblies have been properly fitted, rotate
the crankshaft a number of times by hand to
check for any obvious binding.25Check the connecting rod side play (see
Section 13).
26Compare the measured side play to the
Specifications to make sure it’s correct. If it
was correct before dismantling, and the
original crankshaft and rods were refitted, it
should still be right. If new rods or a new
crankshaft were fitted, the side play may be
incorrect. If so, the rods will have to be
removed and taken to a machine shop for
attention.
27 Initial start-up and running-
in after overhaul
1
Warning:Have a fire extinguisher
handy when starting the engine
for the first time.
1Once the engine has been refitted in the
vehicle, double-check the engine oil and
coolant levels.
2With the spark plugs removed and the
ignition system disabled (see Section 3), crank
the engine until oil pressure registers on the
gauge, or until the oil pressure warning light
goes out.
3Refit the spark plugs, connect the HT leads,
and restore the ignition system functions (see
Section 3).
4Start the engine. It may take a few
moments for the fuel system to build uppressure, but the engine should start without
a great deal of effort. Note: If backfiring
occurs through the throttle body or
carburettor, check the valve timing (check that
the timing chain/belt has been correctly fitted),
the firing order (check the fitted order of the
spark plug HT leads), and the ignition timing.
5After the engine starts, it should be allowed
to warm up to normal operating temperature.
While the engine is warming up, make a
thorough check for fuel, oil and coolant leaks.
6Shut the engine off and recheck the engine
oil and coolant levels.
7Drive the vehicle to an area with minimum
traffic, accelerate at full throttle from 30 to
50 mph, then lift off the throttle completely,
and allow the vehicle to slow to 30 mph with
the throttle closed. Repeat the procedure
10 or 12 times. This will load the piston rings,
and cause them to seat properly against the
cylinder walls. Check again for oil and coolant
leaks.
8Drive the vehicle gently for the first
500 miles (no sustained high speeds) and
keep a constant check on the oil level. It is not
unusual for an engine to use oil during the
running-in period.
9At approximately 500 to 600 miles, change
the oil and filter.
10For the next few hundred miles, drive the
vehicle normally - don’t nurse it, but don’t
abuse it, either.
11After 2000 miles, change the oil and filter
again. The engine may now be considered to
be fully run-in.
2B•22 General engine overhaul procedures
Page 79 of 228
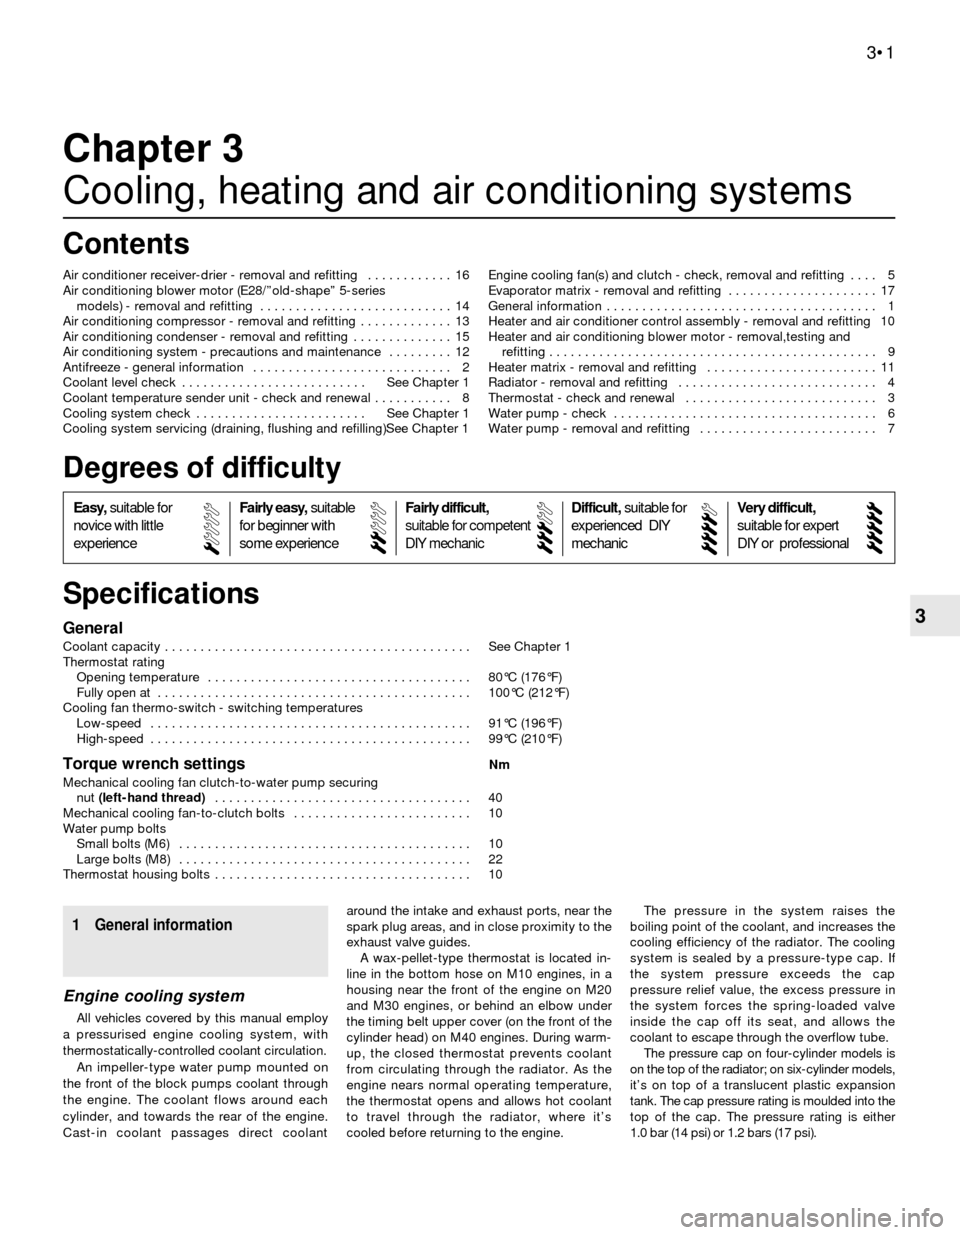
3General
Coolant capacity . . . . . . . . . . . . . . . . . . . . . . . . . . . . . . . . . . . . . . . . . . . See Chapter 1
Thermostat rating
Opening temperature . . . . . . . . . . . . . . . . . . . . . . . . . . . . . . . . . . . . . 80°C (176°F)
Fully open at . . . . . . . . . . . . . . . . . . . . . . . . . . . . . . . . . . . . . . . . . . . . 100°C (212°F)
Cooling fan thermo-switch - switching temperatures
Low-speed . . . . . . . . . . . . . . . . . . . . . . . . . . . . . . . . . . . . . . . . . . . . . 91°C (196°F)
High-speed . . . . . . . . . . . . . . . . . . . . . . . . . . . . . . . . . . . . . . . . . . . . . 99°C (210°F)
Torque wrench settingsNm
Mechanical cooling fan clutch-to-water pump securing
nut (left-hand thread) . . . . . . . . . . . . . . . . . . . . . . . . . . . . . . . . . . . . 40
Mechanical cooling fan-to-clutch bolts . . . . . . . . . . . . . . . . . . . . . . . . . 10
Water pump bolts
Small bolts (M6) . . . . . . . . . . . . . . . . . . . . . . . . . . . . . . . . . . . . . . . . . 10
Large bolts (M8) . . . . . . . . . . . . . . . . . . . . . . . . . . . . . . . . . . . . . . . . . 22
Thermostat housing bolts . . . . . . . . . . . . . . . . . . . . . . . . . . . . . . . . . . . . 10
Chapter 3
Cooling, heating and air conditioning systems
Air conditioner receiver-drier - removal and refitting . . . . . . . . . . . . 16
Air conditioning blower motor (E28/”old-shape” 5-series
models) - removal and refitting . . . . . . . . . . . . . . . . . . . . . . . . . . . 14
Air conditioning compressor - removal and refitting . . . . . . . . . . . . . 13
Air conditioning condenser - removal and refitting . . . . . . . . . . . . . . 15
Air conditioning system - precautions and maintenance . . . . . . . . . 12
Antifreeze - general information . . . . . . . . . . . . . . . . . . . . . . . . . . . . 2
Coolant level check . . . . . . . . . . . . . . . . . . . . . . . . . . See Chapter 1
Coolant temperature sender unit - check and renewal . . . . . . . . . . . 8
Cooling system check . . . . . . . . . . . . . . . . . . . . . . . . See Chapter 1
Cooling system servicing (draining, flushing and refilling)See Chapter 1Engine cooling fan(s) and clutch - check, removal and refitting . . . . 5
Evaporator matrix - removal and refitting . . . . . . . . . . . . . . . . . . . . . 17
General information . . . . . . . . . . . . . . . . . . . . . . . . . . . . . . . . . . . . . . 1
Heater and air conditioner control assembly - removal and refitting 10
Heater and air conditioning blower motor - removal,testing and
refitting . . . . . . . . . . . . . . . . . . . . . . . . . . . . . . . . . . . . . . . . . . . . . . 9
Heater matrix - removal and refitting . . . . . . . . . . . . . . . . . . . . . . . . 11
Radiator - removal and refitting . . . . . . . . . . . . . . . . . . . . . . . . . . . . 4
Thermostat - check and renewal . . . . . . . . . . . . . . . . . . . . . . . . . . . 3
Water pump - check . . . . . . . . . . . . . . . . . . . . . . . . . . . . . . . . . . . . . 6
Water pump - removal and refitting . . . . . . . . . . . . . . . . . . . . . . . . . 7
3•1
Easy,suitable for
novice with little
experienceFairly easy,suitable
for beginner with
some experienceFairly difficult,
suitable for competent
DIY mechanic
Difficult,suitable for
experienced DIY
mechanicVery difficult,
suitable for expert
DIY or professional
Degrees of difficulty
Specifications Contents
1 General information
Engine cooling system
All vehicles covered by this manual employ
a pressurised engine cooling system, with
thermostatically-controlled coolant circulation.
An impeller-type water pump mounted on
the front of the block pumps coolant through
the engine. The coolant flows around each
cylinder, and towards the rear of the engine.
Cast-in coolant passages direct coolantaround the intake and exhaust ports, near the
spark plug areas, and in close proximity to the
exhaust valve guides.
A wax-pellet-type thermostat is located in-
line in the bottom hose on M10 engines, in a
housing near the front of the engine on M20
and M30 engines, or behind an elbow under
the timing belt upper cover (on the front of the
cylinder head) on M40 engines. During warm-
up, the closed thermostat prevents coolant
from circulating through the radiator. As the
engine nears normal operating temperature,
the thermostat opens and allows hot coolant
to travel through the radiator, where it’s
cooled before returning to the engine.The pressure in the system raises the
boiling point of the coolant, and increases the
cooling efficiency of the radiator. The cooling
system is sealed by a pressure-type cap. If
the system pressure exceeds the cap
pressure relief value, the excess pressure in
the system forces the spring-loaded valve
inside the cap off its seat, and allows the
coolant to escape through the overflow tube.
The pressure cap on four-cylinder models is
on the top of the radiator; on six-cylinder models,
it’s on top of a translucent plastic expansion
tank. The cap pressure rating is moulded into the
top of the cap. The pressure rating is either
1.0 bar (14 psi) or 1.2 bars (17 psi).