Rear BMW 3 SERIES 1989 E30 Owner's Guide
[x] Cancel search | Manufacturer: BMW, Model Year: 1989, Model line: 3 SERIES, Model: BMW 3 SERIES 1989 E30Pages: 228, PDF Size: 7.04 MB
Page 90 of 228
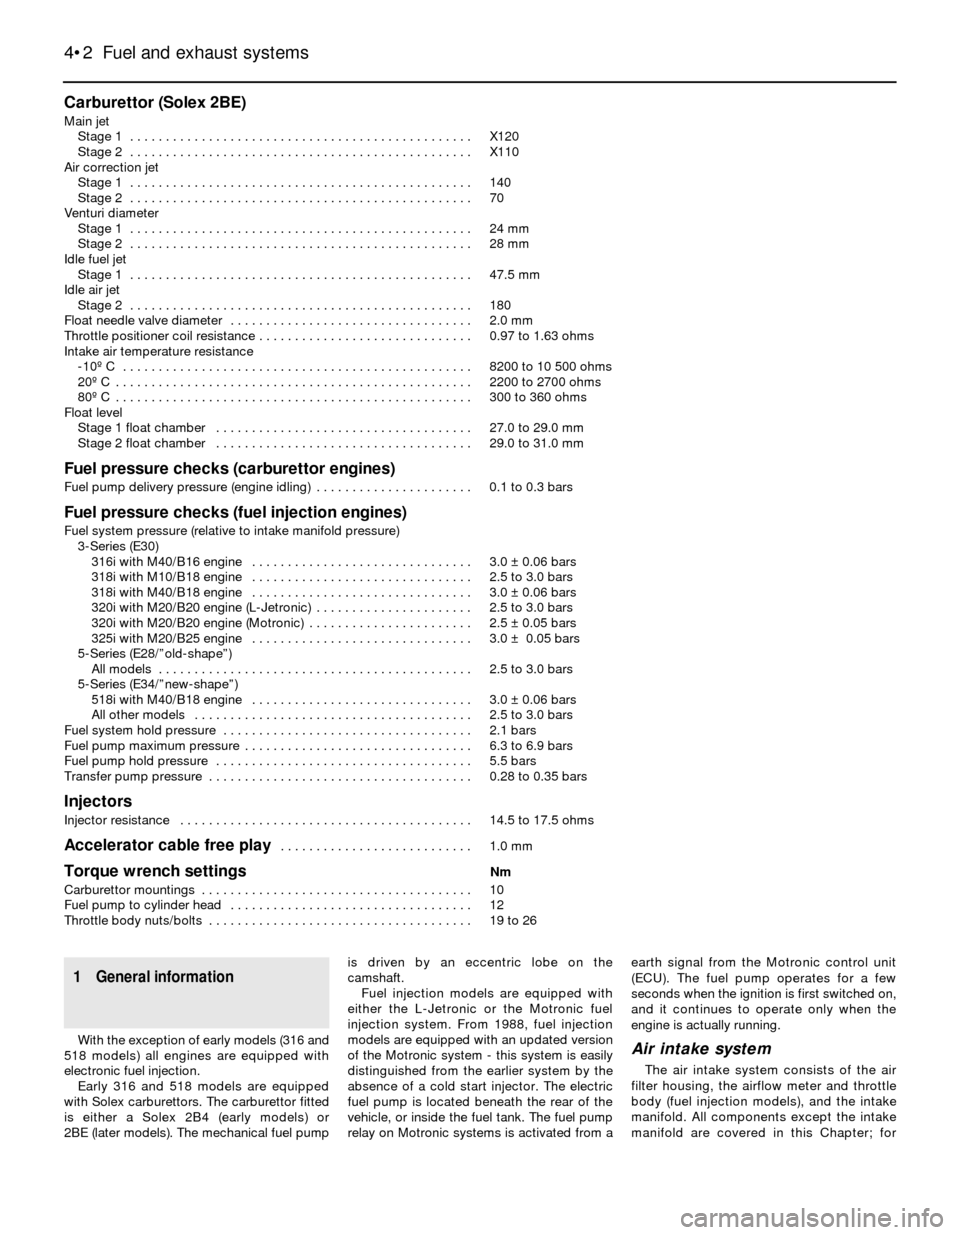
Carburettor (Solex 2BE)
Main jet
Stage 1 . . . . . . . . . . . . . . . . . . . . . . . . . . . . . . . . . . . . . . . . . . . . . . . . X120
Stage 2 . . . . . . . . . . . . . . . . . . . . . . . . . . . . . . . . . . . . . . . . . . . . . . . . X110
Air correction jet
Stage 1 . . . . . . . . . . . . . . . . . . . . . . . . . . . . . . . . . . . . . . . . . . . . . . . . 140
Stage 2 . . . . . . . . . . . . . . . . . . . . . . . . . . . . . . . . . . . . . . . . . . . . . . . . 70
Venturi diameter
Stage 1 . . . . . . . . . . . . . . . . . . . . . . . . . . . . . . . . . . . . . . . . . . . . . . . . 24 mm
Stage 2 . . . . . . . . . . . . . . . . . . . . . . . . . . . . . . . . . . . . . . . . . . . . . . . . 28 mm
Idle fuel jet
Stage 1 . . . . . . . . . . . . . . . . . . . . . . . . . . . . . . . . . . . . . . . . . . . . . . . . 47.5 mm
Idle air jet
Stage 2 . . . . . . . . . . . . . . . . . . . . . . . . . . . . . . . . . . . . . . . . . . . . . . . . 180
Float needle valve diameter . . . . . . . . . . . . . . . . . . . . . . . . . . . . . . . . . . 2.0 mm
Throttle positioner coil resistance . . . . . . . . . . . . . . . . . . . . . . . . . . . . . . 0.97 to 1.63 ohms
Intake air temperature resistance
-10º C . . . . . . . . . . . . . . . . . . . . . . . . . . . . . . . . . . . . . . . . . . . . . . . . . 8200 to 10 500 ohms
20º C . . . . . . . . . . . . . . . . . . . . . . . . . . . . . . . . . . . . . . . . . . . . . . . . . . 2200 to 2700 ohms
80º C . . . . . . . . . . . . . . . . . . . . . . . . . . . . . . . . . . . . . . . . . . . . . . . . . . 300 to 360 ohms
Float level
Stage 1 float chamber . . . . . . . . . . . . . . . . . . . . . . . . . . . . . . . . . . . . 27.0 to 29.0 mm
Stage 2 float chamber . . . . . . . . . . . . . . . . . . . . . . . . . . . . . . . . . . . . 29.0 to 31.0 mm
Fuel pressure checks (carburettor engines)
Fuel pump delivery pressure (engine idling) . . . . . . . . . . . . . . . . . . . . . . 0.1 to 0.3 bars
Fuel pressure checks (fuel injection engines)
Fuel system pressure (relative to intake manifold pressure)
3-Series (E30)
316i with M40/B16 engine . . . . . . . . . . . . . . . . . . . . . . . . . . . . . . . 3.0 ± 0.06 bars
318i with M10/B18 engine . . . . . . . . . . . . . . . . . . . . . . . . . . . . . . . 2.5 to 3.0 bars
318i with M40/B18 engine . . . . . . . . . . . . . . . . . . . . . . . . . . . . . . . 3.0 ± 0.06 bars
320i with M20/B20 engine (L-Jetronic) . . . . . . . . . . . . . . . . . . . . . . 2.5 to 3.0 bars
320i with M20/B20 engine (Motronic) . . . . . . . . . . . . . . . . . . . . . . . 2.5 ± 0.05 bars
325i with M20/B25 engine . . . . . . . . . . . . . . . . . . . . . . . . . . . . . . . 3.0 ± 0.05 bars
5-Series (E28/”old-shape”)
All models . . . . . . . . . . . . . . . . . . . . . . . . . . . . . . . . . . . . . . . . . . . . 2.5 to 3.0 bars
5-Series (E34/”new-shape”)
518i with M40/B18 engine . . . . . . . . . . . . . . . . . . . . . . . . . . . . . . . 3.0 ± 0.06 bars
All other models . . . . . . . . . . . . . . . . . . . . . . . . . . . . . . . . . . . . . . . 2.5 to 3.0 bars
Fuel system hold pressure . . . . . . . . . . . . . . . . . . . . . . . . . . . . . . . . . . . 2.1 bars
Fuel pump maximum pressure . . . . . . . . . . . . . . . . . . . . . . . . . . . . . . . . 6.3 to 6.9 bars
Fuel pump hold pressure . . . . . . . . . . . . . . . . . . . . . . . . . . . . . . . . . . . . 5.5 bars
Transfer pump pressure . . . . . . . . . . . . . . . . . . . . . . . . . . . . . . . . . . . . . 0.28 to 0.35 bars
Injectors
Injector resistance . . . . . . . . . . . . . . . . . . . . . . . . . . . . . . . . . . . . . . . . . 14.5 to 17.5 ohms
Accelerator cable free play . . . . . . . . . . . . . . . . . . . . . . . . . . . 1.0 mm
Torque wrench settingsNm
Carburettor mountings . . . . . . . . . . . . . . . . . . . . . . . . . . . . . . . . . . . . . . 10
Fuel pump to cylinder head . . . . . . . . . . . . . . . . . . . . . . . . . . . . . . . . . . 12
Throttle body nuts/bolts . . . . . . . . . . . . . . . . . . . . . . . . . . . . . . . . . . . . . 19 to 26
4•2 Fuel and exhaust systems
1 General information
With the exception of early models (316 and
518 models) all engines are equipped with
electronic fuel injection.
Early 316 and 518 models are equipped
with Solex carburettors. The carburettor fitted
is either a Solex 2B4 (early models) or
2BE (later models). The mechanical fuel pumpis driven by an eccentric lobe on the
camshaft.
Fuel injection models are equipped with
either the L-Jetronic or the Motronic fuel
injection system. From 1988, fuel injection
models are equipped with an updated version
of the Motronic system - this system is easily
distinguished from the earlier system by the
absence of a cold start injector. The electric
fuel pump is located beneath the rear of the
vehicle, or inside the fuel tank. The fuel pump
relay on Motronic systems is activated from aearth signal from the Motronic control unit
(ECU). The fuel pump operates for a few
seconds when the ignition is first switched on,
and it continues to operate only when the
engine is actually running.Air intake system
The air intake system consists of the air
filter housing, the airflow meter and throttle
body (fuel injection models), and the intake
manifold. All components except the intake
manifold are covered in this Chapter; for
Page 93 of 228
19Depressurise the fuel system (see Sec-
tion 2).
20Detach the battery negative cable.
Caution: If the radio in your
vehicle is equipped with an anti-
theft system, make sure you
have the correct activation code
before disconnecting the battery. Refer to
the information on page 0-7 at the front of
this manual before detaching the cable.
Note: If, after connecting the battery, the
wrong language appears on the instrument
panel display, refer to page 0-7 for the
language resetting procedure.
21Detach the fuel feed hose from the fuel
rail, and attach a fuel pressure gauge directly
to the hose. Note:If the tee fitting is still
connected to the gauge, be sure to plug the
open end.
22Reconnect the battery.
23Using a jumper wire, bridge the terminals
of the fuel pump relay.
24Turn the ignition switch on to operate the
fuel pump.
25Note the pressure reading on the gauge,
and compare the reading to the fuel pump
pressure listed in this Chapter’s Specifica-
tions.
26If the indicated pressure is less than
specified, inspect the fuel line for leaks
between the pump and gauge. If no leaks are
found, renew the fuel pump.
27Turn the ignition off and wait five minutes.
Note the reading on the gauge, and compare
it to the fuel pump hold pressure listed in this
Chapter’s Specifications. If the hold pressure
is less than specified, check the fuel lines
between the pump and gauge for leaks. If no
leaks are found, renew the fuel pump.
28Remove the jumper wire. Relieve the fuel
pressure by opening the bleed valve on the
gauge and directing the fuel into a suitable
container. Remove the gauge and reconnect
the fuel line.
Transfer pump pressure check
29Depressurise the fuel system (see Sec-
tion 2).
30Detach the battery negative cable.
Caution: If the radio in your
vehicle is equipped with an anti-
theft system, make sure you
have the correct activation code
before disconnecting the battery. Refer to
the information on page 0-7 at the front of
this manual before detaching the cable.
Note: If, after connecting the battery, the
wrong language appears on the instrument
panel display, refer to page 0-7 for the
language resetting procedure.
31Remove the transfer pump access plate
(on some models, it’s located under the rear
seat cushion - on others, it’s located under
the carpet in the luggage compartment).
Disconnect the output hose from the transfer
pump, and connect a fuel pressure gauge to
the outlet pipe.
32Reconnect the battery.33Using a jumper wire, bridge the terminals
of the fuel pump relay.
34Turn the ignition switch on to operate the
fuel pump.
35Note the pressure reading on the gauge,
and compare to the value listed in this
Chapter’s Specifications.
36If the indicated pressure is less than
specified, renew the transfer pump.
Fuel pump relay check
37Switch on the ignition.
38Using a voltmeter, probe the following
terminals from the back of the relay electrical
connector. Check for battery voltage at
terminal 30 (M20 and M30 engines) or
terminal 15 (M10 and M40 engines). Note:If
there is no voltage on models with luggage
compartment-mounted batteries, check for a
faulty fusible link. The 50-amp link is about
6 inches from the battery, in a black wire.
39Turn the ignition off, and disconnect the
relay from the electrical connector. Using a
voltmeter, probe the connector terminals that
correspond to fuel pump relay pins 85 (-) and
86(+) on M20 and M30 engines, or terminal 50
and earth on M10 and M40 engines. Have an
assistant turn the engine over on the starter,
and observe the voltage reading. Battery
voltage should be indicated.
40If there is no voltage, check the fuse(s)
and the wiring circuit for the fuel pump relay. If
the voltage readings are correct, and the fuel
pump only runs with the jumper wire in place,
then renew the relay.
41If the fuel pump still does not run, check
for the proper voltage at the fuel pump
terminals (see Section 4). If necessary, renew
the fuel pump.
4 Fuel pump, transfer pump
and fuel level sender unit-
removal and refitting
2
Warning: Fuel is extremely
flammable, so take extra
precautions when you work on
any part of the fuel system. Don’t
smoke, or allow open flames or bare light
bulbs, near the work area. Also, don’t work
in a garage where a natural gas-type
appliance with a pilot light is present.
Fuel pump (carburettor engines)
1Disconnect the battery negative cable.
Disconnect both hoses from the pump, and
unscrew and remove the two securing nuts
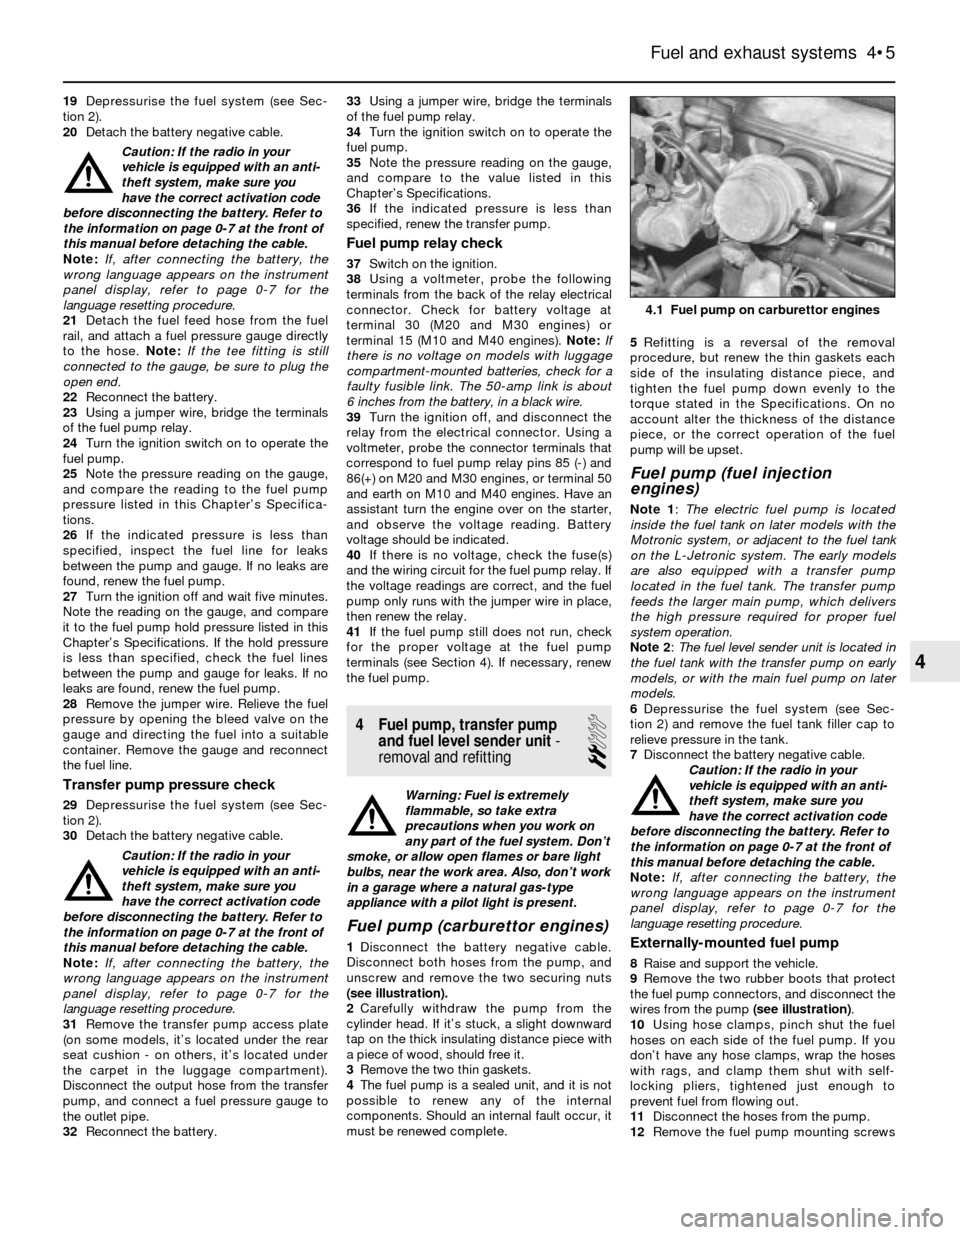
(see illustration).
2Carefully withdraw the pump from the
cylinder head. If it’s stuck, a slight downward
tap on the thick insulating distance piece with
a piece of wood, should free it.
3Remove the two thin gaskets.
4The fuel pump is a sealed unit, and it is not
possible to renew any of the internal
components. Should an internal fault occur, it
must be renewed complete.5Refitting is a reversal of the removal
procedure, but renew the thin gaskets each
side of the insulating distance piece, and
tighten the fuel pump down evenly to the
torque stated in the Specifications. On no
account alter the thickness of the distance
piece, or the correct operation of the fuel
pump will be upset.
Fuel pump (fuel injection
engines)
Note 1: The electric fuel pump is located
inside the fuel tank on later models with the
Motronic system, or adjacent to the fuel tank
on the L-Jetronic system. The early models
are also equipped with a transfer pump
located in the fuel tank. The transfer pump
feeds the larger main pump, which delivers
the high pressure required for proper fuel
system operation.
Note 2: The fuel level sender unit is located in
the fuel tank with the transfer pump on early
models, or with the main fuel pump on later
models.
6Depressurise the fuel system (see Sec-
tion 2) and remove the fuel tank filler cap to
relieve pressure in the tank.
7Disconnect the battery negative cable.
Caution: If the radio in your
vehicle is equipped with an anti-
theft system, make sure you
have the correct activation code
before disconnecting the battery. Refer to
the information on page 0-7 at the front of
this manual before detaching the cable.
Note: If, after connecting the battery, the
wrong language appears on the instrument
panel display, refer to page 0-7 for the
language resetting procedure.
Externally-mounted fuel pump
8Raise and support the vehicle.
9Remove the two rubber boots that protect
the fuel pump connectors, and disconnect the
wires from the pump (see illustration).
10Using hose clamps, pinch shut the fuel
hoses on each side of the fuel pump. If you
don’t have any hose clamps, wrap the hoses
with rags, and clamp them shut with self-
locking pliers, tightened just enough to
prevent fuel from flowing out.
11Disconnect the hoses from the pump.
12Remove the fuel pump mounting screws
Fuel and exhaust systems 4•5
4.1 Fuel pump on carburettor engines
4
Page 94 of 228
and clamps, and remove the fuel pump from
the under the vehicle.
13Refitting is the reverse of removal.
In-tank fuel pump or transfer pump
14On some models, access to the fuel pump
is gained by removing the rear seat cushion.
On other models, access is gained by
removing the carpet from the luggage
compartment.
15Remove the screws from the fuel pump
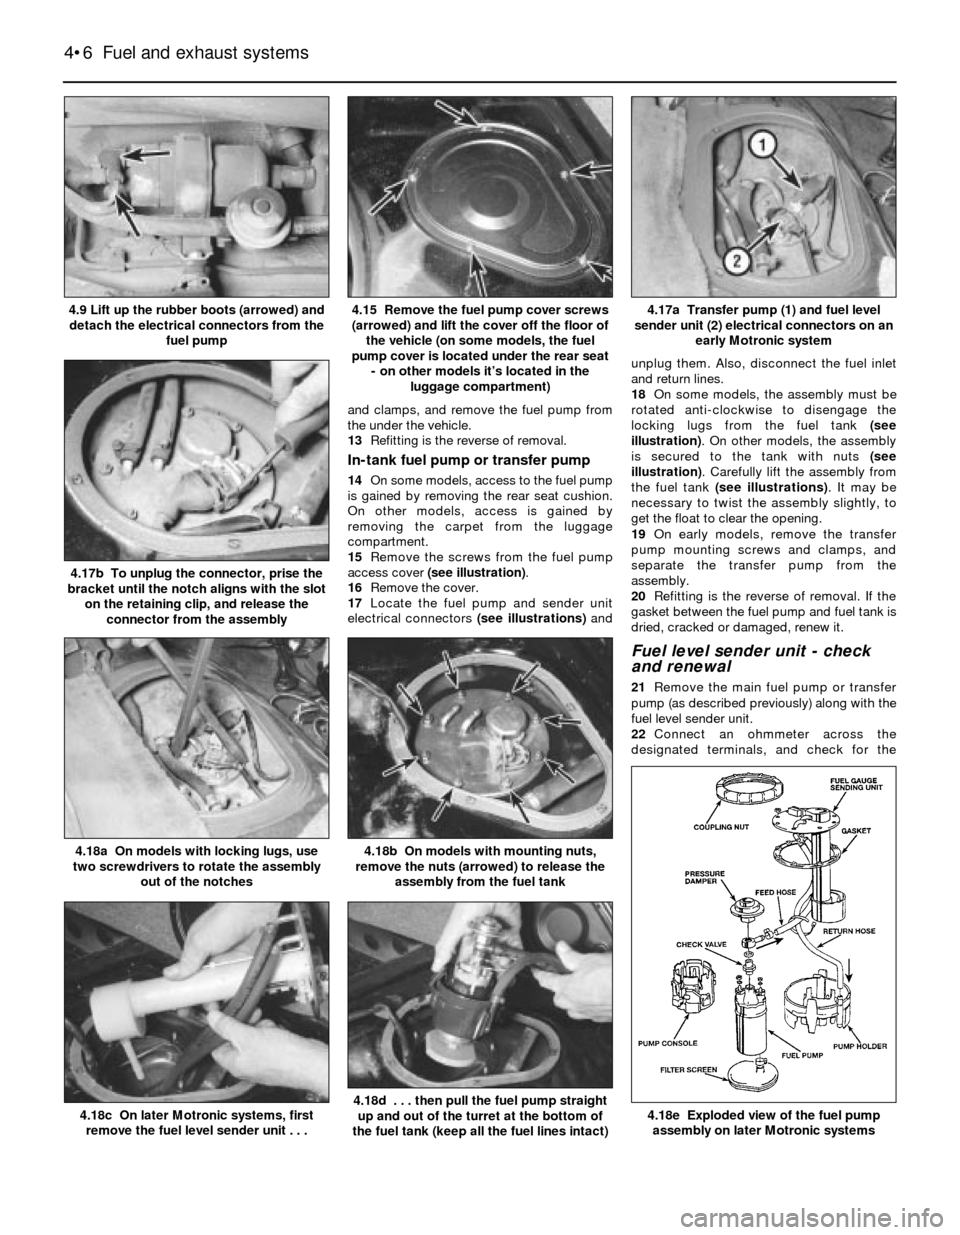
access cover (see illustration).
16Remove the cover.
17Locate the fuel pump and sender unit
electrical connectors (see illustrations)andunplug them. Also, disconnect the fuel inlet
and return lines.
18On some models, the assembly must be
rotated anti-clockwise to disengage the
locking lugs from the fuel tank (see
illustration). On other models, the assembly
is secured to the tank with nuts (see
illustration). Carefully lift the assembly from
the fuel tank (see illustrations). It may be
necessary to twist the assembly slightly, to
get the float to clear the opening.
19On early models, remove the transfer
pump mounting screws and clamps, and
separate the transfer pump from the
assembly.
20Refitting is the reverse of removal. If the
gasket between the fuel pump and fuel tank is
dried, cracked or damaged, renew it.
Fuel level sender unit - check
and renewal
21Remove the main fuel pump or transfer
pump (as described previously) along with the
fuel level sender unit.
22Connect an ohmmeter across the
designated terminals, and check for the
4•6 Fuel and exhaust systems
4.18e Exploded view of the fuel pump
assembly on later Motronic systems4.18d . . . then pull the fuel pump straight
up and out of the turret at the bottom of
the fuel tank (keep all the fuel lines intact)4.18c On later Motronic systems, first
remove the fuel level sender unit . . .
4.18b On models with mounting nuts,
remove the nuts (arrowed) to release the
assembly from the fuel tank4.18a On models with locking lugs, use
two screwdrivers to rotate the assembly
out of the notches
4.17b To unplug the connector, prise the
bracket until the notch aligns with the slot
on the retaining clip, and release the
connector from the assembly
4.17a Transfer pump (1) and fuel level
sender unit (2) electrical connectors on an
early Motronic system4.15 Remove the fuel pump cover screws
(arrowed) and lift the cover off the floor of
the vehicle (on some models, the fuel
pump cover is located under the rear seat
- on other models it’s located in the
luggage compartment)4.9 Lift up the rubber boots (arrowed) and
detach the electrical connectors from the
fuel pump
Page 95 of 228
correct resistance. On L-Jetronic and early
Motronic systems, follow the table below. On
later Motronic systems, connect the
ohmmeter probes onto the fuel level sender
unit terminals that correspond to pins 1 and 3
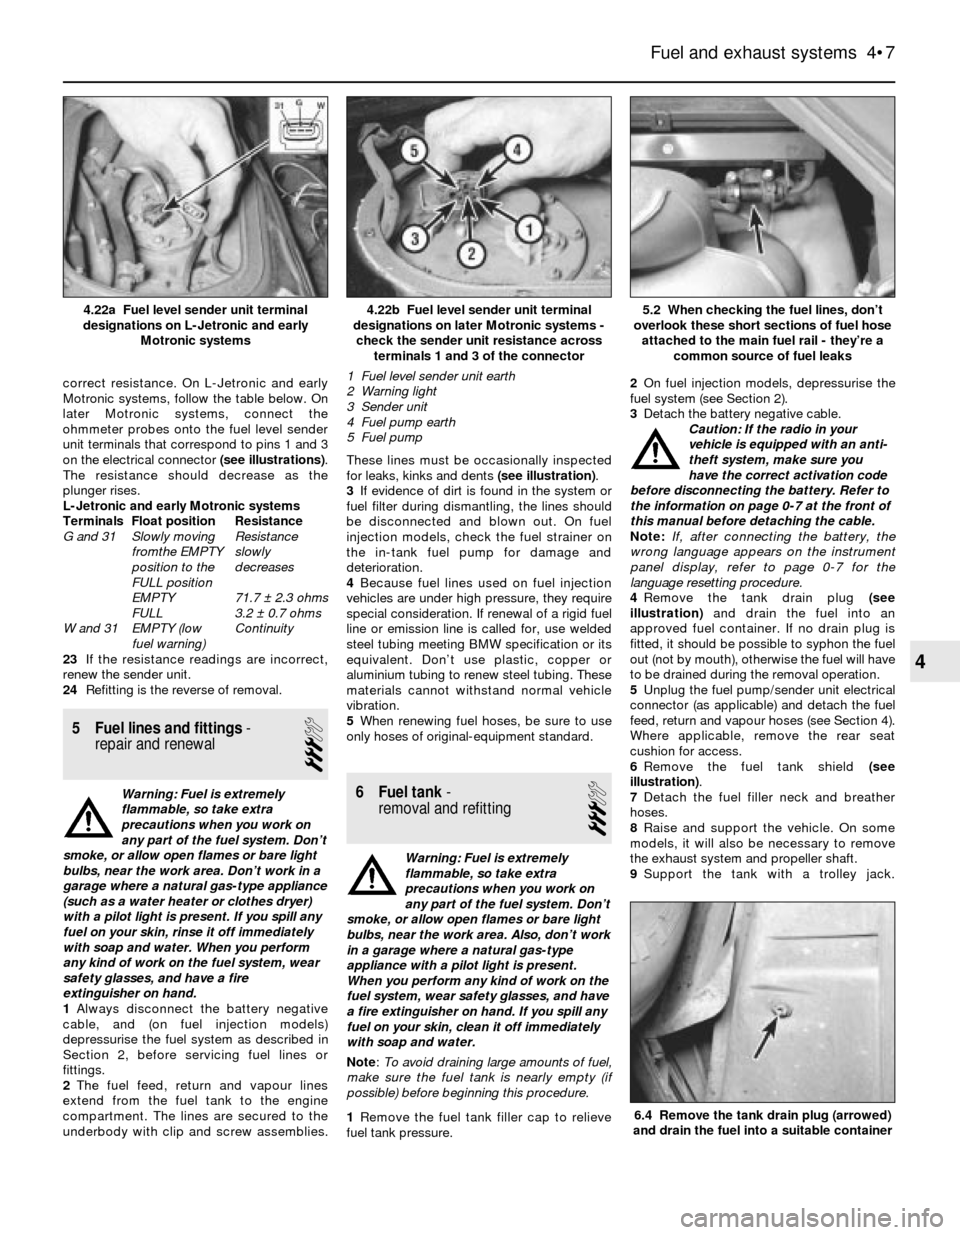
on the electrical connector (see illustrations).
The resistance should decrease as the
plunger rises.
L-Jetronic and early Motronic systems
Terminals Float position Resistance
G and 31 Slowly moving Resistance
fromthe EMPTY slowly
position to the decreases
FULL position
EMPTY 71.7 ± 2.3 ohms
FULL 3.2 ± 0.7 ohms
W and 31 EMPTY (low Continuity
fuel warning)
23If the resistance readings are incorrect,
renew the sender unit.
24Refitting is the reverse of removal.
5 Fuel lines and fittings-
repair and renewal
3
Warning: Fuel is extremely
flammable, so take extra
precautions when you work on
any part of the fuel system. Don’t
smoke, or allow open flames or bare light
bulbs, near the work area. Don’t work in a
garage where a natural gas-type appliance
(such as a water heater or clothes dryer)
with a pilot light is present. If you spill any
fuel on your skin, rinse it off immediately
with soap and water. When you perform
any kind of work on the fuel system, wear
safety glasses, and have a fire
extinguisher on hand.
1Always disconnect the battery negative
cable, and (on fuel injection models)
depressurise the fuel system as described in
Section 2, before servicing fuel lines or
fittings.
2The fuel feed, return and vapour lines
extend from the fuel tank to the engine
compartment. The lines are secured to the
underbody with clip and screw assemblies.These lines must be occasionally inspected
for leaks, kinks and dents (see illustration).
3If evidence of dirt is found in the system or
fuel filter during dismantling, the lines should
be disconnected and blown out. On fuel
injection models, check the fuel strainer on
the in-tank fuel pump for damage and
deterioration.
4Because fuel lines used on fuel injection
vehicles are under high pressure, they require
special consideration. If renewal of a rigid fuel
line or emission line is called for, use welded
steel tubing meeting BMW specification or its
equivalent. Don’t use plastic, copper or
aluminium tubing to renew steel tubing. These
materials cannot withstand normal vehicle
vibration.
5When renewing fuel hoses, be sure to use
only hoses of original-equipment standard.6 Fuel tank-
removal and refitting
3
Warning: Fuel is extremely
flammable, so take extra
precautions when you work on
any part of the fuel system. Don’t
smoke, or allow open flames or bare light
bulbs, near the work area. Also, don’t work
in a garage where a natural gas-type
appliance with a pilot light is present.
When you perform any kind of work on the
fuel system, wear safety glasses, and have
a fire extinguisher on hand. If you spill any
fuel on your skin, clean it off immediately
with soap and water.
Note: To avoid draining large amounts of fuel,
make sure the fuel tank is nearly empty (if
possible) before beginning this procedure.
1Remove the fuel tank filler cap to relieve
fuel tank pressure.2On fuel injection models, depressurise the
fuel system (see Section 2).
3Detach the battery negative cable.
Caution: If the radio in your
vehicle is equipped with an anti-
theft system, make sure you
have the correct activation code
before disconnecting the battery. Refer to
the information on page 0-7 at the front of
this manual before detaching the cable.
Note: If, after connecting the battery, the
wrong language appears on the instrument
panel display, refer to page 0-7 for the
language resetting procedure.
4Remove the tank drain plug (see
illustration)and drain the fuel into an
approved fuel container. If no drain plug is
fitted, it should be possible to syphon the fuel
out (not by mouth), otherwise the fuel will have
to be drained during the removal operation.
5Unplug the fuel pump/sender unit electrical
connector (as applicable) and detach the fuel
feed, return and vapour hoses (see Section 4).
Where applicable, remove the rear seat
cushion for access.
6Remove the fuel tank shield (see
illustration).
7Detach the fuel filler neck and breather
hoses.
8Raise and support the vehicle. On some
models, it will also be necessary to remove
the exhaust system and propeller shaft.
9Support the tank with a trolley jack.
Fuel and exhaust systems 4•7
4.22b Fuel level sender unit terminal
designations on later Motronic systems -
check the sender unit resistance across
terminals 1 and 3 of the connector
1 Fuel level sender unit earth
2 Warning light
3 Sender unit
4 Fuel pump earth
5 Fuel pump4.22a Fuel level sender unit terminal
designations on L-Jetronic and early
Motronic systems
6.4 Remove the tank drain plug (arrowed)
and drain the fuel into a suitable container
5.2 When checking the fuel lines, don’t
overlook these short sections of fuel hose
attached to the main fuel rail - they’re a
common source of fuel leaks
4
Page 98 of 228
Caution: If the radio in your
vehicle is equipped with an anti-
theft system, make sure you
have the correct activation code before
disconnecting the battery. Refer to the
information on page 0-7 at the front of this
manual before detaching the cable.
Note: If, after connecting the battery, the
wrong language appears on the instrument
panel display, refer to page 0-7 for the
language resetting procedure.
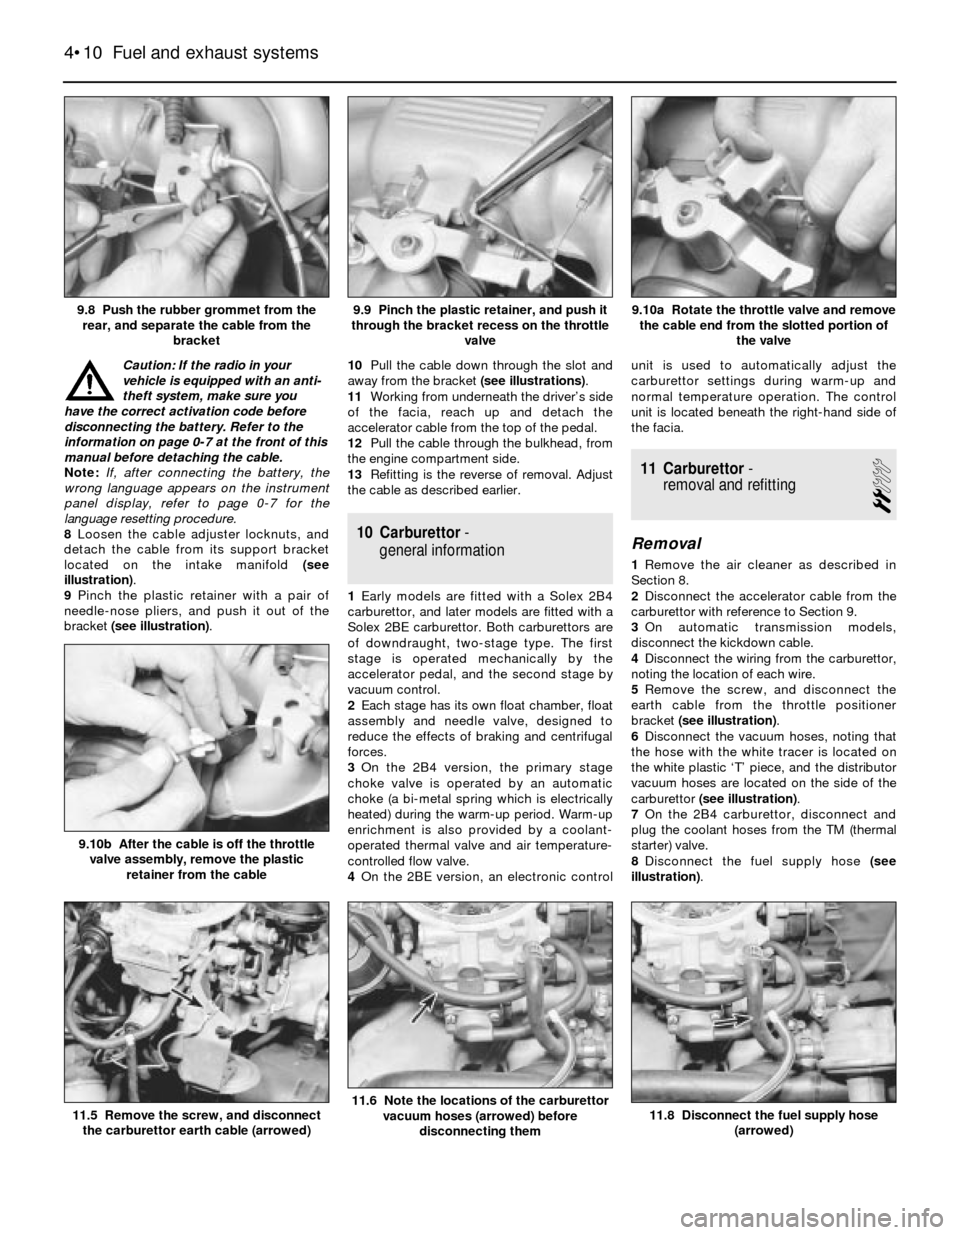
8Loosen the cable adjuster locknuts, and
detach the cable from its support bracket
located on the intake manifold (see
illustration).
9Pinch the plastic retainer with a pair of
needle-nose pliers, and push it out of the
bracket (see illustration).10Pull the cable down through the slot and
away from the bracket (see illustrations).
11Working from underneath the driver’s side
of the facia, reach up and detach the
accelerator cable from the top of the pedal.
12Pull the cable through the bulkhead, from
the engine compartment side.
13Refitting is the reverse of removal. Adjust
the cable as described earlier.
10 Carburettor-
general information
1Early models are fitted with a Solex 2B4
carburettor, and later models are fitted with a
Solex 2BE carburettor. Both carburettors are
of downdraught, two-stage type. The first
stage is operated mechanically by the
accelerator pedal, and the second stage by
vacuum control.
2Each stage has its own float chamber, float
assembly and needle valve, designed to
reduce the effects of braking and centrifugal
forces.
3On the 2B4 version, the primary stage
choke valve is operated by an automatic
choke (a bi-metal spring which is electrically
heated) during the warm-up period. Warm-up
enrichment is also provided by a coolant-
operated thermal valve and air temperature-
controlled flow valve.
4On the 2BE version, an electronic controlunit is used to automatically adjust the
carburettor settings during warm-up and
normal temperature operation. The control
unit is located beneath the right-hand side of
the facia.
11 Carburettor-
removal and refitting
2
Removal
1Remove the air cleaner as described in
Section 8.
2Disconnect the accelerator cable from the
carburettor with reference to Section 9.
3On automatic transmission models,
disconnect the kickdown cable.
4Disconnect the wiring from the carburettor,
noting the location of each wire.
5Remove the screw, and disconnect the
earth cable from the throttle positioner
bracket (see illustration).
6Disconnect the vacuum hoses, noting that
the hose with the white tracer is located on
the white plastic ‘T’ piece, and the distributor
vacuum hoses are located on the side of the
carburettor (see illustration).
7On the 2B4 carburettor, disconnect and
plug the coolant hoses from the TM (thermal
starter) valve.
8Disconnect the fuel supply hose (see
illustration).
4•10 Fuel and exhaust systems
11.8 Disconnect the fuel supply hose
(arrowed)11.6 Note the locations of the carburettor
vacuum hoses (arrowed) before
disconnecting them11.5 Remove the screw, and disconnect
the carburettor earth cable (arrowed)
9.10b After the cable is off the throttle
valve assembly, remove the plastic
retainer from the cable
9.10a Rotate the throttle valve and remove
the cable end from the slotted portion of
the valve9.9 Pinch the plastic retainer, and push it
through the bracket recess on the throttle
valve9.8 Push the rubber grommet from the
rear, and separate the cable from the
bracket
Page 112 of 228
1 General information
The engine electrical systems include all
ignition, charging and starting components.
Because of their engine-related functions,
these components are discussed separately
from body-related electrical devices such as
the lights, the instruments, etc. (which are
included in Chapter 12).
Always observe the following precautions
when working on the electrical systems:
a) Be extremely careful when servicing
engine electrical components. They are
easily damaged if improperly checked,
connected or handled.
b) Never leave the ignition switched on for
long periods of time with the engine off.
c) Don’t disconnect the battery cables while
the engine is running.
d) Observe the rules when jump-starting
your vehicle. Read the precautions at the
front of this manual.
e) Always disconnect the battery negative
cable first, and connect it last, to reduce
the risk of accidental short-circuits.
f) Don’t charge the battery with the cables
connected to the terminals.
It’s also a good idea to review the safety-
related information regarding the engine
electrical systems in the “Safety first”section
near the front of this manual before beginning
any operation included in this Chapter.
Caution: If the radio in your
vehicle is equipped with an anti-
theft system, make sure you
have the correct activation code
before disconnecting the battery. Refer to
the information on page 0-7 at the front of
this manual before detaching the cable.
Note: If, after connecting the battery, the
wrong language appears on the instrument
panel display, refer to page 0-7 for the
language resetting procedure.
2 Battery-
emergency jump starting
1
Refer to the “Jump starting”procedure at
the front of this manual.
3 Battery- removal and refitting
1
Note:Depending on the model, the battery
may be located in the engine compartment, in
the rear luggage compartment, or under the
rear seat. Consult your owners handbook for
the location of the battery, if not already
known to you.Caution: If the radio in your
vehicle is equipped with an anti-
theft system, make sure you
have the correct activation code
before disconnecting the battery. Refer to
the information on page 0-7 at the front of
this manual before detaching the cable.
Note: If, after connecting the battery, the
wrong language appears on the instrument
panel display, refer to page 0-7 for the
language resetting procedure.
1Disconnect the battery negative cable.
2Detach the cable from the positive terminal.
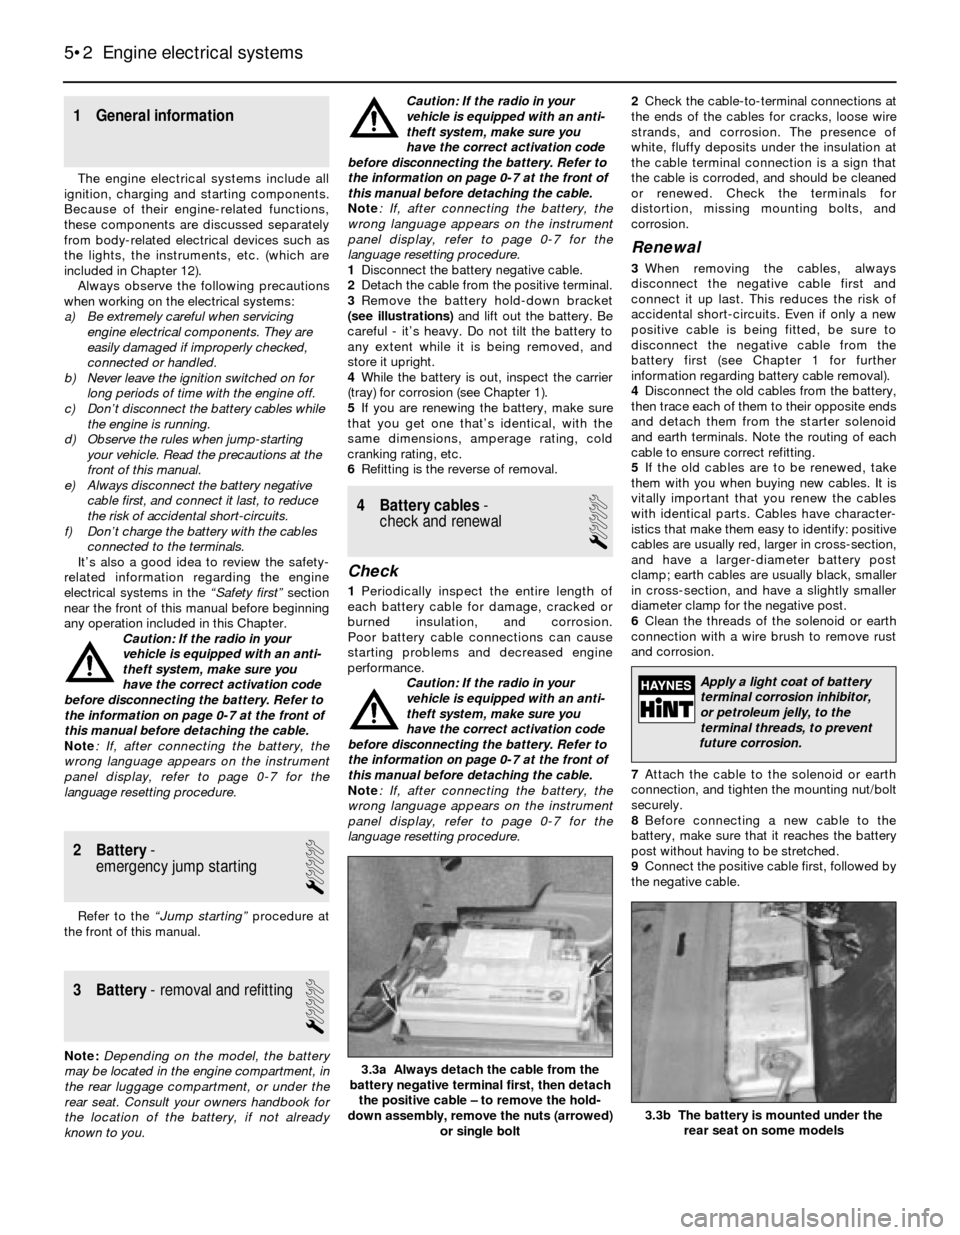
3Remove the battery hold-down bracket
(see illustrations)and lift out the battery. Be
careful - it’s heavy. Do not tilt the battery to
any extent while it is being removed, and
store it upright.
4While the battery is out, inspect the carrier
(tray) for corrosion (see Chapter 1).
5If you are renewing the battery, make sure
that you get one that’s identical, with the
same dimensions, amperage rating, cold
cranking rating, etc.
6Refitting is the reverse of removal.
4 Battery cables-
check and renewal
1
Check
1Periodically inspect the entire length of
each battery cable for damage, cracked or
burned insulation, and corrosion.
Poor battery cable connections can cause
starting problems and decreased engine
performance.
Caution: If the radio in your
vehicle is equipped with an anti-
theft system, make sure you
have the correct activation code
before disconnecting the battery. Refer to
the information on page 0-7 at the front of
this manual before detaching the cable.
Note: If, after connecting the battery, the
wrong language appears on the instrument
panel display, refer to page 0-7 for the
language resetting procedure.2Check the cable-to-terminal connections at
the ends of the cables for cracks, loose wire
strands, and corrosion. The presence of
white, fluffy deposits under the insulation at
the cable terminal connection is a sign that
the cable is corroded, and should be cleaned
or renewed. Check the terminals for
distortion, missing mounting bolts, and
corrosion.
Renewal
3When removing the cables, always
disconnect the negative cable first and
connect it up last. This reduces the risk of
accidental short-circuits. Even if only a new
positive cable is being fitted, be sure to
disconnect the negative cable from the
battery first (see Chapter 1 for further
information regarding battery cable removal).
4Disconnect the old cables from the battery,
then trace each of them to their opposite ends
and detach them from the starter solenoid
and earth terminals. Note the routing of each
cable to ensure correct refitting.
5If the old cables are to be renewed, take
them with you when buying new cables. It is
vitally important that you renew the cables
with identical parts. Cables have character-
istics that make them easy to identify: positive
cables are usually red, larger in cross-section,
and have a larger-diameter battery post
clamp; earth cables are usually black, smaller
in cross-section, and have a slightly smaller
diameter clamp for the negative post.
6Clean the threads of the solenoid or earth
connection with a wire brush to remove rust
and corrosion.
7Attach the cable to the solenoid or earth
connection, and tighten the mounting nut/bolt
securely.
8Before connecting a new cable to the
battery, make sure that it reaches the battery
post without having to be stretched.
9Connect the positive cable first, followed by
the negative cable.
5•2 Engine electrical systems
3.3b The battery is mounted under the
rear seat on some models
3.3a Always detach the cable from the
battery negative terminal first, then detach
the positive cable – to remove the hold-
down assembly, remove the nuts (arrowed)
or single bolt
Apply a light coat of battery
terminal corrosion inhibitor,
or petroleum jelly, to the
terminal threads, to prevent
future corrosion.
Page 119 of 228
Withdraw the sensor from its bracket and
remove it.
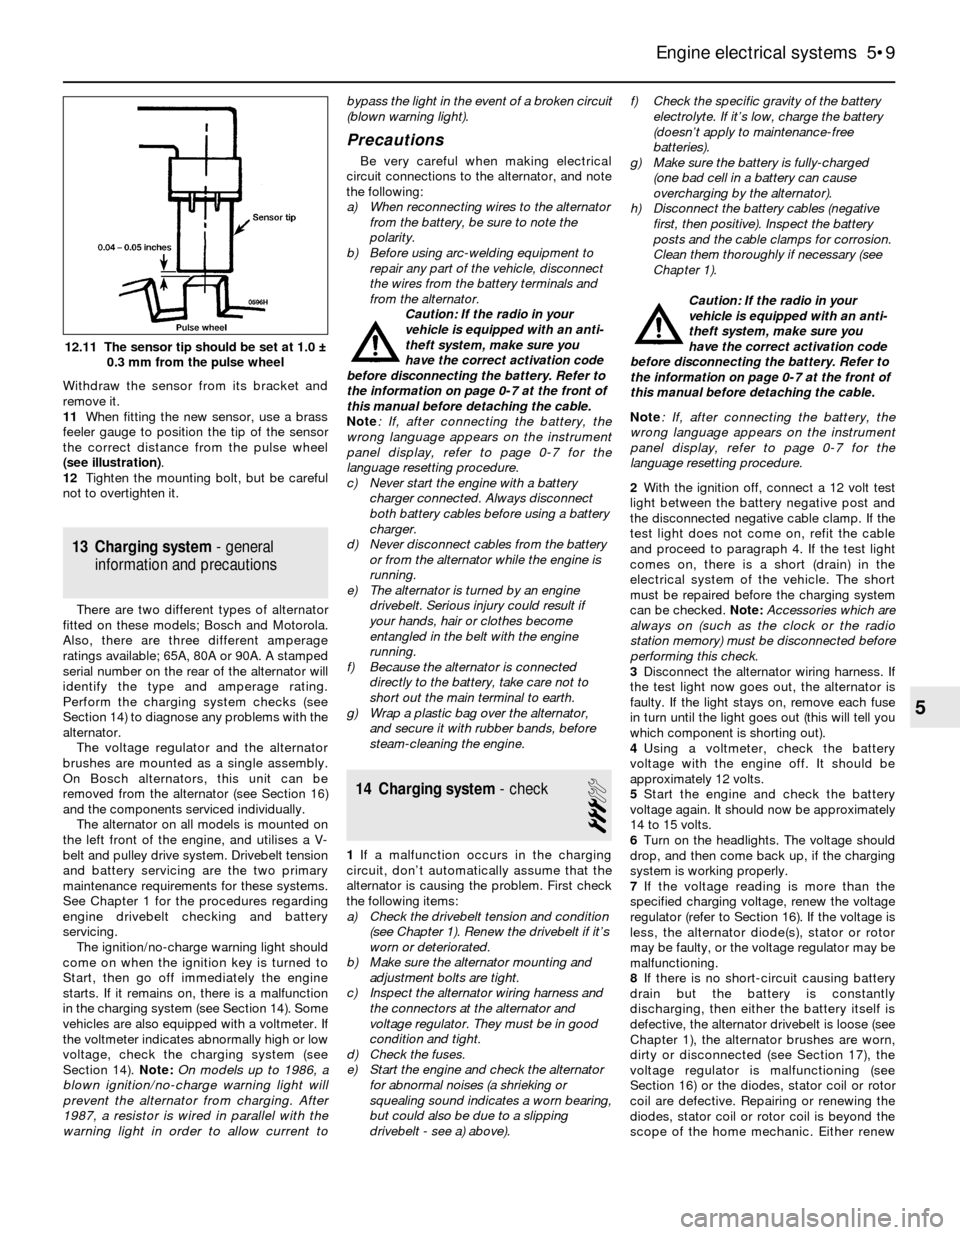
11When fitting the new sensor, use a brass
feeler gauge to position the tip of the sensor
the correct distance from the pulse wheel
(see illustration).
12Tighten the mounting bolt, but be careful
not to overtighten it.
13 Charging system- general
information and precautions
There are two different types of alternator
fitted on these models; Bosch and Motorola.
Also, there are three different amperage
ratings available; 65A, 80A or 90A. A stamped
serial number on the rear of the alternator will
identify the type and amperage rating.
Perform the charging system checks (see
Section 14) to diagnose any problems with the
alternator.
The voltage regulator and the alternator
brushes are mounted as a single assembly.
On Bosch alternators, this unit can be
removed from the alternator (see Section 16)
and the components serviced individually.
The alternator on all models is mounted on
the left front of the engine, and utilises a V-
belt and pulley drive system. Drivebelt tension
and battery servicing are the two primary
maintenance requirements for these systems.
See Chapter 1 for the procedures regarding
engine drivebelt checking and battery
servicing.
The ignition/no-charge warning light should
come on when the ignition key is turned to
Start, then go off immediately the engine
starts. If it remains on, there is a malfunction
in the charging system (see Section 14). Some
vehicles are also equipped with a voltmeter. If
the voltmeter indicates abnormally high or low
voltage, check the charging system (see
Section 14). Note:On models up to 1986, a
blown ignition/no-charge warning light will
prevent the alternator from charging. After
1987, a resistor is wired in parallel with the
warning light in order to allow current tobypass the light in the event of a broken circuit
(blown warning light).
Precautions
Be very careful when making electrical
circuit connections to the alternator, and note
the following:
a) When reconnecting wires to the alternator
from the battery, be sure to note the
polarity.
b) Before using arc-welding equipment to
repair any part of the vehicle, disconnect
the wires from the battery terminals and
from the alternator.
Caution: If the radio in your
vehicle is equipped with an anti-
theft system, make sure you
have the correct activation code
before disconnecting the battery. Refer to
the information on page 0-7 at the front of
this manual before detaching the cable.
Note: If, after connecting the battery, the
wrong language appears on the instrument
panel display, refer to page 0-7 for the
language resetting procedure.
c) Never start the engine with a battery
charger connected. Always disconnect
both battery cables before using a battery
charger.
d) Never disconnect cables from the battery
or from the alternator while the engine is
running.
e) The alternator is turned by an engine
drivebelt. Serious injury could result if
your hands, hair or clothes become
entangled in the belt with the engine
running.
f) Because the alternator is connected
directly to the battery, take care not to
short out the main terminal to earth.
g) Wrap a plastic bag over the alternator,
and secure it with rubber bands, before
steam-cleaning the engine.
14 Charging system- check
3
1If a malfunction occurs in the charging
circuit, don’t automatically assume that the
alternator is causing the problem. First check
the following items:
a) Check the drivebelt tension and condition
(see Chapter 1). Renew the drivebelt if it’s
worn or deteriorated.
b) Make sure the alternator mounting and
adjustment bolts are tight.
c) Inspect the alternator wiring harness and
the connectors at the alternator and
voltage regulator. They must be in good
condition and tight.
d) Check the fuses.
e) Start the engine and check the alternator
for abnormal noises (a shrieking or
squealing sound indicates a worn bearing,
but could also be due to a slipping
drivebelt - see a) above).f) Check the specific gravity of the battery
electrolyte. If it’s low, charge the battery
(doesn’t apply to maintenance-free
batteries).
g) Make sure the battery is fully-charged
(one bad cell in a battery can cause
overcharging by the alternator).
h) Disconnect the battery cables (negative
first, then positive). Inspect the battery
posts and the cable clamps for corrosion.
Clean them thoroughly if necessary (see
Chapter 1).
Caution: If the radio in your
vehicle is equipped with an anti-
theft system, make sure you
have the correct activation code
before disconnecting the battery. Refer to
the information on page 0-7 at the front of
this manual before detaching the cable.
Note: If, after connecting the battery, the
wrong language appears on the instrument
panel display, refer to page 0-7 for the
language resetting procedure.
2With the ignition off, connect a 12 volt test
light between the battery negative post and
the disconnected negative cable clamp. If the
test light does not come on, refit the cable
and proceed to paragraph 4. If the test light
comes on, there is a short (drain) in the
electrical system of the vehicle. The short
must be repaired before the charging system
can be checked. Note: Accessories which are
always on (such as the clock or the radio
station memory) must be disconnected before
performing this check.
3Disconnect the alternator wiring harness. If
the test light now goes out, the alternator is
faulty. If the light stays on, remove each fuse
in turn until the light goes out (this will tell you
which component is shorting out).
4Using a voltmeter, check the battery
voltage with the engine off. It should be
approximately 12 volts.
5Start the engine and check the battery
voltage again. It should now be approximately
14 to 15 volts.
6Turn on the headlights. The voltage should
drop, and then come back up, if the charging
system is working properly.
7If the voltage reading is more than the
specified charging voltage, renew the voltage
regulator (refer to Section 16). If the voltage is
less, the alternator diode(s), stator or rotor
may be faulty, or the voltage regulator may be
malfunctioning.
8If there is no short-circuit causing battery
drain but the battery is constantly
discharging, then either the battery itself is
defective, the alternator drivebelt is loose (see
Chapter 1), the alternator brushes are worn,
dirty or disconnected (see Section 17), the
voltage regulator is malfunctioning (see
Section 16) or the diodes, stator coil or rotor
coil are defective. Repairing or renewing the
diodes, stator coil or rotor coil is beyond the
scope of the home mechanic. Either renew
Engine electrical systems 5•9
12.11 The sensor tip should be set at 1.0 ±
0.3 mm from the pulse wheel
5
Page 120 of 228
the alternator complete, or take it to an
automotive electrician, who may be able to
overhaul it. Note:On models up to 1986, a
blown ignition/no-charge warning light bulb
will prevent the alternator from charging. After
1987, a resistor is wired in parallel with the
warning light, in order to allow current to
bypass the light in the event of a broken circuit
(blown warning light).
15 Alternator-
removal and refitting
1
Caution: If the radio in your
vehicle is equipped with an anti-
theft system, make sure you
have the correct activation code
before disconnecting the battery. Refer to
the information on page 0-7 at the front of
this manual before detaching the cable.
Note: If, after connecting the battery, the
wrong language appears on the instrument
panel display, refer to page 0-7 for the
language resetting procedure.
Removal
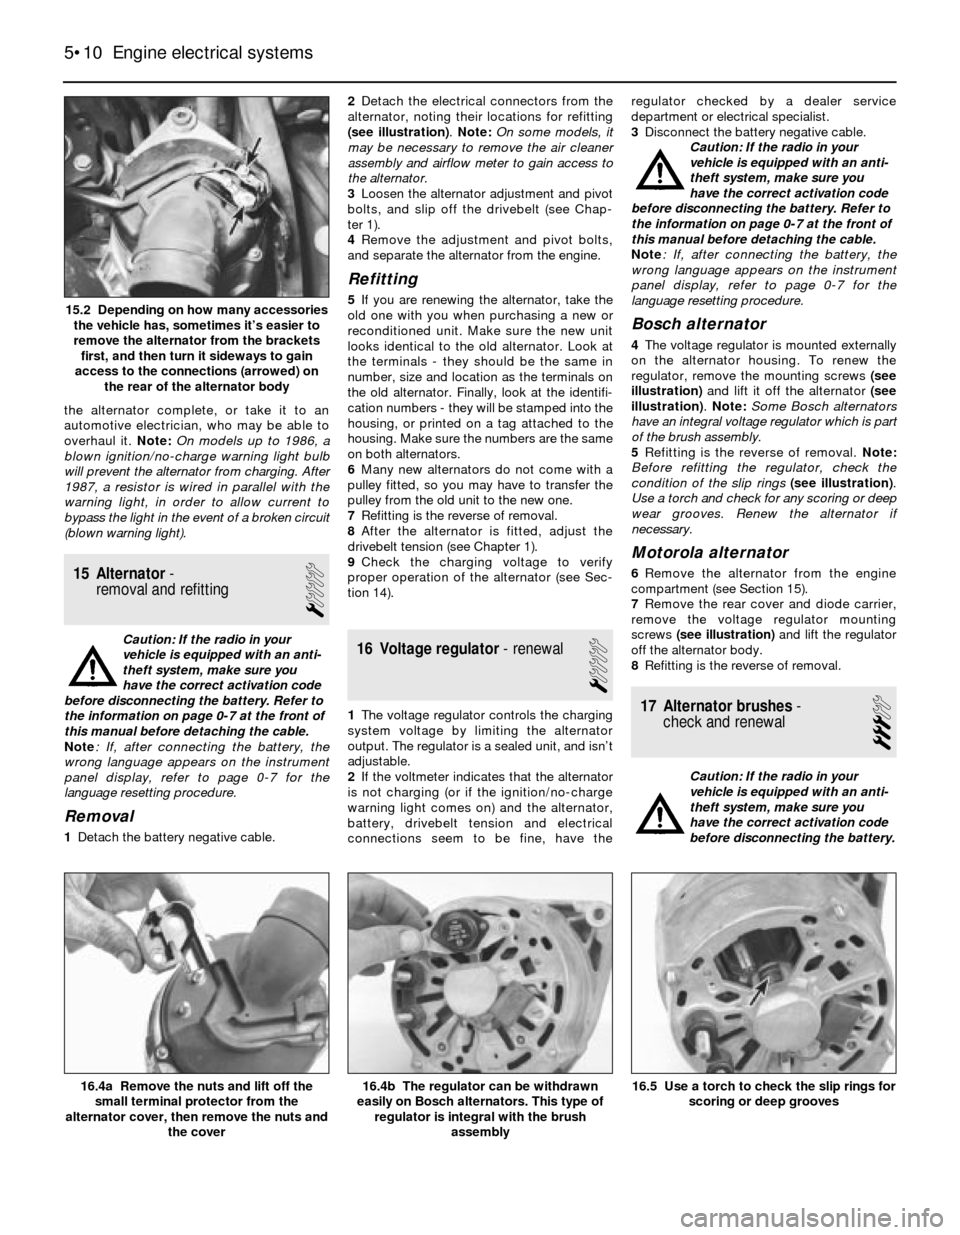
1Detach the battery negative cable.2Detach the electrical connectors from the
alternator, noting their locations for refitting
(see illustration). Note: On some models, it
may be necessary to remove the air cleaner
assembly and airflow meter to gain access to
the alternator.
3Loosen the alternator adjustment and pivot
bolts, and slip off the drivebelt (see Chap-
ter 1).
4Remove the adjustment and pivot bolts,
and separate the alternator from the engine.
Refitting
5If you are renewing the alternator, take the
old one with you when purchasing a new or
reconditioned unit. Make sure the new unit
looks identical to the old alternator. Look at
the terminals - they should be the same in
number, size and location as the terminals on
the old alternator. Finally, look at the identifi-
cation numbers - they will be stamped into the
housing, or printed on a tag attached to the
housing. Make sure the numbers are the same
on both alternators.
6Many new alternators do not come with a
pulley fitted, so you may have to transfer the
pulley from the old unit to the new one.
7Refitting is the reverse of removal.
8After the alternator is fitted, adjust the
drivebelt tension (see Chapter 1).
9Check the charging voltage to verify
proper operation of the alternator (see Sec-
tion 14).
16 Voltage regulator- renewal
1
1The voltage regulator controls the charging
system voltage by limiting the alternator
output. The regulator is a sealed unit, and isn’t
adjustable.
2If the voltmeter indicates that the alternator
is not charging (or if the ignition/no-charge
warning light comes on) and the alternator,
battery, drivebelt tension and electrical
connections seem to be fine, have theregulator checked by a dealer service
department or electrical specialist.
3Disconnect the battery negative cable.
Caution: If the radio in your
vehicle is equipped with an anti-
theft system, make sure you
have the correct activation code
before disconnecting the battery. Refer to
the information on page 0-7 at the front of
this manual before detaching the cable.
Note: If, after connecting the battery, the
wrong language appears on the instrument
panel display, refer to page 0-7 for the
language resetting procedure.
Bosch alternator
4The voltage regulator is mounted externally
on the alternator housing. To renew the
regulator, remove the mounting screws (see
illustration)and lift it off the alternator (see
illustration). Note: Some Bosch alternators
have an integral voltage regulator which is part
of the brush assembly.
5Refitting is the reverse of removal. Note:
Before refitting the regulator, check the
condition of the slip rings(see illustration).
Use a torch and check for any scoring or deep
wear grooves. Renew the alternator if
necessary.
Motorola alternator
6Remove the alternator from the engine
compartment (see Section 15).
7Remove the rear cover and diode carrier,
remove the voltage regulator mounting
screws (see illustration)and lift the regulator
off the alternator body.
8Refitting is the reverse of removal.
17 Alternator brushes-
check and renewal
3
Caution: If the radio in your
vehicle is equipped with an anti-
theft system, make sure you
have the correct activation code
before disconnecting the battery.
5•10 Engine electrical systems
16.5 Use a torch to check the slip rings for
scoring or deep grooves16.4b The regulator can be withdrawn
easily on Bosch alternators. This type of
regulator is integral with the brush
assembly16.4a Remove the nuts and lift off the
small terminal protector from the
alternator cover, then remove the nuts and
the cover
15.2 Depending on how many accessories
the vehicle has, sometimes it’s easier to
remove the alternator from the brackets
first, and then turn it sideways to gain
access to the connections (arrowed) on
the rear of the alternator body
Page 121 of 228
Refer to the information on page 0-7 at the
front of this manual before detaching the
cable.
Note: If, after connecting the battery, the
wrong language appears on the instrument
panel display, refer to page 0-7 for the
language resetting procedure.
1Disconnect the battery negative cable.
Bosch alternator
2Remove the voltage regulator from the back
of the alternator (see Section 16).
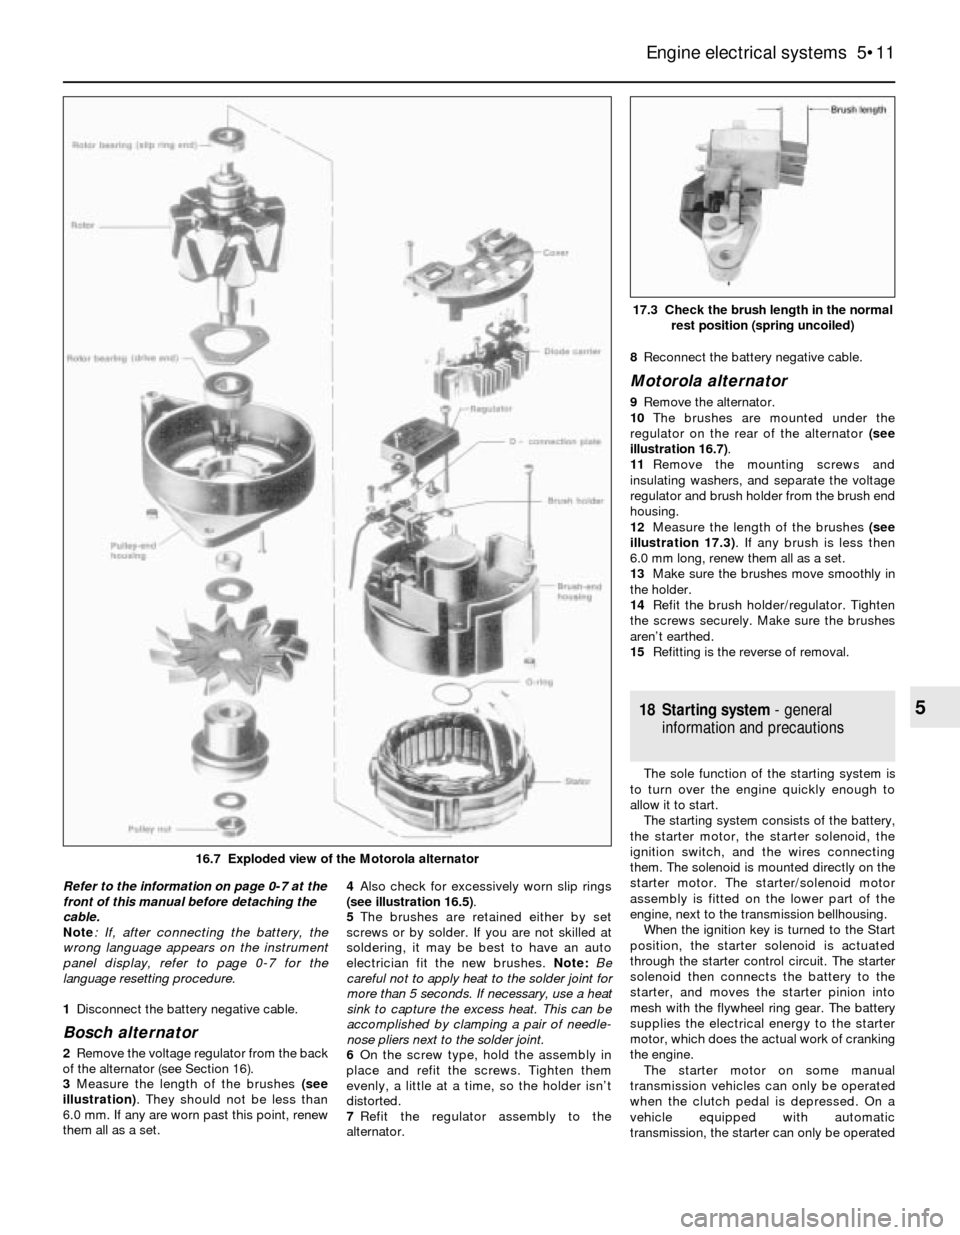
3Measure the length of the brushes (see
illustration). They should not be less than
6.0 mm. If any are worn past this point, renew
them all as a set. 4Also check for excessively worn slip rings
(see illustration 16.5).
5The brushes are retained either by set
screws or by solder. If you are not skilled at
soldering, it may be best to have an auto
electrician fit the new brushes. Note: Be
careful not to apply heat to the solder joint for
more than 5 seconds. If necessary, use a heat
sink to capture the excess heat. This can be
accomplished by clamping a pair of needle-
nose pliers next to the solder joint.
6On the screw type, hold the assembly in
place and refit the screws. Tighten them
evenly, a little at a time, so the holder isn’t
distorted.
7Refit the regulator assembly to the
alternator.8Reconnect the battery negative cable.
Motorola alternator
9Remove the alternator.
10The brushes are mounted under the
regulator on the rear of the alternator (see
illustration 16.7).
11Remove the mounting screws and
insulating washers, and separate the voltage
regulator and brush holder from the brush end
housing.
12Measure the length of the brushes (see
illustration 17.3). If any brush is less then
6.0 mm long, renew them all as a set.
13Make sure the brushes move smoothly in
the holder.
14Refit the brush holder/regulator. Tighten
the screws securely. Make sure the brushes
aren’t earthed.
15Refitting is the reverse of removal.
18 Starting system- general
information and precautions
The sole function of the starting system is
to turn over the engine quickly enough to
allow it to start.
The starting system consists of the battery,
the starter motor, the starter solenoid, the
ignition switch, and the wires connecting
them. The solenoid is mounted directly on the
starter motor. The starter/solenoid motor
assembly is fitted on the lower part of the
engine, next to the transmission bellhousing.
When the ignition key is turned to the Start
position, the starter solenoid is actuated
through the starter control circuit. The starter
solenoid then connects the battery to the
starter, and moves the starter pinion into
mesh with the flywheel ring gear. The battery
supplies the electrical energy to the starter
motor, which does the actual work of cranking
the engine.
The starter motor on some manual
transmission vehicles can only be operated
when the clutch pedal is depressed. On a
vehicle equipped with automatic
transmission, the starter can only be operated
Engine electrical systems 5•11
17.3 Check the brush length in the normal
rest position (spring uncoiled)
5
16.7 Exploded view of the Motorola alternator
Page 125 of 228
Check
12Warm up the engine, and let it run at idle.
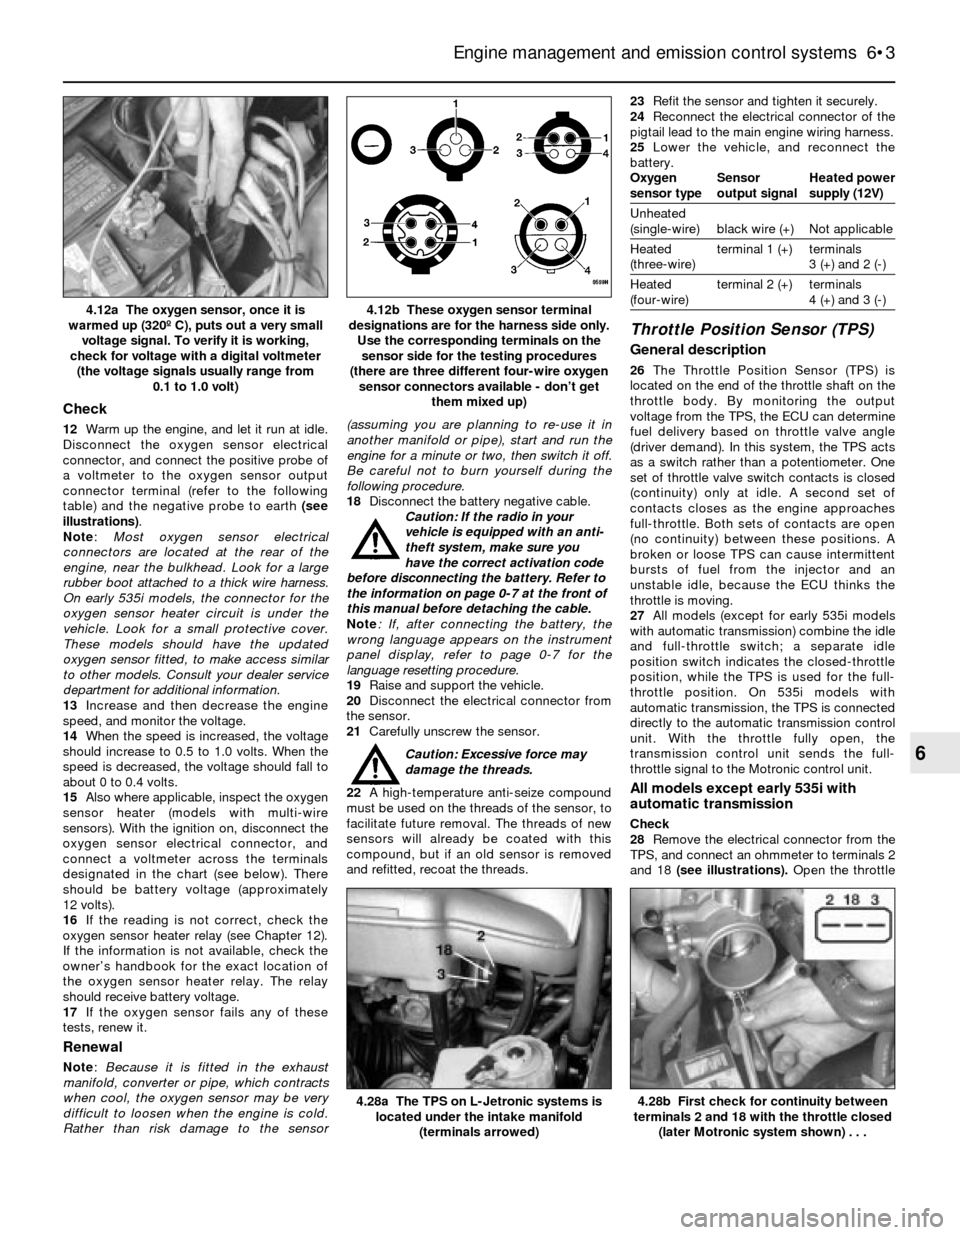
Disconnect the oxygen sensor electrical
connector, and connect the positive probe of
a voltmeter to the oxygen sensor output
connector terminal (refer to the following
table) and the negative probe to earth (see
illustrations).
Note:Most oxygen sensor electrical
connectors are located at the rear of the
engine, near the bulkhead. Look for a large
rubber boot attached to a thick wire harness.
On early 535i models, the connector for the
oxygen sensor heater circuit is under the
vehicle. Look for a small protective cover.
These models should have the updated
oxygen sensor fitted, to make access similar
to other models. Consult your dealer service
department for additional information.
13Increase and then decrease the engine
speed, and monitor the voltage.
14When the speed is increased, the voltage
should increase to 0.5 to 1.0 volts. When the
speed is decreased, the voltage should fall to
about 0 to 0.4 volts.
15Also where applicable, inspect the oxygen
sensor heater (models with multi-wire
sensors). With the ignition on, disconnect the
oxygen sensor electrical connector, and
connect a voltmeter across the terminals
designated in the chart (see below). There
should be battery voltage (approximately
12 volts).
16If the reading is not correct, check the
oxygen sensor heater relay (see Chapter 12).
If the information is not available, check the
owner’s handbook for the exact location of
the oxygen sensor heater relay. The relay
should receive battery voltage.
17If the oxygen sensor fails any of these
tests, renew it.
Renewal
Note: Because it is fitted in the exhaust
manifold, converter or pipe, which contracts
when cool, the oxygen sensor may be very
difficult to loosen when the engine is cold.
Rather than risk damage to the sensor(assuming you are planning to re-use it in
another manifold or pipe), start and run the
engine for a minute or two, then switch it off.
Be careful not to burn yourself during the
following procedure.
18Disconnect the battery negative cable.
Caution: If the radio in your
vehicle is equipped with an anti-
theft system, make sure you
have the correct activation code
before disconnecting the battery. Refer to
the information on page 0-7 at the front of
this manual before detaching the cable.
Note: If, after connecting the battery, the
wrong language appears on the instrument
panel display, refer to page 0-7 for the
language resetting procedure.
19Raise and support the vehicle.
20Disconnect the electrical connector from
the sensor.
21Carefully unscrew the sensor.
Caution: Excessive force may
damage the threads.
22A high-temperature anti-seize compound
must be used on the threads of the sensor, to
facilitate future removal. The threads of new
sensors will already be coated with this
compound, but if an old sensor is removed
and refitted, recoat the threads.23Refit the sensor and tighten it securely.
24Reconnect the electrical connector of the
pigtail lead to the main engine wiring harness.
25Lower the vehicle, and reconnect the
battery.
Oxygen Sensor Heated power
sensor type output signal supply (12V)
Unheated
(single-wire) black wire (+) Not applicable
Heated terminal 1 (+) terminals
(three-wire) 3 (+) and 2 (-)
Heated terminal 2 (+) terminals
(four-wire) 4 (+) and 3 (-)
Throttle Position Sensor (TPS)
General description
26The Throttle Position Sensor (TPS) is
located on the end of the throttle shaft on the
throttle body. By monitoring the output
voltage from the TPS, the ECU can determine
fuel delivery based on throttle valve angle
(driver demand). In this system, the TPS acts
as a switch rather than a potentiometer. One
set of throttle valve switch contacts is closed
(continuity) only at idle. A second set of
contacts closes as the engine approaches
full-throttle. Both sets of contacts are open
(no continuity) between these positions. A
broken or loose TPS can cause intermittent
bursts of fuel from the injector and an
unstable idle, because the ECU thinks the
throttle is moving.
27All models (except for early 535i models
with automatic transmission) combine the idle
and full-throttle switch; a separate idle
position switch indicates the closed-throttle
position, while the TPS is used for the full-
throttle position. On 535i models with
automatic transmission, the TPS is connected
directly to the automatic transmission control
unit. With the throttle fully open, the
transmission control unit sends the full-
throttle signal to the Motronic control unit.
All models except early 535i with
automatic transmission
Check
28Remove the electrical connector from the
TPS, and connect an ohmmeter to terminals 2
and 18 (see illustrations). Open the throttle
Engine management and emission control systems 6•3
4.12b These oxygen sensor terminal
designations are for the harness side only.
Use the corresponding terminals on the
sensor side for the testing procedures
(there are three different four-wire oxygen
sensor connectors available - don’t get
them mixed up)4.12a The oxygen sensor, once it is
warmed up (320º C), puts out a very small
voltage signal. To verify it is working,
check for voltage with a digital voltmeter
(the voltage signals usually range from
0.1 to 1.0 volt)
4.28b First check for continuity between
terminals 2 and 18 with the throttle closed
(later Motronic system shown) . . .4.28a The TPS on L-Jetronic systems is
located under the intake manifold
(terminals arrowed)
6