rear BMW 525i 1997 E39 Workshop Manual
[x] Cancel search | Manufacturer: BMW, Model Year: 1997, Model line: 525i, Model: BMW 525i 1997 E39Pages: 1002
Page 926 of 1002
Downloaded from www.Manualslib.com manuals search engine
--. .
1 Seats
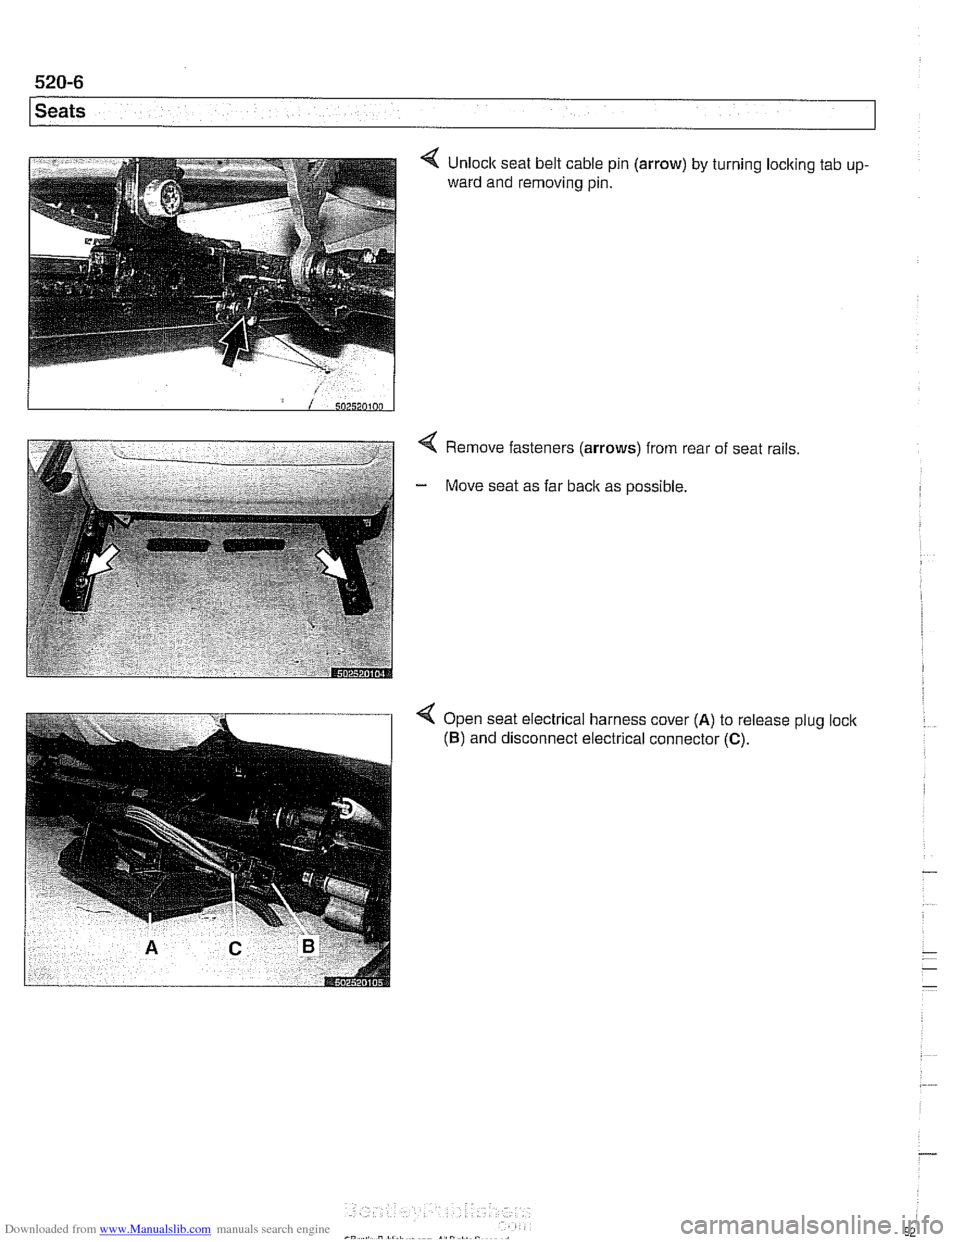
4 Remove fasteners (arrows) from rear
- Move seat as far back as possible. of
seat rails
4 Open seat electrical harness cover (A) to release plug loclc
(6) and disconnect electrical connector (C).
Page 927 of 1002
Downloaded from www.Manualslib.com manuals search engine
Seats
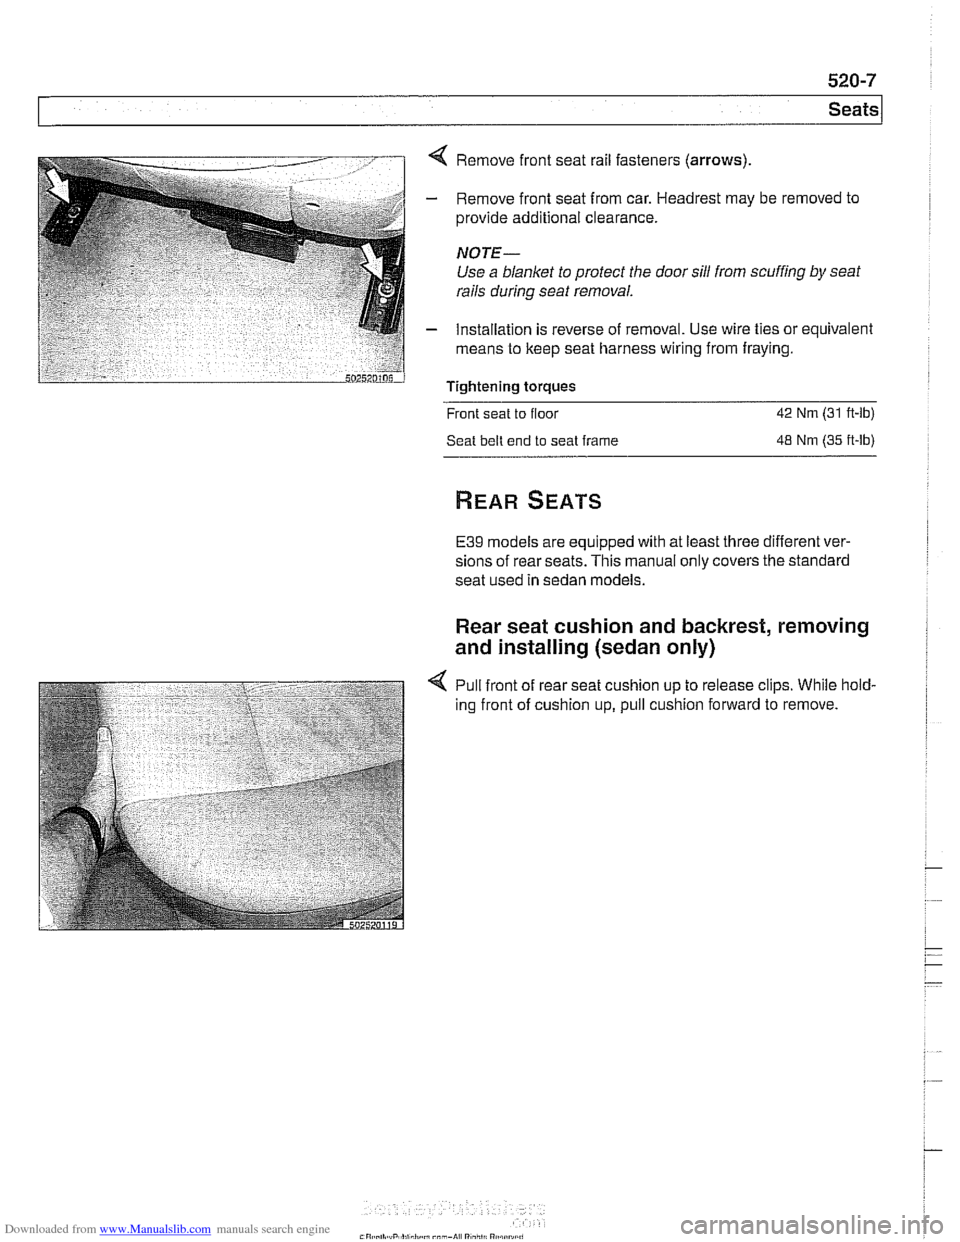
< Remove front seat rail fasteners (arrows)
- Remove front seat from car. Headrest may be removed to
provide additional clearance.
NOTE-
Use a blanket to protect the door sill from scuffing by seat
rails
during seat removal.
- Installation is reverse of removal. Use wire ties or equivalent
means to keep seat harness wiring from fraying.
Tightening torques
Front seat to floor
42 Nm (31 ft-lb)
Seat belt end to seat frame
48 Nm (35 ft-lb)
E39 models are equipped with at least three different ver-
sions of rear seats. This manual only covers the standard
seat used in sedan models.
Rear seat cushion and backrest, removing
and installing (sedan only)
4 Pull front of rear seat cushion up to release clips. While hold-
ing front of cushion up, pull cushion forward to remove.
Page 928 of 1002
Downloaded from www.Manualslib.com manuals search engine
Seats
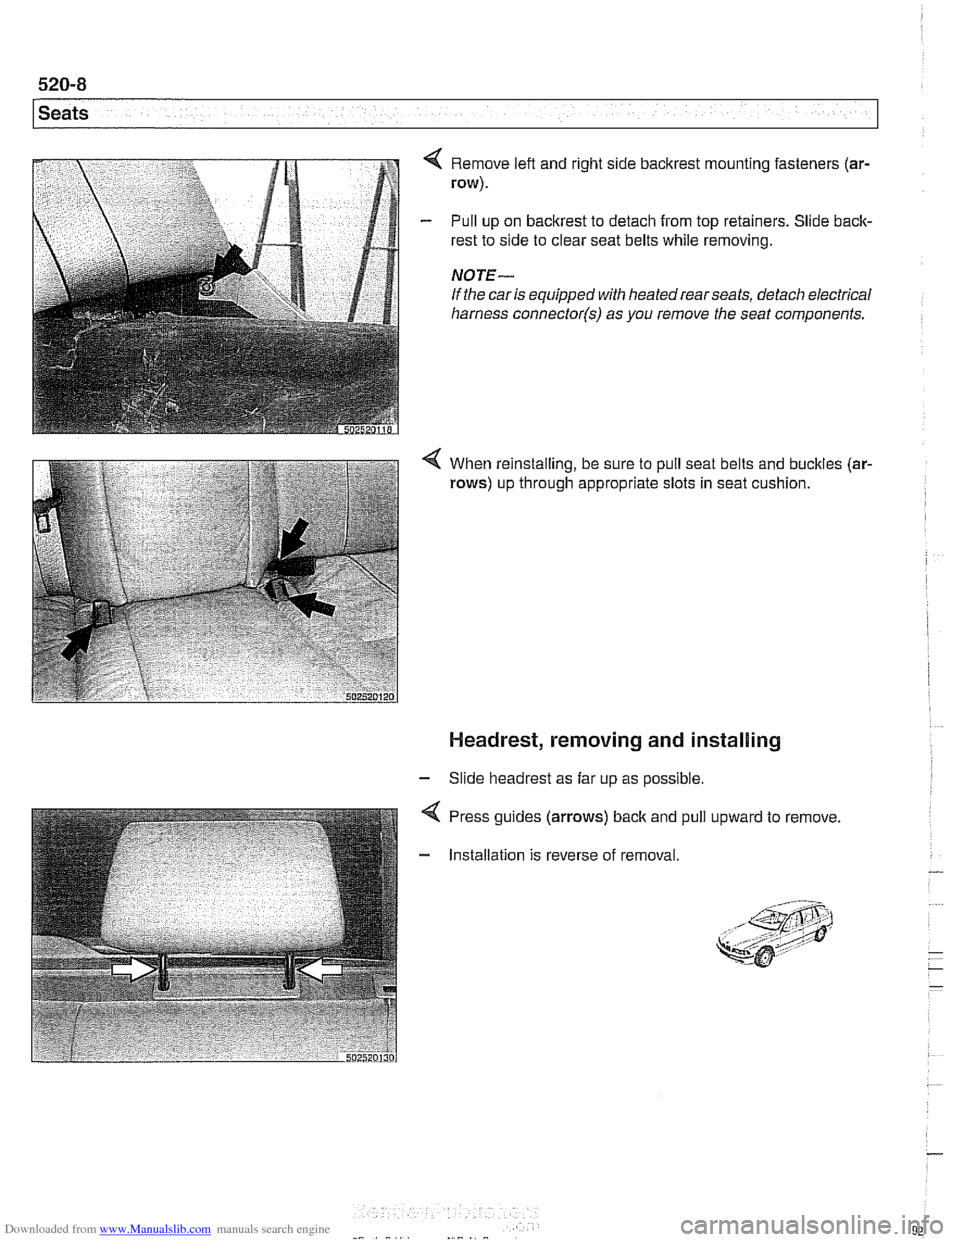
Remove left and right side bacltrest mounting fasteners (ar-
row).
Pull up on backrest to detach from top retainers. Slide back-
rest to side to clear seat belts while removing.
NOTE-
If the car is equipped with heatedrearseats, detach electrical
harness
connector(s) as you remove the seat components.
4 When reinstalling, be sure to pull seat belts and buckles (ar-
rows) up through appropriate slots in seat cushion.
Headrest, removing and installing
- Slide headrest as far up as possible.
Press guides (arrows)
back and
Installation is reverse of removal pull
upward to remove
Page 930 of 1002
Downloaded from www.Manualslib.com manuals search engine
540-2
Sunroof
This repair group covers the slide-tilt sunroof assembly.
There are two types of sunroof panels available: steel
01
glass. Service procedures are different for each type.
Component locations, initialization, sunroof panel replace-
ment, and sunroof height adjustment are covered. Replace-
ment of the cable assembly or frame require that the
headliner be removed. Removal and repair of the sunroof as-
sembly and othercomponents inside the roof cavity is beyond
the scope of this manual.
When the sunroof is set to the vent position (rear of panel up),
the inside headliner moves rearward approximately
120 mm
(4.7 in) This provides cabin ventilation with less wind noise. A
water channel is incorporated into the sunroof assembly. It
automatically rises when the sunroof panel is in the vent posi-
tion and prevents water from entering the interior during brak-
ing.
Sunroof electronic controls, initializing
- Initialize the sunroof in the following situations:
Malfunctions
such as lack of one-touch function, lack of
comfort openinglclosing or lack of safety (anti-trapping)
features.
If sunroof motor has been removed and reinstalled.
If power supply to the sunroof has been interrupted.
If repairs have been performed on the slideltilt mechanism.
NOTE -
The initialization sequence is dependent on the software ver-
sion of
tlie sunroof module (in the sunroof drive unit).
I WARNING -
I There is no anti-trapping protection during initialization. I
Page 933 of 1002
Downloaded from www.Manualslib.com manuals search engine
Sunroof, adjusting
The sunroof is controlled by a set of cables that move the sun-
roof panel along guide rails when the motor is operated. The
sunroof can be adjusted without removing it from the car.
NOTE-
Be sure to check drains in front corners of sunroof carrier if
water is entering car through headliner.
- The sunroof panel should be adjusted under the following cir-
cumstances:
Sunroof misaligned with roof.
Sunroof does not close squarely.
* Wind noise at high speeds (sunroof closed).
Sunroof has been removed.
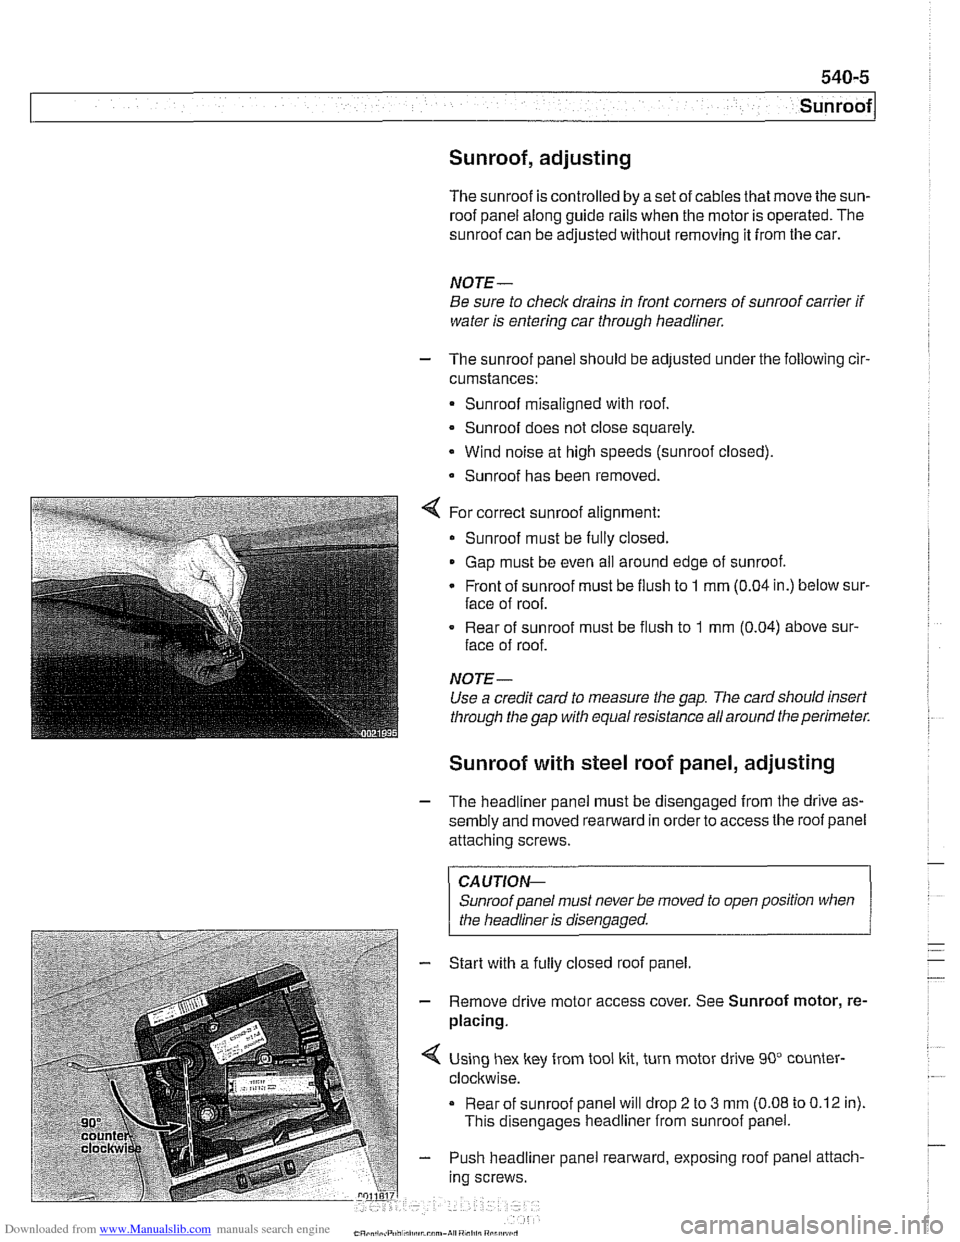
For correct sunroof alignment:
Sunroof must be fully closed.
Gap must be even all around edge of sunroof.
Front of sunroof must be flush to
1 mm (0.04 in.) below sur-
face of roof.
. Rear of sunroof must be flush to 1 mm (0.04) above sur-
face of roof.
NOTE-
Use a credit card to measure the gap. The card sllould insert
through the gap with equal resistance all around the perimeter.
Sunroof with steel roof panel, adjusting
- The headliner panel must be disengaged from the drive as-
sembly and moved rearward in order to access the roof panel
attaching screws.
CAUTIOI\C
Sunroof panel must never be moved to open position when . .
I the headliner is disenaaaed. 1
- Start with a fully closed roof panel.
- Remove drive motor access cover. See Sunroof motor, re-
placing.
Using hex key from tool kit, turn motor drive 90" counter-
clockwise.
Rear of sunroof panel will drop
2 to 3 mm (0.08 to 0.12 in).
This disengages headliner from sunroof panel.
- Push headliner panel rearward, exposing roof panel attach-
ing screws.
Page 934 of 1002
Downloaded from www.Manualslib.com manuals search engine
l Sunroof
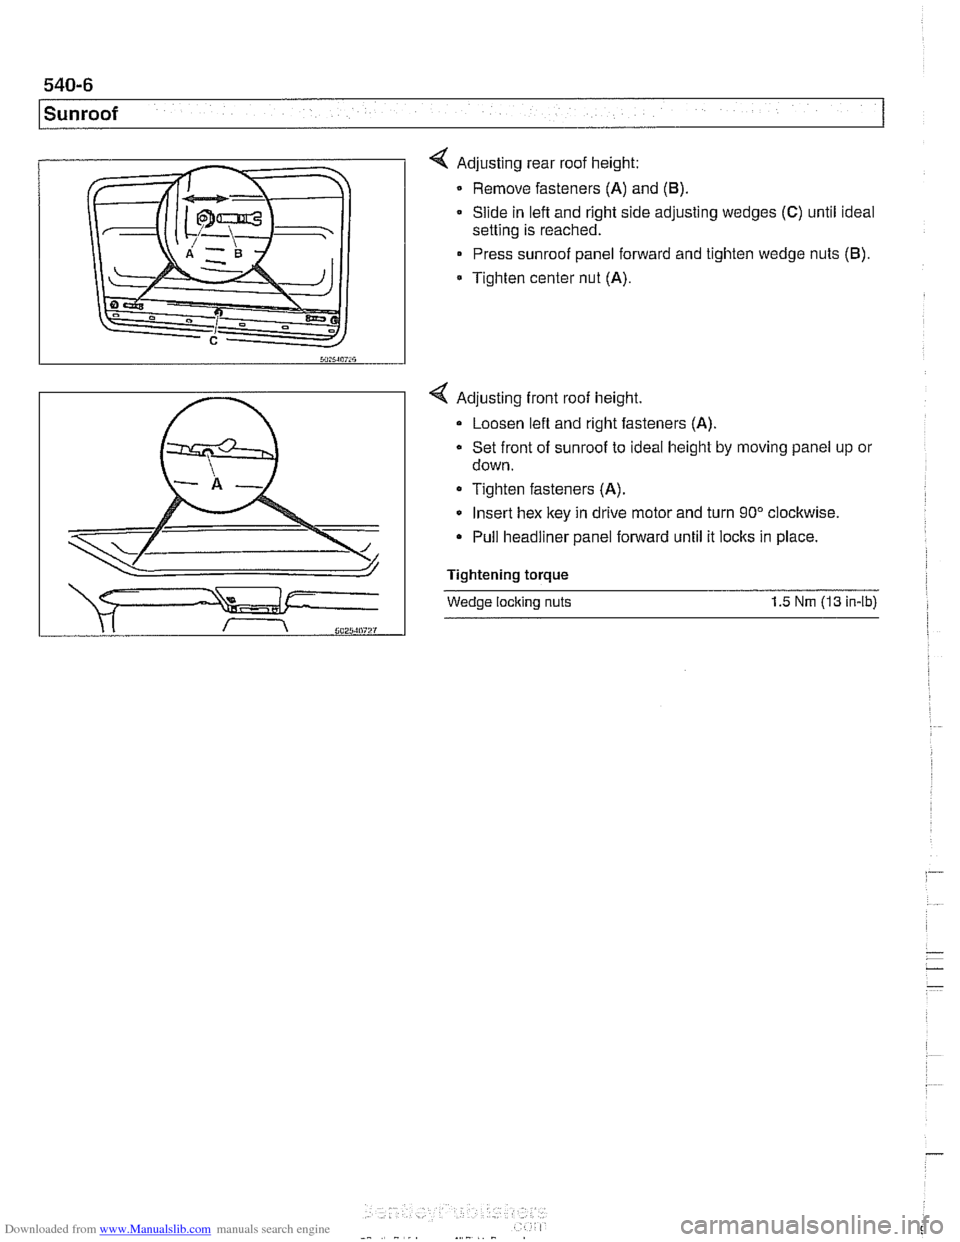
4 Adjusting rear roof height:
Remove fasteners
(A) and (6)
Slide in left and right side adjusting wedges (C) until ideal
setting is reached.
Press sunroof panel forward and tighten wedge nuts
(6).
* Tighten center nut (A).
4 Adjusting front roof height.
Loosen lefl and right fasteners
(A)
Set front of sunroof to ideal height by moving panel up or
down.
Tighten fasteners
(A).
Insert hex key in drive motor and turn 90" clockwise.
Pull headliner panel forward until it locks in place.
Tightening torque
Wedge locking nuts 1.5 Nm (1 3 in-lb)
Page 935 of 1002
Downloaded from www.Manualslib.com manuals search engine
Sunroof
Sunroof with glass roof panel, adjusting - -
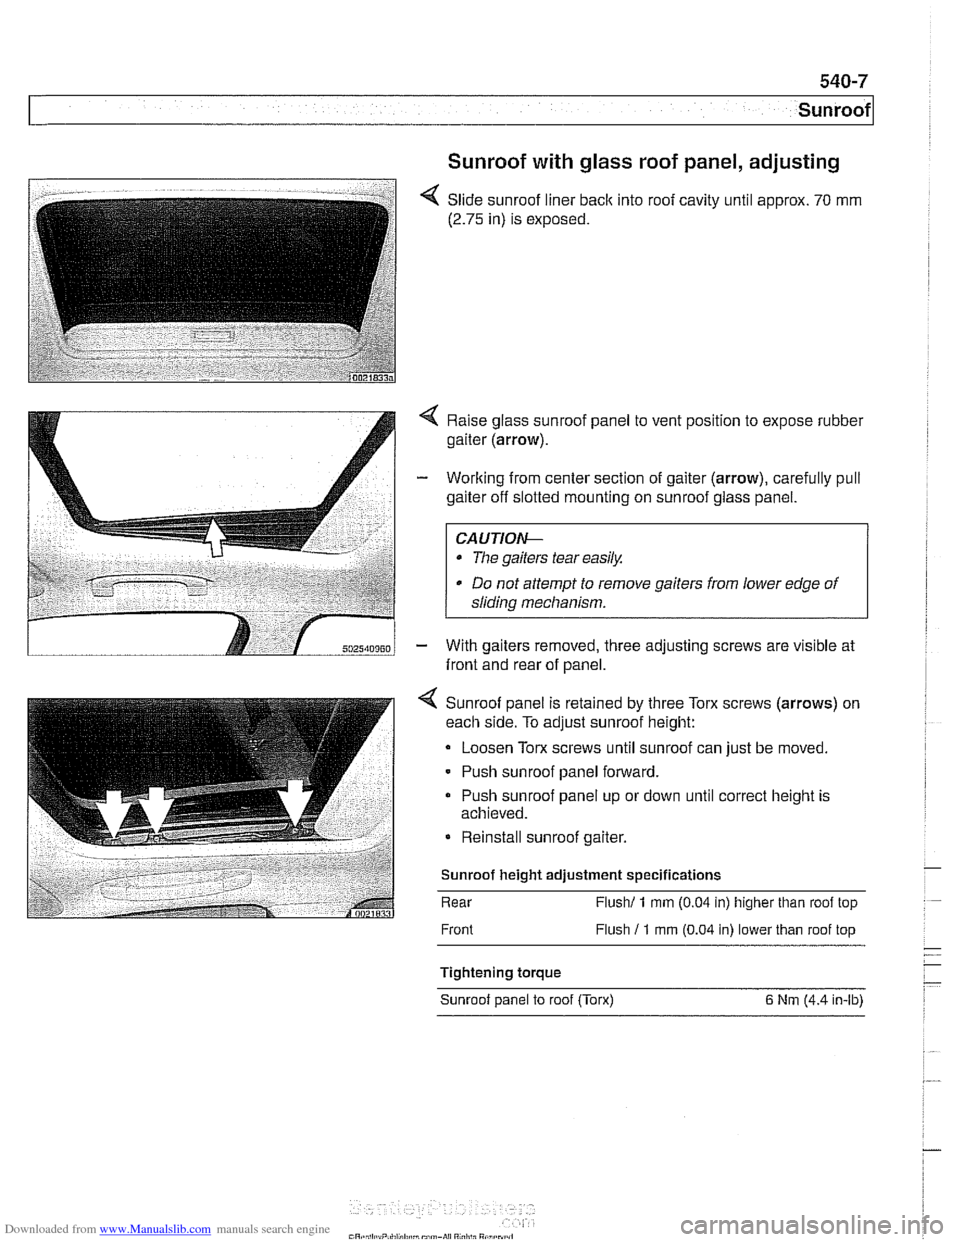
< Slide sunroof liner back into roof cavity until approx. 70 mm
(2.75 in) is exposed.
Raise glass sunroof panel to vent position to expose rubber
gaiter (arrow).
- Working from center section of gaiter (arrow), carefully pull
gaiter off slotted mounting on sunroof glass panel.
CA UTIOW-
The gaiters tear easik
* Do not attempt to remove gaiters from lower edge of
sliding mechanism.
- With gaiters removed, three adjusting screws are visible at
front and rear of panel.
4 Sunroof panel is retained by three Torx screws (arrows) on
each side. To adjust sunroof height:
Loosen Torx screws until sunroof can just be moved.
- Push sunroof panel forward.
Push sunroof panel up or down until correct height is
achieved.
Reinstall sunroof gaiter.
Sunroof height adjustment specifications
Rear
Flush1 1 rnrn (0.04 in) higher than roof top
Front Flush
11 rnrn (0.04 in) lower than roof top
Tightening torque Sunroof panel to roof (Torx)
6 Nrn (4.4 in-lb)
Page 939 of 1002
Downloaded from www.Manualslib.com manuals search engine
........... General ........................... .72 0.2 Rear Seat Belt Assembly 720-8
......... Troubleshooting ..................... .72 0.2 Rear seat belt assembly (sedan) 720-8
................ Rear seat belts (sedan) 720-9
... .......... Front Seat Assembly '720-4 Rear seat belt assembly (Sport Wagon) 720-9
Front seat belt tensioner,
......... Rear seat belts (Sport Wagon) 720-10
removing and installing ................ .72 0.4
Front seat belt assembly
.............. .72 0.6
Front seat belt reel. removing and
installing (sedan and Sport Wagon models)
.72 0.6
Page 941 of 1002
Downloaded from www.Manualslib.com manuals search engine
Seat Belts
NOTE-
The rear bench seat belt strap may not retract fully due to in-
creased friction between strap and seat cover.
A small re-
maining loop in belt strap when fully retracted is acceptable.
WARNING-
* For maximum protection from injury, seat bells should be
replaced as a set (including all hardware), if they are sub-
ject to occupant loading in a collision.
Seat belts should not be modified or repaired. The seat
belt mounting points should not be changed or modi-
fied.
Do not bleach or dye seat belt webbing. Webbing that
is severely faded or
redyed will not meet the strength
requirements of a collision and must be replaced.
Clean belts with a luke-warm soap solution only:
Seat belts should be periodically inspected for webbing
defects such as cuts or pulled threads.
* Immediately after replacing a damaged or worn seat
belt, destroy the old belt to prevent it from being used
again.
Page 944 of 1002
Downloaded from www.Manualslib.com manuals search engine
I Seat Belts
a
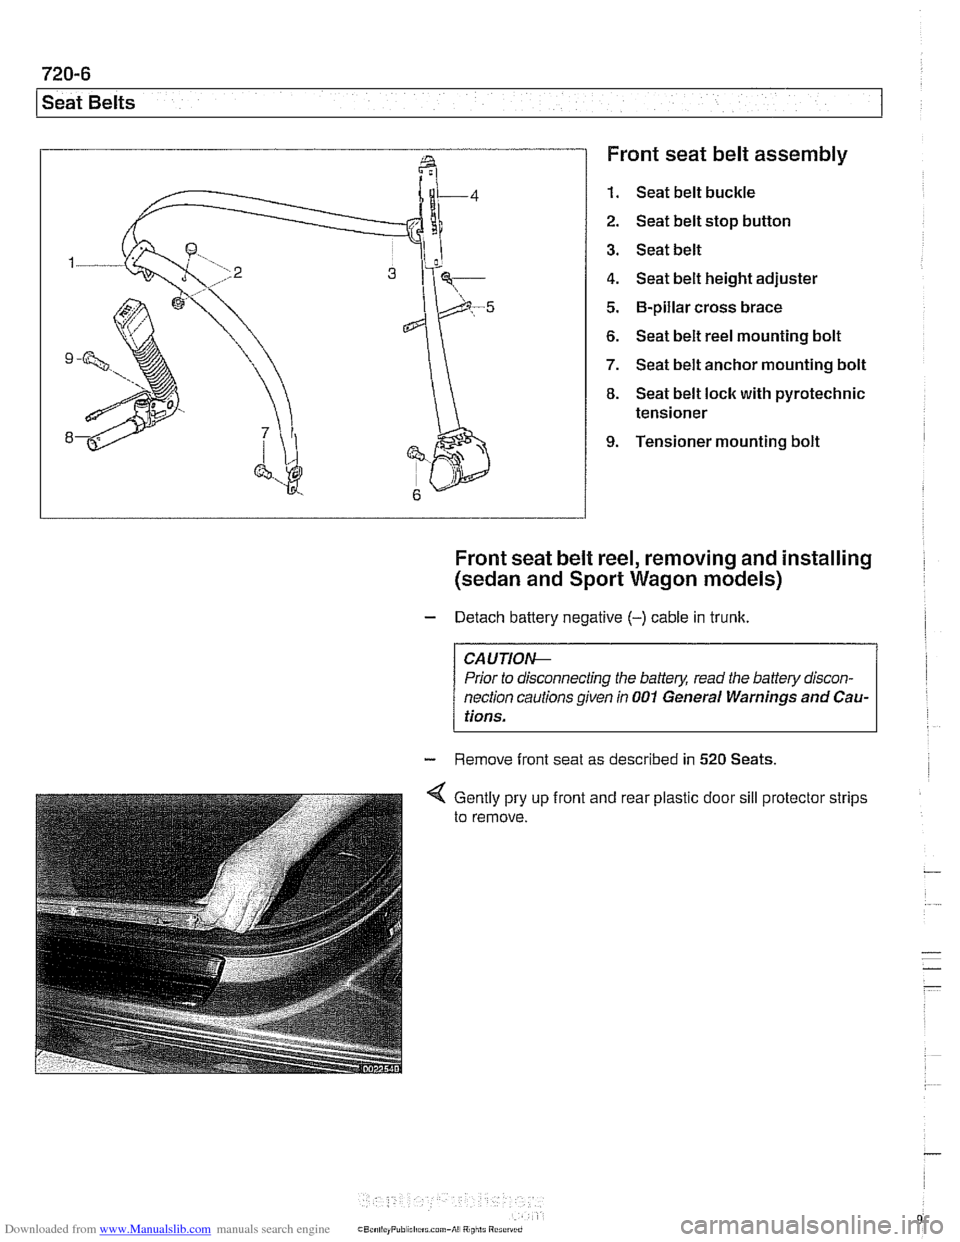
Front seat belt assembly
1. Seat belt buckle
2. Seat belt stop button
3. Seat belt
4. Seat belt height adjuster
5.
6-pillar cross brace
6. Seat belt reel mounting bolt
7. Seat belt anchor mounting bolt
8. Seat belt lock with pyrotechnic
tensioner
9. Tensioner mounting bolt
Front seat belt reel, removing and installing
(sedan and Sport Wagon models)
- Detach battery negative (-) cable in trunk.
~~-~
Prior to disconnecting the battery, read the battery discon-
nection cautions given in
001 General Warnings and Cau-
l tions. I
- Remove front seat as described in 520 Seats
4 Gently pry up front and rear plastic door sill protector strips
to remove.