ECO BMW 525i 1997 E39 Repair Manual
[x] Cancel search | Manufacturer: BMW, Model Year: 1997, Model line: 525i, Model: BMW 525i 1997 E39Pages: 1002
Page 129 of 1002
![BMW 525i 1997 E39 Repair Manual Downloaded from www.Manualslib.com manuals search engine
11 3-35
- cylinder Head Removal and Installation] -
< Lift off exhaust and intake sprocltets together with secondary
chain, thrust spac](/img/1/2822/w960_2822-128.png "BMW 525i 1997 E39 Repair Manual Downloaded from www.Manualslib.com manuals search engine
11 3-35
- cylinder Head Removal and Installation] -
< Lift off exhaust and intake sprocltets together with secondary
chain, thrust spac")
Downloaded from www.Manualslib.com manuals search engine
11 3-35
- cylinder Head Removal and Installation] -
< Lift off exhaust and intake sprocltets together with secondary
chain, thrust spacer
(A), and splined shafl (B).
CAUTION-
Splined shafts share the same part number for both intake
and exhaust camshafts. Used splined shafts must be
rein-
stalled in their original positions.
Remove exhaust camshaft splined sleeve
(A) and shaft (B).
Remove secondary chain tensloner mounting bolts (arrows)
and remove tensioner with retaining pin in place.
Page 132 of 1002
Downloaded from www.Manualslib.com manuals search engine
11 3-38
I Cylinder Head Removal and Installation
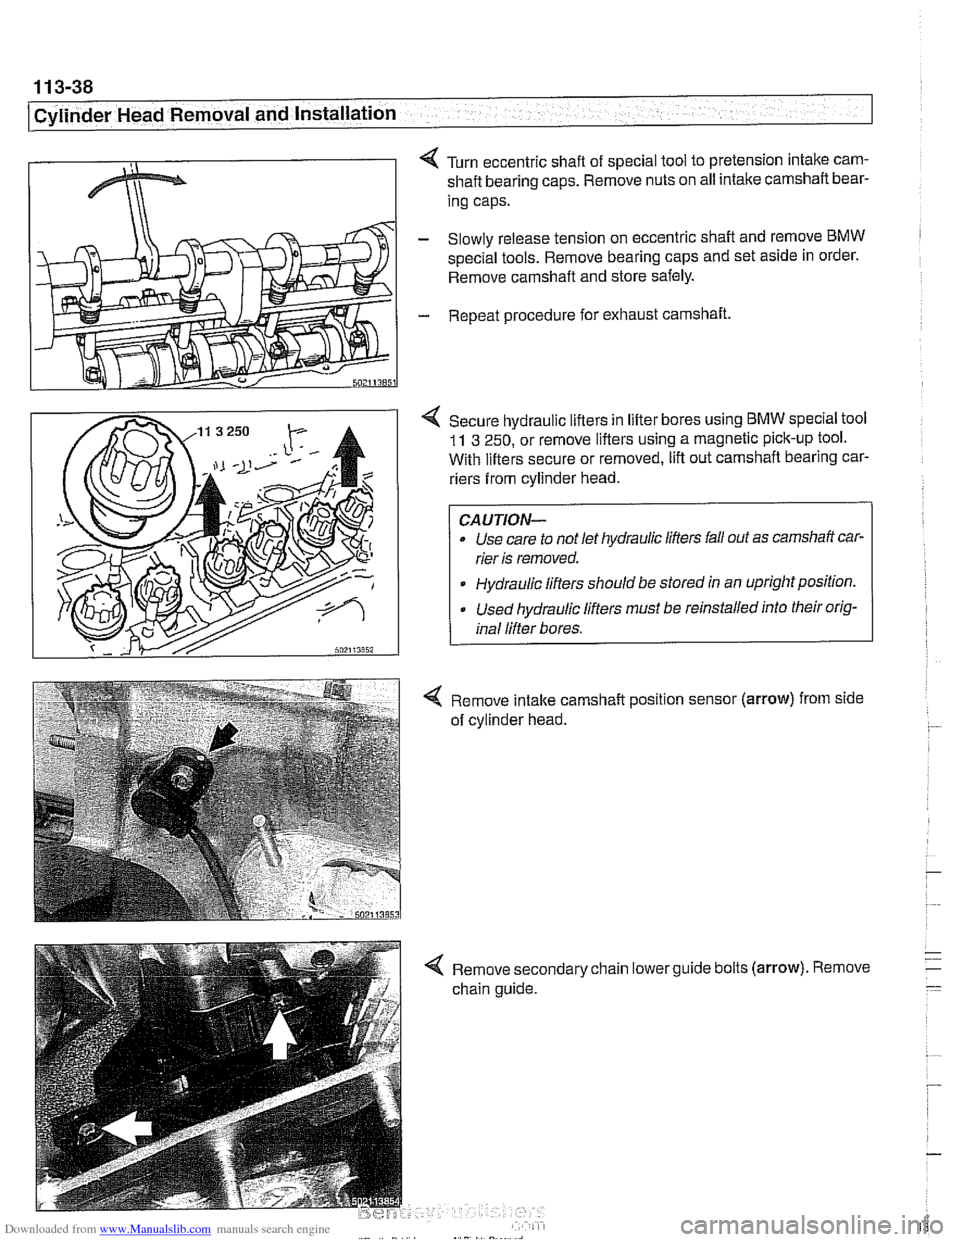
< Turn eccentric shaft of special tool to pretension intake cam-
shaft bearing caps. Remove nuts on all intake camshaft bear-
ing caps.
- Slowly release tension on eccentric shaft and remove BMW
spec~al tools. Remove bearing caps and set as~de in order.
Remove camshaft and store safely.
- Repeat procedure for exhaust camshaft.
4 Secure hydraulic lifters in lifter bores using BMW speclal tool
11 3 250, or remove lifters using a magnetic pick-up tool.
With lifters secure or removed, lift out camshaft bearing car-
riers from cylinder head.
Use care to not let hydraulic lifters fall out as camshaft car-
rier is removed.
Hydraulic lifters should be stored
ln an uprightpositlon.
Used hydraulic lifters must be reinstalled into their orig-
inal lifter bores.
4 Remove intake camshaft position sensor (arrow) from side
of cylinder head.
4 Remove secondary chain lowerguide bolts (arrow). Remove
chain guide.
Page 133 of 1002
Downloaded from www.Manualslib.com manuals search engine
. - -- -
Cylinder Head Removal and Installation --
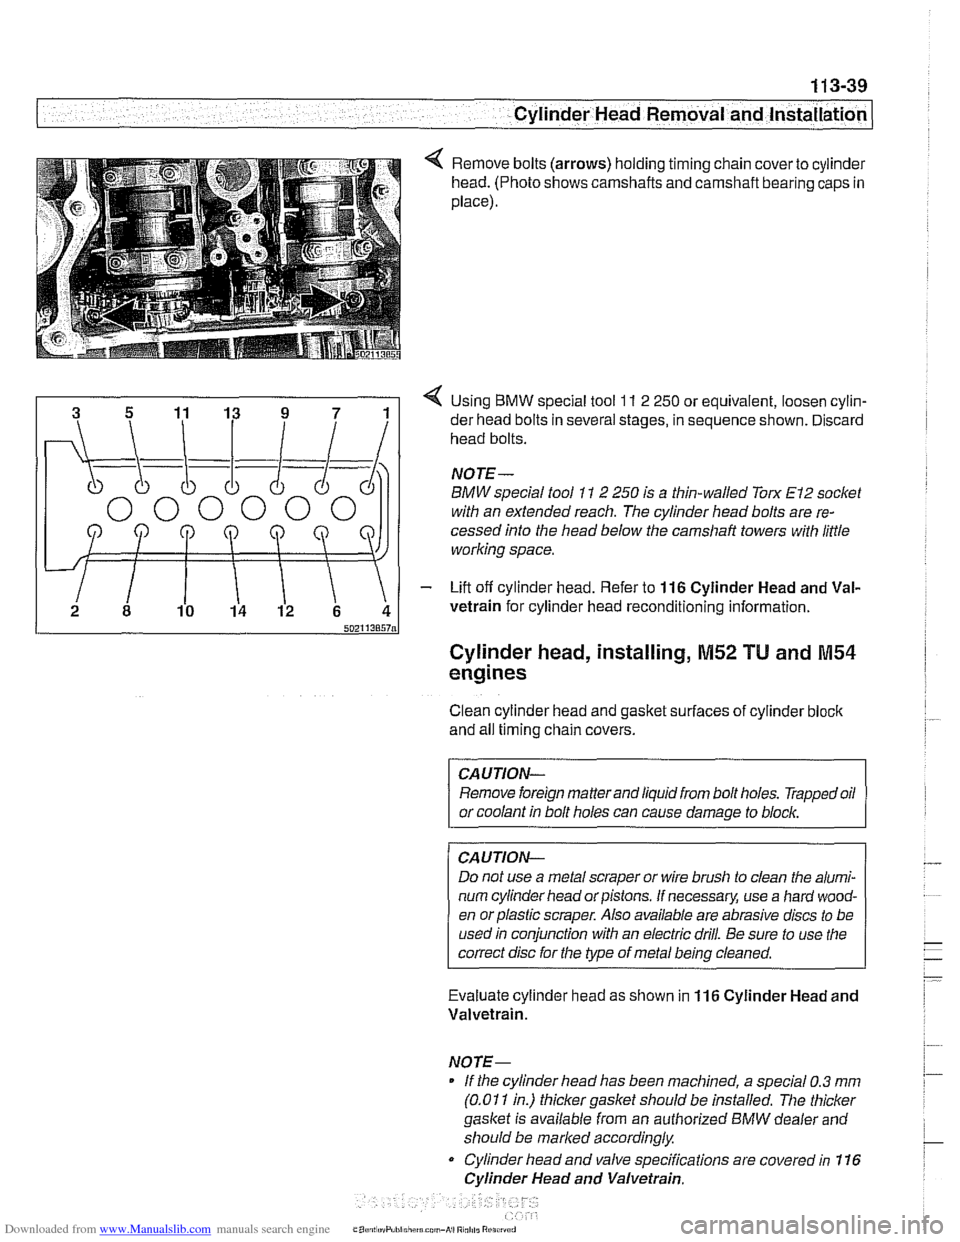
Remove bolts (arrows) holding timing chain cover to cylinder
head. (Photo shows camshafts and camshaft bearing caps in
place).
4 Using BMW special tool 11 2 250 or equivalent, loosen cylin-
der head bolts in several stages, in sequence shown. Discard
head bolts.
NOJE-
BMW special tool 11 2 250 is a thin-walled Torx El2 socket
with an extended reach. The cylinder head bolts are re-
cessed into the head below the
camshaft towers with little
working space.
- Lift off cylinder head. Refer to 116 Cylinder Head and Val-
vetrain for cylinder head reconditioning information.
Cylinder head, installing, M52 TU and M54
engines
Clean cylinder head and gasket surfaces of cylinder bloclc
and all timing chain covers.
CAUTION- Remove foreign matter and liquid from bolt holes. Trapped oil
or coolant in bolt holes can cause damage to
blocl~,
CAUJION-
Do not use a metal scraper or wire brush to clean the alumi-
num cylinder head or pistons. If necessary, use a hard wood-
en orplastic scraper. Also available are abrasive discs to be
used in conjunction with an electric drill. Be sure to use the
correct disc for the type of metal being cleaned.
Evaluate cylinder head as shown in
116 Cylinder Head and
Valvetrain.
NOTE- If the cylinder head has been machined, a special 0.3
mm
(0.01 1 in.) thicker gasket should be installed. The thicker
gasket is available from an authorized
BMW dealer and
should be marked accordingly
Cylinder head and valve specifications are covered in 116
Cylinder Head and Valvetrain.
Page 135 of 1002
![BMW 525i 1997 E39 Repair Manual Downloaded from www.Manualslib.com manuals search engine
. - ..
Cylinder Head Removal and installation] --
- Secure cylinder head bolts by torquing an additional 90"
each for Stage 2 and 3.
T](/img/1/2822/w960_2822-134.png "BMW 525i 1997 E39 Repair Manual Downloaded from www.Manualslib.com manuals search engine
. - ..
Cylinder Head Removal and installation] --
- Secure cylinder head bolts by torquing an additional 90\"
each for Stage 2 and 3.
T")
Downloaded from www.Manualslib.com manuals search engine
. - ..
Cylinder Head Removal and installation] --
- Secure cylinder head bolts by torquing an additional 90"
each for Stage 2 and 3.
Tightening torques
Cylinder head to engine block
(aluminum block)
Stage
1 40 Nm (30 it-lb)
Stage 2 +90°
Stage 3 80'
4 lnstall intake camshaft position sensor (arrow).
4 Install lower secondary chain guide. Tighten tom bolts to
specifications. The bolt on the intake camshaft side is long
and extends into the engine block.
4 Install and tighten cylinder head-to-lower timing chain cover
bolts (arrows). (Photo shows camshafts in place).
Tightening torque Secondary chain guide to cylinder head
10 Nm (89 in-lb)
Cylinder head to lower timing chain cover
M6 10 Nm (89 in-lb)
M7 15 Nm (1 1 it-lb)
Page 140 of 1002
Downloaded from www.Manualslib.com manuals search engine
1 13-46
Cylinder Head Removal and Installation
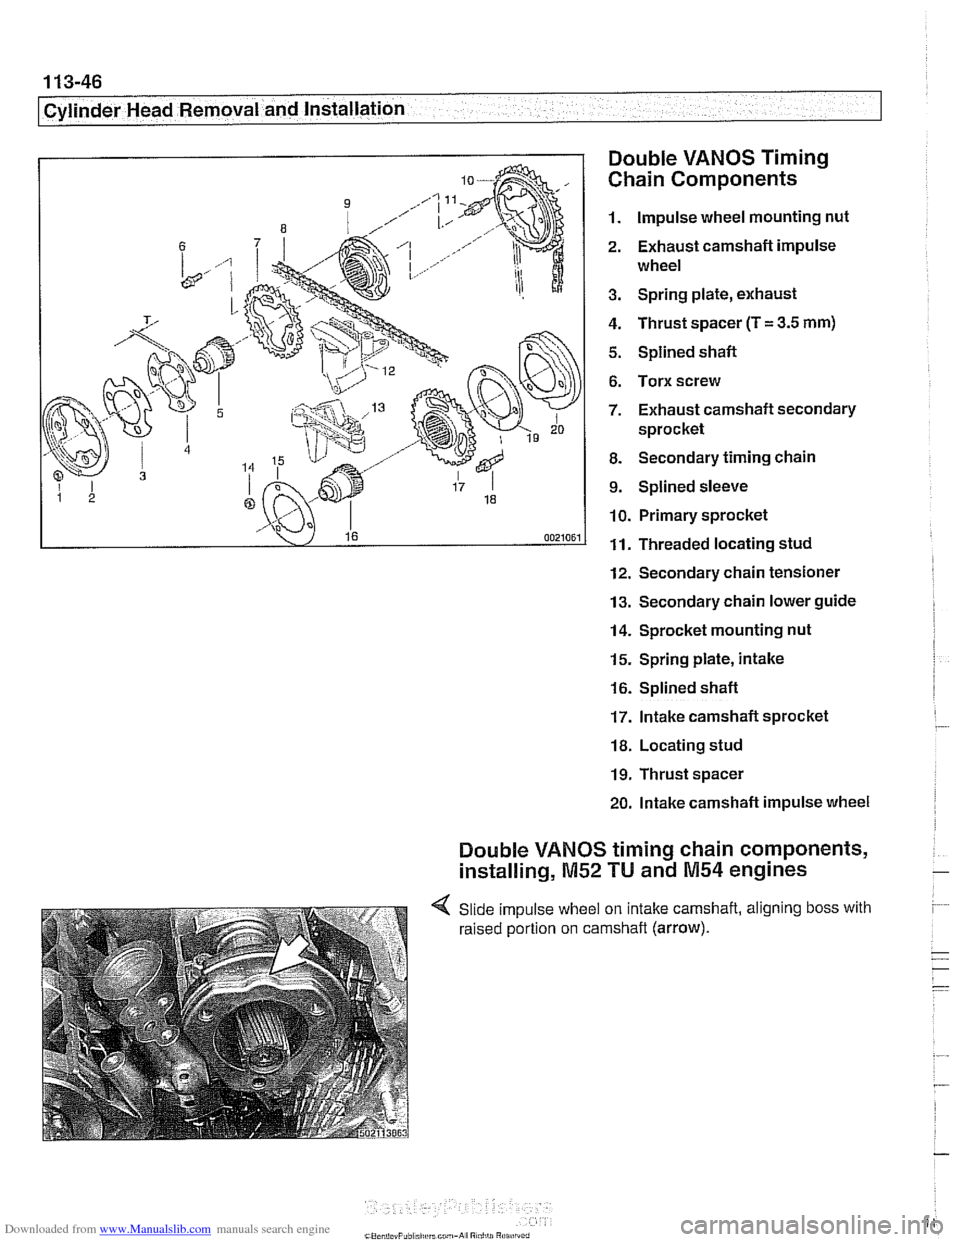
Double
VANOS Timing
Chain Components
1. Impulse wheel mounting nut
2. Exhaust camshaft impulse
wheel
3. Spring plate, exhaust
4. Thrust spacer (T
= 3.5 mm)
5. Splined shaft
6. Torx screw
7. Exhaust camshaft secondary
sprocket
8. Secondary timing chain
9. Splined sleeve
10. Primary sprocket
11. Threaded locating stud
12. Secondary chain tensioner
13. Secondary chain lower guide
14. Sprocket mounting nut
15. Spring plate, intake
16. Splined shaft
17. lntakecamshaft sprocket
18. Locating stud
19. Thrust spacer
20. Intake camshaft impulse wheel
Double VANOS timing chain components,
installing,
M52 TU and M54 engines -
4 Slide impulse wheel on intake camshaft, aligning boss with
raised portion on camshaft
(arrow).
Page 142 of 1002
Downloaded from www.Manualslib.com manuals search engine
I Cvlinder Head Removal and Installation
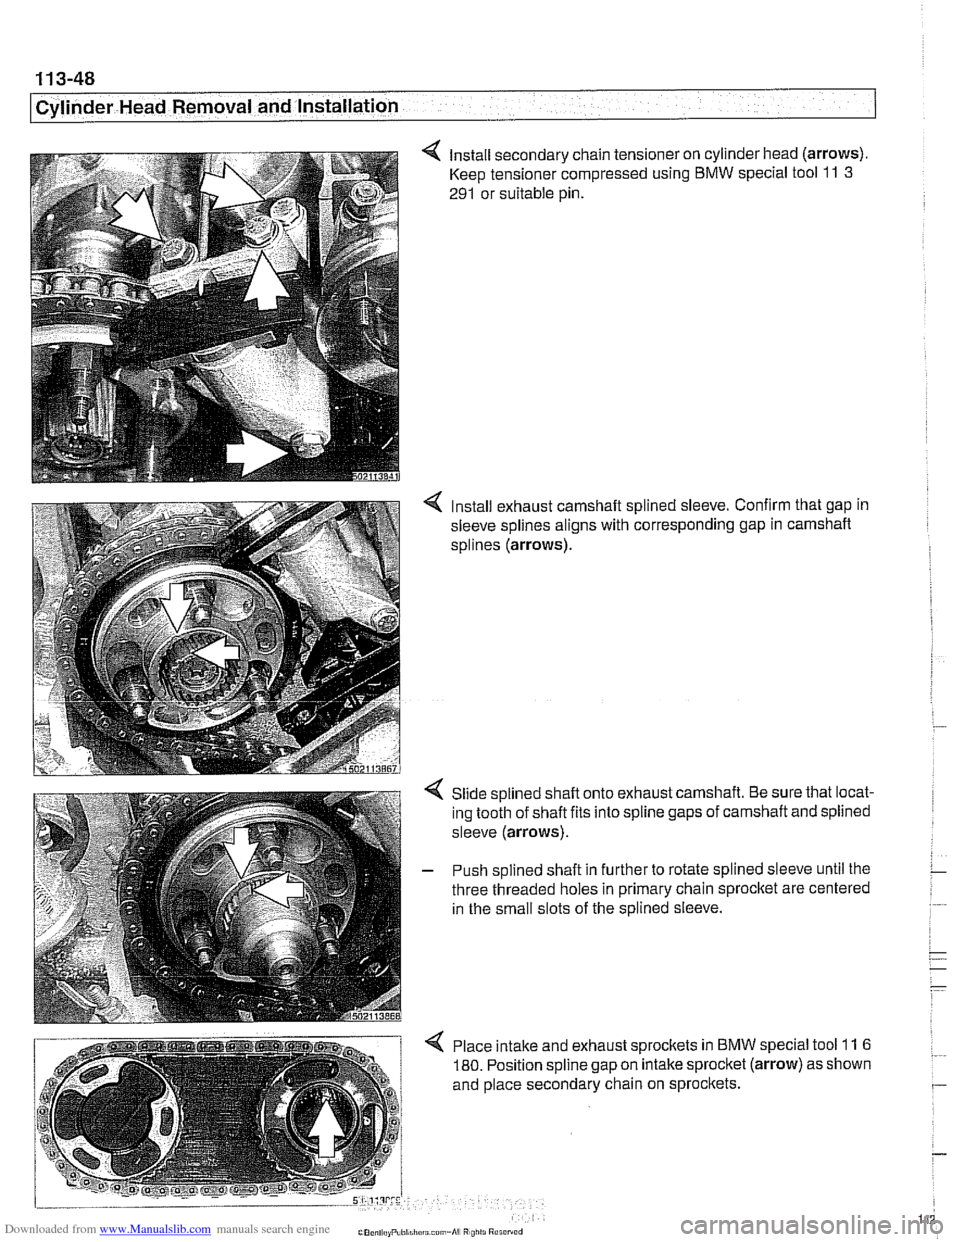
4 Install secondary chain tensioner on cylinder head (arrows).
Keep tensioner compressed using BMW special tool 11 3
291 or suitable pin.
< Install exhaust camshaft splined sleeve. Confirm that gap in
sleeve splines aligns with corresponding gap in
camshaft
splines (arrows).
Slide splined shaft onto exhaust camshaft. Be sure that locat-
ing tooth of shaft fits into spline gaps of camshaft and splined
sleeve
(arrows).
- Push splined shaft in further to rotate splined sleeve until the
three threaded holes in primary chain sprocket are centered
in the small slots of the splined sleeve.
4 Place intake and exhaust sprockets in BMW special tool 11 6
180. Position spline gap on intake sprocket (arrow) as shown
and place secondary chain on sprockets.
Page 145 of 1002
Downloaded from www.Manualslib.com manuals search engine
113-51
Cylinder Head Removal and Installation
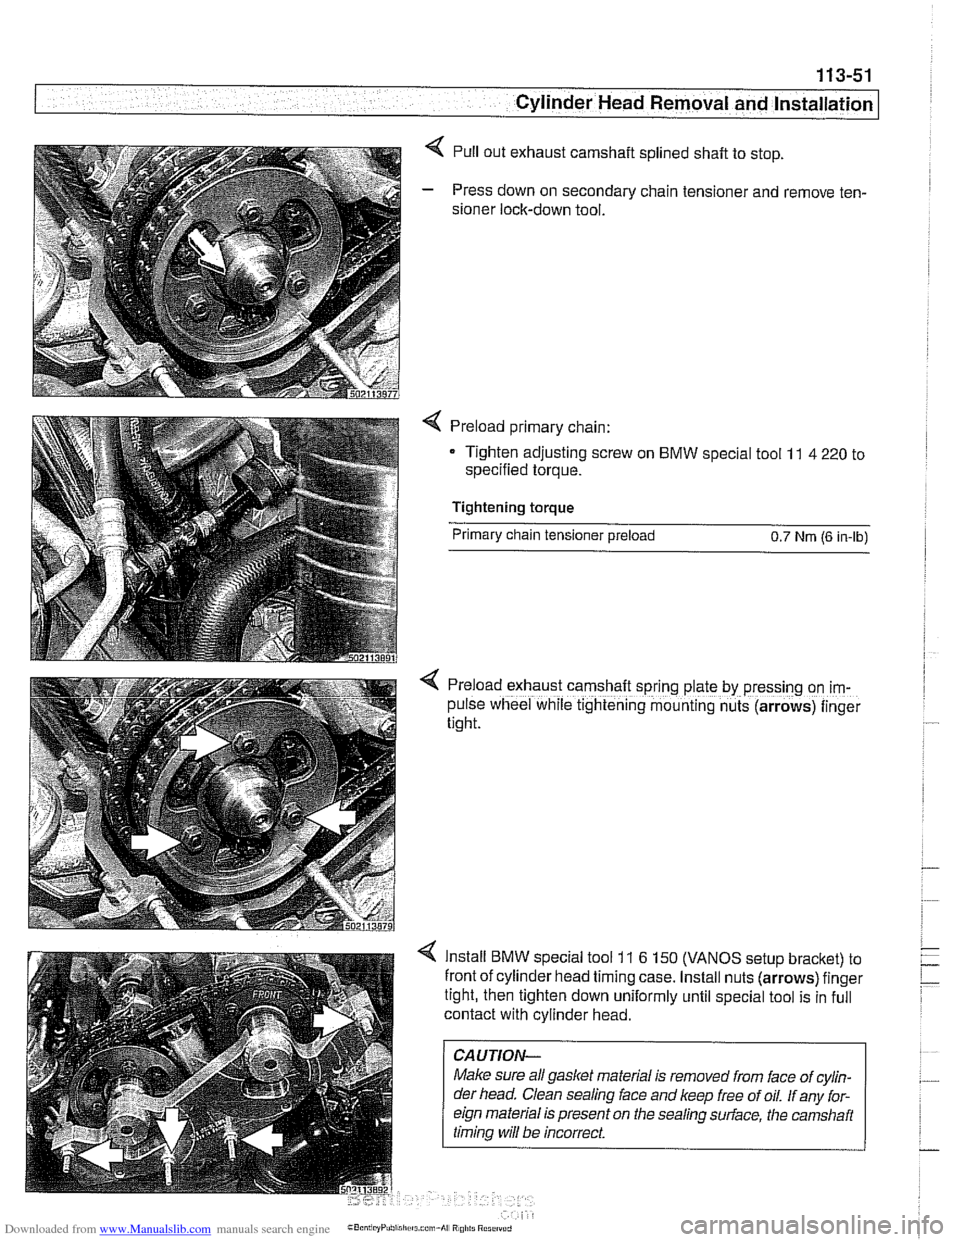
< Pull out exhaust camshaft splined shaft to stop.
- Press down on secondary chain tensioner and remove ten-
sioner lock-down tool.
Preload primary chain:
Tighten adjusting screw on
BMW special tool 11 4 220 to
specified torque.
Tightening torque
Primary chain tensioner preload
0.7 Nrn (6 in-lb)
< Preload exhaust camshaft sprrng plate by pressing on im-
pulse wheel while tightening mounting nuts (arrows) finger
tight.
Install BMW special tool 11 6 150 (VANOS setup bracket) to
front of cylinder head timing case. Install nuts (arrows) finger
tight, then tighten down uniformly until special tool is in full
contact with cylinder head.
CAUTION-
Make sure all gasket material is removed from face of cylin-
der head. Clean sealing
face and keep free of oil. If any for-
eign material is present on the sealing
sudace, the camshait
timina will be incorrect.
Page 147 of 1002
Downloaded from www.Manualslib.com manuals search engine
Cylinder Head Removal and Installation /
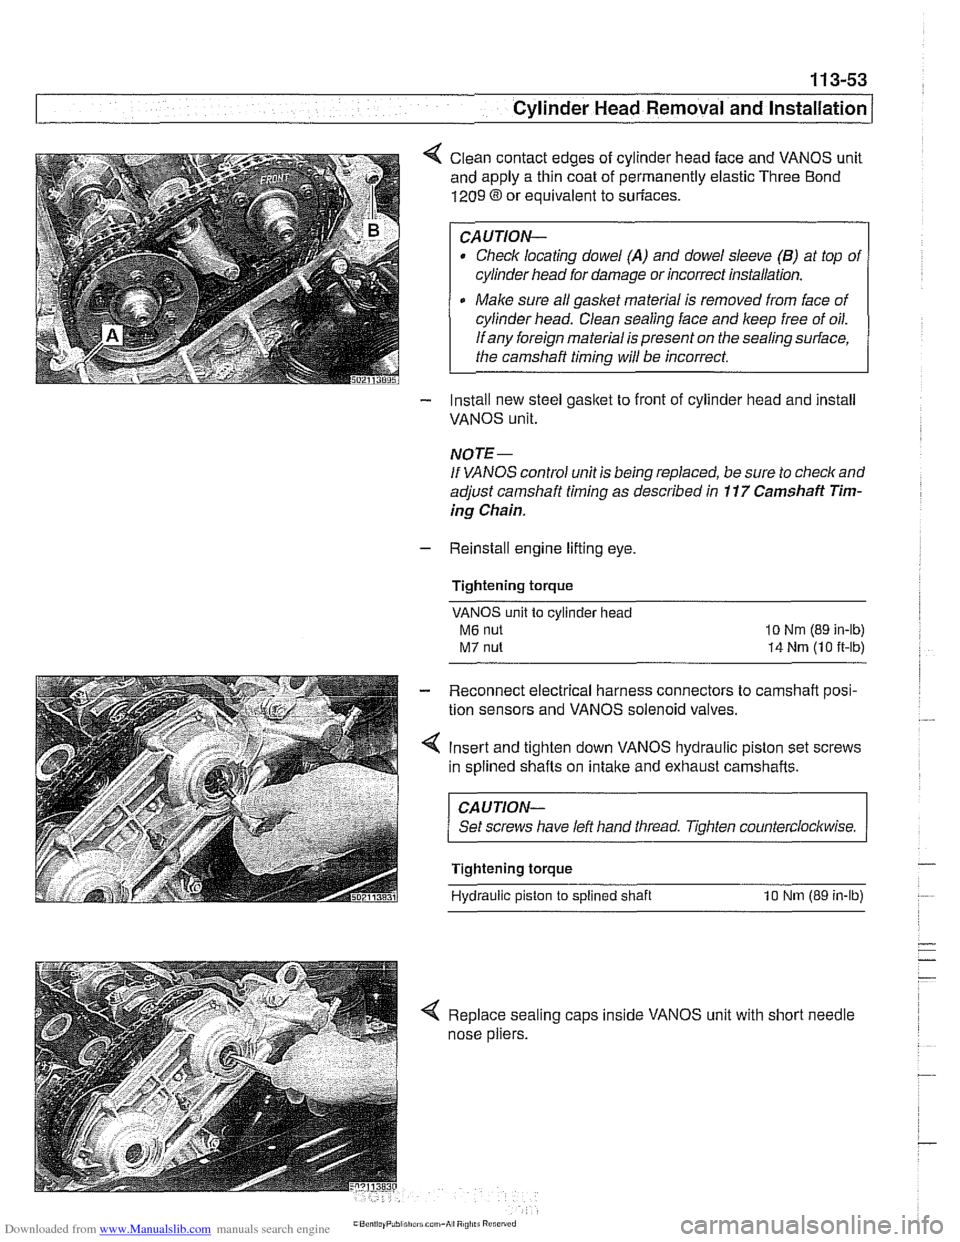
< Clean contact edges of cylinder head face and VANOS unit
and apply a thin coat of permanently elastic Three Bond
1209 8 or equivalent to suriaces.
CAUTION-
Check locating dowel (A) and dowel sleeve (B) at top of
cylinder head for damage or incorrect installation.
Make sure all gasket material is removed from face of
cylinder head. Clean sealing face and keep free of oil.
If any foreign material is present on the sealing surface,
the camshaft timing will be incorrect.
- Install new steel gasket to front of cylinder head and install
VANOS unit.
NOTE -
If VANOS control unit is being replaced, be sure to check and
adjust camshaft timing as described in
11 7 Camshaft Tim-
ing Chain.
- Reinstall engine lifting eye.
Tightening torque
VANOS unit to cylinder head
M6 nut
M7 nut
lo Nm (89 in-lb)
14 Nrn (10 it-lb)
- Reconnect electrical harness connectors to camshaft posi-
tion sensors and VANOS solenoid valves.
4 Insert and tighten down VANOS hydraulic piston set screws
in splined shafts on
intake and exhaust camshafts.
CAUJION-
Set screws have left hand tliread. Tighten counterclockwise.
Tightening torque
Hydraulic piston
to splined shaft 10 Nm (89 in-lb)
< Replace sealing caps inside VANOS unit with short needle
nose pliers.
Page 150 of 1002
Downloaded from www.Manualslib.com manuals search engine
11 3-56
I Cvlinder Head Removal and Installation
- Installation of the remaining parts is reverse or removal, not-
ing the following:
- Refill cooling system as described in 170 Radiator and
Cooling System.
Change engine oil and filter as described in
020 Mainte-
nance.
If necessary, adjust accelerator cable.
a Reconnect battery.
CAUTION- To prevent damaging the engine electronic systems, installall
ground wire previously removed, including the ground wires
for the
ionition coils.
Tightening torque Coolant drain
pluq to cylinder bloclc 25 Nm (1 8 ft-lb)
Radiator cooling fan to coolant pump 40 Nm (30 ft-lb) -
Radiator drain screw to radiator 2.5
Nm (22 in-lb)
spark plug to cylinder head 25
Nm (1 8 ft-lb)
CYLINDER MEAD REMOVAL AND
INSTALLATION (M62 ENGINE)
This procedure covers cylinder head removal and installation
for the
M62 V-8 engine. Procedures forthe M62 TU VANOS
engine are not covered in this manual.
Intake manifold, left cylinder head, and right cylinder head re-
moval and installation are written as separate procedures.
The intake manifold must be removed before the cylinder
heads can be removed.
WARNING
-
Due to risk of personal injuv be sure the engine is cold be-
fore beginning the removal procedure.
Cylinder head removal and installation requires multiple spe-
cial service tools. Read the entire procedure before beginning
the repair.
Intake manifold, removal and installation,
M62 engine
- Disconnect negative (-) battery cable.
CAUTION- Prior to disconnecting the
batterj read the baitery discon-
nection cautions
in 001 General Cautions and Warnings.
Page 178 of 1002
Downloaded from www.Manualslib.com manuals search engine
This group covers cylinder head and valvetrain service and
repair. Some of the repair procedures described here require
that the cylinder head first be removed as described in
113
Cylinder Head Removal and Installation.
NOTE- For timing chain and
VANOS repair information, see 117
Camshaft Timing Chain.
If it is
determined that the cylinder head will require signif-
icant reconditioning work, a remanufactured cylinder head
may be a good alternative. Remanufactured cylinder
heads are available from an authorized
BMW dealer.
The information given in this repair group is organized ac-
cording to engine code. For engine application information,
see
I00 Engine-General.
For specific repair procedures, refer to the appropriate repair
group:
* 020 Maintenance
100 Engine-General
113 Cylinder Head Removal and Installation
117 Camshafi Timing Chain
= 170 Radiator and Coo!ing System
Special Tools
Special BMW tools are required for most cylinder head ser-
vice described in this repair group. Many of these tools are ex-
pensive and only available through an authorized
BMW
dealer. If the special tools are not available, have the cylinder
head removed and disassembled by an authorized BMW
dealer. Be sure to read each procedure thoroughly before
starting a job to determine which special tools and equipment
will be necessary.
Most of the repairs to a cylinder head require precision
rna-
chine work to specific tolerances. This type of work should be
performed by an authorized BMW repairfacility or an ASE
certified machinist.
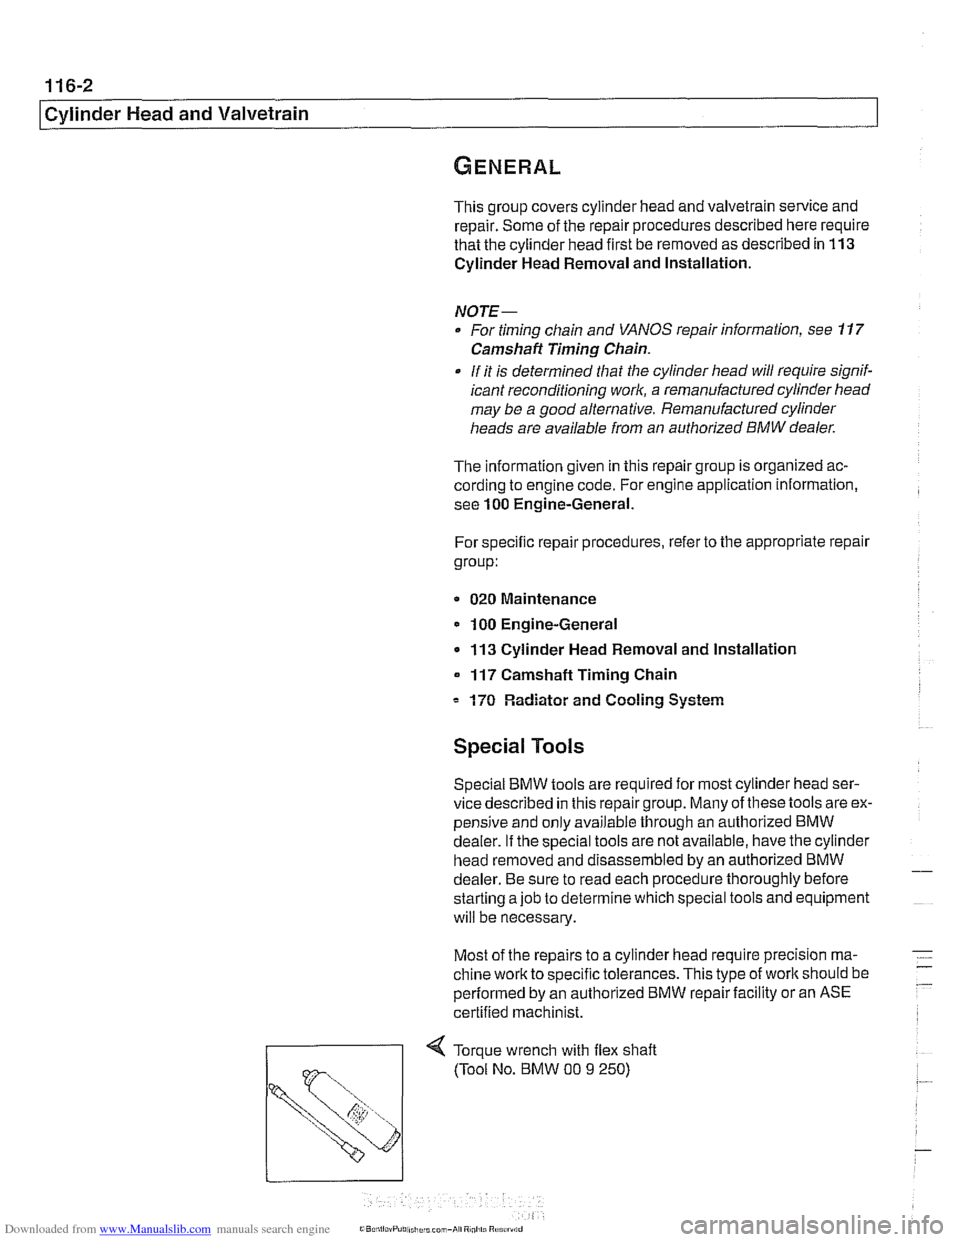
71 Torque wrench with flex shaft