ECO BMW 525i 1997 E39 Owners Manual
[x] Cancel search | Manufacturer: BMW, Model Year: 1997, Model line: 525i, Model: BMW 525i 1997 E39Pages: 1002
Page 267 of 1002

Downloaded from www.Manualslib.com manuals search engine
Camshaft Timing chain1
Tap locating dowels into cover until they protrude 2 to 3 mm
from sealing surface.
- Using new gaskets, install lower timing chain cover:
Tap cover into position to engage dowels.
Install timing chain cover fasteners and tighten to
5 Nm (44
in-lb).
Drive dowels in flush to front of cover.
. Tighten cover mounting bolts alternately and in stages.
Install cylinder head to timing chain cover fasteners and
tighten.
Tightening torques Lower timing chain cover to block
M7 15 Nm (1 1 ft-lb)
ME 20 Nm (15 it-lb)
- Replace front crankshaft radial seal. See Crankshaft oil
seal, front, replacing
(M52 engine).
Install engine oil pan using
a new gasket. See 119 Lubrica-
tion System.
Mount primary timing chain sprocket to primary
cha~n so that
arrow on sprocket faces up. Mount sprocket to camshafl so
that tapped holes in camshaft are on left side of elongated
holes in sprocket.
4 Install adjustable timing chain tensioner (BMW special tool
11 4 220). Thread tool in finger tight until slack is removed
from chain.
NOTE-
BMW special tool 11 4 220 is an adjustable timing chain ten-
sioner that simulates the function of the hydraulic tensioner.
- Check that elongated holes in primary sprocket are centered
to bolt holes in camshafl and chain is free of slack.
- Install secondary timing chain guide and secondary chain
tensioner. Tighten mounting bolts (tensioner remains
locited
down).
F81.,,l,ryT-iib.l>nii,:oni-Aii Ri"ilti R
Page 268 of 1002
Downloaded from www.Manualslib.com manuals search engine
-- -
Chain 1
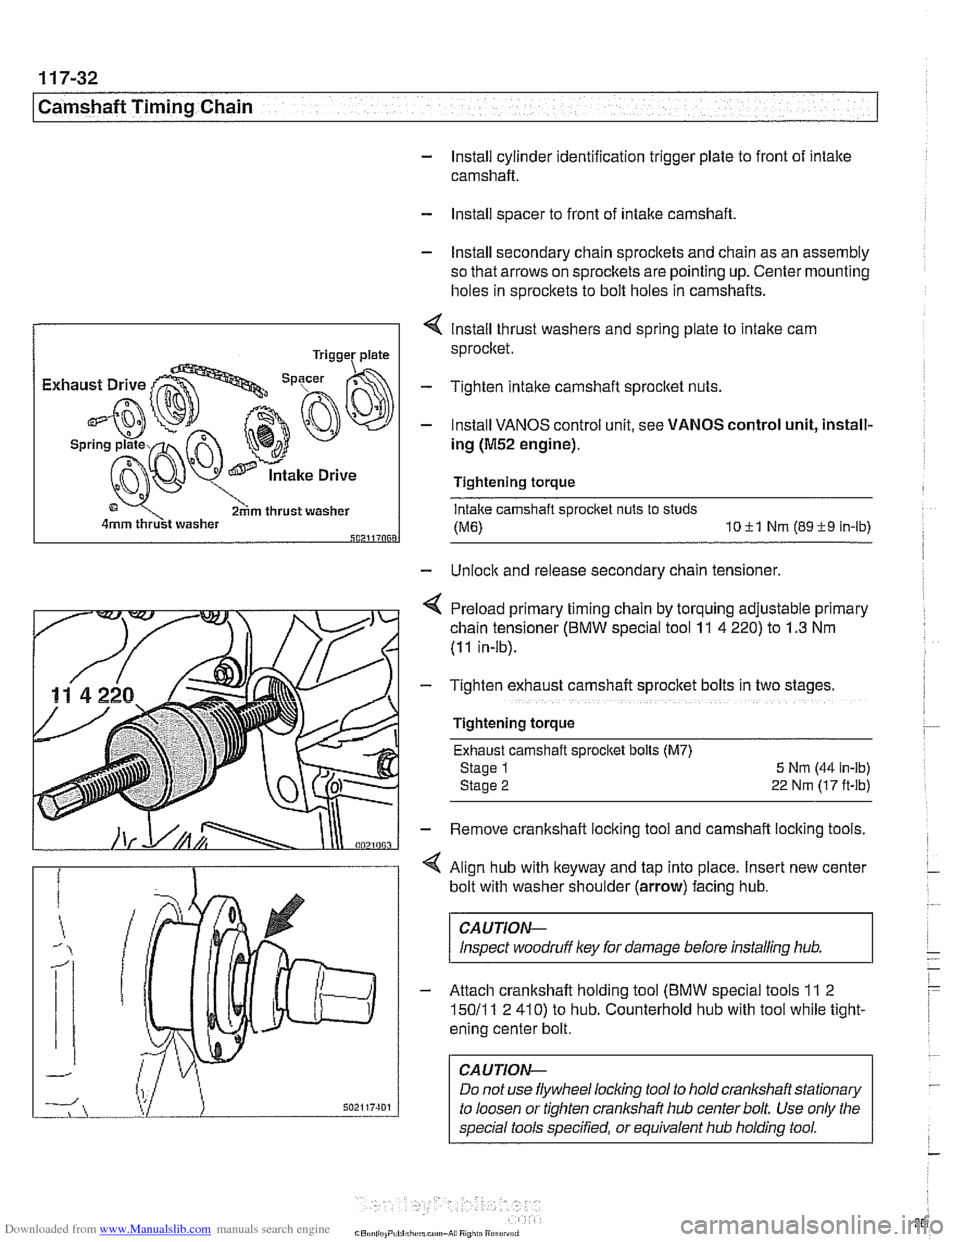
- Install cylinder identification trigger plate to front of intake
camshaft.
- Install spacer to front of intake camshaft
- Install secondary chain sprockets and chain as an assembly
so that arrows on sprockets are pointing up. Center mounting
holes in sprockets to bolt holes in camshafts.
4 lnstall thrust washers and spring plate to intake cam
sprocket.
Tighten intake camshaft sprocket nuts.
- Install VANOS control unit, see VANOS control unit, install-
ing
(M52 engine).
Tightening torque
Intake camshaft sprocket nuts to studs
(ME) 1011 Nm (8919 In-lb) 502117068
- Unlock and release secondary chain tensioner,
4 Preload primary timing chain by torquing adjustable primary
chain tensioner (BMW special tool
11 4 220) to 1.3 Nm
(11 in-lb).
- Tighten exhaust camshaft sprocket bolts in two stage
Tightening torque Exhaust camshaft sprocket bolls (M7)
Stage 1
5 Nrn (44 in-lb)
Stage
2 22 Nm (17 ft-lb)
- Remove crankshaft locking tool and camshaft locking tools.
< Align hub with keyway and tap into place. Insert new center
bolt with washer shoulder (arrow) facing hub.
CAUTION-
Inspect woodruff ley for damage before installing hub.
- Attach crankshaft holding tool (BMW special tools 11 2
15011 1 2 410) to hub. Counterhold hub with tool while tight-
ening center bolt.
CAUTION-
Do not use flywheel locling tool to hold crankshaft stationary
to loosen or tighten
cranlshaft hub center bolt. Use only the
special tools specified, or equivalent hub holding tool.
Page 271 of 1002
Downloaded from www.Manualslib.com manuals search engine
Camshaft Timing Chain
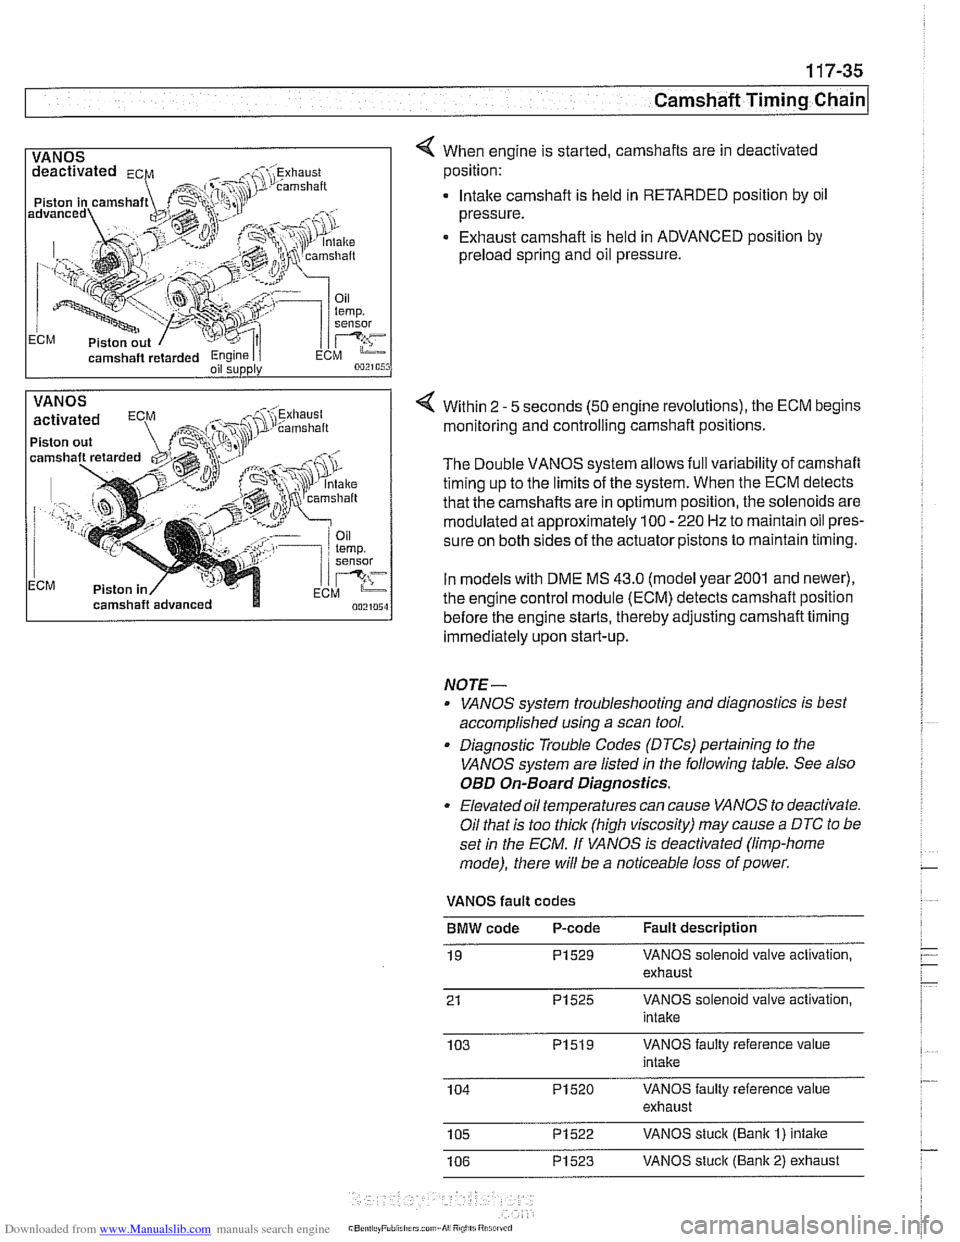
1 VANOS I 4 When engine is started, camshafts are in deactivated
camshaft
retarded Engine I i oil supply
position:
. lntalte camshaft is held in RETARDED position by oil
pressure.
Exhaust camshaft is held in ADVANCED position by
preload spring and oil pressure.
VANOS
Piston out
ECM Piston in Within 2
- 5
seconds (50 engine revolutions), the ECM begins
monitoring and controlling camshaft positions.
The Double VANOS system allows full variability of camshaft
timing up to the limits of the system. When the ECM detects
that the camshafts are in optimum position, the solenoids are
modulated at approximately 100
- 220 Hz to maintain oil pres-
sure on both sides of the actuator pistons to maintain timing.
In models with DME
MS 43.0 (model year2001 and newer),
the engine control module (ECM) detects camshaft position
before the engine starts, thereby adjusting camshaft timing
immediately upon start-up.
NOTE-
. VANOS system troubleshooting and diagnostics is best
accomplished using a scan tool.
. Diagnostic Trouble Codes (DTCs) pertaining to the
VANOS system are listed
in the following table. See also
OED On-Board Diagnostics.
Elevated oil temperatures can cause VANOS to deactivate.
Oil that is too thick (high viscosity) may cause
a DTC to be
set
in the ECM. If VANOS is deactivated (limp-home
mode), there will be a noticeable loss of power.
VANOS fault codes
BMW code P-code Fault description
19
PI529 VANOS solenoid valve activation,
exhaust
21
PI525 VANOS solenoid valve activation,
intake
103
PI519 VANOS faulty reference value
intake
104
PI520 VANOS faulty reference value
exhaust
105
PI522 VANOS stuck (Bank I) intake
106
PI523 VANOS stuck (Bank 2) exhaust
Page 277 of 1002
Downloaded from www.Manualslib.com manuals search engine
Camshaft Timing Chain
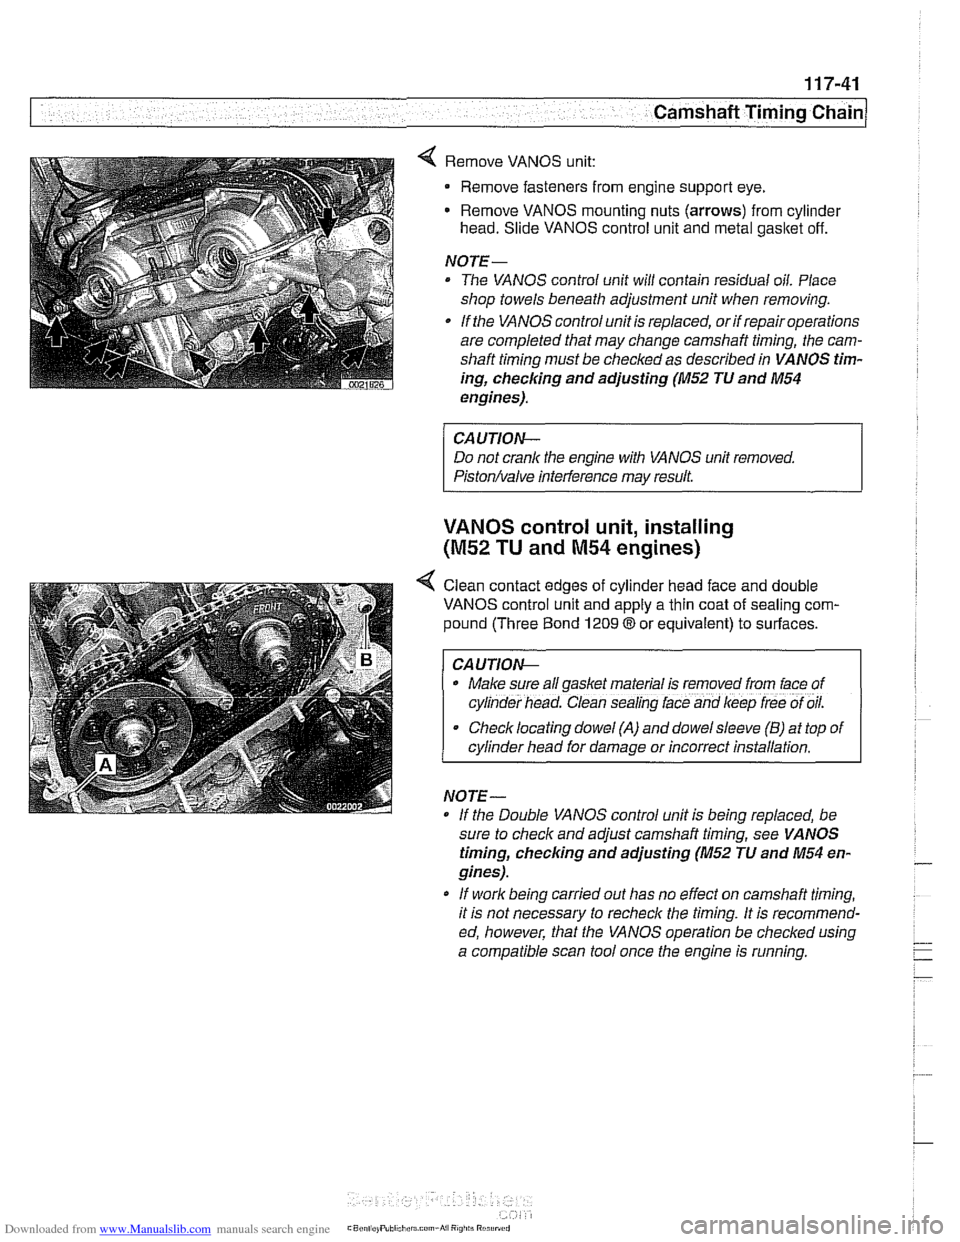
4 Remove VANOS unit:
Remove fasteners from engine support eye.
Remove VANOS mounting nuts (arrows) from cylinder
head. Slide VANOS control unit and metal gasltet off.
NOJE-
The VANOS control unit will contain residual oil. Place
shop towels beneath adjustment unit when removing.
If the VANOS control unit is replaced, or if repair operations
are completed that may change camshaft timing, the cam-
shaft timing must be checked as described in VANOS tim-
ing,
checlcing and adjusting (M52 JU and M54
engines).
CAUJION-
Do not crank the engine with VANOS unit removed.
Piston/valve interference may result.
VANOS control unit, installing
(M52 TU and M54 engines)
< Clean contact edges of cylinder head face and double
VANOS control unit and apply a thin coat of sealing com-
pound (Three Bond
1209 8 or equivalent) to surfaces.
I CAUJION-
. Make sure all gaskel material is removed from lace of
cyl~nder head. Clean sealing lace and keep lree of oil.
Checklocating dowel (A) and dowelsleeve (B) at top of
cylinder head for damage or incorrect installation.
NO
JE -
If the Double VANOS control unit is beino reolaced. be -.
sure to check and adjust camshaft timing, see VA NOS
timing, checking and adjusting (M52 JU and M54 en-
gines).
* If work being carried out has no effect on camshaft timing,
it is not necessary to recheck the timing. It is recommend-
ed, however, that the VANOS operation be checked using
a compatible scan tool once the engine is running.
Page 281 of 1002
Downloaded from www.Manualslib.com manuals search engine
Camshaft Timing chain1
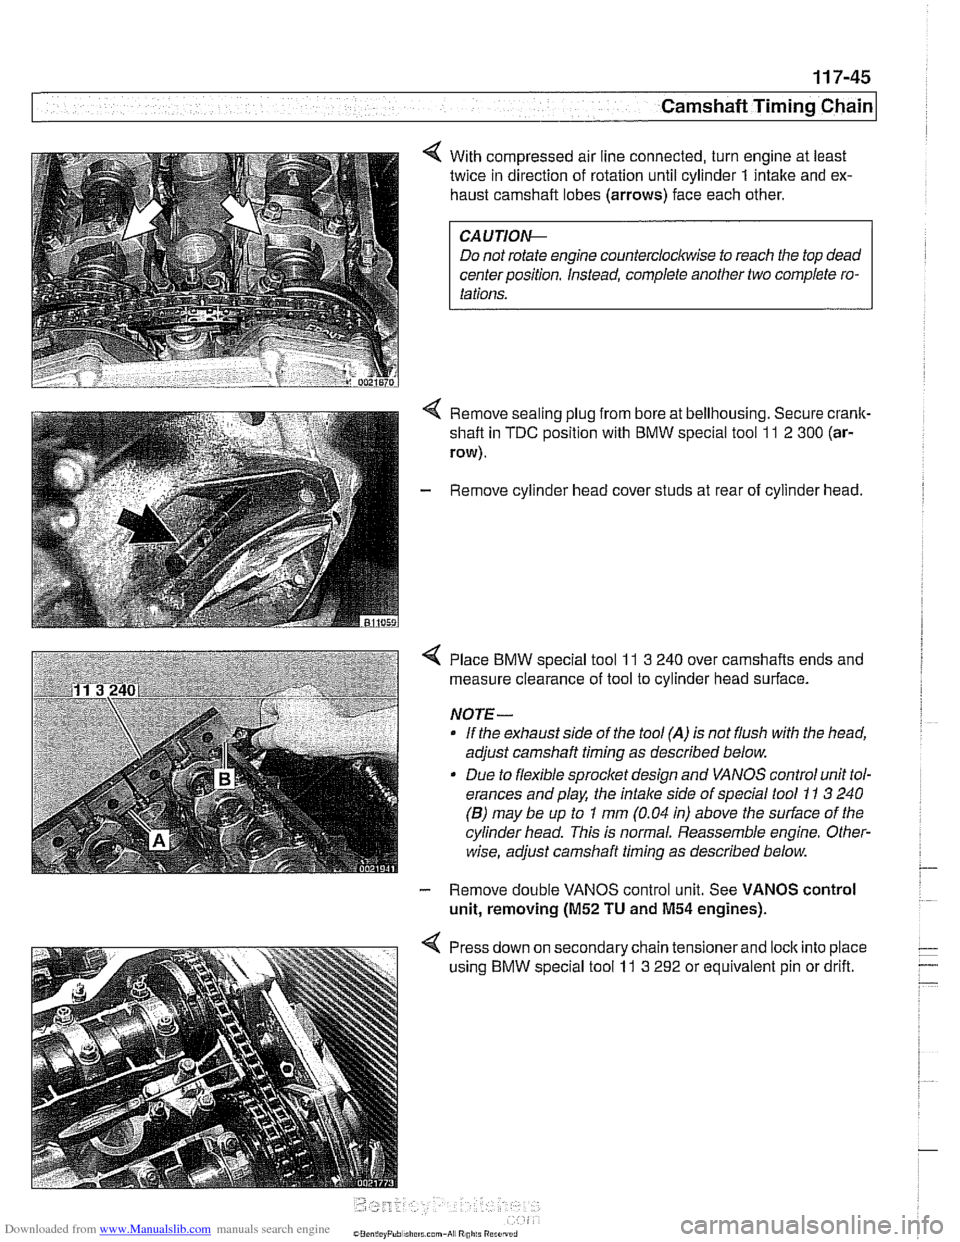
< With compressed air line connected, turn engine at least
twice in direction of rotation until cylinder
1 intake and ex-
haust camshaft lobes (arrows) face each other.
Do not rotate engine counterclockwise to reach the top dead
center position. Instead, complete another two complete ro-
Remove sealing plug from bore at bellhousing. Secure crank-
shaft in
TDC position with BMW special tool 11 2 300 (ar-
row).
- Remove cylinder head cover studs at rear of cylinder head.
< Place BMW special tool 11 3 240 over camshafts ends and
measure clearance of tool to cylinder head surface.
NOTE-
If the exhaust side of the tool (A) is not flush with the head,
adjust camshaft timing as described below.
Due to flexible sprocket design and VANOS control unit tol-
erances and play, the
intake side of special tool 11 3 240
(B) may be up to 1 mm (0.04 in) above the surface of the
cylinder head. This is normal. Reassemble engine. Other-
wise, adjust camshaft timing as described below.
- Remove double VANOS control unit. See VANOS control
unit, removing
(M52 TU and M54 engines).
< Press down on secondary chain tensionerand lock into place
using BMW special tool
11 3 292 or equivalent pin or drift.
Page 286 of 1002
Downloaded from www.Manualslib.com manuals search engine
11 7-50
/Camshaft Timing Chain
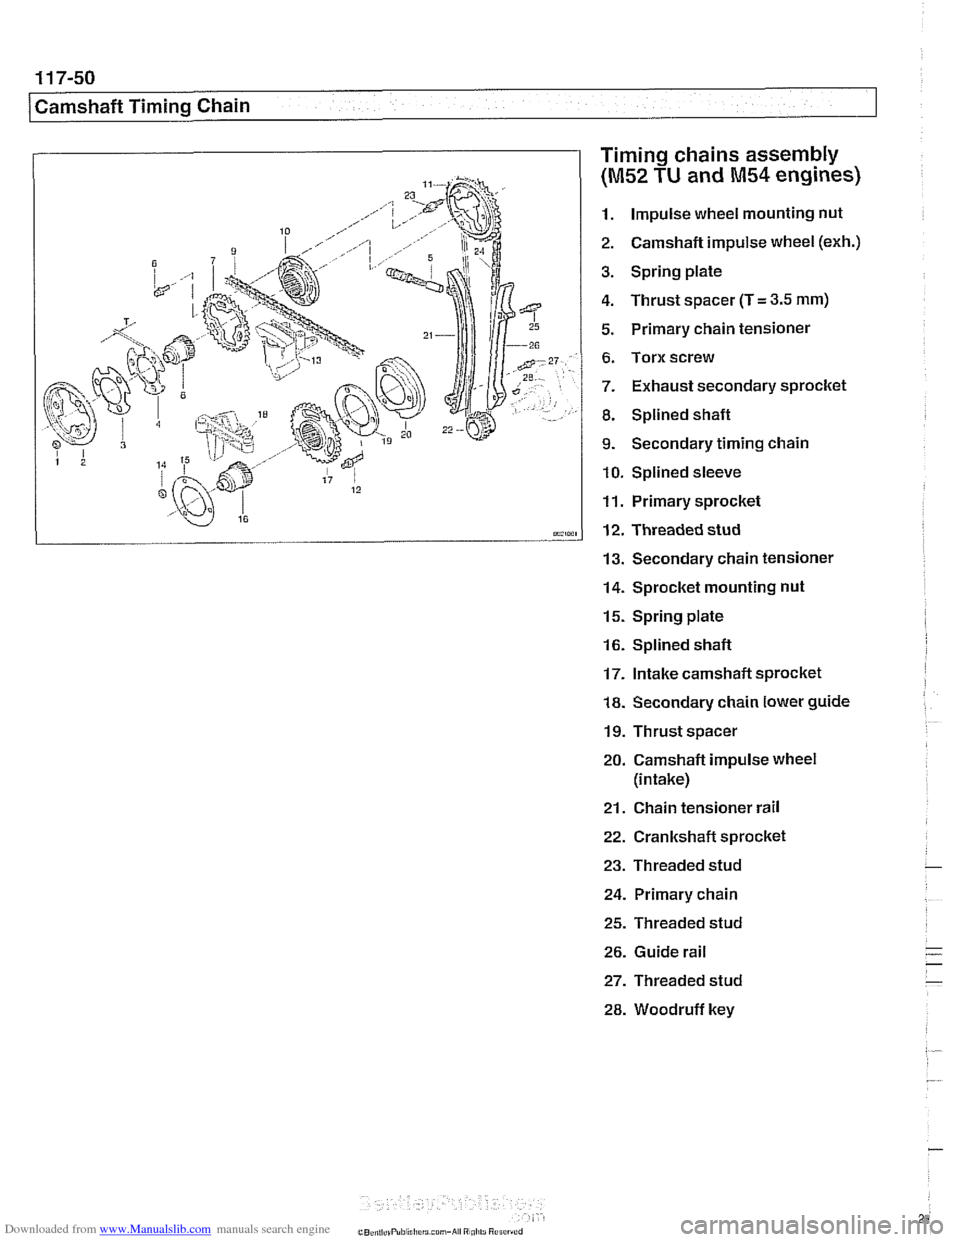
Timing chains assembly
(M52 TU and M54 engines)
1. Impulse wheel mounting nut
2. Camshaft impulse wheel
(exh.)
3. Spring plate
4. Thrust spacer (T
= 3.5 mm)
5. Primary chain tensioner
6. Torx screw
7. Exhaust secondary sprocket
8. Splined shaft
9. Secondary timing chain
10. Splined sleeve
11. Primary sprocket
12. Threaded stud
13. Secondary chain tensioner
14. Sprocket mounting nut
15. Spring plate
16. Splined shaft
17. Intake camshaft sprocket
18. Secondary chain lower guide
19. Thrust spacer
20. Camshaft impulse wheel
(intake)
21. Chain tensioner rail
22. Crankshaft sprocket
23. Threaded stud
24. Primary chain
25. Threaded stud
26. Guide rail
27. Threaded stud
28. Woodruff key
Page 288 of 1002
Downloaded from www.Manualslib.com manuals search engine
11 7-52
Camshaft Timing Chain
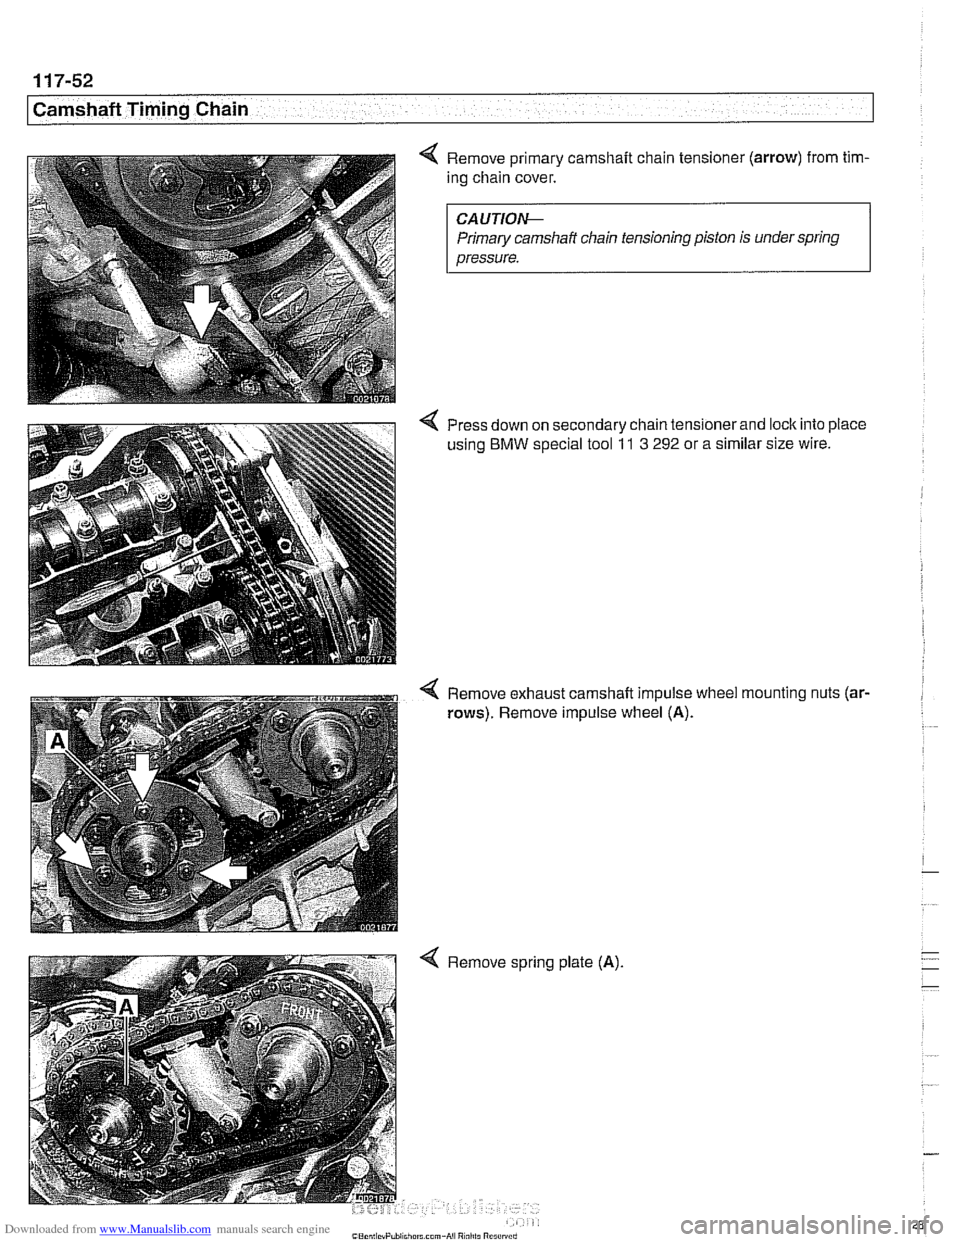
Remove primary camshaft chain tensioner (arrow) from tim-
ing chain cover.
CAUTIOIG
Primary camshaft chain tensioning piston is under spring
pressure.
Press down on secondary chain tensionerand lock into place
using
BMW special tool 11 3 292 or a similar size wire.
Remove exhaust camshaft impulse wheel
rows). Remove impulse wheel (A).
4 Remove spring plate (A). mounting
nuts
(ar-
Page 289 of 1002
Downloaded from www.Manualslib.com manuals search engine
-
Camshaft Timing chain1
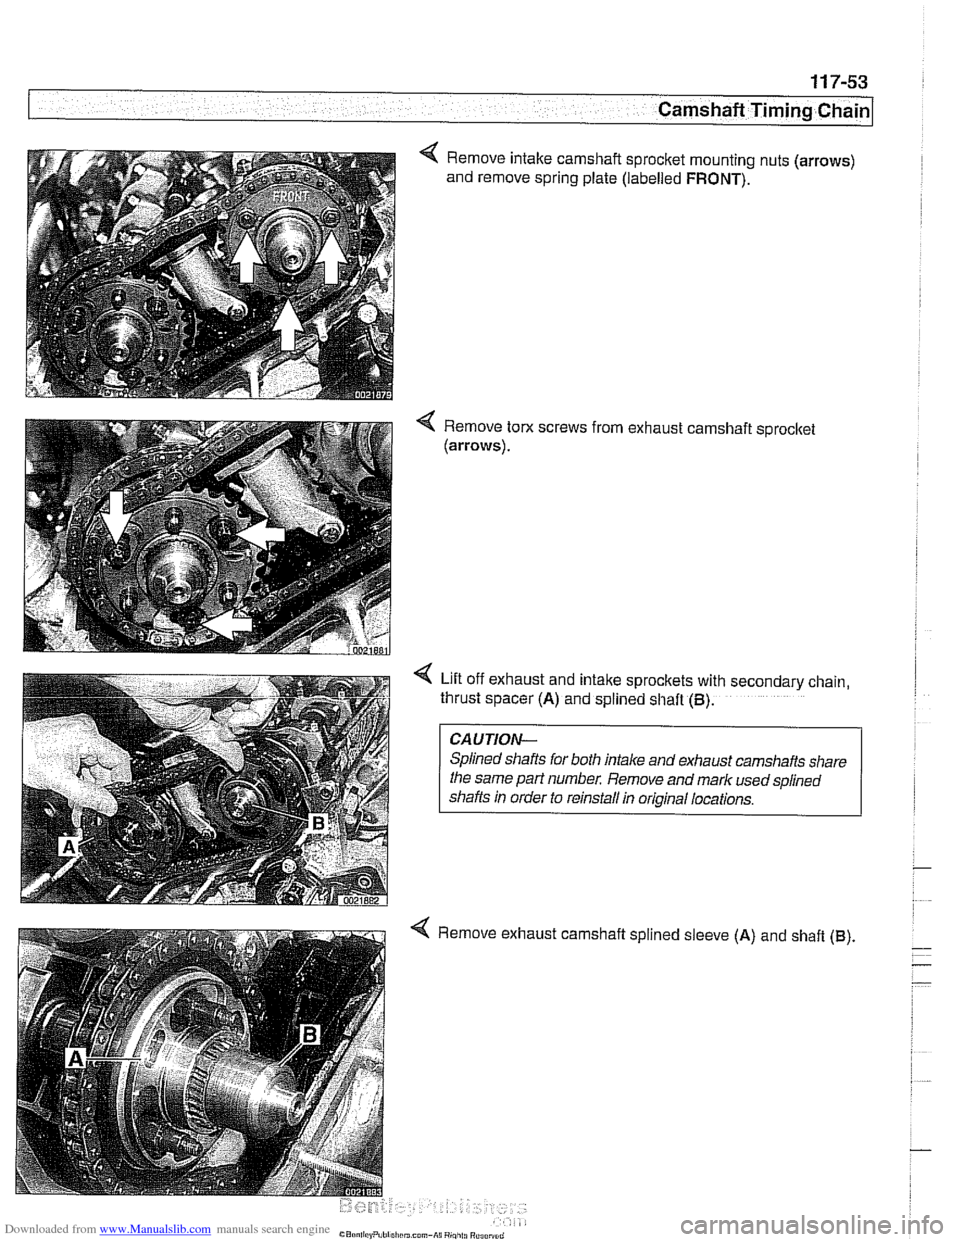
< Remove intake camshaft sprocket mounting nuts (arrows)
and remove spring plate (labelled
FRONT).
Remove tom screws from exhaust camshaft sprocket
(arrows).
Lift off exhaust and intake sprockets with secondary chain,
thrust spacer
(A) and splined shaft (B).
CAUTION-
Splined shafts for both intake and exhaust camshafts share
the same part
numbe,: Remove and mark used splined
shafts in order to reinstall in original locations.
4 Remove exhaust camshaft splined sleeve (A) and shaft (8).
Page 290 of 1002
Downloaded from www.Manualslib.com manuals search engine
1 17-54
Camshaft Timing Chain
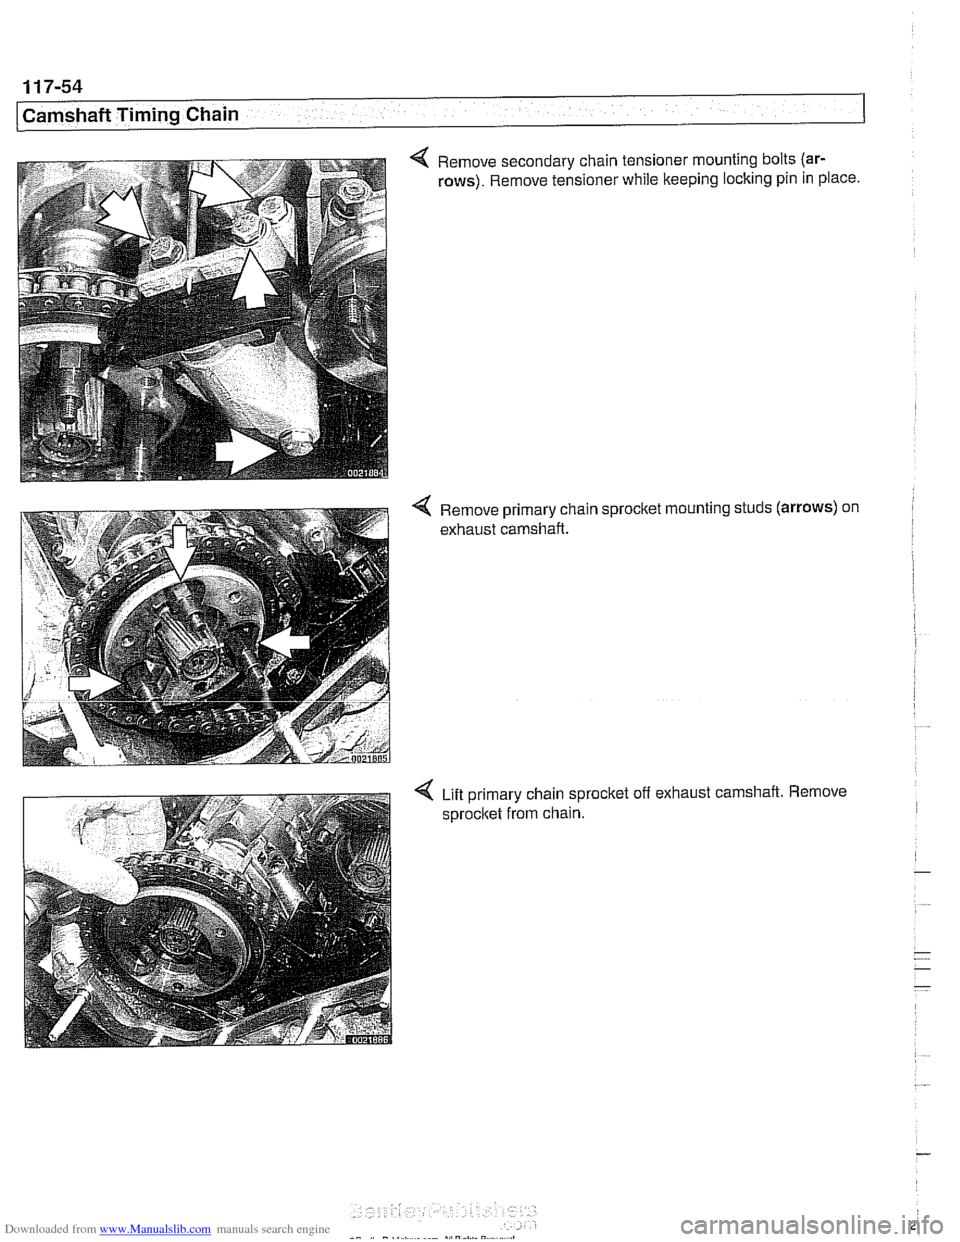
4 Remove secondary chain tensioner mounting bolts (ar-
rows).
Remove tensioner while keeping locking pin in place.
4 Remove primary chain sprocket mounting studs (arrows) on
exhaust camshaft.
4 Lift primary chain sprocltet off exhaust camshaft. Remove
sprocket from chain.
Page 291 of 1002
Downloaded from www.Manualslib.com manuals search engine
11 7-55
Camshaft Timing Chain
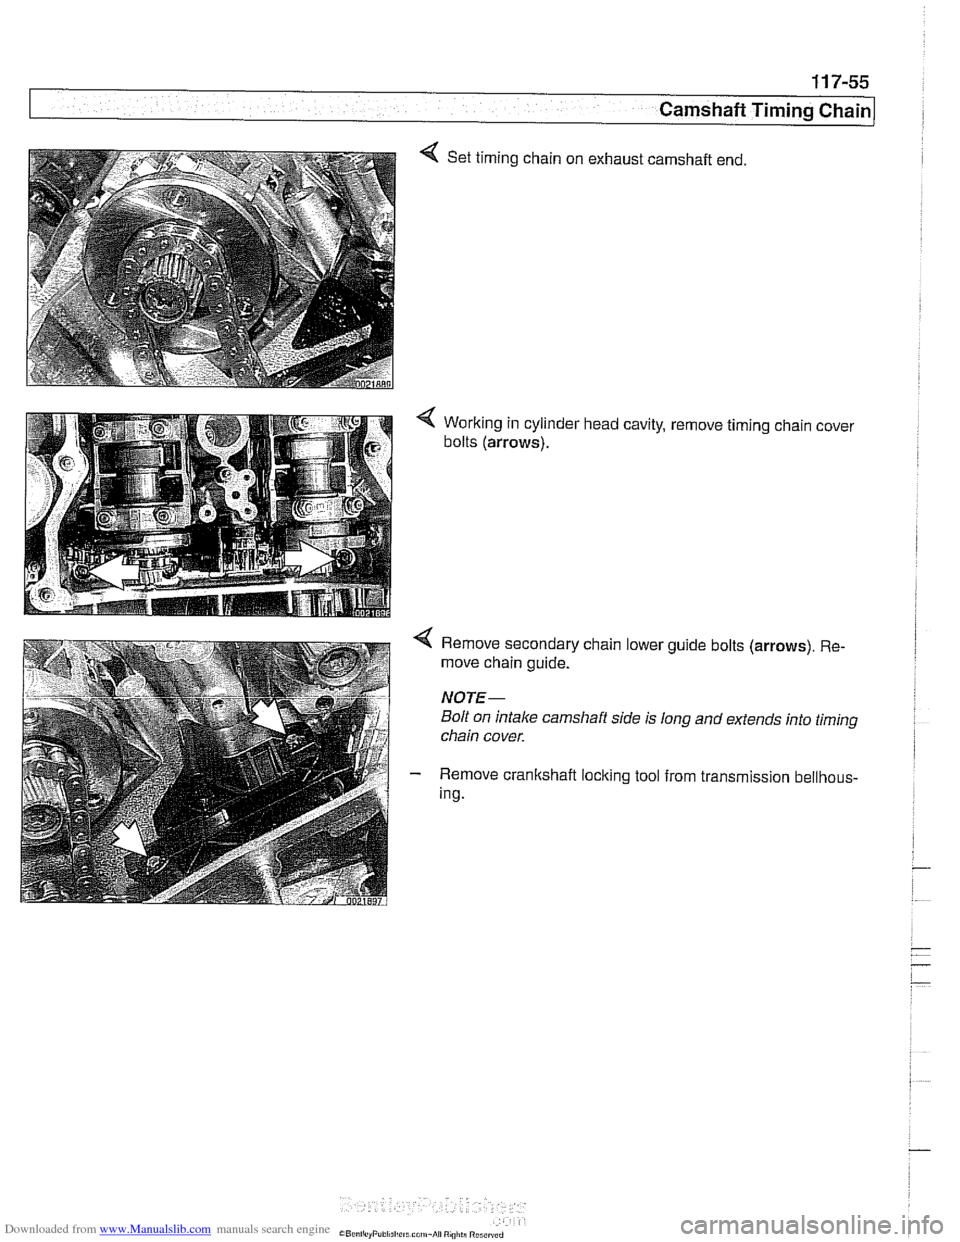
< Set timing chain on exhaust camshaft end
< Working in cylinder head cavity, remove timing chain cover
bolts
(arrows).
< Remove secondary chain lower guide bolts (arrows). Re-
move chain guide.
NOTE-
Bolt on intake camshaft side is long and extends into timing
chain cover.
- Remove crankshaft loclting tool from transmission bellhous-
ing.