turn BMW 540i 1999 E39 Workshop Manual
[x] Cancel search | Manufacturer: BMW, Model Year: 1999, Model line: 540i, Model: BMW 540i 1999 E39Pages: 1002
Page 11 of 1002
Downloaded from www.Manualslib.com manuals search engine
01 0-1
010 General
General ........................... .01 0.2
How to Use this Manual ............ .01 0.2
Warnings. cautions and notes ........... .0l 0.3
Getting Started .................... .0i 0.5
Safety ............................. .O1 0.5
Lifting the car ........................ .O1 0.5
Raising car ......................... .O1 0.5
Working under car .................... .O1 0.6
Advice for the Beginner ............ .O1 0.7
Planning ahead ...................... .O1 0.7
Workshop practices ................... .O1 0.7
Non-reusable fasteners ................ .O1 0.7
Tightening fasteners .................. .O1 0.8
Gaskets and seals .................... .O1 0.9
Electrical testing .................... .O1 0.10
Wire repairs ........................ .O1 0.10
Buying Parts ..................... .01 0.11
Genuine BMW parts ................. .O1 0.11
Non-returnable parts ................. .O1 0.11
Information you need to know .......... .0l 0.12
Service ........................... 01 0-1 3
TOOIS ............................. 010-13
Basic tool requirements ............... 01 0-1 4
Jack stands ......................... 01 0-1 6
Oil change equipment ................. 01 0-1 6
Torque wrench ...................... 01 0-17
Digital multimeter .................... 010-17
BMW special tools ................... 01 0-1 8
Emergencies ...................... 01 0-1 8
Changing a tire ...................... 01 0-1 8
Jump starting ....................... 01 0-1 9
Indicator and warning lights ............ 01 0-1 9
Towing ............................ 010-20
Spare parts kit ...................... 010-21
Page 20 of 1002
Downloaded from www.Manualslib.com manuals search engine
01 0-1 0
General
Electrical testing
Many electrical problems can be understood and solved with
only a little fundamental knowledge of how electrical circuits
function.
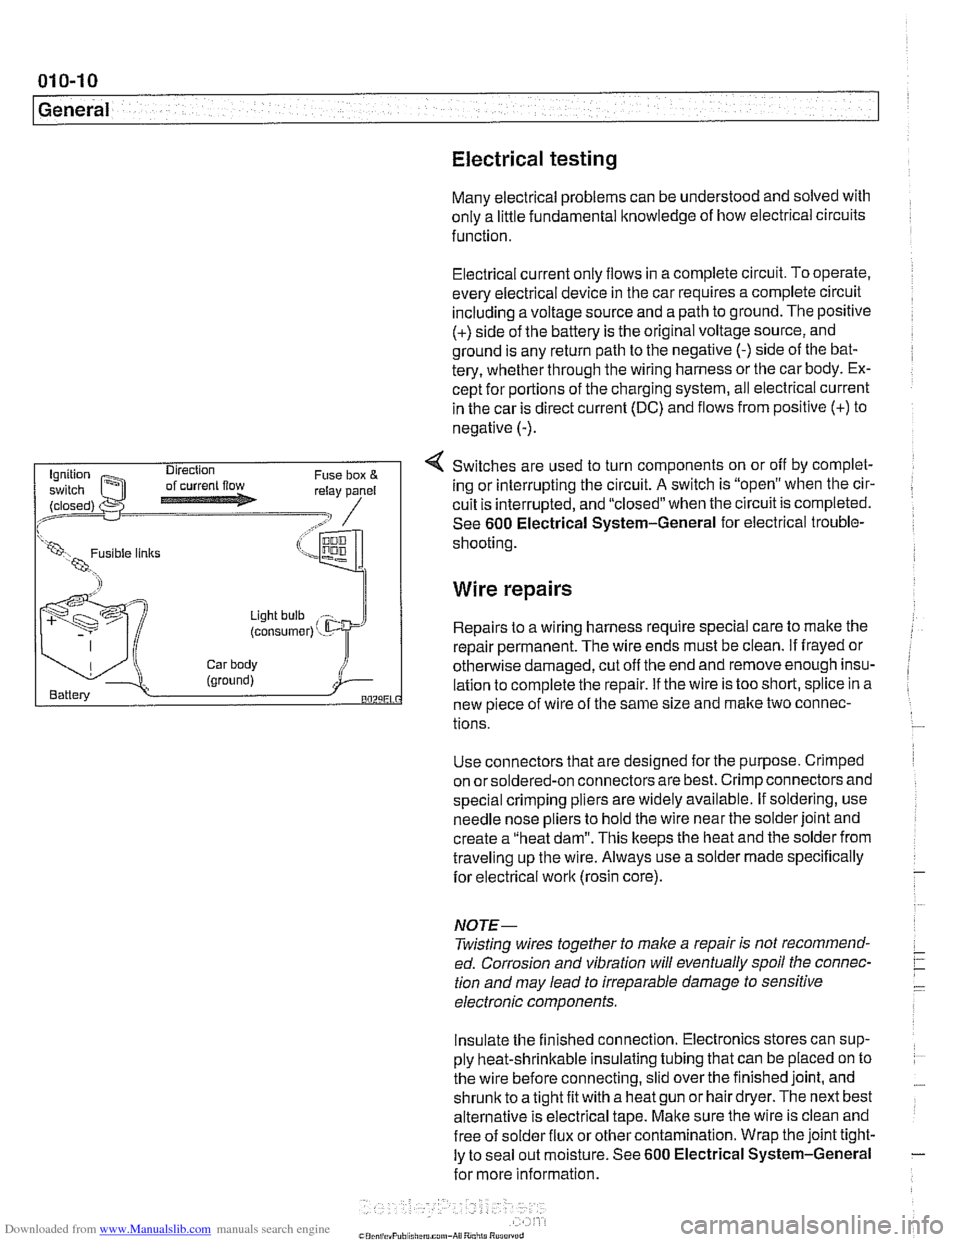
Electrical current
only flows in a complete circuit. To operate.
every electrical device in the car requires a complete circuit
including a voltage source and a path to ground. The positive
(+) side of the battery is the original voltage source, and
ground is any return path to the negative
(-) side of the bat-
tery, whether through the wiring harness or the car body. Ex-
cept for portions of the charging system, all electrical current
in the car is direct current (DC) and flows from positive
(+) to
negative
(-).
4 Switches are used to turn components on or off by complet-
ing or interrupting the circuit.
A switch is "open" when the cir-
cuit is interrupted, and "closed" when the circuit is completed.
See
600 Electrical System-General for electrical trouble-
(LW, 1 shooting
Wire repairs
Light bulb
(consumer) ' - Repairs to a wiring harness require special care to make the
repair permanent. The wire ends must be clean.
if frayed or
Car body otherwise damaged, cut off the end and remove enough insu- (ground) i Battery lation to complete the repair. if the wire is too short, splice in a BOZLiEL new piece of wire of the same size and make two connec-
tions.
Use connectors that are designed for the purpose. Crimped
on orsoldered-on connectors are best. Crimp connectors and
special crimping pliers are widely available. If soldering, use
needle nose pliers to hold the wire near the solder joint and
create a "heat dam". This keeps the heat and the solder from
traveling up the wire. Always use a solder made specifically
for electrical
work (rosin core).
NOJE-
Twisting wires together to make a repair is not recommend-
ed. Corrosion and vibration will eventually spoil the connec-
tion and may lead to irreparable damage to sensitive
electronic components.
Insulate the finished connection. Electronics stores can sup-
ply heat-shrinkable insulating tubing that can be placed on to
the wire before connecting, slid over the finished joint, and
shrunic to a tight fit with a heat gun or hair dryer. The next best
alternative is electrical tape. Make sure the wire is clean and
free of
solder flux or other contamination. Wrap the joint tight-
ly to seal out moisture. See
600 Electrical System-General
for more information.
Page 21 of 1002
Downloaded from www.Manualslib.com manuals search engine
- - ..
General
Many of the maintenance and repair tasks in this manual call
forthe installation of new parts, orthe use of new gaskets and
other materials when reinstalling parts. Most often, the parts
that will be needed should be on hand before beginning the
job. Read the introductorytext and the complete procedure
to
determine which parts will be needed.
NOTE-
For some biggerjobs, partial disassembly and inspection is
required to determine a complete parts list. Read the proce-
dure carefully and, if necessary, male other arrangements to
get the necessary parts while your car is disassembled.
Genuine BMW parts
Genuine BMW replacement parts from an authorized BMW
dealer are designed and manufactured to the same high stan-
dards as the original parts. They will be the correct material.
manufactured to same specifications, and guaranteed to fit
and work as intended. Most genuine BMW parts carry a limit-
ed warranty.
Many independent repair shops make a point of using genu-
ine
BMW parts, even though they may at times be more ex-
pensive than parts from other sources. They know the value
of doing the job right with ihe right parts. Parts from other
sources can be as good as BMW parts, particularly if manu-
factured by one of
BMW's or~ginal equipment suppliers, but it
is often difficult to know.
BMW is constantly updating and improving their cars, often
malting improvements during a given model year. BMW may
recommend a newer, improved part as a replacement, and
your authorized dealer's parts department will know about it
and provide it. The BMW parts organization is best equipped
to deal with your BMW parts needs.
Non returnable parts
Some parts cannot be returned, even for credit. The best ex-
ample is electrical parts, which are almost universally consid-
ered non returnable. Buy electrical parts carefully, and be as
sure as possible that a replacement is needed, especially for
expensive parts such as electronic control units. It may be
wise to let an authorized BMW dealer or other qualified shop
confirm your diagnosis before replacing an expensive non re-
turnable
Dart.
Page 28 of 1002
Downloaded from www.Manualslib.com manuals search engine
-
General
BMW special tools
Many repairs covered in this manual call for the use of BMW
special tools. Many of the BMW special tools mentioned in
this manual are simply the best thing to use to do the job cor-
rectly. In these cases, the tool is identified with a
BMW parl
number. See your authorized BMW dealer parts department
for information on how to order special tools.
There are some jobs for which expensive special tools are es-
sential, and not a cost-effective purchase for a one time repair
by the do-it-yourself owner. This manual includes such re-
pairs for the benefit of those with the necessary experience
and access to tools. For the do-it-yourselfer, the need for spe-
cial tools is noted in the text, and whether or not BMW dealer
service is recommended.
Changing a tire
- Stop car on as flat a surface as possible, in a place where you
can be easily seen by other drivers. Avoid stopping just over
the crest of a hill.
WARNING -
If a tire goes flat while driving, pull well off the road. Changing
a tire on a busy slreet or liigliway is very dangerous. If
nec-
essag drive a short distance on the flat tire to get to a safe
place. It is much better to ruin a tire or rim than to
risk being
hit.
-
- Turn on emergency flashers, and set out flares or emergency
markers well behind car.
Choclc wheel (wheel chock located
in trunk) diagonally opposite to the one being changed. Pas-
sengers should get out of car and stand well away from road.
- Take jaclc and tools from tool area beneath trunk mat. Re-
move spare tire from tire storage tray.
- Loosen wheel bolts while car is on ground, but leave them a
little snug.
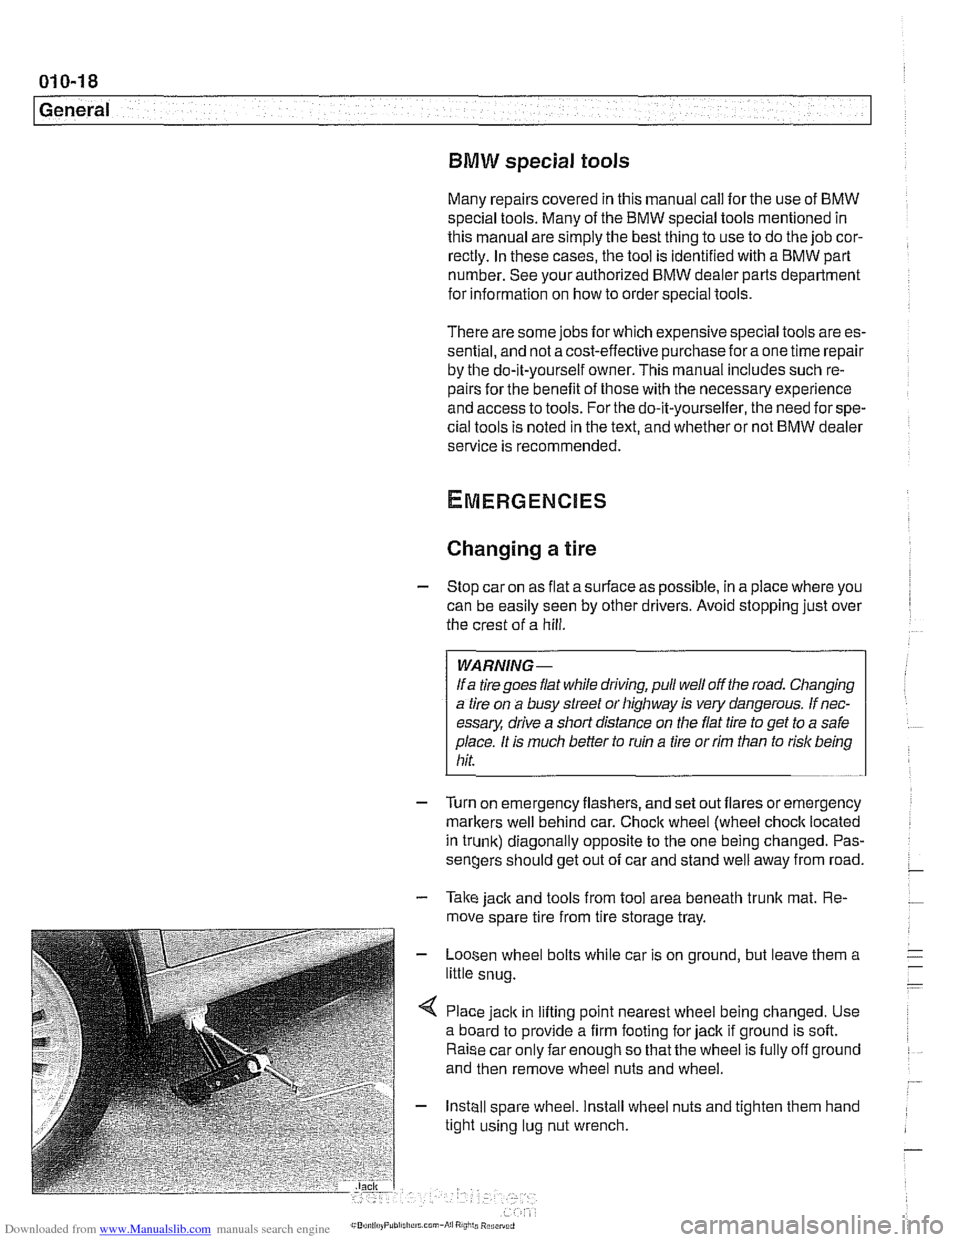
< Place jack in lifting point nearest wheel being changed. Use
a board to provide a firm footing for jack if ground is soft.
Raise car only far enough so that the wheel is fully off ground
and then remove wheel nuts and wheel.
- Install spare wheel. Install wheel nuts and tighten them hand
tight using lug nut wrench.
Page 29 of 1002
Downloaded from www.Manualslib.com manuals search engine
General
Cars with discharged or dead batteries can be jump-started
using the good battery from another car. See owner's manual
for proper instruction on jump starting. When jump-starling
the engine, always note the following warnings.
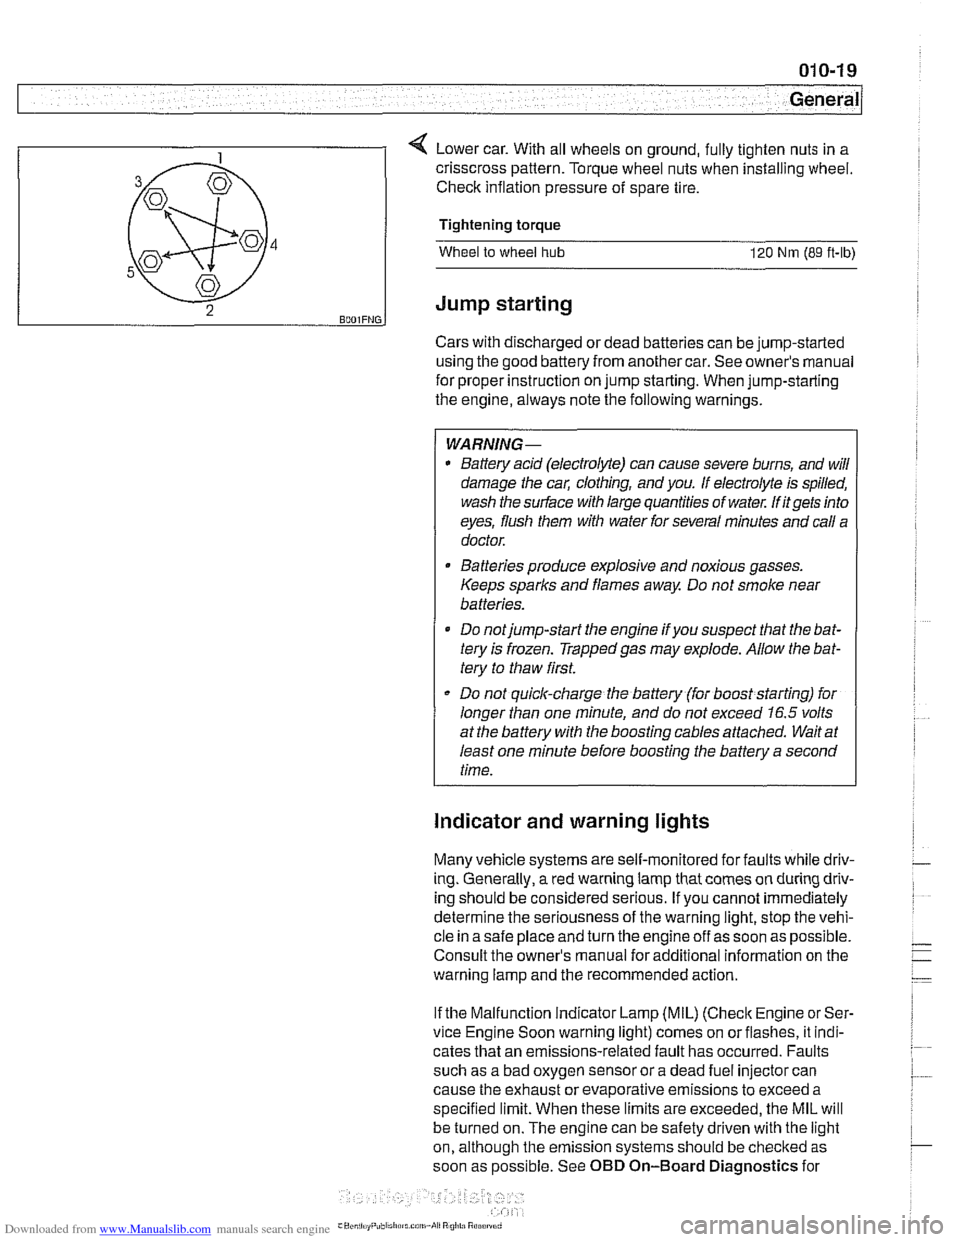
4 Lower car. With all wheels on ground, fully tighten nuts in a
WARNING-
* Battery acid (electrolyte) can cause severe burns, and will
damage the
cal; clothing, and you. If electrolyte is spilled,
wash the surface with large quantities of water.
M itgets into
eyes, flush them with water for several minutes and call a
doctor.
B4
5
43
2 BOOIFNG.
Batteries produce explosive and noxious gasses.
Keeps sparks and flames away. Do not smoke near
batteries.
Do notjump-start the engine
ifyou suspect that the bat-
tery is frozen. Trappedgas may explode. Allow the bat-
tery to thaw first.
Do not quick-charge the battery (for boost starting) for
longer than one minute, and do not exceed
16.5 volts
at the battery with the boosting cables attached. Wait at
least one minute before boosting the battery a second
time.
crisscross pattern.
Torque wheel nuts when installing wheel.
Check inflation pressure of spare tire.
Tightening torque
Wheel to wheel hub 120 Nm (89 ft-ib)
Jump starting
Indicator and warning lights
Many vehicle systems are self-monitored for faults while driv-
ing. Generally,
a red warning lamp that comes on during driv-
ing should be considered serious. If you cannot immediately
determine the seriousness of the warning light, stop the vehi-
cle in a safe place and turn the engine off as soon as possible.
Consult the owner's manual for additional information on the
warning lamp and the recommended action.
If the Malfunction Indicator Lamp (MIL)
(Check Engine or Ser-
vice Engine Soon warning light) comes on orflashes, it indi-
cates that an emissions-related fault has occurred. Faults
such as a bad oxygen sensor or a dead fuel injector can
cause the exhaust or evaporative emissions to exceed a
specified limit. When these limits are exceeded, the MIL will
be turned on. The engine can be safety driven with the light
on, although the emission systems should be
checked as
soon as possible. See OBD On-Board Diagnostics for
Page 31 of 1002
Downloaded from www.Manualslib.com manuals search engine
Spare parts kit
Carrying a basic set of spare parts can prevent a rninorbreak-
down from turning into a major repair annoyance. The list be-
low is a good place to start.
Spare parts kit
- basic
Polyribbed drive
belt(s)
BMW engine oil: one or two quarts
BMW engine coolant:
1 gallon of premixed 50150 BMW
anti-freeze and water
Fuse assortment:
7.5A. IOA, 1 5A, 20A, 30A. 50A
Radiator hoses: upper and lower
Spare parts
kit - additional contents
Exterior lighting bulbs: headlight, bralte light, turn signal,
and taillight
* Wiper blades or blade inserts
Brake fluid: new, unopened bottle, DOT
4 specification
Main relay for DME system
Page 36 of 1002
Downloaded from www.Manualslib.com manuals search engine
020-4
Maintenance
1997 to 2000 models
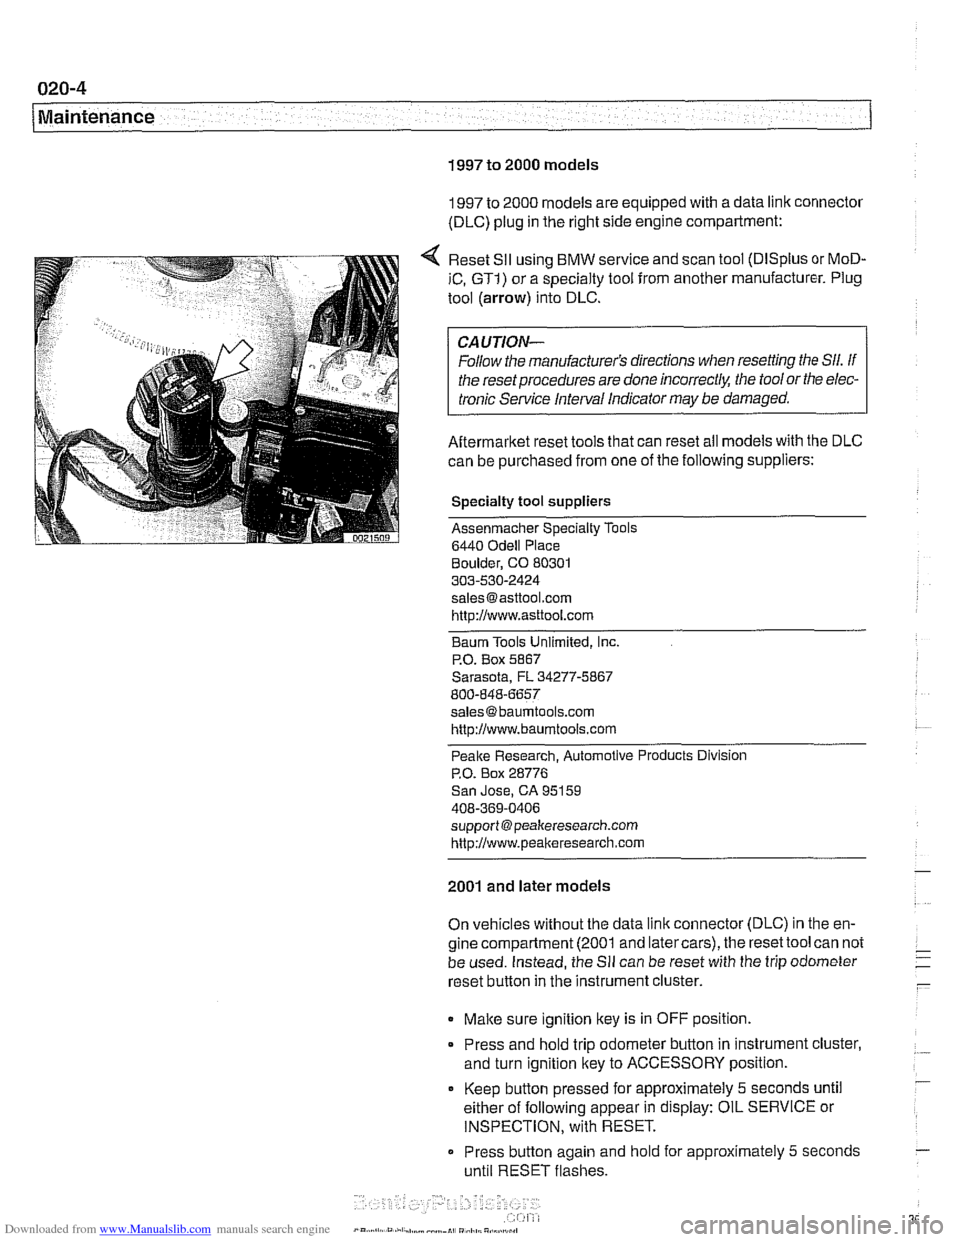
1997 to 2000 models are equipped with a data link connector
(DLC) plug in the right side engine compartment:
Reset
SII using BMW service and scan tool (DISplus or MoD-
iC, GTI) or a specialty tool from another manufacturer. Plug
tool (arrow) into DLC.
CAUTION-
Follow the manufacturer's directions when resetting the Sll. If
the reset procedures are done
incorrect& the tool or the elec-
tronic Service Interval Indicator
may be damaged.
Aftermarket reset tools that can reset all models with the DLC
can be purchased from one of the following suppliers:
Specialty tool suppliers
Assenmacher Specialty Tools
6440
Odell Place
Boulder, CO 80301
303-530-2424
[email protected] http://www.asttool.com
Baum Tools Unlimited,
Inc.
P.O. Box 5867
Sarasota, FL 34277-5867
800-848-6657
[email protected]
http://www.baumtools.com
Peake Research. Automotive Products Division
P.O. Box 28776
San Jose, CA 95159
408-369-0406
support @peakeresearch.com
http://www.peal~eresearch.com
2001 and later models
On vehicles without the data link connector (DLC) in the en-
gine compartment (2001 and latercars), the reset tool can not
be used. Instead, the
Sll can be reset with the trip odometer
reset button in the instrument cluster.
Make sure ignition key is in OFF position.
* Press and hold trip odometer button in instrument cluster,
and turn ignition key to ACCESSORY position.
Keep
button pressed for approximately 5 seconds until
either of following appear in display: OIL SERVICE or
INSPECTION, with RESET.
Press button again and
hold for approximately 5 seconds
until RESET flashes.
Page 40 of 1002
Downloaded from www.Manualslib.com manuals search engine
--- -
Maintenance
Table b. Inspection I Service (continued)
I I I I
Warm engine Dealer service
required recommended
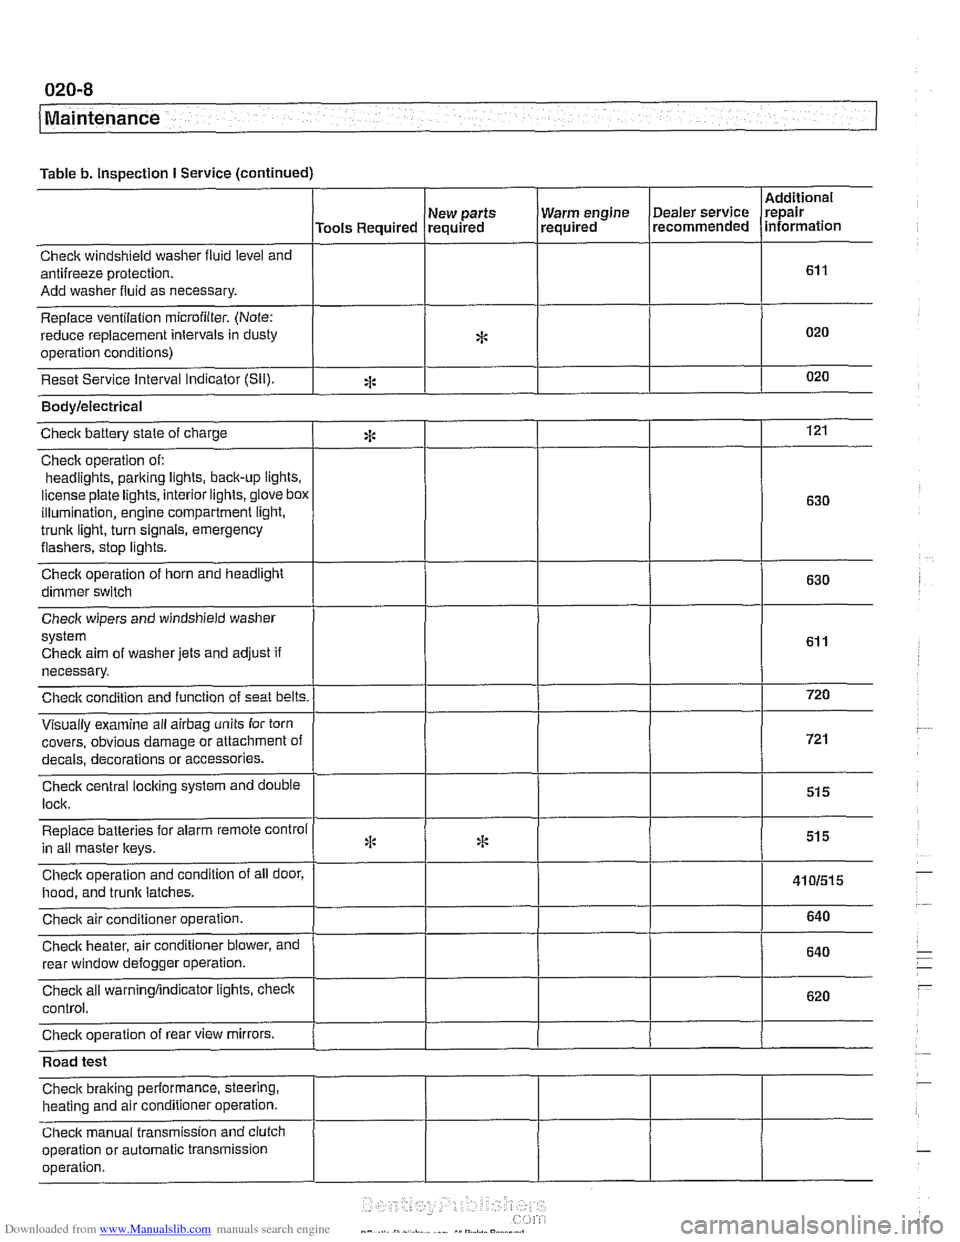
Check windshield
washer fluid level and
antifreeze protection.
Add washer fluid as necessary.
Replace ventilation
microfilter. (Note:
reduce replacement intervals in dusty
operation conditions)
Reset Service interval Indicator
(Sil).
Additional
repair
information
Tools Required
*
eck aim of washer jets and adjust if
necessary.
covers, obvious damage or attachment o
s or accessories.
Road test
Check braking performance, steering,
heating and air conditioner operation.
Check manual transmission and clutch
operation or automatic transmission
operation. New
parts
required
*
Bodylelectrical
121
630
630
Checic battery state of charge
Check operation of:
headlights,
parking iights, back-up lights.
license plate lights, interior lights,
glove box
illumination, engine compartment light,
trunk light, turn signals, emergency
flashers, stop iights.
Check operation of horn and headlight
dimmer switch
:i:
Page 48 of 1002
Downloaded from www.Manualslib.com manuals search engine
020-1 6
Maintenance
loose, hose is damaged, or connection is dirty or corroded.
Dried coolant has achalky appearance. Hoses should be firm
and springy. Replace any hose that is cracked, has become
soft and limp, or has been contaminated by oil.
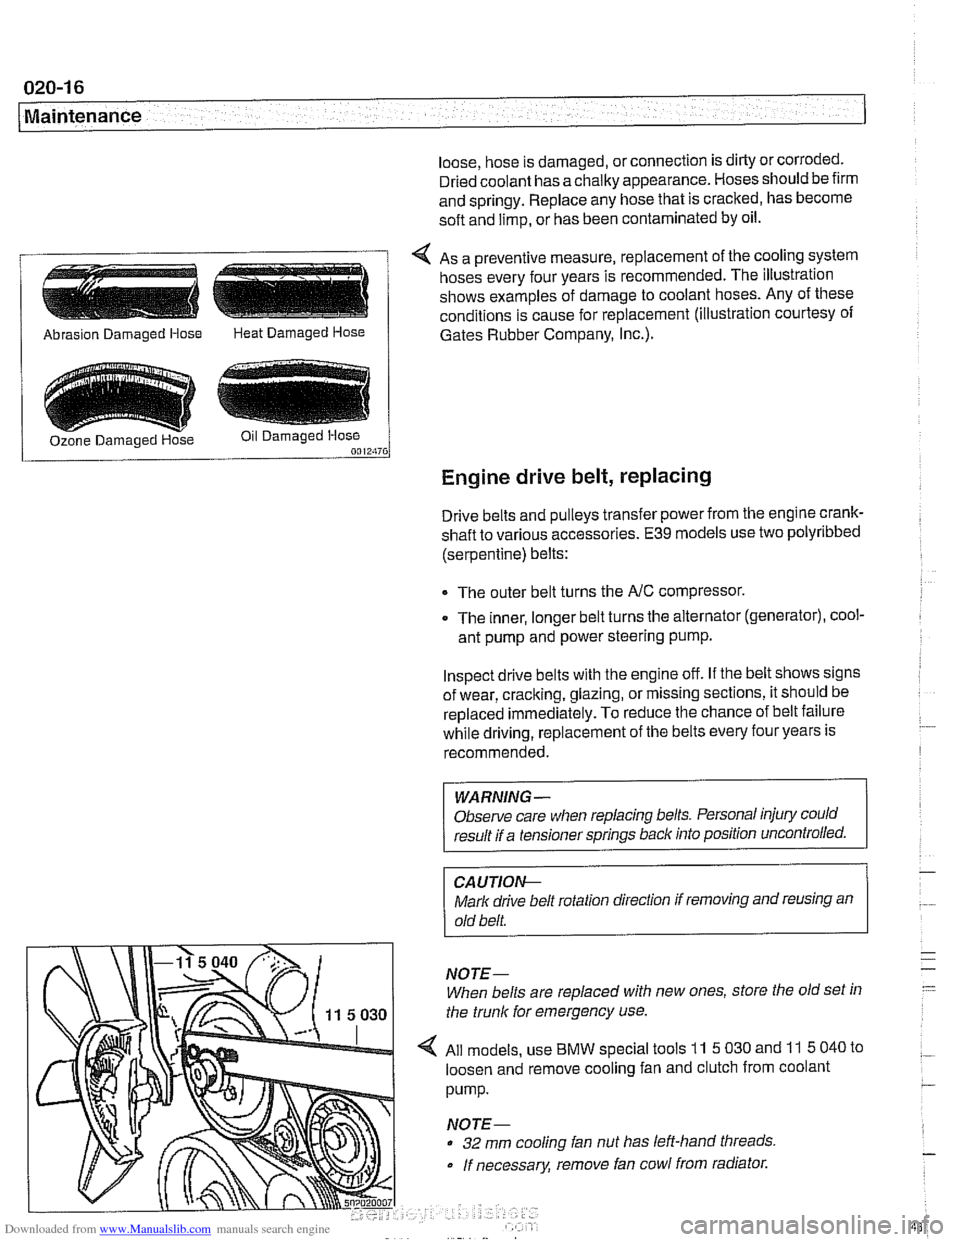
4 As a preventive measure, replacement of the cooling system
hoses every four years is recommended. The illustration
shows examples of damage to coolant hoses. Any of these
conditions is cause for replacement (illustration courtesy of
/ Abrasion Damaged Hose Heat Damaged Hose 1 Gates Rubber Company, I~c.).
Engine drive belt, replacing
Drive belts and pulleys transfer power from the engine crank-
shaft to various accessories.
E39 models use two polyribbed
(serpentine) belts:
The outer belt turns the
NC compressor.
0 The inner, longer belt turns the alternator (generator), cool-
ant pump and power steering pump.
Inspect drive belts with the engine off. If the belt shows signs
of wear, cracking, glazing, or missing sections, it should be
replaced
immediately. To reduce the chance of belt failure
while driving, replacement of the belts every four years is
recommended.
WARNING -
Observe care when replacing belts. Personal injury could
result if a tensioner springs back into position uncontrolled.
CA UTIOI\C
Mark drive belt rotation direction if removing and reusing an
old belt.
NOTE-
When belts are replaced with new ones, store the old set in
the trunk for emergency use.
All models, use
BMW special tools 11 5 030 and 11 5 040 to
loosen and remove cooling fan and clutch from coolant
pump.
NOTE-
32 mm cooling fan nut has left-hand threads
If necessary, remove fan cowl from radiator.
Page 49 of 1002
Downloaded from www.Manualslib.com manuals search engine
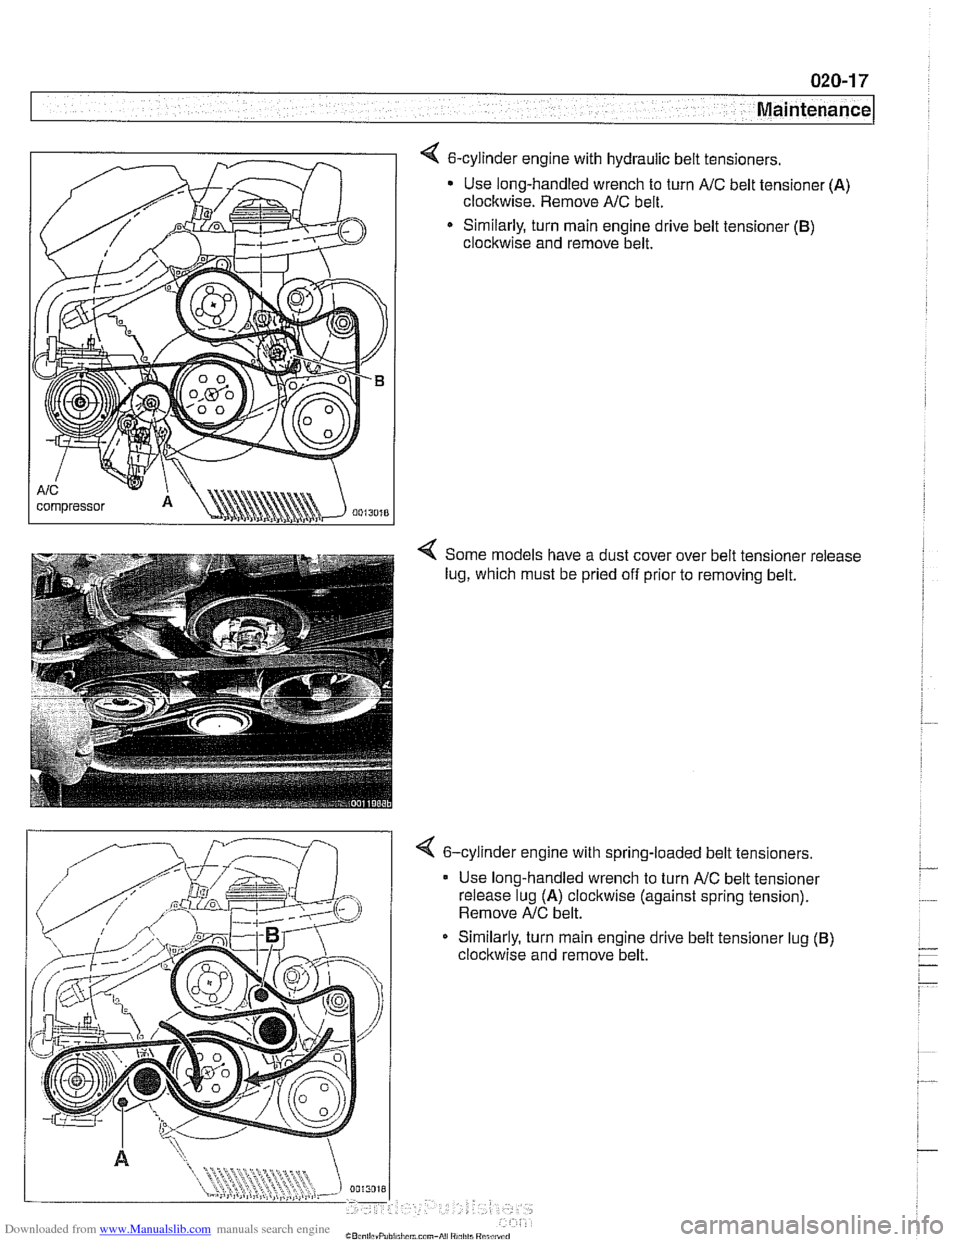
< 6-cylinder engine with hydraulic belt tensioners.
Use long-handled wrench to turn
A/C belt tensioner (A)
clockwise. Remove AfC belt.
* Similarly, turn main engine drive belt tensioner (B)
clockwise and remove belt.
< Some models have a dust cover over belt tensioner release
lug, which must be pried off prior to removing belt.
4 6-cylinder engine with spring-loaded belt tensioners.
Use long-handled wrench to turn
AfC belt tensioner
release lug
(A) clocltwise (against spring tension).
Remove
AfC belt.
Similarly, turn main engine drive belt tensioner lug
(B)
clocltwise and remove belt.