torque BMW M3 1992 E36 Workshop Manual
[x] Cancel search | Manufacturer: BMW, Model Year: 1992, Model line: M3, Model: BMW M3 1992 E36Pages: 759
Page 301 of 759
7
.
Turn
on
ignition
.
Check
that
light
comes
on
as
soonas
4
.
Remove
parkíng
brake
shoes
as
described
above
.
lever
is
pulled
up
.
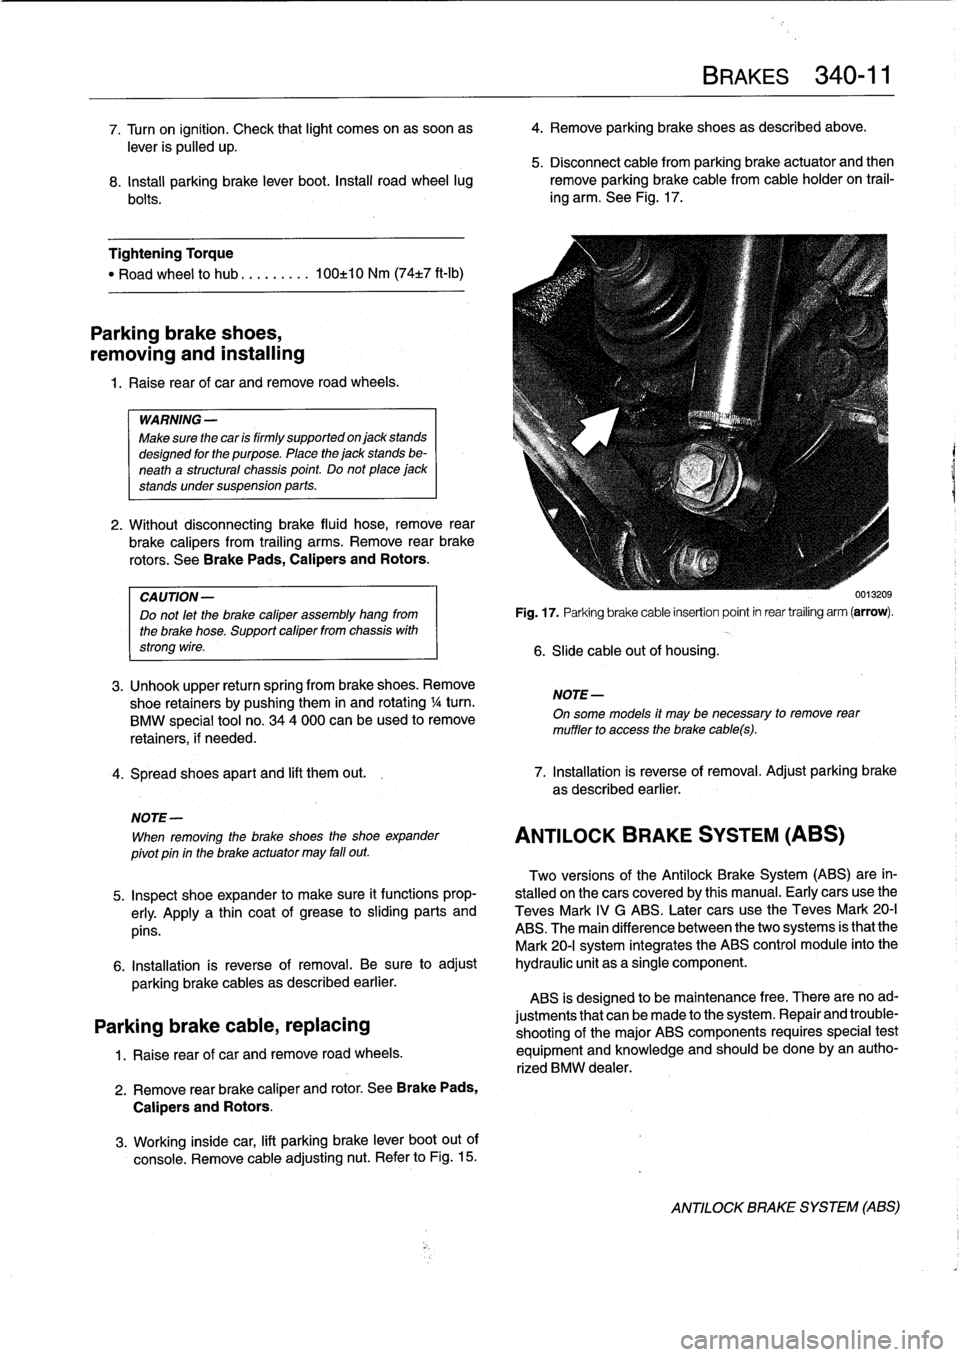
5
.
Disconnect
cable
from
parking
brake
actuator
and
then
8
.
Install
parking
brake
lever
boot
.
Install
road
wheel
lug
remove
parking
brakecable
from
cable
holder
on
trail-
bolts
.
ing
arm
.
See
Fig
.
17
.
Tightening
Torque
"
Road
wheel
to
hub
.
..
......
100±10
Nm
(74±7
ft-Ib)
Parking
brake
shoes,
removing
and
installing
1.
Raise
rear
of
car
andremove
road
wheels
.
WARNING
-
Make
sure
the
car
is
firmly
supportedon
jack
stands
designed
for
the
purpose
.
Place
the
jack
stands
be-
neath
a
structural
chassis
point
.
Do
not
place
jack
stands
undersuspension
parts
.
2
.
Without
disconnecting
brake
fluid
hose,
remove
rear
brake
calipers
from
trailing
arms
.
Remove
rear
brake
rotors
.
See
Brake
Pads,
Calipers
and
Rotors
.
CA
UTION-
Do
not
let
the
brake
caliper
assembly
hang
from
the
brake
hose
.
Support
caliper
from
chassis
with
strong
wire
.
3
.
Unhook
upper
return
spring
from
brake
shoes
.
Remove
shoe
retainers
bypushing
them
in
and
rotating
1
/4turn
.
BMW
special
tool
no
.
344
000
can
beused
to
remove
retainers,
if
needed
.
4
.
Spread
shoes
apart
and
lift
them
out
.
7
.
Installation
is
reverse
of
removal
.
Adjust
parking
brake
as
described
earlier
.
NOTE-
When
removing
the
brake
shoes
the
shoe
expander
pivot
pin
in
the
brake
actuator
may
fall
out
.
Two
versions
of
the
Antilock
Brake
System
(ABS)
are
in-
5
.
Inspect
shoe
expander
to
make
sure
it
functions
prop-
stalled
onthe
cars
coveredby
this
manual
.
Early
cars
use
the
erly
.
Apply
a
thin
coat
of
grease
tosliding
parts
and
Teves
Mark
IV
G
ABS
.
Later
cars
use
the
Teves
Mark
20-I
pins
.
ABS
.
The
main
difference
between
the
two
systems
is
that
the
Mark
20-I
system
integrates
the
ABS
control
module
into
the
6
.
Installation
is
reverse
of
removal
.
Be
sure
to
adjust
hydraulic
unit
as
a
single
component
.
parking
brake
cables
as
described
earlier
.
ABS
is
designed
to
be
maintenance
free
.
There
are
noad
Parking
brake
cable,
replacing
justments
that
canbe
made
to
the
system
.
Repair
and
trouble-
shooting
of
the
major
ABS
components
requires
special
test
1
.
Raise
rear
of
car
and
remove
road
wheels
.
equipment
and
knowiedge
and
should
be
done
by
an
autho-
rized
BMW
dealer
.
2
.
Remove
rear
brake
caliper
and
rotor
.
See
Brake
Pads,
Calipers
and
Rotors
.
3
.
Working
inside
car,
lift
parking
brake
lever
boot
out
of
console
.
Remove
cable
adjusting
nut
.
Refer
to
Fig
.
15
.
Fig
.
17
.
Parking
brake
cable
insertion
point
in
rear
trailing
arm
(arrow)
.
6
.
Slide
cable
out
of
housing
.
NOTE
-
BRAKES
340-
1
1
On
some
models
it
may
be
necessary
to
remove
rear
muffler
to
access
the
brake
cabes)
.
ANTILOCK
BRAKE
SYSTEM
(ABS)
0013209
ANTILOCK
BRAKE
SYSTEM
(ABS)
Page 317 of 759
Door
Hinge
Adjustment
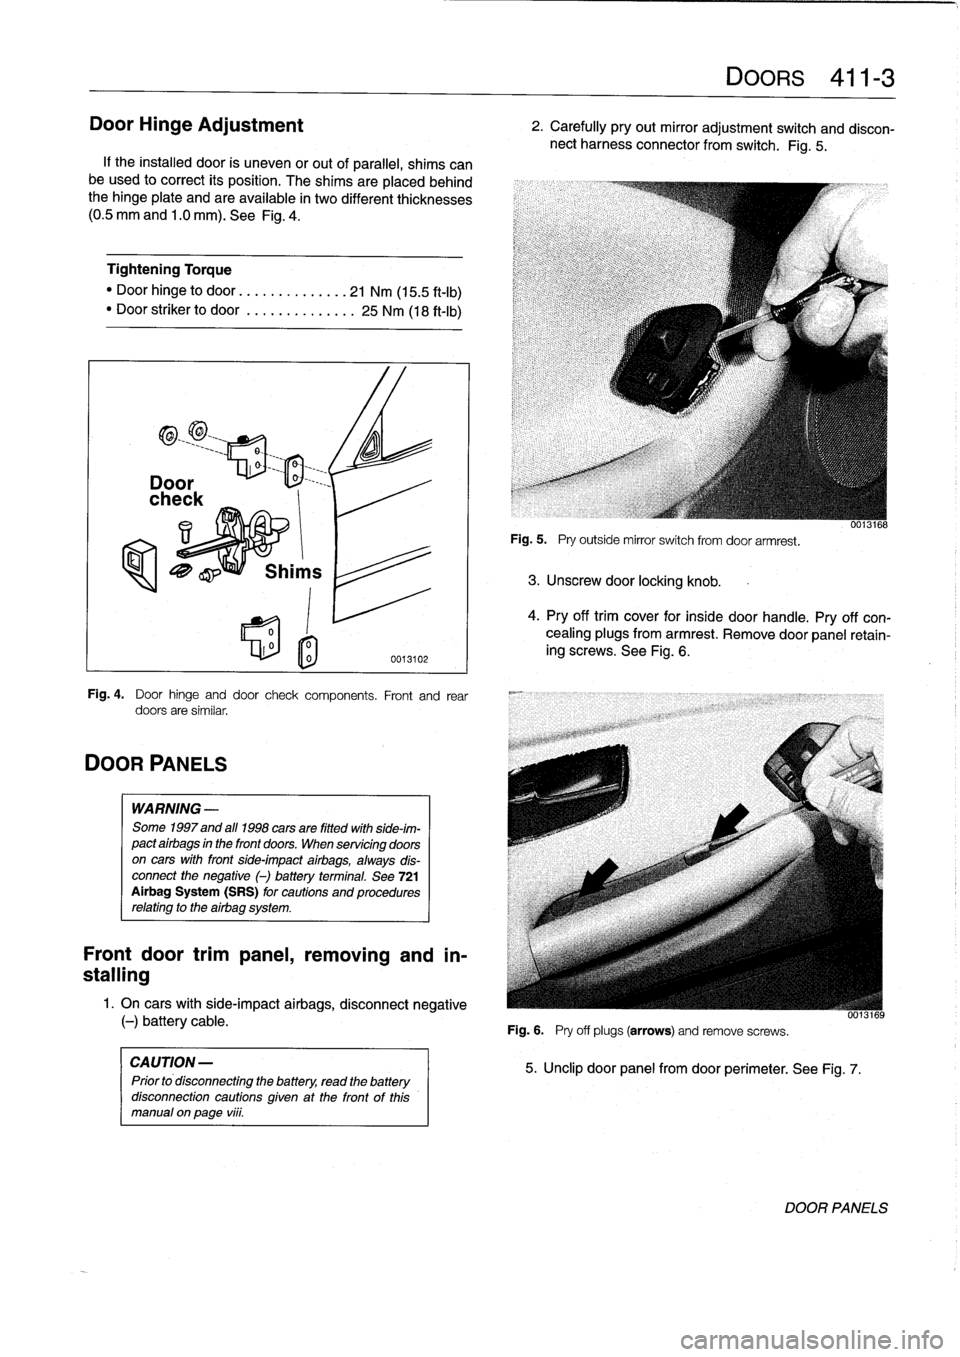
If
the
installed
door
is
uneven
or
out
of
parallel,
shims
can
be
used
to
correct
its
position
.
The
shims
are
placedbehind
the
hinge
plate
and
are
available
in
two
different
thicknesses
(0
.5
mm
and
1
.0
mm)
.
See
Fig
.
4
.
Tightening
Torque
"
Door
hinge
to
door
.............
..
21
Nm
(15
.5
ft-I
b)
"
Door
striker
to
door
...........
...
25
Nm
(18
ft-Ib)
DOOR
PANELS
0
l
o
0013102
Fig
.
4
.
Door
hinge
and
door
check
components
.
Front
and
rear
doors
are
similar
.
WARNING
-
Some
1997
and
all
1998
cars
are
fitted
with
side-im-
pact
airbags
in
the
front
doors
.
When
servicing
doors
on
cars
with
front
side-impact
airbags,
always
dis-
connect
the
negative
()
battery
terminal
.
See
721
Airbag
System
(SRS)
for
cautions
and
procedures
relating
to
the
airbag
system
.
Front
door
trimpanel,
removing
and
in-
stalling
1
.
On
cars
with
side-impact
airbags,
disconnect
negative
(-)
battery
cable
.
CAUTION
-
Prior
to
disconnecting
the
battery,
read
the
battery
disconnection
cautions
given
at
the
front
of
this
manual
on
page
viii
.
Fig
.
5
.
Pry
outside
mirror
switch
from
door
armrest
.
3
.
Unscrew
door
locking
knob
.
Fig
.
6
.
Pry
off
plugs
(arrows)
and
remove
screws
.
DOORS
411-
3
2
.
Carefully
pry
out
mirror
adjustment
switch
and
discon-
nect
harness
connector
from
switch
.
Fig
.
5
.
5
.
Unclip
door
panel
from
door
perimeter
.
See
Fig
.
7
.
0013168
4
.
Pry
off
trim
cover
for
insíde
door
handle
.
Pry
off
con-
cealing
plugs
from
armrest
.
Remove
door
panel
retain-
ing
screws
.
See
Fig
.
6
.
UU13169
DOOR
PANELS
Page 324 of 759
510-2
EXTERIOR
TRIIVI,
BUMPERS
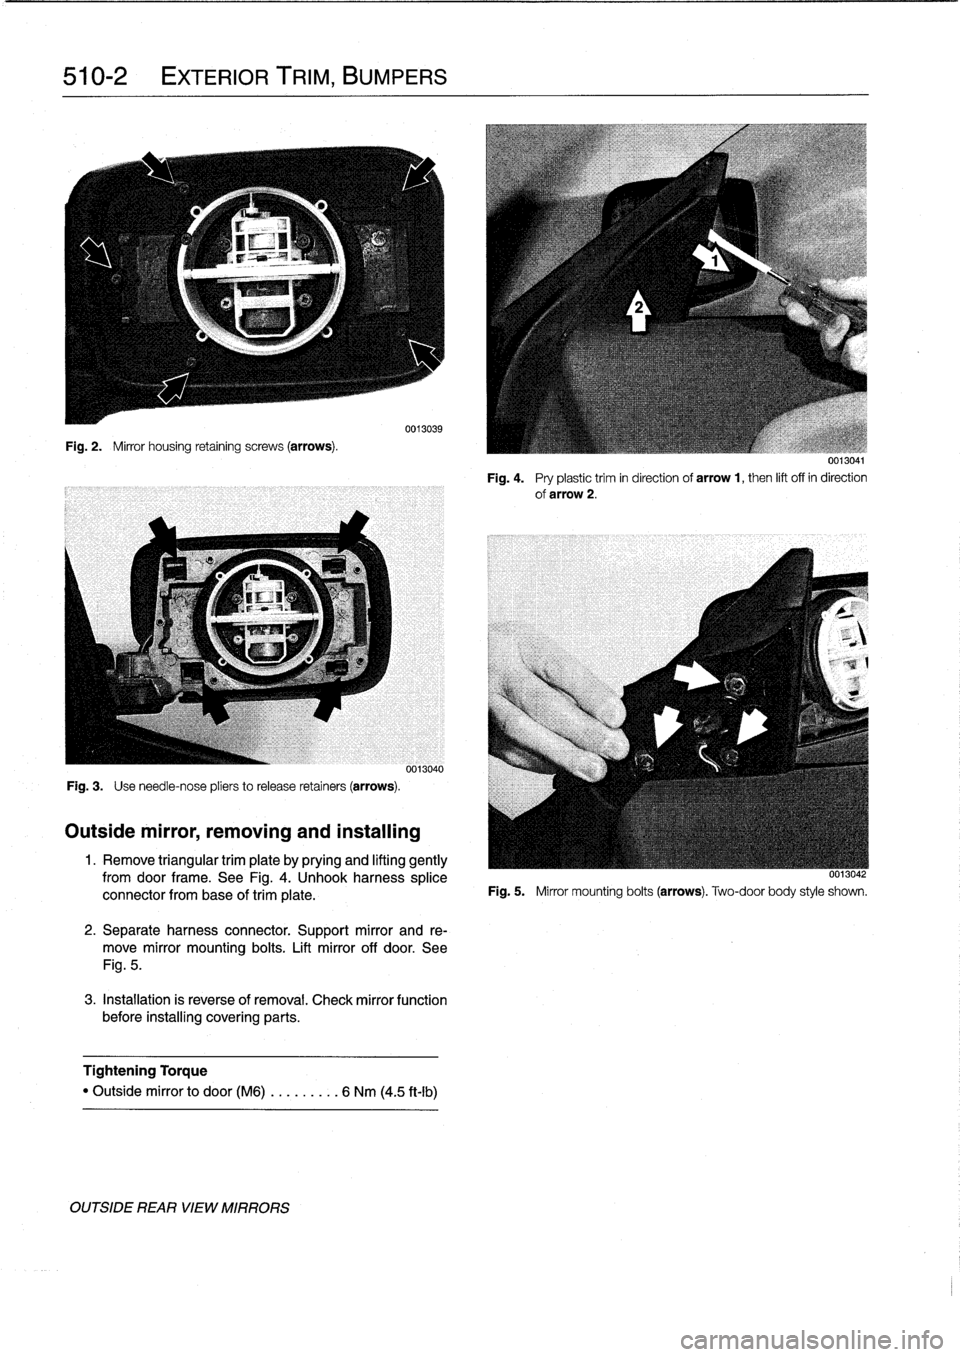
Fig
.
2
.
Mirror
housing
retaining
screws
(arrows)
.
Fig
.
3
.
Use
need1e-nose
pliers
to
release
retainers
(arrows)
.
Outside
mirror,
removing
and
installing
0013039
0013040
1
.
Remove
triangular
trim
plate
by
prying
and
lifting
gently
fromdoor
frame
.
See
Fig
.
4
.
Unhook
harness
splice
connector
from
base
of
trim
píate
.
2
.
Separate
harness
connector
.
Support
mirror
and
re-
move
mirror
mounting
bolts
.
Lift
mirror
off
door
.
See
Fig
.
5
.
3
.
Installation
is
reverse
of
removal
.
Check
mirror
function
before
installing
covering
parts
.
Tightening
Torque
"
Outside
mirror
to
door(M6)
..
.
..
.
..
.
6
Nm
(4
.5
ft-Ib)
OUTSIDE
REAR
VIEW
MIRRORS
0013041
Fig
.
4
.
Pry
plastictrim
in
direction
of
arrow
1,
then
lift
off
in
direction
of
arrow
2
.
0013042
Fig
.
5
.
Mirror
mounting
bolts
(arrows)
.
Two-door
body
style
shown
.
Page 326 of 759
510-4
EXTERIOR
TRIM,
BUMPERS
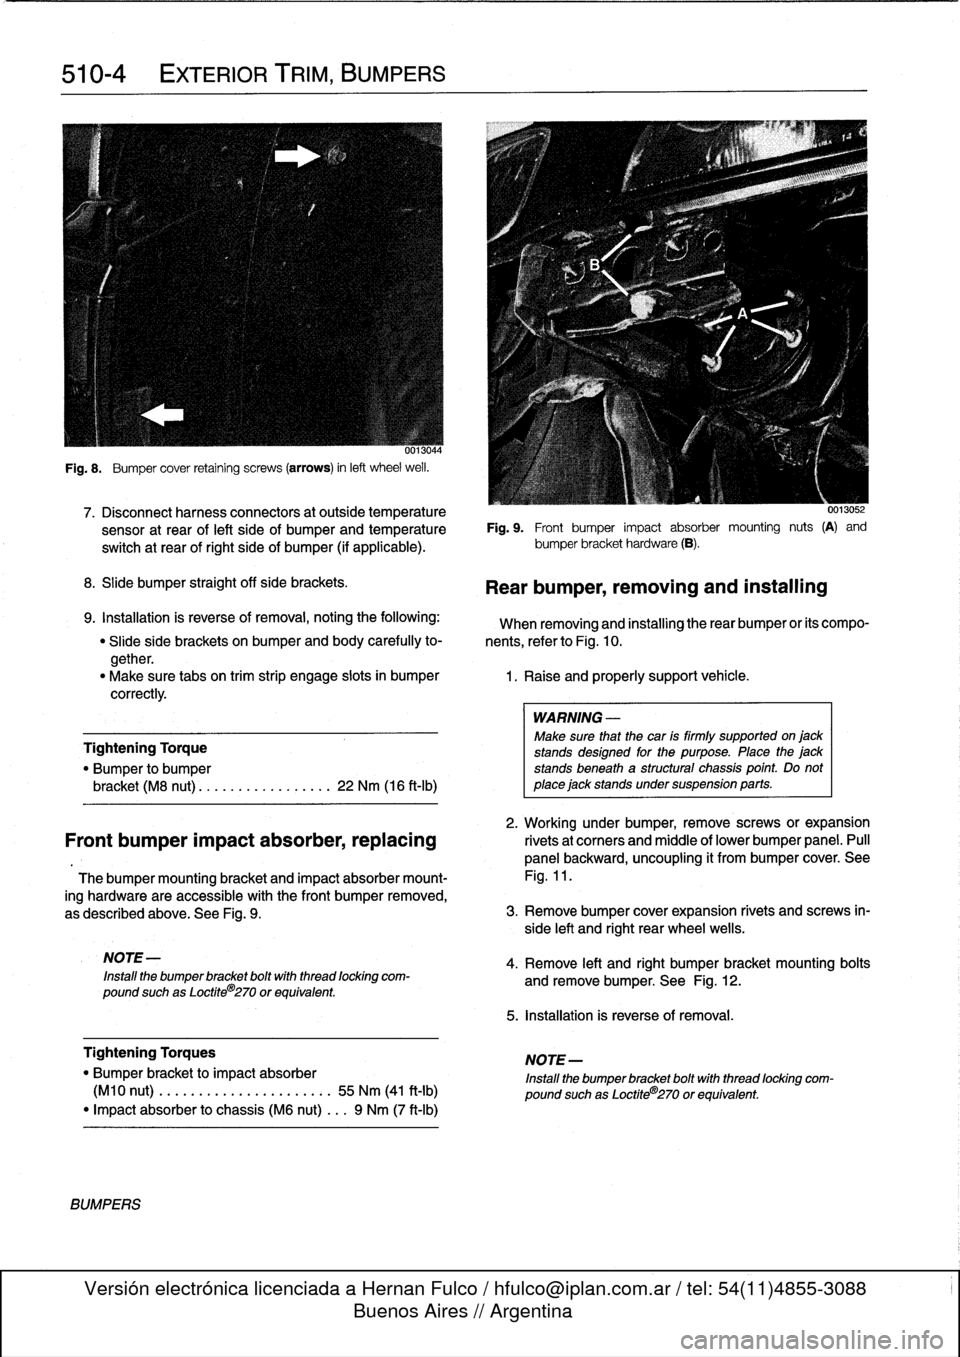
Fig
.
8
.
Bumper
cover
retaining
screws
(arrows)
in
left
wheel
weil
.
7
.
Disconnect
harnessconnectors
at
outside
temperature
0013052
sensor
at
rear
of
left
side
of
bumperand
temperatura
Fig
.
9
.
Front
bumper
impact
absorber
mounting
nuts
(A)
and
switch
at
rear
of
right
side
of
bumper
(if
applicable)
.
bumper
bracket
hardware
(B)
.
8
.
Slide
bumper
straight
off
sida
brackets
.
9
.
Installation
is
reverse
of
removal,
notingthe
following
:
When
removing
and
installing
therear
bumper
or
its
compo-
"
Slide
side
brackets
on
bumper
and
body
carefully
to-
nents,
referto
Fig
.
10
.
gether
.
"
Make
sure
tabs
on
trim
strip
engage
slots
in
bumper
1
.
Raise
and
properly
support
vehicle
.
correctly
.
Tightening
Torque
"
Bumper
to
bumper
bracket
(M8
nut)
............
...
.
.
22
Nm
(16
ft-Ib)
2
.
Working
under
bumper,
remove
screws
or
expansion
Front
bumper
impact
absorber,replacing
rivetsat
corners
and
middle
of
lower
bumper
panel
.
Pull
panel
backward,
uncoupling
it
from
bumper
cover
.
See
Thebumper
mounting
bracket
and
impact
absorber
mount-
Fig
.
11
.
ing
hardware
are
accessible
with
the
Font
bumper
removed,
as
described
above
.
See
Fig
.
9
.
3
.
Remove
bumper
cover
expansion
rivets
and
screws
in-
side
left
and
right
rear
wheel
wells
.
NOTE
-
Install
the
bumper
bracket
boltwith
thread
locking
com-
pound
suchas
Loctite
8
270
or
equivalent
.
Tightening
Torques
"
Bumper
bracket
to
impact
absorber
(M10
nut)
.
..
.
...
.............:.
55
Nm
(41
ft-Ib)
"
Impact
absorber
to
chassis
(M6
nut)
...
9
Nm
(7
ft-Ib)
BUMPERS
Rear
bumper,
removing
and
installing
WARNING
-
Make
sure
that
the
car
is
firmly
supported
on
jack
stands
designad
for
the
purpose
.
Place
the
jack
stands
beneath
a
structural
chassis
point
.
Do
not
place
jack
stands
under
suspension
parts
.
4
.
Remove
left
and
right
bumper
bracket
mounting
bolts
and
remove
bumper
.
See
Fig
.
12
.
5
.
Installation
is
reverse
of
removal
.
NOTE-
Install
the
bumper
bracket
bolt
with
thread
locking
com-
pound
suchas
Loctite®270
or
equivalent
.
Page 327 of 759
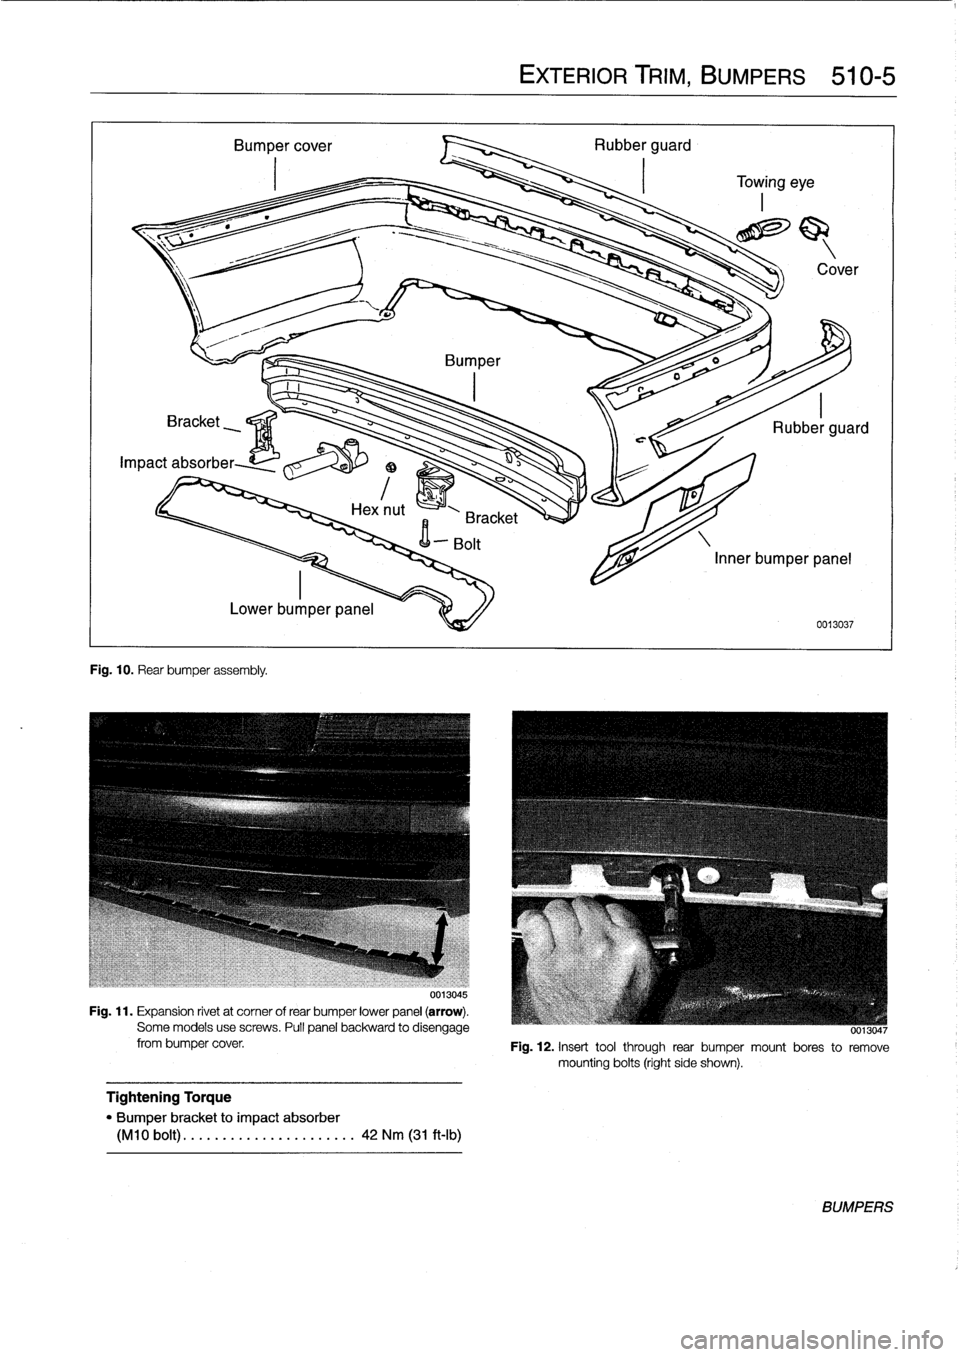
Fig
.
10
.
Rear
bumper
assembly
.
0013045
Fig
.
11
.
Expansion
rivet
at
corner
of
rear
bumper
lower
panel
(arrow)
.
Some
models
usescrews
.
Pull
panel
backward
to
disengage
from
bumper
cover
.
Tightening
Torque
"
Bumper
bracket
to
impact
absorber
(M10
bolt)
.
..
...........
...
.
..
..
42
Nm
(31
ft-Ib)
EXTERIOR
TRIM,
BUMPERS
510-5
0013047
Fig
.
12
.
Inserttool
through
rear
bumper
mount
bores
to
remove
mounting
bolts
(right
side
shown)
.
BUMPERS
Page 328 of 759
510-
6
EXTERIOR
TRIM,
BUMPERS
Rear
bumper
impact
absorber,replacing
1
.
Remove
bumperas
described
above
.
2
.
Remove
luggage
compartment
floor
covering
.
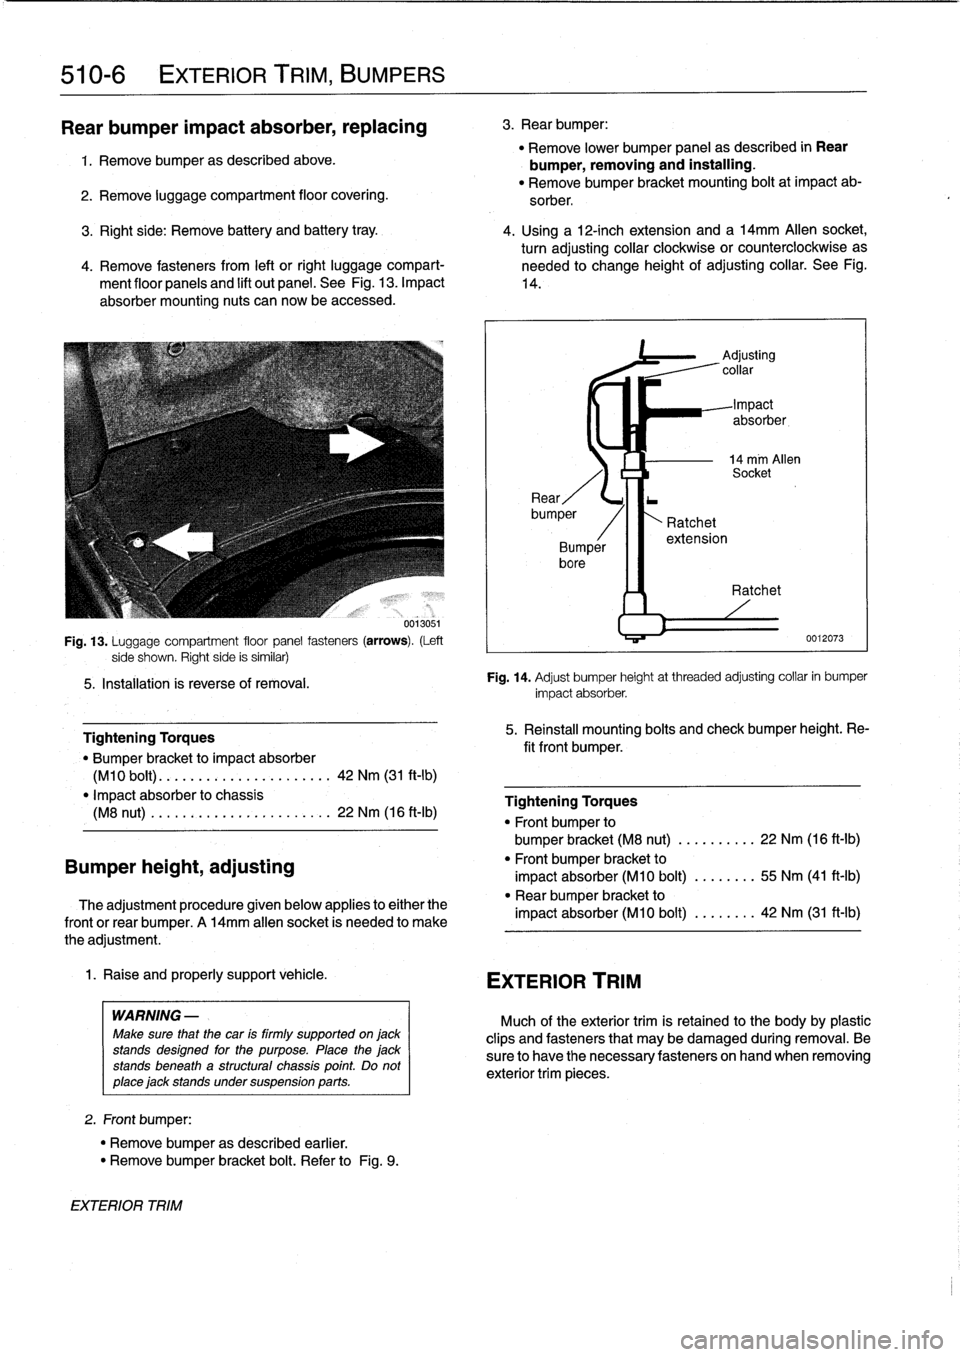
Fig
.
13
.
Luggage
compartment
floor
panel
fasteners
(arrows)
.
(Left
side
shown
.
Righf
side
is
similar)
5
.
Installation
ís
reverse
of
removal
.
Bumper
height,
adjusting
Tightening
Torques
"
Bumper
bracket
to
impact
absorber
(M10
bolt)
.
............
.
...
..
..
.
42
Nm
(31
ft-lb)
"
Impact
absorber
to
chassis
(M8
nut)
.
.
..........
.
......
.
.
.
.
22
Nm
(16
ft-Ib)
The
adjustment
procedure
given
below
applies
to
either
the
frontor
rear
bumper
.
A
14mm
allen
socket
is
needed
to
make
the
adjustment
.
1
.
Raise
and
properly
support
vehicle
.
WARNING
-
Make
sure
that
the
car
is
firmly
supported
on
jack
stands
designed
for
the
purpose
.
Place
the
jack
stands
beneath
a
structural
chassis
point
.
Do
not
place
jack
stands
under
suspension
parts
.
2
.
Front
bumper
:
"
Remove
bumper
as
described
earlier
.
"
Remove
bumper
bracket
bolt
.
Refer
to
Fig
.
9
.
EXTERIOR
TRIM
3
.
Rear
bumper
:
"
Remove
lower
bumper
panel
as
described
in
Rear
bumper,
removing
and
installing
.
"
Remove
bumper
bracket
mounting
bolt
at
impact
ab-
sorber
.
3
.
Right
side
:
Remove
battery
and
battery
tray
.
4
.
Using
a
12-inch
extension
and
a
l4mm
Allen
socket,
turn
adjusting
collar
clockwise
or
counterclockwise
as
4
.
Remove
fasteners
from
left
or
right
luggage
compart-
needed
to
change
height
of
adjusting
collar
.
See
Fig
.
ment
floor
panels
and
lift
out
panel
.
See
Fig
.
13
.
Impact
14
.
absorber
mounting
nuts
can
now
be
accessed
.
~4
EXTERIOR
TRIM
Ratchet
extension
Adjusting
collar
Impact
absorber,
14
mm
Allen
Socket
Ratchet
0012073
Fig
.
14
.
Adjust
bumper
height
at
threaded
adjusting
collar
in
bumper
impact
absorber
.
5
.
Reinstall
mounting
bolts
and
check
bumper
height
.
Re-
fit
front
bumper
.
Tightening
Torques
"
Front
bumper
to
bumper
bracket
(M8
nut)
......
.
..
.
22
Nm
(16
ft-Ib)
"
Front
bumper
bracket
to
impact
absorber
(M10
bolt)
........
55
Nm
(41
ft-Ib)
"
Rear
bumper
bracket
to
impact
absorber
(M10
bolt)
........
42
Nm
(31
ft-Ib)
Much
of
the
exteriortrim
is
retained
to
the
body
by
plasticclips
and
fasteners
that
may
be
damaged
during
removal
.
Be
sure
to
have
the
necessary
fasteners
onhand
when
removing
exterior
trim
pieces
.
Page 334 of 759
512-
4
DOOR
WINDOWS
7
.
Push
regulator
stop
tightly
against
window
regulator
4
.
Lower
door
window
about
12
in
.
(300
mm)
.
Remove
sector
and
tighten
nut
.
window
lifting
arm
retaining
clip
from
window
slide
.
Re-
o
Check
for
tight,
even
fit
at
top
of
window
frame
.
fer
to
Fig
.
2
.
"
If
necessary,temporarily
reconnect
negative
(-)
cable
to
battery
and
raise
window
so
it
is
pressing
uniformly
WARNING-
against
toprubber
sea¡
before
final
tightening
.
Once
the
window
is
lowered,
dísconnect
harness
connector
from
power
window
motor
to
prevent
ac-
8
.
Reinitialize
front
window
motorsas
described
earlier
.
cidental
operation
of
the
window
.
Tightening
Torques
"
Regulator
stop
to
window
regulator
....
9
Nm
(7
ft-Ib)
"
Window
regulator
bracket
to
door
.....
9
Nm
(7
ft-Ib)
Rear
door
window,
removing
and
installing
(4-door
models)
1
.
Remove
rear
door
panel
and
vapor
barrier
.
See
411
7
.
Remove
window
glass
from
above
.
Doors
.
2
.
Pul¡
out
rubber
guide
at
front
of
window
frame
.
Remove
three
screws
and
pul¡
off
exteriortrim
cover
.
See
Fig
.
6
.
UJ117U1
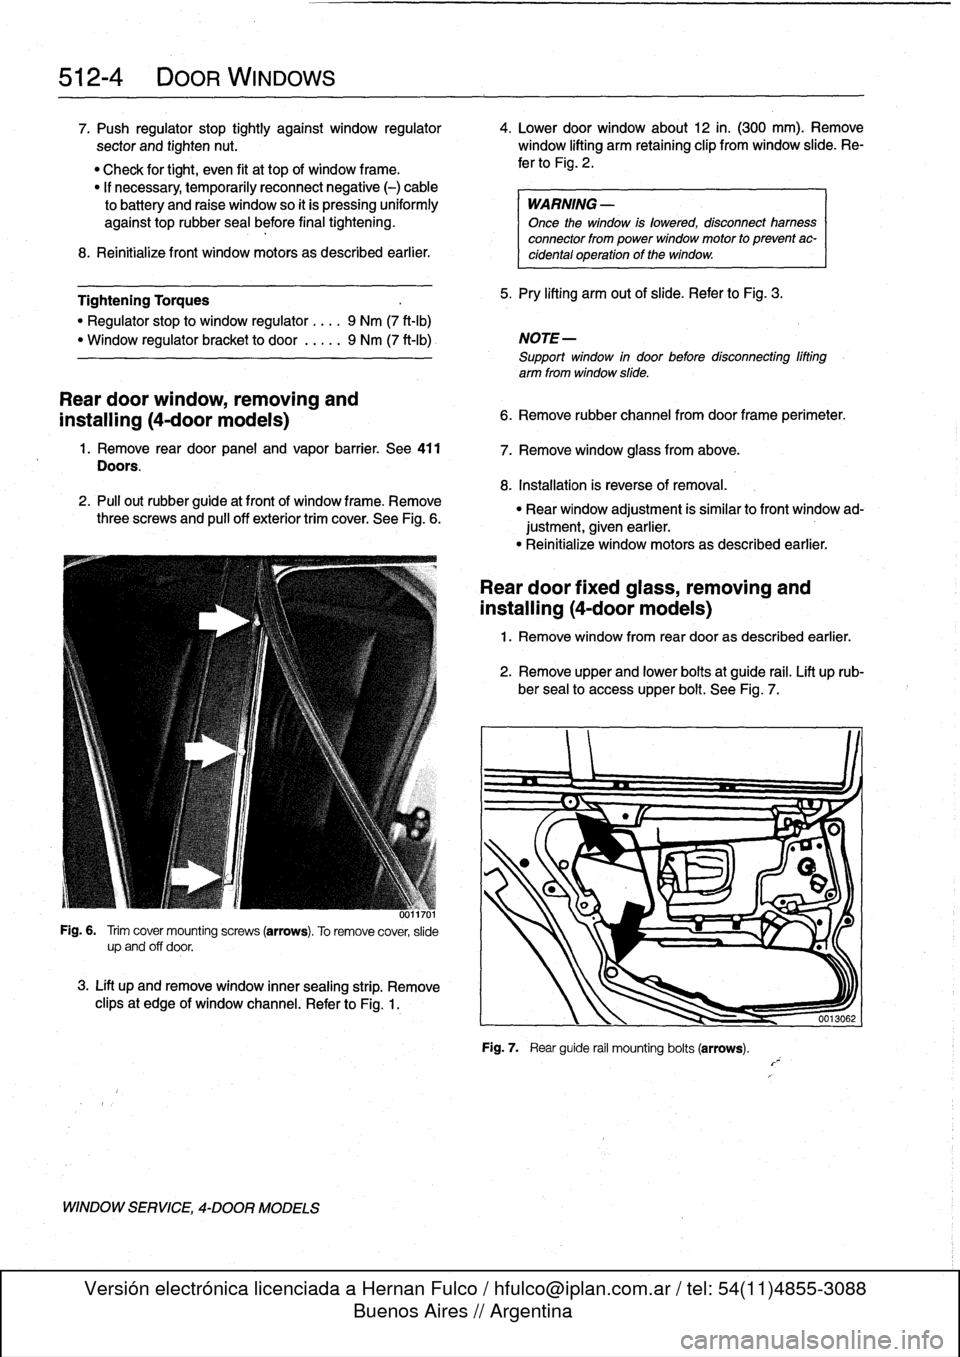
Fig
.
6
.
Trim
covermounting
screws
(arrows)
.
To
remove
cover,
slide
upand
off
door
.
3
.
Lift
up
andremovewindow
inner
sealing
strip
.
Remove
clipsat
edge
of
window
channel
.
Refer
to
Fig
.
1
.
WINDOW
SERVICE,
4-DOOR
MODELS
5
.
Pry
lifting
arm
out
of
slide
.
Refer
to
Fig
.
3
.
NOTE
-
Support
window
in
door
before
disconnecting
lifting
arm
from
window
slide
.
6
.
Remove
rubber
channelfromdoorframe
perimeter
.
8
.
Installation
is
reverse
of
removal
.
"
Rear
window
adjustment
is
similar
to
front
window
ad-
justment,given
earlier
.
"
Reinitialize
window
motorsas
described
earlier
.
Rear
door
fixed
glass,
removing
and
installing
(4-door
models)
1
.
Remove
window
from
rear
dooras
described
earlier
.
2
.
Remove
upper
and
lower
bolts
at
guide
rail
.
Lift
up
rub-
ber
sea¡
to
accessupper
bolt
.
See
Fig
.
7
.
Fig
.
7
.
Rear
guide
rail
mounting
bolts
(arrows)
.
Page 337 of 759
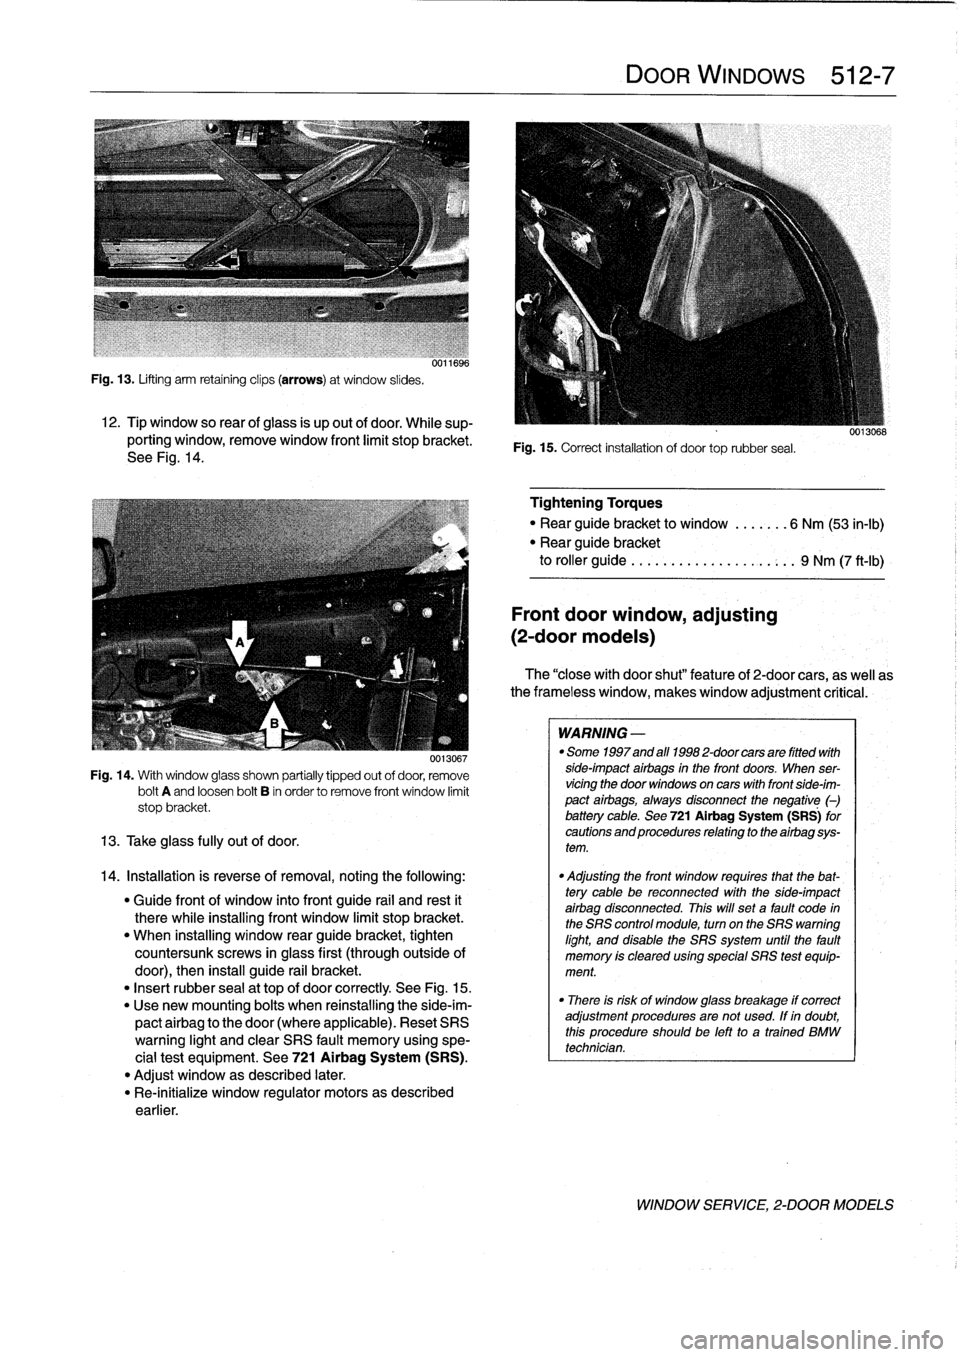
Fig
.
13
.
Lifting
arm
retaining
clips
(arrows)
at
window
slides
.
12
.
Tip
window
so
rear
ofglass
is
up
out
of
door
.
While
sup-
porting
window,
remove
window
front
limit
stopbracket
.
See
Fig
.
14
.
0013067
Fig
.
14
.
With
window
glass
shown
partially
tipped
out
of
door,
remove
bolt
A
and
loosen
bolt
B
in
order
to
remove
front
window
limit
stop
bracket
.
13
.
Take
glass
fully
out
of
door
.
14
.
Installation
is
reverse
of
removal,notingthe
following
:
"
Guide
front
of
window
into
front
guide
rail
and
rest
it
therewhile
installing
front
window
limit
stop
bracket
.
"
When
installing
window
rear
guide
bracket,
tighten
countersunk
screws
in
glass
first
(throughoutside
of
door),
then
install
guide
rail
bracket
.
"
Insert
rubber
sea¡
at
top
of
door
correctly
See
Fig
.
15
.
"
Use
new
mounting
bolts
when
reinstalling
the
side-im-
pactairbag
to
the
door
(where
applicable)
.
Reset
SRS
warning
light
and
clear
SRS
fault
memory
using
spe-
cial
test
equipment
.
See
721
Airbag
System
(SRS)
.
"
Adjust
window
as
described
later
.
"
Re-inítialize
window
regulator
motors
as
described
earlier
.
DOOR
WINDOWS
512-
7
Fig
.
15
.
Correct
installation
of
door
toprubber
seal
.
Tightening
Torques
"
Rear
guide
bracket
to
window
.......
6
Nm
(53
in-lb)
"
Rear
guide
bracket
to
roller
guide
..
.
...
...............
9
Nm
(7
ft-Ib)
Front
door
window,
adjusting
(2-door
modeis)
The
"closewith
door
shut"
feature
of
2-door
cars,
as
well
as
the
frameless
window,
makeswindow
adjustment
critical
:
WARNING
-
"
Some
1997
and
afl
1998
2-door
cars
are
fitted
with
side-impact
airbags
in
the
front
doors
.
When
ser-
vicingthe
door
windows
on
cars
with
front
side-im-
pact
airbags,
always
disconnect
the
negative
(-)
battery
cable
.
See
721Airbag
System
(SRS)
for
cautions
and
procedures
relating
to
the
airbag
sys-
tem
.
"
Adjusting
the
front
window
requires
that
the
bat-
tery
cable
be
reconnected
with
the
side-impact
airbag
disconnected
.
This
will
set
a
fault
code
in
the
SRS
control
module,
turn
on
the
SRS
warning
light,
and
disable
the
SRS
system
until
the
fault
memory
is
cleared
using
special
SRS
test
equip-
ment
.
"
There
is
risk
of
window
glass
breakage
if
correct
adjustment
proceduresare
not
used
.
If
in
doubt,
this
procedureshouldbe
left
to
a
trained
BMW
technician
.
WINDOW
SERVICE,
2-DOOR
MODELS
Page 342 of 759
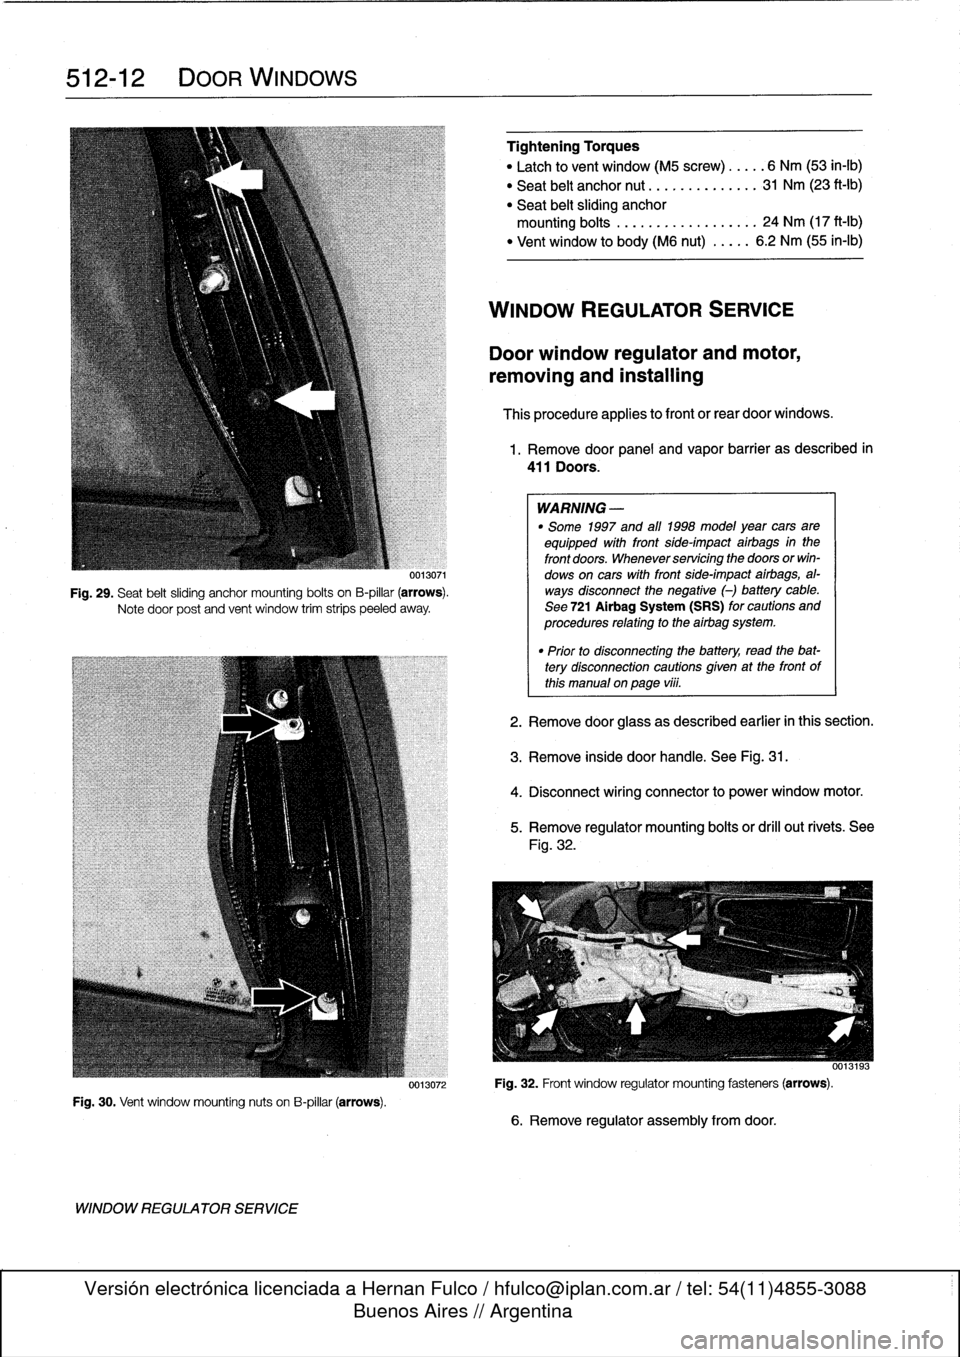
512-
1
2
DOOR
WINDOWS
Fig
.
30
.
Vent
window
mounting
nuts
on
B-pillar
(arrows)
.
WINDOW
REGULATOR
SERVICE
0013071
Fig
.
29
.
Seat
belt
sliding
anchor
mounting
bolts
on
B-pillar
(arrows)
.
Notedoor
post
and
vent
window
trim
strips
peeled
away
.
Tightening
Torques
"
Latch
to
vent
window
(M5
screw)
.....
6
Nm
(53
in-lb)
"
Seat
belt
anchor
nut
..............
31
Nm
(23
ft-Ib)
"
Seat
belt
sliding
anchor
mounting
bolts
.
..
...
.
...........
24
Nm
(17
ft-Ib)
"
Vent
window
to
body(M6
nut)
.....
6
.2
Nm
(55
in-lb)
WINDOW
REGULATOR
SERVICE
Door
window
regulator
and
motor,
removing
and
installing
This
procedure
applies
to
front
or
rear
door
windows
.
1
.
Remove
door
panel
and
vapor
barrier
as
described
in
411
Doors
.
WARNING
-
"
Some
1997
and
all
1998
model
year
cars
are
equipped
with
front
side-impact
airbags
in
the
front
doors
.
Whenever
servicing
the
doors
orwin-
dows
on
cars
with
front
side-impact
airbags,
al-
ways
disconnect
the
negative
(-)
battery
cable
.
See
721
Airbag
System
(SRS)
for
cautions
and
procedures
relating
to
the
airbag
system
.
"
Prior
to
disconnectiog
the
battery,
read
the
bat-tery
disconnection
cautions
gíven
at
the
front
of
this
manual
onpage
vi¡¡
.
2
.
Remove
door
glass
as
described
earlier
in
this
section
.
3
.
Remove
inside
door
handle
.
See
Fig
.
31
.
4
.
Disconnect
wiring
connector
to
power
window
motor
.
5
.
Remove
regulator
mounting
bolts
or
drill
out
rivets
.
See
Fig
.
32
.
0013193
0013072
Fig
.
32
.
Front
window
regulator
mounting
fasteners
(arrows)
.
6
.
Remove
regulator
assembly
fromdoor
.
Page 343 of 759
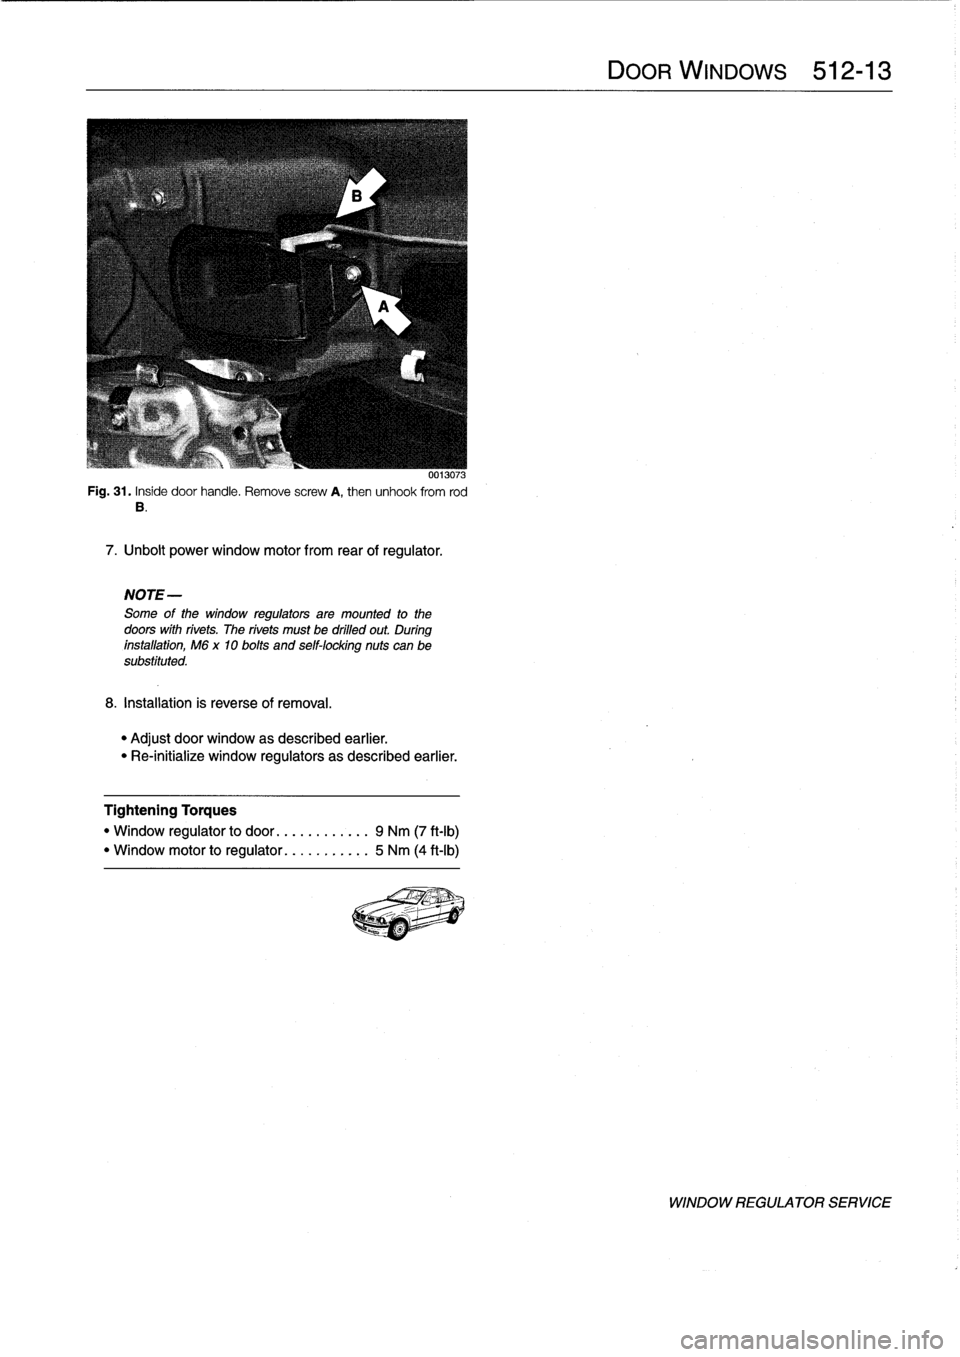
Fig
.
31
.
Inside
door
handle
.
Remove
screw
A,then
unhook
from
rod
B
.
7
.
Unbolt
power
window
motor
from
rear
of
regulator
.
NOTE-
Some
of
the
window
regulators
are
mounted
to
the
doors
with
rivets
.
The
rivets
must
be
drilled
out
.
During
installation,
M6
x
10
bolts
and
self-locking
nuts
can
be
substituted
.
8
.
Installation
is
reverse
of
removal
.
0013073
"
Adjust
door
window
as
described
earlier
.
"
Re-initialize
window
regulators
as
described
earlier
.
Tightening
Torques
"
Window
regulator
to
door
............
9
Nm
(7
ft-Ib)
"
Window
motor
to
regulator
...........
5
Nm
(4
ft-Ib)