sensor BMW M3 1998 E36 Repair Manual
[x] Cancel search | Manufacturer: BMW, Model Year: 1998, Model line: M3, Model: BMW M3 1998 E36Pages: 759
Page 164 of 759
130-18
FUEL
INJECTION
The
engine
coolant
temperature
(ECT)
sensor
sends
con-
tinuous
engine
coolant
temperature
information
to
the
ECM
.
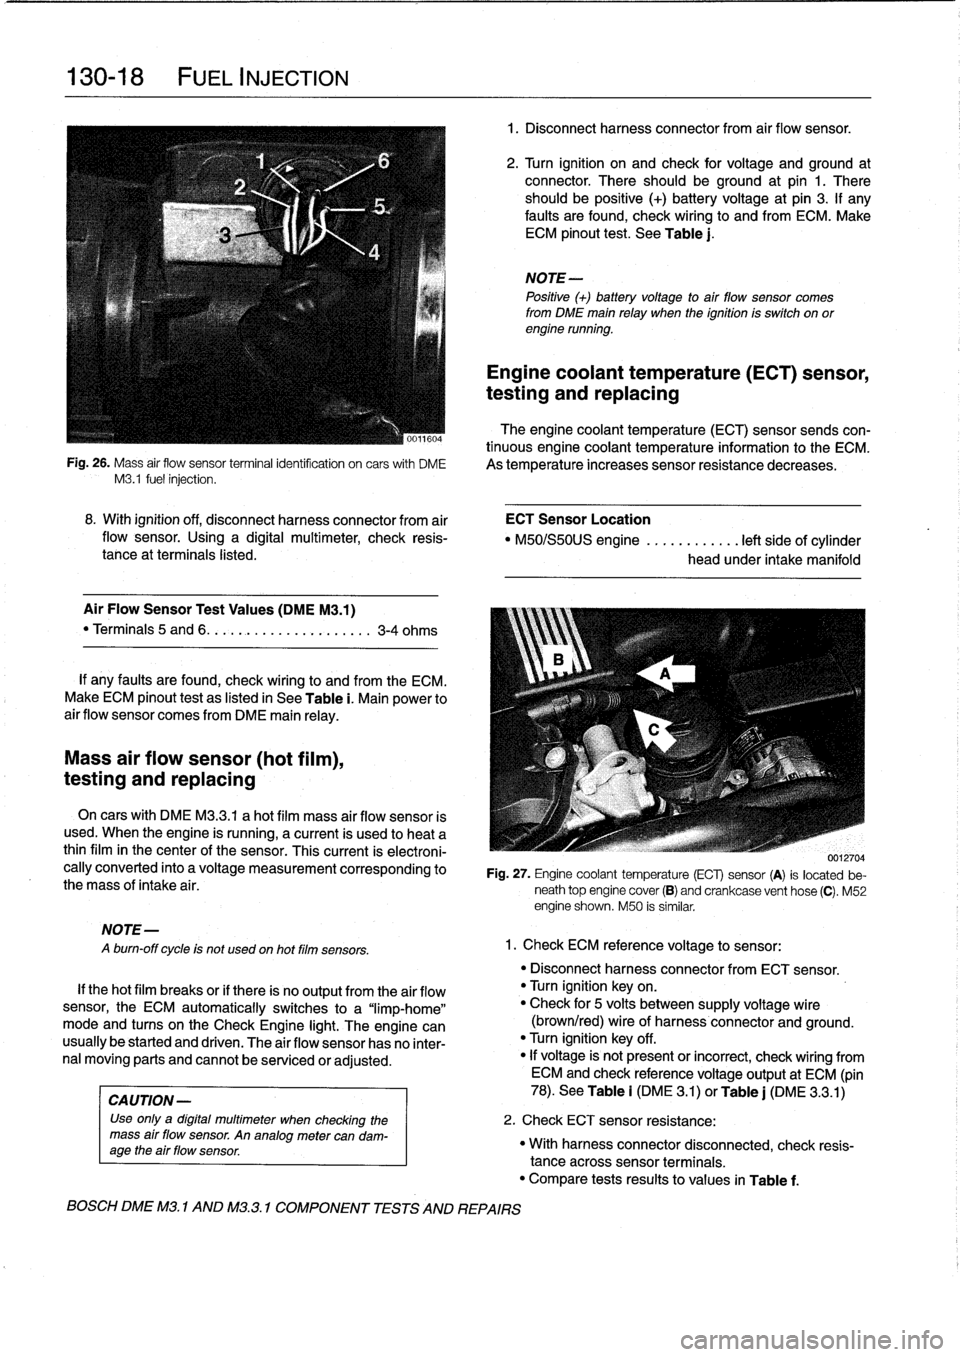
Fig
.
26
.
Mass
air
flow
sensor
terminalidentifcation
on
carswith
DME
As
temperature
increases
sensor
resistance
decreases
.
M3
.1
fuel
injection
.
Mass
air
flow
sensor
(hot
film),
testing
and
replacing
MOTE-
A
burn-off
cycle
is
not
used
on
hot
film
sensors
.
8
.
With
ignition
off,
disconnect
harness
connector
from
air
ECT
Sensor
Location
flow
sensor
.
Using
a
digital
multimeter,
check
resis-
"
M50/S50US
engine
............
left
side
of
cylinder
tance
at
terminals
listed
.
head
under
intake
manifold
Air
Flow
Sensor
Test
Values
(DMEM3
.1)
"
Terminals
5
and
6
.
.
.
.........
..
.
..
....
3-4
ohms
If
any
faults
are
found,
check
wiring
lo
and
from
the
ECM
.
Make
ECM
pinout
test
as
listed
in
See
Table
i
.
Main
power
to
air
flow
sensor
comes
from
DME
main
relay
.
On
cars
with
DME
M3
.3
.1
a
hot
film
mass
air
flow
sensor
is
used
.
When
the
engine
is
running,
a
current
is
used
lo
heat
a
thinfilm
in
the
center
of
the
sensor
.
This
current
is
electroni-
cally
converted
into
a
voltage
measurement
corresponding
to
the
mass
of
intake
air
.
If
thehot
film
breaks
or
if
there
is
no
output
from
the
air
flow
sensor,
the
ECM
automatically
switches
to
a
"limp-home"
mode
and
tucos
on
the
Check
Engine
light
.
The
engine
can
usually
be
started
and
driven
.
The
air
flow
sensor
has
no
inter-
nal
moving
parts
and
cannot
be
senricedor
adjusted
.
CA
UTION-
Use
only
a
digital
multimeter
when
checking
the
mass
air
flow
sensor
.
An
analogmetercan
dam-
age
the
air
flow
sensor
.
BOSCH
DME
M3
.
1
AND
M32
.1
COMPONENT
TESTS
AND
REPAIRS
1
.
Disconnect
harnessconnector
from
air
flow
sensor
.
2
.
Turn
ignition
on
and
check
for
voltage
and
ground
at
connector
.
There
should
beground
at
pin
1
.
There
should
be
positive
(+)
battery
voltage
at
pin
3
.
If
any
faults
are
found,
check
wiring
to
and
from
ECM
.
Make
ECM
pinout
test
.
See
Table
j
.
NOTE-
Positive
(+)
battery
voltage
to
air
flow
sensor
comes
from
DME
main
relay
when
the
ignition
is
switch
on
orengine
running
.
Engine
coolant
temperature
(ECT)
sensor,
testing
and
replacing
0012704
Fig
.
27
.
Engine
coolant
temperature
(ECT)
sensor
(A)
is
located
be-
neath
top
engine
cover
(B)
and
crankcase
vent
hose
(C)
.
M52
engine
shown
.
M50
is
similar
.
1
.
Check
ECM
reference
voltage
to
sensor
:
"
Disconnect
harnessconnector
from
ECT
sensor
.
"
Turn
ignition
keyon
.
"
Check
for
5
volts
between
supply
voltage
wire
(brown/red)
wire
of
harness
connector
and
ground
.
"
Turn
ignition
key
off
.
"
If
voltage
is'
not
present
or
incorrect,
check
wiring
from
ECM
and
check
referencevoltage
output
at
ECM
(pin
78)
.
See
Table
i
(DM
E
3
.1)
or
Table
j
(DME
3
.3
.1)
2
.
Check
ECT
sensor
resistance
:
"
With
harnessconnector
disconnected,
check
resis-
tance
acrosssensor
terminals
.
"
Compare
tests
results
to
values
in
Table
f
.
Page 165 of 759
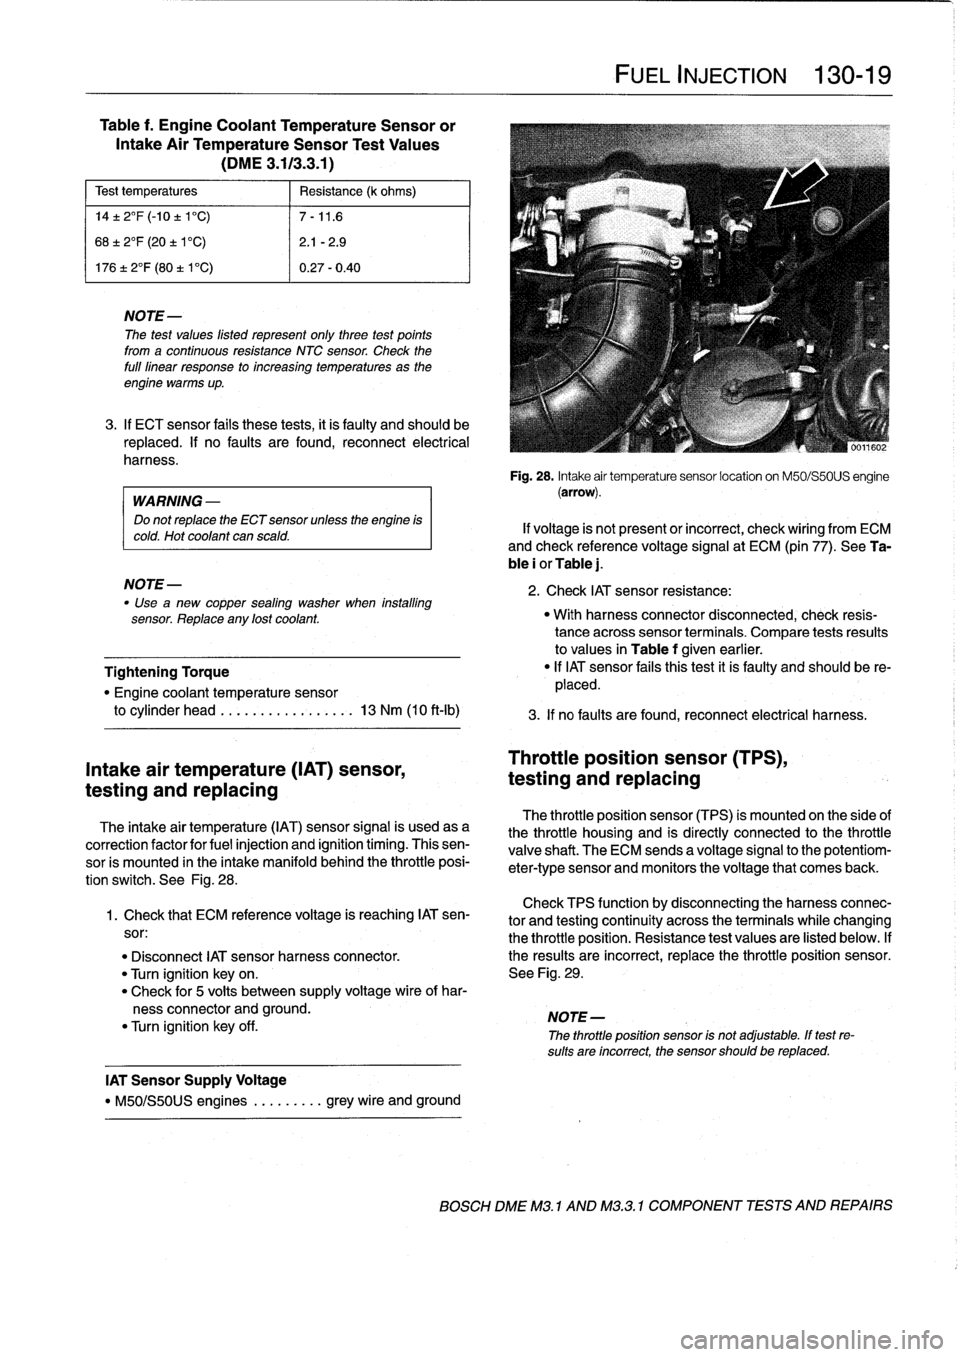
Table
f
.
Engine
Coolant
TemperatureSensor
or
Intake
Air
TemperatureSensor
Test
Values
(DME
3
.113
.3
.1)
Test
temperatures
Resistance
(k
ohms)
14±
2°F
(-10
±
1'C)
7-11
.6
68±
2°F
(20
±
1'C)
2
.1
-2
.9
17612°F
(80
t
V
C)
0
.27-0
.40
NOTE
The
test
values
listed
represent
only
three
test
points
from
a
continuous
resistance
NTC
sensor
.
Check
the
full
linear
response
to
increasing
temperatures
as
the
engine
warms
up
.
3
.
If
ECT
sensor
fails
these
tests,
it
is
faulty
and
should
be
replaced
.
If
no
faults
are
found,
reconnect
electrical
harness
.
WARNING
-
Do
not
replace
the
ECT
sensor
unless
the
engine
is
cold
.
Hot
coolant
can
scald
.
NOTE-
Use
"
a
new
copper
sealing
washer
when
installing
sensor
.
Replace
any
lost
coolant
.
Tightening
Torque
"
Engine
coolant
temperature
sensor
to
cylinder
head
.........
..
.
..
...
13
Nm
(10
ft-lb)
Intake
air
temperature
(IAT)
sensor,
testing
and
replacing
The
intake
air
temperature
(IAT)
sensor
signal
is
usedasa
correction
factor
for
fuel
injection
and
ignition
timing
.
Thissen-
sor
is
mounted
in
the
intake
manifold
behind
the
throttle
posi-
tion
switch
.
See
Fig
.
28
.
Check
TPS
function
by
disconnecting
theharnessconnec-
1
.
Check
that
ECM
reference
voltage
is
reaching
IAT
sen-
tor
and
testing
continuity
across
the
terminalswhile
changing
sor
:
the
throttle
position
.
Resistance
test
values
are
listed
below
.
If
"
Disconnect
IAT
sensor
harness
connector
.
the
resuits
are
incorrect,
replace
the
throttle
position
sensor
.
"
Turn
ignition
keyon
.
See
Fig
.
29
.
"
Check
for
5
volts
between
supply
voltage
wire
of
har-
ness
connector
and
ground
.
NOTE-
"
Turn
ignition
key
off
.
The
throttle
position
sensor
is
not
adjustable
.
If
test
re-
sults
are
incorrect,
the
sensor
should
be
replaced
.
IAT
Sensor
Supply
Voltage
"
M50/S50US
engines
.
........
grey
wire
and
ground
FUEL
INJECTION
130-19
Fig
.
28
.
Intake
air
temperature
sensor
location
on
M50/S50US
engine
(arrow)
.
If
voltage
is
not
present
or
incorrect,
check
wiring
from
ECM
and
check
reference
voltage
signal
at
ECM
(pin
77)
.
See
Ta-
ble
i
or
Table
j
.
2
.
Check
IAT
sensor
resistance
:
"
With
harness
connector
disconnected,
check
resis-
tance
acrosssensor
terminals
.
Compare
tests
resuits
to
values
in
Table
f
given
earlier
.
"
If
IAT
sensor
fafs
thistest
it
is
faulty
and
should
be
re-
placed
.
3
.
If
no
faults
are
found,
reconnect
electrical
harness
.
Throttle
position
sensor
(TPS),
testing
and
replacing
The
throttle
position
sensor
(TPS)
is
mounted
on
the
side
of
the
throttle
housing
and
is
directly
connected
to
the
throttle
valve
shaft
.
The
ECM
sends
a
voltage
signal
to
the
potentiom-
eter-type
sensor
and
monitors
the
voltage
that
comes
back
.
BOSCH
DME
M3
.
1
AND
M32
.1
COMPONENT
TESTS
AND
REPAIRS
Page 166 of 759
130-20
FUEL
INJECTION
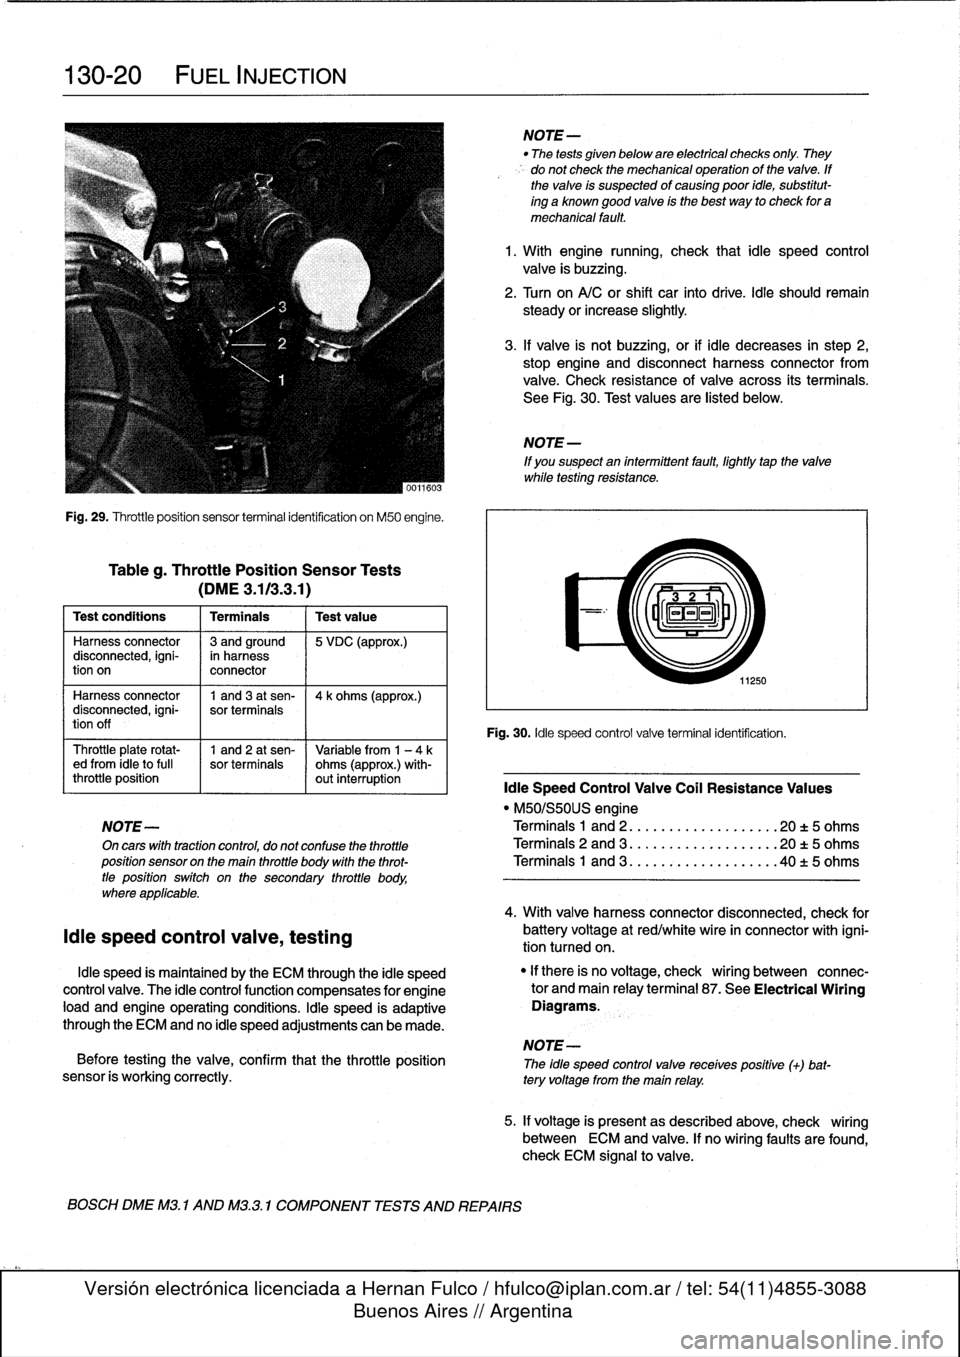
Fig
.
29
.
Throttleposition
sensor
terminal
identification
on
M50
engine
.
Tableg
.
Throttle
Position
Sensor
Tests
(DME3
.113
.3
.1)
Test
conditions
I
Terminals
I
Testvalue
Harness
connector
13
andground
15
VDC
(approx
.)
disconnected,
igni-
in
harness
tion
on
connector
Harness
connector
1
and3
at
sen-
14
k
ohms
(approx
.)
disconnected,
igni-
sor
terminals
tion
off
Throttle
plate
rotat-
1
and
2
at
sen-
Variable
from
1
-
4ked
from
¡dieto
full
sor
terminals
ohms
(approx
.)
with-
throttle
position
out
interruption
¡die
Speed
Control
Valve
Coil
Resistance
Values
"
M50/S50US
engine
NOTE-
Terminals
1
and
2
..
.
................
20
t
5
ohms
On
cars
with
tractioncontrol,
do
not
confuse
the
throttle
Terminals
2
and
3
...................
20
t5
ohms
position
sensor
on
the
main
throttle
body
with
the
throt-
Terminals
1
and
3
..
.
..
:
............
.40
t
5
ohms
tle
positionswitch
on
the
secondary
throttle
body,
where
applicable
.
¡die
speed
control
valve,
testing
¡die
speed
is
maintained
by
the
ECM
through
the
¡die
speed
control
valve
.
The
¡die
controlfunction
compensates
for
engine
load
and
engine
operating
conditions
.
¡die
speed
is
adaptive
through
the
ECM
and
no
¡die
speed
adjustments
can
be
made
.
NOTE-
Before
testing
the
valve,
confirm
that
the
throttle
position
The
idle
speed
controlvalve
receives
positive
(+)
bat-
sensor
is
working
correctly
.
tery
voltage
from
the
main
relay
.
BOSCH
DME
M3
.
1
AND
M3
.3
.1
COMPONENT
TESTS
AND
REPAIRS
NOTE-
"
The
tests
given
below
are
electrical
checks
only
.
They
do
not
check
the
mechanical
operation
of
the
valve
.
If
the
valve
is
suspected
of
causing
poor
idie,
substitut-
ing
a
known
good
valve
is
the
best
way
to
check
for
a
mechanical
fault
.
1
.
With
engine
running,
check
that
¡die
speed
control
valve
is
buzzing
.
2
.
Turn
on
A/C
or
shift
car
finto
drive
.
¡die
should
remain
steady
orincrease
slightly
.
3
.
If
valve
is
not
buzzing,or
if
¡die
decreases
in
step
2,
stop
engine
and
disconnect
harness
connector
from
valve
.
Check
resistance
of
valve
across
its
terminals
.
See
Fig
.
30
.
Test
values
are
listed
below
.
NOTE
-
If
you
suspect
an
intermittent
fault,
lightly
tapthe
valve
while
testing
resistance
.
11250
Fig
.
30
.
¡die
speed
control
valve
terminal
identification
.
4
.
With
valve
harnessconnector
disconnected,
check
for
battery
voltage
at
red/white
wire
in
connector
with
igni-
tion
tumed
on
.
"
If
there
is
no
voltage,
check
wiring
between
connec-
tor
and
main
relayterminal
87
.
See
Electrical
Wiring
Diagrams
.
5
.
If
voltage
is
presentas
described
above,
check
wiring
between
ECM
and
valve
.
If
no
wiring
faults
are
found,
check
ECM
signal
to
valve
.
Page 168 of 759
130-
2
2
FUEL
INJECTION
Mass
air
flow
sensor,
replacing
1
.
Disconnect
harness
connector
and
intake
air
bootfrom
air
flow
sensor
.
See
Fig
.
32
.
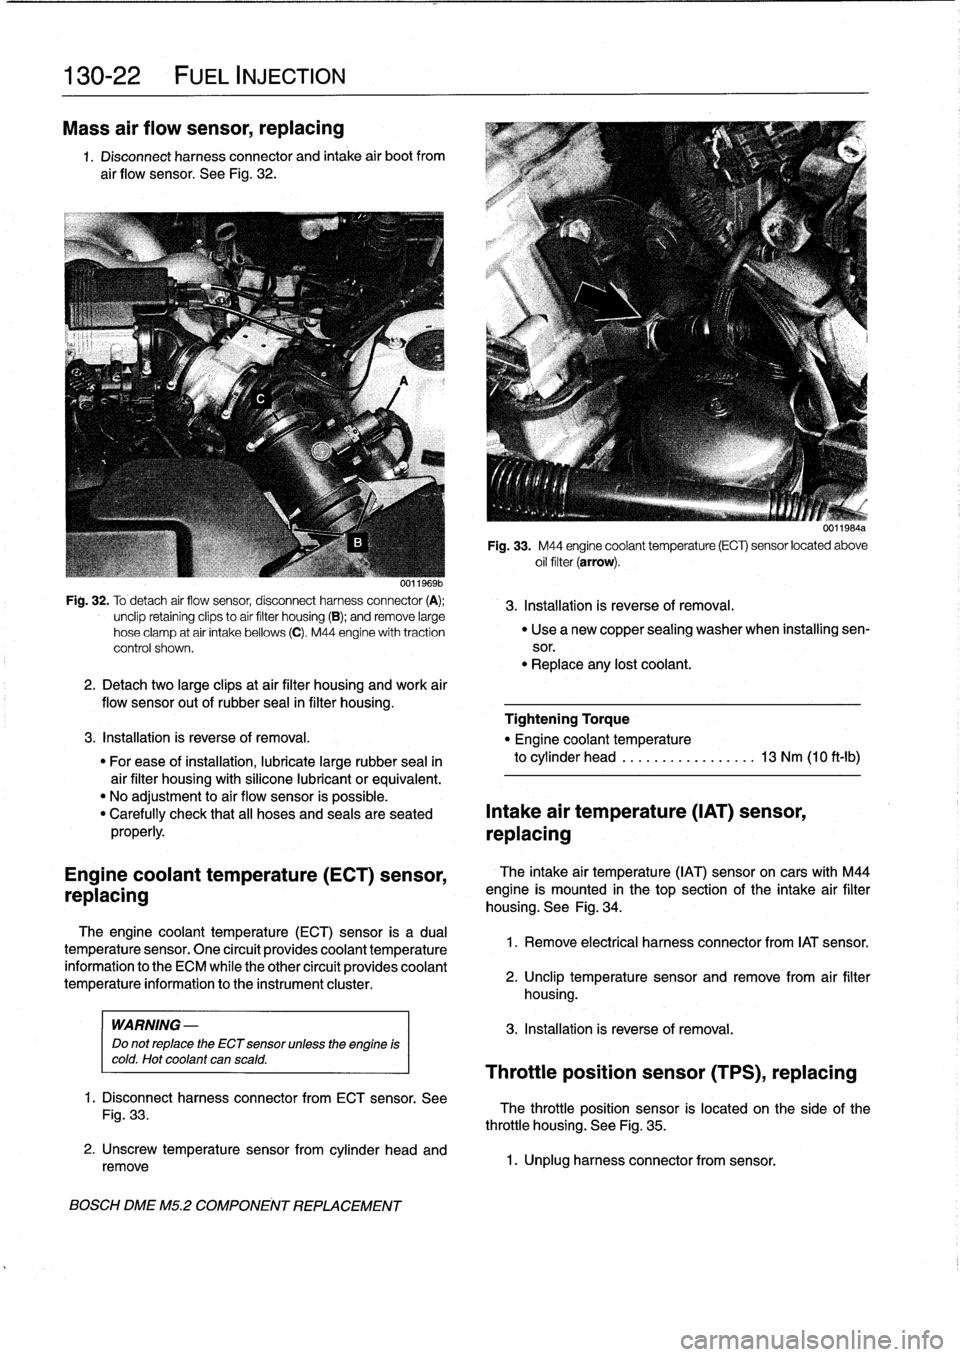
Fig
.
32
.
To
detach
air
flow
sensor,
disconnect
harness
connector
(A)
;
3
.
Installation
is
reverse
of
removal
.
unclip
retainíng
clips
to
aír
filter
housing
(B)
;
andremove
large
hose
clamp
at
air
intake
bellows
(C)
.
M44
engine
with
traction
"
Use
a
new
copper
sealing
washer
when
installing
sen-
control
shown
.
sor
.
"
Replace
any
lost
coolant
.
2
.
Detachtwo
large
clipsat
air
filter
housing
and
work
air
flow
sensor
out
of
rubber
seal
in
filter
housing
.
Tightening
Torque
3
.
Installation
is
reverse
of
removal
.
"
Engine
coolant
temperature
"
For
ease
of
installation,
lubricate
large
rubber
seal
in
to
cylinder
head
.............
.
..
.
13
Nm
(10
ft-Ib)
air
filter
housing
with
silicone
lubricant
or
equivalent
.
"
No
adjustment
to
air
flow
sensor
is
possible
.
"
Carefully
check
that
all
hoses
and
seals
are
seated
Intake
air
temperature
(IAT)
sensor,
properly
.
replacing
Engine
coolant
temperature
(ECT)
sensor,
replacing
The
engine
coolant
temperature
(ECT)sensor
is
a
dual
temperature
sensor
.
One
circuít
provides
coolant
temperature
information
to
the
ECM
while
the
other
circuít
provides
coolant
temperature
information
to
the
instrument
cluster
.
WARNING
-
Do
not
replace
the
ECT
sensor
unless
the
engine
is
cold
.
Hot
coolant
can
scald
.
1
.
Disconnect
harness
connector
from
ECT
sensor
.
See
Fig
.
33
.
2
.
Unscrew
temperature
sensorfrom
cylinder
head
and
remove
BOSCH
DME
M5
.2
COMPONENT
REPLACEMENT
U1111
bis4a
Fig
.
33
.
M44
engine
coolant
temperature
(ECT)
sensor
located
above
oil
filter
(arrow)
.
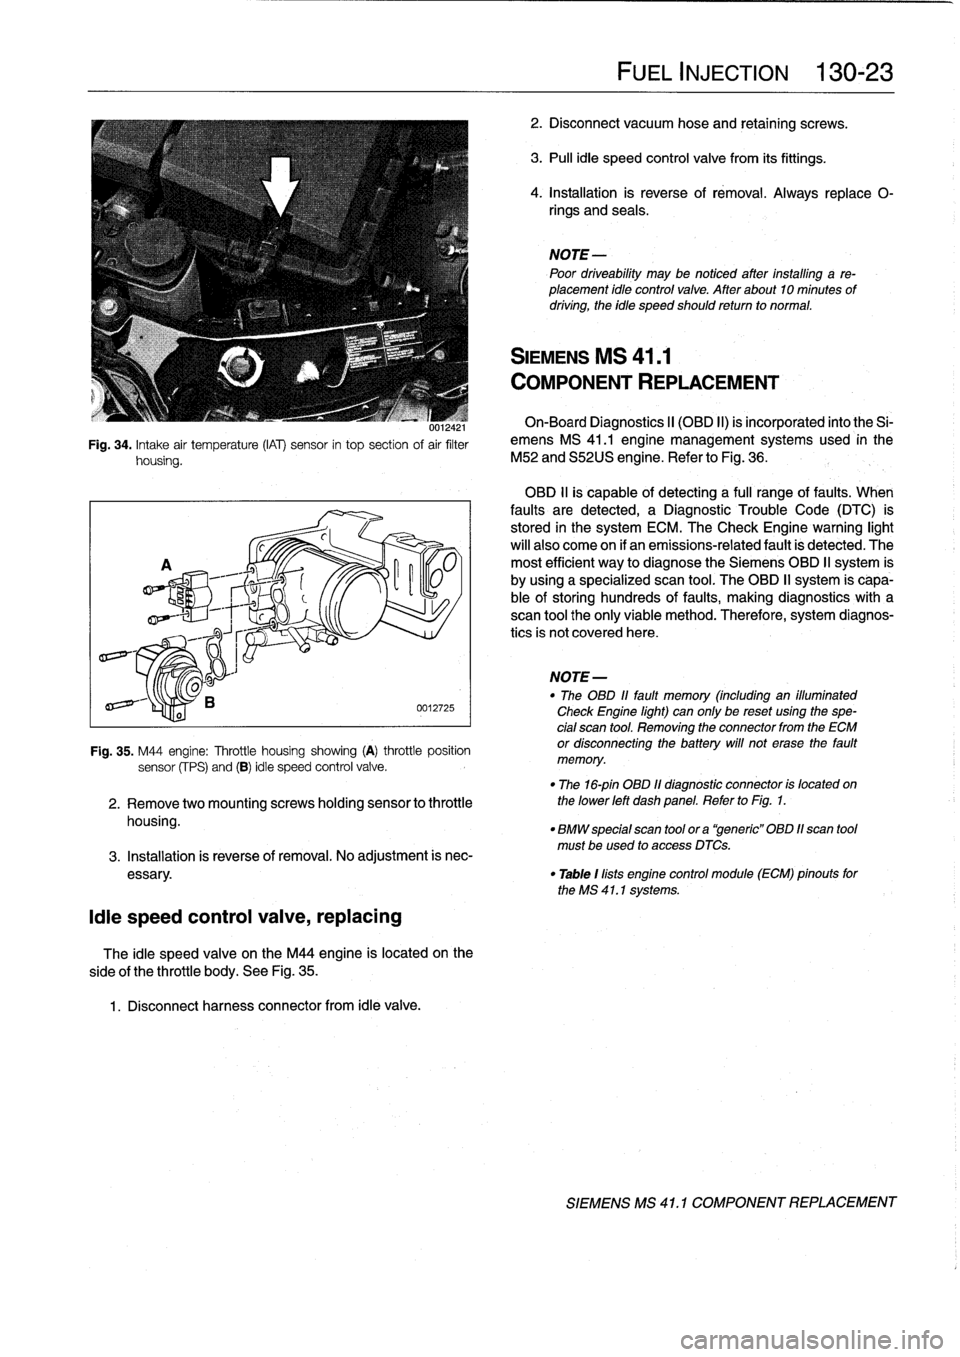
The
intake
air
temperature
(IAT)
sensoron
cars
with
M44
engine
is
mounted
in
thetop
section
of
the
intake
air
filter
housing
.
See
Fig
.
34
.
1
.
Remove
electrical
harness
connector
from
IAT
sensor
.
2
.
Unclip
temperature
sensor
and
remove
from
air
filter
housing
.
3
.
Installation
is
reverse
of
removal
.
Throttle
position
sensor
(TPS),
replacing
The
throttle
position
sensor
is
located
on
the
side
of
the
throttle
housing
.
See
Fig
.
35
.
1
.
Unplug
harness
connector
from
sensor
.
Page 169 of 759
001ía4
i
Fig
.
34
.
Intake
air
temperature
(IAT)
sensor
in
top
section
of
air
filter
housing
.
¡die
speed
control
valve,
replacing
side
of
the
throttle
body
.
See
Fig
.
35
.
1
.
Disconnect
harness
connector
from
¡die
valve
.
0012725
Fig
.
35
.
M44
engine
:
Throttle
housing
showing
(A)
throttle
position
sensor
(fPS)
and
(B)
¡die
speed
control
valve
.
2
.
Remove
twomountingscrews
holding
sensor
to
throttle
housing
.
The
¡die
speed
valve
on
the
M44
engine
is
located
on
the
FUEL
INJECTION
130-23
2
.
Disconnect
vacuum
hose
and
retaining
screws
.
3
.
Pull
¡die
speed
control
valve
from
its
fittings
.
4
.
Installation
is
reverse
of
rémoval
.
Always
replace
0-
rings
and
seals
.
NOTE
Poor
driveability
may
be
notíced
after
installing
a
re-
placement
¡dio
control
valve
.
After
about10
minutes
of
driving,
the
idie
speed
should
retum
to
normal
.
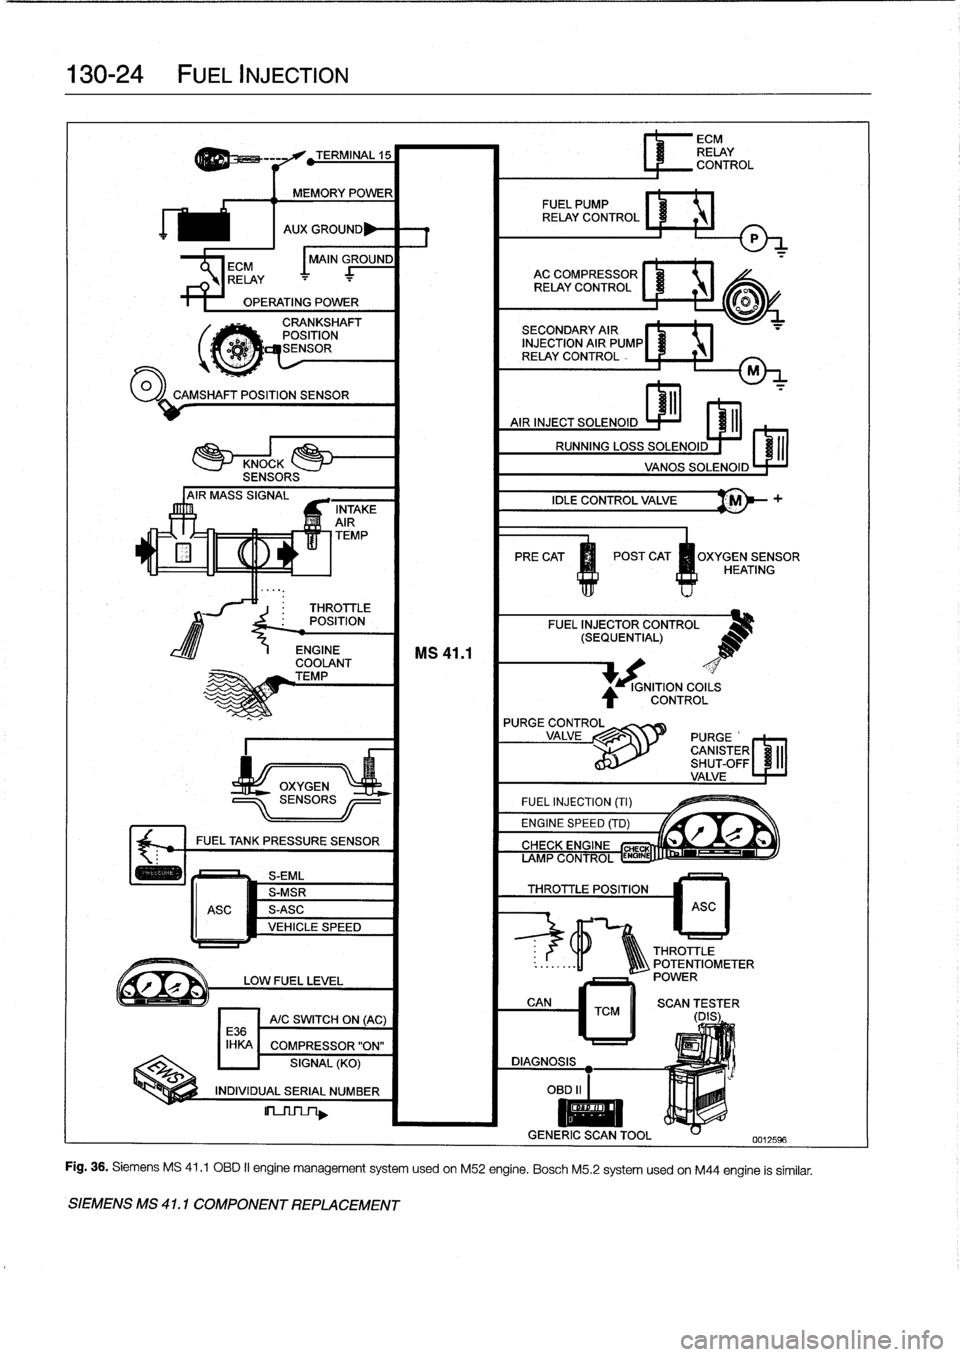
SIEMENS
MS
41
.1
COMPONENT
REPLACEMENT
On-Board
Diagnostics
II
(OBD
II)
is
incorporated
into
the
Si-
emens
MS
41
.1
engine
management
systems
used
in
the
M52
and
S52US
engine
.
Refer
to
Fig
.
36
.
OBD
11
is
capable
of
detecting
a
fui¡
range
offaults
.
When
faults
are
detected,
a
Diagnostic
Trouble
Code
(DTC)
is
stored
in
the
system
ECM
.
The
Check
Engine
warning
light
will
also
come
on
if
an
emissions-related
fault
is
detected
.
The
most
efficient
way
to
diagnose
the
Siemens
OBD
II
system
is
by
using
a
specialized
scan
tool
.
The
OBD
II
system
is
capa-
ble
of
storing
hundreds
of
faults,
making
diagnostics
with
a
scan
tool
the
only
viable
method
.
Therefore,
system
diagnos-
tics
is
not
covered
here
.
NOTE
-
"
The
OBD
11
fault
memory
(including
an
illuminated
Check
Engine
light)
can
only
be
reset
using
the
spe-
cial
scan
tool
.
Removing
the
connector
from
the
ECM
or
disconnecting
the
battery
will
not
erase
the
fault
memory
.
"
The
16-pin
OBD
11
diagnostic
connector
is
located
on
the
lower
left
dash
panel
.
Refer
to
Fig
.
1
.
"
BMW
special
scan
tool
ora
"generic"
OBD
11scan
tool
must
be
used
to
access
DTCs
.
3
.
Installation
is
reverse
of
removal
.
No
adjustment
is
nec
essary
.
"
Table
1
lists
engine
control
module
(ECM)
pinouts
forthe
MS
41
.1
systems
.
SIEMENS
MS
41
.
1
COMPONENT
REPLACEMENT
Page 170 of 759
130-24
FUEL
INJECTION
Jo
'0
o_A
í1
RELAY
..
.
.
CAMSHAFT
POSITION
SENSOR
'
.
~'
~
:UhI~IIUH~W~`bY~7~d~t~II7
.
.
.
,
1111111
~ilf
ASC
TERMINAL
15
MEMORY
POWER
CRANKSHAFT
POSITION
qtcMSENSOR
THROTTLE
POSITION
ENGINE
COOLANT
TEMP
FUELTANK
PRESSURE
SENSOR
S-EML
S-MSR
S-ASC
VEHICLE
SPEED
LOW
FUEL
LEVEL
A/C
SWITCH
ON
(AC)
E36
IHKA
COMPRESSOR
"ON"
SIGNAL
(KO)
INDIVIDUAL
SERIAL
NUMBER
SIEMENS
MS
41
.
1
COMPONENT
REPLACEMENT
FUEL
PUMP
RELAY
CONTROL
AUX
GROUND
P
MAIN
GROUND
AC
COMPRESSOR
RELAY
CONTROL
~®
SECONDARY
AIR
INJECTION
AIR
PUMP
RELAY
CONTROL
-
M
PRE
CAT
POST
CAT
m
nXYGEN
SENSOR
ys
U
~
4
,
HEATING
FUELINJECTOR
CONTROL
(
MS
41
.1
(
MS
PURGE
CONTROL
VALVE
//
PURGE
'
CANISTERSHUT-OFF
VALVE
ECM
RELAY
CONTROL
IGNITION
COILS
CONTROL
1
ASC
o
ayi
THROTTLE
POTENTIOMETER
POWER
,
al
;
..
i
r71a
.
"a
fn7111,
/
r
Fig
.
36
.
Siemens
MS
41
.1
OBD
II
engine
management
system
usedon
M52
engine
.
Bosch
M5
.2
systemusedon
M44
engine
is
similar
.
Page 171 of 759
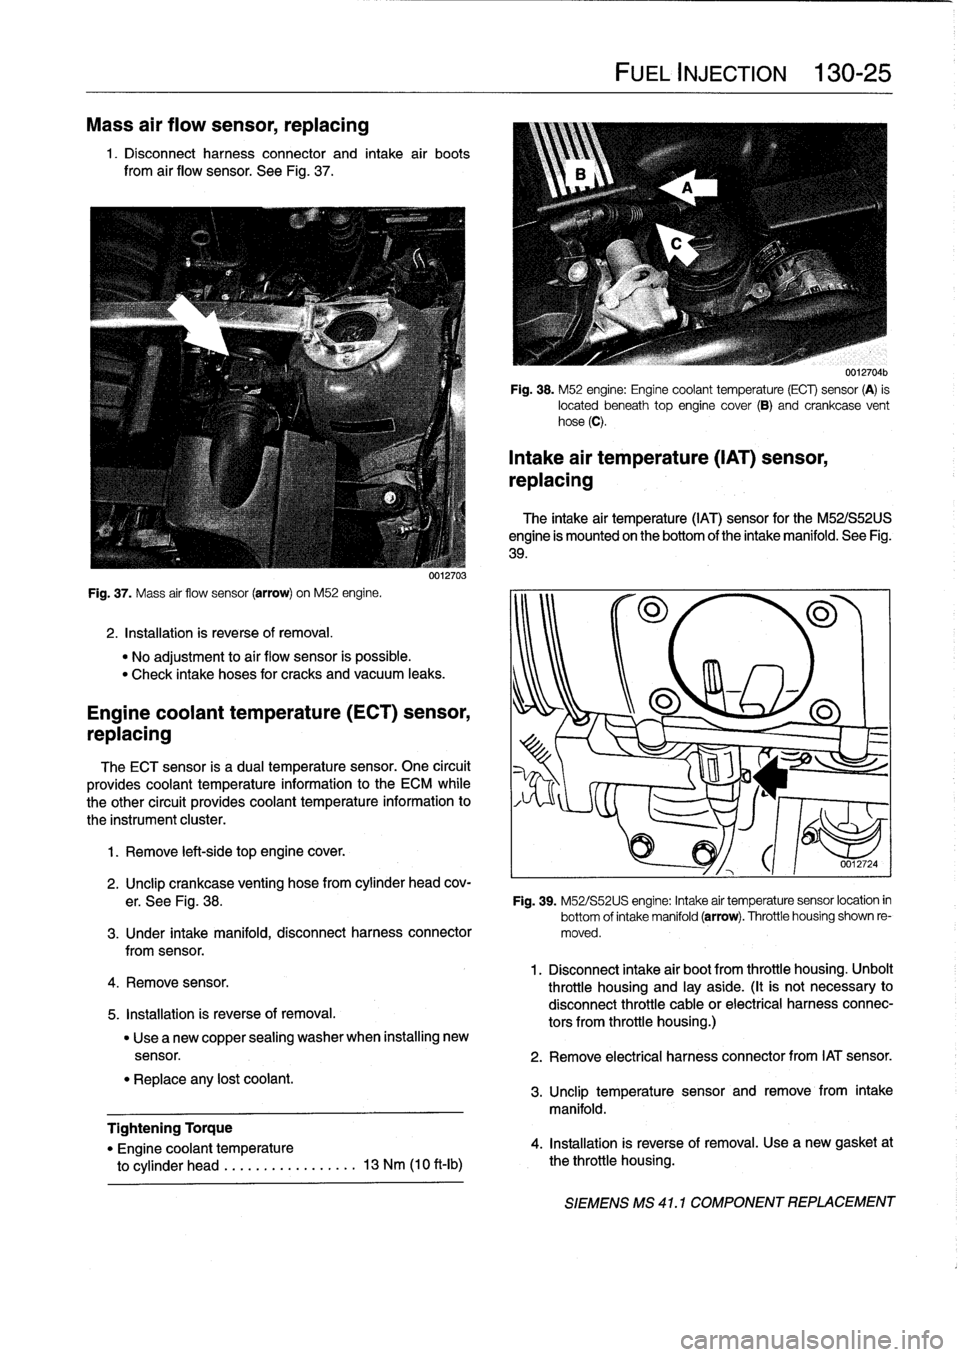
Mass
air
flow
sensor,
replacing
1
.
Disconnect
harness
connector
and
intake
air
boots
from
air
flow
sensor
.
See
Fig
.
37
.
Fig
.
37
.
Mass
air
flow
sensor
(arrow)
on
M52
engine
.
2
.
Installation
is
reverse
of
removal
.
"
No
adjustment
to
aír
flow
sensor
is
possible
.
"
Check
intake
hoses
for
cracks
and
vacuum
leaks
.
Engine
coolant
temperature(ECT)
sensor,
replacing
The
ECT
sensor
is
a
dual
temperature
sensor
.
One
circuit
provides
coolant
temperature
information
to
the
ECM
while
the
other
circuit
provides
coolant
temperature
information
to
the
instrument
cluster
.
1
.
Remove
left-side
top
engine
cover
.
4
.
Remove
sensor
.
5
.
Installation
is
reverse
of
removal
.
"
Replace
any
lost
coolant
.
0012703
"
Use
a
new
copper
sealing
washer
when
installing
new
Tightening
Torque
"
Engine
coolant
temperature
to
cylinder
head
.....
..
.
...
......
13
Nm
(10
ft-Ib)
FUEL
INJECTION
130-
25
0012704b
Fig
.
38
.
M52
engine
:
Engine
coolant
temperature
(ECT)
sensor
(A)
is
located
beneath
top
engine
cover
(8)
and
crankcase
vent
hose
(C)
.
Intake
air
temperature
(IAT)
sensor,
replacing
The
intake
air
temperature
(IAT)
sensor
for
the
M52/S52US
engine
is
mounted
on
the
bottom
of
the
intake
manifold
.
See
Fig
.
39
.
2
.
Unclip
crankcase
venting
hose
from
cylinder
head
cov-
er
.
See
Fig
.
38
.
Fig
.
39
.
M52/S52US
engine
:
Intake
air
temperaturesensor
location
in
bottom
of
intake
manifold(arrow)
.
Throttle
housing
shown
re
3
.
Under
intake
manifold,
disconnect
harness
connector
moved
.
fromsensor
.
1
.
Disconnect
intake
air
bootfrom
throttle
housing
.
Unbolt
throttle
housing
and
¡ay
aside
.
(It
is
not
necessary
to
disconnect
throttle
cable
or
electrical
harnessconnec-
tors
from
throttle
housing
.)
sensor
.
2
.
Remove
electrical
harness
connector
from
IAT
sensor
.
3
.
Unclip
temperature
sensor
and
remove
from
intake
manifold
.
4
.
Installation
is
reverse
of
removal
.
Use
a
new
gasket
at
the
throttle
housing
.
SIEMENS
MS
41
.1
COMPONENT
REPLACEMENT
Page 172 of 759
130-26
FUEL
INJECTION
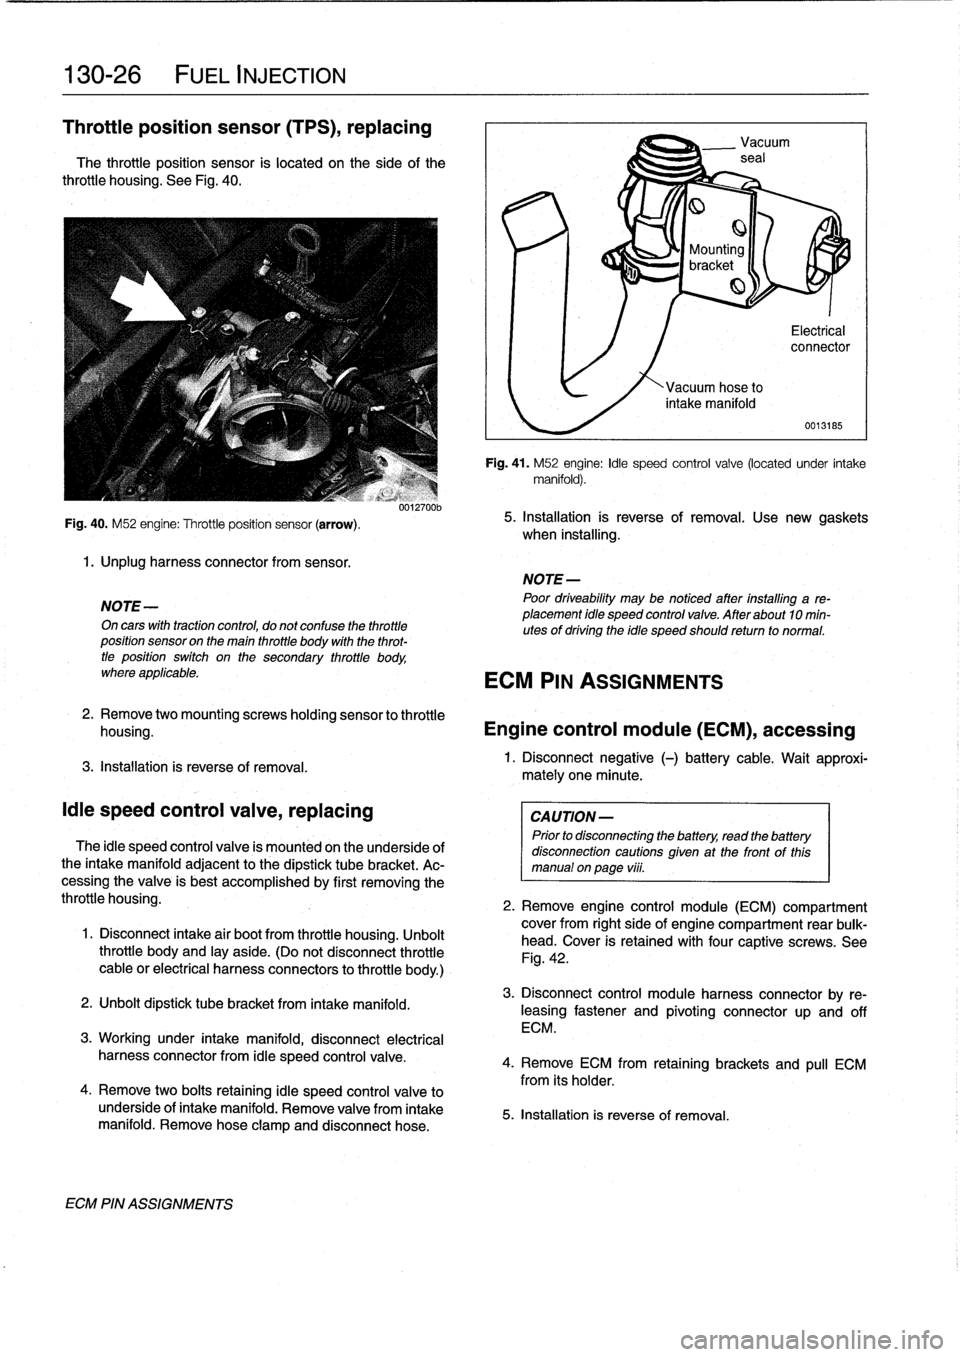
Throttle
position
sensor
(TPS),
replacing
The
throttie
position
sensor
is
located
on
the
side
of
the
throttie
housing
.
See
Fig
.
40
.
Fig
.
40
.
M52
engine
:
Throttle
position
sensor
(arrow)
.
1
.
Unplug
harness
connector
from
sensor
.
NOTE
-
On
cars
with
tractioncontrol,
do
not
confuse
the
throttieposition
sensor
on
the
main
throttie
body
wíth
the
throt-
tie
position
switch
on
the
secondary
throttie
body,
where
applicable
.
3
.
Installation
is
reverse
of
removal
.
¡die
speed
control
valve,
replacing
0012700b
The
¡die
speed
control
valve
is
mounted
on
the
underside
of
the
intake
manifoldadjacent
to
the
dipstick
tube
bracket
.
Ac-
cessing
the
valve
is
best
accomplished
by
first
removing
the
throttie
housing
.
1
.
Disconnect
intake
air
bootfrom
throttie
housing
.
Unbolt
throttie
body
and
¡ay
aside
.
(Do
not
disconnect
throttie
cable
or
electrical
harness
connectors
to
throttie
body
.)
2
.
Unbolt
dipstick
tube
bracket
from
intakemanifold
.
3
.
Workíng
under
intake
manifold,
disconnect
electrical
harness
connector
from
¡die
speed
control
valve
.
4
.
Remove
two
bolts
retaining
¡die
speed
control
valve
to
underside
of
intake
manifold
.
Remove
valve
from
intake
manifold
.
Remove
hose
clamp
and
disconnect
hose
.
ECM
PIN
ASSIGNMENTS
mately
one
minute
.
Vacuum
seal
Mounting
bracket
Electrical
connector
0013185
Fig
.
41
.
M52
engine
:
¡die
speed
control
valve
(located
under
intake
manifold)
.
5
.
Installation
ís
reverse
of
removal
.
Use
new
gaskets
when
installing
.
NOTE
-
Poor
driveabilíty
may
be
noticed
atter
installing
a
re-
placement
idle
speed
control
valve
.
After
about
10
min-utes
of
dríving
the
idle
speed
should
return
to
normal
.
ECM
PIN
ASSIGNMENTS
2
.
Remove
twomountingscrews
holding
sensor
to
throttie
housing
.
Engine
control
module
(ECM),
accessing
1
.
Disconnect
negative
(-)
battery
cable
.
Wait
approxi-
CAUTION-
Prior
to
disconnecting
the
battery,
read
the
battery
disconnection
cautions
given
at
the
front
of
this
manual
onpage
vüi
.
2
.
Remove
engine
control
module
(ECM)
compartment
cover
from
right
side
of
engine
compartment
rear
bulk-
head
.
Cover
is
retained
withfour
captíve
screws
.
See
Fig
.
42
.
3
.
Disconnect
control
module
harness
connector
by
re-
leasing
fastener
and
pivoting
connectorup
and
off
ECM
.
4
.
Remove
ECM
from
retaining
brackets
and
pull
ECM
from
its
holder
.
5
.
Installation
is
reverse
of
removal
.
Page 173 of 759
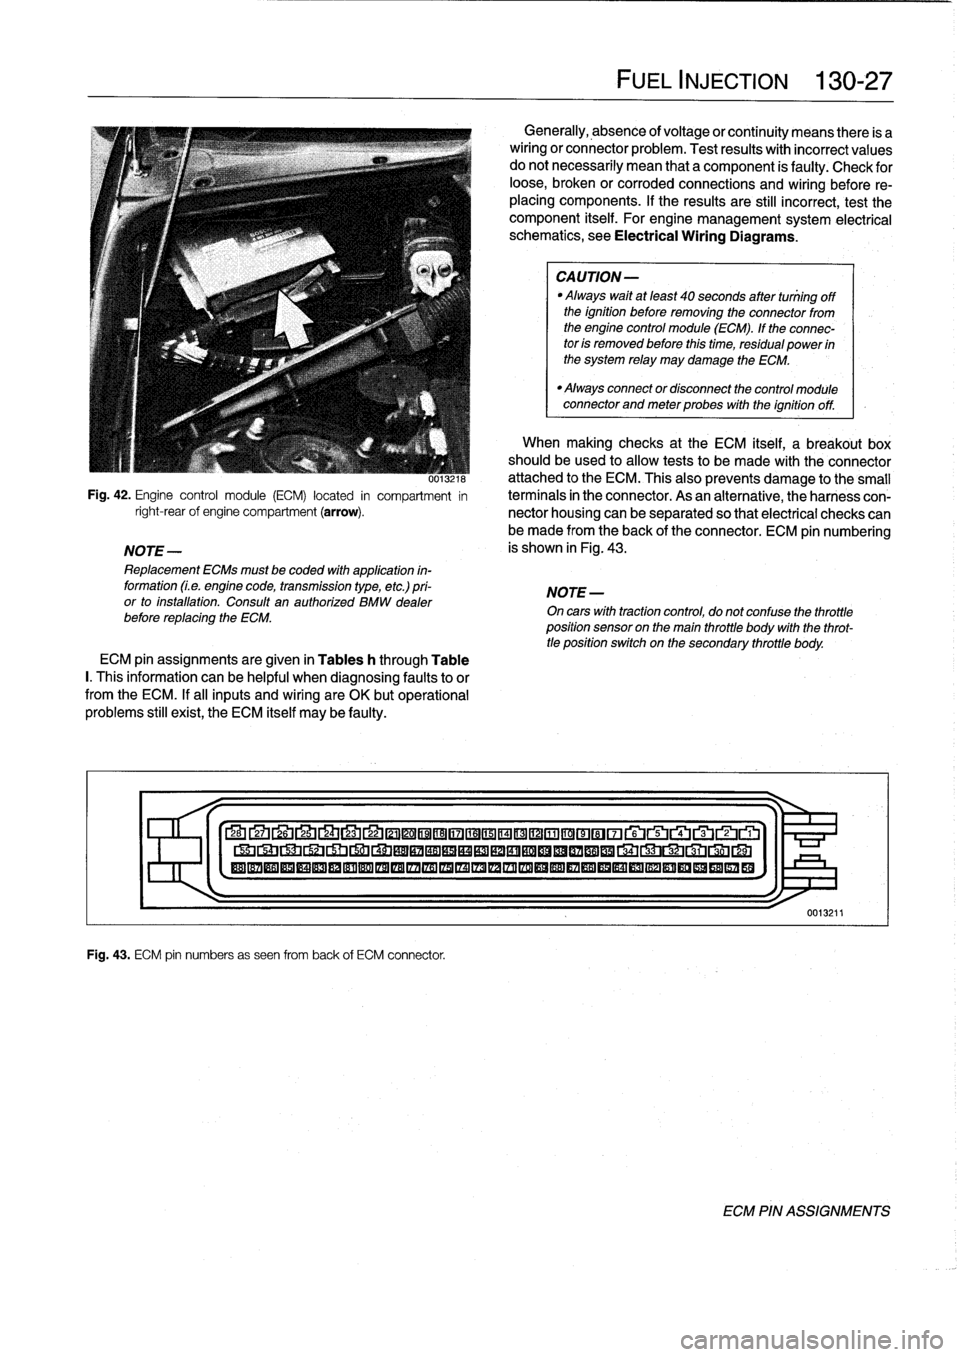
0013ZIM
Fig
.
42
.
Engine
control
module
(ECM)
located
in
compartment
in
right-rearof
engine
compartment
(arrow)
.
NOTE-
Replacement
ECMs
must
be
coded
with
application
in-
formation
(Le
.
engine
code,
transmission
type,
etc
.)
pri-
or
to
installation
.
Consult
an
authorized
BMW
dealer
before
replacing
the
ECM
.
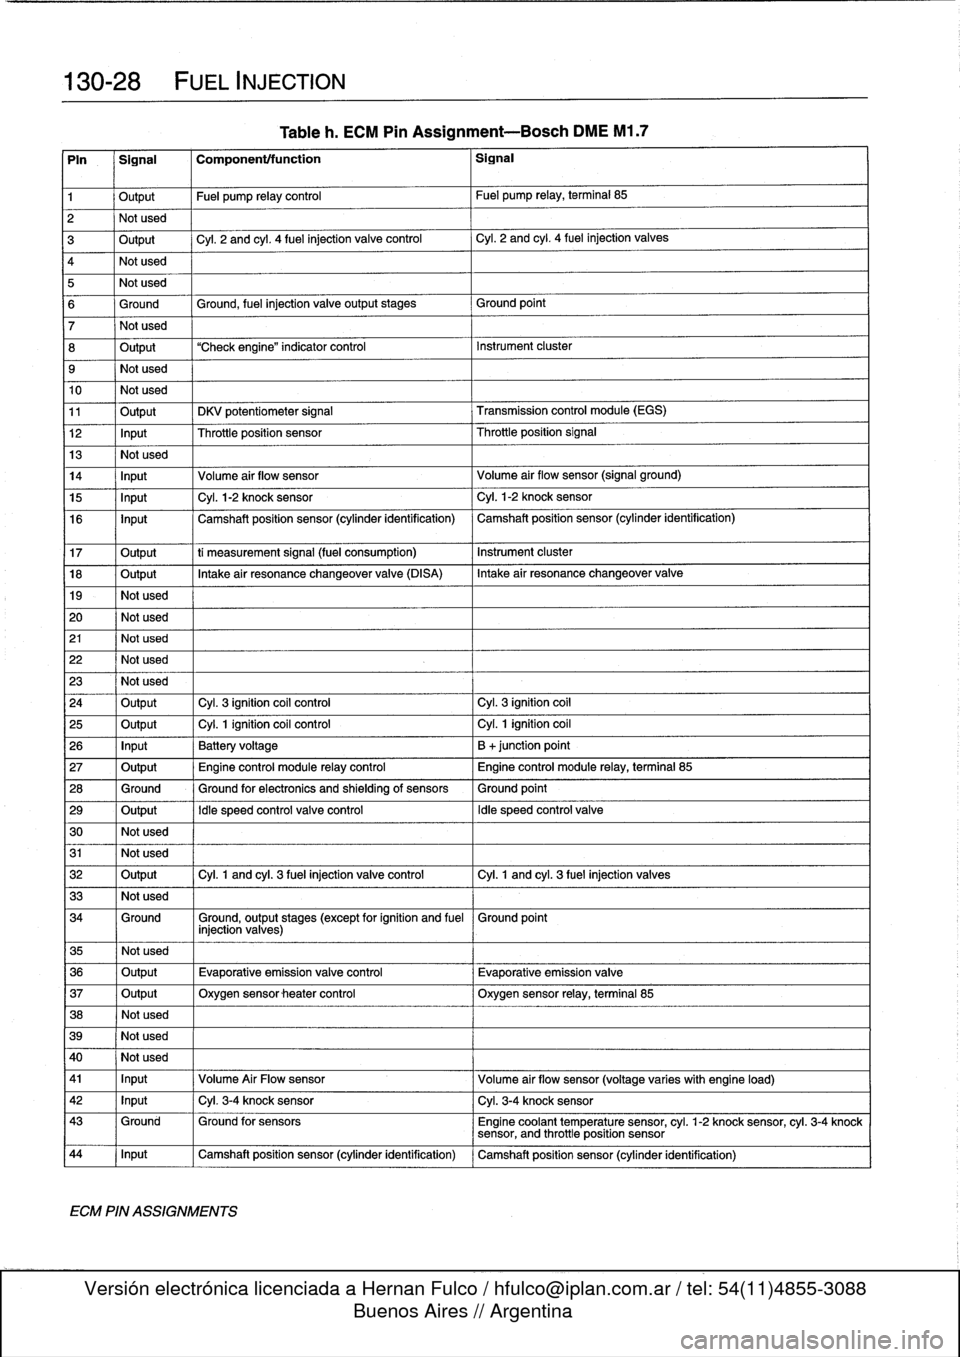
ECM
pin
assignments
are
given
in
Tables
h
through
Table
I.
This
information
can
be
helpful
when
diagnosing
faultsto
or
from
the
ECM
.
If
al¡
inputs
and
wiring
are
OK
butoperational
problems
still
exist,
the
ECM
itself
may
be
faulty
.
Fig
.
43
.
ECM
pin
numbers
as
seen
from
back
of
ECM
connector
.
FUEL
INJECTION
130-
2
7
Generally,
absence
of
voltage
or
continuity
means
there
is
a
wiring
or
connector
problem
.
Test
results
with
incorrect
values
do
notnecessarily
mean
that
a
component
is
faulty
:
Check
for
loose,
broken
or
corroded
connections
and
wiring
before
re-
placing
components
.
If
the
results
are
still
incorrect,
test
the
component
itself
.
For
engine
management
system
electrical
schematics,
see
Electrical
Wiring
Diagrams
.
CAUTION-
Always
waitat
least
40
seconds
after
tuniing
off
the
ignition
before
removing
the
connector
from
the
engine
control
module
(ECM)
.
If
the
connec-
tor
is
removed
before
this
time,
residual
power
in
the
system
relay
may
damage
the
ECM
.
"
Always
connector
disconnect
the
control
module
connector
and
meter
probes
with
the
ignitionoff
.
When
making
checks
at
the
ECM
itself,
a
breakout
box
should
be
used
to
allow
tests
to
be
made
with
the
connector
attached
to
the
ECM
.
This
also
prevents
damage
tothe
small
termínals
in
the
connector
.
As
an
alternative,
theharness
con-
nector
housing
can
be
separated
so
that
electrical
checks
can
be
made
from
the
back
of
the
connector
.
ECM
pin
numbering
is
shown
in
Fig
.
43
.
NOTE
-
On
cars
with
tractioncontrol,
do
not
confuse
the
throttle
position
sensor
on
the
main
throttle
body
with
the
throt-
tle
position
switch
on
the
secondary
throttle
body
.
27
Lb
2L4
LJ
22
©©®®17
©©®©©~©©®©~~rui~~ru
®®®®®®®®®®®®®®®IZA®®®®®®®®®®®®®®®®®
1
>I-
0013211
ECM
PIN
ASSIGNMENTS
Page 174 of 759
130-
2
8
FUEL
INJECTION
Tableh
.
ECM
Pin
Assignment-Bosch
DME
M1
.7
Pin
Signal
Componenttfunction
Signal
1
Output
Fuel
pump
relay
control
Fuel
pump
relay,
terminal
85
2
Not
used
3
Output
Cyl
.
2
and
cyl
.
4
fuel
injection
valve
control
Cyl
.
2
and
cyl
.
4
fuel
injection
valves
4
Not
used
5
Not
used
6
Ground
Ground,
fuel
injection
valveoutputstages
Ground
point
7
Not
used
8
Output
"Check
engine"
indicator
control
Instrument
cluster
9
Not
used
10
Not
used
11
Output
DKV
potentiometer
signal
Transmission
control
module
(EGS)
12
Input
Throttleposition
sensor
Throttleposition
Signal
13
Not
used
14
Input
Volume
air
flow
sensor
Volume
air
flow
sensor
(signal
ground)
15
Input
Cyl
.
1-2
knock
sensor
Cyl
.
1-2
knock
sensor
16
Input
Camshaft
position
sensor
(cylinder
identification)
Camshaft
position
sensor
(cylinder
identification)
17
Output
ti
measurement
signal
(fuel
consumption)
Instrument
cluster
18
Output
Intakeair
resonance
changeover
valve
(DISA)
Intake
air
resonance
changeover
valve
19
-
Not
used
20
Not
used
21
Not
used
22
Not
used
23
Not
used
24
Output
Cyl
.
3
ignition
coil
control
Cyl
.
3
ignition
coil
25
Output
Cyl
.
1
ignition
coil
control
Cyl
.
1
ignition
coil
26
Input
Battery
voltage
B
+junction
point
27
Output
Engine
control
module
relay
control
Engine
control
module
relay,
terminal
85
28
Ground
Ground
for
electronics
and
shielding
of
sensors
Ground
point
29
Output
Idle
speed
control
valve
control
Idle
speed
control
valve
30
Not
used
31
Not
used
32
Output
Cyl
.
1
and
cyl
.
3
fuel
injection
valve
control
Cyl
.
1
and
cyl
.
3
fuel
injection
valves
33
Not
used
34
Ground
Ground,
output
stages
(except
for
ignition
and
fuel
Ground
point
injection
valves)
35
Not
used
36
Output
Evaporative
emissionvalve
control
Evaporative
emission
valve
37
Output
Oxygen
sensor
heater
control
Oxygen
sensor
relay,
terminal
85
38
Not
used
39
Not
used
40
I
Not
used
41
I
Input
,
Volume
Air
Flow
sensor
Volume
air
flow
sensor
(voltage
varies
with
engine
load)
42
1
Input
1
Cyl
.
3-4
knock
sensor
1
Cyl
.
3-4
knock
sensor
43
Ground
Ground
for
sensors
Engine
coolant
temperature
sensor,
cyl
.
1-2
knock
sensor,
cyl
.
3-4
knock
sensor,
and
throttle
position
sensor
44
1
Input
1
Camshaft
position
sensor
(cylinder
identification)
1
Camshaft
position
sensor
(cylinder
identification)
ECM
PIN
ASSIGNMENTS