brake pads BMW MOTORRAD K 1200 RS 2004 Rider's Manual (in English)
[x] Cancel search | Manufacturer: BMW MOTORRAD, Model Year: 2004, Model line: K 1200 RS, Model: BMW MOTORRAD K 1200 RS 2004Pages: 80, PDF Size: 5.57 MB
Page 24 of 80
22
Maintenance and care
2
Removing brake calipers
e Important:
When removing, avoid damage
to brake pipes, brake discs,
brake pads and the wheel rim
(apply masking tape if neces-
sary).
Do not scratch the rim when
forcing back the brake pads or
removing the calipers (apply
masking tape if necessary).
Do not damage the ABS sensor
cable, toothed ring or sensor.
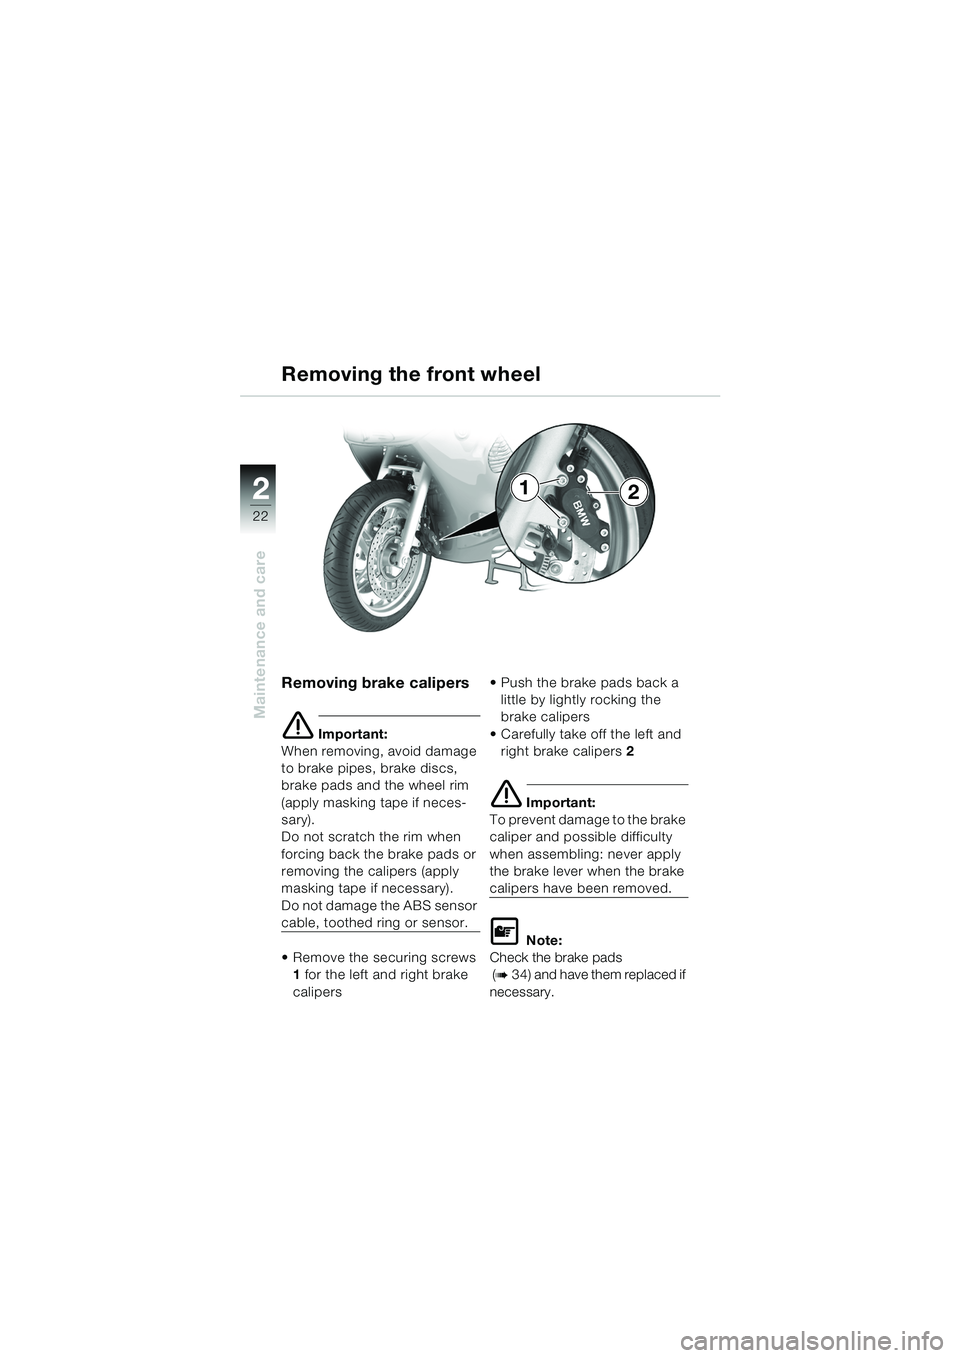
Remove the securing screws 1 for the left and right brake
calipers Push the brake pads back a
little by lightly rocking the
brake calipers
Carefully take off the left and right brake calipers 2
e Important:
To prevent damage to the brake
caliper and possible difficulty
when assembling: never apply
the brake lever when the brake
calipers have been removed.
L Note:
Check the brake pads
(
b 34) and have them replaced if
necessary.
Removing the front wheel
21
20k41bkg3.book Seite 22 Mittwoch, 26. Mai 2004 3:33 15
Page 27 of 80
25
Maintenance and care
2
Installing the front wheel
Installing the front wheel
e Important:
Avoid damage to brake lines,
discs and pads when installing.
Keep dirt and moisture away
from the wheel bearings.
Do not damage the ABS sensor
cable, toothed ring or sensor.
L Note:
Note the position mark on the
tyre or the ABS toothed ring, or
the direction-of-rotation arrow
on the tyre.
Roll the front wheel in
between the fork legs
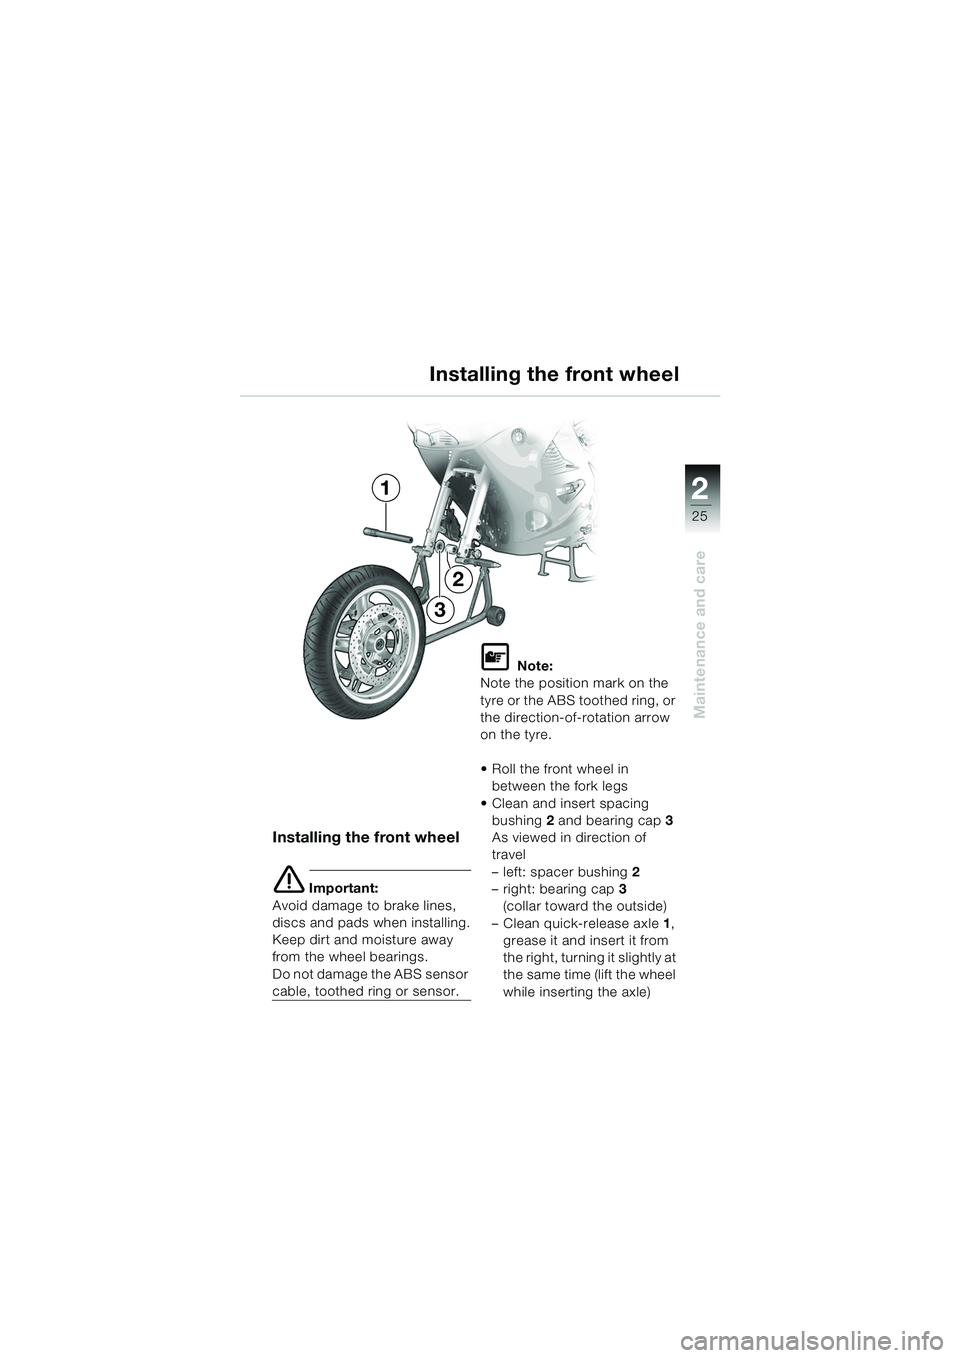
Clean and insert spacing bushing 2 and bearing cap 3
As viewed in direction of
travel
– left: spacer bushing 2
– right: bearing cap 3
(collar toward the outside)
– Clean quick-release axle 1,
grease it and insert it from
the right, turning it slightly at
the same time (lift the wheel
while inserting the axle)
2
3
1
20k41bkg3.book Seite 25 Mittwoch, 26. Mai 2004 3:33 15
Page 31 of 80
29
Maintenance and care
2
e Important:
Avoid damage to brake lines,
brake disc, brake pads and
wheel when removing.
Do not damage the ABS sensor
cable, toothed ring or sensor.
Do not scratch the wheel when
forcing back the brake pads or
removing the caliper (apply
masking tape if necessary).
To prevent damage to the brake
caliper and possible difficulty
when assembling: never oper-
ate the brake lever when the
brake calipers have been re-
moved. Place the motorcycle on its
main stand on a flat, firm
surface
(Rider's Manual
b chapter 3).
Apply a load at the front wheel so that the motorcycle cannot
tip toward the rear
Select first gear
Push the splash guard up (
b 36)
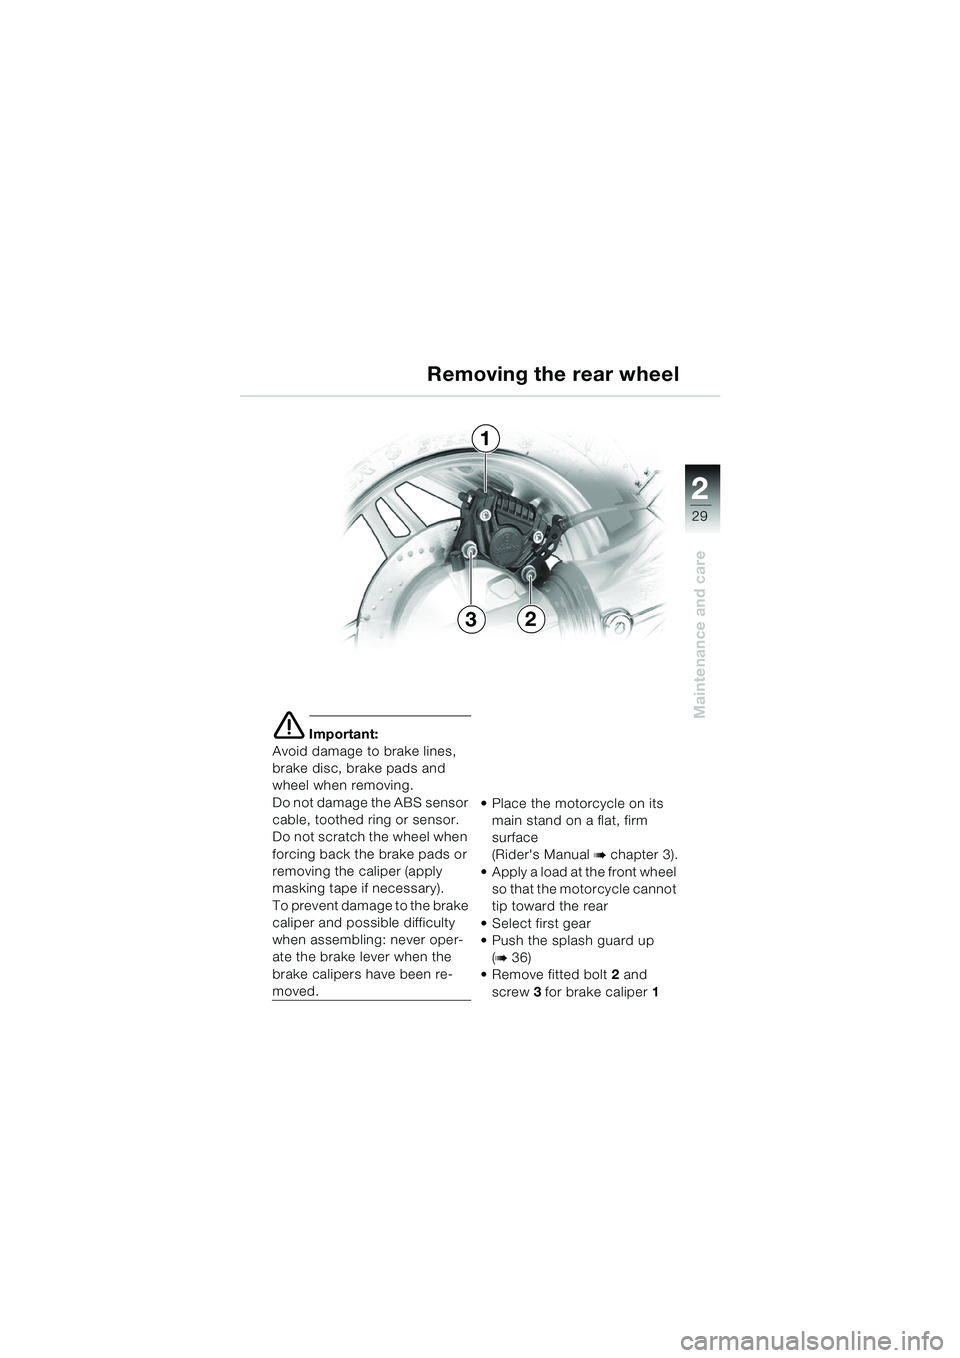
Remove fitted bolt 2 and
screw 3 for brake caliper 1
Removing the rear wheel
1
32
20k41bkg3.book Seite 29 Mittwoch, 26. Mai 2004 3:33 15
Page 32 of 80
30
Maintenance and care
2
Removing the rear wheel
Force back the brake pads by tilting the caliper carefully
Carefully place brake caliper on the brake disc
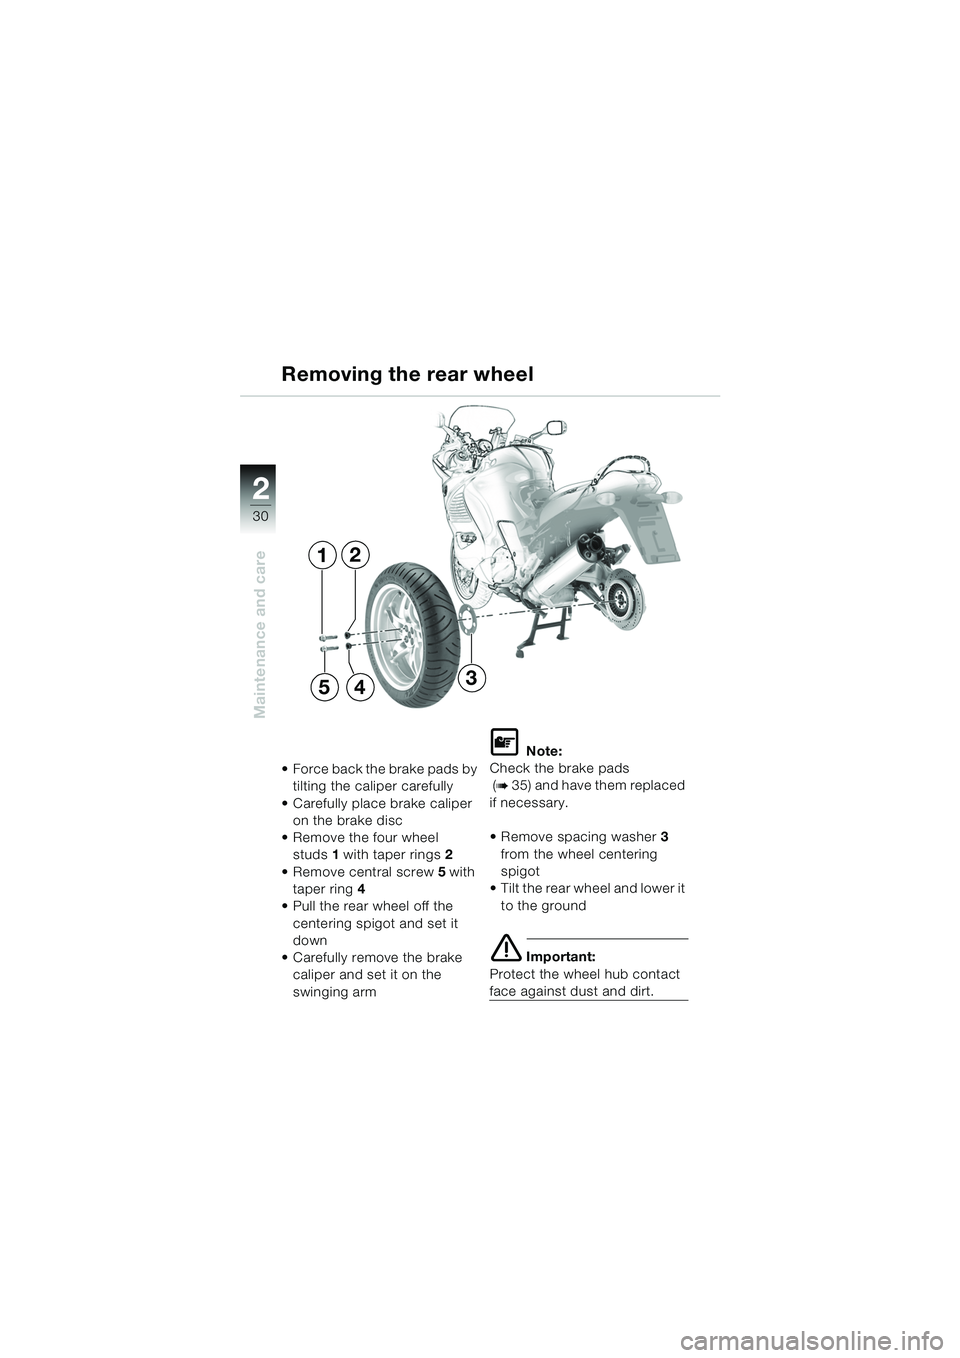
Remove the four wheel studs 1 with taper rings 2
Remove central screw 5 with
taper ring 4
Pull the rear wheel off the
centering spigot and set it
down
Carefully remove the brake caliper and set it on the
swinging arm
L Note:
Check the brake pads
(
b 3 5 ) a n d h a v e t h e m r e p l a c e d
if necessary.
Remove spacing washer 3
from the wheel centering
spigot
Tilt the rear wheel and lower it to the ground
e Important:
Protect the wheel hub contact
face against dust and dirt.
1
5
2
43
20k41bkg3.book Seite 30 Mittwoch, 26. Mai 2004 3:33 15
Page 33 of 80
31
Maintenance and care
2
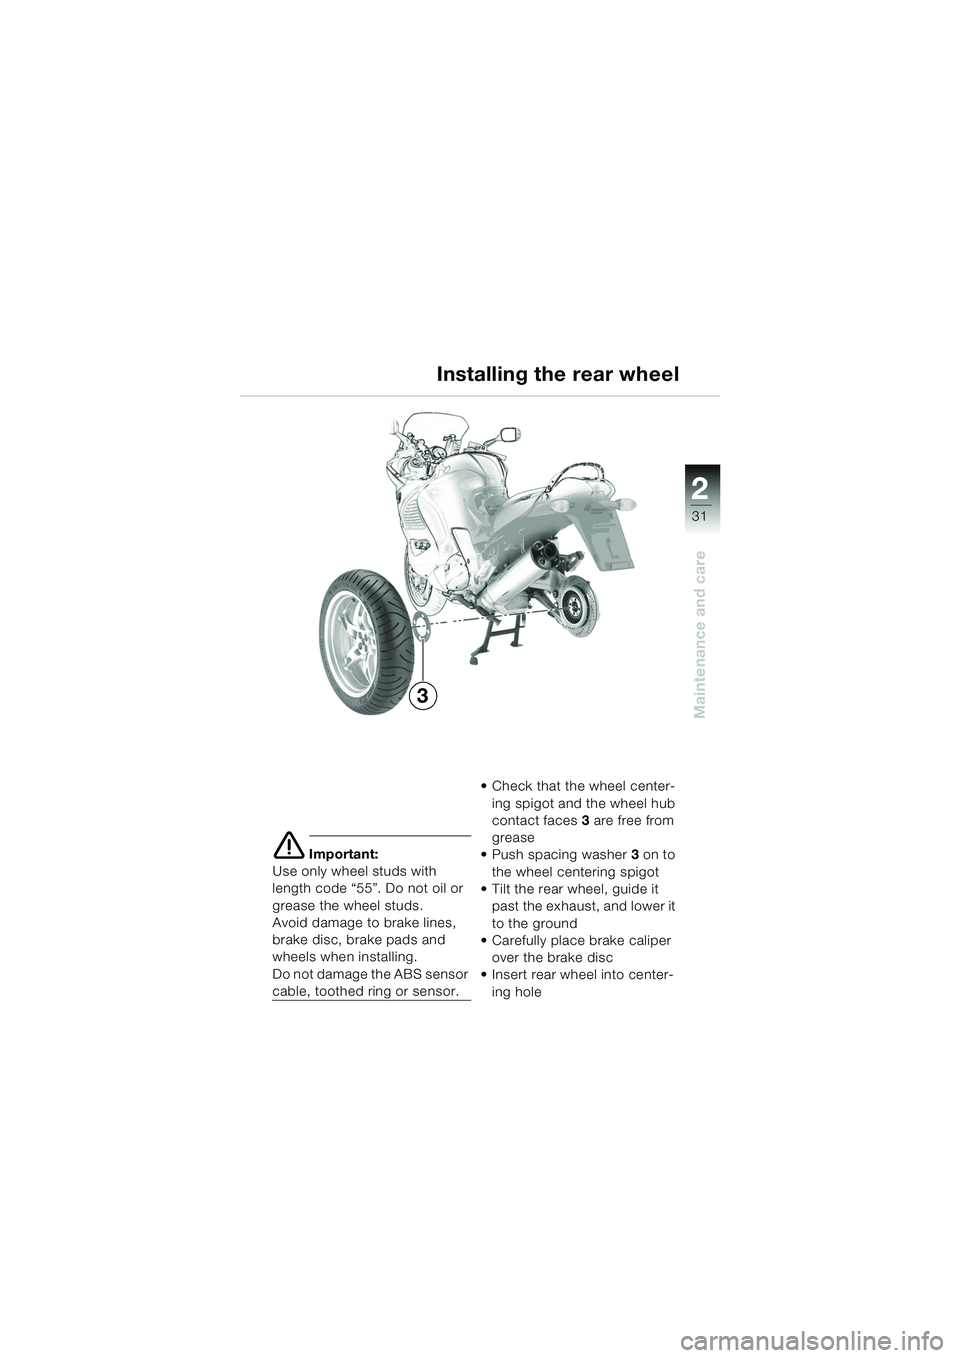
e Important:
Use only wheel studs with
length code “55”. Do not oil or
grease the wheel studs.
Avoid damage to brake lines,
brake disc, brake pads and
wheels when installing.
Do not damage the ABS sensor
cable, toothed ring or sensor. Check that the wheel center-
ing spigot and the wheel hub
contact faces 3 are free from
grease
Push spacing washer 3 on to
the wheel centering spigot
Tilt the rear wheel, guide it past the exhaust, and lower it
to the ground
Carefully place brake caliper
over the brake disc
Insert rear wheel into center-
ing hole
3 Installing the rear wheel
20k41bkg3.book Seite 31 Mittwoch, 26. Mai 2004 3:33 15
Page 36 of 80
34
Maintenance and care
2
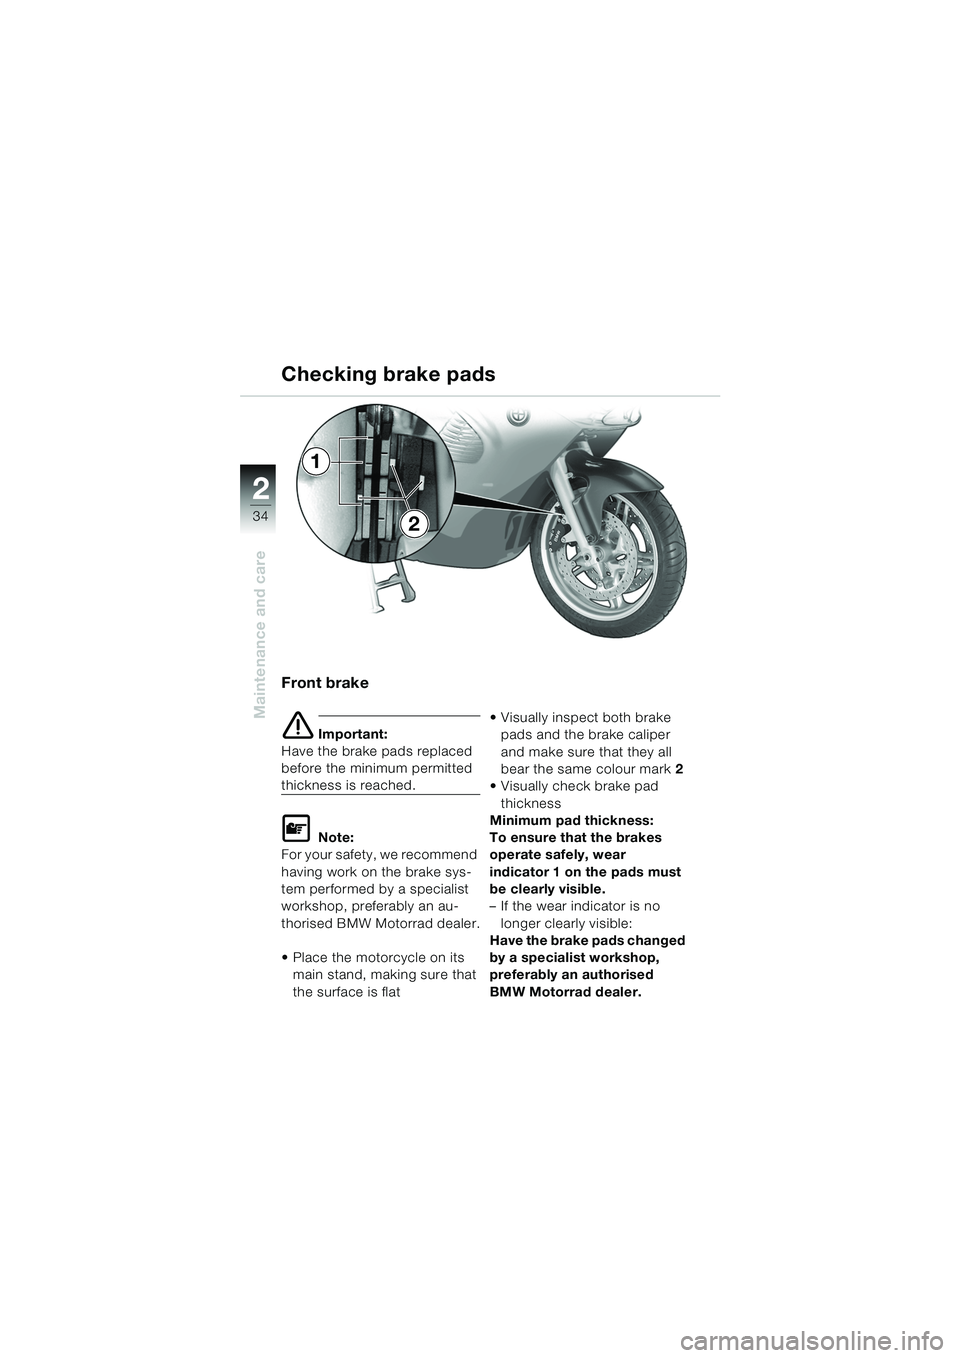
Front brake
e Important:
Have the brake pads replaced
before the minimum permitted
thickness is reached.
L Note:
For your safety, we recommend
having work on the brake sys-
tem performed by a specialist
workshop, preferably an au-
thorised BMW Motorrad dealer.
Place the motorcycle on its main stand, making sure that
the surface is flat Visually inspect both brake
pads and the brake caliper
and make sure that they all
bear the same colour mark 2
Visually check brake pad thickness
Minimum pad thickness:
To ensure that the brakes
operate safely, wear
indicator 1 on the pads must
be clearly visible.
– If the wear indicator is no
longer clearly visible:
Have the brake pads changed
by a specialist workshop,
preferably an authorised
BMW Motorrad dealer.
Checking brake pads
1
2
20k41bkg3.book Seite 34 Mittwoch, 26. Mai 2004 3:33 15
Page 37 of 80
35
Maintenance and care
2
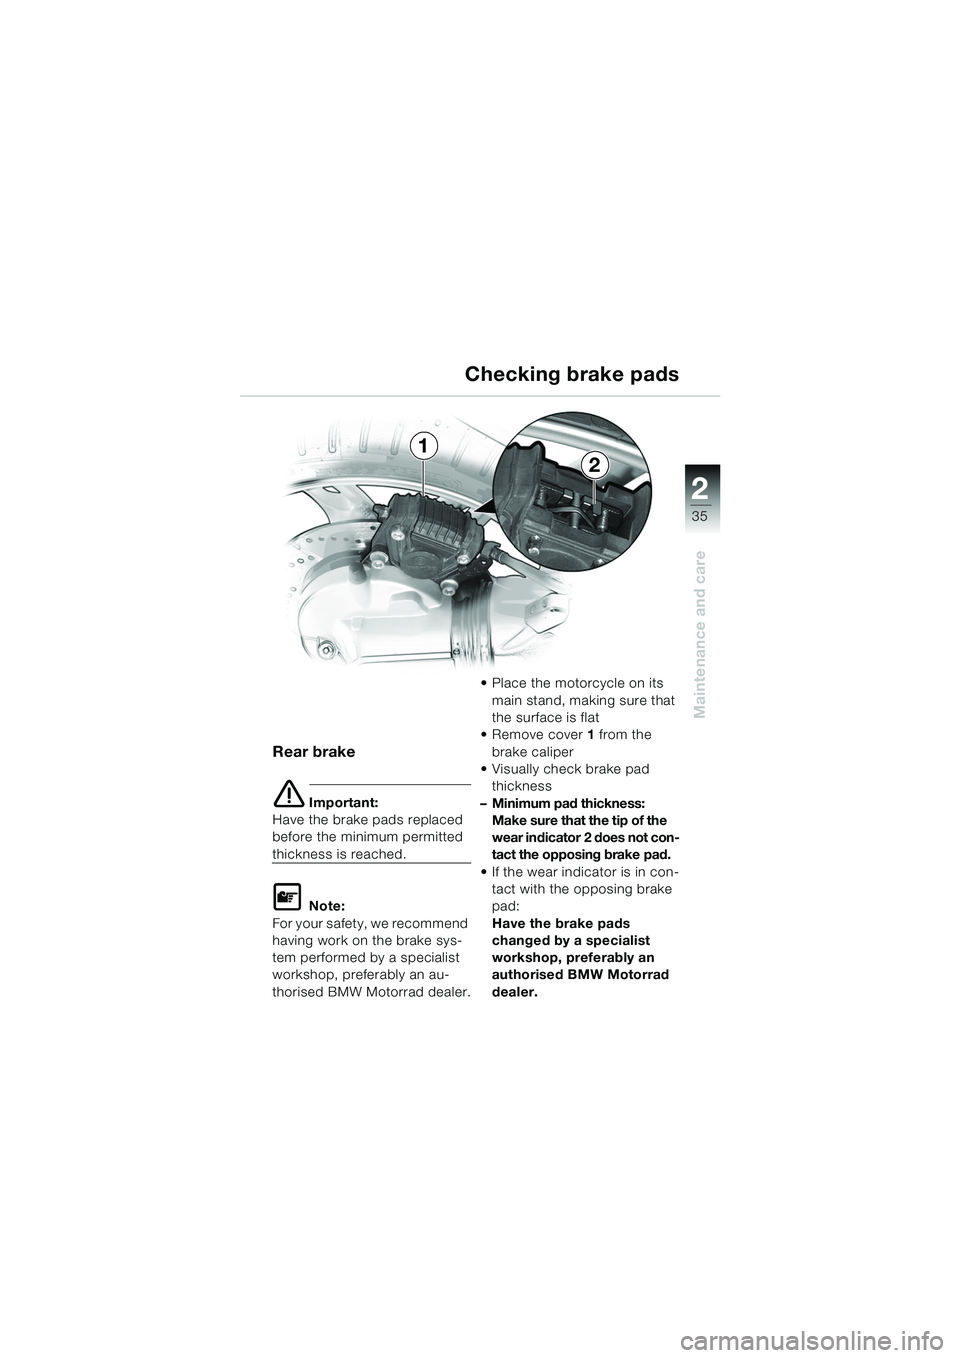
Rear brake
e Important:
Have the brake pads replaced
before the minimum permitted
thickness is reached.
L Note:
For your safety, we recommend
having work on the brake sys-
tem performed by a specialist
workshop, preferably an au-
thorised BMW Motorrad dealer. Place the motorcycle on its
main stand, making sure that
the surface is flat
Remove cover 1 from the
brake caliper
Visually check brake pad
thickness
– Minimum pad thickness: Make sure that the tip of the
wear indicator 2 does not con-
tact the opposing brake pad.
If the wear indicator is in con- tact with the opposing brake
pad:
Have the brake pads
changed by a specialist
workshop, preferably an
authorised BMW Motorrad
dealer.
Checking brake pads
1
2
20k41bkg3.book Seite 35 Mittwoch, 26. Mai 2004 3:33 15
Page 65 of 80
63
Technical Data
3
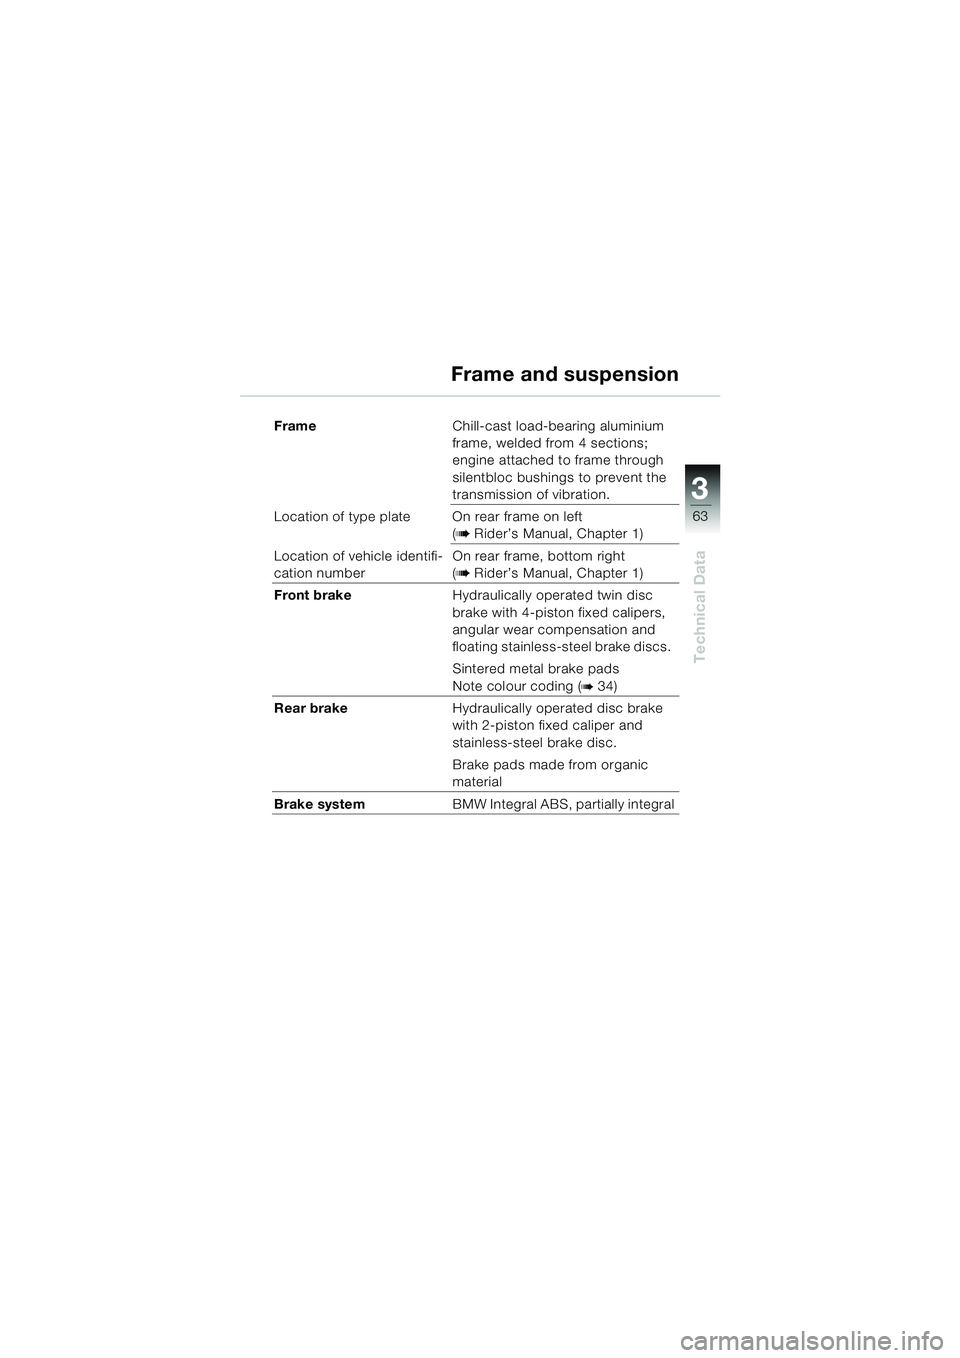
FrameChill-cast load-bearing aluminium
frame, welded from 4 sections;
engine attached to frame through
silentbloc bushings to prevent the
transmission of vibration.
Location of type plate On rear frame on left (
b Rider’s Manual, Chapter 1)
Location of vehicle identifi-
cation number On rear frame, bottom right
(
b Rider’s Manual, Chapter 1)
Front brake Hydraulically operated twin disc
brake with 4-piston fixed calipers,
angular wear compensation and
floating stainless-steel brake discs.
Sintered metal brake pads
Note colour coding (
b 34)
Rear brake Hydraulically operated disc brake
with 2-piston fixed caliper and
stainless-steel brake disc.
Brake pads made from organic
material
Brake system BMW Integral ABS, partially integral
Frame and suspension
20k41bkg3.book Seite 63 Mittwoch, 26. Mai 2004 3:33 15