lock BMW MOTORRAD R 1150 GS 2002 Rider's Manual (in English)
[x] Cancel search | Manufacturer: BMW MOTORRAD, Model Year: 2002, Model line: R 1150 GS, Model: BMW MOTORRAD R 1150 GS 2002Pages: 104, PDF Size: 7.54 MB
Page 20 of 104
11
18
General information and controls
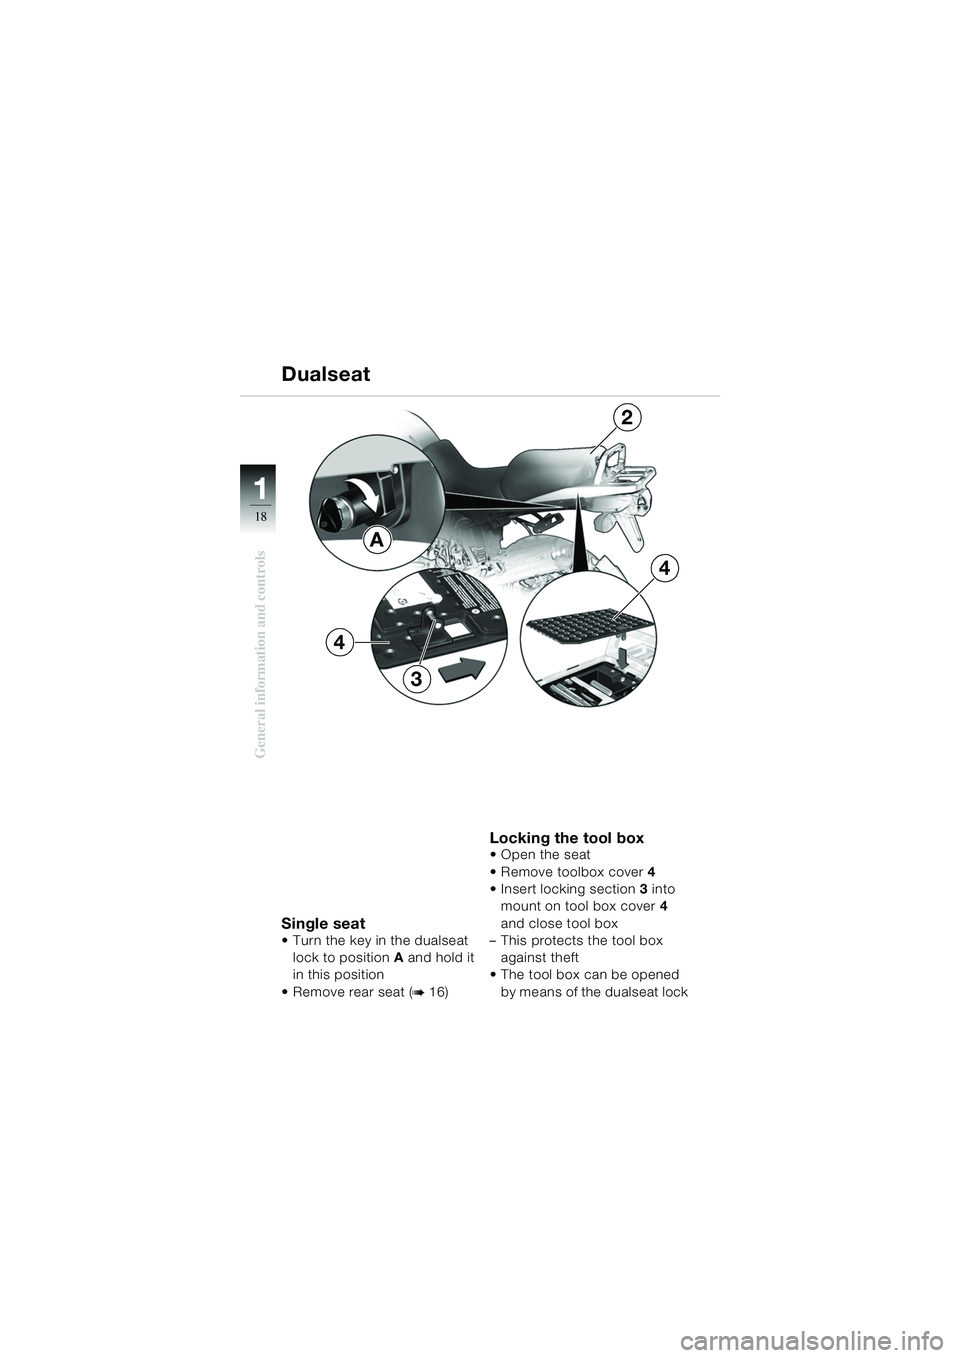
Single seat Turn the key in the dualseat lock to position A and hold it
in this position
Remove rear seat (
b16)
Locking the tool boxOpen the seat
Remove toolbox cover 4
Insert locking section 3 into
mount on tool box cover 4
and close tool box
– This protects the tool box
against theft
The tool box can be opened
by means of the dualseat lock
A
Dualseat
4
4
2
3
10geBKg6.book Seite 18 Dienstag, 19. November 2002 1:11 13
Page 21 of 104
111
19
General information and controls
Seat
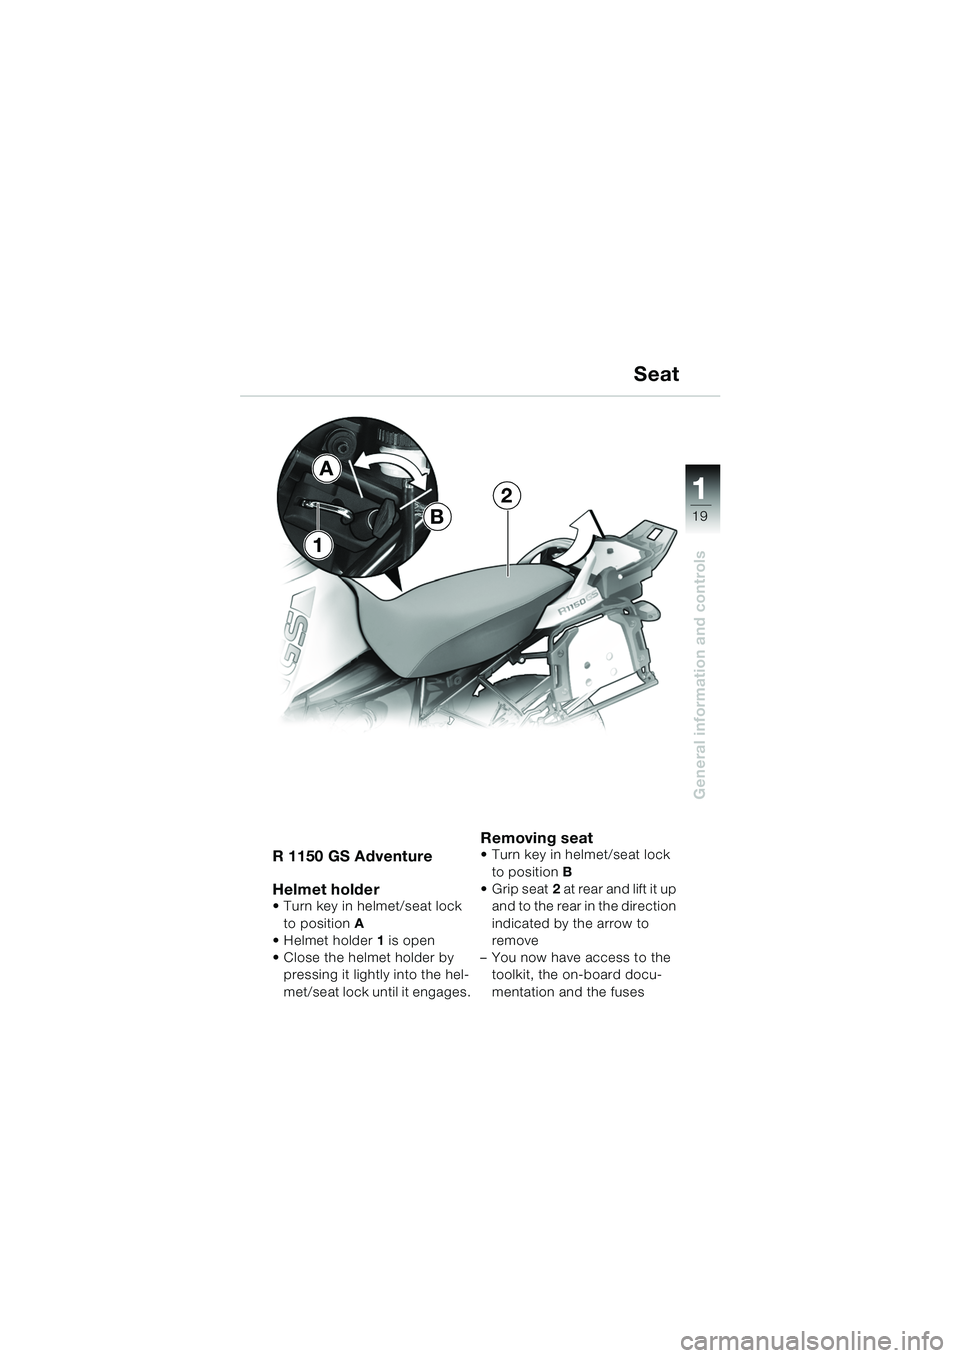
R 1150 GS Adventure
Helmet holder
• Turn key in helmet/seat lock to position A
Helmet holder 1 is open
Close the helmet holder by pressing it lightly into the hel-
met/seat lock until it engages.
Removing seat Turn key in helmet/seat lock
to position B
Grip seat 2 at rear and lift it up
and to the rear in the direction
indicated by the arrow to
remove
– You now have access to the toolkit, the on-board docu-
mentation and the fuses
B
A
1
2
10ge01g6.fm Seite 19 Montag, 7. Juni 2004 10:14 10
Page 22 of 104
11
20
General information and controls
Seat
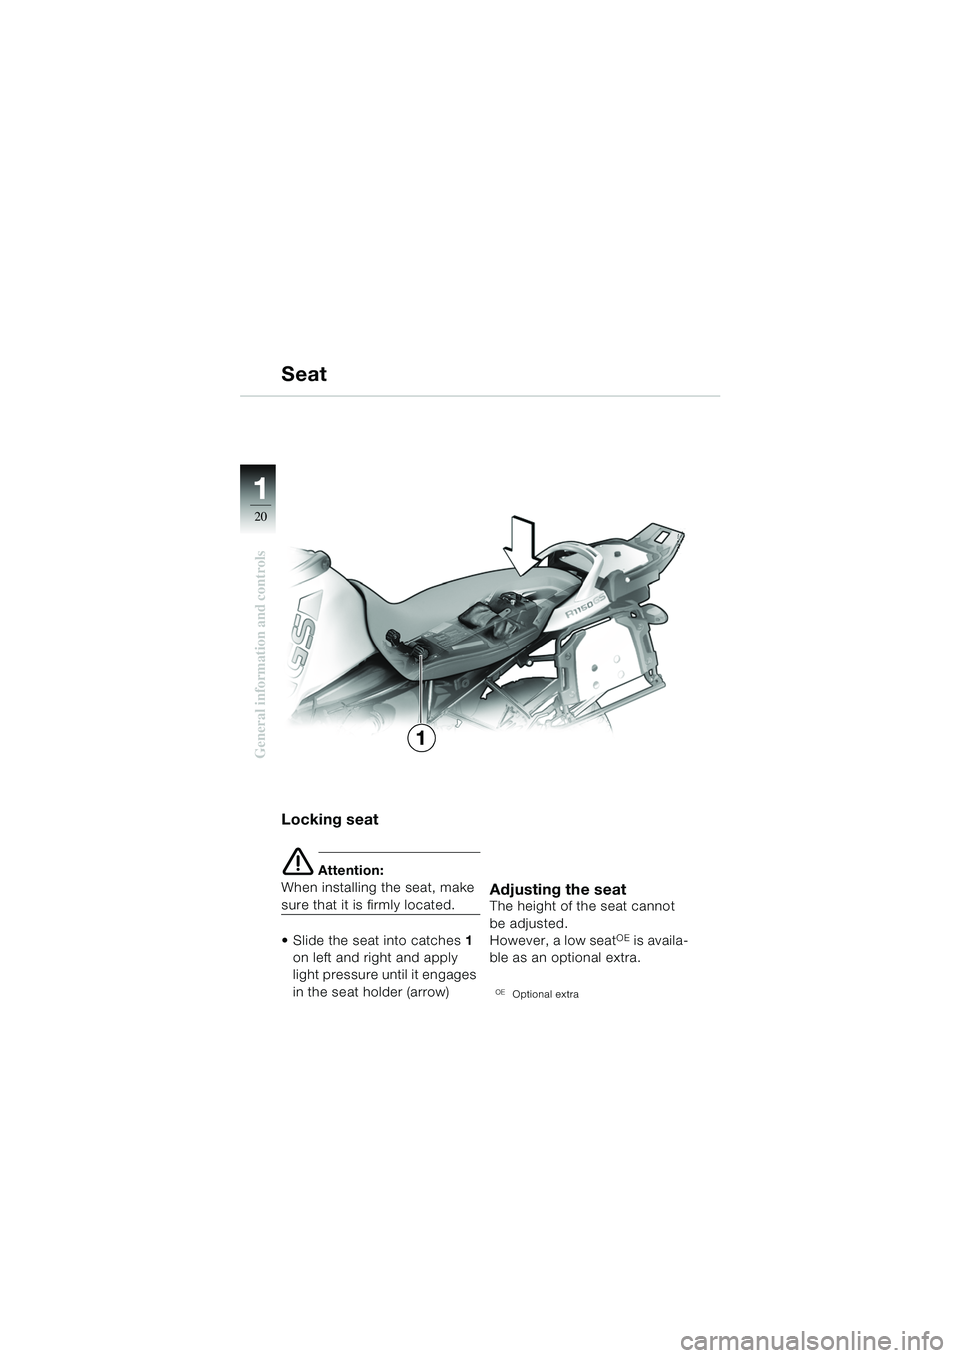
Locking seat
e Attention:
When installing the seat, make
sure that it is firmly located.
Slide the seat into catches 1
on left and right and apply
light pressure until it engages
in the seat holder (arrow)Adjusting the seatThe height of the seat cannot
be adjusted.
However, a low seat
OE is availa-
ble as an optional extra.
OEOptional extra
1
10geBKg6.book Seite 20 Dienstag, 19. November 2002 1:11 13
Page 23 of 104
111
21
General information and controls
R 1150 GS
d Warning:
After an accident or if the
motorcycle has fallen over,
check that the system cases
are correctly secured!
Max. load per system case:
10 kg (22 lbs).
With System cases installed,
it is advisable not to exceed
130 km/h (80 mph).
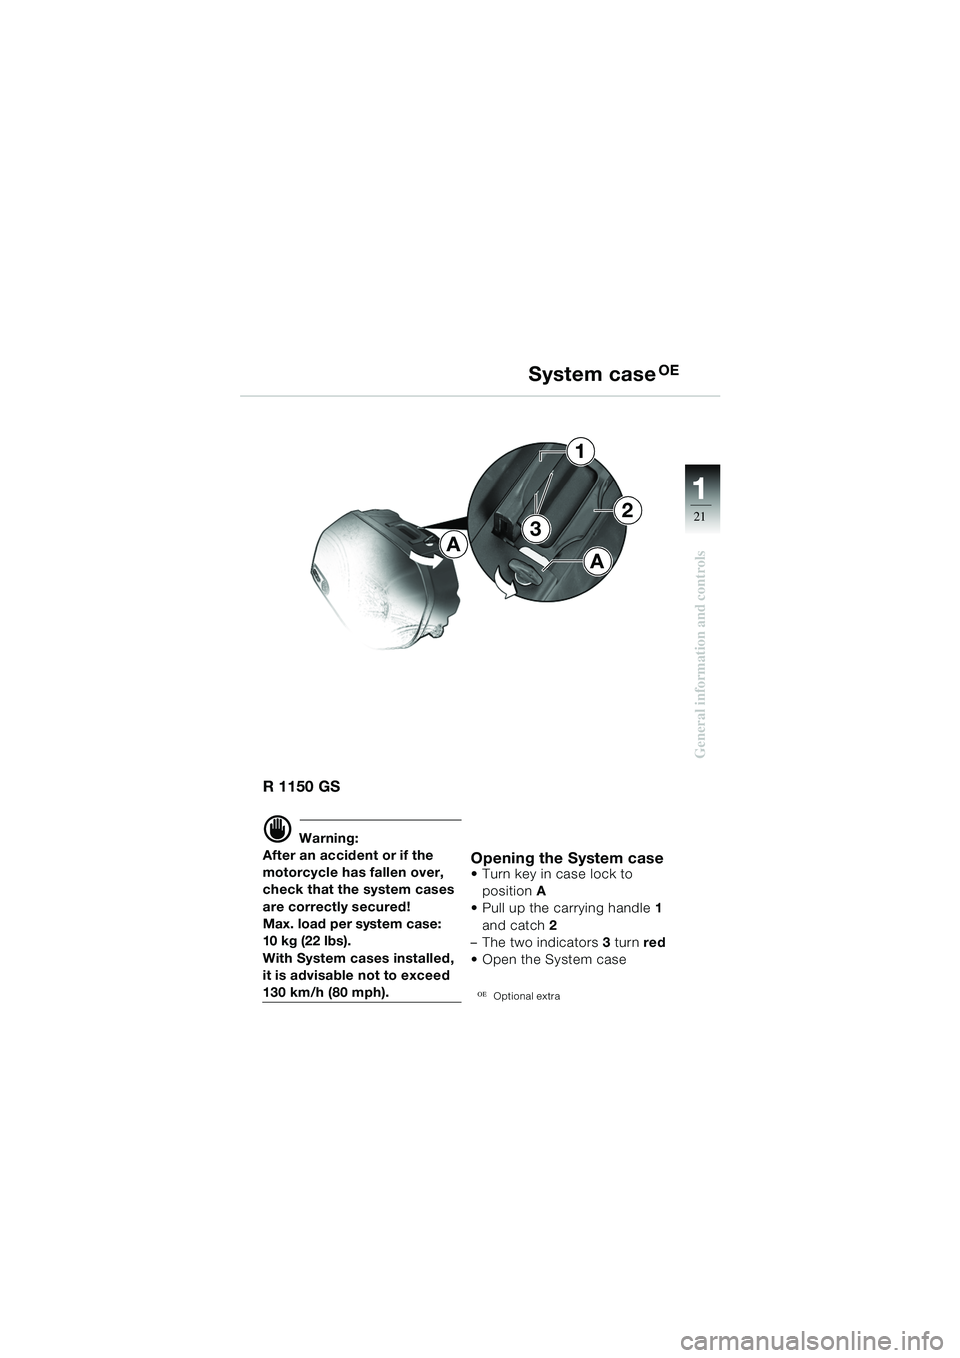
Opening the System case Turn key in case lock to position A
Pull up the carrying handle 1
and catch 2
– The two indicators 3 turn red
Open the System case
OEOptional extra
System caseOE
A
1
2
3
A
10geBKg6.book Seite 21 Dienstag, 19. November 2002 1:11 13
Page 24 of 104
11
22
General information and controls
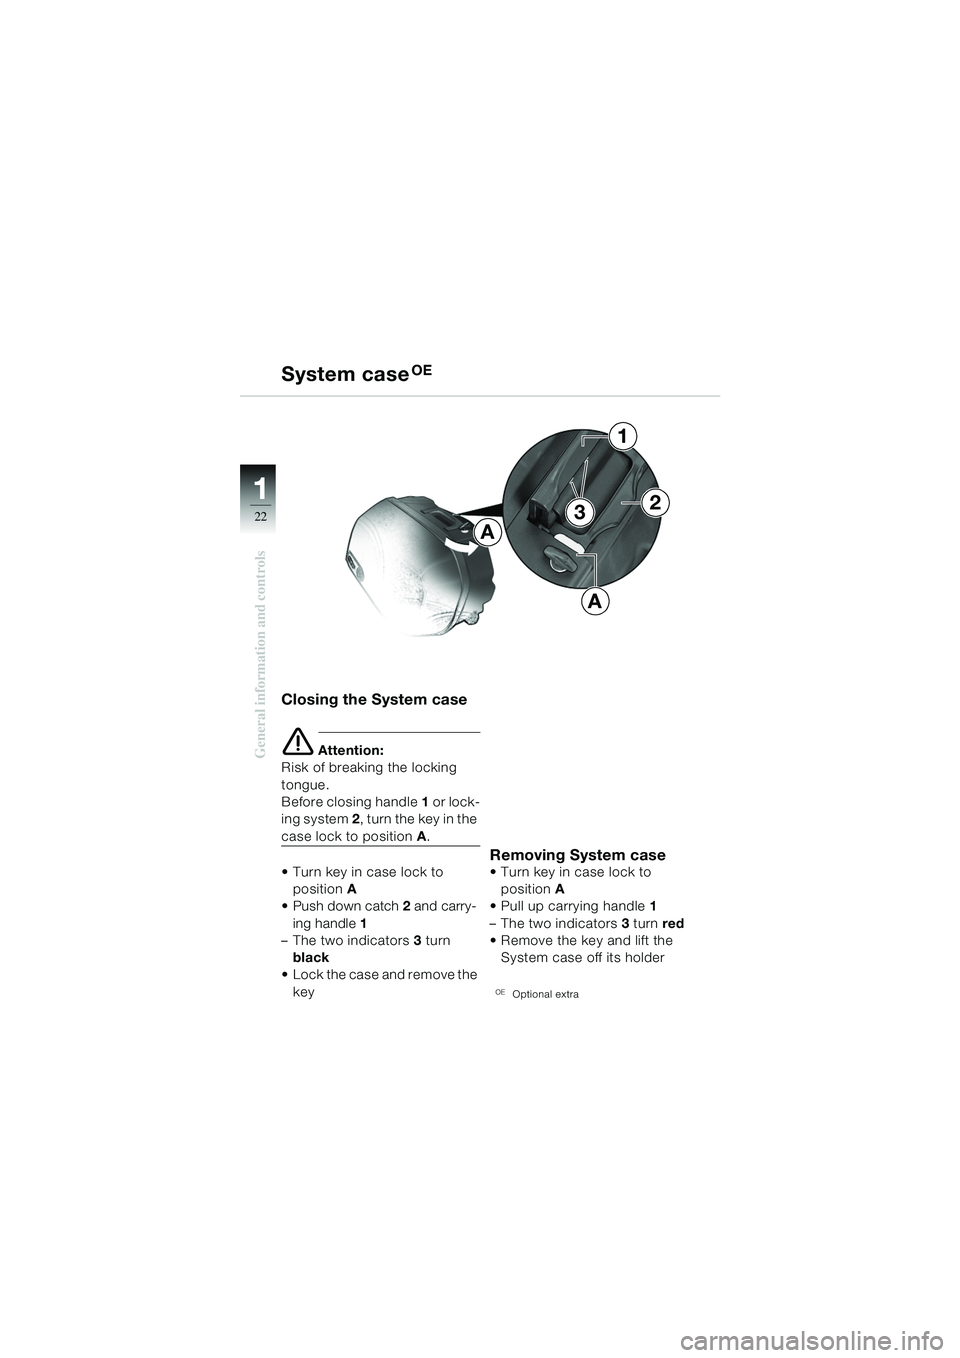
Closing the System case
e Attention:
Risk of breaking the locking
tongue.
Before closing handle 1 or lock-
ing system 2, turn the key in the
case lock to position A.
Turn key in case lock to position A
Push down catch 2 and carry-
ing handle 1
– The two indicators 3 turn
black
Lock the case and remove the
key
Removing System case Turn key in case lock to position A
Pull up carrying handle 1
– The two indicators 3 turn red
Remove the key and lift the
System case off its holder
OEOptional extra
A
1
2
System case
OE
3
A
10geBKg6.book Seite 22 Dienstag, 19. November 2002 1:11 13
Page 25 of 104
111
23
General information and controls
A
1
2
A
3
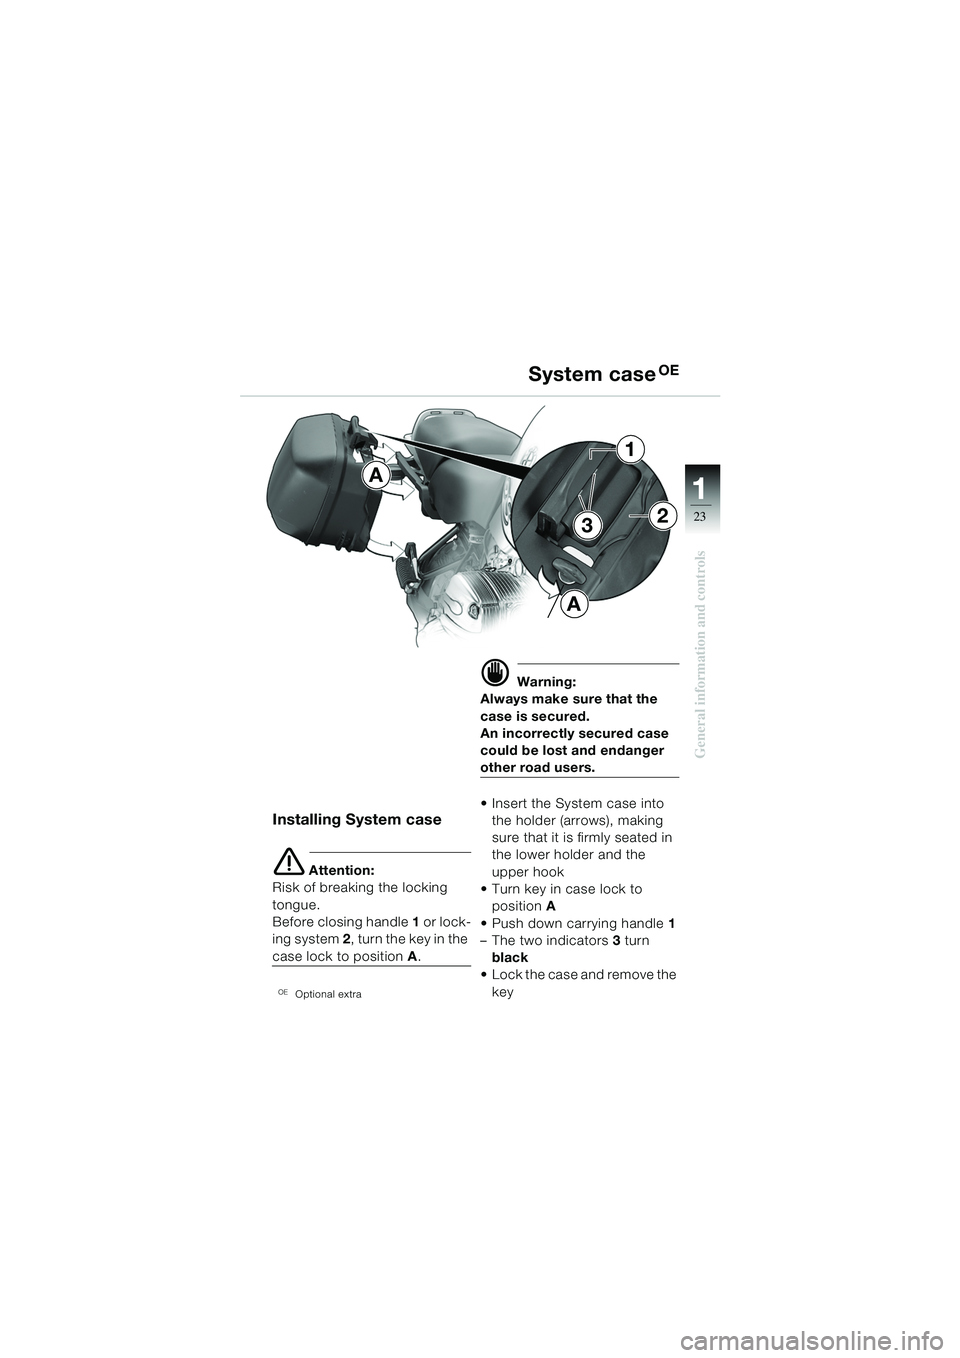
Installing System case
e Attention:
Risk of breaking the locking
tongue.
Before closing handle 1 or lock-
ing system 2, turn the key in the
case lock to position A.
OEOptional extra
d Warning:
Always make sure that the
case is secured.
An incorrectly secured case
could be lost and endanger
other road users.
Insert the System case into the holder (arrows), making
sure that it is firmly seated in
the lower holder and the
upper hook
Turn key in case lock to position A
Push down carrying handle 1
– The two indicators 3 turn
black
Lock the case and remove the
key
System caseOE
10geBKg6.book Seite 23 Dienstag, 19. November 2002 1:11 13
Page 26 of 104
11
24
General information and controls
R 1150 GS Adventure
d Warning:
After an accident or if the
motorcycle has fallen over,
check that the aluminium
cases are correctly secured.
Max. load on case carrier
without cases fitted: max. 5kg
(11 lbs) Max. load per
aluminium case: 10 kg (22 lbs).
With aluminium cases
installed, it is advisable not to
exceed 130 km/h (80 mph).
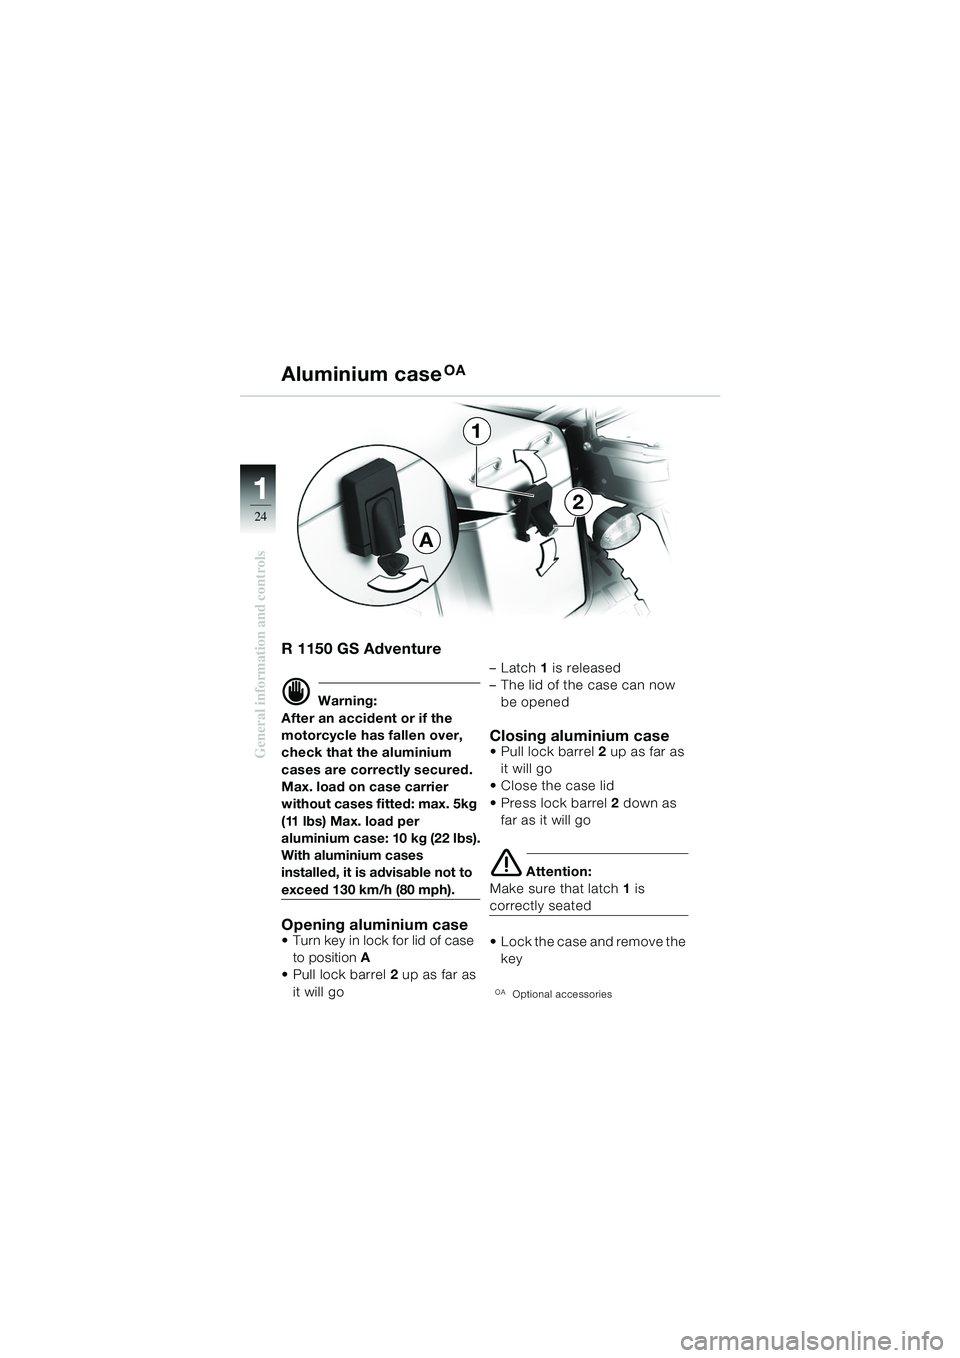
Opening aluminium case Turn key in lock for lid of case to position A
Pull lock barrel 2 up as far as
it will go –Latch
1 is released
– The lid of the case can now
be opened
Closing aluminium case Pull lock barrel 2 up as far as
it will go
Close the case lid
Press lock barrel 2 down as
far as it will go
e Attention:
Make sure that latch 1 is
correctly seated
Lock the case and remove the
key
OAOptional accessories
Aluminium caseOA
A
1
2
10geBKg6.book Seite 24 Dienstag, 19. November 2002 1:11 13
Page 27 of 104
111
25
General information and controls
Aluminium caseOA
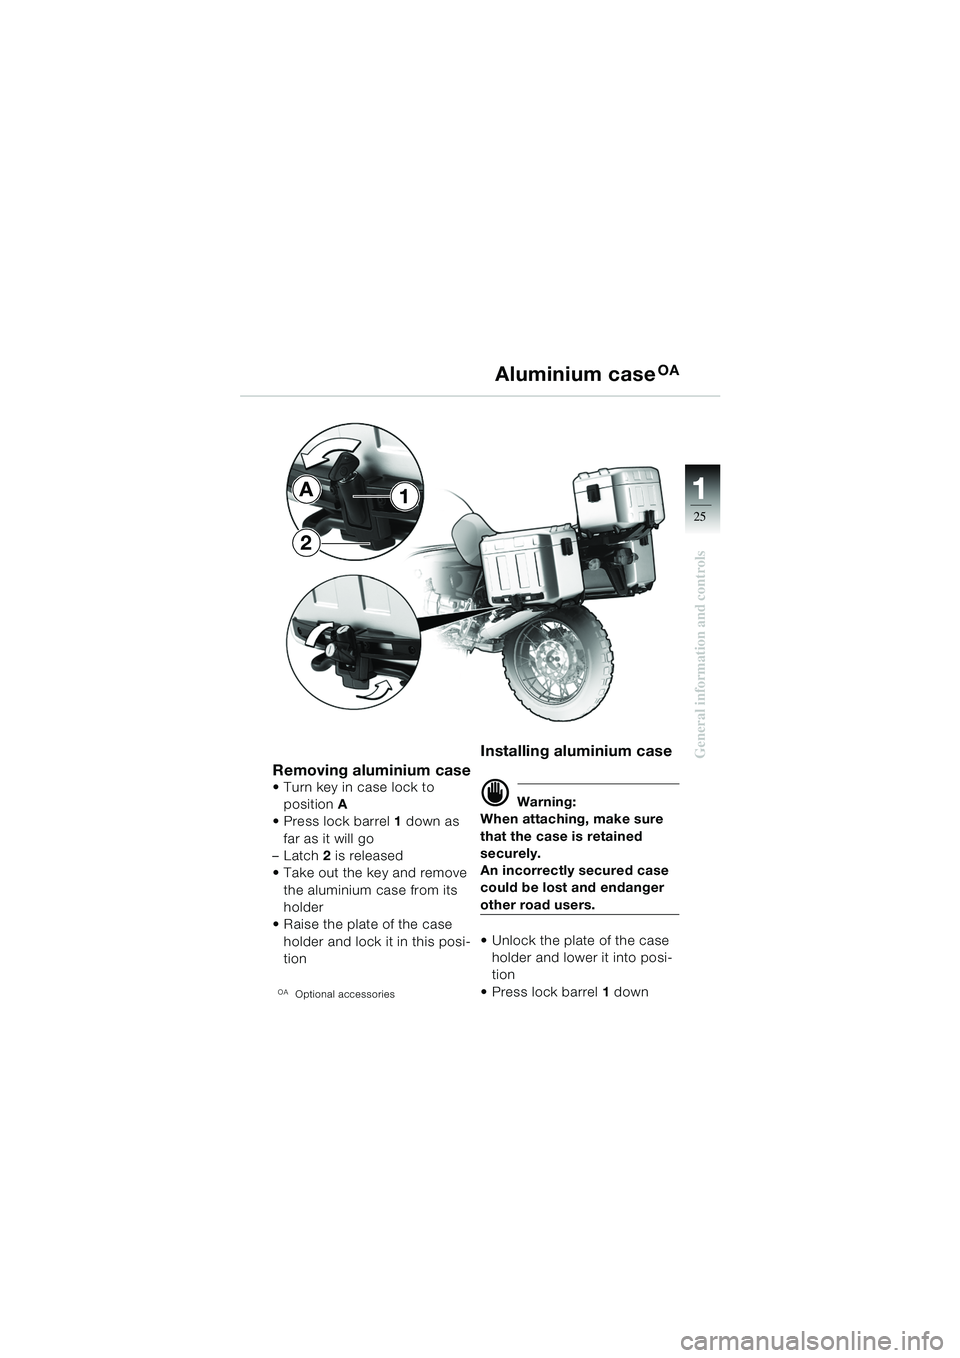
Removing aluminium case Turn key in case lock to position A
Press lock barrel 1 down as
far as it will go
–Latch 2 is released
Take out the key and remove
the aluminium case from its
holder
Raise the plate of the case holder and lock it in this posi-
tion
OAOptional accessories
Installing aluminium case
d Warning:
When attaching, make sure
that the case is retained
securely.
An incorrectly secured case
could be lost and endanger
other road users.
Unlock the plate of the case
holder and lower it into posi-
tion
Press lock barrel 1 down
A1
2
10geBKg6.book Seite 25 Dienstag, 19. November 2002 1:11 13
Page 28 of 104
11
26
General information and controls
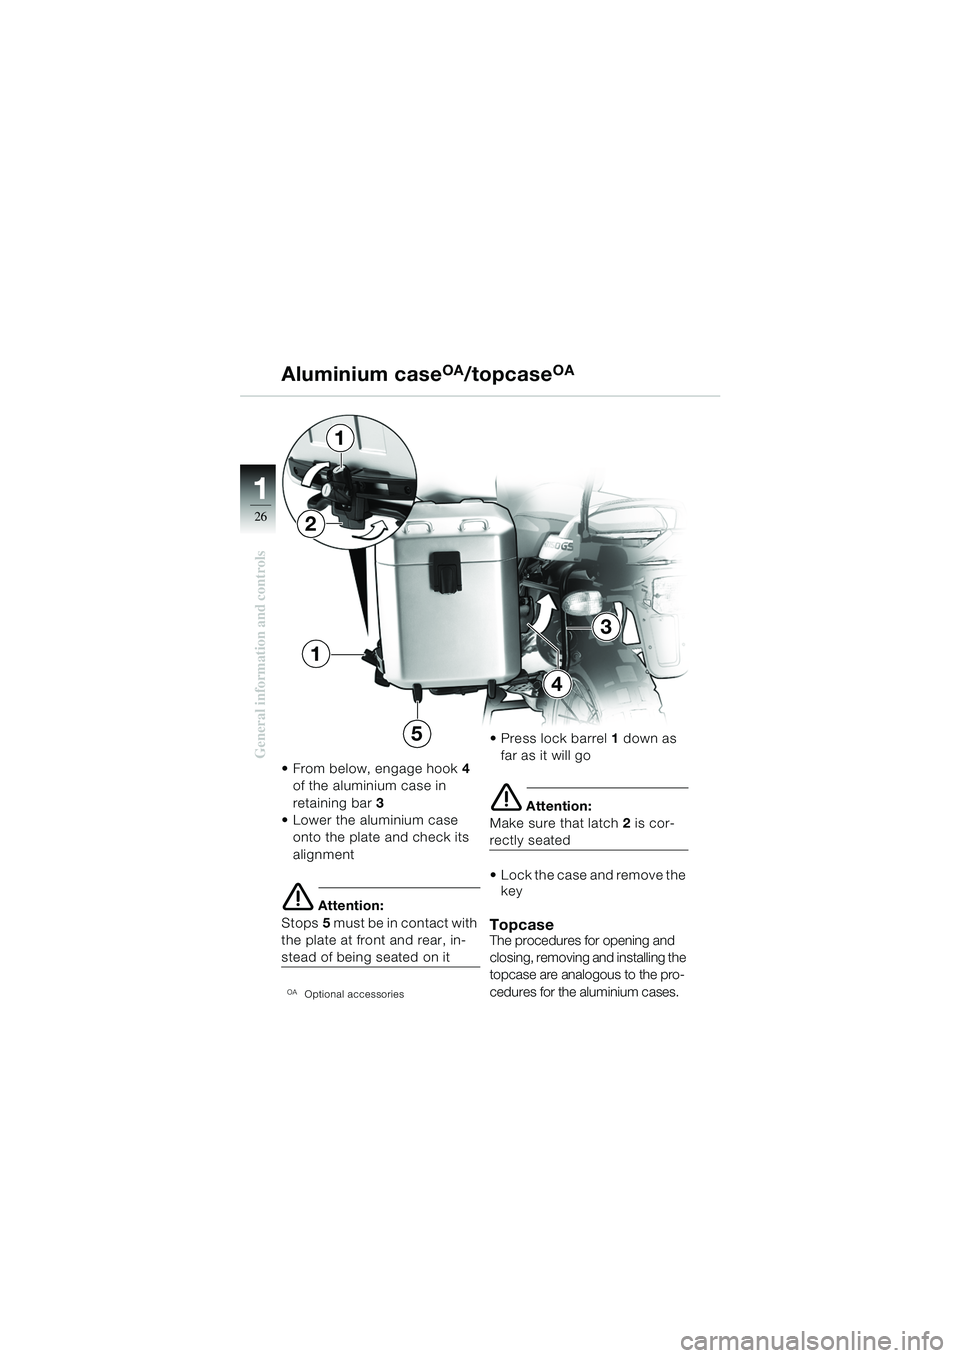
Aluminium caseOA/topcaseOA
From below, engage hook4
of the aluminium case in
retaining bar 3
Lower the aluminium case
onto the plate and check its
alignment
e Attention:
Stops 5 m u s t b e i n c o n t a c t w i t h
the plate at front and rear, in-
stead of being seated on it
OAOptional accessories
Press lock barrel 1 down as
far as it will go
e Attention:
Make sure that latch 2 is cor-
rectly seated
Lock the case and remove the
key
TopcaseThe procedures for opening and
closing, removing and installing the
topcase are analogous to the pro-
cedures for the aluminium cases.
3
4
5
1
2
1
10geBKg6.book Seite 26 Dienstag, 19. November 2002 1:11 13
Page 36 of 104
2
34
Safety check
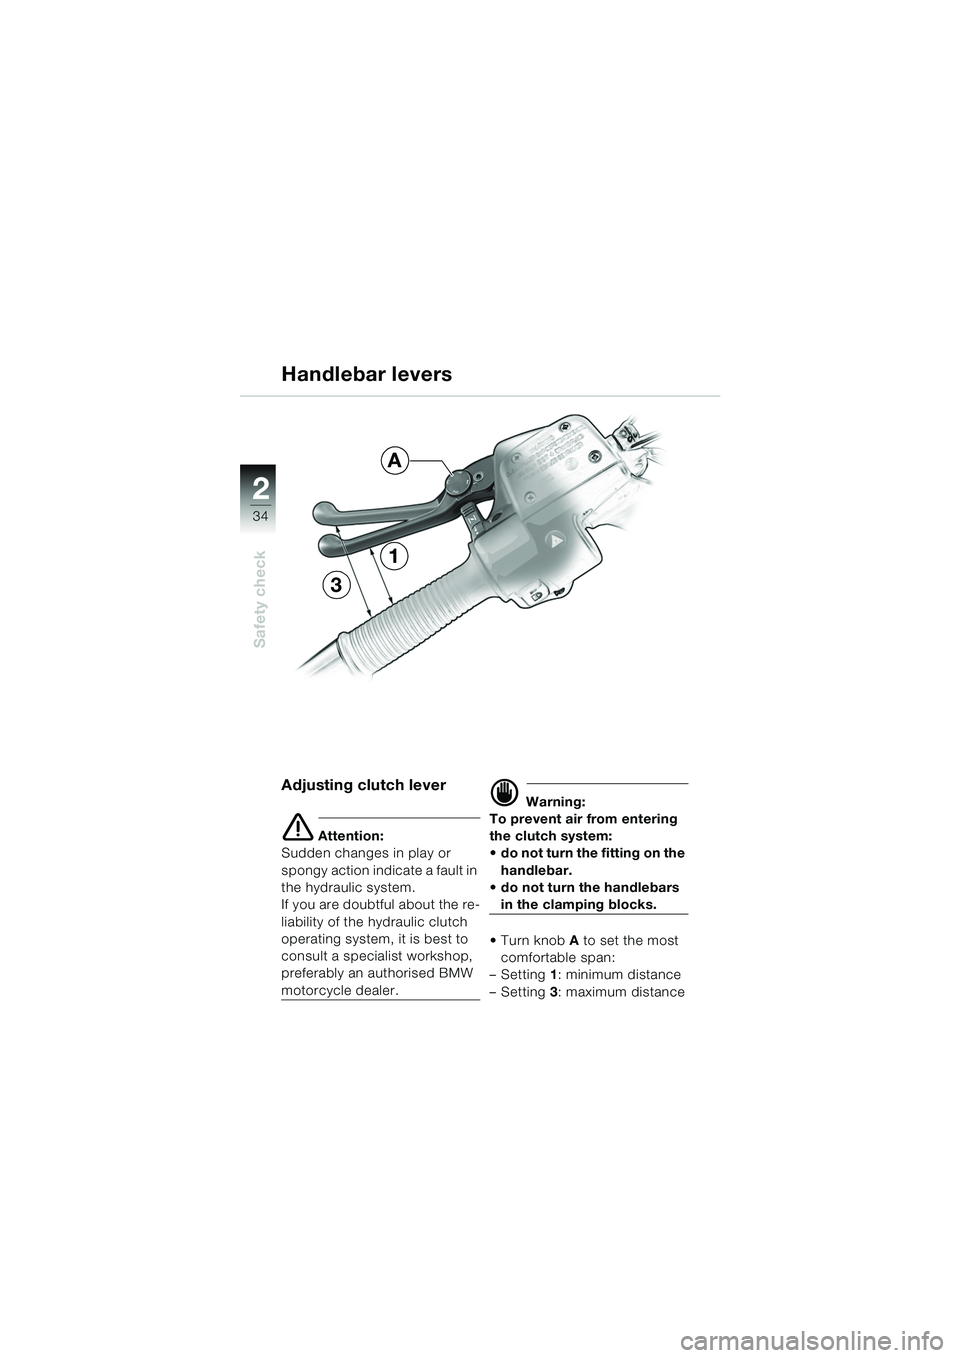
Handlebar levers
Adjusting clutch lever
e Attention:
Sudden changes in play or
spongy action indicate a fault in
the hydraulic system.
If you are doubtful about the re-
liability of the hydraulic clutch
operating system, it is best to
consult a specialist workshop,
preferably an authorised BMW
motorcycle dealer.
d Warning:
To prevent air from entering
the clutch system:
do not turn the fitting on the
handlebar.
do not turn the handlebars
in the clamping blocks.
Turn knob A to set the most
comfortable span:
–Setting 1: minimum distance
–Setting 3: maximum distance
1
3
A
10geBKg6.book Seite 34 Dienstag, 19. November 2002 1:11 13