BUICK CENTURY 1994 Owners Manual
Manufacturer: BUICK, Model Year: 1994, Model line: CENTURY, Model: BUICK CENTURY 1994Pages: 308, PDF Size: 16.3 MB
Page 231 of 308
should have your brake system fixed, since a leak means
that sooner or later your brakes wonŌĆÖt work well,
or
wonŌĆÖt work at all. So, it isnŌĆÖt a good idea to ŌĆ£top offŌĆÖ
your brake fluid. Adding brake fluid wonŌĆÖt correct a
leak. If you add fluid when your linings are worn, then
youŌĆÖll have too much fluid when you get new brake
linings. You should add (or remove) brake fluid, as
necessary, only when work
is done on the brake
hydraulic system.
When
your brake fluid falls to a low level, your brake
warning light will come on. See ŌĆ£Brake System Warning
LightŌĆØ in the Index.
What to Add
When you do need brake fluid, use only DOT-3 brake
fluid
-- such as Delco Supreme 11 @ (GM Part
No. 1052535). Use new brake fluid from a sealed
container only, and always clean the brake fluid
reservoir cap before removing it.
NOTICE:
DOT-5 silicone brake fluid can damage
your vehicle. DonŌĆÖt use
it.
a DonŌĆÖt let someone put in the wrong kind of
fluid. For example,
just a few drops of
mineral-based
oil, such as engine oil, in
your brake system can damage brake
system parts
so badly that theyŌĆÖll have to
be replaced.
Brake fluid can damage paint, so be careful
not to spill brake
fluid on your vehicle. If
,you do, wash it off immediately. See
ŌĆ£Appearance CareŌĆØ in the Index.
229
ProCarManuals.com
Page 232 of 308
Brake Wear
Your Buick has front disc brakes and rear drum brakes.
Disc brake pads have built-in wear indicators that make
a high-pitched warning sound when the brake pads are
worn and new pads are needed. The sound may come
and
go or be heard all the time your vehicle is moving
(except when
you are pushing on the brake pedal
firmly).
Continuing to drive with worn-out brake pads
could result in costly brake repair.
Some driving conditions or climates may cause a brake
squeal when the brakes are first applied or lightly
applied. This does not mean something
is wrong with
your brakes.
Your rear drum brakes donŌĆÖt have wear indicators, but if
you ever hear a rear brake rubbing noise, have the rear
brake linings inspected. Also, the rear brake drums
should be removed and inspected each time the tires are
removed for rotation or changing. When you have the
front brakes replaced, have the rear brakes inspected,
too.
Brake linings should always be replaced as complete
axle sets.
Brake Pedal Travel
See your dealer if the brake pedal does not return to
normal height, or
if there is a rapid increase in pedal
travel. This could be a sign of brake trouble.
Brake Adjustment
Every time you apply the brakes moderately, with or
without the vehicle moving, your brakes adjust for wear.
230
ProCarManuals.com
Page 233 of 308
Replacing Brake System Parts
The braking system on a modern vehicle is complex. Its
many parts have to be of top quality and work well
together if the vehicle is to have really good braking.
Vehicles we design and test have top-quality GM brake
parts in them, as your Buick does when it is new. When
you replace parts of your braking system -- for example,
when your brake linings wear down and
you have to
have new ones put
in -- be sure you get new genuine
GM replacement parts. If you donŌĆÖt, your brakes may no
longer work properly. For example, if someone puts in
brake linings that are wrong for your vehicle, the
balance between your front and rear brakes can change,
for the worse. The braking performance
youŌĆÖve come to
expect can change
in many other ways if someone puts
in the wrong replacement brake parts.
Battery
Every new Buick has a Delco FreedomŌĆÖ battery. You
never have to add water to one of these. When itŌĆÖs time
for a new battery, we recommend a Delco FreedomŌĆÖ
battery. Get one that has the catalog number shown on
the original batteryŌĆÖs label.
Vehicle Storage
If youŌĆÖre not going to drive your vehicle for 25 days or
more, take off the black, negative
(-) cable from the
battery. This will help keep your battery from running
down.
Contact your dealer
to learn how to prepare your vehicle
for longer storage periods.
321
ProCarManuals.com
Page 234 of 308
Halogen Bulbs
Headlamp Bulb Replacement
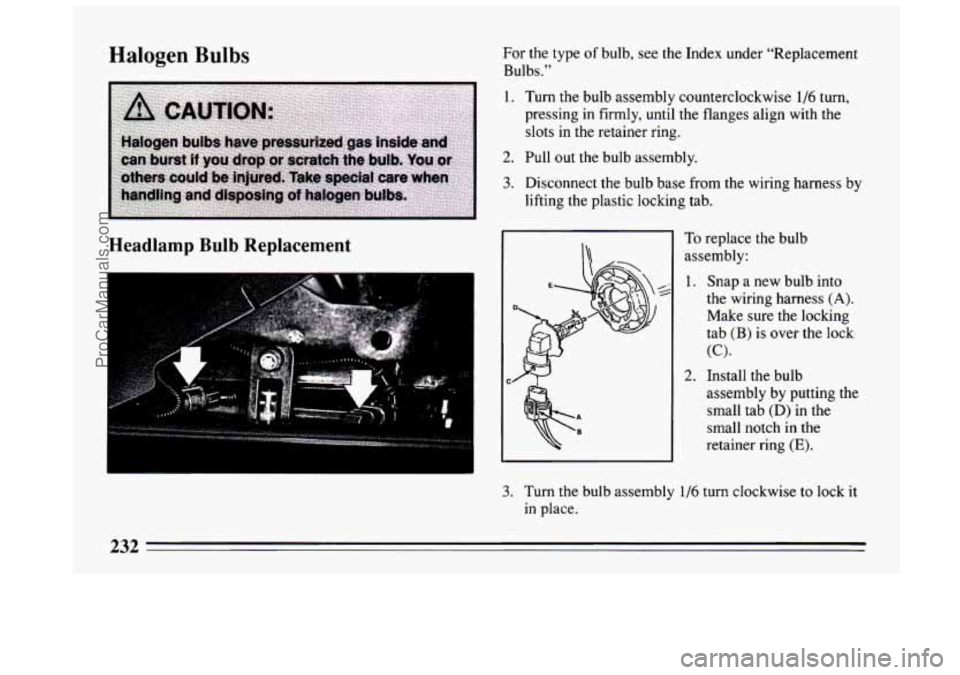
For the type of bulb, see the Index under "Replacement
Bulbs."
1. Turn the bulb assembly counterclockwise 1/6 turn,
pressing in firmly, until the flanges align with the
slots in
the retainer ring.
2. Pull out the bulb assembly.
3. Disconnect the bulb base from the wiring harness by
lifting the plastic locking tab.
To replace the bulb
assembly:
1.
2.
Snap a new bulb into
the wiring harness
(A).
Make sure the locking
tab
(B) is over the lock
(C).
Install the bulb
assembly by putting the
small tab
(D) in the
small notch in the
retainer ring
(E).
3. Turn the bulb assembly 1/6 turn clockwise to lock it
in place.
232
ProCarManuals.com
Page 235 of 308
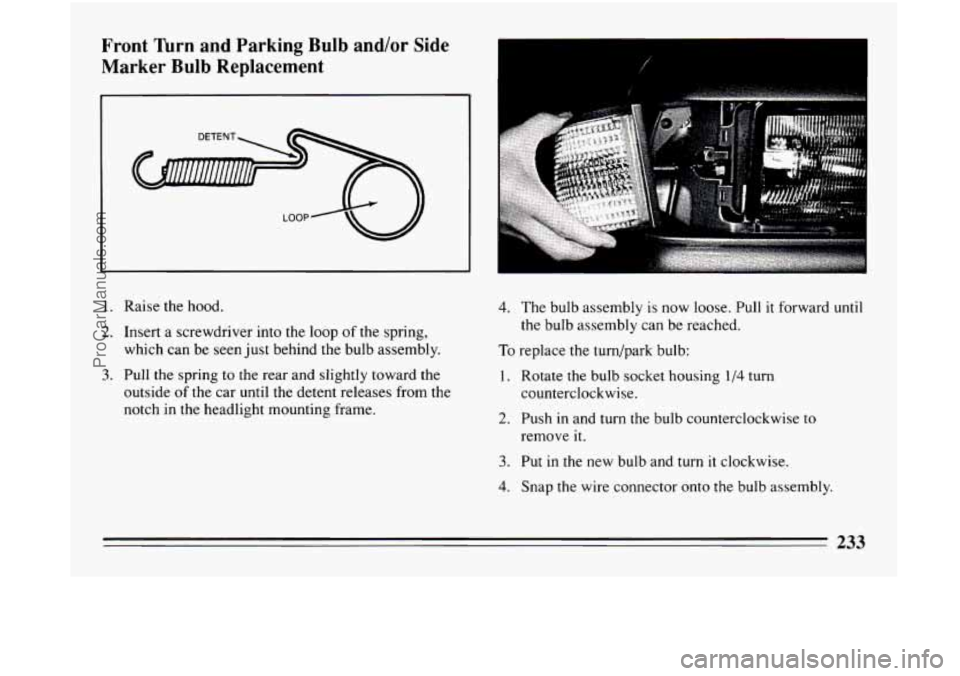
Front Turn and Parking Bulb and/or Side
Marker Bulb Replacement
1. Raise the hood.
2. Insert a screwdriver into the loop of the spring,
which can be seen just behind the bulb assembly.
3. Pull the spring to the rear and slightly toward the
outside
of the car until the detent releases from the
notch in the headlight mounting frame.
,I'
4. The bulb assembly is now loose. Pull it forward until
the bulb assembly can be reached.
To replace the turn/park bulb:
1. Rotate the bulb socket housing 1/4 turn
counterclockwise.
2. Push in and turn the bulb counterclockwise to
remove
it.
3. Put in the new bulb and turn it clockwise.
4. Snap the wire connector onto the bulb assembly.
233
ProCarManuals.com
Page 236 of 308
. ..ŌĆś
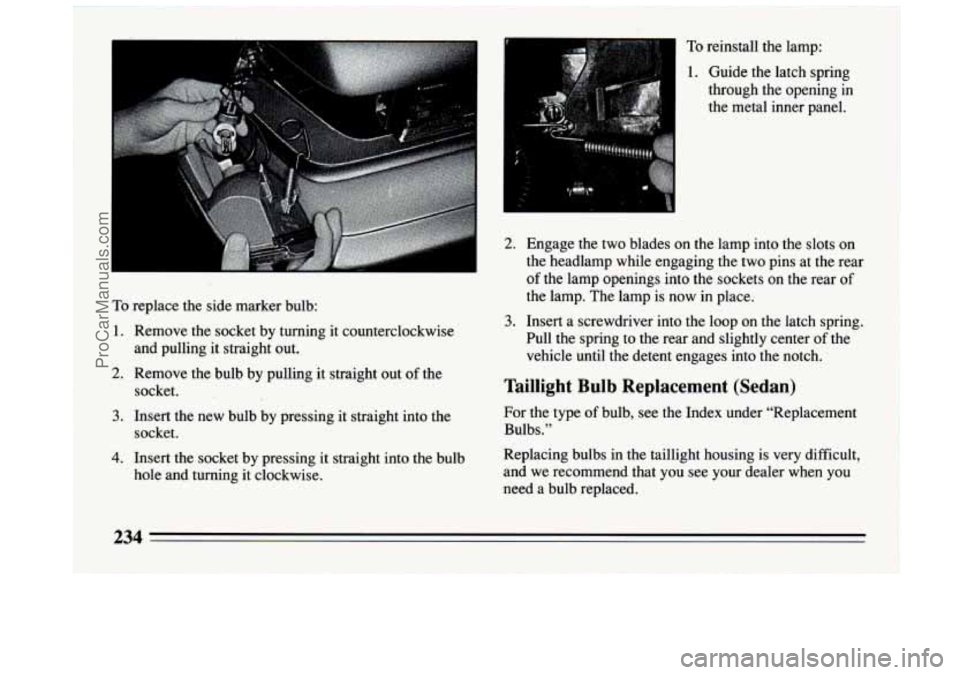
To replace the side marker bulb:
1. Remove the socket by turning it counterclockwise
2. Remove the bulb by pulling it straight out of the
and
pulling it straight out.
socket.
3. Insert the new bulb by pressing it straight into the
socket.
4. Insert the socket by pressing it straight into the bulb
hole and turning it clockwise.
I
To reinstall the lamp:
1. Guide the latch spring
through the opening in
the metal inner panel.
2. Engage the two blades on the lamp into the slots on
the headlamp while engaging the two pins at the rear
of the lamp openings into the sockets on the rear of
the lamp. The lamp is now in place.
3. Insert a screwdriver into the loop on the latch spring.
Pull the spring to the rear and slightly center
of the
vehicle until the detent engages into the notch.
Taillight Bulb Replacement (Sedan)
For the type of bulb, see the Index under ŌĆ£Replacement
Bulbs.ŌĆØ
Replacing bulbs in the taillight housing is very difficult,
and we recommend that you see your dealer when you
need a bulb replaced.
ProCarManuals.com
Page 237 of 308
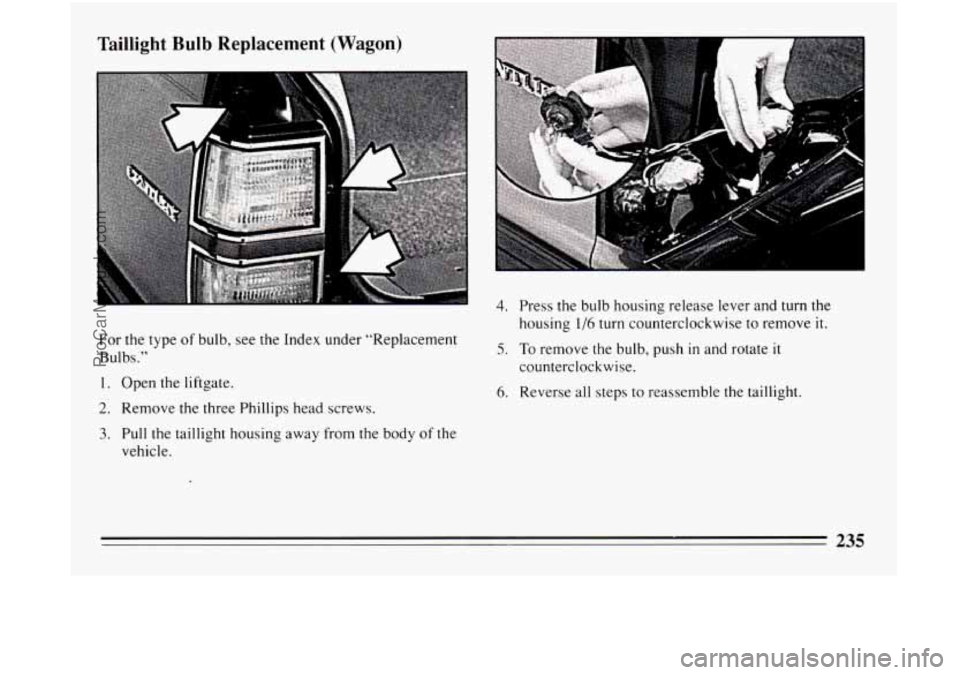
Taillight Bulb Replacement (Wagon)
For the type of bulb, see the Index under ŌĆ£Replacement
Bulbs.ŌĆØ
1. Open the liftgate.
2. Remove the three Phillips head screws.
3. Pull the taillight housing away from the body of the
vehicle.
4. Press the bulb housing release lever and turn the
housing
1/6 turn counterclockwise to remove it.
5. To remove the bulb, push in and rotate it
counterclockwise.
6. Reverse all steps to reassemble the taillight.
235
ProCarManuals.com
Page 238 of 308
Loading Your Vehicle
TIRE-LOADING INFORMATION
OCCUPANTS VEHICLE CAP. WT.
FRT. CTR. RR. TOTAL LBS. KG
MAX. LOADING & GVWR SAME AS VEHICLE
CAPACITY WEIGHT
XXX COLD TIRE
TIRE SIZE SPEED PRESSURE RTG
PSI/KPa
FRT.
RR.
SPA.
IF TIRES ARE HOT, ADD 4PSD28KPa
SEE OWNERŌĆśS MANUAL FOR ADDITIONAL
INFORMATION IlrmlI :$#
~
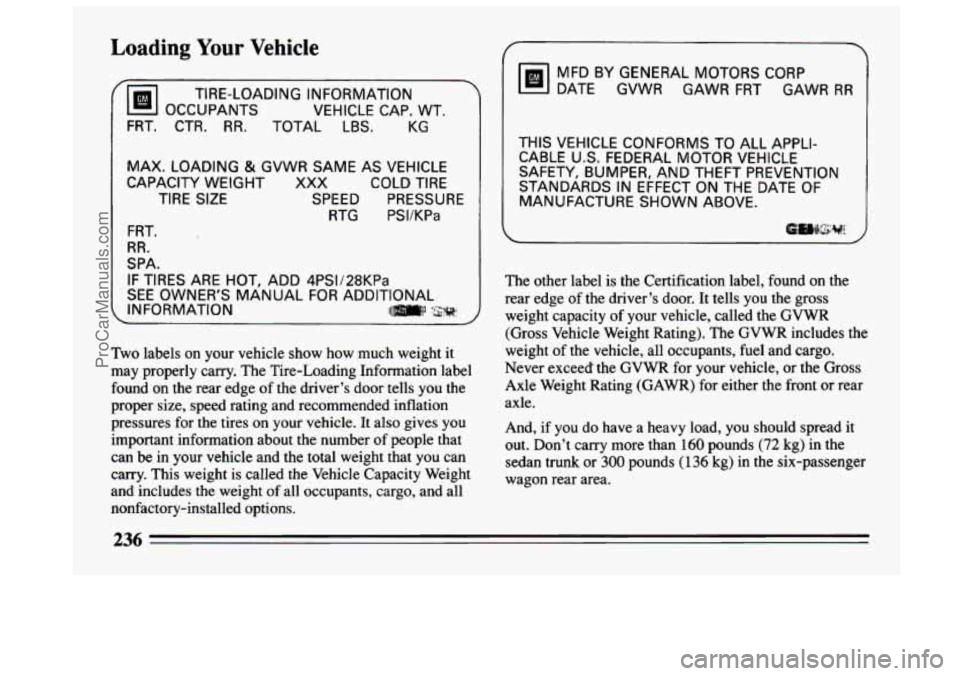
Two labels on your vehicle show how much weight it
may properly carry. The Tire-Loading Information label
found on
the rear edge of the driverŌĆÖs door tells you the
proper size, speed rating and recommended inflation
pressures for the tires
on your vehicle. It also gives you
important information about the number
of people that
can be in your vehicle and the total weight that you can
carry. This weight is called the Vehicle Capacity Weight
and includes the weight
of all occupants, cargo, and all
nonfactory-installed options.
MFD BY GENERAL MOTORS CORP
DATE GVWR GAWR FRT GAWR RR
THIS VEHICLE CONFORMS TO ALL APPLI-
CABLE
U.S. FEDERAL MOTOR VEHICLE
SAFETY, BUMPER, AND THEFT PREVENTION
STANDARDS
IN EFFECT ON THE DATE OF
MANUFACTURE
SHOWN ABOVE.
The other label is the Certification label, found on the
rear edge of the driverŌĆÖs door. It tells you the gross
weight capacity of your vehicle, called the GVWR
(Gross Vehicle Weight Rating). The GVWR includes the
weight of the vehicle,
all occupants, fuel and cargo.
Never exceed the GVWR for your vehicle, or the Gross
Axle Weight Rating (GAWR) for either the front or rear
axle.
And, if you do have a heavy load, you should spread it
out. DonŌĆÖt carry more than
160 pounds (72 kg) in the
sedan
trunk or 300 pounds (136 kg) in the six-passenger
wagon rear area.
ProCarManuals.com
Page 239 of 308
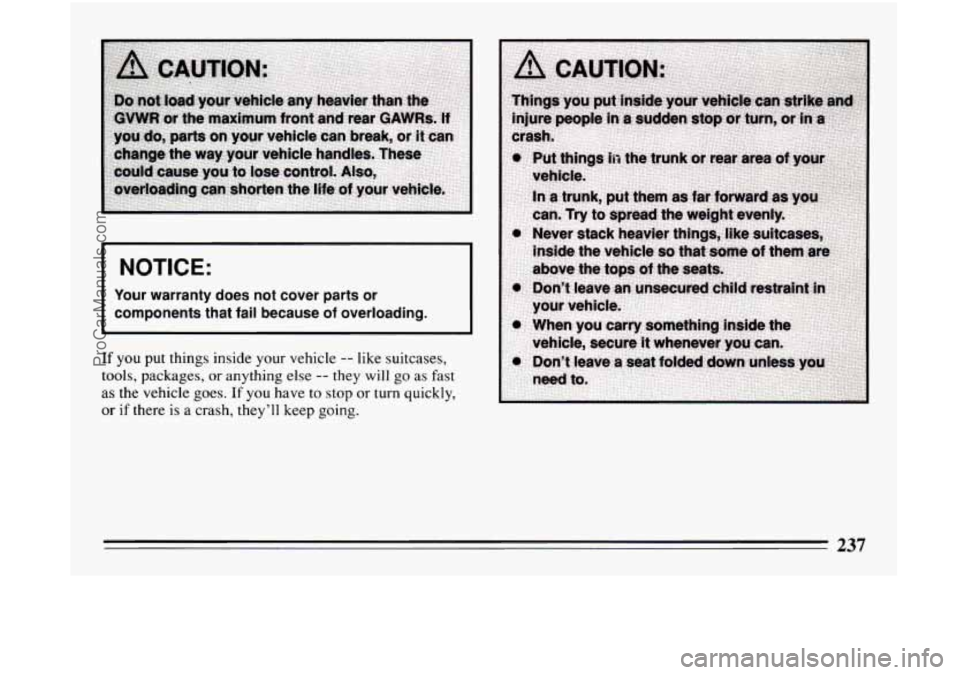
I NOTICE:
I
Your warranty does not cover parts or
components that fail because
of overloading.
If you put things inside your vehicle -- like suitcases,
tools, packages,
or anything else -- they will go as fast
as the vehicle goes.
If you have to stop or turn quickly,
or
if there is a crash, theyŌĆÖll keep going.
237
ProCarManuals.com
Page 240 of 308
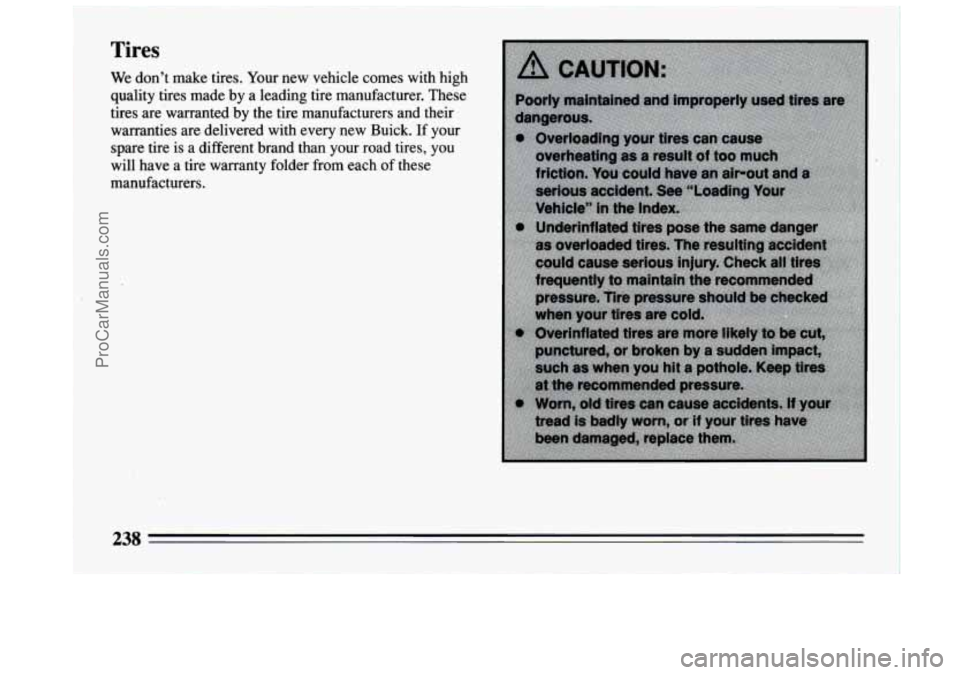
Tires
We don't make tires. Your new vehicle comes with high
quality tires made by a leading tire manufacturer. These
tires are'warranted by the tire manufacturers and their
warranties are delivered with every new Buick. If your
spare tire is a different brand than your road tires, you
will have
a tire warranty folder from each of these
manufacturers.
238
ProCarManuals.com