automatic transmission CADILLAC CT5 2023 Owners Manual
[x] Cancel search | Manufacturer: CADILLAC, Model Year: 2023, Model line: CT5, Model: CADILLAC CT5 2023Pages: 526, PDF Size: 6.85 MB
Page 7 of 526
Cadillac CT5 Owner Manual (GMNA-Localizing-U.S./Canada-16500419) -
2023 - CRC - 5/6/22
6 Introduction
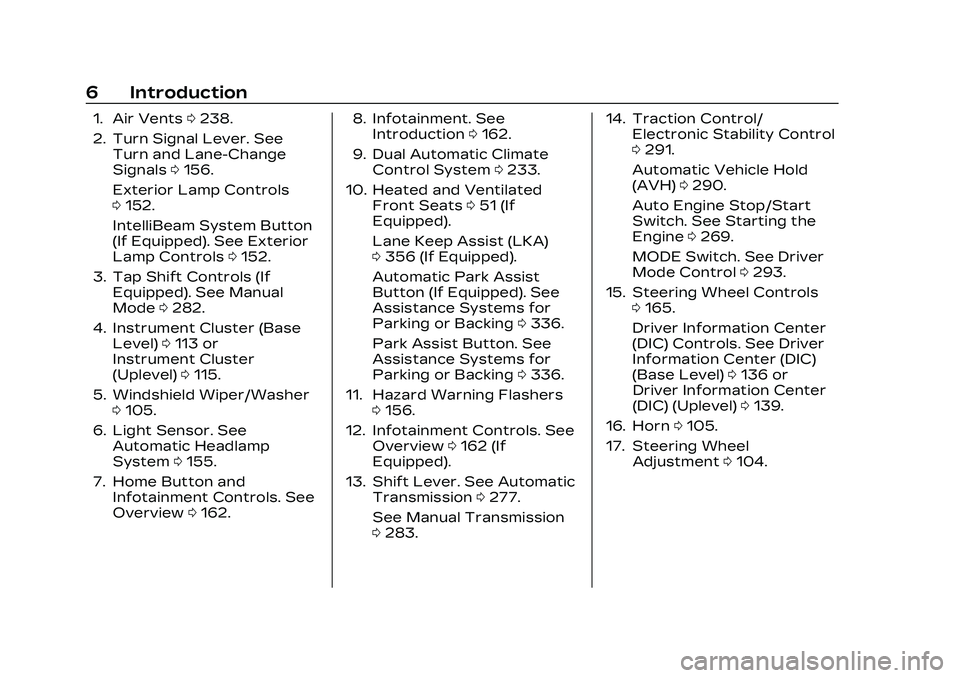
1. Air Vents0238.
2. Turn Signal Lever. See Turn and Lane-Change
Signals 0156.
Exterior Lamp Controls
0 152.
IntelliBeam System Button
(If Equipped). See Exterior
Lamp Controls 0152.
3. Tap Shift Controls (If Equipped). See Manual
Mode 0282.
4. Instrument Cluster (Base Level) 0113 or
Instrument Cluster
(Uplevel) 0115.
5. Windshield Wiper/Washer 0105.
6. Light Sensor. See Automatic Headlamp
System 0155.
7. Home Button and Infotainment Controls. See
Overview 0162. 8. Infotainment. See
Introduction 0162.
9. Dual Automatic Climate Control System 0233.
10. Heated and Ventilated Front Seats 051 (If
Equipped).
Lane Keep Assist (LKA)
0 356 (If Equipped).
Automatic Park Assist
Button (If Equipped). See
Assistance Systems for
Parking or Backing 0336.
Park Assist Button. See
Assistance Systems for
Parking or Backing 0336.
11. Hazard Warning Flashers 0156.
12. Infotainment Controls. See Overview 0162 (If
Equipped).
13. Shift Lever. See Automatic Transmission 0277.
See Manual Transmission
0 283. 14. Traction Control/
Electronic Stability Control
0291.
Automatic Vehicle Hold
(AVH) 0290.
Auto Engine Stop/Start
Switch. See Starting the
Engine 0269.
MODE Switch. See Driver
Mode Control 0293.
15. Steering Wheel Controls 0165.
Driver Information Center
(DIC) Controls. See Driver
Information Center (DIC)
(Base Level) 0136 or
Driver Information Center
(DIC) (Uplevel) 0139.
16. Horn 0105.
17. Steering Wheel Adjustment 0104.
Page 22 of 526
Cadillac CT5 Owner Manual (GMNA-Localizing-U.S./Canada-16500419) -
2023 - CRC - 5/6/22
Keys, Doors, and Windows 21
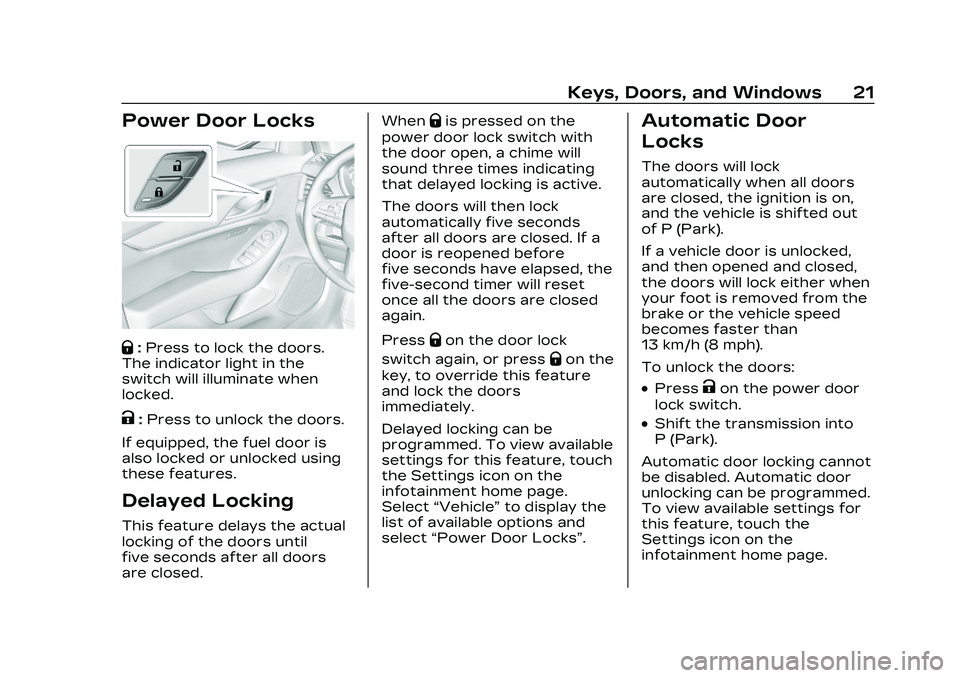
Power Door Locks
Q:Press to lock the doors.
The indicator light in the
switch will illuminate when
locked.
K: Press to unlock the doors.
If equipped, the fuel door is
also locked or unlocked using
these features.
Delayed Locking
This feature delays the actual
locking of the doors until
five seconds after all doors
are closed. When
Qis pressed on the
power door lock switch with
the door open, a chime will
sound three times indicating
that delayed locking is active.
The doors will then lock
automatically five seconds
after all doors are closed. If a
door is reopened before
five seconds have elapsed, the
five-second timer will reset
once all the doors are closed
again.
Press
Qon the door lock
switch again, or press
Qon the
key, to override this feature
and lock the doors
immediately.
Delayed locking can be
programmed. To view available
settings for this feature, touch
the Settings icon on the
infotainment home page.
Select “Vehicle” to display the
list of available options and
select “Power Door Locks”.
Automatic Door
Locks
The doors will lock
automatically when all doors
are closed, the ignition is on,
and the vehicle is shifted out
of P (Park).
If a vehicle door is unlocked,
and then opened and closed,
the doors will lock either when
your foot is removed from the
brake or the vehicle speed
becomes faster than
13 km/h (8 mph).
To unlock the doors:
.PressKon the power door
lock switch.
.Shift the transmission into
P (Park).
Automatic door locking cannot
be disabled. Automatic door
unlocking can be programmed.
To view available settings for
this feature, touch the
Settings icon on the
infotainment home page.
Page 50 of 526

Cadillac CT5 Owner Manual (GMNA-Localizing-U.S./Canada-16500419) -
2023 - CRC - 5/6/22
Seats and Restraints 49
To save preferred driving
positions to 1 and 2:1. Turn the vehicle on or to accessory mode. A DIC
welcome message may
indicate the driver number
of the current remote key.
See “Identifying Driver
Number” previously in this
section.
2. Adjust all available memory features to the desired
driving position.
3. Press and release SET; a beep will sound.
4. Immediately upon releasing SET, press and hold
memory button 1 or
2 matching the current
Driver’s remote key
number until two beeps
sound. If too much time
passes between releasing
SET and pressing 1 or 2,
the two beeps will not
sound indicating memory
position were not saved.
Repeat Steps 3 and 4 to
try again. 5. Repeat Steps 1–4 for the
other remote key 1 or 2
using the other 1 or
2 memory button.
It is recommended to save the
preferred driving positions to
both 1 and 2 if you are the only
driver.
To save the common exit
seating position to
Bthat is
used by all drivers for
Manually Recalling Seating
Positions and Auto Seat Exit
Memory Recall features,
repeat Steps 1–4 using
B, the
exit button.
Manually Recalling Seating
Positions
Press and hold 1, 2, or
B
button until the recall is
complete, to recall the
positions previously saved to
that button.
Manual Memory recall
movement for 1, 2 or
B
buttons may be initiated and will complete to the saved
memory position if the vehicle
is in or out of P (Park).
If manual transmission
equipped, Manual Memory
recall movement for 1, 2, or
B
buttons may be initiated and
will complete to the saved
memory position if the vehicle
parking brake is set or
released.
Enabling Automatic Recalls
.Seat Entry Memory moves
the driver seat to the
selected 1 or 2 position when
the vehicle is started. Select
Settings > Vehicle > Seating
Position > Seat Entry
Memory > ON or OFF. See
“Auto Seat Entry Memory
Recall”
later in this section.
.Seat Exit Memory moves the
driver seat to the preferred
exit position of the
Bbutton
when the vehicle is turned
off and the door is opened.
Select Settings > Vehicle >
Seating Position > Seat Exit
Page 51 of 526

Cadillac CT5 Owner Manual (GMNA-Localizing-U.S./Canada-16500419) -
2023 - CRC - 5/6/22
50 Seats and Restraints
Memory > Select ON or OFF.
See“Auto Seat Exit Memory
Recall” later in this section.
Auto Seat Entry Memory
Recall
Seat Entry Memory will
automatically begin movement
to the seating positions of the
1 or 2 button corresponding to
the driver’s remote key
number 1 or 2 detected by the
vehicle when:
.The vehicle is turned ON.
.Seating positions have been
previously saved to the
same 1 or 2 button. See
“Saving Seating Positions”
previously in this section.
.Seat Entry Memory is
enabled. See “Enabling
Automatic Recalls”
previously in this section.
.The shift lever is in P (Park).
.If manual transmission
equipped, the parking brake
must be set. Seat Entry Memory Recall will
continue if the vehicle is
shifted out of P (Park) prior to
reaching the saved memory
position.
If manual transmission
equipped, Seat Entry Memory
Recall will continue if the
parking brake is released prior
to reaching the saved memory
position.
If the saved memory seat
position does not
automatically recall, verify the
recall is enabled. See
“Enabling
Automatic Recalls” previously
in this section.
If the memory seat recalls to
the wrong position, the
driver’s remote key number 1
or 2 may not match the
memory button number
positions they were saved to.
Try the other remote key or
try saving the positions to the
other 1 or 2 memory button.
See “Saving Seating Positions”
previously in this section. Automatic Seat Entry Memory
recalls are only available for
driver’s remote key numbers
1 and 2. Remote key 3–8 will
not provide Seat Entry
Memory recalls.
Auto Seat Exit Memory
Recall
Seat Exit Memory will begin
movement to the seating
position of the
B
button when:
.The vehicle is turned off and
the driver door is open or
opened within a short time.
.A seating position has been
previously been saved to the
Bmemory button. See
“Saving Seating Positions”
previously in this section.
.Seat Exit Memory is enabled.
See “Enabling Automatic
Recalls” previously in this
section.
.The shift lever is in P (Park).
.If manual transmission
equipped, the parking brake
must be set.
Page 102 of 526
Cadillac CT5 Owner Manual (GMNA-Localizing-U.S./Canada-16500419) -
2023 - CRC - 5/6/22
Storage 101
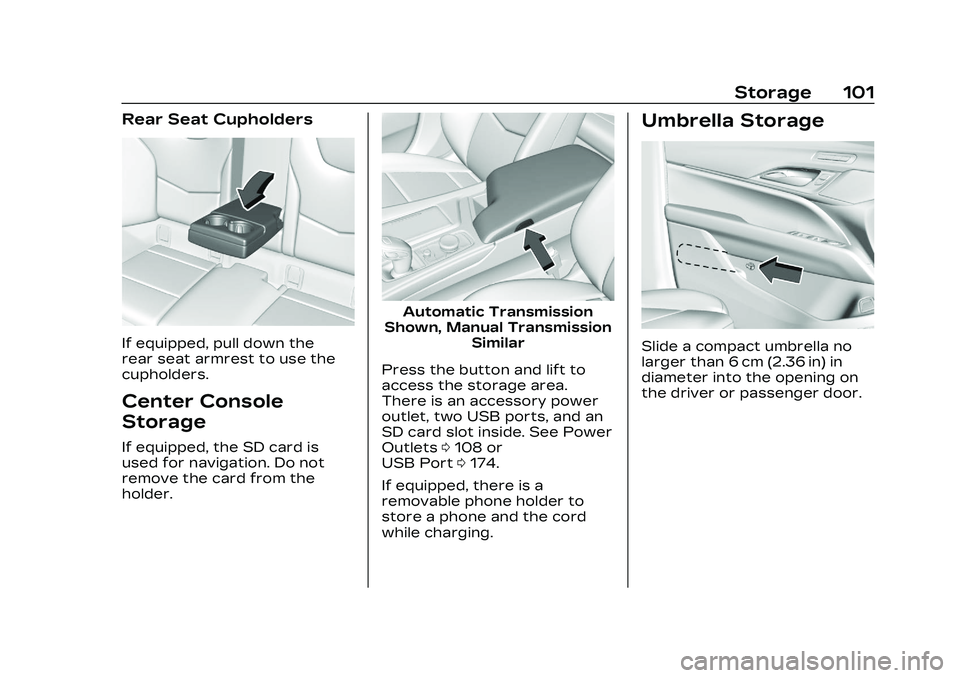
Rear Seat Cupholders
If equipped, pull down the
rear seat armrest to use the
cupholders.
Center Console
Storage
If equipped, the SD card is
used for navigation. Do not
remove the card from the
holder.
Automatic Transmission
Shown, Manual Transmission Similar
Press the button and lift to
access the storage area.
There is an accessory power
outlet, two USB ports, and an
SD card slot inside. See Power
Outlets 0108 or
USB Port 0174.
If equipped, there is a
removable phone holder to
store a phone and the cord
while charging.
Umbrella Storage
Slide a compact umbrella no
larger than 6 cm (2.36 in) in
diameter into the opening on
the driver or passenger door.
Page 108 of 526

Cadillac CT5 Owner Manual (GMNA-Localizing-U.S./Canada-16500419) -
2023 - CRC - 5/6/22
Instruments and Controls 107
on the windshield and controls
the frequency of the
windshield wiper.
To turn the Rainsense feature
on or off, select Settings >
Vehicle > Comfort and
Convenience > Rainsense
Wipers > Select ON or OFF.
Keep this area of the
windshield clear of debris to
allow for best system
performance.
AUTO :When enabled, move
the windshield wiper lever to
AUTO. Turn the
xAUTO
band on the wiper lever to
adjust the sensitivity.
.Turn the band up for more
sensitivity to moisture.
.Turn the band down for less
sensitivity to moisture.
.Move the windshield wiper
lever out of the AUTO
position to deactivate
Rainsense.
Wiper Arm Assembly
Protection
If equipped with wiper arm
assembly protection, when
using an automatic car wash,
move the windshield wiper
lever to OFF. This disables the
automatic Rainsense
windshield wipers.
With Rainsense, if the
transmission is in N (Neutral)
and the vehicle speed is very
slow, the wipers will
automatically stop at the base
of the windshield.
The wiper operations return
to normal when the
transmission is no longer in
N (Neutral) or the vehicle
speed has increased.Wiper-Activated
Headlamps
This feature activates the
headlamps and parking lamps
after the windshield wipers
have been in use for a while.
The transition time for the
lamps coming on varies based
on the wiper speed. For this
feature to work, the exterior
lamp control must be in AUTO.
The wiper-activated
headlamps immediately turn
off when the ignition is turned
to off, or the windshield wiper
control is turned off.
Compass
The vehicle may have a
compass display on the Driver
Information Center (DIC). The
compass receives its heading
and other information from
the Global Positioning
System (GPS) antenna,
StabiliTrak/Electronic Stability
Control (ESC), and vehicle
speed information.
Page 121 of 526
Cadillac CT5 Owner Manual (GMNA-Localizing-U.S./Canada-16500419) -
2023 - CRC - 5/6/22
120 Instruments and Controls
Tachometer
The tachometer displays the
engine speed in revolutions
per minute (rpm).
For vehicles with the Stop/
Start system, when the
ignition is on, the tachometer
indicates the vehicle status.
When pointing to AUTO STOP
(Base Level) or the cluster
displays AUTO STOP text
(Uplevel), the engine is off but
the vehicle is on and can move.
The engine could auto start at
any time. When the indicator
points to OFF, the vehicle
is off.
The tachometer may vary by
several hundred rpm, during
Auto Stop mode, when the
engine is shutting off and
restarting.
Uplevel
The redline of the tachometer
adjusts dynamically based on
engine temperature. The
redline displays a lowerindication when the vehicles
odometer value is less than
805 kilometers (500 miles).
If equipped, the shift
indicators are displayed on
instrument cluster and
Head-Up Display (HUD). The
shift indicators are only
operational when the
automatic transmission is in
Manual mode, or the vehicle
has a manual transmission.
See Manual Mode
0282. When
the vehicle engine is less than
70°C (158°F) and the vehicle
odometer value is less than
805 kilometers (500 miles) the
shift indications are not
displayed.
A strong visual indicator is
displayed as the vehicle
approaches the red line. Tour
and Sport themes feature
shift rings while the Track
theme features shift lights
accompanied by a numerical
tachometer display.
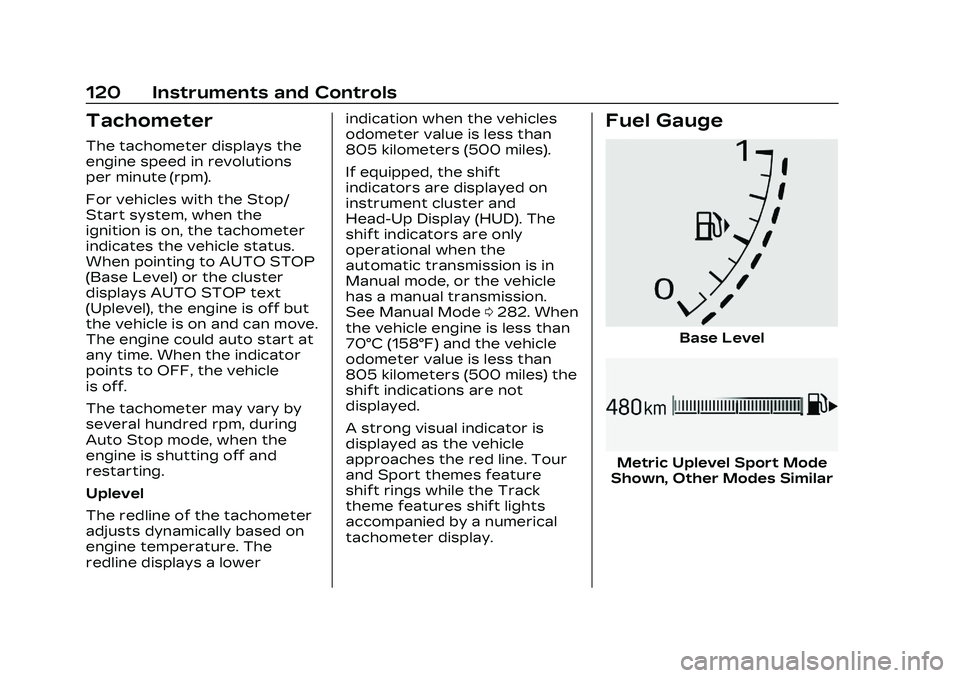
Fuel Gauge
Base Level
Metric Uplevel Sport Mode
Shown, Other Modes Similar
Page 156 of 526

Cadillac CT5 Owner Manual (GMNA-Localizing-U.S./Canada-16500419) -
2023 - CRC - 5/6/22
Lighting 155
If equipped, the DRL will come
on when all of the following
conditions are met:
.The ignition is on.
.The exterior lamp control is
in AUTO.
.The light sensor determines
it is daytime.
The DRL turn off when the
headlamps are turned to
Oor
the ignition is off.
For vehicles first sold in
Canada, the DRL can only be
turned off when the vehicle is
parked.
Automatic Headlamp
System
When the exterior lamp
control is set to AUTO and it is
dark enough outside, the
headlamps come on
automatically.
If equipped, the light sensor is
on top of the instrument panel
or on the windshield near the
rearview mirror. Do not cover
the sensor, otherwise the
headlamps will come on when
they are not needed.
The system may also turn on
the headlamps when driving
through a parking garage or
tunnel.
If the vehicle is started in a
dark garage, the automatic
headlamp system comes on
immediately. If it is light
outside when the vehicle
leaves the garage, there is a slight delay before the
automatic headlamp system
turns off the headlamps.
During that delay, the
instrument cluster may not be
as bright as usual. Make sure
the instrument panel
brightness control is in the full
bright position. See
Instrument Panel Illumination
Control
0157.
When it is bright enough
outside, the headlamps will
turn off.
The automatic headlamp
system turns off when the
exterior lamp control is turned
to
Oor the ignition is off. For
vehicles sold in Canada, this
control only works when the
transmission is in P (Park).
Lights On with Wipers
If the windshield wipers are
activated in daylight with the
engine on, and the exterior
lamp control is in AUTO, the
headlamps, parking lamps, and
other exterior lamps come on.
Page 205 of 526
Cadillac CT5 Owner Manual (GMNA-Localizing-U.S./Canada-16500419) -
2023 - CRC - 5/6/22
204 Infotainment System
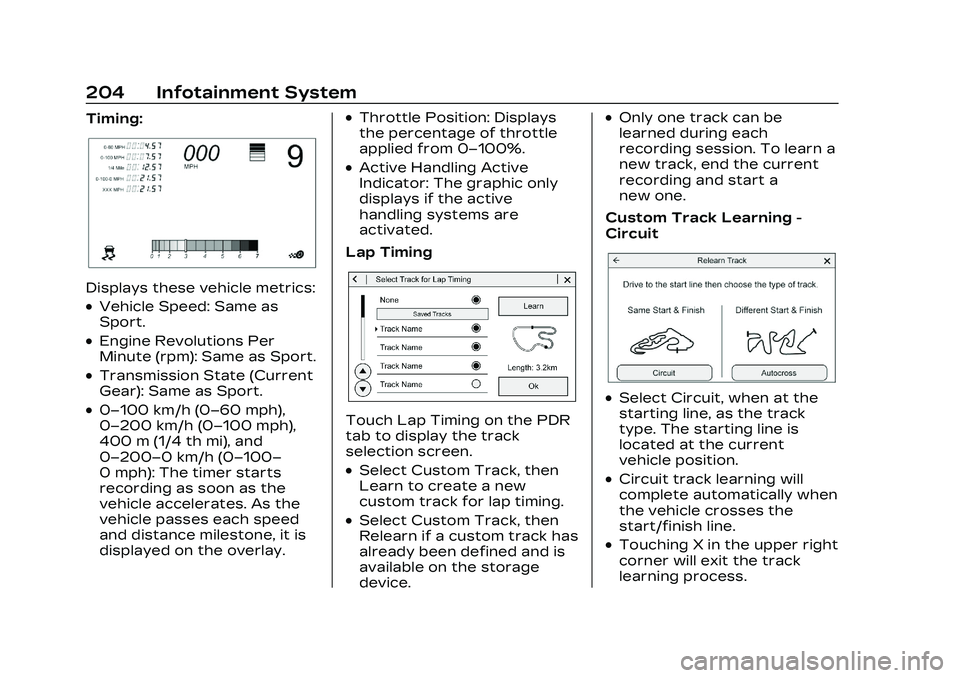
Timing:
Displays these vehicle metrics:
.Vehicle Speed: Same as
Sport.
.Engine Revolutions Per
Minute (rpm): Same as Sport.
.Transmission State (Current
Gear): Same as Sport.
.0–100 km/h (0–60 mph),
0–200 km/h (0–100 mph),
400 m (1/4 th mi), and
0–200–0 km/h (0–100–
0 mph): The timer starts
recording as soon as the
vehicle accelerates. As the
vehicle passes each speed
and distance milestone, it is
displayed on the overlay.
.Throttle Position: Displays
the percentage of throttle
applied from 0–100%.
.Active Handling Active
Indicator: The graphic only
displays if the active
handling systems are
activated.
Lap Timing
Touch Lap Timing on the PDR
tab to display the track
selection screen.
.Select Custom Track, then
Learn to create a new
custom track for lap timing.
.Select Custom Track, then
Relearn if a custom track has
already been defined and is
available on the storage
device.
.Only one track can be
learned during each
recording session. To learn a
new track, end the current
recording and start a
new one.
Custom Track Learning -
Circuit
.Select Circuit, when at the
starting line, as the track
type. The starting line is
located at the current
vehicle position.
.Circuit track learning will
complete automatically when
the vehicle crosses the
start/finish line.
.Touching X in the upper right
corner will exit the track
learning process.
Page 221 of 526

Cadillac CT5 Owner Manual (GMNA-Localizing-U.S./Canada-16500419) -
2023 - CRC - 5/6/22
220 Infotainment System
The PIN is required to:
.Set up/Add or remove keys.
.Change Teen Driver
settings.
.Change or clear the Teen
Driver PIN.
.Access or delete Report
Card data.
Set up/Add keys to activate
Teen Driver and assign
restrictions to the key:
Any vehicle key can be
registered, up to a maximum
of eight keys. Label the key to
tell it apart from the
other keys.
For a pushbutton start
system: 1. Start the vehicle.
2. For automatic transmissions, the vehicle
must be in P (Park). For
manual transmissions, the
vehicle must be stopped
with the parking brake set. 3. From the Settings menu,
touch Vehicle and then
Teen Driver.
4. Enter the PIN.
5. Place the remote key you wish to register in the
transmitter pocket. The
key does not need to be
the one that started the
vehicle. See Remote Key
Operation 09 for
transmitter pocket
location.
6. From the Teen Driver menu, touch Setup Keys or
Add/Remove Teen
Driver Keys.
.If the remote key has
not previously been
registered, the option to
add the key displays.
Touch Add and a
confirmation message
displays. Teen Driver
restrictions will be
applied whenever this
remote key is used to
operate the vehicle.
.If the remote key has
already been registered,
the option to remove
the key displays.
If Remove is touched,
the remote key is no
longer registered.
A confirmation message
displays, and Teen
Driver restrictions will
not be applied if this
remote key is used to
operate the vehicle.
In vehicles with a pushbutton
start system, if a Teen Driver
and a non-Teen Driver key are
both present at start up, the
vehicle will recognize the
non-Teen Driver key to start
the vehicle. The Teen Driver
settings will not be active.
For a keyed ignition system: 1. Start the vehicle.
2. For automatic transmissions, the vehicle
must be in P (Park). For
manual transmissions, the
vehicle must be stopped
with the parking brake set.