light CADILLAC ESCALADE 2010 3.G Owners Manual
[x] Cancel search | Manufacturer: CADILLAC, Model Year: 2010, Model line: ESCALADE, Model: CADILLAC ESCALADE 2010 3.GPages: 616, PDF Size: 39.41 MB
Page 275 of 616

r(Enter):Press to select the choice that ishighlighted in any menu.
z(Display Menu):Press to adjust the brightness,screen display mode (normal, full, or zoom), and displaythe language menu.
q(Return):Press to exit the current active menu andreturn to the previous menu. This button operates onlywhen the display menu or a DVD menu is active.
c(Stop):Press to stop playing, fast reversing, or fastforwarding a DVD. Press twice to return to thebeginning of the DVD.
s(Play/Pause):Press to start playing a DVD. Presswhile a DVD is playing to pause it. Press again tocontinue playing the DVD.
When the DVD is playing, depending on the radio,perform slow play by pressing the play/pause buttonthen pressing the fast forward button. The DVDcontinues playing in a slow play mode. Depending onthe radio, perform reverse slow play by pressing theplay/pause button and then pressing the fast reversebutton. To cancel slow play mode, press the play/pausebutton.
t(Previous Track/Chapter):Press to return to thestart of the current track or chapter. Press again to go tothe previous track or chapter. This button might notwork when the DVD is playing the copyright informationor the previews.
u(Next Track/Chapter):Press to go to the beginningof the next chapter or track. This button might not workwhen the DVD is playing the copyright information orthe previews.
r(Fast Reverse):Press to fast reverse the DVD orCD. To stop fast reversing a DVD video, press the play/pause button. To stop fast reversing a DVD audio orCD, release the fast reverse button. This button mightnot work when the DVD is playing the copyrightinformation or the previews.
[(Fast Forward):Press to fast forward the DVD orCD. To stop fast forwarding a DVD video, press theplay/pause button. To stop fast forwarding a DVD audioor CD, release the fast forward button. This buttonmight not work when the DVD is playing the copyrightinformation or the previews.
e(Audio):Press to change audio tracks on DVDs thathave this feature when the DVD is playing. The formatand content of this function vary for each disc.
{(Subtitles):Press to turn ON/OFF subtitles and tomove through subtitle options when a DVD is playing.The format and content of this function varies foreach disc.
4-83
Page 282 of 616
Vehicle Speakers
Audio from the DVD player or an auxiliary device canbe heard through the vehicle speakers or the wireless/wired headphones, while the radio is tuned to one of thesix frequencies selected on the Sound Around portionof the system’s remote control. See“Remote Control”later in this supplement.
Only one audio source can be heard through thevehicle’s speakers at a time. The audio source beingused is specified by the A/V (audio/video) sourceselected on the driver side head restraint video displayscreen.
To turn the RSE system audio output to the vehicle’sspeakers, press Sound Around ON, on the system’sremote control. The audio from the RSE system can beheard through the wireless/wired headphones and thevehicle’s speakers at the same time. The volume on theradio can vary when switching between the radio, CD,DVD, MP3, or an auxiliary device.
Wireless Headphones
The two wireless headphones included with theHeadrest DVD RSE system will only work with theHeadrest DVD RSE system and are marked for channel3 and 4. The wireless headphones must be used withina line of sight of the transmitter that is located above thevideo display screen.
3!4 Channel Selector :This is located on the rightearpiece. Either Channel 3 or 4 can be selected withthe channel selector. The driver side monitor isdesignated as Channel 3, and the passenger side asChannel 4. Set the channel selector switch according tothe video display screen being viewed. The message,“To listen to this monitor tune your headphones toChannel 3 (or 4)”displays for five seconds thendisappears when the video display screen is turned on.
OFF/ON (Power) :Turn the power switch located onthe earpiece to turn the wireless headphones on or off.Each headphone has a light to indicate ON. If the lightdoes not come on, the batteries may need to bereplaced. See“Battery Replacement”under Rear SeatEntertainment System in the vehicle’s owner manual.
The headphones shut off automatically if the RSEsystem is turned off or if the headphones are out ofrange of the transmitter for more than three minutes.
VOL0(Volume):Use to adjust the volume on the
headphones.
Notice:Do not store the headphones in heat ordirect sunlight. This could damage the headphonesand repairs will not be covered by the warranty.Storage in extreme cold can weaken the batteries.Keep the headphones stored in a cool, dry place.
4-90
Page 283 of 616
Remote Control
To use the remote control, aim at the remote sensorlocated on top center of the video display screen andpress the desired button.
Objects blocking the line-of-sight can affect the functionof the remote control. Direct or very bright light canaffect the ability of the transmitter to receive signalsfrom the remote control. If the remote control does notseem to be working, the batteries might need to bereplaced. See“Battery Replacement”following thissection.
The remote control provided with the Headrest DVDRSE system, is not a universal remote control and willnot control other equipment.
Notice:Storing the remote control in a hot area orin direct sunlight can damage it, and the repairs willnot be covered by the warranty. Storage in extremecold can weaken the batteries. Keep the remotecontrol stored in a cool, dry place.
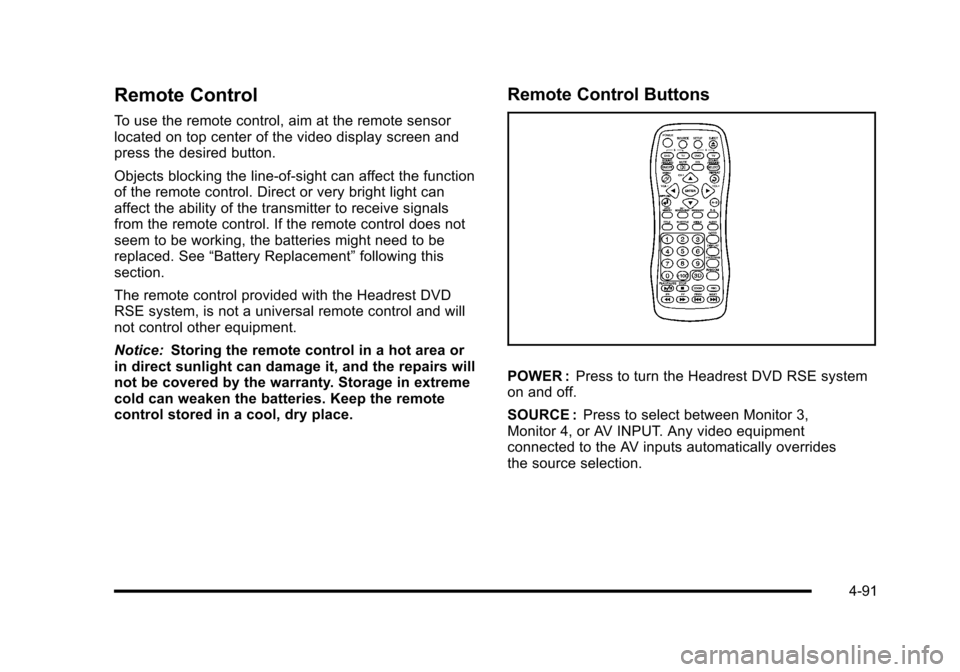
Remote Control Buttons
POWER :Press to turn the Headrest DVD RSE systemon and off.
SOURCE :Press to select between Monitor 3,Monitor 4, or AV INPUT. Any video equipmentconnected to the AV inputs automatically overridesthe source selection.
4-91
Page 293 of 616
Selecting Folders and Songs
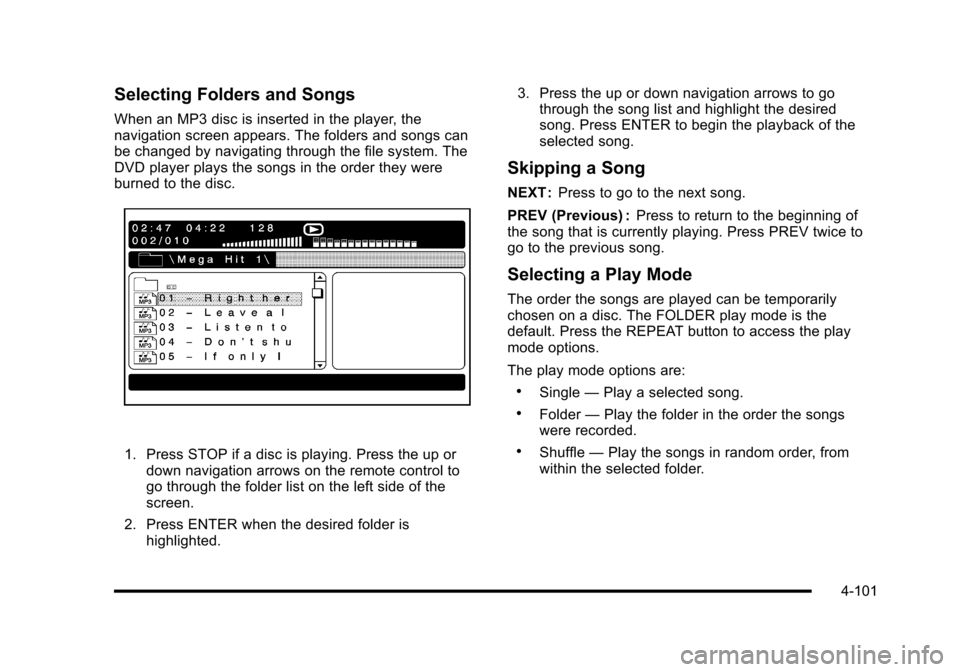
When an MP3 disc is inserted in the player, thenavigation screen appears. The folders and songs canbe changed by navigating through the file system. TheDVD player plays the songs in the order they wereburned to the disc.
1. Press STOP if a disc is playing. Press the up ordown navigation arrows on the remote control togo through the folder list on the left side of thescreen.
2. Press ENTER when the desired folder ishighlighted.
3. Press the up or down navigation arrows to gothrough the song list and highlight the desiredsong. Press ENTER to begin the playback of theselected song.
Skipping a Song
NEXT :Press to go to the next song.
PREV (Previous) :Press to return to the beginning ofthe song that is currently playing. Press PREV twice togo to the previous song.
Selecting a Play Mode
The order the songs are played can be temporarilychosen on a disc. The FOLDER play mode is thedefault. Press the REPEAT button to access the playmode options.
The play mode options are:
.Single—Play a selected song.
.Folder—Play the folder in the order the songswere recorded.
.Shuffle—Play the songs in random order, fromwithin the selected folder.
4-101
Page 294 of 616
Using the REPEAT Feature
REPEAT :Press to change between Repeat One andRepeat Folder.
.Repeat One—Repeats the song that is playing.
.Repeat Folder—Repeats the folder that isplaying.
Tips and Troubleshooting Chart
ProblemRecommended Action
IR Sensor Inoperative.Check that thebatteries are goodin the remotecontrol..Check that theremote Control IRSensor is notblocked..Aim the remotecontrol toward theIR Sensor beingcontrolled..Select the correctscreen, 3 or 4.
ProblemRecommended Action
No picture.Check that thecorrect video inputmode is selected..Check that thevideo cable isplugged into thejack securely.
No Sound.Check that thecorrect audio inputmode is selected..Check that theaudio cable issecurely pluggedinto the jack.
Cleaning the Video Screens
The video display screens are made of a speciallycoated glass and can be scratched or damaged byabrasive products, solvents, or ammonia-based windowcleaners. Clean with a soft, lint-free, cotton cloth thathas been slightly dampened with warm water. Dry thescreens by wiping with a clean dry cotton cloth.
4-102
Page 295 of 616
Cleaning the Components
Use care when touching or cleaning the componentssuch as the DVD player or the discs.
Do not use DVD lens cleaners for DVD players becausethe lens of the DVD optics can become contaminatedby lubricants.
Handle CDs and DVDs carefully. Store them in theiroriginal cases or other protective cases and away fromdirect sunlight and dust. The DVD player scans thebottom surface of the disc. If the surface of a CD orDVD is damaged, such as cracked, broken,or scratched, the CD or DVD may not play properly ornot at all. If the surface of a CD or DVD is soiled, take asoft, lint free cloth or dampen a clean, soft cloth in amild, neutral detergent solution mixed with water, andclean it. Make sure the wiping process starts from thecenter to the edge.
Do not touch the bottom side of a CD or DVD whilehandling it; this could damage the surface. Pick up CDsor DVDs by grasping the outer edges or the edge of thehole and the outer edge.
Rear Seat Audio (RSA)
Vehicles with this feature allow the rear seatpassengers to listen to and control any of the musicsources: radio, CDs, DVDs, or other auxiliary sources.The rear seat passengers can control the same musicsources the front seat passengers are listening to (dualcontrol) or a different source. For example, rear seatpassengers can listen to and control a CD through theheadphones, while the driver listens to the radio throughthe speakers. The rear seat passengers have control ofthe volume for each set of headphones.
The radio functionality is controlled by both the RSAand the front radio, only one band can be tuned to atone time. Changing the band on the RSA or the frontradio will change band on the other system.
RSA functions can be operated even when the mainradio is off.
Audio can be heard through wired headphones(not included) plugged into the jacks on the RSA.If the vehicle has this feature, audio can also beheard on Channel 2 of the wireless headphones.
The audio system allows the rear speakers to continueplaying even when the RSA audio is active through theheadphones.
4-103
Page 299 of 616
Music Navigator Screen
To enter the music navigator screen, press and release¨while on the main audio screen. While using themusic navigator screen, the track currently playingcontinues to play until the next track is selected.
To move up or down the list of tracks or folders:
.Press and releaseworxto highlight one track
or folder at a time.
.Press and holdworxto scroll through the list.
To select the highlighted track or folder press and
release¨.
To move back to the previous folder, press
and hold¨.
Radio Reception
Frequency interference and static can occur duringnormal radio reception if items such as cell phonechargers, vehicle convenience accessories, andexternal electronic devices are plugged into theaccessory power outlet. If there is interference or static,unplug the item from the accessory power outlet.
AM
The range for most AM stations is greater than for FM,especially at night. The longer range can cause stationfrequencies to interfere with each other. For better radioreception, most AM radio stations boost the powerlevels during the day, and then reduce these levelsduring the night. Static can also occur when things likestorms and power lines interfere with radio reception.When this happens, try reducing the treble on the radio.
FM Stereo
FM signals only reach about 10 to 40 miles (16 to 65 km).Although the radio has a built-in electronic circuit thatautomatically works to reduce interference, some staticcan occur, especially around tall buildings or hills,causing the sound to fade in and out.
XM™Satellite Radio Service
XM Satellite Radio Service gives digital radio receptionfrom coast-to-coast in the 48 contiguous United States,and in Canada. Just as with FM, tall buildings or hillscan interfere with satellite radio signals, causing thesound to fade in and out. In addition, traveling orstanding under heavy foliage, bridges, garages,or tunnels may cause loss of the XM signal for a periodof time.
4-107
Page 307 of 616
Language—English/Metric
To change the language of the navigation screens, seeDriver Information Center (DIC)on page 4!41for moreinformation.
To change the navigation screens from English ormetric, seeDIC Operation and Displayson page 4!41for more information.
Deleting Personal Information
This navigation system can record and store personalinformation such as names and addresses. Delete thisinformation when selling your vehicle or returning aleased vehicle. See“Edit Address Book—Edit/View”underConfigure Menuon page 5!42for deletinginformation from the address book.
Limit Features While Driving
The navigation system may have this feature.
Touch the Limit Features While Driving screen button toturn the ability to limit functions on and off while driving.When this screen button is highlighted, the followingfunctions are limited while driving:
.Music Navigator Scrolling
.Radio Category Scrolling
.Navigation Menu Scrolling and some functions
See“Category”underNavigation Audio Systemonpage 5!60for more information. See“From Map”underDestinationon page 5!24for more information.
Some functions will remain limited regardless of thesetting.
Storing Radio Station Presets
To set preset radio stations, do the following:
1. PressOto turn the system on.
2. Press the AUDIO hard key and select the desiredband (AM, FM, or XM (if equipped)).
3. Use thew(tuning) knob or the SEEK arrows to
tune to the desired station.
4. Press and hold one of the five preset screenbuttons, at the bottom of the screen, until a beep isheard or if the station displays on the selectedpreset button.
5. Repeat the steps for each preset.
See“Storing Radio Station Presets”underNavigationAudio Systemon page 5!60for more information.
5-7
Page 309 of 616
7. Select the state/province screen button, if needed,to change the current state or province. A list of allof the available states and provinces appear.Select the state or province.
8. Once a state or province has been selectedthe City name category is automatically selectedfor entry.
If five or less names are available, a list displays.If more than five are available, the List screenbutton displays a number. This number representsthe number of available cities. Select this button toview the list and select a city.
9. Once a city has been selected the Street namecategory is automatically selected for entry.
If five or less streets are available for the selectedcity, the system displays the list of streets. If morethan five streets are available the system displaysthe alpha keyboard. Start entering the street name.If five or less names are available, a list displays.If more than five are available, the List screenbutton displays a number. This button representsthe number of available streets. Select this buttonto view the list and select a street.
10. Once a street has been selected, select theHouse # screen button to enter the house number.The system displays the house number range thatis available for the street.
11. Select the Go screen button. A map screen, withthe destination marked appears.
12. Select the route preference (Fastest, Shortest,or Other). The system calculates and highlightsthe route.
13. Select the Start Guidance screen button. You arenow ready to start your route.
See“Address Entry”underDestinationon page 5!24for more information.
Entering a Point of Interest (POI)
To set a destination by entering a Point of Interest(POI), do the following:
1. If the radio is already on with a map disc inserted,skip to Step 5.
2. PressOto turn the system on.
3. Insert the DVD map disc. See“Installing the MapDVD”underMapson page 5!14for moreinformation.
4. A caution may appear. Touch the OK screen buttonto proceed.
5. Press the DEST hard key.
6. Press theiPoint of Interest screen button.
5-9
Page 310 of 616

7. Select the state/province screen button, if needed,to change the current state or province. A list of allof the available states and provinces appear.Select the state or province.
8. Enter the specific title of the POI in the POI namespace (e.g. Washington Monument).
If five or less names are available, a list displays.If more than five are available, the List screenbutton displays a number. This button representsthe number of available POIs. Select this button toview the list.
9. Select the Go screen button next to the POI.A map screen, with the destination markedappears.
10. Select the route preference (Fastest, Shortest,or Other). The system calculates and highlightsthe route.
11. Select the Start Guidance screen button. The routeis now ready to be started.
See“Point of Interest (POI)”underDestinationonpage 5!24for more information.
Storing Preset Destinations
1. If the radio is already on with a map disc inserted,skip to Step 5.
2. PressOto turn the system on.
3. Insert the DVD map disc. See“Installing theMap DVD”underMapson page 5!14for moreinformation.
4. A caution may appear. Touch the OK screen buttonto proceed.
5. Press the DEST hard key.
Enter a destination. SeeDestinationon page 5!24for more information on how to enter a destination.
6. Press the DEST hard key, the Route screendisplays. Press the Final Destination or Stopoverscreen button. The information screen displays forthat location. Press the Add to Address Bookscreen button. The address book screen appears.
7. Select the Name screen button. An alpha-keyboarddisplays. Enter the name. Select the Back screenbutton.
8. Press and hold one of the screen buttons at thebottom of the screen until the name appears in thescreen button on the display.
The name appears in that preset destinationscreen button and is now available to select fromthe Destination Entry screen. See“Using YourStored Preset Destinations”next in this section toselect it as a destination.
See“Adding or Changing Preset Destinations”underDestinationon page 5!24for moreinformation on how to add preset destinations.
5-10