light CADILLAC ESCALADE 2010 3.G Repair Manual
[x] Cancel search | Manufacturer: CADILLAC, Model Year: 2010, Model line: ESCALADE, Model: CADILLAC ESCALADE 2010 3.GPages: 616, PDF Size: 39.41 MB
Page 212 of 616
Ashtray(s) and Cigarette Lighter
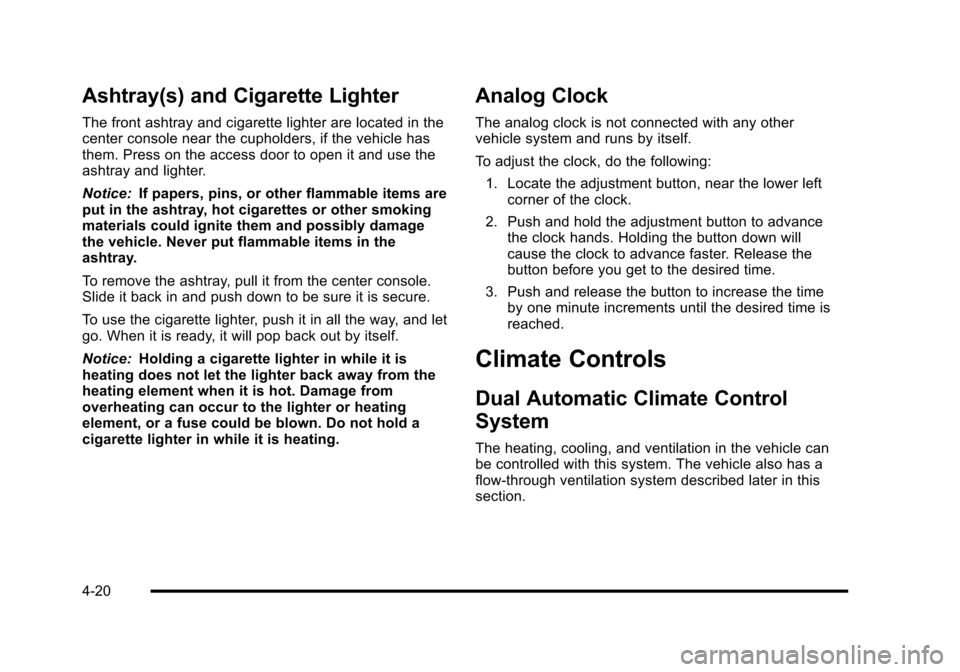
The front ashtray and cigarette lighter are located in thecenter console near the cupholders, if the vehicle hasthem. Press on the access door to open it and use theashtray and lighter.
Notice:If papers, pins, or other flammable items areput in the ashtray, hot cigarettes or other smokingmaterials could ignite them and possibly damagethe vehicle. Never put flammable items in theashtray.
To remove the ashtray, pull it from the center console.Slide it back in and push down to be sure it is secure.
To use the cigarette lighter, push it in all the way, and letgo. When it is ready, it will pop back out by itself.
Notice:Holding a cigarette lighter in while it isheating does not let the lighter back away from theheating element when it is hot. Damage fromoverheating can occur to the lighter or heatingelement, or a fuse could be blown. Do not hold acigarette lighter in while it is heating.
Analog Clock
The analog clock is not connected with any othervehicle system and runs by itself.
To adjust the clock, do the following:
1. Locate the adjustment button, near the lower leftcorner of the clock.
2. Push and hold the adjustment button to advancethe clock hands. Holding the button down willcause the clock to advance faster. Release thebutton before you get to the desired time.
3. Push and release the button to increase the timeby one minute increments until the desired time isreached.
Climate Controls
Dual Automatic Climate Control
System
The heating, cooling, and ventilation in the vehicle canbe controlled with this system. The vehicle also has aflow-through ventilation system described later in thissection.
4-20
Page 214 of 616
Automatic Operation
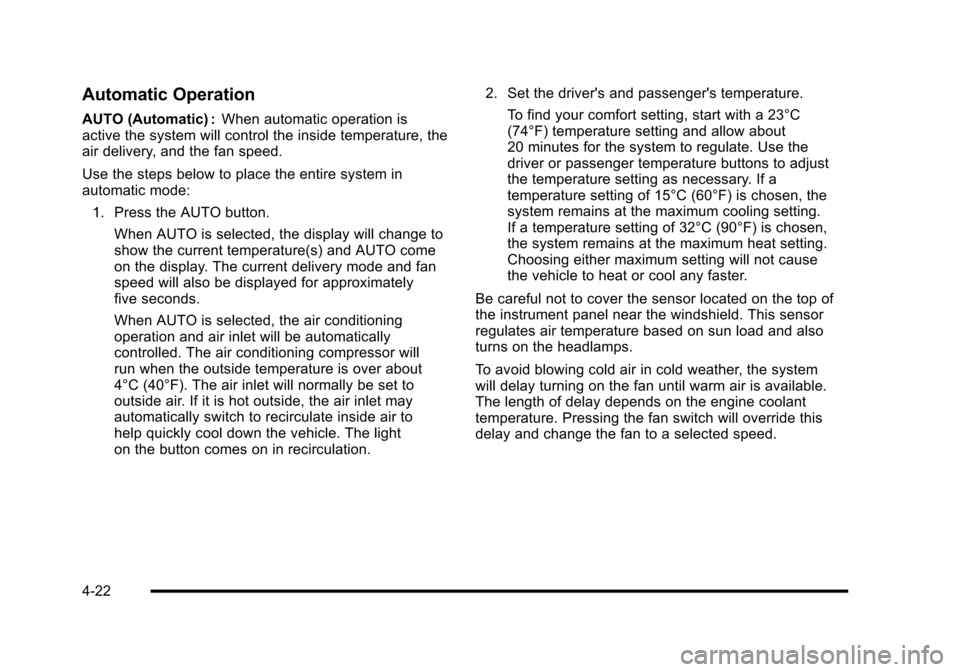
AUTO (Automatic) :When automatic operation isactive the system will control the inside temperature, theair delivery, and the fan speed.
Use the steps below to place the entire system inautomatic mode:
1. Press the AUTO button.
When AUTO is selected, the display will change toshow the current temperature(s) and AUTO comeon the display. The current delivery mode and fanspeed will also be displayed for approximatelyfive seconds.
When AUTO is selected, the air conditioningoperation and air inlet will be automaticallycontrolled. The air conditioning compressor willrun when the outside temperature is over about4°C (40°F). The air inlet will normally be set tooutside air. If it is hot outside, the air inlet mayautomatically switch to recirculate inside air tohelp quickly cool down the vehicle. The lighton the button comes on in recirculation.
2. Set the driver's and passenger's temperature.
To find your comfort setting, start with a 23°C(74°F) temperature setting and allow about20 minutes for the system to regulate. Use thedriver or passenger temperature buttons to adjustthe temperature setting as necessary. If atemperature setting of 15°C (60°F) is chosen, thesystem remains at the maximum cooling setting.If a temperature setting of 32°C (90°F) is chosen,the system remains at the maximum heat setting.Choosing either maximum setting will not causethe vehicle to heat or cool any faster.
Be careful not to cover the sensor located on the top ofthe instrument panel near the windshield. This sensorregulates air temperature based on sun load and alsoturns on the headlamps.
To avoid blowing cold air in cold weather, the systemwill delay turning on the fan until warm air is available.The length of delay depends on the engine coolanttemperature. Pressing the fan switch will override thisdelay and change the fan to a selected speed.
4-22
Page 215 of 616
Manual Operation
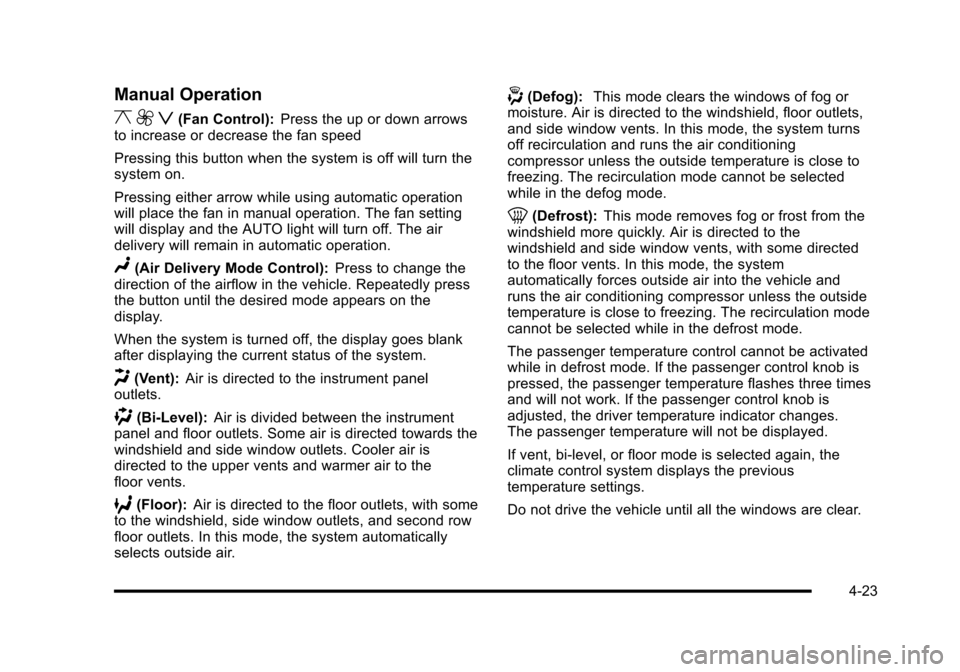
y9z(Fan Control):Press the up or down arrowsto increase or decrease the fan speed
Pressing this button when the system is off will turn thesystem on.
Pressing either arrow while using automatic operationwill place the fan in manual operation. The fan settingwill display and the AUTO light will turn off. The airdelivery will remain in automatic operation.
N(Air Delivery Mode Control):Press to change thedirection of the airflow in the vehicle. Repeatedly pressthe button until the desired mode appears on thedisplay.
When the system is turned off, the display goes blankafter displaying the current status of the system.
H(Vent):Air is directed to the instrument paneloutlets.
)(Bi-Level):Air is divided between the instrumentpanel and floor outlets. Some air is directed towards thewindshield and side window outlets. Cooler air isdirected to the upper vents and warmer air to thefloor vents.
6(Floor):Air is directed to the floor outlets, with someto the windshield, side window outlets, and second rowfloor outlets. In this mode, the system automaticallyselects outside air.
-(Defog):This mode clears the windows of fog ormoisture. Air is directed to the windshield, floor outlets,and side window vents. In this mode, the system turnsoff recirculation and runs the air conditioningcompressor unless the outside temperature is close tofreezing. The recirculation mode cannot be selectedwhile in the defog mode.
0(Defrost):This mode removes fog or frost from thewindshield more quickly. Air is directed to thewindshield and side window vents, with some directedto the floor vents. In this mode, the systemautomatically forces outside air into the vehicle andruns the air conditioning compressor unless the outsidetemperature is close to freezing. The recirculation modecannot be selected while in the defrost mode.
The passenger temperature control cannot be activatedwhile in defrost mode. If the passenger control knob ispressed, the passenger temperature flashes three timesand will not work. If the passenger control knob isadjusted, the driver temperature indicator changes.The passenger temperature will not be displayed.
If vent, bi-level, or floor mode is selected again, theclimate control system displays the previoustemperature settings.
Do not drive the vehicle until all the windows are clear.
4-23
Page 216 of 616

#(Air Conditioning):Press to turn the airconditioning (A/C) compressor on and off. An indicatorlight comes on to show that the air conditioning is on.
Pressing this button when the outside temperatureis too cool for air conditioning will make the airconditioning indicator flash three times and then turn offindicating the air conditioning mode is not available.If the air conditioning is on and the outside temperaturedrops below a temperature which is too cool for airconditioning to be effective, the air conditioning lightturns off to show that the air conditioning mode hasbeen canceled.
On hot days, open the windows long enough to let hotinside air escape. This helps to reduce the time it takesfor the vehicle to cool down. It also helps the system tooperate more efficiently.
The air conditioning system removes moisture from theair, so a small amount of water might drip under thevehicle while idling or after turning off the engine.This is normal.
@(Recirculation):Press to turn the recirculationmode on or off. An indicator light comes on to show thatthe recirculation is on.
This mode recirculates and helps to quickly cool the airinside the vehicle. It can be used to help preventoutside air and odors from entering the vehicle.
The recirculation mode cannot be used with floor, defog,or defrost modes. If recirculation is selected with one ofthose modes, the indicator light flashes three times andthen turns off. The air conditioning compressor alsocomes on when this mode is activated. While inrecirculation mode the windows may fog when theweather is cold and damp. To clear the fog, select eitherthe defog or defrost mode and increase the fan speed.
The recirculation mode can also be turned off by turningoff the ignition.
REAR :For vehicles with the rear heating and airconditioning controls. Press the REAR button to turn therear climate control system on or off. SeeRear AirConditioning and Heating System and ElectronicClimate Controls on page 4!26.
4-24
Page 219 of 616

Automatic Operation, If Equipped.
AUTO :Press the air delivery mode button until thissetting is selected to control the inside temperature, airdelivery, and fan speed. AUTO appears in the displaywhen automatic operation is active.
+/!(Increase/Decrease Temperature) :Pressthe + or!buttons to increase or decrease the cabintemperature. The rear control temperature display willshow the temperature setting increasing or decreasing.
The display only indicates climate control functionswhen the system is in rear independent mode.
Manual Operation
DC(Fan Control):Press these buttons on the rearseat audio control panel to increase or decrease theairflow. Pressing the fan up button when the system isoff will turn the system on. The air delivery mode willremain under automatic control.
+/!(Temperature Control) :Press these buttons toadjust the temperature of the air flowing into thepassenger area. Press the + button for warmer air andpress the!button for cooler air.
N(Air Delivery Mode Control):Press the modebutton to change the direction of the airflow in thevehicle. Repeatedly press the button until the desiredmode appears on the display. Multiple presses will cyclethrough the delivery selections.
Warning Lights, Gages, and
Indicators
Warning lights and gages can signal that something iswrong before it becomes serious enough to cause anexpensive repair or replacement. Paying attention to thewarning lights and gages could prevent injury.
Warning lights come on when there might be or there isa problem with one of the vehicle's functions. Somewarning lights come on briefly when the engine isstarted to indicate they are working.
Gages can indicate when there might be or there is aproblem with one of the vehicle's functions. Often gagesand warning lights work together to indicate a problemwith the vehicle.
When one of the warning lights comes on and stays onwhile driving, or when one of the gages shows therecould be a problem, check the section that explainswhat to do. Follow this manual's advice. Waiting to dorepairs can be costly and even dangerous.
4-27
Page 221 of 616

Speedometer and Odometer
The speedometer shows the vehicle's speed in bothkilometers per hour (km/h) and miles per hour (mph).
The vehicle's odometer works together with the DriverInformation Center (DIC). The Trip odometer can be set.See“Trip Odometer”underDIC Operation and Displayson page 4!41for more information.
To check the odometer mileage while the vehicle is notrunning, press the trip stem on the instrument panelcluster.
If the vehicle ever needs a new odometer installed, thenew one will be set to the correct mileage total of theold odometer.
Trip Odometer
The trip odometer can show how far the vehicle hasbeen driven since the trip odometer was last set to zero.
For more information see“Trip Odometer”underDICOperation and Displays on page 4!41.
Tachometer
The tachometer displays the engine speed inrevolutions per minute (rpm).
Safety Belt Reminders
Driver Safety Belt Reminder Light
When the engine is started, a chime sounds for severalseconds to remind a driver to fasten the safety belt,unless the driver safety belt is already buckled.
The safety belt lightflashes for severalseconds, then comes onsolid for several more.
This chime and light sequence are repeated if the driverremains unbuckled and the vehicle is in motion. If thedriver safety belt is already buckled, neither the chimenor the light comes on.
4-29
Page 222 of 616

Passenger Safety Belt Reminder Light
For vehicles equipped with the passenger safety beltreminder light, several seconds after the engine isstarted, a chime sounds for several seconds to remindthe front passenger to buckle their safety belt. Thepassenger safety belt light, located on the overheadconsole, comes on and stays on for several seconds,flashes for several more seconds and then comes onsolid for several more.
This chime and lightsequence is repeated ifthe passenger remainsunbuckled and the vehicleis in motion.
If the passenger safety belt is buckled, neither thechime nor the light comes on.
The front passenger safety belt warning light and chimemay turn on if an object is put on the seat such as abriefcase, handbag, grocery bag, laptop or otherelectronic device. To turn off the warning light and orchime, remove the object from the seat or buckle thesafety belt.
Airbag Readiness Light
The system checks the airbag's electrical system forpossible malfunctions. If the light stays on it indicatesthere is an electrical problem. The system checkincludes the airbag sensor, the pretensioners, theairbag modules, the wiring and the crash sensing anddiagnostic module. For more information on the airbagsystem, seeAirbag System on page 2!74.
The airbag readiness lightcomes on solid for a fewseconds when the engineis started. If the light doesnot come on then, have itfixed immediately.
4-30
Page 223 of 616
{WARNING:
If the airbag readiness light stays on after the
vehicle is started or comes on while driving, it
means the airbag system might not be working
properly. The airbags in the vehicle might not
inflate in a crash, or they could even inflate
without a crash. To help avoid injury, have the
vehicle serviced right away.
If there is a problem with the airbag system, an airbagDriver Information Center (DIC) message can alsocome on. SeeDIC Warnings and Messagesonpage 4!48for more information.
Passenger Airbag Status Indicator
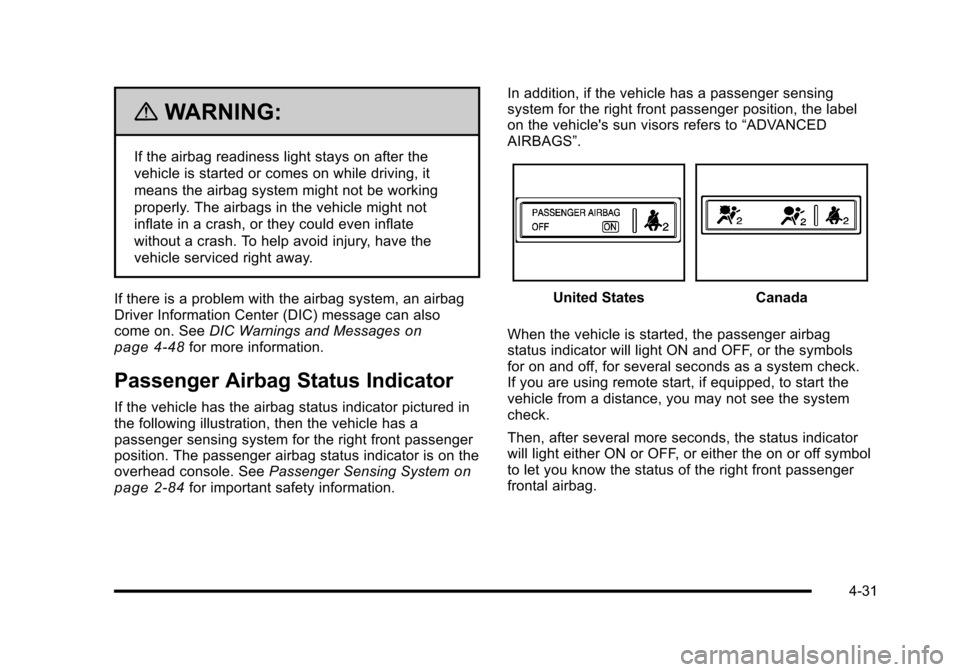
If the vehicle has the airbag status indicator pictured inthe following illustration, then the vehicle has apassenger sensing system for the right front passengerposition. The passenger airbag status indicator is on theoverhead console. SeePassenger Sensing Systemonpage 2!84for important safety information.
In addition, if the vehicle has a passenger sensingsystem for the right front passenger position, the labelon the vehicle's sun visors refers to“ADVANCEDAIRBAGS”.
United StatesCanada
When the vehicle is started, the passenger airbagstatus indicator will light ON and OFF, or the symbolsfor on and off, for several seconds as a system check.If you are using remote start, if equipped, to start thevehicle from a distance, you may not see the systemcheck.
Then, after several more seconds, the status indicatorwill light either ON or OFF, or either the on or off symbolto let you know the status of the right front passengerfrontal airbag.
4-31
Page 224 of 616

If the word ON or the on symbol is lit on the passengerairbag status indicator, it means that the right frontpassenger frontal airbag is enabled (may inflate).
If the word OFF or the off symbol is lit on the airbagstatus indicator, it means that the passenger sensingsystem has turned off the right front passenger frontalairbag.
If, after several seconds, both status indicator lightsremain on, or if there are no lights at all, there may be aproblem with the lights or the passenger sensingsystem. See your dealer/retailer for service.
{WARNING:
If the airbag readiness light ever comes on and
stays on, it means that something may be wrong
with the airbag system. To help avoid injury to
yourself or others, have the vehicle serviced right
away. SeeAirbag Readiness Lighton page 4!30
for more information, including important safety
information.
Charging System Light
This light comes on brieflywhen the ignition key isturned to START, but theengine is not running, asa check to show it isworking.
If it does not, have the vehicle serviced by your dealer/retailer.
The light should go out once the engine starts. If it stayson, or comes on while driving, there could be a problemwith the charging system. A charging system messagein the Driver Information Center (DIC) can also appear.SeeDIC Warnings and Messageson page 4!48formore information. This light could indicate that there areproblems with a generator drive belt, or that there is anelectrical problem. Have it checked right away. If thevehicle must be driven a short distance with the light on,turn off accessories, such as the radio and airconditioner.
4-32
Page 225 of 616
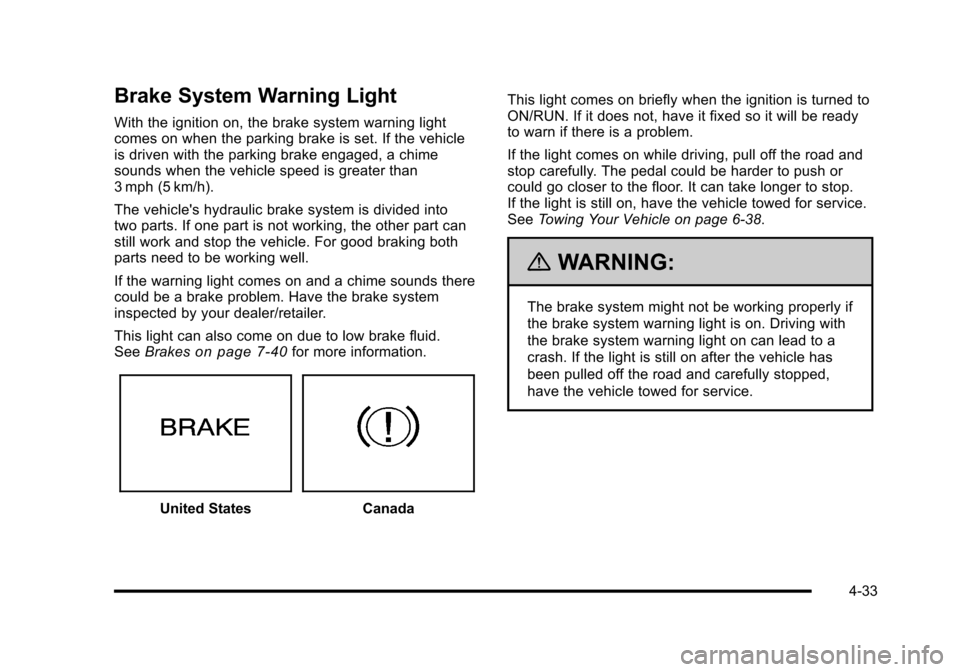
Brake System Warning Light
With the ignition on, the brake system warning lightcomes on when the parking brake is set. If the vehicleis driven with the parking brake engaged, a chimesounds when the vehicle speed is greater than3 mph (5 km/h).
The vehicle's hydraulic brake system is divided intotwo parts. If one part is not working, the other part canstill work and stop the vehicle. For good braking bothparts need to be working well.
If the warning light comes on and a chime sounds therecould be a brake problem. Have the brake systeminspected by your dealer/retailer.
This light can also come on due to low brake fluid.SeeBrakeson page 7!40for more information.
United StatesCanada
This light comes on briefly when the ignition is turned toON/RUN. If it does not, have it fixed so it will be readyto warn if there is a problem.
If the light comes on while driving, pull off the road andstop carefully. The pedal could be harder to push orcould go closer to the floor. It can take longer to stop.If the light is still on, have the vehicle towed for service.SeeTowing Your Vehicle on page 6!38.
{WARNING:
The brake system might not be working properly if
the brake system warning light is on. Driving with
the brake system warning light on can lead to a
crash. If the light is still on after the vehicle has
been pulled off the road and carefully stopped,
have the vehicle towed for service.
4-33