light CADILLAC ESCALADE 2010 3.G Owners Manual
[x] Cancel search | Manufacturer: CADILLAC, Model Year: 2010, Model line: ESCALADE, Model: CADILLAC ESCALADE 2010 3.GPages: 616, PDF Size: 39.41 MB
Page 445 of 616
Electric Brake Control Wiring
Provisions
These wiring provisions are included with the vehicle aspart of the trailer wiring package. These provisions arefor an electric brake controller. The instrument panelcontains blunt cut wires near the data link connector forthe trailer brake controller. The harness contains thefollowing wires:
.Dark Blue: Brake Signal to Trailer Connector
.Red/Black: Battery
.Light Blue/White: Brake Switch
.White: Ground
It should be installed by your dealer/retailer or aqualified service center.
Trailer Recommendations
Subtract the hitch loads from the Cargo Weight Rating(CWR). CWR is the maximum weight of the load thevehicle can carry. It does not include the weight of thepeople inside, but you can figure about 150 lbs. (68 kg)for each passenger. The total cargo load must not bemore than the vehicles CWR.
Weigh the vehicle with the trailer attached, so theGVWR or GAWR are not exceeded. If using aweight-distributing hitch, weigh the vehicle without thespring bars in place.
The best performance is obtained by correctlyspreading out the weight of the load and choosing thecorrect hitch and trailer brakes.
For more information seeTowing a Traileronpage 6!42.
6-55
Page 447 of 616
Section 7 Service and Appearance Care
Service. . . . . . . . . . . . . . . . . . . . . . . . . . . . . . . . . . . . . . . . . . . . . 7-4Accessories and Modifications . . . . . . . . . . . . . . . . . . 7-4California Proposition 65 Warning . . . . . . . . . . . . . . . 7-5California Perchlorate MaterialsRequirements . . . . . . . . . . . . . . . . . . . . . . . . . . . . . . . . . 7-5Doing Your Own Service Work . . . . . . . . . . . . . . . . . . 7-6Adding Equipment to the Outside of theVehicle . . . . . . . . . . . . . . . . . . . . . . . . . . . . . . . . . . . . . . . . 7-6
Fuel. . . . . . . . . . . . . . . . . . . . . . . . . . . . . . . . . . . . . . . . . . . . . . . . . 7-7Gasoline Octane . . . . . . . . . . . . . . . . . . . . . . . . . . . . . . . . 7-8Gasoline Specifications . . . . . . . . . . . . . . . . . . . . . . . . . 7-8California Fuel . . . . . . . . . . . . . . . . . . . . . . . . . . . . . . . . . . 7-8Additives . . . . . . . . . . . . . . . . . . . . . . . . . . . . . . . . . . . . . . . . 7-9Fuel E85 (85% Ethanol) . . . . . . . . . . . . . . . . . . . . . . . . . 7-9Fuels in Foreign Countries . . . . . . . . . . . . . . . . . . . . . 7-10Filling the Tank . . . . . . . . . . . . . . . . . . . . . . . . . . . . . . . . . 7-11Filling a Portable Fuel Container . . . . . . . . . . . . . . . 7-13
Checking Things Under the Hood. . . . . . . . . . . . . . . 7-14Hood Release . . . . . . . . . . . . . . . . . . . . . . . . . . . . . . . . . 7-15Engine Compartment Overview . . . . . . . . . . . . . . . . 7-16Engine Oil . . . . . . . . . . . . . . . . . . . . . . . . . . . . . . . . . . . . . 7-17Engine Oil Life System . . . . . . . . . . . . . . . . . . . . . . . . 7-20Engine Air Cleaner/Filter . . . . . . . . . . . . . . . . . . . . . . . 7-22
Automatic Transmission Fluid . . . . . . . . . . . . . . . . . . 7-24Cooling System . . . . . . . . . . . . . . . . . . . . . . . . . . . . . . . . 7-28Engine Coolant . . . . . . . . . . . . . . . . . . . . . . . . . . . . . . . . 7-29Engine Overheating . . . . . . . . . . . . . . . . . . . . . . . . . . . 7-34Overheated Engine ProtectionOperating Mode . . . . . . . . . . . . . . . . . . . . . . . . . . . . . 7-37Engine Fan Noise . . . . . . . . . . . . . . . . . . . . . . . . . . . . . 7-37Power Steering Fluid . . . . . . . . . . . . . . . . . . . . . . . . . . 7-38Windshield Washer Fluid . . . . . . . . . . . . . . . . . . . . . . 7-39Brakes . . . . . . . . . . . . . . . . . . . . . . . . . . . . . . . . . . . . . . . . . 7-40Battery . . . . . . . . . . . . . . . . . . . . . . . . . . . . . . . . . . . . . . . . . 7-43Jump Starting . . . . . . . . . . . . . . . . . . . . . . . . . . . . . . . . . . 7-44
All-Wheel Drive. . . . . . . . . . . . . . . . . . . . . . . . . . . . . . . . . . . 7-49
Rear Axle. . . . . . . . . . . . . . . . . . . . . . . . . . . . . . . . . . . . . . . . . 7-50
Front Axle. . . . . . . . . . . . . . . . . . . . . . . . . . . . . . . . . . . . . . . . . 7-51
Headlamp Aiming. . . . . . . . . . . . . . . . . . . . . . . . . . . . . . . . 7-52
Bulb Replacement. . . . . . . . . . . . . . . . . . . . . . . . . . . . . . . . 7-54High Intensity Discharge (HID) Lighting . . . . . . . . 7-54LED Lighting . . . . . . . . . . . . . . . . . . . . . . . . . . . . . . . . . . . 7-55Back-Up Lamps . . . . . . . . . . . . . . . . . . . . . . . . . . . . . . . 7-55License Plate Lamp . . . . . . . . . . . . . . . . . . . . . . . . . . . . 7-56Replacement Bulbs . . . . . . . . . . . . . . . . . . . . . . . . . . . . 7-56
7-1
Page 454 of 616

Gasoline Octane
If the vehicle has the 6.0L V8 engine (VIN Code J), useregular unleaded gasoline with a posted octane ratingof 87 or higher. If the octane rating is less than 87, anaudible knocking noise, commonly referred to as sparkknock, might be heard when driving. If this occurs, usea gasoline rated at 87 octane or higher as soon aspossible. If heavy knocking is heard when usinggasoline rated at 87 octane or higher, the engineneeds service.
If the vehicle has the 6.2L V8 engine (VIN Code F), usepremium unleaded gasoline with a posted octane ratingof 91 or higher. You can also use regular unleadedgasoline rated at 87 octane or higher, but the vehicle'sacceleration could be slightly reduced, and a slightaudible knocking noise, commonly referred to as sparkknock, might be heard. If the octane is less than 87, youmight notice a heavy knocking noise when you drive.If this occurs, use a gasoline rated at 87 octane orhigher as soon as possible. Otherwise, you coulddamage the engine. If heavy knocking is heard whenusing gasoline rated at 87 octane or higher, the engineneeds service.
Gasoline Specifications
At a minimum, gasoline should meet ASTMspecification D 4814 in the United States orCAN/CGSB!3.5 or 3.511 in Canada. Some gasolinescontain an octane-enhancing additive calledmethylcyclopentadienyl manganese tricarbonyl (MMT).We recommend against the use of gasolines containingMMT. SeeAdditiveso n p a g e 7!9for additionalinformation.
California Fuel
If the vehicle is certified to meet California EmissionsStandards, it is designed to operate on fuels that meetCalifornia specifications. See the underhood emissioncontrol label. If this fuel is not available in statesadopting California emissions standards, the vehiclewill operate satisfactorily on fuels meeting federalspecifications, but emission control system performancemight be affected. The malfunction indicator lamp couldturn on and the vehicle might fail a smog!check test.SeeMalfunction Indicator Lampon page 4!36. If thisoccurs, return to your authorized dealer/retailer fordiagnosis. If it is determined that the condition is causedby the type of fuel used, repairs might not be coveredby the vehicle warranty.
7-8
Page 459 of 616
If the vehicle has a Driver Information Center (DIC), theTIGHTEN GAS CAP message displays if the fuel cap isnot properly installed.
{WARNING:
If a fire starts while you are refueling, do not
remove the nozzle. Shut off the flow of fuel by
shutting off the pump or by notifying the station
attendant. Leave the area immediately.
Notice:If you need a new fuel cap, be sure to getthe right type. Your dealer/retailer can get one foryou. If you get the wrong type, it may not fitproperly. This may cause the malfunction indicatorlamp to light and may damage the fuel tank andemissions system. SeeMalfunction Indicator Lampon page 4!36.
Filling a Portable Fuel Container
{WARNING:
Never fill a portable fuel container while it is in
the vehicle. Static electricity discharge from the
container can ignite the fuel vapor. You can be
badly burned and the vehicle damaged if this
occurs. To help avoid injury to you and others:
.Dispense fuel only into approved containers.
.Do not fill a container while it is inside a
vehicle, in a vehicle's trunk, pickup bed,
or on any surface other than the ground.
.Bring the fill nozzle in contact with the inside
of the fill opening before operating the nozzle.
Contact should be maintained until the filling
is complete.
.Do not smoke while pumping fuel.
.Do not use a cellular phone while
pumping fuel.
7-13
Page 468 of 616
Engine Air Cleaner/Filter
SeeEngine Compartment Overviewon page 7!16forthe location of the engine air cleaner/filter.
Inspect the air cleaner/filter every other oil change andreplace it at the first oil change after each 50,000 mile(80 000 km) interval. SeeScheduled Maintenanceonp a g e 8!3for more information. If driving on dusty/dirtyconditions, inspect the filter at each engine oil change.
How to Inspect the Engine Air Cleaner/
Filter
To inspect the air cleaner/filter, remove the engine aircleaner/filter from the vehicle by following Steps 1through 6. When the engine air cleaner/filter isremoved, lightly shake it to release loose dust and dirt.If the engine air cleaner/filter remains caked with dirt, anew filter is required. Never use compressed air toclean the filter.
Replacing the Engine Air Cleaner/Filter
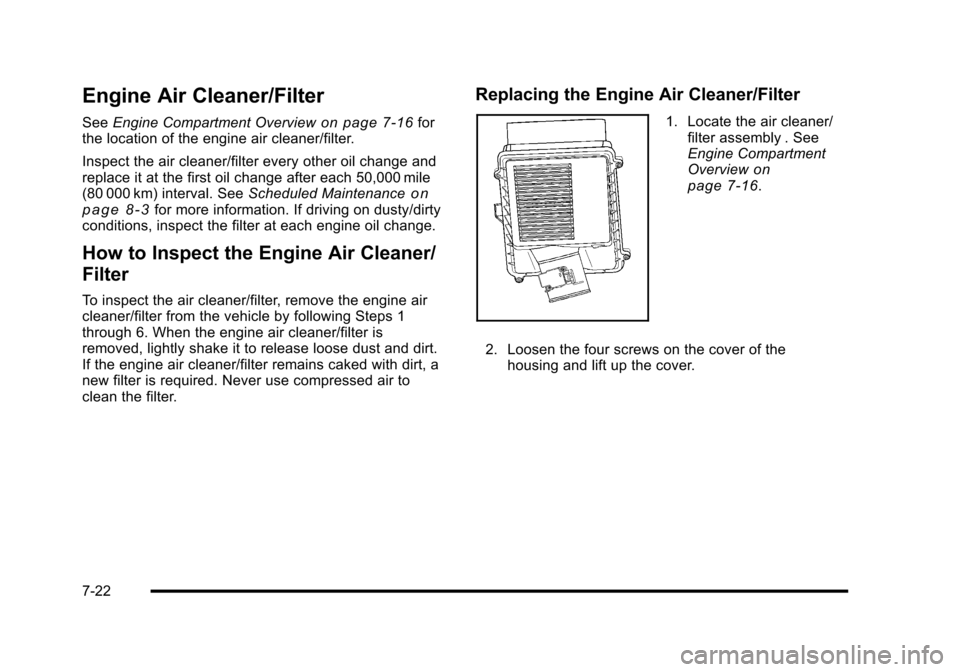
1. Locate the air cleaner/filter assembly . SeeEngine CompartmentOverviewonpage 7!16.
2. Loosen the four screws on the cover of thehousing and lift up the cover.
7-22
Page 486 of 616

Brakes
Brake Fluid
The brake master cylinderreservoir is filled with DOT3 brake fluid. SeeEngineCompartment Overviewon page 7!16for thelocation of the reservoir.
There are only two reasons why the brake fluid level inthe reservoir might go down:
.The brake fluid level goes down because ofnormal brake lining wear. When new linings areinstalled, the fluid level goes back up.
.A fluid leak in the brake hydraulic system can alsocause a low fluid level. Have the brake hydraulicsystem fixed, since a leak means that sooner orlater the brakes will not work well.
Do not top off the brake fluid. Adding fluid does notcorrect a leak. If fluid is added when the linings areworn, there will be too much fluid when new brakelinings are installed. Add or remove brake fluid, asnecessary, only when work is done on the brakehydraulic system.
{WARNING:
If too much brake fluid is added, it can spill on the
engine and burn, if the engine is hot enough. You
or others could be burned, and the vehicle could
be damaged. Add brake fluid only when work is
done on the brake hydraulic system. See
“Checking Brake Fluid”in this section.
When the brake fluid falls to a low level, the brakewarning light comes on. SeeBrake System WarningLight on page 4!33.
Refer to the Maintenance Schedule to determine whento check the brake fluid. SeeScheduled Maintenanceo n p a g e 8!3.
7-40
Page 488 of 616
Brake Wear
This vehicle has disc brakes. Disc brake pads havebuilt-in wear indicators that make a high-pitchedwarning sound when the brake pads are worn and newpads are needed. The sound can come and go or beheard all the time the vehicle is moving, except whenapplying the brake pedal firmly.
{WARNING:
The brake wear warning sound means that soon
the brakes will not work well. That could lead to
an accident. When the brake wear warning sound
is heard, have the vehicle serviced.
Notice:Continuing to drive with worn-out brakepads could result in costly brake repair.
Some driving conditions or climates can cause a brakesqueal when the brakes are first applied or lightlyapplied. This does not mean something is wrong withthe brakes.
Properly torqued wheel nuts are necessary to helpprevent brake pulsation. When tires are rotated, inspectbrake pads for wear and evenly tighten wheel nuts inthe proper sequence to torque specifications inCapacities and Specifications on page 7!115.
Brake linings should always be replaced as completeaxle sets.
Brake Pedal Travel
See your dealer/retailer if the brake pedal does notreturn to normal height, or if there is a rapid increase inpedal travel. This could be a sign that brake servicemight be required.
Brake Adjustment
Every brake stop, the disc brakes adjust for wear.
7-42
Page 491 of 616
Notice:Ignoring these steps could result in costlydamage to the vehicle that would not be covered bythe warranty.
Trying to start the vehicle by pushing or pulling itwill not work, and it could damage the vehicle.
1. Check the other vehicle. It must have a 12-voltbattery with a negative ground system.
Notice:If the other vehicle's system is not a 12-voltsystem with a negative ground, both vehicles canbe damaged. Only use vehicles with 12-volt systemswith negative grounds to jump start your vehicle.
2. Get the vehicles close enough so the jumpercables can reach, but be sure the vehicles are nottouching each other. If they are, it could cause aground connection you do not want. You would notbe able to start your vehicle, and the badgrounding could damage the electrical systems.
To avoid the possibility of the vehicles rolling, setthe parking brake firmly on both vehicles involvedin the jump start procedure. Put the automatictransmission in P (Park) or a manual transmissionin Neutral before setting the parking brake. If youhave a four-wheel-drive vehicle, be sure thetransfer case is in a drive gear, not in Neutral.
Notice:If you leave the radio or other accessorieson during the jump starting procedure, they couldbe damaged. The repairs would not be covered bythe warranty. Always turn off the radio and otheraccessories when jump starting the vehicle.
3. Turn off the ignition on both vehicles. Unplugunnecessary accessories plugged into thecigarette lighter or the accessory power outlets.Turn off the radio and all the lamps that are notneeded. This avoids sparks and helps save bothbatteries. And it could save the radio!
4. Open the hood on the other vehicle and locate thepositive (+) and negative (!) terminal locations onthat vehicle.
Your vehicle has a remote positive (+) jump startingterminal and a remote negative (!) jump startingterminal. You should always use these remoteterminals instead of the terminals on the battery.
If the vehicle has a remote positive (+) terminal, itis located under a red plastic cover at the positivebattery post. To uncover the remote positive (+)terminal, open the red plastic cover.
7-45
Page 492 of 616
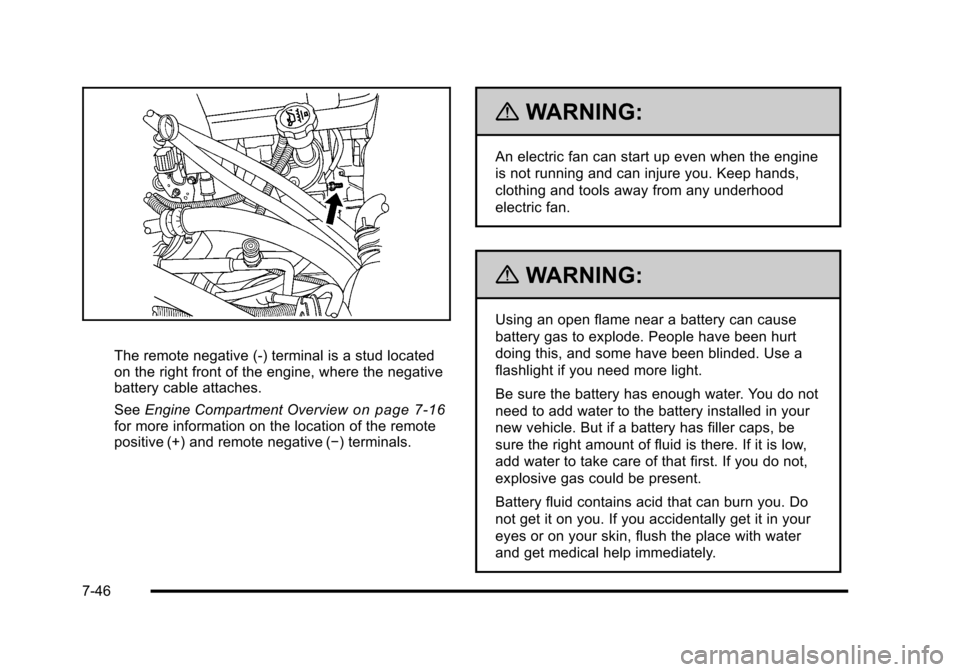
The remote negative (-) terminal is a stud locatedon the right front of the engine, where the negativebattery cable attaches.
SeeEngine Compartment Overviewon page 7!16for more information on the location of the remotepositive (+) and remote negative (!) terminals.
{WARNING:
An electric fan can start up even when the engine
is not running and can injure you. Keep hands,
clothing and tools away from any underhood
electric fan.
{WARNING:
Using an open flame near a battery can cause
battery gas to explode. People have been hurt
doing this, and some have been blinded. Use a
flashlight if you need more light.
Be sure the battery has enough water. You do not
need to add water to the battery installed in your
new vehicle. But if a battery has filler caps, be
sure the right amount of fluid is there. If it is low,
add water to take care of that first. If you do not,
explosive gas could be present.
Battery fluid contains acid that can burn you. Do
not get it on you. If you accidentally get it in your
eyes or on your skin, flush the place with water
and get medical help immediately.
7-46
Page 498 of 616
Headlamp Aiming
The vehicle has a visual optical headlamp aimingsystem. The aim of the headlamps have been preset atthe factory and should need no further adjustment.
However, if the vehicle is damaged in a crash, the aimof the headlamps may be affected and adjustment maybe necessary.
If oncoming vehicles flash their high beams at you, thismay mean the vertical aim of your headlamps needs tobe adjusted.
It is recommended that the vehicle is taken to yourdealer/retailer for service if the headlamps need to beadjusted. It is possible however, to re-aim theheadlamps as described.
The vehicle should:
.Be placed so the headlamps are 25 ft. (7.6 m) froma light colored wall or other flat surface.
.Have all four tires on a level surface which is levelall the way to the wall or other flat surface.
.Be placed so it is perpendicular to the wall or otherflat surface.
.Not have any snow, ice, or mud on it.
.Be fully assembled and all other work stoppedwhile headlamp aiming is being performed.
.Be normally loaded with a full tank of fuel and oneperson or 160 lbs (75 kg) sitting on the driver seat.
.Have the tires properly inflated.
.Have the spare tire is in its proper location in thevehicle.
Headlamp aiming is done with the vehicle's low-beamheadlamps. The high-beam headlamps will be correctlyaimed if the low-beam headlamps are aimed properly.
To adjust the vertical aim:
1. Open the hood. SeeHood Releaseon page 7!15for more information.
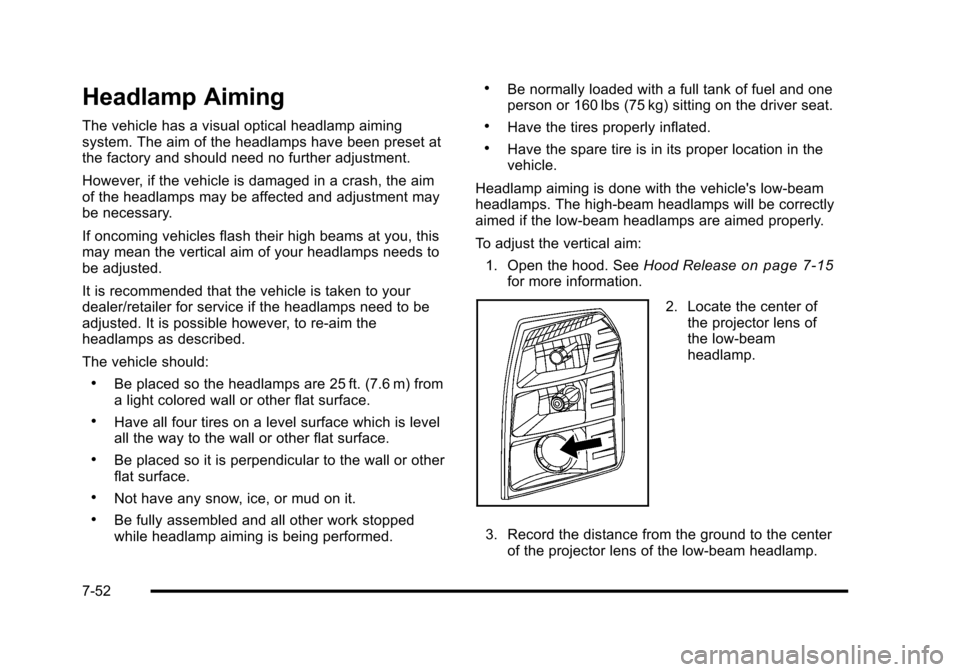
2. Locate the center ofthe projector lens ofthe low!beamheadlamp.
3. Record the distance from the ground to the centerof the projector lens of the low!beam headlamp.
7-52