CADILLAC ESCALADE 2010 3.G Owners Manual
Manufacturer: CADILLAC, Model Year: 2010, Model line: ESCALADE, Model: CADILLAC ESCALADE 2010 3.GPages: 616, PDF Size: 39.41 MB
Page 211 of 616
Accessory Power Outlet(s)
The accessory power outlets let you plug in auxiliaryelectrical equipment, such as a cellular telephone.
The vehicle has three accessory power outlets located:
.Inside the floor console storage bin.
.On the rear of the floor console.
.In the rear cargo area on the passenger side.
To use an accessory power outlet, remove theprotective cap. When not in use, always cover theaccessory power outlet with the protective cap.
Certain power accessory plugs may not be compatibleto the accessory power outlet and could result in blownadapter or vehicle fuses. If you experience a problem,see your dealer/retailer for additional information on theaccessory power plugs.
The accessory power outlets are powered, even whenthe ignition is in LOCK/OFF. Continuing to use poweroutlets while the ignition is in LOCK/OFF may cause thevehicle's battery to run down.
Notice:Adding any electrical equipment to thevehicle can damage it or keep other componentsfrom working as they should. The repairs would notbe covered by the vehicle warranty. Do not useequipment exceeding maximum amperage rating of20 amperes. Check with your dealer/retailer beforeadding electrical equipment.
When adding electrical equipment, be sure to followthe proper installation instructions included with theequipment. Do not use equipment exceeding themaximum amperage rating of 20 amperes.
Notice:Improper use of the power outlet can causedamage not covered by the vehicle warranty. Do nothang any type of accessory or accessory bracketfrom the plug because the power outlets aredesigned for accessory power plugs only.
4-19
Page 212 of 616
Ashtray(s) and Cigarette Lighter
The front ashtray and cigarette lighter are located in thecenter console near the cupholders, if the vehicle hasthem. Press on the access door to open it and use theashtray and lighter.
Notice:If papers, pins, or other flammable items areput in the ashtray, hot cigarettes or other smokingmaterials could ignite them and possibly damagethe vehicle. Never put flammable items in theashtray.
To remove the ashtray, pull it from the center console.Slide it back in and push down to be sure it is secure.
To use the cigarette lighter, push it in all the way, and letgo. When it is ready, it will pop back out by itself.
Notice:Holding a cigarette lighter in while it isheating does not let the lighter back away from theheating element when it is hot. Damage fromoverheating can occur to the lighter or heatingelement, or a fuse could be blown. Do not hold acigarette lighter in while it is heating.
Analog Clock
The analog clock is not connected with any othervehicle system and runs by itself.
To adjust the clock, do the following:
1. Locate the adjustment button, near the lower leftcorner of the clock.
2. Push and hold the adjustment button to advancethe clock hands. Holding the button down willcause the clock to advance faster. Release thebutton before you get to the desired time.
3. Push and release the button to increase the timeby one minute increments until the desired time isreached.
Climate Controls
Dual Automatic Climate Control
System
The heating, cooling, and ventilation in the vehicle canbe controlled with this system. The vehicle also has aflow-through ventilation system described later in thissection.
4-20
Page 213 of 616
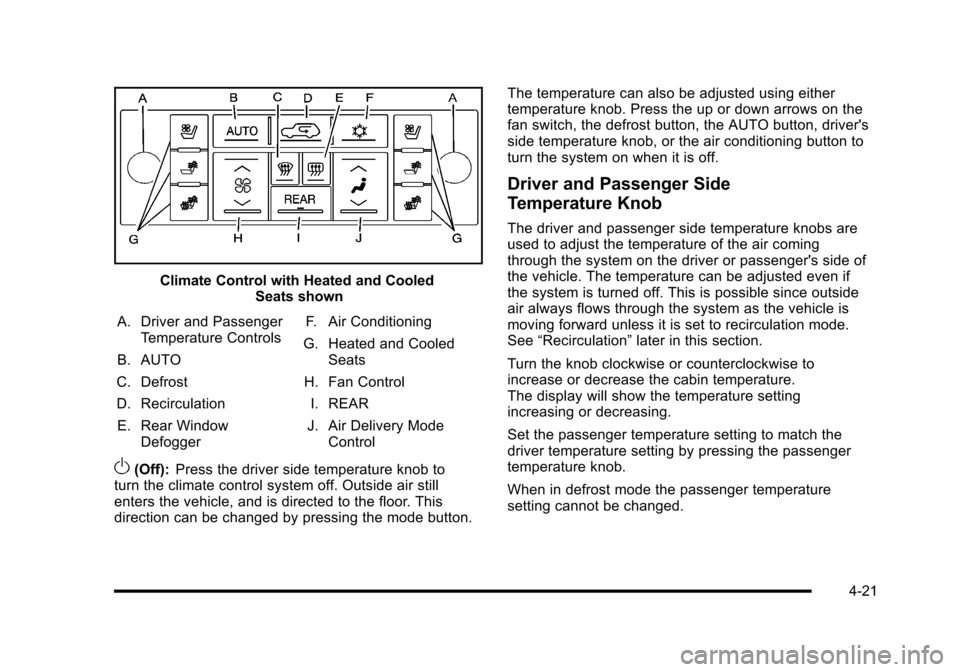
Climate Control with Heated and CooledSeats shown
A. Driver and PassengerTemperature Controls
B. AUTO
C. Defrost
D. Recirculation
E. Rear WindowDefogger
F. Air Conditioning
G. Heated and CooledSeats
H. Fan Control
I. REAR
J. Air Delivery ModeControl
O(Off):Press the driver side temperature knob toturn the climate control system off. Outside air stillenters the vehicle, and is directed to the floor. Thisdirection can be changed by pressing the mode button.
The temperature can also be adjusted using eithertemperature knob. Press the up or down arrows on thefan switch, the defrost button, the AUTO button, driver'sside temperature knob, or the air conditioning button toturn the system on when it is off.
Driver and Passenger Side
Temperature Knob
The driver and passenger side temperature knobs areused to adjust the temperature of the air comingthrough the system on the driver or passenger's side ofthe vehicle. The temperature can be adjusted even ifthe system is turned off. This is possible since outsideair always flows through the system as the vehicle ismoving forward unless it is set to recirculation mode.See“Recirculation”later in this section.
Turn the knob clockwise or counterclockwise toincrease or decrease the cabin temperature.The display will show the temperature settingincreasing or decreasing.
Set the passenger temperature setting to match thedriver temperature setting by pressing the passengertemperature knob.
When in defrost mode the passenger temperaturesetting cannot be changed.
4-21
Page 214 of 616
Automatic Operation
AUTO (Automatic) :When automatic operation isactive the system will control the inside temperature, theair delivery, and the fan speed.
Use the steps below to place the entire system inautomatic mode:
1. Press the AUTO button.
When AUTO is selected, the display will change toshow the current temperature(s) and AUTO comeon the display. The current delivery mode and fanspeed will also be displayed for approximatelyfive seconds.
When AUTO is selected, the air conditioningoperation and air inlet will be automaticallycontrolled. The air conditioning compressor willrun when the outside temperature is over about4°C (40°F). The air inlet will normally be set tooutside air. If it is hot outside, the air inlet mayautomatically switch to recirculate inside air tohelp quickly cool down the vehicle. The lighton the button comes on in recirculation.
2. Set the driver's and passenger's temperature.
To find your comfort setting, start with a 23°C(74°F) temperature setting and allow about20 minutes for the system to regulate. Use thedriver or passenger temperature buttons to adjustthe temperature setting as necessary. If atemperature setting of 15°C (60°F) is chosen, thesystem remains at the maximum cooling setting.If a temperature setting of 32°C (90°F) is chosen,the system remains at the maximum heat setting.Choosing either maximum setting will not causethe vehicle to heat or cool any faster.
Be careful not to cover the sensor located on the top ofthe instrument panel near the windshield. This sensorregulates air temperature based on sun load and alsoturns on the headlamps.
To avoid blowing cold air in cold weather, the systemwill delay turning on the fan until warm air is available.The length of delay depends on the engine coolanttemperature. Pressing the fan switch will override thisdelay and change the fan to a selected speed.
4-22
Page 215 of 616
Manual Operation
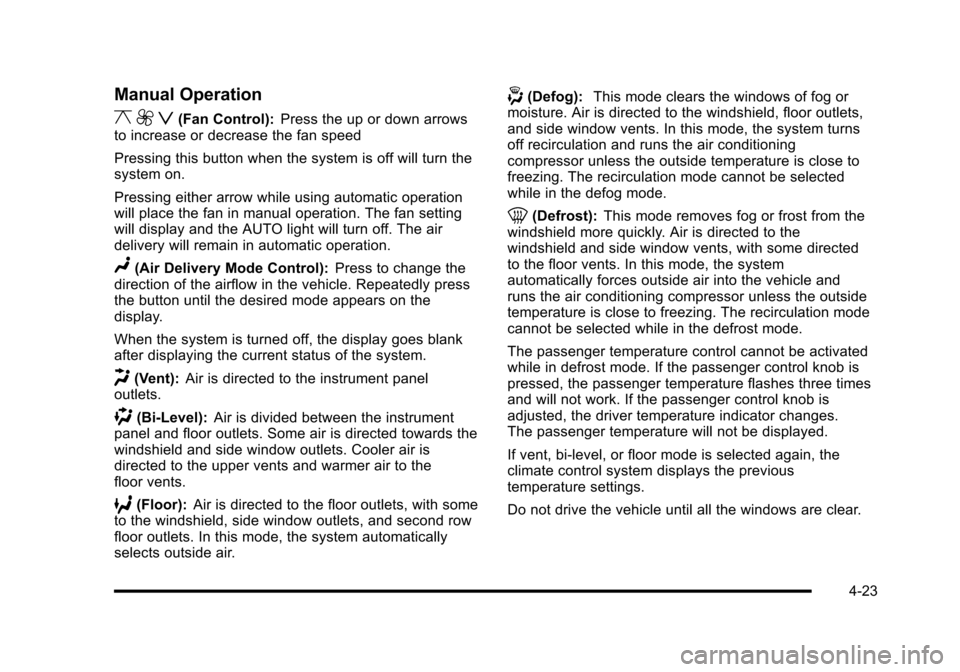
y9z(Fan Control):Press the up or down arrowsto increase or decrease the fan speed
Pressing this button when the system is off will turn thesystem on.
Pressing either arrow while using automatic operationwill place the fan in manual operation. The fan settingwill display and the AUTO light will turn off. The airdelivery will remain in automatic operation.
N(Air Delivery Mode Control):Press to change thedirection of the airflow in the vehicle. Repeatedly pressthe button until the desired mode appears on thedisplay.
When the system is turned off, the display goes blankafter displaying the current status of the system.
H(Vent):Air is directed to the instrument paneloutlets.
)(Bi-Level):Air is divided between the instrumentpanel and floor outlets. Some air is directed towards thewindshield and side window outlets. Cooler air isdirected to the upper vents and warmer air to thefloor vents.
6(Floor):Air is directed to the floor outlets, with someto the windshield, side window outlets, and second rowfloor outlets. In this mode, the system automaticallyselects outside air.
-(Defog):This mode clears the windows of fog ormoisture. Air is directed to the windshield, floor outlets,and side window vents. In this mode, the system turnsoff recirculation and runs the air conditioningcompressor unless the outside temperature is close tofreezing. The recirculation mode cannot be selectedwhile in the defog mode.
0(Defrost):This mode removes fog or frost from thewindshield more quickly. Air is directed to thewindshield and side window vents, with some directedto the floor vents. In this mode, the systemautomatically forces outside air into the vehicle andruns the air conditioning compressor unless the outsidetemperature is close to freezing. The recirculation modecannot be selected while in the defrost mode.
The passenger temperature control cannot be activatedwhile in defrost mode. If the passenger control knob ispressed, the passenger temperature flashes three timesand will not work. If the passenger control knob isadjusted, the driver temperature indicator changes.The passenger temperature will not be displayed.
If vent, bi-level, or floor mode is selected again, theclimate control system displays the previoustemperature settings.
Do not drive the vehicle until all the windows are clear.
4-23
Page 216 of 616

#(Air Conditioning):Press to turn the airconditioning (A/C) compressor on and off. An indicatorlight comes on to show that the air conditioning is on.
Pressing this button when the outside temperatureis too cool for air conditioning will make the airconditioning indicator flash three times and then turn offindicating the air conditioning mode is not available.If the air conditioning is on and the outside temperaturedrops below a temperature which is too cool for airconditioning to be effective, the air conditioning lightturns off to show that the air conditioning mode hasbeen canceled.
On hot days, open the windows long enough to let hotinside air escape. This helps to reduce the time it takesfor the vehicle to cool down. It also helps the system tooperate more efficiently.
The air conditioning system removes moisture from theair, so a small amount of water might drip under thevehicle while idling or after turning off the engine.This is normal.
@(Recirculation):Press to turn the recirculationmode on or off. An indicator light comes on to show thatthe recirculation is on.
This mode recirculates and helps to quickly cool the airinside the vehicle. It can be used to help preventoutside air and odors from entering the vehicle.
The recirculation mode cannot be used with floor, defog,or defrost modes. If recirculation is selected with one ofthose modes, the indicator light flashes three times andthen turns off. The air conditioning compressor alsocomes on when this mode is activated. While inrecirculation mode the windows may fog when theweather is cold and damp. To clear the fog, select eitherthe defog or defrost mode and increase the fan speed.
The recirculation mode can also be turned off by turningoff the ignition.
REAR :For vehicles with the rear heating and airconditioning controls. Press the REAR button to turn therear climate control system on or off. SeeRear AirConditioning and Heating System and ElectronicClimate Controls on page 4!26.
4-24
Page 217 of 616

Rear Window Defogger
The rear window defogger uses a warming grid toremove fog from the rear window.
<(Rear Window Defogger):Press to turn the rearwindow defogger on or off. It automatically turns offafter it has been activated. The defogger can also beturned off by turning off the engine. Do not drive thevehicle until all the windows are clear.
Notice:Do not use a razor blade or sharp object toclear the inside rear window. Do not adhereanything to the defogger grid lines in the rear glass.These actions may damage the rear defogger.Repairs would not be covered by your warranty.
Heated Mirrors :For vehicles with heated outsiderearview mirrors, the mirrors heat to help clear fog orfrost from the surface of the mirror when the rearwindow defog button is pressed. SeeOutside HeatedMirrors on page 3!45.
Heated or Cooled Seats :For vehicles with heated andcooled seats, seeHeated and Cooled Seatsonp a g e 2!5.
Outlet Adjustment
Use the air outlets located in the center and on the sideof the instrument panel to direct the airflow.
Operation Tips
.Keep the hood and front air inlets free of ice, snow,or any other obstruction (such as leaves). Theheater and defroster will work far better, reducingthe chance of fogging the inside of the windows.
.When you enter a vehicle in cold weather, pressthe fan up button to the maximum fan level beforedriving. This helps clear the intake ducts of snowand moisture, and reduces the chance of foggingthe inside of the window.
.Keep the air path under the front seats clear ofobjects. This helps air to circulate throughout thevehicle.
.Adding outside equipment to the front of thevehicle, such as hood-air deflectors, may affect theperformance of the heating and air conditioningsystem. Check with your dealer/retailer beforeadding equipment to the outside of the vehicle.
4-25
Page 218 of 616
Rear Air Conditioning and Heating
System and Electronic Climate
Controls
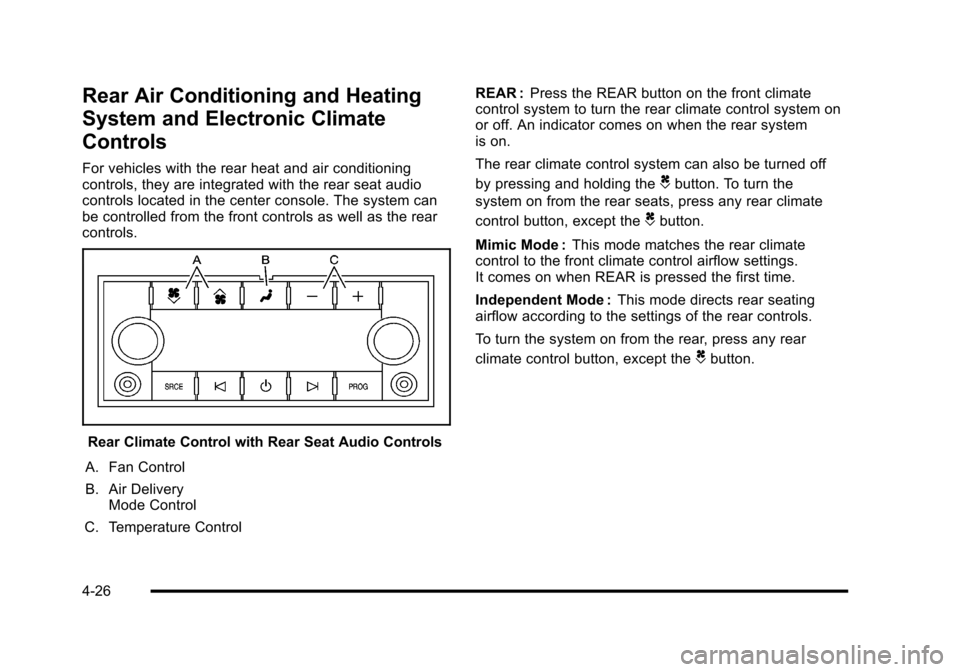
For vehicles with the rear heat and air conditioningcontrols, they are integrated with the rear seat audiocontrols located in the center console. The system canbe controlled from the front controls as well as the rearcontrols.
Rear Climate Control with Rear Seat Audio Controls
A. Fan Control
B. Air DeliveryMode Control
C. Temperature Control
REAR :Press the REAR button on the front climatecontrol system to turn the rear climate control system onor off. An indicator comes on when the rear systemis on.
The rear climate control system can also be turned off
by pressing and holding theCbutton. To turn the
system on from the rear seats, press any rear climate
control button, except theCbutton.
Mimic Mode :This mode matches the rear climatecontrol to the front climate control airflow settings.It comes on when REAR is pressed the first time.
Independent Mode :This mode directs rear seatingairflow according to the settings of the rear controls.
To turn the system on from the rear, press any rear
climate control button, except theCbutton.
4-26
Page 219 of 616

Automatic Operation, If Equipped.
AUTO :Press the air delivery mode button until thissetting is selected to control the inside temperature, airdelivery, and fan speed. AUTO appears in the displaywhen automatic operation is active.
+/!(Increase/Decrease Temperature) :Pressthe + or!buttons to increase or decrease the cabintemperature. The rear control temperature display willshow the temperature setting increasing or decreasing.
The display only indicates climate control functionswhen the system is in rear independent mode.
Manual Operation
DC(Fan Control):Press these buttons on the rearseat audio control panel to increase or decrease theairflow. Pressing the fan up button when the system isoff will turn the system on. The air delivery mode willremain under automatic control.
+/!(Temperature Control) :Press these buttons toadjust the temperature of the air flowing into thepassenger area. Press the + button for warmer air andpress the!button for cooler air.
N(Air Delivery Mode Control):Press the modebutton to change the direction of the airflow in thevehicle. Repeatedly press the button until the desiredmode appears on the display. Multiple presses will cyclethrough the delivery selections.
Warning Lights, Gages, and
Indicators
Warning lights and gages can signal that something iswrong before it becomes serious enough to cause anexpensive repair or replacement. Paying attention to thewarning lights and gages could prevent injury.
Warning lights come on when there might be or there isa problem with one of the vehicle's functions. Somewarning lights come on briefly when the engine isstarted to indicate they are working.
Gages can indicate when there might be or there is aproblem with one of the vehicle's functions. Often gagesand warning lights work together to indicate a problemwith the vehicle.
When one of the warning lights comes on and stays onwhile driving, or when one of the gages shows therecould be a problem, check the section that explainswhat to do. Follow this manual's advice. Waiting to dorepairs can be costly and even dangerous.
4-27
Page 220 of 616
Instrument Panel Cluster
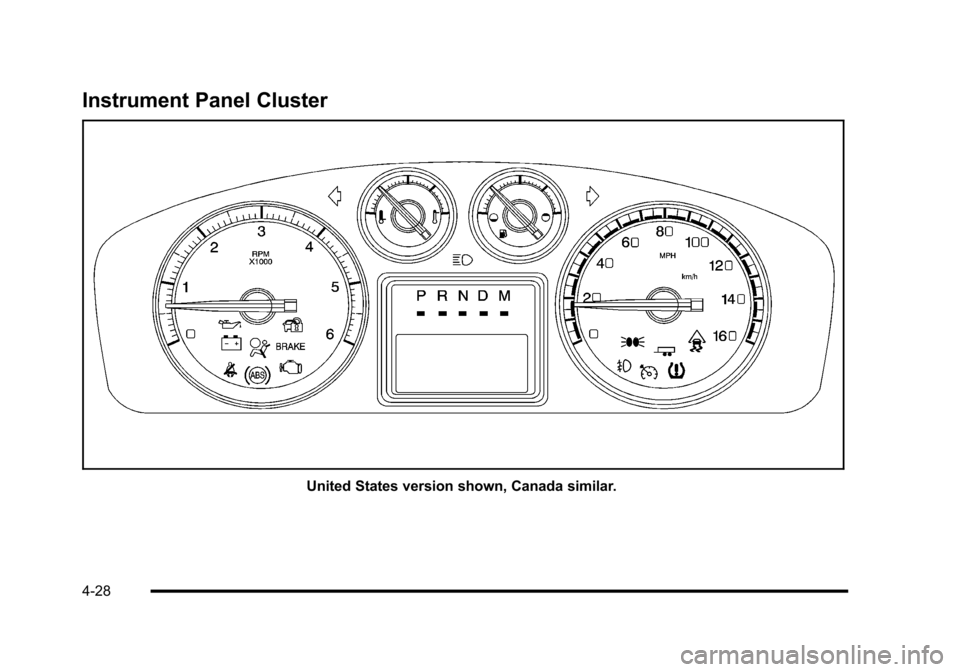
United States version shown, Canada similar.
4-28