CADILLAC ESCALADE 2010 3.G Owners Manual
Manufacturer: CADILLAC, Model Year: 2010, Model line: ESCALADE, Model: CADILLAC ESCALADE 2010 3.GPages: 616, PDF Size: 39.41 MB
Page 231 of 616
If the light comes on and stays on, it means that oil isnot flowing through the engine properly. The vehiclecould be low on oil and it might have some othersystem problem.
Security Light
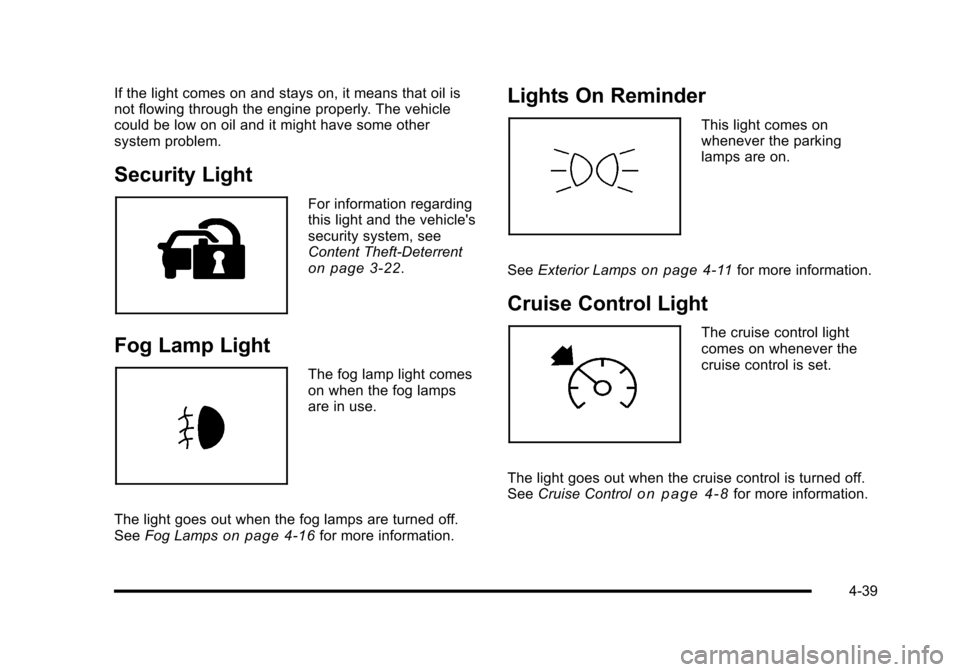
For information regardingthis light and the vehicle'ssecurity system, seeContent Theft-Deterrenton page 3!22.
Fog Lamp Light
The fog lamp light comeson when the fog lampsare in use.
The light goes out when the fog lamps are turned off.SeeFog Lampson page 4!16for more information.
Lights On Reminder
This light comes onwhenever the parkinglamps are on.
SeeExterior Lampson page 4!11for more information.
Cruise Control Light
The cruise control lightcomes on whenever thecruise control is set.
The light goes out when the cruise control is turned off.SeeCruise Controlo n p a g e 4!8for more information.
4-39
Page 232 of 616
Highbeam On Light
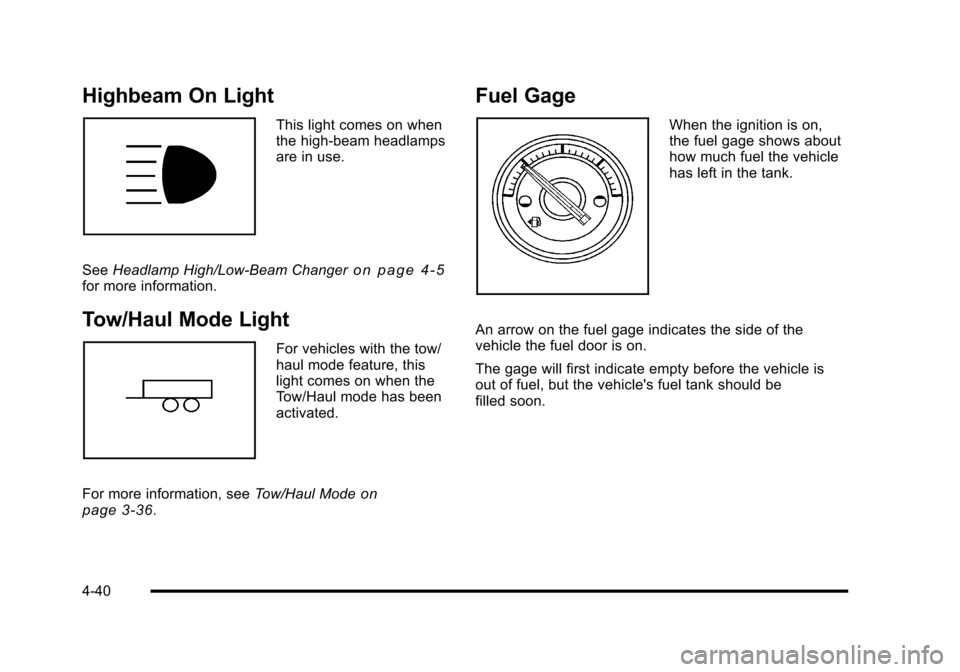
This light comes on whenthe high-beam headlampsare in use.
SeeHeadlamp High/Low-Beam Changero n p a g e 4!5for more information.
Tow/Haul Mode Light
For vehicles with the tow/haul mode feature, thislight comes on when theTow/Haul mode has beenactivated.
For more information, seeTow/Haul Modeonpage 3!36.
Fuel Gage
When the ignition is on,the fuel gage shows abouthow much fuel the vehiclehas left in the tank.
An arrow on the fuel gage indicates the side of thevehicle the fuel door is on.
The gage will first indicate empty before the vehicle isout of fuel, but the vehicle's fuel tank should befilled soon.
4-40
Page 233 of 616
Here are some situations owners may experience withthe fuel gage. None of these indicate a problem with thefuel gage.
.At the gas station, the fuel pump shuts off beforethe gage reads full.
.It takes a little more or less fuel to fill up than thefuel gage indicated. For example, the gage mayhave indicated the tank was half full, but it actuallytook a little more or less than half the tank'scapacity to fill the tank.
.The gage goes back to empty when the ignition isturned off.
Driver Information Center (DIC)
Your vehicle has a Driver Information Center (DIC).
The DIC displays information about your vehicle. It alsodisplays warning messages if a system problem isdetected. The DIC also allows some features to becustomized. SeeDIC Vehicle Customizationonpage 4!57for more information.
All messages will appear in the DIC display located inthe center of the instrument panel cluster.
The DIC comes on when the ignition is on. After a shortdelay, the DIC will display the information that was lastdisplayed before the engine was turned off.
SeeDIC Operation and Displayson page 4!41andDIC Vehicle Customizationon page 4!57for thedisplays available.
DIC Operation and Displays
The DIC has different displays which can be accessedby pressing the DIC buttons located on the instrumentpanel, next to the steering wheel.
The DIC displays trip, fuel, and vehicle systeminformation, and warning messages if a system problemis detected. A digital speedometer also appears at thebottom of the DIC display. The digital speedometercan be enabled or disabled. See“DISPLAY DIGITALSPEED”underDIC Vehicle Customizationonpage 4!57for more information.
4-41
Page 234 of 616
DIC Buttons
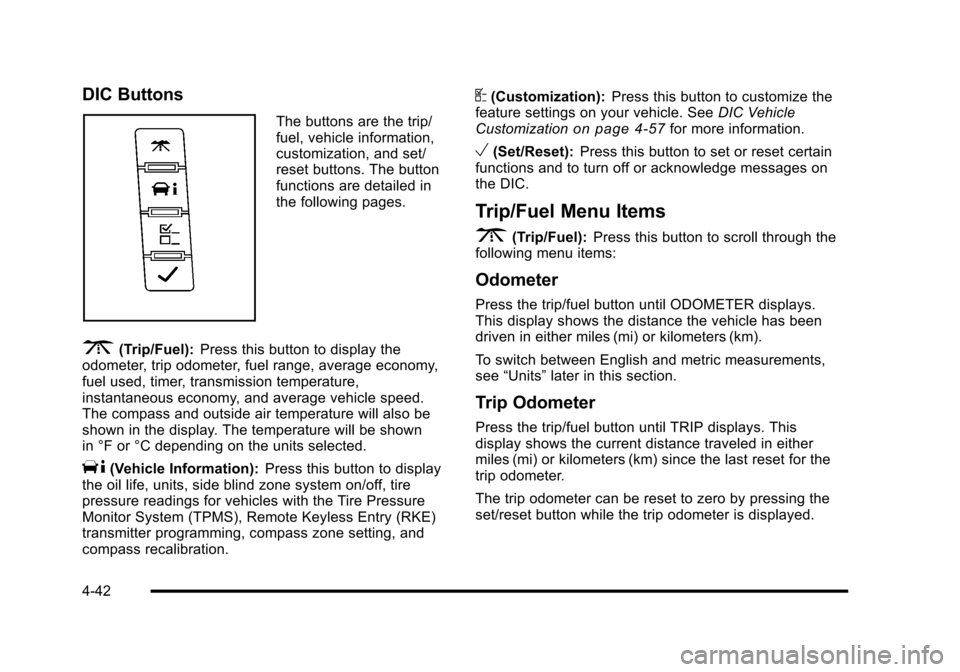
The buttons are the trip/fuel, vehicle information,customization, and set/reset buttons. The buttonfunctions are detailed inthe following pages.
3(Trip/Fuel):Press this button to display theodometer, trip odometer, fuel range, average economy,fuel used, timer, transmission temperature,instantaneous economy, and average vehicle speed.The compass and outside air temperature will also beshown in the display. The temperature will be shownin °F or °C depending on the units selected.
T(Vehicle Information):Press this button to displaythe oil life, units, side blind zone system on/off, tirepressure readings for vehicles with the Tire PressureMonitor System (TPMS), Remote Keyless Entry (RKE)transmitter programming, compass zone setting, andcompass recalibration.
U(Customization):Press this button to customize thefeature settings on your vehicle. SeeDIC VehicleCustomizationon page 4!57for more information.
V(Set/Reset):Press this button to set or reset certainfunctions and to turn off or acknowledge messages onthe DIC.
Trip/Fuel Menu Items
3(Trip/Fuel):Press this button to scroll through thefollowing menu items:
Odometer
Press the trip/fuel button until ODOMETER displays.This display shows the distance the vehicle has beendriven in either miles (mi) or kilometers (km).
To switch between English and metric measurements,see“Units”later in this section.
Trip Odometer
Press the trip/fuel button until TRIP displays. Thisdisplay shows the current distance traveled in eithermiles (mi) or kilometers (km) since the last reset for thetrip odometer.
The trip odometer can be reset to zero by pressing theset/reset button while the trip odometer is displayed.
4-42
Page 235 of 616

Fuel Range
Press the trip/fuel button until FUEL RANGE displays.This display shows the approximate number ofremaining miles (mi) or kilometers (km) the vehicle canbe driven without refueling. The display will show LOWif the fuel level is low.
The fuel range estimate is based on an average of thevehicle's fuel economy over recent driving history andthe amount of fuel remaining in the fuel tank. Thisestimate will change if driving conditions change.For example, if driving in traffic and making frequentstops, this display may read one number, but if thevehicle is driven on a freeway, the number may changeeven though the same amount of fuel is in the fuel tank.This is because different driving conditions producedifferent fuel economies. Generally, freeway drivingproduces better fuel economy than city driving. Fuelrange cannot be reset.
Average Economy
Press the trip/fuel button until AVERAGE ECONOMYdisplays. This display shows the approximate averagemiles per gallon (mpg) or liters per 100 kilometers(L/100 km). This number is calculated based on thenumber of mpg (L/100 km) recorded since the last timethis menu item was reset. To reset AVERAGEECONOMY, press and hold the set/reset button.
Fuel Used
Press the trip/fuel button until FUEL USED displays.This display shows the number of gallons (gal) orliters (L) of fuel used since the last reset of this menuitem. To reset the fuel used information, press and holdthe set/reset button while FUEL USED is displayed.
Timer
Press the trip/fuel button until TIMER displays.This display can be used as a timer.
To start the timer, press the set/reset button whileTIMER is displayed. The display will show the amountof time that has passed since the timer was last reset,not including time the ignition is off. Time will continueto be counted as long as the ignition is on, even ifanother display is being shown on the DIC. Thetimer will record up to 99 hours, 59 minutes and59 seconds (99:59:59) after which the display willreturn to zero.
To stop the timer, press the set/reset button brieflywhile TIMER is displayed.
To reset the timer to zero, press and hold the set/resetbutton while TIMER is displayed.
4-43
Page 236 of 616
Transmission Temperature
Press the trip/fuel button until TRANS TEMP displays.This display shows the temperature of the automatictransmission fluid in either degrees Fahrenheit (°F) ordegrees Celsius (°C).
Instantaneous Economy
If your vehicle has this display, press the trip/fuel buttonuntil INST ECON displays. This display shows thecurrent fuel economy at a particular moment and willchange frequently as driving conditions change. Thisdisplay shows the instantaneous fuel economy in milesper gallon (mpg) or liters per 100 kilometers (L/100 km).Unlike average economy, this screen cannot be reset.
The display may also show if the vehicle is currentlyin V4, V6 or V8 mode.
Average Vehicle Speed
Press the trip/fuel button until AVERAGE SPEEDdisplays. This display shows the average speed inmiles per hour (MPH) or kilometers per hour (km/h).
Blank Display
This display shows no information.
Vehicle Information Menu Items
T(Vehicle Information):Press this button to scrollthrough the following menu items:
Oil Life
Press the vehicle information button until OIL LIFEREMAINING displays. This display shows an estimateof the oil's remaining useful life. If you see 99% OILLIFE REMAINING on the display, that means 99% ofthe current oil life remains. The engine oil life systemwill alert you to change the oil on a schedule consistentwith your driving conditions.
When the remaining oil life is low, the CHANGEENGINE OIL SOON message will appear on thedisplay. See“CHANGE ENGINE OIL SOON”underDICWarnings and Messageson page 4!48. You shouldchange the oil as soon as you can. SeeEngine Oilonpage 7!17. In addition to the engine oil life systemmonitoring the oil life, additional maintenance isrecommended in the Maintenance Schedule in thismanual. SeeScheduled Maintenanceo n p a g e 8!3formore information.
4-44
Page 237 of 616
Remember, you must reset the OIL LIFE displayyourself after each oil change. It will not reset itself.Also, be careful not to reset the OIL LIFE displayaccidentally at any time other than when the oil has justbeen changed. It cannot be reset accurately until thenext oil change. To reset the engine oil life system,seeEngine Oil Life System on page 7!20.
Side Blind Zone Alert
If your vehicle has the Side Blind Zone Alert (SBZA)system, this display allows the system to be turned onor off. Once in this display, press the set/reset button toselect between ON or OFF. If you choose ON, thesystem will be turned on. If you choose OFF, the systemwill be turned off. When the SBZA system is turned off,the DIC will display the SIDE BLIND ZONE ALERTSYSTEM OFF message as a reminder that the systemhas been turned off. SeeDIC Warnings and Messageson page 4!48andSide Blind Zone Alert (SBZA)onpage 3!48for more information.
Units
Press the vehicle information button until UNITSdisplays. This display allows you to select betweenEnglish or Metric units of measurement. Once in thisdisplay, press the set/reset button to select betweenENGLISH or METRIC units. All of the vehicleinformation will then be displayed in the unit ofmeasurement selected.
Tire Pressure
On vehicles with the Tire Pressure Monitor System(TPMS), the pressure for each tire can be viewed in theDIC. The tire pressure will be shown in either poundsper square inch (psi) or kilopascals (kPa). Press thevehicle information button until the DIC displays FRONTTIRES PSI (kPa) LEFT ## RIGHT ##. Press the vehicleinformation button again until the DIC displays REARTIRES PSI (kPa) LEFT ## RIGHT ##.
If a low tire pressure condition is detected by thesystem while driving, a message advising you toadd air to a specific tire will appear in the display.SeeInflation - Tire Pressureon page 7!65andDICWarnings and Messageson page 4!48for moreinformation.
If the tire pressure display shows dashes instead of avalue, there may be a problem with your vehicle. If thisconsistently occurs, see your dealer/retailer for service.
Battery Voltage
This display shows the current battery voltage. If thevoltage is in the normal range, the value will display.For example, the display may read BATTERYVOLTAGE 13.2 VOLTS. If the voltage is low, thedisplay will show LOW. If the voltage is high, thedisplay will show HIGH. Your vehicle's charging
4-45
Page 238 of 616
system regulates voltage based on the state of thebattery. The battery voltage may fluctuate whenviewing this information on the DIC. This is normal.SeeCharging System Lighton page 4!32for moreinformation. If there is a problem with the batterycharging system, the DIC will display a message.SeeDIC Warnings and Messages on page 4!48.
Oil Pressure
This display will show the oil pressure in eitherpounds per square inch (psi) or kilopascals (kPa)
Relearn Remote Key
This display allows you to match Remote Keyless Entry(RKE) transmitters to your vehicle. This procedure willerase all previously learned transmitters. Therefore,they must be relearned as additional transmitters.
To match an RKE transmitter to your vehicle:
1. Press the vehicle information button until
PRESSVTO RELEARN REMOTE KEY displays.
2. Press the set/reset button until REMOTE KEYLEARNING ACTIVE is displayed.
3. Press and hold the lock and unlock buttons on thefirst transmitter at the same time for about15 seconds.
On vehicles with memory recall seats, thefirst transmitter learned will match driver 1 andthe second will match driver 2.
A chime will sound indicating that the transmitteris matched.
4. To match additional transmitters at this time,repeat Step 3.
Each vehicle can have a maximum ofeight transmitters matched to it.
5. To exit the programming mode, you must cycle thekey to LOCK/OFF.
Compass Zone Setting
This display allows for setting the compass zone. SeeDIC Compasson page 4!47for more information.
Compass Recalibration
This display allows for calibrating the compass. SeeDIC Compasson page 4!47for more information.
Blank Display
This display shows no information.
4-46
Page 239 of 616
DIC Compass
Your vehicle may have a compass in the DriverInformation Center (DIC).
Compass Zone
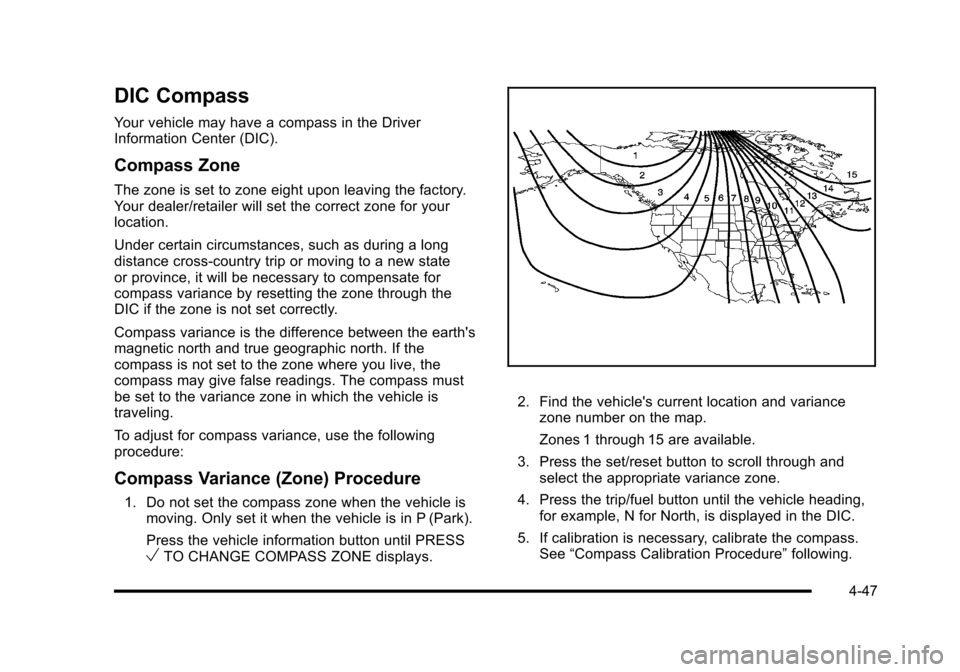
The zone is set to zone eight upon leaving the factory.Your dealer/retailer will set the correct zone for yourlocation.
Under certain circumstances, such as during a longdistance cross-country trip or moving to a new stateor province, it will be necessary to compensate forcompass variance by resetting the zone through theDIC if the zone is not set correctly.
Compass variance is the difference between the earth'smagnetic north and true geographic north. If thecompass is not set to the zone where you live, thecompass may give false readings. The compass mustbe set to the variance zone in which the vehicle istraveling.
To adjust for compass variance, use the followingprocedure:
Compass Variance (Zone) Procedure
1. Do not set the compass zone when the vehicle ismoving. Only set it when the vehicle is in P (Park).
Press the vehicle information button until PRESSVTO CHANGE COMPASS ZONE displays.
2. Find the vehicle's current location and variancezone number on the map.
Zones 1 through 15 are available.
3. Press the set/reset button to scroll through andselect the appropriate variance zone.
4. Press the trip/fuel button until the vehicle heading,for example, N for North, is displayed in the DIC.
5. If calibration is necessary, calibrate the compass.See“Compass Calibration Procedure”following.
4-47
Page 240 of 616
Compass Calibration
The compass can be manually calibrated. Only calibratethe compass in a magnetically clean and safe location,such as an open parking lot, where driving the vehiclein circles is not a danger. It is suggested to calibrateaway from tall buildings, utility wires, manhole covers,or other industrial structures, if possible.
If CAL should ever appear in the DIC display, thecompass should be calibrated.
If the DIC display does not show a heading, forexample, N for North, or the heading does not changeafter making turns, there may be a strong magnetic fieldinterfering with the compass. Such interference may becaused by a magnetic CB or cell phone antenna mount,a magnetic emergency light, magnetic note pad holder,or any other magnetic item. Turn off the vehicle, movethe magnetic item, then turn on the vehicle and calibratethe compass.
To calibrate the compass, use the following procedure:
Compass Calibration Procedure
1. Before calibrating the compass, make sure thecompass zone is set to the variance zone in whichthe vehicle is located. See“Compass Variance(Zone) Procedure”earlier in this section.
Do not operate any switches such as window,sunroof, climate controls, seats, etc. during thecalibration procedure.
2. Press the vehicle information button until
PRESSVTO CALIBRATE COMPASS displays.
3. Press the set/reset button to start the compasscalibration.
4. The DIC will display CALIBRATING: DRIVE INCIRCLES. Drive the vehicle in tight circles at lessthan 5 mph (8 km/h) to complete the calibration.The DIC will display CALIBRATION COMPLETEfor a few seconds when the calibration is complete.The DIC display will then return to theprevious menu.
DIC Warnings and Messages
Messages are displayed on the DIC to notify the driverthat the status of the vehicle has changed and thatsome action may be needed by the driver to correct thecondition. Multiple messages may appear one afteranother.
Some messages may not require immediate action, butyou can press any of the DIC buttons on the instrumentpanel to acknowledge that you received the messagesand to clear them from the display.
Some messages cannot be cleared from the DICdisplay because they are more urgent. Thesemessages require action before they can be cleared.
4-48